
638BCK - Hi-Fi System BOSS - Free user manual and instructions
Find the device manual for free 638BCK BOSS in PDF.


| Product Type | Digital Media Receiver (Car Stereo) |
| Model | 638BCK |
| Brand | BOSS Audio Systems |
| Power Supply | DC 12V (negative ground) |
| Maximum Power Output | 50W x 4 channels |
| Speaker Impedance | 4 - 8 ohms |
| Fuse | 15A blade fuse |
| Dimensions (W x H x D) | 7.0 x 2.0 x 3.8 inches (178 x 51 x 97 mm) |
| Weight | 1.54 lb (0.7 kg) |
| Radio Frequency Range (FM) | USA: 87.5 - 107.9 MHz; Europe: 87.5 - 108.0 MHz |
| Radio Frequency Range (AM) | USA: 530 - 1710 kHz; Europe: 522 - 1620 kHz |
| FM Channel Step | USA: 200 kHz; Europe: 50 kHz |
| AM Channel Step | USA: 10 kHz; Europe: 9 kHz |
| Bluetooth Profiles | A2DP, AVRCP, HSP, HFP |
| Bluetooth Range | Up to 30 feet (10 meters) |
| Supported Audio Formats | MP3, WMA |
| Media Sources | USB, SD Card, AUX, Bluetooth Streaming, Radio |
| Preamp Outputs | Front and Rear (RCA pairs) |
| Frequency Response | 20 Hz - 20 kHz |
| Signal-to-Noise Ratio | 60 dB |
| Audio Output Impedance | 4 ohms (speakers) |
| Preset Memory Stations | 30 (6 each for FM1, FM2, FM3, AM1, AM2) |
| Display | LCD with backlight |
| Controls | Rotary volume, buttons for source, tuning, preset, mute, etc. |
| Remote Control | Included (IR) |
| Detachable Faceplate | Yes |
| Safety Warnings | Use only with 12V negative ground; replace fuse with same rating; do not disassemble |
| Maintenance | Clean with soft dry cloth; avoid liquids |
Frequently Asked Questions - 638BCK BOSS
User questions about 638BCK BOSS
0 question about this device. Answer the ones you know or ask your own.
Ask a new question about this device
Download the instructions for your Hi-Fi System in PDF format for free! Find your manual 638BCK - BOSS and take your electronic device back in hand. On this page are published all the documents necessary for the use of your device. 638BCK by BOSS.
USER MANUAL 638BCK BOSS
Precautions....1
Lithium Battery Cell Warnings 1
Take Precaution....1
Installation 2-3
Installation Procedures 2
Installation Opening....2
Wiring Connections....3
Remove of the Main Unit 3
Control Panel Button Locations....4
Operation 4-5
Power / SRC 4
Adjust Menu Options (SRC) 4
Change the Source (SRC) 4
Store/Recall Preset Stations-(1..6) 4
Play/Pause 4
Next/Previous Track....4
Fast Forward/Backward 4
Set the Clock (CLK) 4
Insert SD Card 4
Insert USB 4
Adjust Volume (VOL) 5
Switch Between US and EU Frequency 5
Manual Tuning·(|<<./>>|) 5
Auto Seek Tuning (|<< / >>|) 5
Change Bands (BAND) 5
Automatic Music Search (AMS) 5
Track Search 5
Track/Folder Navigation 5
Mute 5
AUX In Jack 5
Reset System (RESET) 5
Bluetooth Operation....6
Pair and Connect 6
Make a Call 6
Redial Last Dialed Number 6
Answer a Call....6
End a Call 6
Switch Audio Between Car and Phone 6
Adjust Talk Volume....6
Audio Streaming (A2DP)....6
Troubleshooting....7
Specifications 8
Lithium Battery Cell Warnings
• Cell leakage may cause damage to the remote control.
• Do not throw cells into fire, as this may cause an explosion.
- Keep battery cells out of reach of children.
Take Precaution
• To reduce the risk of fire, electric shock, and annoying interference, do not repair yourself. Please refer serving to qualified person.
• Some MP3/WMA files may not be playable.
- Keep lower volumes to concentrate on traffic and road conditions.
• If the battery is disconnected or discharged or changed, the preset memory will be erased and must be reprogrammed.
• Installation of unit is better at a horizontal position, or if it is at an angle, it may be not working at its best situation.
- Be sure to lower the volume before switching off the unit or the ignition key.
Installation Procedures
First complete the electrical connections and then check for correctness.
Installation Opening
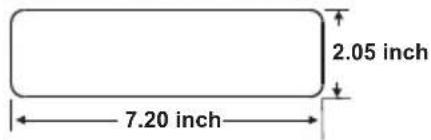
This unit can be installed in any dashboard. Having an opening as shown above.
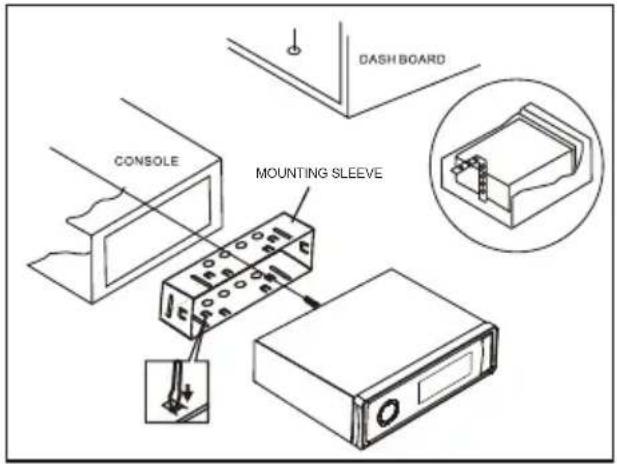
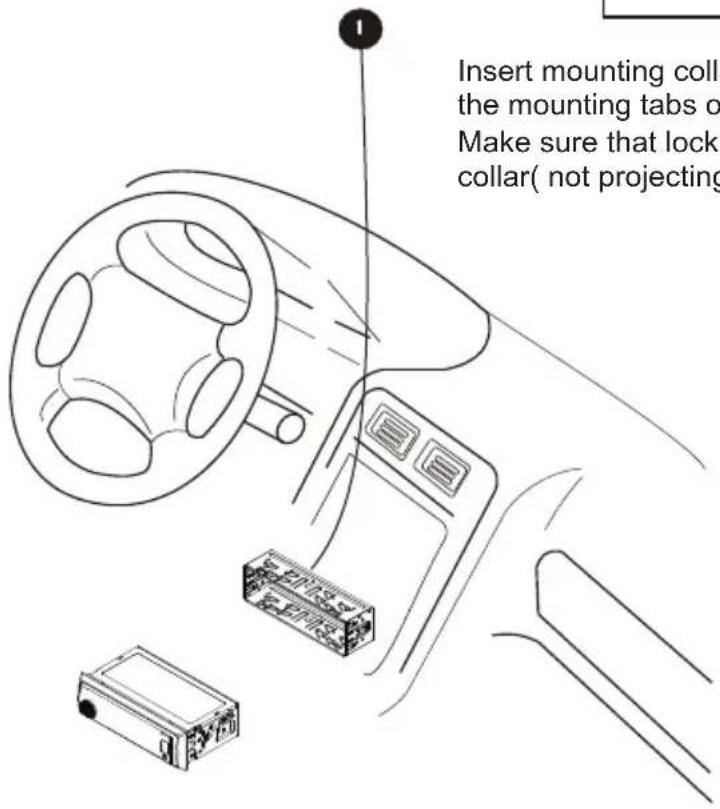
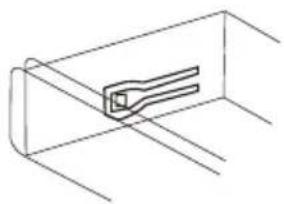
Insert mounting collar into the dashboard and bend the mounting tabs out with a screwdriver.
Make sure that lock lever(※) is flush with the mounting collar (not projecting outward).
natural_image
Pure technical line drawing of a mechanical component inside a housing (no text or symbols)
- Only use speakers with 4 ohms impedance.
- Do not attach the control panel to the chassis before wiring is complete.
- The maximum current of the auto antenna is 200mA.
Wiring Connections
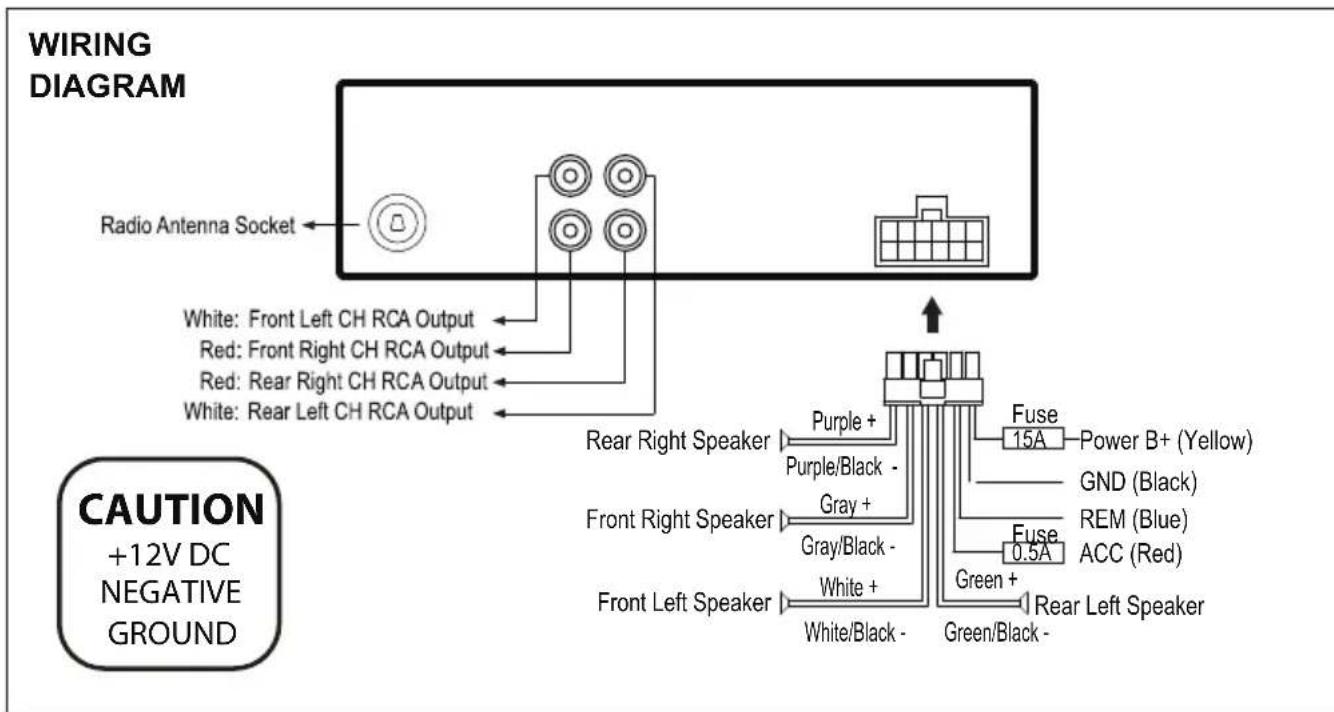
Removal of the Main Unit
- Remove the metal strap from the main unit.
- Remove the plastic trim out from the main unit.
- Insert a bracket key into the left and right side of the main unit and draw the unit out of the mounting sleeve.
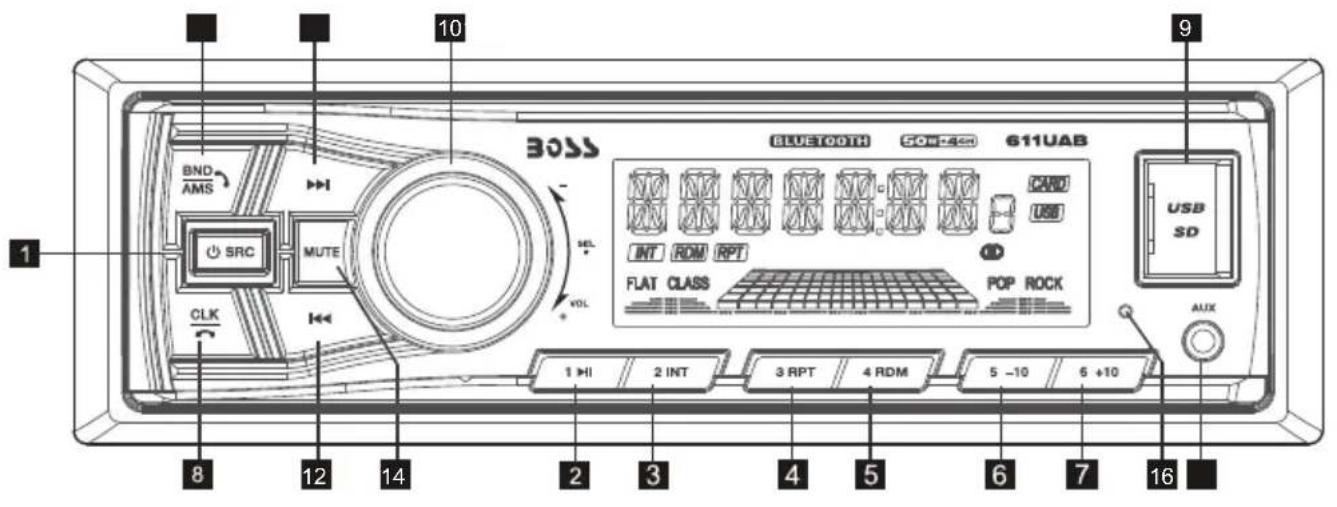
OPERATION
1. POWER/SRC
Press the POWER button to turn on the unit, and long press it again to turn off the unit.
When the unit turn on, short press POWER/SRC button to switch the unit between
RADIO, BT, USB & CARD, AUX IN, modes (if there are USB and SD card inside the unit).
1/. If there is no USB & SD card, then it will be only radio and Aux. When the user
inserts a USB flash drive or SD Card, their respective logos will illuminate on the display.
2-7.(button 1 to 6) PRESET MEMORY BUTTONS In Radio mode
To memorize the frequency, press one of the six preset buttons(1-6) hold for more 2"S, the frequency is successfully stored.
Therefore there are FM1, FM2, FM3, AM1 & AM2, each band can store 6 stations, so total 30 stations can be stored.
To recall the preset memory station, press one of the preset buttons(1-6) plus the BND button for FM1, FM2, FM3. AM1 & AM2.
During USB or SD card mode, press '5/-10' button to go backward 10 tracks.
Press '6/+10' button to jump forward 10 tracks.
During USB or SD card mode, long press '5/-10' button to go back 1 folder.
Long press '6/+10' button to go up 1 folder. You can repeat this function depending on the number of folders. This button will have no function if the USB or SD card has no folders.
8. CLK
Press the CLK button once to display the real time, With time appearing on the display. Press and hold CLK button for more than 2 seconds until the time flashes. You can adjust the HOUR and MINUTE by pressing the >>1 button and 1<< button respectively and press the CLK button to switch the HOUR and MINUTE.
9. USB Port / Micro SD Card Slot
10. VOLUME adjustment
In the radio mode, rotate the volume knob to increase or decrease the volume level of the sound output. Press the volume knob, it will be switching the sequence as follows:

flowchart
graph LR
    A["Bass"] --> B["Treble"]
    B --> C["Balance"]
    C --> D["Fader"]
    D --> E["EQ off"]
    E --> F["Loc Loud Stereo Vol"]
In the USB or SD card mode, press the volume knob to enter the EQ function that the audio mode in the following order: EQ OFF → FLAT → POP → ROCK → CLASS
At the radio status, press and hold the VOL button to enter switch state of the US(USA) and EU (EUROPE) frequency, then rotate the VOL knob to select US frequency or EU frequency, after selecting US or EU frequency, the system will switch to the selected frequency 3 seconds later.
11.FF(>>|) &12.FB(|<<)
In the radio mode, long press the FF(>>1) or FB(1<<) button for more than 2 seconds, the unit will search the next or previous frequency step by step.
Short press the FF(>>1) or FB(1<<) button, the automatic search will start, it will search upward or downward for the strong signal radio station within the cuttent band. The auto searching will stop until find a station.
13.BND/AMS
In radio mode, short press the BND/AMS button repeatedly to select the one of the radio band: FM 1, FM 2, FM 3, AM1, AM2 in a cycle sequence. When you select a band, the word F1、F2、F3 for FM band, and A1、A2 for AM band will be shown on the LCD display. Press the BND/AMS button for several seconds, the radio searches form the current frequency and check Whening Strength stations will search is finished. stored into the corresponding preset number within the current band. Short press the BND/AMS button to scan each preset station in each band.
14. MUTE
Short press the MUTE button to turn MUTE ON/OFF, when it is on, the MUTE will be flash on the LCD and no sound output. When short press again it will be cancelled.
15. AUX IN JACK
16. RESET
To reset all parameters to factory default values. Use a subject with a sharp point end to thrush the RESET hole.
Pair and Connect
Prior to using the Bluetooth device as a handsfree system for a Bluetooth-enabled mobile phone for the first time, you must pair and connect the two devices as follows:
- In any mode, prior to pairing and connecting, the BT logo flashes in the LCD indicating that no device is connected. To begin pairing, enable BT mode on your mobile phone.
- When the phone finds the car audio system, the BOSS AUDIO name will be displayed.
- Choose the BOSS AUDIO from the device list to pair and connect with the car audio system. Upon confirming, the BT logo will stop flashing.
- When pairing is complete, the mobile phone audio will automatically transfer to the car audio system whenever a call is made or received, or when the mobile phone plays music.
Make a Call
To make a call, dial the call directly from the paired mobile phone.
Redial Last Dialed Number
Press and hold the button on the control panel to redial the last dialed phone number.
Answer a Call
- When the mobile phone is called, the incoming telephone number displays in the LCD.
- To receive the call, press the button on the control panel.
- To reject the call, press the button on the control panel.
End a Call
To end an active call, press the button.
Switch Audio Between Car and Phone
During a call, press the VOL knob/button to switch the audio source from the car audio system back to your mobile phone.
Adjust Talk Volume
• During a call, use VOL knob or VOL + and VOL - buttons to adjust the volume level.
- Use the MUTE button to mute sound.
Audio Streaming (A2DP)
- Press the /SRC button to enter BT mode and display media in the LCD.
- When a mobile device is paired, music played through that device will automatically be heard through the car audio system.
- Press the >>| or |<< button to play the next or previous song/file on the mobile phone.
- Press the >|| button to pause or resume music playback.
If you suspect something is wrong immediately switch power off. Do not use the unit in abnormal condition, for example without sound, or with smoke or foul smell, can cause fire or electric shock. Immediately stop using it and call the store where you purchased it. Never try to repair the unit yourself because it is dangerous to do so.
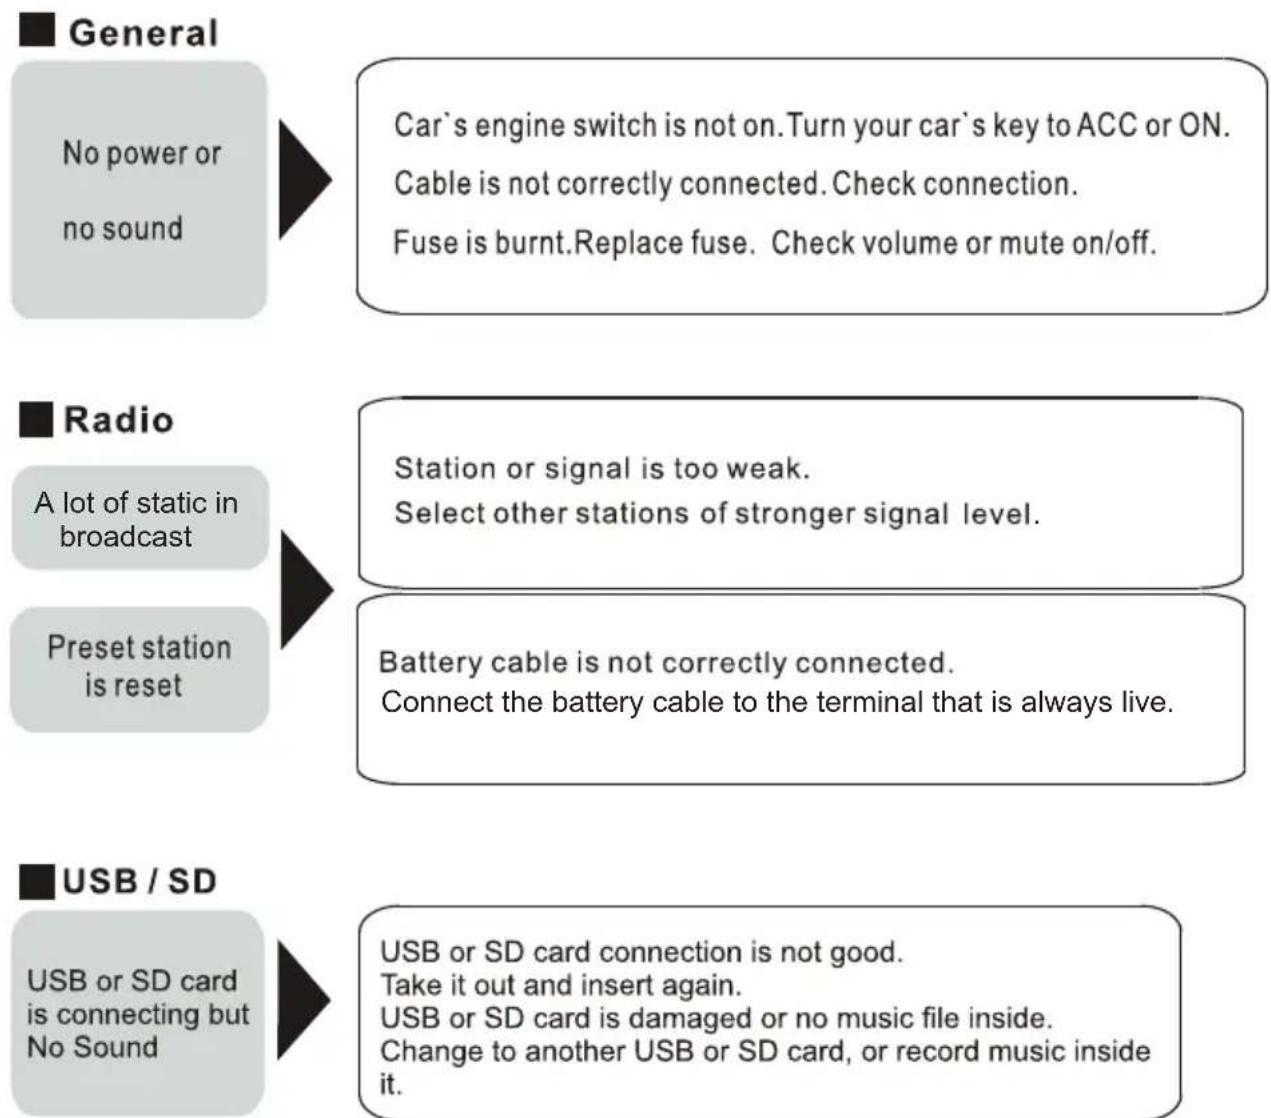
flowchart
graph TD
    A["General"] --> B["No power or no sound"]
    B --> C["Car's engine switch is not on. Turn your car's key to ACC or ON.<br>Cable is not correctly connected. Check connection.<br>Fuse is burnt. Replace fuse. Check volume or mute on/off."]
    D["Radio"] --> E["A lot of static in broadcast"]
    E --> F["Station or signal is too weak.<br>Select other stations of stronger signal level."]
    G["Preset station is reset"] --> H["Battery cable is not correctly connected.<br>Connect the battery cable to the terminal that is always live."]
    I["USB / SD"] --> J["USB or SD card is connecting but No Sound"]
    J --> K["USB or SD card connection is not good.<br>Take it out and insert again.<br>USB or SD card is damaged or no music file inside.<br>Change to another USB or SD card, or record music inside it."]
General
Power supply Requirement : DC 12V
Maximum power output : 50W X 4CH
Speaker impedance : 4 - 8 Ohm
Unit Dimensions(WxHxD) : 7.0 X 2.0 X 3.8 inch
Weight : 1.54 Lb (0.7 kg)
Fuse : 15 A
RADIO
FM
Frequency Range USA / EUROPE: 87.5 MHz - 107.9 MHz / 87.5 MHz - 108.0MHz
Channel step: 200 KHz / 50 KHz
AM
Frequency Range USA / EUROPE: 530 KHz - 1710 KHz / 522-1620 KHz
Channel step: 10 KHz / 9 KHz
USB/Card
Usable Audio Formats.... MP3/WMA
Pre-amp Output.... Front and Rear
Frequency Response 20 Hz - 20 KHz
S/N Ratio 60dB
BT
BT Profile supports.... A2DP, AVRCP,HSP & HFP profiles
Range of frequency.... 2.4GHz spectrum
USER'S MANUAL
611UAB
BLUETOOTH®-ENABLED | MP3-COMPATIBLE DIGITAL MEDIA AM/FM RECEIVER
BOSS®
AUDIO SYSTEMS
BOSS Audio Systems
3451 Lunar Court • Oxnard, CA 93030
www.bossaudio.com | 805.751.4853
tech support: www.bossaudio.com/support



1214
iPod® / iPhone® are trademarks of Apple, Inc. registered in the U.S. and other countries.
BOSS Audio Systems is not affiliated with Apple, Inc.
- Lithium Battery Cell Warnings
- Take Precaution
- Installation Procedures
- Removal of the Main Unit
- OPERATION
- POWER/SRC
- 2-7.(button 1 to 6) PRESET MEMORY BUTTONS In Radio mode
- CLK
- USB Port / Micro SD Card Slot
- VOLUME adjustment
- 11.FF(>>|) &12.FB(|<<)
- 13.BND/AMS
- MUTE
- AUX IN JACK
- RESET
- Pair and Connect
- Make a Call
- Redial Last Dialed Number
- Answer a Call
- End a Call
- Switch Audio Between Car and Phone
- Adjust Talk Volume
- Audio Streaming (A2DP)
- General
- RADIO
- FM
- AM
- USB/Card
- BT
- USER'S MANUAL
- 611UAB
- BOSS®
- AUDIO SYSTEMS
Brand : BOSS
Model : 638BCK
Category : Hi-Fi System