
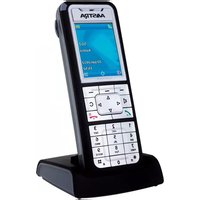
Meridian M6320 - Telephone AASTRA - Free user manual and instructions
Find the device manual for free Meridian M6320 AASTRA in PDF.


| Type of product | Business Featurephone |
| Display | Two-line adjustable display with alphanumeric characters |
| Programmable keys | 13 feature keys (can be line or feature keys) |
| Handsfree | Built-in microphone and speaker; press selector key to activate |
| Headset support | Dual headset sockets; one transmits, both receive |
| Dial pad | 12-key alphanumeric keypad |
| Volume control | Adjustable alerter, handset, handsfree speaker, and on-hook monitor volume |
| Mute | Mutes handset or headset; LED flashes when active |
| Visual indicators | Visual ringing and message waiting LED; multi-functional LED for handsfree/headset |
| Modes | Handsfree mode (default) and ACD mode for call centers |
| Local features | Save Number, Memory Number (up to 5), Pause, Predial, Call Timer |
| Network features | Call Forward, Call Waiting, Call Pickup, Conference, Transfer, Ring Again, Override, Privacy, etc. |
| ACD agent features | Log in/out, answer ACD calls, Not Ready, Emergency, Line of Business codes |
| Supervisor features | Agent monitoring, queue status display, Night Service, Controlled Interflow |
| Power supply | AC adaptor (110V); power failure allows basic handset calls |
| Mounting | Desktop or wall-mountable with bracket |
| Language support | Multiple display languages selectable |
| Safety | TNV circuits; must be connected to Centrex system only; not for PSTN |
| Cleaning and maintenance | Use a dry cloth; avoid liquids; keep vents clear |
Frequently Asked Questions - Meridian M6320 AASTRA
User questions about Meridian M6320 AASTRA
0 question about this device. Answer the ones you know or ask your own.
Ask a new question about this device
Download the instructions for your Telephone in PDF format for free! Find your manual Meridian M6320 - AASTRA and take your electronic device back in hand. On this page are published all the documents necessary for the use of your device. Meridian M6320 by AASTRA.
USER MANUAL Meridian M6320 AASTRA
natural_image
Front view of a classic office telephone with keypad and cord (no visible text or symbols)
natural_image
Black-and-white photo of two people interacting, one holding a smartphone, in front of a grid-patterned wall (no visible text or symbols)The M6320 Featurephone is a practical and convenient way to use a wide range of business telephone features, including Call Forward, Conference Calling, and Speed Dial. The M6320 is equipped with automated 13 programmable feature keys to be programmed as either line keys or as feature keys and integrated dual headset sockets. It has also a two line display to show you information about your calls and a built in hands-free microphone.
This guide first takes you through the basic features of the M6320 telephone. You'll learn the different parts of the set and what they do, as well as other basics such as how to make calls and put calls on hold.
After you have covered the basics, you can then read how to set up the local features available on the M6320 telephone. Local features provide you with convenient ways to customize the set for your use.
The remaining portions of the guide describe Network features which can be installed on your M6320, such as Call Forward and Call Waiting. Unlike local features, Network features must be ordered from your telephone service provider. Note that some of the Network features contained in this guide may not be available to you. Also note that your service provider may have provisioned your set with features which are not described here. Contact your System Administrator or Customer Service Representative if you need more information or help with the Network features installed on your set.
Table of Contents
natural_image
Black-and-white photo of a man in a suit holding a phone, with striped background (no visible text or symbols)M6320 Quick start up 4
Using your M6320 telephone—the basics 5
Answering calls 7
Making calls 7
Placing a call on hold 7
Ending a call 8
Setting the alerter volume 8
Setting the handset volume 8
Setting the Handsfree speaker volume 8
Setting the On-hook monitor volume 8
Muting the handset 8
Tones that you hear when using the M6320 9
Handsfree Calling 9
Display Features 10
Setting up local features 11
Save, Memory, and Pause 11
Alerter Volume 12
Time and Date 13
Call Timer 13
Display Language 14
C.O. (Network) Features 14
Predial 15
Save Number 15
Memory Number 16
Pause 16
Mode Selection 17
Message Waiting 17
Quick ways to make calls 18
Automatic Dial 18
Automatic Line 18
Intercom 19
Intercom Group 20
Last Number Redial 21
Speed Call 21
How to avoid missing a call 22
Call Forward 22
Call Waiting 22
Call Pickup 23
Message Waiting 23
Leave Message 23
When you can't reach someone 24
Override 24
Ring Again 25
Ways to transfer or share calls 26
Conference 26
Call Park 27
Privacy Release 27
Transfer 28
Controlling your telephone line 29
Make Busy 29
Privacy 29
Agent Features 30
Logging in 30
Logging out 31
Answering ACD calls 31
Putting an ACD call on hold 32
Calling your supervisor 32
Line of Business key 33
Emergency calls 33
Not Ready key 34
Displaying the queue threshold 34
Supervisor Features 36
Interpreting agent indicators 36
Displaying the status of an ACD queue 36
Displaying a summary of agent activity 37
Observing agents 38
Calling an agent 39
Answering agent calls 39
Answering emergency calls 40
Night Service 40
Controlled Interflow 41
Supervisors as agents 41
Connecting your M6320 42
Wall mounting M6320 44
Introduction
This section of the user guide has been designed to provide you with pointers to sections within the document to enable you to achieve a quick start-up. The items mentioned below are considered to be essential if you wish to use all functionality within the phone.
1. Key Layout
It is recommended that you familiarize yourself with the position and function of the keys on the telephone. See pages 5 to 6.
2. Mode of operation
The phone has two modes of operation called handsfree and ACD mode. If you are in an ACD environment you must set the phone to ACD mode. For other environments the phone should be set to handsfree mode. When the phone was delivered to you it was set to Handsfree mode. See page 17 of this guide.
3. Time and Date and Format
It is recommended that the phone's time and date is set. See page 13 of this guide.
Using Your M6320 telephone—the basics

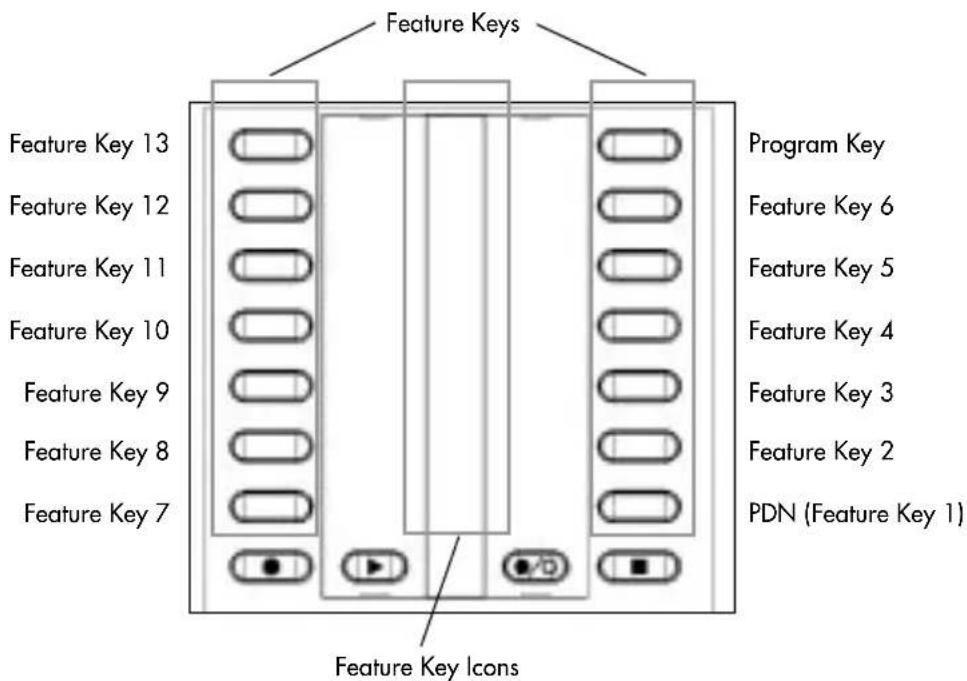
Using Your M6320 telephone—the basics
- Handset allows two-way communication while a call is established.
- Speaker turns on when you press an available line key. You can hear when the other party answers and pick up the handset to speak. You can also use the speaker to listen to the other party on Handsfree calls.
- Release key cancels active calls.
- Hold key keeps a caller on the line.
- Feature/line keys let you make and receive telephone calls or use installed features.
- Prime Directory Number (PDN) key is your main telephone line or extension number. It is automatically selected for outgoing calls when you lift the handset. Other telephone extensions that appear on your M6320 can be used by pressing the appropriate key.
- Feature/Line Indicators. The ◀ or ▶ indicators appear beside active lines or features. A steady ◀ or ▶ means that the feature or line is active. A slow flashing ◀ or ▶ means the line is ringing. A fast flashing ◀ or ▶ means the line is on hold or a feature is being programmed.
- Dial Pad gives you easy push-button dialing and programming.
- Volume Key adjusts the speaker, ringer, or handset volume. It is also used to scroll through setup functions shown on the display and to edit Predial digits.
- Display shows useful information about your calls or features.
- Visual Ringing and Message Waiting flashes when the telephone rings and illuminates when there is a message waiting (provide it has been programmed for message waiting see Setting up local features section).
- Selector key in Handsfree mode allows you to speak to a caller without using the handset (see Handsfree Calling on page 6). In ACD mode the selector key is used to select which of the two headsets is active in transmit and receive.
- Mute can be used to prevent the other party hearing you when you use either handset or headset or handsfree.
- Dual Headset Sockets either socket can be set to transmit and receive while the other headset is in receiving mode only. Headset 1 is the socket nearest to the user i.e. towards the bottom of the set, as indicated by the led dot.
- Multi functional LED illuminates when the set is in handsfree (Handsfree mode only) or when headset 1 is able to transmit (ACD mode only). Also flashes when mute is active.
- Cursor keys can be used instead of the Hold, Release and volumes keys in program mode.
- In Calls Key in Handsfree mode will select or answer a call on the PDN key, in ACD mode will select or answer a call on the PDN key and mimic the Release key when on a PDN call.
- Personal greeting keys - not in use on the M6320.
Answering calls
To signal an incoming call, your telephone rings, the alerter light flashes, and the indicator beside a line or intercom key flashes slowly.
To answer a call:
- If the call is ringing on a line other than your PDN, press the line or intercom key beside the flashing indicator.
- Lift the handset to speak or press Ⓜ to answer the call (see page 9).
To answer a call when the handset is off-hook and the line is not on:
- The incoming call is signalled by a lone alerter beep and a flashing indicator beside the line key. To answer the call, press the line key.
Making calls
Using your handset:
- Lift the handset—the PDN key is selected automatically and you hear a dial tone.
- Dial the number.
Using a line key:
- Press any available line key or ☑. You hear a dial tone from the speaker.
- Dial the number.
- Lift the handset when the other party answers or press Ⓧ (Hands-free Mode only) to talk to the called party (see page 9).
Placing a call on hold
Using the Hold key:
- Press Hold . The indicator flashes beside the line on hold and you can use other lines or features.
- Press the line key with the flashing indicator to return to the held call.
Using Automatic hold:
- Press another line key. The indicator flashes beside the line on hold and you can use other lines or features.
- Press the line key with the flashing indicator to return to the held call.
The basics: continued
Ending a call
- Hang up or press Rls .
Note: If a headset is connected, then RIs can be used.
Setting the alerter volume
- Press
up or down while the telephone is ringing. The display shows the adjusted alerter (ringing) volume level, which remains in effect until the next adjustment.
Setting the handset volume
- Press
up or down while using the handset on a call. The display shows the adjusted handset volume level, which remains in effect until the next adjustment.
Setting the Handsfree speaker volume
- Press ⚡️.
- Press ▶□▶ up or down to adjust the volume. The display shows the adjusted Handsfree speaker volume level, which remains in effect until the next adjustment.
Setting the On-hook monitoring volume
- Press any available line key. (Not available with headset connected)
- Press ▶□▶ up or down to adjust the volume. The display shows the adjusted monitoring speaker volume level, which remains in effect until the next adjustment.
Muting the handset or headset
The ☒ button can be used to prevent the other party from hearing you over the handset or headset. This is useful when you wish to speak privately with someone at your desk. When mute is active the Multi Functional LED will flash.
To mute your handset or headset:
- Press .
- Press again to release.
The basics: continued
Dial tone A continuous tone which means you can dial your call.
Busy tone A tone which repeats once per second to indicate that the number you dialed is busy.
Reorder tone A fast busy tone which indicates the call cannot proceed.
Confirmation Two short beeps followed by silence informs you tone that the feature you used was successfully completed.
Call Waiting Two short beeps sent at regular intervals which indicate tone a second incoming call.
Ring Again One long and two short pings indicate that the line for tone which you left a Ring Again request has come free.
Special tone Three beeps followed by a dial tone indicate that you can proceed with the feature you have activated
Handsfree Calling (Handsfree mode only)
The Handsfree feature allows you to use the built-in microphone and speaker on your M6320 to carry on a telephone conversation. While using Handsfree, speak clearly and face the M6320 — raise your voice a little if you move away from the telephone. You can also use the Mute feature to turn off your microphone. Mute is useful when background noises interfere with your conversation or when you want to speak privately with someone at your desk.
To answer a call using Handsfree:
-
Press instead of picking up the receiver.
-
If you wish to speak privately with the other person, pick up the handset. Handsfree turns off automatically.
-
Press RIs to end your call.
To use Handsfree during your call:
-
Press Ⓜ and replace the handset in the cradle.
-
To speak privately once again, pick up the handset.
-
Press RIs to end your call.
To mute your microphone while on a Handsfree call:
-
Press .
-
To turn your microphone on again, press ☒ once more.
Display features
The M6320 has an adjustable two-line display which shows you helpful information about the features you activate or the calls you make and receive. When making an outgoing call, for instance, the numbers you dial are shown on the display.
If your organization has installed the Calling Name Display feature, your display shows an incoming caller's name and telephone number:
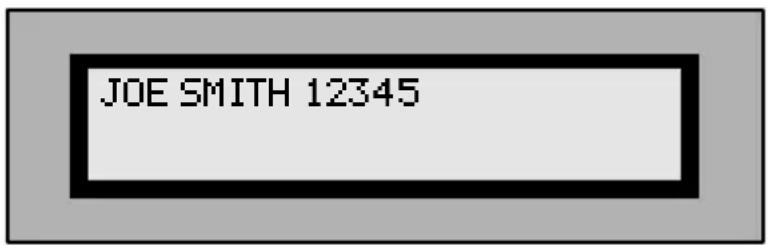
If your organization has the Reason Display feature, your display shows additional information. For example, when you have forwarded an incoming call to another telephone in your system your display shows the following information:
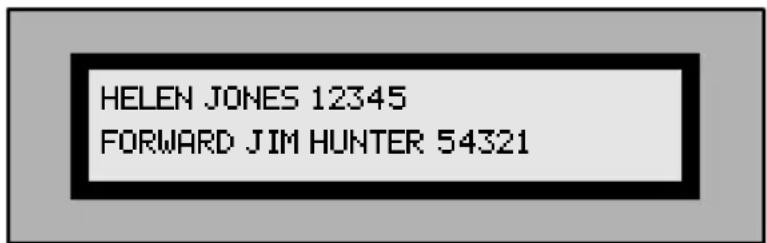
The top line of the display shows the name and number of the person receiving the forwarded call. The bottom line shows your name and number as well the name of the feature which has been activated.
The messages and names which are shown on your display are selected by your organization and may differ from those shown above. Check with your System Administrator or Customer Service Representative to find out the messages and names you can expect to see.
Setting up local features
The M6320 has a variety of local features which you can set up to make the set easier to use and to customize the set to meet your specific needs. The PROGRAM key allows you to enter Programming mode to set up the following features:
• Personal Greeting - feature not available on this model
- Display Language
- Alerter Volume
- Predial
- Call Timer
- Memory
• Time and Date Format
• Time and Date Set
• C.O. (Network) Features
- Mode Selection
- Message Waiting
Save, Memory, and Pause
The following three additional feature keys are available, when the C.O. (Network) Features function is disabled:
- Save Number
- Memory Number
- Pause
Note: when C.O. (Network) features are disabled the M6320 is set up to have the Save Number, Memory Number, and Pause keys available to you and they appear at the feature key locations shown below:

Save, Memory, and Pause (continued)
These keys are always available to you unless C.O. (Network) Features are enabled. C.O. (Network) Features must be enabled when the Save Number, Memory Number, and Pause keys are provisioned for switch features by your service provider). To find out whether the C.O. (Network) Features should be disabled or enabled, contact your System Administrator or Customer Service Representative.
The Save Number, Memory Number, and Predial functions are not available when the set is used in the Automatic Call Distribution (ACD) environment. These three local features only work with the Prime Directory Number (PDN) of the set.
Note that an incoming call interrupts the activation or programming of all local functions. Local features are also not available during an active call, with a call on hold, or when a C.O. (Network) feature is active (the Time/Date C.O. (Network) feature is active for 12 seconds).
Alerter Volume
To adjust the alerter volume:
- Press PROGRAM.
- Press 《《》》 until Alerter Volume? is shown on the display.
- Press Hold.
- Press 《《》》 to adjust the volume level. The bars on the display indicate the adjusted level.
- Press Hold to save the new alerter volume level.
- Press PROGRAM or Rls to exit programming mode.
Time and Date
To set the time and date on your M6320:
- Press PROGRAM.
- Press 《》 until Time and Date Set? is shown on the display.
- Press Hold.
- Enter the date using the format shown on the display.
- Enter the current time based upon the 24 hour clock.
- Press Hold to save the new time and date settings.
- Press PROGRAM or RIs to exit programming mode.
To select the time and date display format:
-
Press PROGRAM.
-
Press 《》 until Time and Date Format? is shown on the display.
-
Press Hold.
-
Press <<|>> until the desired format is shown on the display.
-
Press Hold to save the new format setting.
-
Press PROGRAM or RIs to exit programming mode.
Call Timer
The Call Timer uses the display to show the time elapsed since the start of a normal call (the timer appears on the display 5 seconds after the call starts and remains on the display 5 seconds after you end the call). Follow the instructions below to enable the Call Timer.
To enable the Call Timer:
- Press PROGRAM.
- Press 《《》until Call Timer? is shown on the display.
- Press Hold.
- Press 《《》》 to enable or disable the Call Timer.
- Press Hold to save the new setting.
- Press PROGRAM or RIs to exit programming mode.
Display Language
To select the language used to show information on the display:
- Press PROGRAM.
- Press 《《》》 until Language? is shown on the display.
- Press Hold.
- Press 《《》》 until the desired language is shown on the display.
- Press Hold to save the new setting.
- Press PROGRAM or Rls to exit programming mode.
C.O.(Network) Features
The M6320 allows you to replace the Save Number, Memory Number, and Pause local features with additional Central Office C.O. (Network) Features. When instructed to do so by your System Administrator or Customer Service Representative, use the following instructions to enable or disable Central Office C.O. (Network) Features. When enabled, the additional features will be located on the feature keys normally pressed to use Save Number, Memory Number, and Pause.
To enable/disable C.O. (Network) Features in place of the Save, Memory, and Pause keys:
- Press PROGRAM.
- Press 《《》》 until C.O.Features? is shown on the display.
- Press Hold.
- Press 《《》》 until the desired setting is shown.
- Press Hold to save the new setting.
- Press PROGRAM or RIs to exit programming mode.
Note: If your phone has network features programmed on Feature Keys 4, 5 & 6 please ensure that C.O. Features is ENABLED.
Predial
The Predial feature allows you to dial your number first, inspect it as it is shown on the display, and then pickup the handset or press 📂 to make your call.
To enable/disable the Predial feature:
- Press PROGRAM.
- Press 《《》》 until Predial? is shown on the display.
- Press Hold.
- Press 《《》》 to enable or disable the Predial feature.
- Press Hold to save the new setting.
- Press PROGRAM or RIs to exit programming mode.
To make a call when Predial has been enabled:
- Dial the telephone number - the number is shown on the display.
- Pickup the handset or press Ⓜ. The M6320 selects the PDN line and makes the call. Note that you can edit the Predial number by using the <<|__ >> key and the dialpad digits.
Save Number
The Save Number feature allows you to save the telephone number you are calling so that you can redial the number quickly the next time you call.
To save the number for the current call:
- Before you end the current call, press Save.
When the number has been saved, Saved is displayed on the top line of the display for 3 seconds.
To make a call using the number you saved:
- Press Save.
- Pickup the handset or press Ⓞ.
The previously saved number is dialed automatically. Note that the number remains unchanged until you save another number.
Memory Number
The Memory Number feature allows you to program up to five telephone numbers which can be recalled and dialed quickly and easily. Note that the Memory? option does not appear on the Program menu when C.O. (Network) Features are enabled.
To program a number into memory:
- Press PROGRAM.
- Press 《《》 until Memory? is shown on the display.
- Press Hold.
-
Press ◆◆ □▶ until the desired memory location is shown on the display (M1, M2, M3, M4 or M5). (If a number has already been stored, it is also shown on the display).
-
Enter the number you wish to store.
-
Press Hold to save the new setting.
-
Press PROGRAM or RIs to exit programming mode.
To make a call using Memory Number:
- Press Memory until the stored number you wish to call is shown on the display (M1, M2, M3, M4 or M5).
- Pickup the handset or press Ⓞ.
Pause
In order to make certain types of calls, you are sometimes required to pause a moment during dialing. When storing this type of telephone number using Memory Number or Speed Call, the required pause can be inserted into the sequence of digits (or dial string) by using the Pause key.
To insert a pause into the dial string:
- Press Pause at the appropriate place when entering the number. For example, to enter a pause when accessing voice mail, the sample dial string shown below can be entered:
8088Pause 4321#
Mode Selection
The set has two operational modes Handsfree (default mode) and ACD mode. The handsfree mode is intended to give the user a high level of features, some of which are listed below.
- Handsfree operation by pressing the selector key.
- Dual headset working (only 1 operates in transmit mode) in conjunction with the handset.
In ACD mode the set is designed for call centre working and has the following design features:
- Dual headset working (only 1 operates in transmit mode at a time).
The speech transmit path can be switched between headsets using the selector key.
To select the mode of operation:
- Press PROGRAM.
- Press «|» or left/right cursor keys until Mode Selection? is displayed.
- Press Hold or the down scroll key to show Handsfree Mode or ACD Mode.
- Press 《《》》 or left/right cursor keys until the require mode is displayed.
- Press Hold or the down scroll key to save the setting.
- Press or to exit the program mode.
Message Waiting
To enable the large red LED at the top of the set to illuminate when a message is waiting, you will have to indicate to the phone which feature key is assigned to the network feature 'message waiting'.
To program the message waiting key:
- Press PROGRAM.
- Press «|» or left/right cursor keys until Message Waiting? is displayed.
- Press Hold Hold or the down scroll key to show Msg Wait key Unassigned.
- Press a feature key to assign that key to the message waiting function or press RIs to unassign the function.
- Press Hold or the down scroll key to save the setting.
- Press PROGRAM or RIs to exit the program mode.
Quick ways to make calls
The remaining sections of the guide describe network features which can be installed on your M6320. Note that some of the network features contained here may not be available to you. Also note that your service provider may have provisioned your set with network features which are not described here.
Automatic Dial
Use Automatic Dial to program feature keys on your telephone for one-touch dialing. Automatic Dial keys on your set are assigned by your Customer Service Representative or System Administrator.
To program an Automatic Dial key:
- Press the Automatic Dial key you want to program.
- Dial the number you want to store.
- Press the Automatic Dial key again.
- Label the key. You may want to use a name or telephone number to identify the key.
To erase an Automatic Dial key:
- Press the Automatic Dial key you want to clear.
- Press #.
- Press the Automatic Dial key again.
To make a call using an Automatic Dial key:
- Lift the handset. (You can also press the desired key, ☐ or Ⓧ to start the call).
- Press the desired Automatic Dial key to dial the number you want to call.
Automatic Line
Automatic Line keys are pre-programmed for you by your Customer Service Representative or System Administrator to dial a specific number. You should label any installed Automatic Line keys with a name or number.
To use an Automatic Line key:
- Press the desired Automatic Line key.
- Lift the handset or press Ⓧ when your party answers.
Intercom Calls
You can talk directly to a designated person using an Intercom line and they will hear you through their telephone speaker. For example, an Intercom line can be set up between two security desks.
Each I/C key is set up by your system manager to call a particular person. Intercom Group is a similar feature which allows you to call a number of different people by dialling a short code.
Answering an Intercom call
Telephone not in use
If your telephone is not in use, the telephone rings and the I/C indicator flashes. To answer the Intercom call:
-
Press I/C or wait a few seconds to be automatically connected The Intercom indicator comes on. You hear the caller's voice through the speaker.
-
If you want to respond, pick up the handset or press Handsfree.
Telephone in use
If your telephone is in use, you hear a long buzz and the I/C indicator flashes.
-
Press I/C. The display clears. The I/C indicator comes on and the line indicator flashes. Your first call is put on hold and you hear the second caller's voice.
-
If you want to respond, pick up the handset, or press Handsfree. To return to your original call, press the line key that the call is on.
Making an Intercom call:
-
Press /C .
-
Pick up the handset. The I/C indicator comes on. The called telephone rings.
If the person called does not answer within a few seconds, the call will be automatically connected to their Intercom, provided they are not on the telephone. If the person is busy on the telephone, you will hear their telephone continue to ring until they press their I/C key.
Ending an Intercom call
The Intercom feature (I/C) clears when either party releases the call (hangs up).
Intercom Group
The telephones in your company can be arranged in Intercom Groups. For example, your project team could be an Intercom Group. You can call another person within your group by dialling a code assigned by your system manager. The person called will hear you through the speaker on their telephone.
Making a call within your Intercom Group:
- Press I/C Group. The I/C Group indicator comes on.
- Key the code of the person you want to talk to. Your system administrator will provide you with the code.
The display shows you the number entered.
When the telephone rings, pick up the handset.
Answering an Intercom Group call
The telephone rings and the I/C Group indicator flashes. To answer the call, press I/C Group. The I/C Group indicator comes on and the display shows you information about the call.
You hear the caller's voice. If you want to respond, pick up the handset.
You can belong to more than one Intercom Group. Your telephone will have a separate I/C Group key for each group.
Quick ways to make calls: continued
Last Number Redial
You can redial the last number you called on a specific line. This is useful if the number you called was busy and you want to reach the person again.
To call using Last Number Redial:
- Press the line key used to make the last call.
- Press # twice.
- Lift the handset when the other party answers.
Speed Call
You can dial telephone numbers quickly and easily using one- or two-digit codes. Speed Call provides you with 10 one-digit codes (0–9) or up to 70 two-digit codes (00–69). See your Customer Service Representative or System Administrator to find out which type of codes are available to you.
To program a Speed Call number:
- Press Spd Call.
- Enter a one- or two-digit code (0–9 or 00–69).
- Dial the telephone number you want to assign to that code. You can store telephone numbers up to 24 digits long. Note that if there is a number already assigned to this code, the new number you input erases the old.
- Press Spd Call again.
- Make a note of the Speed Call code and telephone number for future reference.
To erase a programmed Speed Call number:
- Press Spd Call.
- Enter the one- or two-digit code for the number you want to erase.
- Press #.
- Press Spd Call again.
To make a call using Speed Call:
- Lift the handset. (You can also press the desired line key, or ☐ or Ⓜ to start the call).
- Press Spd Call.
- Dial the code for the telephone number you want to call.
How to avoid missing a call
Call Forward
Away from your telephone, but expecting an important call? Do you want someone to take your calls for you while on vacation? Call Forward lets you redirect your calls to another telephone or voice message system.
To set Call Forward:
- Press Call Fwd.
The indicator beside the Call Forward key flashes.
-
Enter the number to which you want to redirect your calls or skip to step 3 if you want to use the previous Call Forward number.
-
Press Call Fwd again.
The indicator beside the Call Forward key goes ON.
To cancel Call Forward:
- Press Call Fwd.
The indicator beside the Call Forward key goes OFF.
Call Waiting
Call Waiting lets you know when you have a second incoming call by sending two short tones to the handset or speaker at regular intervals and by lighting the Call Waiting indicator.
To answer your second call:
- Press the Call Wait key which shows the flashing indicator. The original call goes on hold automatically.
To return to your original call:
- Press the line key of the original call. The other party is put on hold automatically and the Call Wait indicator winks.
You can alternate between the calls by pressing the appropriate line key.
How to avoid missing a call: continued
Call Pickup
Telephones in your system can be programmed by your Customer Service Representative or System Administrator into Call Pickup groups. Call Pickup lets you answer a call ringing at any telephone in your pickup group from your M6320.
To pickup a call ringing at another telephone in your pickup group:
-
Lift the handset. (You can also press the desired line key, 📄 or 🌐 to start the call).
-
Press Pickup.
Message Waiting
Message Waiting for the M6320 works with the Leave Message feature or with your organization's voice mail system. An indicator beside the Msg Wait key is ON whenever someone has left you a call request or a voice mail message. Message Waiting queues up all call requests left for you starting with the first caller.
To retrieve your messages:
-
Lift your handset or press Handsfree.
-
Press Msg Wait to dial the Message Center automatically or dial the Message Center number yourself.
-
Retrieve your messages one by one until all messages have been heard. The Message Waiting indicator turns OFF when you have listened to all of your messages.
Leave Message
Leave Message work with the Message Waiting feature by letting you send a call request to another telephone in your system. Your call request allows the other party to return your call quickly and easily.
To leave a call request:
- Make a call.
- If there is no answer or the line is busy, press Leave Msg.
The Message Waiting indicator on their telephone goes ON.
When you can't reach someone
Override
Override lets you interrupt a person on a call. It is helpful in emergency situations or when someone expects you to call with important news.
To bridge into a two-way call within your system:
- Press Override when you hear a busy signal.
- To temporarily disconnect the third party and speak privately with the person you called, press Override again.
- To allow the original parties to carry on with their conversation, hang up your telephone.
Note: Not all lines in your system can be overridden when busy — check with your Customer Service Representative or System Administrator. When you cannot interrupt a call, you hear a reorder tone.
Ring again
When you receive a busy signal when calling someone, Ring Again can signal you when their telephone becomes free. You can then use Ring Again to automatically redial the number. Note that you can only have one Ring Again request at a time.
To use Ring Again:
- Make a call.
- If the line is busy, press Ring Again.
- Press RIs to release the call. When the telephone you called becomes free, you hear a Confirmation tone from the speaker and the Ring Again indicator flashes.
- Lift the handset or press ⚡️.
- Press Ring Again to automatically redial the number. If you do not press Ring Again within a pre-defined time limit (between 8–32 seconds), the Ring Again request is cancelled automatically.
- If you have only one line and are already on a call when the Ring Again indicator flashes, you must complete the call before the predefined time limit and press Ring Again to redial the previously busy number.
If you have two lines and are already on another call when the Ring Again indicator flashes, press Hold to put the current call on hold. Press the free line key and then press Ring Again to redial the number.
To cancel a Ring Again request:
- Press Ring Again before you hear the Ring Again Confirmation tone.
Ways to transfer or share calls
Conference
You can set up a telephone call between you and up to five other people. This is useful when meeting in a common place is not possible.
To add a person to a call:
- While on the current call, press Conf 3. The current call goes on hold automatically and you hear the dial tone.
- Dial the number of the new person you want to add to your call.
- Press Conf 3 to establish a conference.
The line key indicator for the new person goes OFF once added to the conference. - Repeat steps 1–3 until you have added all the desired parties to the conference.
To add an incoming call to the conference:
- While on the current conference call, press the line key of the incoming call. The conference call goes on hold automatically.
- Press Conf 3 to add the new caller.
To end the conference call:
- Hang up or press RIs .
Note: Check with your Customer Service Representative or System Administrator to verify the number of people that can be added to your conference call.
Ways to transfer or share calls: continued
Call Park
Call Park lets you put a call on hold at your telephone, then retrieve the call from any telephone in your system.
To park a call:
-
While on a call, press Call Park.
You hear two short beeps followed by silence. -
Hang up.
To retrieve a parked call from any telephone in your system:
- Lift the handset.
- Press Call Park.
You hear three short beeps followed by the dial tone. - Dial the number of the telephone that parked the call.
Privacy Release
If you share a line with other people and the line is programmed for Privacy, no one can access the line while you are using it. You can temporarily release Privacy so that a co-worker can join your call.
To temporarily release Privacy while on a call:
- Press Priv RIs. Your co-worker can now select the line and join the call.
To make your call private again:
- Press Priv Rls.
Privacy is also automatically restored to your line when you end your call.
Transfer
Send a current call to another telephone within your system using Transfer. You can either remain on the line when you make the transfer or simply redirect the call.
To transfer a call directly to another telephone:
-
Press Transfer or Conf 3.
-
Call the person to whom you want to transfer the call. When the person answers, you can talk privately — the original caller cannot hear your conversation. If the line is busy or if the person does not answer, press RIs to return to the original caller.
-
Press Transfer or Conf 3 to complete the transfer and did yourself from the call.
To transfer a call by establishing a conference:
- While on the current call, press Conf 3.
The current call goes on hold automatically. You hear three beeps followed by the dial tone.
-
Dial the number of the new person you want to add to the conference. When the person answers, you can talk privately — the original caller cannot hear your conversation. If the line is busy or the person does not answer, press RIs to return to the original caller.
-
Press Conf 3 to establish a conference. You can now speak with both parties.
-
Press Rls to disconnect yourself from the call and complete the transfer.
Controlling your telephone line
Make Busy
You can make your telephone appear busy to all callers except those using the intercom. You might want to use this feature when you are meeting with someone and don't want to be disturbed.
To make your telephone appear busy:
- Press Make Busy. The indicator beside the Make Busy key goes ON.
To cancel Make Busy:
- Press Make Busy OFF.
again. The indicator beside the Make Busy key goes
Privacy
If you share a line with other people and the line is not programmed for Privacy, anyone can access the line while you are using it. Privacy lets you make a call temporarily private.
To make your current call private:
- Press Privacy.
Other people who share your line are now prevented from bridging into your call.
To remove the privacy status from your call:
- Press Privacy again.
Privacy is also automatically removed from your line when you end your call.
Agent Features
AN ACD system distributes incoming calls evenly to all agents that are logged into the system. Agents are divided into groups working under the guidance of a supervisor. As an agent, you are responsible for answering calls that have been directed to your ACD group and presented at your position.
This part of the guide explains how to:
- log in and out of the ACD system - answer ACD calls - put calls on hold - call your supervisor - use the Line of Business feature - deal with an emergency call - use the Not Ready key for post-call processing - display the queue threshold.
Logging in
To act as an agent and receive ACD calls you must first log into the system. At the start of the log-in procedure the Make Busy indicator should be on. If the indicator is blinking, press Make Busy until the indicator comes on steadily.
To log in:
-
Press
-
Lift the handset or plug in your headset. The In Calls indicator comes on and you hear special dial tone (a lower note and a higher note repeated alternately).
- Key your 4-digit log-in ID. The digits appear on the display as you key them.
If your installation uses passwords, you will hear special dial tone again and you should key your 4-digit password. Your supervisor will tell you if a password is required. The digits of your password will not be displayed as you key them.
After successful entry of a log-in ID (and password, if required) the In Calls and Make Busy indicators go out, the display clears, and the Not Ready indicator comes on.
- When you are ready to begin receiving ACD calls press Not Ready. The Not Ready indicator goes out.
Logging out
At the end of your shift you should log out from the ACD system.
To log out, press Make Busy. The Make Busy indicator comes on and you are logged out of the ACD system. No ACD calls or non-ACD calls will be presented to your telephone while the Make Busy indicator is on.
If you wish to receive non-ACD calls, press Make Busy a second time. The indicator starts to blink. Non-ACD calls may be received on line keys when the Make Busy indicator is blinking.
If you press Make Busy while active on an ACD call, you will be logged out when the call is released.
Note: If a call is presented to your station and it is not answered within a specified number of rings, your telephone will automatically go into Make Busy mode.
Answering ACD calls
ACD calls are presented to your telephone on the Ⓞ key (the bottom key on your telephone). When an ACD call is received, the In Calls indicator flashes and you hear a short ring from the telephone. If you are using a headset you hear a short tone through the earpiece.
The Ⓞ key is used only to answer ACD calls. The other features part of this guide explains how to make and answer non-ACD calls.
To answer the ACD call, press 📄. The In Calls indicator comes on and you are connected to the caller.
Note: At some sites the telephones are programmed to answer ACD calls automatically. Your supervisor will tell you if your ACD system works like this. If it does, you are connected to the caller immediately after the telephone rings without having to press 📄.
At the end of the call press RIs (or hang up the handset if no headset is connected).
Agent Features: continued
Putting an ACD call on hold
To put a call on hold while you look up information or consult your supervisor press Hold. The In Calls indicator starts to flash quickly.
To return to the held call, press 📞 again.
Calls may also be put on hold automatically if, for example, you press the Supervisor key to call your supervisor or press a line key to make another call.
You can switch back and forth between an ACD call and a non-ACD call by pressing the appropriate key: ☐ for the ACD call and Supervisor or the line key for the non-ACD call.
Calling your supervisor
The Supervisor key is used to call your supervisor and to answer any calls your supervisor makes to you. You can also call your supervisor by pressing a line key and dialling the appropriate extension number.
To call your supervisor while active on an ACD call:
- Press Supervisor. Your ACD call is automatically placed on hold, and the Supervisor indicator comes on.
- When you have finished talking to your supervisor press RIs . The Supervisor indicator goes out.
To return to the ACD call, press 📞.
Note: This procedure cannot be used to establish a three-way call between your ACD caller, your supervisor and you. Refer to ‘Call Transfer and Three-Way Calling’ in the ‘Other features’ part of this guide if you need to do this.
Agent Features: continued
Line of Business key
This optional feature allows a Line of Business (LOB) code to be entered for each call that you answer. These codes will be predefined for your system and will allow tracking of such items as the number of calls of a specific type and the holding times for these calls. Up to three LOB codes may be entered for each ACD call. Your supervisor will tell you if this feature is used at your site.
To enter an LOB code while active on an ACD call press , then key the appropriate digits to reflect the type of call being handled. The digits are displayed on your telephone.
Note: If you make a mistake while entering a LOB code, pressing a second time clears the display and allows you to enter the correct code.
Emergency calls
The Emergency key lets you call for assistance if you receive an abusive, threatening or urgent ACD call.
When dealing with an emergency call, first note the digits displayed on your telephone. This may help security with any follow-up activities for the call.
Press Emergency to call your supervisor. The Emergency indicator flashes while the supervisor is being called. When the supervisor is connected, the indicator comes on steadily and a Three-Way Call is established.
In some installations, a tape recording of the call will also begin. The caller is not aware of the recording action.
Note: You must remain in the conference for the duration of the call: if you hang up, the call will be disconnected.
If your supervisor happens to be active on another emergency call, your request will either be routed to the first available supervisor or disallowed, depending on the way your ACD system has been configured. If your call is disallowed the Emergency indicator will not come on. Your supervisor will tell you which way your system has been configured.
Not Ready key
Pressing the Not Ready key at the end of an ACD call makes your position temporarily unavailable to receive new ACD calls. The key is most often used to allow time for post-call processing; for example, completing paperwork associated with an ACD call.
To stop further ACD calls coming in, press Not Ready at the end of a call. The Not Ready indicator comes on.
When you are ready to receive further calls press Not Ready a second time.
Note: Do not press Not Ready during a ACD call or the call may be disconnected.
In some organizations codes are used to indicate the reason why the Not Ready key was pressed. If this feature is used at your site, the Not Ready indicator will flash until you dial the code. Your supervisor will tell you if this applies to your site and what codes to use if it does.
Displaying the queue threshold
It is sometimes useful to know how many calls are waiting to be answered or how long the call at the front of the queue has been waiting. The optional Display Queue Threshold feature provides this information. Your supervisor will tell you if the feature is available at your site.
To view information about calls waiting to be answered press Disp queue.
The information displayed normally includes a figure for the number of calls in the queue, or the waiting time for the call at the front of the queue and a graphical representation of the same information. A typical display is shown below.
T1 T2 T3 WAIT 000000000000 110
In the example above, the labels T1, T2 and T3 represent particular waiting times selected by the organization concerned. The call at the front of the queue has been waiting for 110 seconds, which is slightly more than time T2.
Displaying the queue threshold (continued)
At some sites, information about the queue is displayed each time a call is presented to your telephone, as shown in the typical example below.
RESERVATIONS
T1 CALLQ 026
In this example the display shows that the call came in on the organization's reservations number and the caller has been waiting for time T1. The bottom right-hand corner of the display shows that there are currently 26 calls in the queue.
At some sites, the queue information is displayed whenever you press the Not Ready key. In this case the information will remain visible, and will be updated at regular intervals until you press Not Ready again to resume receiving ACD calls.
Supervisor features
As the supervisor of an ACD group, you are responsible for monitoring and assisting agents' work. In addition you may work as an agent whenever necessary. You may be responsible for one or more ACD groups.
This part of the guide explains how to:
- interpret agent indicators - display the status of an ACD group - display a summary of agent activity - observe an agent - call an agent - answer a call from an agent - respond to an emergency call - use the Night Service key - use the Interflow key - access ACD agent functions.
Interpreting agent indicators
The status of an ACD agent may be checked by looking at the indicator associated with the agent's key. This indicator is automatically updated each time the agent's status changes, and will always be in one of four states:
- Off agent position is logged out.
- On agent is active on an ACD call.
Flashing - agent is waiting for an ACD call.
Flashing quickly - the Not Ready key has been pressed, the agent is busy with post-call processing.
Displaying the status of an ACD queue
When you press the Disp queue key, information is displayed about how many calls are waiting to be answered and how long the call at the front of the queue with highest answering priority has been waiting. This allows you to see whether the ACD group is handling calls effectively or not.
The example below shows the information typically displayed when you press the Disp queue key.
Displaying the status of an ACD queue (continued)
INC is the number of incoming calls waiting in the ACD call queue
LOG is the number of calls logically queued for this group
AGT is the number of agents available to answer calls
WAIT is the waiting time (in seconds) of the call at the front of the highest priority queue.
INC LOG AGT WAIT
24 12 8 102
The information is displayed for 12 seconds, or until another feature key is pressed or an ACD call is presented on your ☐ key. If you have more than one Disp queue key on your telephone each key will be associated with a different ACD group.
Some sites use the Display Queue Threshold feature rather than Display Queue Status. For information on this feature refer to Displaying the queue threshold in the Agent features part of this guide.
Displaying a summary of agent activity
When you press the Dis Agt Sum key, information is displayed about the activity of all the agent positions in your ACD group.
The example below shows the information typically displayed when you press Dis Agt Sum.
ACD SDN NR IDL NMD
6
0
2
3
4
ACD is the number of agents active on ACD calls
SDN is the number of agents active on non-ACD calls (Secondary Directory Number calls)
NR is the number of agents logged in but not ready to receive calls
IDL is the number of agents idle and ready to receive calls
NMD is the number of positions which are not manned (that is, not logged in).
Observing agents
Agents may be observed when they are active on ACD calls or non-ACD calls. You may monitor an agent's conversation or participate in the call. Depending on the way your ACD system has been configured, the agent may receive a warning tone indicating that they are being monitored.
To monitor a conversation between an agent and a caller:
- Press Obs Agent. The associated indicator comes on.
Either
- Press the Agent of the agent's key.
The display shows the agent's In Calls number. You hear the conversation between the agent and the caller but you cannot participate in the conversation at this stage.
To participate in the call:
- Press Call Agent while monitoring the call.
A Three-Way Call is established.
You can listen to a non-ACD call on an agent's secondary directory number by pressing the appropriate Agt Status key while monitoring an ACD call.
To switch back to the ACD call:
- Press Agent again.
You can toggle between the ACD call and the non-ACD call using the Agent and Agt Status keys. It is not necessary for an agent to be logged in to monitor calls on the secondary directory number.
Supervisor Features: continued
Calling an agent
You can use the Call Agent key to contact the agents you supervise. You can also use it in conjunction with the Agent keys to call an agent directly without dialling the agent's number.
Press Call Agent. The associated indicator comes on.
Press the Agent key for the agent you wish to call.
The display shows the number associated with the agent's Call Supv key. If the agent is talking on the Call Supv key or does not have a Call Supv key you hear busy tone.
You can also contact an agent by pressing Call Agent and then dialling the appropriate number.
Finally you may press a line key to select a secondary directory number and then dial an agent's telephone number.
Note: The Agent keys cannot be used to contact agents directly on secondary directory numbers.
Answering agent calls
Agents will occasionally need your help in handling a call. Calls made to you by agents are presented on the Ans Agent key. No calls can be originated from this key.
When an agent presses the Call Supv key or dials the directory number associated with your Ans Agent key, your telephone rings and the Ans Agent indicator flashes. The agent's □ directory number is displayed.
Press Ans Agent.
The Ans Agent indicator stays on and you are connected to the agent.
To end the call, press RIs , or hang up.
Supervisor Features: continued
Answering emergency calls
Instances may arise when an agent needs to contact you for assistance in dealing with an urgent or threatening call. Agent telephones are configured with an Emergency key which, when pressed, connects the agent directly to your position. At some sites a recording device may also be switched on to record the call.
All emergency calls are presented on the Ans Emerg key. Your telephone rings steadily for 30 seconds and the Ans Emerg light flashes.
Press Ans Emerg.
The associated indicator stays on and you are connected in a Three-Way Call with the agent and the caller.
To end the call, press RIs , or hang up.
Note: Emergency calls are presented even if you activate Make Busy.
Night Service
Night Service controls the handling of incoming ACD calls received during normal business hours. Night Service handling will vary from location to location. It may involve routing calls to another site where agents are still working, or connecting calls to a recorded announcement to inform callers or your usual operating hours.
Night Service is activated automatically when all the agents press their Make Busy key, or alternatively when the supervisor presses the Night Service key for the group.
When Night Service is activated, no new calls will be queued for the ACD group. Any calls already in the queue will be presented in the normal manner unless all the agents have pressed their Make Busy key.
To activate Night Service:
- Press Night Service. The Night Serv indicator comes on and any new calls are handled appropriately.
To turn off the feature:
- Press Night Service again. The indicator goes out and calls will once more be presented or queued in the normal manner.
Controlled Interflow
As a supervisor, it is your responsibility to monitor the state of the incoming call queues for your ACD group and to route calls from one group to another if a group has more calls waiting to be answered than can be handled in an acceptable time.
The Interflow key allows you to re-route incoming calls from one ACD group to another. The route taken when the feature is activated is defined during site configuration — you have no local control over the route.
Any calls already in progress or already in the queue are not affected.
To activate the Controlled Interflow feature:
- Press Interflow.
The associated indicator comes on. All subsequent calls to this ACD group are re-routed to another group.
To turn off the re-routing feature:
- Press Interflow again.
Supervisors as agents
If you have an Ⓞ key on your supervisor's telephone you can also function as an ACD agent if necessary, for example if the ACD group is exceptionally busy.
To do this you must first log into the system to be recognized as an agent available to receive calls see Logging in, in the Agent features part of this guide. Once you are logged in, ACD calls will be presented on your key. Refer to the Agent features part of the guide for information on performing agent activities.
Connecting your M6320
If your M6320 has not been connected to the wall jack/power supply or you are moving the set to another location, use these instructions to make all the required connections.
To connect your M6320 to the telephone wall jack and AC power:
- Use the silver-grey line cord (7.5 feet/2.25 meters) and the AC adaptor unit provided with your M6320. Contact your System Administrator or Customer Service Representative if you need a replacement for a missing or damaged adaptor.
- Remove the stand F.
- Insert one end of the line cord into the appropriate jack (A) located underneath the M6320. The connector clicks into place when correctly inserted.
- If the handset has not been connected, insert one end of the curly handset cord into the appropriate jack (C). Feed the cord through the restraining tab (D) so that the cord falls to the left side of the set. Insert the other end of the handset cord into the handset.
Figure 1-M6320 connections

Figure 2 - Wall jack/AC adaptor connections
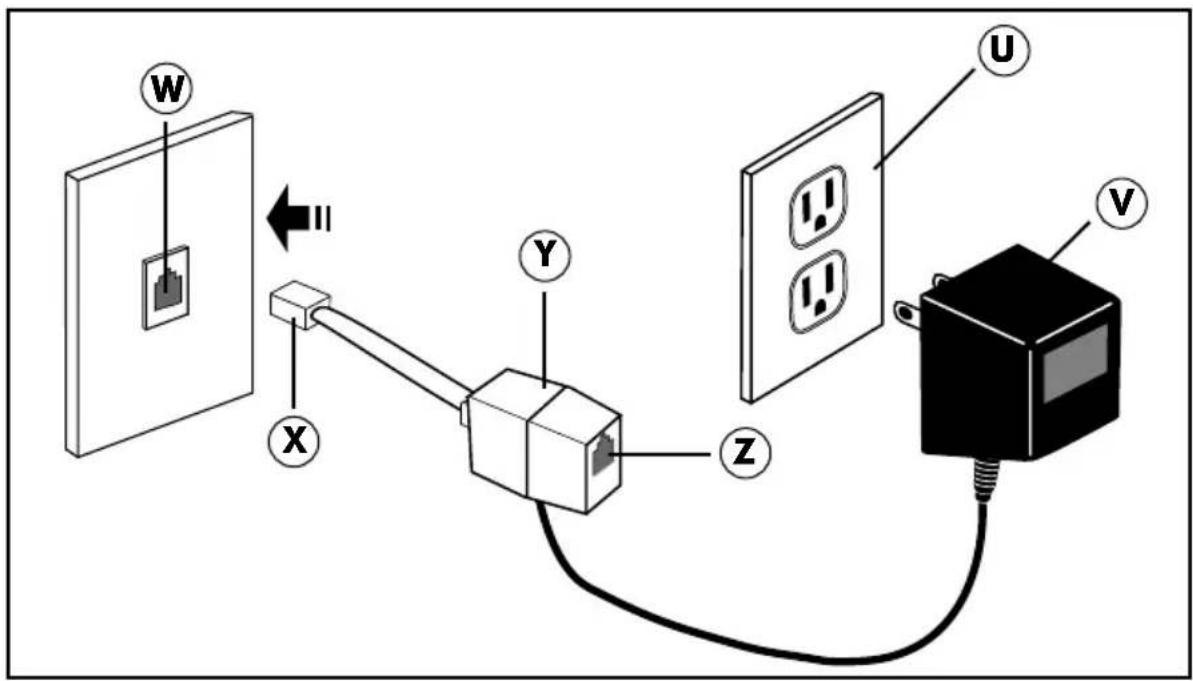
- Run the free end of the line cord through the “E” hole in the stand “F”. Slide the cord under the retaining tabs “B” (allow a little slack). Refit the stand in high or low position.
- Turn the M6320 right-side up and position it on your desk, ensuring that line cord runs through slot "G".
- Insert the free end of the line cord into the open jack (Z) on the plastic connector (Y).
- Insert the free end of the plastic connector (X) into the wall jack (W).
- Plug in the AC adaptor (V) into a AC 110V wall socket (U).
Wall mounting the M6320
Your telephone set has been prepared at the factory for use on your desk. If you require the set to be positioned on a wall, follow procedure.
To mount the M6320 on the wall:
- Pull off the wedge-shaped base unit (stand) from the telephone set.
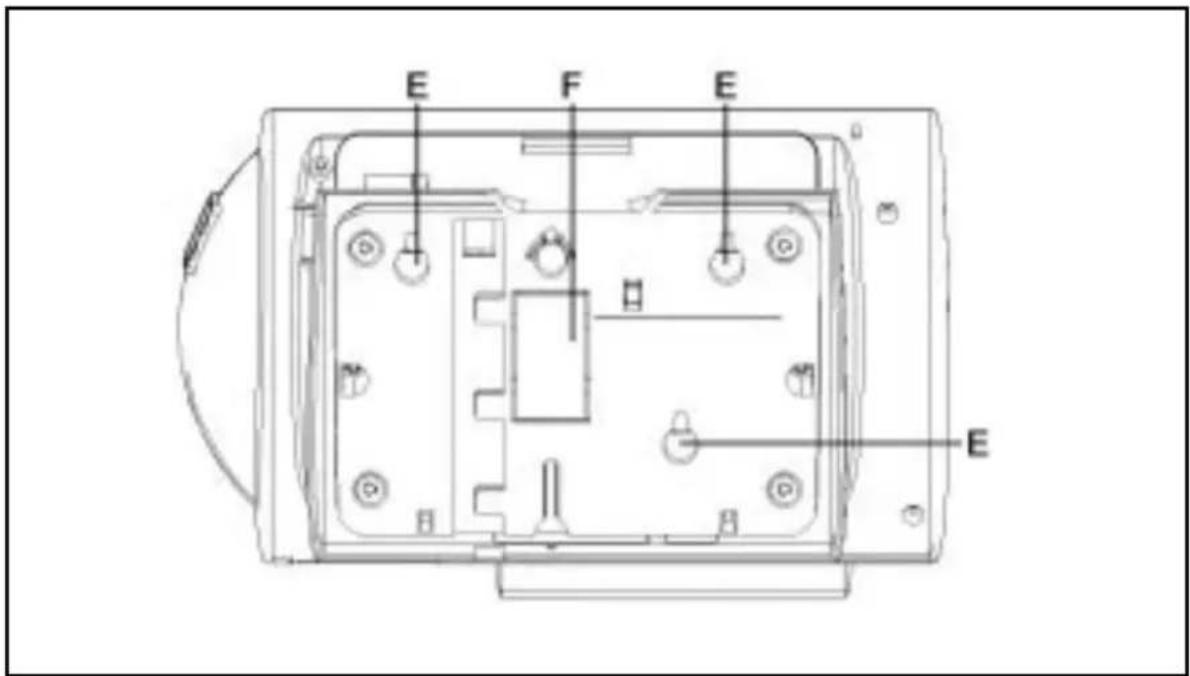
- If the set is to be connected to a line cord connecting block mounted on the wall, push out the knock-out section in the base (F) as shown in Figure 1.
Figure 1 - M6320 wall mounting positions
-
Reposition the stand on to the base the other way round. Press the stand firmly into the bottom of the set until the plastic tabs have clicked into place.
-
Insert the two screws into the screw mounts shown in Figure 1. Tighten the screws until the stand is seated securely. Do not over tighten the screws as this may cause the plastic to crack.
-
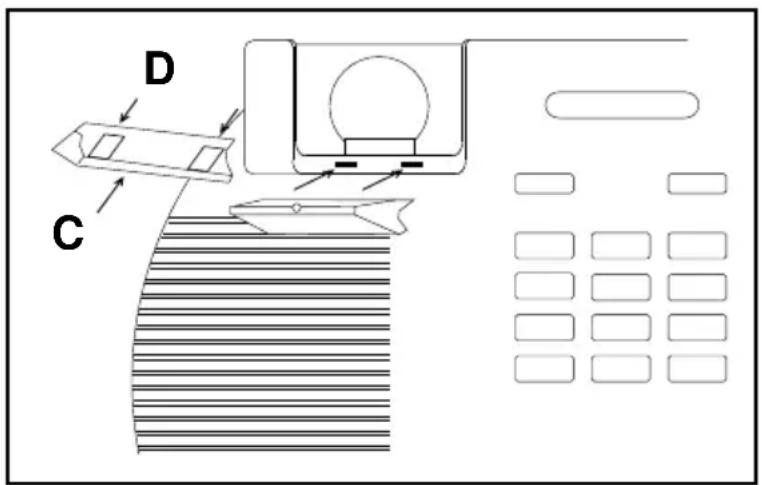
Position the handset retainer (C in Figure 2) into the handset cradle. The handset retainer is included in the stand assembly. Insert the two plastic tabs (D) on the retainer into the two holes provided. Press firmly until the retainer clicks into place.
Figure 2 - Handset retainer installation
- Attach the telephone set to a standard wall bracket using the mounting holes provided on the wedge-shaped base. Once mounted on the wall bracket, the telephone set should hang flush to the wall. Note that the knock-out section removed in step 3 allows enough space to accommodate the line cord connecting block, if present.
Approval Requirements
Permitted Connections
This telephone, with its associated power supply connector, may only be connected to a Centrex telephone system using a socket provided by your system administrator.
Only one terminal with its associated power supply may be connected to the telephone socket.
Non-permitted Connections
This telephone must not be connected to the Public Switched Telephone Network.
Power Failure
In the event of a local power failure, calls can be made using the handset or headset, incoming ringing may be at a reduced level and special features such as the display and handsfree operation will not function.
Safety Requirements
Power Supply
The telephone must be installed near to a mains socket which should be easily accessible.
Caution Hazardous Voltages
When the terminal is connected to the telephone network all of the interconnection points are at Telephone Network Voltage (TNV).
The telephone and any accessories must be assembled and connected in accordance with the manufacturer's instructions in the user guide before the equipment is plugged into the telephone line socket.
Copyright © Astra Technologies 2003.
All rights reserved
Information is subject to change since Astra Technologies reserves the right, without notice, to make changes in equipment design or components as progress in engineering or manufacturing methods may warrant.
P0885521
ISSUE 04
AASTRA
Telecôm


- Table of Contents
- M6320 Quick start up 4
- Using your M6320 telephone—the basics 5
- Setting up local features 11
- Quick ways to make calls 18
- How to avoid missing a call 22
- When you can't reach someone 24
- Ways to transfer or share calls 26
- Controlling your telephone line 29
- Agent Features 30
- Supervisor Features 36
- Connecting your M6320 42
- Wall mounting M6320 44
- Introduction
- Key Layout
- Mode of operation
- Time and Date and Format
- Using Your M6320 telephone—the basics
- Answering calls
- To answer a call:
- Making calls
- Using your handset:
- Using a line key:
- Placing a call on hold
- Using the Hold key:
- Using Automatic hold:
- The basics: continued
- Ending a call
- Setting the alerter volume
- Setting the handset volume
- Setting the Handsfree speaker volume
- Setting the On-hook monitoring volume
- Muting the handset or headset
- To mute your handset or headset:
- Handsfree Calling (Handsfree mode only)
- To answer a call using Handsfree:
- To use Handsfree during your call:
- To mute your microphone while on a Handsfree call:
- Display features
- Setting up local features
- Save, Memory, and Pause
- Save, Memory, and Pause (continued)
- Alerter Volume
- To adjust the alerter volume:
- Time and Date
- To set the time and date on your M6320:
- To select the time and date display format:
- Call Timer
- To enable the Call Timer:
- Display Language
- To select the language used to show information on the display:
- C.O.(Network) Features
- To enable/disable C.O. (Network) Features in place of the Save, Memory, and Pause keys:
- Predial
- To enable/disable the Predial feature:
- To make a call when Predial has been enabled:
- Save Number
- To save the number for the current call:
- To make a call using the number you saved:
- Memory Number
- To program a number into memory:
- To make a call using Memory Number:
- Pause
- To insert a pause into the dial string:
- Mode Selection
- To select the mode of operation:
- Message Waiting
- To program the message waiting key:
- Quick ways to make calls
- Automatic Dial
- To program an Automatic Dial key:
- To erase an Automatic Dial key:
- To make a call using an Automatic Dial key:
- Automatic Line
- To use an Automatic Line key:
- Intercom Calls
- Answering an Intercom call
- Telephone not in use
- Telephone in use
- Making an Intercom call:
- Ending an Intercom call
- Intercom Group
- Making a call within your Intercom Group:
- Answering an Intercom Group call
- Quick ways to make calls: continued
- Last Number Redial
- To call using Last Number Redial:
- Speed Call
- To program a Speed Call number:
- To erase a programmed Speed Call number:
- To make a call using Speed Call:
- How to avoid missing a call
- Call Forward
- To set Call Forward:
- To cancel Call Forward:
- Call Waiting
- To answer your second call:
- To return to your original call:
- How to avoid missing a call: continued
- Call Pickup
- To pickup a call ringing at another telephone in your pickup group:
- To retrieve your messages:
- Leave Message
- To leave a call request:
- When you can't reach someone
- Override
- To bridge into a two-way call within your system:
- Ring again
- To use Ring Again:
- To cancel a Ring Again request:
- Ways to transfer or share calls
- Conference
- To add a person to a call:
- To add an incoming call to the conference:
- To end the conference call:
- Ways to transfer or share calls: continued
- Call Park
- To park a call:
- Privacy Release
- To temporarily release Privacy while on a call:
- To make your call private again:
- Transfer
- To transfer a call directly to another telephone:
- To transfer a call by establishing a conference:
- Controlling your telephone line
- Make Busy
- To make your telephone appear busy:
- To cancel Make Busy:
- Privacy
- To make your current call private:
- To remove the privacy status from your call:
- Agent Features
- Logging in
- To log in:
- Logging out
- Answering ACD calls
- Agent Features: continued
- Putting an ACD call on hold
- Calling your supervisor
- To call your supervisor while active on an ACD call:
- Line of Business key
- Emergency calls
- Not Ready key
- Displaying the queue threshold
- Displaying the queue threshold (continued)
- Supervisor features
- Interpreting agent indicators
- Displaying the status of an ACD queue
- Displaying the status of an ACD queue (continued)
- Displaying a summary of agent activity
- Observing agents
- To monitor a conversation between an agent and a caller:
- To participate in the call:
- To switch back to the ACD call:
- Supervisor Features: continued
- Calling an agent
- Answering agent calls
- Answering emergency calls
- Night Service
- To activate Night Service:
- To turn off the feature:
- Controlled Interflow
- To activate the Controlled Interflow feature:
- To turn off the re-routing feature:
- Supervisors as agents
- Connecting your M6320
- To connect your M6320 to the telephone wall jack and AC power:
- Wall mounting the M6320
- To mount the M6320 on the wall:
- Approval Requirements
- Permitted Connections
- Non-permitted Connections
- Power Failure
- Safety Requirements
- Power Supply
- Caution Hazardous Voltages
Brand : AASTRA
Model : Meridian M6320
Category : Telephone