XPress - Wi-Fi repeater Digi - Free user manual and instructions
Find the device manual for free XPress Digi in PDF.


| Brand | Digi |
| Model | XPress |
| Product Type | Wi-Fi Repeater / Extender |
| Wireless Standard | IEEE 802.11ac (Wi-Fi 5) |
| Frequency Bands | 2.4 GHz (up to 300 Mbps) + 5 GHz (up to 867 Mbps) |
| Max Speed | Up to 1200 Mbps (combined) |
| Ports | 1x Gigabit Ethernet (RJ-45) |
| Buttons | WPS / Reset |
| LED Indicators | Power, WPS, Signal Strength |
| Antenna Type | Internal dual-band antennas |
| Power Input | 100-240V AC, 50-60 Hz (via wall plug) |
| Dimensions (W x D x H) | Approx. 70 x 50 x 30 mm |
| Weight | Approx. 80 g |
| Security | WPA/WPA2-PSK, WEP |
| Operation Modes | Repeater mode, Access Point mode (via settings) |
| Installation | Plug and play with WPS button or web-based setup |
| Compatible Routers | Any standard 802.11 b/g/n/ac router |
| Temperature Range | 0°C to 40°C (operating) |
| Humidity | 10% to 80% non-condensing |
| Certifications | CE, FCC, RoHS |
| Package Contents | XPress repeater, quick start guide, warranty card |
Frequently Asked Questions - XPress Digi
User questions about XPress Digi
0 question about this device. Answer the ones you know or ask your own.
Ask a new question about this device
Download the instructions for your Wi-Fi repeater in PDF format for free! Find your manual XPress - Digi and take your electronic device back in hand. On this page are published all the documents necessary for the use of your device. XPress by Digi.
USER MANUAL XPress Digi
XPress™ Ethernet Bridge User's Manual
©2011 Digi International Inc.
Printed in the United States of America. All rights reserved.
Digi, Digi International, the Digi logo, a Digi International Company, XPress, are trademarks or registered trademarks of Digi International, Inc. in the United States and other countries worldwide. All other trademarks are the property of their respective owners.
Information in this document is subject to change without notice and does not represent a commitment on the part of Digi International.
Digi provides this document “as is,” without warranty of any kind, either expressed or implied, including, but not limited to, the implied warranties of, fitness or merchantability for a particular purpose. Digi may make improvements and/or changes in this manual or in the product(s) and/or the program(s) described in this manual at any time.
This product could include technical inaccuracies or typographical errors. Changes are made periodically to the information herein; these changes may be incorporated in new editions of the publication.
Table of Contents
About This Guide ....4
Digi Contact Information ....4
Summary and Specifications .... 5
Summary 5
Physical Dimentions ....7
900 MHz Channels 8
Setup and Initialization 9
Setup 9
Digital Setup 9
FCC Certification ....14
Appendix A: Additional Information 15
1-Year Warranty ....15
Thank you for your purchase of the XPress™ Ethernet Bridge.
If you have purchased a single XEB, you will recieve the following:
- One XEB RF Modem (“-W” = International variant)
• One 2.1 dBi Weatherproof Dipole Antenna
• One 12 VDC Power Supply
• One Power over Ethernet (PoE) injector
If you have purchased a pair of XEBs, you will receive two of each item.
If you have any questions when configuring your Digi product, please visit www.digi.com/support. If further assistance is needed, send an e-mail to support@digi.com. To speak to a live technician, please call technical support at the number listed below, during normal business hours.
Digi Contact Information
To contact Digi International for more information about your Digi products, or for customer service and technical support, use the following contact information:
| To Contact Digi International by: Use: | |
| Mail Digi International | 11001 Bren Road East Minnetonka, MN 55343 U.S.A. |
| World Wide Web: http://www.digi.com/support/ | |
| Email rf-experts@digi.com | |
| Telephone (U.S.) (952) 912-3444 or (877) | 912-3444 |
| Telephone (other locations) +1 (952) 912-3444 or (877) 912-3444 | |
Note: This document contains information on the XEB functionality only. If you have purchased an XEB with XPress™ Crypto Module, please refer to the XPress™ Crypto Module User's Guide for more information.
Summary
The XPress™ Ethernet Bridge allows the user to create a long-range, wireless Ethernet network with up to 16 active (63 total) subscriber units per access point.
Configuring a wireless link with the XEB requires the establishment of six elements:
• Each radio must know whether it is to be an access point (AP) or subscriber unit (SU)
- Each radio must have an IP address that is unique among all others on the same network
- The AP must know how many SUs are expecting communication with it
- The AP and any given SU must agree on which radio frequency channel they are using. This can be set manually or allowed to change automatically.
- The SU must be assigned a unique subscriber ID to specify which time division slot it will use when communication with the AP
- The AP and any given SU must share a common 128-bit encryption key
The access point (AP) automatically scans for the best of the 12 available radio frequency channels, encrypts Ethernet data received from the network, and transmits it wirelessly to the correct subscriber unit (SU). The AP is constantly monitoring the radio link and can automatically change the channel if performance is degraded due to interference. If two AP units are very close to one another, they may interfere if operating on adjacent frequency channels. Place them at least 10 feet apart or manually select non-adjacent channels for their operation. Also, the SU should be placed at least 10 feet from the AP to avoid overloading the radio's receiver.
Any 10/100 BaseT Ethernet client device (ECD) can be connected to an XPress™ subscriber unit. Each SU encrypts Ethernet traffic received from the attached ECD and transmits the data wirelessly to its AP. Each SU can be plugged directly into an ECD without adding drivers or loading software. Essentially, once the AP/SU pair is configured and running, it behaves like a continuous Ethernet cable.
XPress™ Ethernet Bridge Specifications
| Characteristic Specification/Description | |
| RF Transmission Rate 1.536 Mbps | |
| Ethernet Throughput 935 Kbps | |
| Output Power +21 dBm (125 mW), (4 W EIRP with 15 dBi antenna) | |
| Receiver Sensitivity | -97 dBm at 10^-4 bit error rate |
| Range Up to 1000 ft (300 m) indoor with 2.1 dBi dipole antennasUp to 2 miles (3.2 km) outdoor line of sight with 2.1 dBi dipole antennasUp to 15 miles (24 km) outdoor line of sight with high-gain antennas | |
| Radio Channels / Bandwidth | 12 channels (6 in international version) with 2.0833 MHz spacing and 1.75 MHz occupied bandwidth |
| Manual Frequency Select Channel selected with dipswitch or via web browser interface | |
| Connector Types RF RPTNC female / Ethernet RJ-45 / Power Jack P5-2.1 mm center positive | |
| Status LEDs Power, Ethernet Link, RF RX, RF TX, 4/Channel and 6/Link Quality | |
| Error Correction Technique | Sub-block error detection and retransmission |
| Adjacent Band Rejection | SAW receiver filter attenuates cellular interference |
| Regulator Type Switching regulator | |
| Browser Management Tools | QoS Statistics, Network Settings, Spectrum Analyzer and Firmware Upgrading |
| Power Consumption | Transmit: 1.7 W Receive: 0.8 W |
| Voltage | Power over Ethernet 9-48 VDC pins 4/5 positive and 7/8 ground |
| Temperature Range | Radio/Enclosure: -40 C to 70 C; PoE Injector: -40 C to 85 C; Power Supply: 0 C to 40 C |
| Transmit Current Draw | 175 mA @ 9 VDC; 140 mA @ 12 VDC; 35 mA @ 48 VDC |
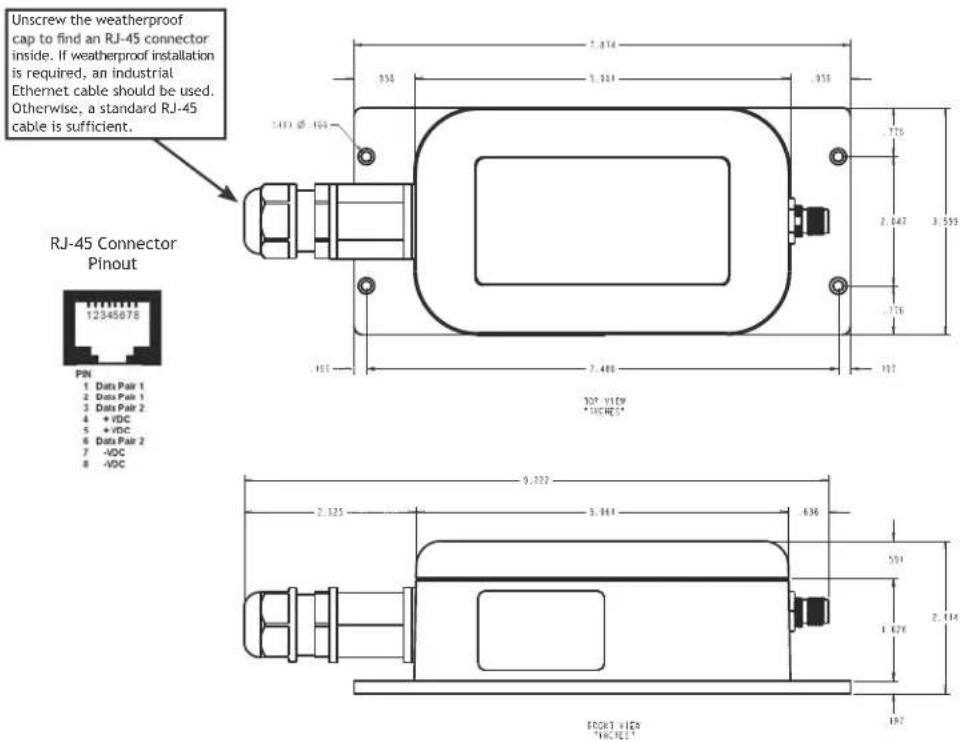
| Size | 9.22" L x 3.60" W x 2.19" H; 320 grams |
| Weatherproofing | The XPressTM enclosure is IP65 rated and tested for weatherproof installation. The PoE injector and power supply are not weatherproof and should be installed indoors. |
| Certifications and Compliance | FCC Part 15; Industry Canada (IC); contains FCC ID: R4N-AW900MR and IC: 5305A-AW900MR; UL 60950-1; CSA C22.2, No. 60950-1, E112790; RoHS |
Physical Dimentions
900 MHz Channels
| Channel US/Canada International Center Frequency | ||
| 0 x x Auto Mode | ||
| 1 x 903.12500 MHz | ||
| 2 x 905.20833 MHz | ||
| 3 x 907.29167 MHz | ||
| 4 x 909.37500 MHz | ||
| 5 x 911.45833 MHz | ||
| 6 x 913.54167 MHz | ||
| 7 x x 915.62500 MHz | ||
| 8 x x 917.70833 MHz | ||
| 9 x x 919.79167 MHz | ||
| 10 x x 921.87500 MHz | ||
| 11 x x 923.95833 MHz | ||
| 12 x x 926.04167 MHz | ||
Setup
- Consult IT - Each XPress™ radio comes default with a static IP address of 192.168.17.17. Digi recommends connecting each radio to a standalone computer disconnected from any shared network, and consulting with your IT department before connecting them to any shared network.
- Install hardware - If the device is to be used outdoors, mount it vertically with the antenna facing up. This orientation will mitigate any environmental effects and allow drainage. Attach the antenna to the XPress™ radio. Antenna installation is required to maintain device sealing. Attach the Ethernet cable (straight or cross-over) between the XPress™ radio and the "DATA + PWR" jack on the PoE injector. In order to maintain the seal around the Ethernet cable, the Ethernet gland cap should be firmly tightened.
- Configure radios* - Use either the Digital Setup method as shown below, or use the old DIP switch method (see Page 3 of the 90000888 manual at www.digi.com).
Note: XEB09-CIPA(-W) radios come pre-configured as a paired set. No configuration is required.
Digital Setup
- Digital configuration is done by means of the XPress™ built-in browser interface. It should be powered on and connected at least temporarily to a network containing a computer that can run a conventional web browser.
- Download the Digi IP Discovery Utility from our website at: www.digi.com/products/wireless/xpress.jsp#docs.
Note: This utility only runs on MS Windows, not linux or Mac. If you must use a non-Windows computer for configuration, make sure your subnet mask allows your computer to see 192.168.17.17. Connect to that default IP address with your web browser, continuing the setup procedure with step 6.
- Run the IP Discovery Utility, changer_DIGI.exe and you should see a window similar to this:
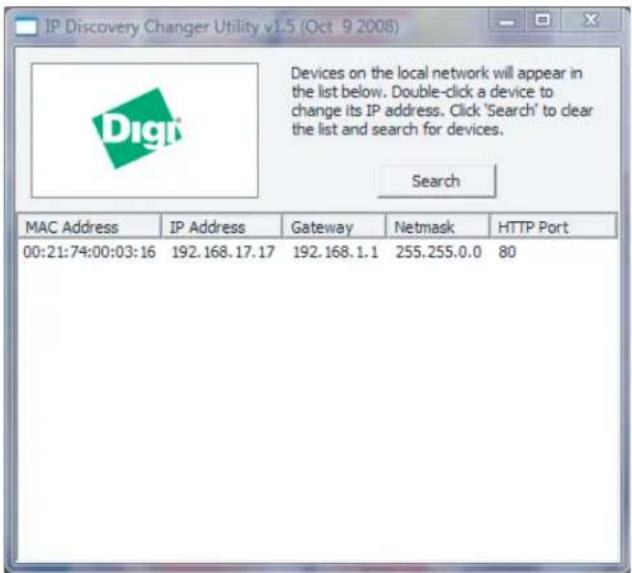
The XPress™ should appear in the list at the default IP address of 192.168.17.17. If it does not, click "Search" to regenerate the list. If it still does not appear, you have a connection issue and need to re-examine the cabling or you may have a firewall issue on your computer.
- Double-click the list item that refers to the XPress™ being configured. You should see a second window that is similar to the following picture:
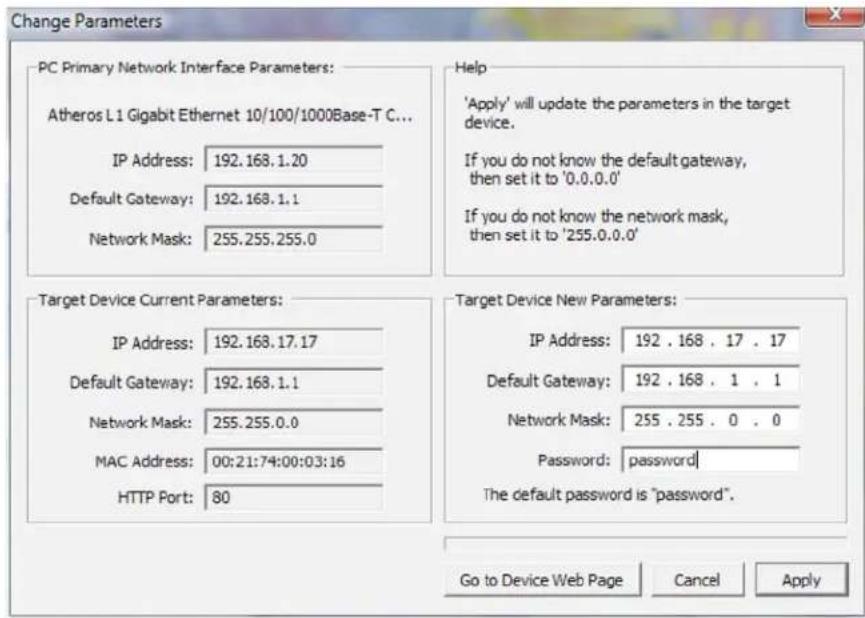
This information is the current status of the radio, while the boxes on the right allow you to change it. It is important that the IP address of the XPress ^™ is in the same subnet as your computer. For example, if the
subnet mask is 255.255.255.0 (a class C network), the first three number groups of the IP address must match. Choose your desired parameters and click "Apply".
- Make note of the chosen IP address and password, then click "Go to Device Web Page". This will cause your default web browser to launch with the device IP address in the browser address bar. You may also launch the the browser on your own and enter the web page address manually.
- The browser page that loads first shows the current device information and QoS statistics and provides a login at the upper right. Log in using the password you just specified (or "password" if you kept the default). If the login succeeds, you will see an admin page similar to this:
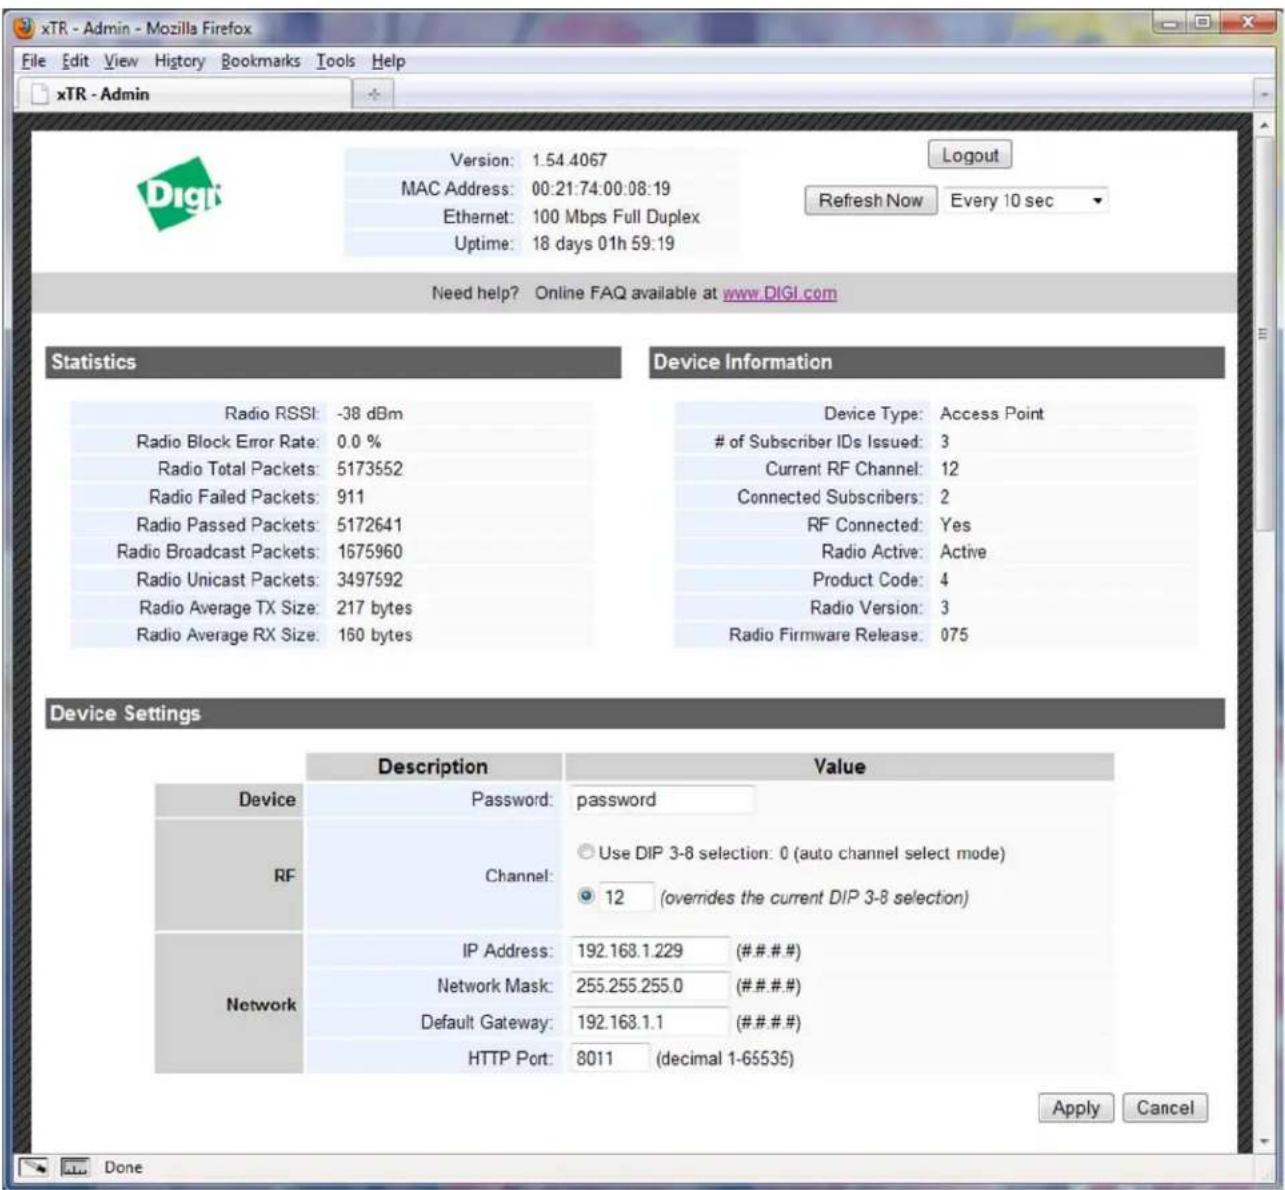
- The admin page has sections similar to the login page showing radio statistics and device information, plus it adds several new sections. The Device Setting section allows setting the network information and choosing an RF frequency channel. The default is to allow the radio to choose its own frequency based on minimizing interference. If you set a fixed channel, make sure the AP and all SUs use the same one. References to DIPs refer to switches inside the radio that are used in the legacy method of configuration and may be ignored when using the browser method.
If you scroll down in the admin browser page, you will come to three more sections:
- A graphical spectrum analyzer display that may help you to select radio channels that avoid interference
- A section to be used if an update to the XPress™ firmware is required. Note that there are two possible firmware loads for this unit, one for compatibility with older XPress™ Ethernet Bridge Multipoint radios (XEB09-Bxxx), and and international version that limits the frequency band to 915-928 MHz (channels 7 through 12). The latest firmware is found online at ftp://ftp1.digi.com/support/firmware/update/xpress. To change firmware download the desired .bin and .webbin files, and click “Upload Firmware” to install the files one at a time. Please note that we recommend contacting technical support before changing firmware.
- An Advanced Links section, which indicates that it should only be used by advanced users
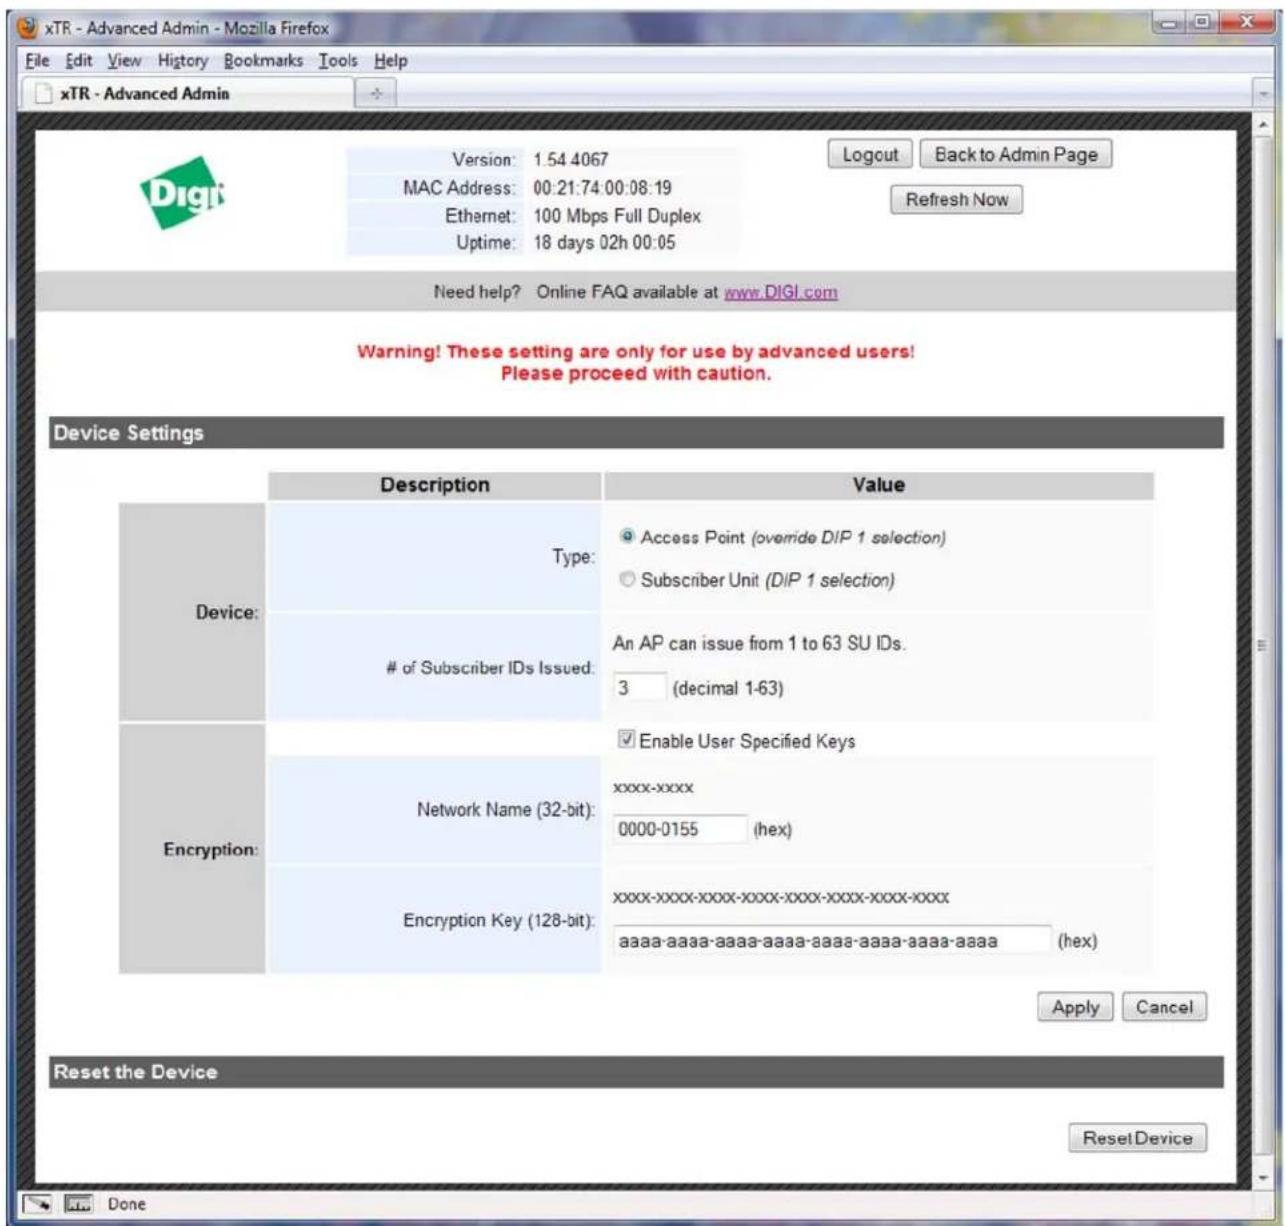
Despite this warning, you will need to click the "Advanced Admin" button in order to set the device type, ID and encryption key. You should then see a page similar to the following:
-
On the Advanced Admin page, set the parameters as follows:
-
Choose Device Type: Access Point or Subscriber Unit
- For Subscriber Units, assign unique ID numbers in numeric order from 1 to 63
- For an Access Point, enter the numbers of Subscriber Units that will be communicating with it
- Click the box labeled "Enable User Specified Keys"
- Choose an 8-digit hex (0-9 and A-F) Network Name that will be common among the AP and its SUs and enter. The hyphen is required. - Choose a 32-digit hex encryption key and enter it. Again, the hyphens are required. This key must match between the AP and the SU so make a note of it as well.
After entering the parameters, click the "Apply" button to save them to the radio.
- When all of the radios are keyed and operating, connect them to your network and Ethernet devices as desired and cycle the radio's power to begin normal operation. Now, browser management of the SUs can be performed over the wireless network. Note: avoid plugging actively linked radios into the same switch because this will corrupt its routing table and may cause network problems just as if you had plugged a CAT5 cable directly between two ports of a switch.
FCC Certification
The XPress™ Ethernet Bridge complies with Part 15 of the FCC rules and regulations. Compliance with labeling requirements, FCC notices and antenna regulations is required.
IMPORTANT: The XPress™ Ethernet Bridge has been certified by the FCC for use with other products without any further certification (as per FCC section 2.1091). Changes or modifications not expressly approved by Digi International could void the user's authority to operate the equipment.
IMPORTANT: The XPress™ Ethernet Bridge has been certified for fixed base station and mobile applications. If modules will be used for portable applications, the device must undergo SAR testing.
ANTENNAE: The XPress™ Ethernet Bridge is approved for use with the following Digi weatherproof antennae: A09-HTM-675 (2.1 dBi dipole RPTNC male), A09-Y10TM-P10I (10 dBi Yagi RPTNC male), A09-Y15TM-P10I (15 dBi Yagi RPTNC male), A09-Y8NF (8.1 dBi Yagi N female), A09-Y11NF (11.1 dBi Yagi N female), A09-Y15NF (15.1 dBi Yagi N female).
Appendix A: Additional Information
1-Year Warranty
The XPress™ Ethernet Bridge from Digi International, Inc. (the "Product") is warranted against defects in materials and workmanship under normal use, for a period of 1-year from the date of purchase. In the event of a product failure due to materials or workmanship, Digi will repair or replace the defective product. For warranty service, return the defective product to Digi, shipping prepaid, for prompt repair or replacement.
The foregoing sets forth the full extent of Digi's warranties regarding the Product. Repair or replacement at Digi's option is the exclusive remedy. THIS WARRANTY IS GIVEN IN LIEU OF ALL OTHER WARRANTIES, EXPRESS OR IMPLIED, AND DIGI SPECIFICALLY DISCLAIMS ALL WARRANTIES OF MERCHANTABILITY OR FITNESS FOR A PARTICULAR PURPOSE. IN NO EVENT SHALL DIGI, ITS SUPPLIERS OR LICENSORS BE LIABLE FOR DAMAGES IN EXCESS OF THE PURCHASE PRICE OF THE PRODUCT, FOR ANY LOSS OF USE, LOSS OF TIME, INCONVENIENCE, COMMERCIAL LOSS, LOST PROFITS OR SAVINGS, OR OTHER INCIDENTAL, SPECIAL OR CONSEQUENTIAL DAMAGES ARISING OUT OF THE USE OR INABILITY TO USE THE PRODUCT, TO THE FULL EXTENT SUCH MAY BE DISCLAIMED BY LAW. SOME STATES DO NOT ALLOW THE EXCLUSION OR LIMITATION OF INCIDENTAL OR CONSEQUENTIAL DAMAGES. THEREFORE, THE FOREGOING EXCLUSIONS MAY NOT APPLY IN ALL CASES.
This warranty provides specific legal rights. Other rights which vary from state to state may also apply.


(1P):90001146-88 E
- XPress™ Ethernet Bridge User's Manual
- Table of Contents
- About This Guide ....4
- Summary and Specifications .... 5
- Setup and Initialization 9
- Appendix A: Additional Information 15
- Digi Contact Information
- Summary
- Physical Dimentions
- MHz Channels
- Setup
- Digital Setup
- of Subscriber IDs Issued: 3
- of Subscriber IDs Issued:
- FCC Certification
- Appendix A: Additional Information
- 1-Year Warranty
Brand : Digi
Model : XPress
Category : Wi-Fi repeater