
PRO-1140HD - Television PIONEER - Free user manual and instructions
Find the device manual for free PRO-1140HD PIONEER in PDF.


| Product Type | Plasma Display System |
| Model | PRO-1140HD |
| Display Size (Diagonal) | 50 inches |
| Native Resolution | 1365 × 768 pixels |
| Audio Amplifier Output | 13 W + 13 W (1 kHz, 10 %, 8 Ω) |
| Surround System | SRS FOCUS / TruBass |
| Weight (Main Unit) | 34.3 kg (75.7 lbs) |
| Power Requirement | 120 V AC, 60 Hz, 355 W (26 W Standby) |
| Dimensions (W × H × D) | See manual for exact dimensions; approximately 1227 × 736 × 115 mm |
| Digital Tuner | ATSC (8VSB/64QAM/256QAM) with CableCARD slot |
| Analog Tuner | NTSC, VHF/UHF/CATV |
| HDMI Inputs | 2 (INPUT 5 & 6, conforms to HDMI 1.1, HDCP 1.1) |
| Component Video Inputs | 3 (INPUT 2, 3, 4) |
| PC Input | 1 (Analog RGB, D-sub 15 pin) |
| USB Port | 1 (Side, USB 1.1/2.0) |
| Network Connectivity | Ethernet (RJ-45) for DLNA and Home Media Gallery |
| Special Features | PureCinema, TV Guide On Screen, Home Media Gallery (DLNA), G-LINK, Color Management, 3DYC, I-P Mode |
| Energy Saving | Energy Save mode, No Signal/No Operation auto-off |
| Parental Control | V-Chip with TV, MPAA, and Canadian rating systems |
| Screen Cleaning | Use supplied cleaning cloth or soft dry cloth; do not use liquid cleaners |
| Ventilation Requirements | Leave adequate space around unit; do not block vents |
| Safety Features | Grounding plug, automatic power-off if overheated, anti-tip stabilization |
Frequently Asked Questions - PRO-1140HD PIONEER
User questions about PRO-1140HD PIONEER
0 question about this device. Answer the ones you know or ask your own.
Ask a new question about this device
Download the instructions for your Television in PDF format for free! Find your manual PRO-1140HD - PIONEER and take your electronic device back in hand. On this page are published all the documents necessary for the use of your device. PRO-1140HD by PIONEER.
USER MANUAL PRO-1140HD PIONEER
Pioneer sound.vision.soul
PLASMA DISPLAY SYSTEM
PRO-1140HD
PRO-940HD
ELITE
Register Your Product on
www.pioneerelectronics.com (US)
www.pioneerelectronics.ca (Canada)
Operating Instructions


dlna™
CERTIFIED

DOLBY

(○)®
WOW

OMI ^TM

IMPORTANT

The lightning flash with arrowhead symbol, within an equilateral triangle, is intended to alert the user to the presence of uninsulated, 'dangerous voltage' within the product's enclosure that may be of sufficient magnitude to constitute a risk of electric shock to persons.
CAUTION
RISK OF ELECTRIC SHOCK DO NOT OPEN
CAUTION: TO PREVENT THE RISK OF ELECTRIC SHOCK, DO NOT REMOVE COVER (OR BACK). NO USER-SERVICEABLE PARTS INSIDE. REFER SERVICING TO QUALIFIED SERVICE PERSONNEL.

The exclamation point within an equilateral triangle is intended to alert the user to the presence of important operating and maintenance (servicing) instructions in the literature accompanying the appliance.
IMPORTANT SAFETY INSTRUCTIONS
1) Read these instructions.
2) Keep these instructions.
3) Heed all warnings.
4) Follow all instructions.
5) Do not use this apparatus near water.
6) Clean only with dry cloth.
7) Do not block any ventilation openings. Install in accordance with the manufacturer's instructions.
8) Do not install near any heat sources such as radiators, heat registers, stoves, or other apparatus (including amplifiers) that produce heat.
9) Do not defeat the safety purpose of the polarized or grounding-type plug. A polarized plug has two blades with one wider than the other. A grounding type plug has two blades and a third grounding prong. The wide blade or the third prong are provided for your safety. If the provided plug does not fit into your outlet, consult an electrician for replacement of the obsolete outlet.
10) Protect the power cord from being walked on or pinched particularly at plugs, convenience receptacles, and the point where they exit from the apparatus.
11) Only use attachments/accessories specified by the manufacturer.
12) Use only with the cart, stand, tripod, bracket, or table specified by the manufacturer, or sold with the apparatus. When a cart is used, use caution when moving the cart/apparatus combination to avoid injury from tip-over.

13) Unplug this apparatus during lightning storms or when unused for long periods of time.
14) Refer all servicing to qualified service personnel. Servicing is required when the apparatus has been damaged in any way, such as power-supply cord or plug is damaged, liquid has been spilled or objects have fallen into the apparatus, the apparatus has been exposed to rain or moisture, does not operate normally, or has been dropped.
NOTE TO CATV SYSTEM INSTALLER
THIS REMINDER IS PROVIDED TO CALL THE CATV SYSTEM INSTALLER'S ATTENTION TO ARTICLE 820-40 OF THE NEC THAT PROVIDES GUIDELINES FOR PROPER GROUNDING AND, IN PARTICULAR, SPECIFIES THAT THE CABLE GROUND SHALL BE CONNECTED TO THE GROUNDING SYSTEM OF THE BUILDING, AS CLOSE TO THE POINT OF CABLE ENTRY AS PRACTICAL. D1-4-2-8_En
WARNING: This product equipped with a three-wire grounding (earthed) plug - a plug that has a third (grounding) pin. This plug only fits a grounding-type power outlet. If you are unable to insert the plug into an outlet, contact a licensed electrician to replace the outlet with a properly grounded one. Do not defeat the safety purpose of the grounding plug D3-4-2-1-6_A_En
WARNING: To prevent a fire hazard, do not place any naked flame sources (such as a lighted candle) on the equipment. D3-4-2-1-7a_A_En
This digital television is capable of receiving analog basic, digital basic and digital premium cable television programming by direct connection to a cable system providing such programming. A security card provided by your cable operator is required to view encrypted digital programming. Certain advanced and interactive digital cable services such as video-on-demand, a cable operator's enhanced program guide and data-enhanced television services may require the use of a set-top box. For more information call your local cable operator.
VENTILATION CAUTION:
When installing this unit, make sure to leave around the unit for ventilation to improve heat radiation. For the minimum space required, see page 18.
pace
WARNING: Slots and openings in the cabinet are provided for ventilation to ensure reliable operation of the product, and to protect it from overheating. To prevent fire hazard, the openings should never be blocked or covered with items (such as newspapers, table-cloths, curtains) or by operating the equipment on thick carpet or a bed.
WARNING: THE APPARATUS IS NOT WATERPROOFS, TO PREVENT FIRE OR SHOCK HAZARD, DO NOT EXPOSE THIS APPLIANCE TO RAIN OR MOISTURE AND DO NOT PUT ANY WATER SOURCE NEAR THIS APPARATUS, SUCH AS VASE, FLOWER POT, COSMETICS CONTAINER AND MEDICINE BOTTLE ETC.
WARNING: Handling the cord on this product or cords associated with accessories sold with the product will expose you to lead, a chemical known to the State of California and other governmental entities to cause cancer and birth defects or other reproductive harm. Wash hands after handling.
Information to User
Alteration or modifications carried out without appropriate authorization may invalidate the user's right to operate the equipment.
[For Canadian model]
This Class B digital apparatus complies with Canadian ICES-003.
FEDERAL COMMUNICATIONS COMMISSION DECLARATION OF CONFORMITY
This device complies with part 15 of the FCC Rules. Operation is subject to the following two conditions: (1) This device may not cause harmful interference, and (2) this device must accept any interference received, including interference that may cause undesired operation.
Product Name: Plasma Display System
Model Number: PRO-1140HD/PRO-940HD
Product Category: Class B Personal Computers & Peripherals
Responsible Party Name: PIONEER ELECTRONICS SERVICE, INC.
Address: 1925 E. DOMINGUEZ ST. LONG BEACH, CA 90801-1760, U.S.A.
Phone: 800-421-1625
For Business Customer URL
http://www.PioneerUSA.com
NOTE: This equipment has been tested and found to comply with the limits for a Class B digital device, pursuant to Part 15 of the FCC Rules. These limits are designed to provide reasonable protection against harmful interference in a residential installation.
This equipment generates, uses, and can radiate radio frequency energy and, if not installed and used in accordance with the instructions, may cause harmful interference to radio communications. However, there is no guarantee that interference will not occur in a particular installation. If this equipment does cause harmful interference to radio or television reception, which can be determined by turning the equipment off and on, the user is encouraged to try to correct the interference by one or more of the following measures:
– Reorient or relocate the receiving antenna.
– Increase the separation between the equipment and receiver.
- Connect the equipment into an outlet on a circuit different from that to which the receiver is connected.
- Consult the dealer or an experienced radio/TV technician for help.
D8-10-1-2_En
CAUTION: This product satisfies FCC regulations when shielded cables and connectors are used to connect the unit to other equipment. To prevent electromagnetic interference with electric appliances such as radios and televisions, use shielded cables and connectors for connections. D8-10-3a_En
IMPORTANT NOTICE – THE SERIAL NUMBER FOR THIS EQUIPMENT IS LOCATED IN THE REAR. PLEASE WRITE THIS SERIAL NUMBER ON YOUR ENCLOSED WARRANTY CARD AND KEEP IN A SECURE AREA. THIS IS FOR YOUR SECURITY. D1-4-2-6-1_En
CAUTION: The power switch does not completely separate the unit from the mains in off position. Therefore install the unit suitable places easy to disconnect the mains plug in case of the accident. The mains plug of unit should be unplugged from the wall socket when left unused for a long period of time.
STANDBY: When placed into the standby mode, the main power flow is cut and the unit is no longer fully operational.
STANDBY/ON Indicator: The indicator is lit red when the unit is in the standby mode and lit blue when it is in the power-on mode. No operation can be performed when the indicator is off. However, the Plasma Display System will still consume some power as long as the power cord is inserted into the power outlet.
CAUTION: Operating Environment
Operating environment temperature and humidity: +0^ to +40^ (+32^ to +104^) , less than 85% RH (cooling vents not blocked) Do not install this unit in a poorly ventilated area, or in locations exposed to high humidity or direct sunlight (or strong artificial light)
Contents
Thank you for buying this Pioneer product.
Please read through these operating instructions so you will know how to operate your model properly. After you have finished reading the instructions, put them away in a safe place for future reference. In some countries or regions, the shape of the power plug and power outlet may sometimes differ from that shown in the explanatory drawings. However the method of connecting and operating the unit is the same.
Illustrations shown in this manual are for the PRO-1140HD unless otherwise specified.
01 Important User Guidance Information
02 Safety Precautions
03 Supplied Accessories
04 Part Names
Plasma Display 13
Remote control unit 17
05 Preparation
Installing the Plasma Display 18
Moving the Plasma Display .....18
Preventing the Plasma Display from Falling
Over 19
Attaching/detaching the PIONEER stand (for PRO-940HD only) 20
Cable connections for watching digital and/or conventional TV channels ....21
Connecting VHF/UHF antennas and a Cable 21
Inserting the CableCARD ^TM .....21
Switching between antenna A and B .....21
Preparing the remote control unit .....22 Inserting batteries .....22
Cautions regarding batteries .....22
Allowed operation range of the remote control unit ....22
Cautions regarding the remote control unit 22
Connecting the power cord ....23
Routing cables 23
06 Basic Operations
Turning on the power 24
Turning off the power 24
Watching TV channels 25
Selecting the antenna 25
Changing channels 25
Changing the volume and sound .....26
Changing the language 26
Setting MTS/SAP mode 27
Viewing a channel banner ......28
Using the POD service 28
Using the multiscreen functions 28
Splitting the screen 28
Freezing images 29
07 TV Guide On Screen™ System Setup
About the TV Guide On Screen™ system 30
Setting up the TV Guide On Screen ^™ system 30
08 Menu Setup
Menu Configuration 34
AV mode menus 34
PC mode menus 34
Menu operations 34
09 Tuner Setup
Setting up TV channels 35
Using Auto Channel Preset 35
Setting for skipping unwanted channels 35
Setting up TV channels manually ..... 35
Checking signal strength 35
Checking the CableCARD ID 36
Parental Control 36
Changing the password 36
Clearing the password 37
Activating the Parental Control ...... 37
Setting the voluntary movie rating system (MPAA) 37
Setting the TV ratings 37
Setting the TV Parental Guidelines (TV Guidelines) 38
Blocking Not Rated TV programs ..... 38
Canadian rating systems 38
Setting Canadian English ratings ..... 39
Setting Canadian French ratings ..... 39
Setting new ratings 39
Deleting new ratings 40
Temporarily deactivating the Parental Control 40
Setting your favorite channels 41
Contents
Setting up closed captions 41
Activating the closed caption ..... 41
Selecting the type of conventional closed captions 41
Selecting digital closed captions ..... 42
Selecting digital closed caption parameters 42
Clock Setting 42
10 TV Guide On Screen™ System Operation
Using the TV Guide On Screen™
system 44
Screen components 44
TV Guide On Screen™ icons 44
TV Guide On Screen™ navigation ..... 45
The Listings screen 45
Recording programs 46
Setting program reminders 47
Searching for programs 49
Searching by category 49
Searching by keyword 50
Alphabetical search 51
The search Episode Options menu ..... 51
Scheduling recordings and reminders ... 52
The Schedule Options menu 52
Changing setup options 53
Changing the System Settings ..... 53
Changing the Channel Display settings 53
Changing the Default Options .... 54
11 Adjustments and Settings
Sleep Timer 55
AV Selection 55
Basic picture adjustments 56
Advanced picture adjustments ..... 57
Using PureCinema 57
Using Color Temp 57
Using CTI 58
Using Color Management 58
Using Color Space 58
Using Intelligent Color 58
Eliminating noise from images 59
Using the Dynamic Range Expander (DRE) functions 59
Using the 3DYC and I-P Mode 60
Sound adjustments 60
FOCUS 61
Front Surround 61
Power Control 61
Energy Save 61
No Signal off (AV mode only) 61
No Operation off (AV mode only) ...... 62
Power Management (PC mode only) 62
Image position adjustment
(AV mode only) 62
Automatic image position and clock
(Hertz) adjustments (PC mode only) ..... 62
Manual image position and clock adjustments (PC mode only) 63
Selecting a screen size manually 63
Selecting a screen size automatically ..... 64
Selecting a screen size for 4:3 aspect ratio signals 64
Changing the brightness on both sides of the screen (Side Mask) 65
Language setting 65
12 Using External Equipment
About External Equipment 66
Watching a DVD image 66
Connecting a DVD player 66
Displaying a DVD image 66
Watching a VCR image 66
Connecting a VCR 66
Displaying a VCR image 66
Using HDMI Input 67
Connecting HDMI equipment 67
Using a game console or watching
camcorder images 68
Connecting a game console or camcorder 68
Displaying an image of the game console or camcorder 68
Recording digital TV programs using
a VCR 68
Avoiding unwanted feedback 68
Connecting a recorder 69
Connecting other audio equipment ...... 69
Connecting an AV receiver 69
Watching an image from a computer ..... 70
Connecting a personal computer ..... 70
Displaying an image from a PC 70
Computer compatibility chart 71
G-LINK™ connection 71
Connecting control cables 72
About SR+ 72
Contents
Enjoying the Home Media Gallery .....73
Making network connections .....74
Connecting a USB device 74
Starting the Home Media Gallery
function 75
Enjoying movie files 77
Enjoying music files 80
Enjoying photo files 81
Other useful functions 84
Glossary 89
13 Useful Remote Control Features
Learning function of the remote
control unit 90
Using the learning function .....90
Presetting manufacturer codes to
control other devices 90
Presetting manufacturer codes .....90
Library Search 90
Delete Learning 90
Manufacturing Reset 91
Programming codes 92
CABLE 92
SATELLITE 92
VCR 93
PVR 95
DVD 95
DVD-R 96
LD 96
Using the remote control unit to control
other devices 97
Receiver control buttons .....97
CBL/SAT control buttons 98
VCR control buttons 99
DVD/DVR control buttons ....100
14 Appendix
Troubleshooting 101
Specifications ....115
In order to obtain maximum enjoyment from this Pioneer PureVision PRO-1140HD/PRO-940HD Plasma Display Panel, please first read this information carefully.
With the Pioneer PureVision PRO-1140HD/PRO-940HD, you can be assured of a high quality Plasma Display Panel with long-life and high reliability. To achieve images of exceptional quality, this Pioneer Plasma Display Panel incorporates state-of-the-art design and construction as well as precise and highly advanced technology.
The Pioneer PureVision PRO-1140HD/PRO-940HD incorporates the latest in color filter technology – Direct Color Filter. This filter technology improves color reproduction over previous models. It also eliminates the need for a glass panel to be layered in front of the plasma panel. This feature which furthers Pioneer's goal of reducing environmental waste in consumer electronics, during the manufacturing process and in the future during the recycling process.
Over the course of its lifetime, the luminosity of the Pioneer PRO-1140HD/PRO-940HD Plasma Display System will diminish very slowly, which happens to all phosphor-based screens (for example, a traditional tube-type television). To enjoy beautiful and bright images on your Pioneer Plasma Display Panel for many years to come, please carefully read and follow the usage guidelines below.
Usage guidelines
All phosphor-based screens (including conventional tube-type televisions) can be affected by static images appearing for a prolonged period. Plasma displays are no exception to this rule. After-image and permanent effects on the screen can be avoided by taking some basic precautions.
- Whenever possible, avoid showing the same image or low-motion pictures (e.g. closed-captioned images or video game images which have static portions).
- Avoid viewing the On Screen Display (OSD) for extended periods (from a DVD player, VCR, and all other components).
- Do not leave the same picture, freeze-framed or paused continuously, shown over a long period of time when using the still picture mode from a TV, VCR, DVD player or any other component.
- Images which have both very bright areas and very dark areas side by side should not be displayed for a prolonged period of time.
- When playing a video game, the "GAME" mode setting within "AV Selection" is strongly recommended. However, please do not use this mode for long periods of time.
- After playing a game, displaying a PC image, or any still image, it is best to view a normal moving picture in the "WIDE" or "FULL" screen setting for over 3 times longer than the previous still/moving image was shown.
• After using the Plasma Display System, always switch the display to Standby. - Extensive viewing of content with top, bottom, or side masks may cause uneven wear. After viewing masked content, view full screen motion video for an equal or greater amount of time.
Installation guidelines
The Pioneer PureVision PRO-1140HD/PRO-940HD Plasma Display Panel incorporates a very thin design. To ensure safety, please take the proper measures when mounting or installing the Plasma Display. Prevent the unit from tipping over during vibration or accidental movement.
This product should be installed by using only parts and accessories designed by PIONEER. Use of installation or mounting accessories other than PIONEER-approved stands or brackets may result in instability and could cause injury. For custom installation, please consult the dealer where the unit was purchased. To ensure correct installation, experienced and qualified experts must install the unit. PIONEER is not responsible for accident or damage caused by the use of parts and/or accessories manufactured by other unauthorized companies.
To avoid malfunction and overheating when installing, make sure that the vents on the main unit are not blocked. To ensure proper venting:
- Distance the unit slightly from other equipment, walls, etc. For the minimum space required around the unit, see page 18.
- Do not place the unit inside a narrow place where ventilation is poor.
- Do not cover with a cloth, etc.
- Clean the vents on the sides and rear of the unit to remove dust build-up. Use a vacuum cleaner set to its lowest suction setting to clear dust.
- Do not place the product on a carpet or blanket.
- Do not leave the product tilted at an angle without proper anchoring.
- Do not invert the product.
Using the unit without proper ventilation may cause the internal temperature to rise, and could result in possible malfunction. When the surrounding or internal temperature exceeds a certain degree, the display automatically powers OFF in order to cool the internal electronics.
Malfunction can be caused by many factors: inappropriate installation site, improper assembly/installation/mounting, improper operation of or modifications made to this product, etc. PIONEER is not responsible for accidents or malfunction caused by the above situations.

NOTE
The following points are typical effects and characteristics of a phosphor-based matrix display and as such, are not covered by the manufacturer's limited warranties:
- Permanent residual images upon the panel's phosphors.
- Existence of a small number of inactive light cells.
- Panel generated sounds (Fan motor noise, electrical circuit humming, glass panel buzzing, etc.)

CAUTION
PIONEER bears no responsibility for any damage arising from incorrect use of the product malfunctions when in use, other product related problems, and use of the product except in cases where the company must be liable.
Plasma Display protection function
When still images (such as photos and computer images) stay on the screen for an extended period of time, the screen slightly dims. This function automatically adjusts the brightness to protect the screen when a still image is detected. The screen is dimmed for approximately three minutes.
Information of pixel defect
Plasma screens display information using pixels. Pioneer plasma display panels contain a very large number of pixels. (A 42" panel has over 2.3 million pixels and a 50" panel has over 3.1 million pixels). All Pioneer plasma panels are manufactured using a very high level of ultra-precision technology and undergo individual quality control.
In rare cases, one or more pixels may remain switched Off or On. A pixel that remains Off appears as a tiny black dot on the screen while an active pixel appears as a dot of a particular color.
This effect is common to all plasma displays because it is a consequence of the technology.
If the defective pixels are visible at a normal viewing distance of between 2.5 and 3.5 meters (8.2 and 11.5 feet) while viewing a normal broadcast (i.e. not a test card, still image, or single color display) please contact Pioneer Customer Support Div. (USA) or Customer Satisfaction Dept. (CANADA). See back cover for contact information.
If, however, the fixed pixel(s) can only be seen from a distance of less than 8 feet or during single color displays then the appearance is considered normal for plasma technology.
Infrared rays
The Plasma Display releases infrared rays because of the panel characteristics. Surrounding equipment with remote controls and wireless headphones using infrared signals can experience interference. Move any affected equipment to a location away from the plasma panel.
Radio interference
While this product meets required specifications, the panel emits a small amount of electronic noise. This noise can affect radio, computer, and VCR reception. Move devices away from the panel to reduce or eliminate interference.
Plasma Display driving sound
The screen of the Plasma Display is composed of extremely fine pixels and these pixels emit light according to received video signals. This principle may cause you to hear a buzz or electrical hum coming from the Plasma Display.
Do not attach such items as labels and tape to the product.
- Labels and tape can mar or discolor the cabinet.
When not using the product for a long time
- If you do not use the product for a long time, the functions of the product may be adversely affected. Switch ON and run the product occasionally to maintain quality.
Condensation
- Condensation may take place on the surface or inside of the panel when the unit is rapidly moved from a cold place to a warm place or when a heater is turned On in the room. When condensation occurs, do not switch On the panel until condensation disappears. Operating the panel when there is condensation can damage the unit.
Cleaning the surface of the screen and the glossy surface of the front cabinet
- When cleaning the surface of the screen or the glossy surface of the front cabinet, gently wipe with the supplied cleaning cloth or a similar cloth (e.g., cotton, flannel, etc.). Using a dirty or course material cloth can scratch and damage the panel's surfaces.
- If you clean the surface of the screen with a wet cloth, water droplets may enter into the product, resulting in a malfunction.
Cleaning the cabinet
- When cleaning other panel surfaces, gently wipe with a clean soft cloth (e.g., cotton, flannel, etc.). Using a dirty or course material cloth can scratch and damage the panel's surfaces.
- The cabinet of this product is mostly composed of plastic. Do not use chemicals such as benzene or thinner to clean the cabinet. Using these chemicals can strip the surface coating or cause cabinet deterioration.
- Do not expose the product to a volatile gas or fluid such as pesticide. Do not apply rubber or vinyl products to the cabinet for long periods of time. The effect of plasticizer on the cabinet can strip the surface coating or cause deterioration.
- If you clean the surface of the cabinet with a wet cloth, water droplets may enter into the product, resulting in a malfunction.
Handles at the rear of the Plasma Display
- Do not remove the handles from the rear of the Plasma Display.
- When moving the Plasma Display, ask another person for help and use the handles attached to the rear of the Plasma Display. Do not move the Plasma Display by holding only a single handle. Use the handles as shown on page 18.
- Do not use the handles to hang, suspend, or anchor the panel.
Fan motor noise
The rotation speed of the cooling fan motor increases when the ambient temperature of the Plasma Display becomes high. You may hear the sound of the fan motor at that time.
About the menu window size following video format switch
The video program that you watch may be high definition (HD) or standard definition (SD). This Plasma Display is designed to scale to either HD or SD signals. If the video program's definition type changes while a menu window is displayed on the screen (for example: HD → SD or SD → HD), the menu size may temporarily shrink or enlarge until the scaling is complete. For example, switching between a TV program and an external digital video recorder (D-VHS) while viewing a menu can cause the menu window size to fluctuate.
If this happens, the menu will return to its normal size after two to three seconds. This action is normal, and does not indicate a problem with your Plasma Display Panel.
Image Retention
When a static image is shown on a display for several hours, a faint imprint of the image, known as image retention, can remain. This image retention may be temporary or permanent. Although caused by different things, image retention can occur on all display technologies, including plasma and LCD. On today's plasma displays, permanent image retention is less of a worry. Most image retention can be improved simply by watching a motion video sequence.
Image retention, also known as burn-in, can occur in all phosphor-based display systems (including CRT television systems—both direct view and projection—as well as plasma display systems). To avoid image retention or burn-in, do not show a still image for an extended period. Recommended guidelines are as follows:
- Do not display static images such as still images, fixed images from PC or TV game equipment, and/or fixed images such as time of day indicator or channel logo display for long periods.
- Do not display content in the 4:3 aspect ratio (black or gray bars on left and right side of content) or letter-box content (black bars above and below content) for extended periods of time, or use either of these viewing modes repeatedly within a short period of time. This plasma display system is equipped with multiple wide-screen viewing modes; use one of these screen modes to fill the entire screen with content.
- Displaying dark images after showing a still image for an extended time may cause image retention. In most cases, the image retention can be corrected by displaying bright images for a similar period of time.
Warning: Displaying a still image on the panel for a long period of time can cause the image to be burned in to the screen permanently.

CAUTION
Panel sticking and after-image lag
- Displaying the same images such as still images for a long time may cause after-image lagging. This may occur in the following two cases.
1 After-image lagging due to remaining electric load
When image patterns with very high peak luminance are displayed for more than one(1) minute, after-image lagging may occur due to the remaining electrical load. The after-images remaining on the screen disappears when moving images are shown. The time for the after-images to disappear depends on the luminance of the still image and the length of time displayed.
2 After-image (lag image) due to burning
Avoid displaying the same image on the Plasma Display continuously over a long period of time. If the same image is displayed continuously for several hours, or for shorter periods but over several days, a permanent after-image may remain on the screen due to burning of the fluorescent materials. Such images may become less noticeable if moving images are later displayed but they do not disappear completely.

NOTE
- When a program menu, TV Guide screen or frozen image is displayed for 5 to 10 minutes, the system automatically turns the screen off to prevent damage from screen burning.
- To prevent screen burning, the display position is automatically changed slightly when the power is switched on or the input changed. Depending on the broadcast content, some parts of the picture may not be visible.
Preventing damage from screen burning
- Please show images in full screen unless doing so causes copyright infringement. See page 63.
- The Energy save function can be set to help prevent screen burn-in. See page 61.

CAUTION
DO NOT PLACE THIS PRODUCT ON AN UNSTABLE CART, STAND, TRIPOD, BRACKET, OR TABLE. THE PRODUCT MAY FALL, CAUSING SERIOUS PERSONAL INJURY AND SERIOUS DAMAGE TO THE PRODUCT. USE ONLY WITH A CART, STAND, TRIPOD, BRACKET, OR TABLE RECOMMENDED BY THE MANUFACTURER, OR SOLD WITH THE PRODUCT. FOLLOW THE MANUFACTURER'S INSTRUCTIONS WHEN INSTALLING THE PRODUCT. ONLY USE MOUNTING ACCESSORIES RECOMMENDED BY THE MANUFACTURER. A PRODUCT AND CART COMBINATION SHOULD BE MOVED WITH CARE. QUICK STOPS, EXCESSIVE FORCE, AND UNEVEN SURFACES MAY CAUSE THE COMBINED UNIT TO OVERTURN.

This product has been engineered and manufactured with the highest priority on safety. However, improper use can result in electric shock and/or fire. To prevent injury, please observe the following instructions when installing, operating and cleaning the product. To ensure your safety and prolong the service life of your product, please read the following precautions carefully before using the product.
- Read all operating instructions before operating the panel.
- Keep this manual safe for future reference.
- Observe all warnings on the product and in the operating instructions.
- Follow all operating instructions.
- Cleaning—Unplug the power cord from the wall outlet before cleaning the product. To clean the product, use the supplied cleaning cloth or other soft cloth (e.g., cotton, flannel, etc.). Do not use liquid or aerosol cleaners.
- Do not use attachments unless recommended by the manufacturer. Use of unauthorized attachments can result in accidents.
- Do not use the product near water (bathtub, washbasin, kitchen sink, laundry area, swimming pool, in a wet or damp basement, etc.).
- Do not place the product on an unstable cart, stand, tripod or table. Placing the product on an unstable base can cause the product to fall, resulting in serious personal injuries as well as damage to the panel. Use only a cart, stand, tripod, bracket or table recommended by the manufacturer or sold with the unit. When mounting the product on a wall, follow the manufacturer's instructions precisely. Use only mounting hardware recommended by the manufacturer.
- Sudden stops, excessive pushing and uneven floors can cause a unit mounted on a cart to fall. Move the cart with caution.

- Openings in the cabinet are designed for ventilation. Do not cover or block these vents and openings since insufficient ventilation can cause overheating and/or shorten the life of the panel. Do not place the product on a bed, sofa, rug or other similar surface since material can block the vents. This product is not designed for built-in installations. Do not place the product in an enclosed place such as a bookcase or rack unless properly vented.
- This product must operate on a power source as stated on the specification label. If you are not sure of the type of power supply used in your home, consult your dealer or local power company.
- Power cord protection—The power cords must be routed properly to prevent being stepped on or being pinched between objects. Check entire length of all cables to guard against pinching.
- This panel contains glass elements. Sudden impacts from dropping or hitting the panel can break the glass. If the panel is broken, avoid contact with the glass shards.
- Do not overload AC outlets or extension cords. Overloading can cause fire or electric shock.
-
Never insert objects through vents or openings. High voltage flows in the product, inserting an object can cause electrical shock and/or short internal parts. For the same reason, do not spill water or liquids into the products.
-
Do not attempt to service the product yourself. Removing covers can expose you to high voltage and other dangerous conditions. Request service from qualified and authorized service personnel.
- If any of the following conditions occurs, unplug the power cord from the AC outlet and arrange for repairs with qualified service personnel.
• power cord or plug is damaged
- liquid spilled or objects fallen into unit
• exposed to rain or water
- product fails to perform as described in the operating instructions
Do not touch the controls other than those described in the operating instructions. Improper adjustments can cause damage, which often requires correction by a qualified technician
- unit dropped or damaged
• abnormal appearance of picture
- Replacement parts must meet or exceed specifications set by the manufacturer. Use of unauthorized parts can result in fire, electric shock and/or other danger.
- Upon completion of service or repair work, request that the service technician perform periodic safety checks to ensure that the product is in proper operating condition.
- When mounting the product on a wall or ceiling, install the panel according to the method recommended by the manufacturer.
- Keep the product away from heat sources such as radiators, heaters, stoves and other heat-generating devices (including amplifiers).
- Unplug the power cord from the wall outlet before installing the speakers.
- Never expose the screen of the Plasma Display Panel to a strong impact. The screen may be broken, resulting in fire or personal injury.
- Do not expose the Plasma Display Panel to direct sunlight for a long period of time. The optical characteristics of the front protection panel changes, resulting in discoloration or warping.
- The approximate weight of each Plasma Display Panel is as follows:
- PRO-1140HD - 34.3 kg (75.7 lbs.)
- PRO-940HD - 31.7 kg (69.9 lbs.) (with stand)
Unpacking, carrying, and installing requires two or more people.
Installation Precautions
Observe the following precautions when installing the panel using optional mounting methods such as the bracket.
When using the optional brackets or equivalent items
- Ask your dealer to perform the installation.
- Use only the supplied bolts.
- For details, see the instruction manual that comes with the optional bracket (or equivalent mounting item).
When using other items
- Consult your dealer.
- The following six mounting holes can be used for the installation:
Rear view (PRO-1140HD)

Side view

Rear view (PRO-940HD)


CAUTION
- Use at least four mounting holes symmetrical to the vertical and horizontal median lines.
- Use M8 screws, which go 12 mm to 18 mm (0.5 inches to 0.7 inches) in depth from the mounting surface of the Plasma Display. See the side view above.
- Be careful not to block rear vents on the Plasma Display.
• Install the Plasma Display on a flat surface to avoid warping the glass. - The diagrams above show the location of standard mounting screw holes. Holes other than those shown above are for specific mounting methods and should not be used unless a mounting option's instructions require their use.

NOTE
- Use the optional PIONEER mounting products whenever possible.
- PIONEER shall not be liable for any personal injury or property damage that results from using mounting items other than the optional PIONEER products.
natural_image
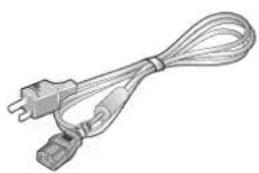
Coiled electrical cable with two connectors (no text or symbols visible)Power cord (2 m/6.6 feet)

natural_image
Simple line drawing of a folded paper or fabric with no text or symbolsCleaning cloth
natural_image
Simple 3D illustration of a blank rectangular block with no text or symbolsOperating instructions


Speed clamp × 3 Ferrite Board Mauryalty Card


G-LINK cable (3 m/9.8 feet)


natural_image
Line drawing of a remote control with keypad and buttons (no text or symbols)Remote control unit
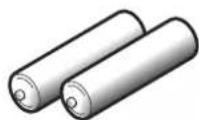
AA size battery x 2 (Alkaline battery for remote control unit)

Hexagonal wrench x 1 (Diagonal size: 6 mm) (for PRO-940HD only)
Plasma Display
Front/side view (PRO-1140HD)

1 ⏻ POWER button
(See page 24)
2 POWER ON indicator (See page 24)
3 STANDBY indicator (See page 24)
4 REC TIMER indicator
5 Remote control sensor
(Side view)
6 STANDBY/ON button
7 I N Button(TENTER button*)
8 VOLUME UP/DOWN buttons (UP/DOWN buttons*)
9 CHANNEL UP/DOWN buttons (LEFT/RIGHT buttons*)
10 TV GUIDE button*
11 USB port
12 INPUT 4 terminals (COMPONENT VIDEO: Y, CB/PB, CR/PR)
13 INPUT 4 terminal (VIDEO)
14 INPUT 4 terminals (AUDIO)
Front/side view (PRO-940HD)

1 ⏻ POWER button
(See page 24)
2 POWER ON indicator (See page 24)
3 STANDBY indicator (See page 24)
4 REC TIMER indicator
5 Remote control sensor
(Side view)
6 STANDBY/ON button
7 I N Button(TENTER button*)
8 VOLUME UP/DOWN buttons (UP/DOWN buttons*)
9 CHANNEL UP/DOWN buttons (LEFT/RIGHT buttons*)
10 TV GUIDE button*
11 USB port
12 INPUT 4 terminals (COMPONENT VIDEO: Y, CB/PB, CR/PR)
13 INPUT 4 terminal (VIDEO)
14 INPUT 4 terminals (AUDIO)
Rear view
(PRO-1140HD)

1 PC INPUT terminal (ANALOG RGB)
2 CableCARD ^TM slot
3 ANT/CABLE A IN terminal
4 ANT B IN terminal
5 AC IN terminal
6 Ethernet cable port
7 HDMI terminals (INPUT 5/INPUT 6)
8 RS-232C terminal (used for factory setup)
9 DIGITAL OUT terminal (OPTICAL)
10 G-LINK terminal
11 INPUT 5 terminals (AUDIO)
12 INPUT 6 terminals (AUDIO)
13 SUB WOOFER terminal
14 INPUT 3 terminals (AUDIO)
15 INPUT 3 terminals (COMPONENT VIDEO: Y, CB/PB, CR/PR)
16 INPUT 2 terminals (COMPONENT VIDEO: Y, CB/PB, CR/PR)
17 INPUT 2 terminal (VIDEO)
18 INPUT 2 terminal (S-VIDEO)
19 INPUT 2 terminals (AUDIO)
20 INPUT 1 terminals (AUDIO)
21 INPUT 1 terminal (S-VIDEO)
22 INPUT 1 terminal (VIDEO)
23 MONITOR OUT terminal (VIDEO)
24 MONITOR OUT terminals (AUDIO)
25 PC INPUT terminal (AUDIO)
26 CONTROL OUT terminal
27 CONTROL IN terminal
28 SPEAKER (R/L) terminals
Rear view (PRO-940HD)

1 PC INPUT terminal (ANALOG RGB)
2 CableCARD ^TM slot
3 ANT/CABLE A IN terminal
4 ANT B IN terminal
5 AC IN terminal
6 Ethernet cable port
7 HDMI terminals (INPUT 5/INPUT 6)
8 RS-232C terminal (used for factory setup)
9 DIGITAL OUT terminal (OPTICAL)
10 G-LINK terminal
11 INPUT 5 terminals (AUDIO)
12 INPUT 6 terminals (AUDIO)
13 SUB WOOFER terminal
14 INPUT 3 terminals (AUDIO)
15 INPUT 3 terminals (COMPONENT VIDEO: Y, CB/PB, CR/PR)
16 INPUT 2 terminals (COMPONENT VIDEO: Y, CB/PB, CR/PR)
17 INPUT 2 terminal (VIDEO)
18 INPUT 2 terminal (S-VIDEO)
19 INPUT 2 terminals (AUDIO)
20 INPUT 1 terminals (AUDIO)
21 INPUT 1 terminal (S-VIDEO)
22 INPUT 1 terminal (VIDEO)
23 MONITOR OUT terminal (VIDEO)
24 MONITOR OUT terminals (AUDIO)
25 PC INPUT terminal (AUDIO)
26 CONTROL OUT terminal
27 CONTROL IN terminal
Remote control unit
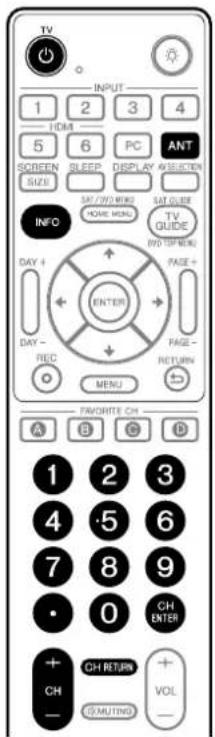
This section describes the button functions when the mode is set to TV. To use the remote for controlling other equipment, see "Using the remote control unit to control other devices" starting on page 97.

1 TV ☑: Turns ON the Plasma Display Panel or places it in Standby.
2 Transmission confirmation LED
3 I N : Belets an input source for the Plasma Display Panel. (INPUT 1, INPUT 2, INPUT 3, INPUT 4, INPUT 5, INPUT 6 and PC)
4 SCREEN SIZE : Selects the screen size.
5 S L : Sets the Sleep timer.
6 I N: Displays a channel banner when a TV program is being watched. (When the TV Guide On Screen™ system is in operation, information about the currently highlighted channel appears on screen (when available).)
7 HOME: Displays the Home Menu screen
8 DAY +/- : Jumps to the next or previous day of program listings in the TV Guide On Screen™ Listing service.
9 ↑/↓/: Selects a desired item on the menu screen
10 REC : When using the TV Guide On Screen™ System, triggers recording to a connected VCR
11 FAVORITE CH (A, B, C, D): Selects any of the four preset channels (see page 41 for details to set the FAVORITE CH) While watching, toggle the set channels by pressing A, B, C and D.
12 0 - 9 : Selects the channel
13 •(dot) : Enters a dot When entering the number of a sub-channel.
14 CH +/- : Selects the channel.
15 SPLIT : Switches the screen mode: 2-screen, picture-in-picture, single-screen
16 FREEZE : Freezes a frame from a moving image. Press again to cancel the function.
17 MTS : Selects MTS/SAP or language depending on the program being watched
18 ☐: Lights up all buttons Lights turn off if no operations are performed within 5 seconds. This is used for remote control use in dark locations.
19 ANT : Selects the antenna (A, B) (see page 21 for details)
20 AV SELECTION : Selects audio and video settings. (AV mode: STANDARD, DYNAMIC, MOVIE, GAME, PURE, USER. PC mode: STANDARD, USER)
21 DISPLAY : Displays the channel information
22 TV GUIDE : Displays the TV Guide On Screen™ system
23 ENTER : Executes a command
24 PAGE +/- (for the TV Guide On Screen™ system): Scrolls the program listing screen vertically.
25 RETURN : Returns to the previous menu screen
26 MENU : Displays a panel menu in the TV Guide On Screen™ system
27 CH ENTER: Executes a channel number
28 CH RETURN : Returns to the previous channel This button is disabled while the TV Guide On Screen™ system is displayed.
29 VOL +/- : Sets the volume
30 ⚫ MUTING: Mutes the sound
31 SHIFT : Moves the small screen to a different location when in the picture-in-picture mode
32 SWAP: Switches between the two screens when in the 2-screen or picture-in-picture mode
NOTE
- When using the remote control, aim it at the Plasma Display.
• See pages 90 to 100 for buttons not listed on this page.
Installing the Plasma Display

Location
- Avoid direct sunlight.
- Maintain adequate ventilation.
- Because the Plasma Display is heavy, have someone help you when moving or installing the panel.

NOTE
- Allow enough space around the installed Plasma Display Panel to ensure proper ventilation.
Moving the Plasma Display

CAUTION
These Plasma Display Panels are thin and can be unstable when held upright. Therefore, at least two people must move and install these panels.
(PRO-1140HD)

natural_image
Line drawing of a person using a device to adjust or install a tool, with no visible text or symbols.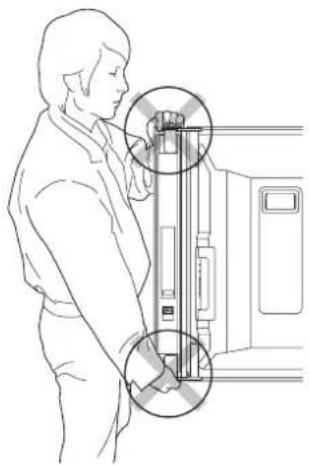
natural_image
Line drawing of a person using a device to adjust or install a component, with no visible text or symbols.
NOTE
- Do not hold by the speaker.
• Install the panel on a flat, stable location to avoid warping the glass components.
(PRO-940HD)

natural_image
Line drawing of a hand adjusting a door panel inside a vehicle (no text or symbols)
CAUTION
When installing on a rack, etc., someone must steady the panel at all times.
Preventing the Plasma Display from Falling Over
During installation, someone must steady the panel at all times.
Stabilizing on a table or floor
Stabilize the Plasma Display as shown in the diagram using screws that are 6 mm (1/4 inch) and at least 20 mm (13/16 inch) long (available from your dealer or other hardware sources).


CAUTION
The installation site should have adequate strength to support the Plasma Display. A weak installation site could result in personal injury and property damage. Please take the necessary safety measures to prevent it from falling during emergencies, such as earthquakes or construction accidents. If you do not take these precautions, the Plasma Display could fall, causing injury or property damage.
Screws, hooks, chains, and other fittings used to secure the Plasma Display vary according to the composition and thickness of the surface to which the panel is attached. Inspect the mounting surface carefully to determine its thickness and composition; consult a professional installer if necessary.
Using a wall for stabilization
- Attach fall-prevention bolts (hooks) to the Plasma Display.
- Use strong cords to firmly attach the panel to a wall, pillar, or other sturdy construction.
- Repeat attachment for the other side of the panel.

NOTE
Use hooks, cords, and fittings that are available from your dealer or other hardware sources. Recommended hook: Nominal diameter 8 mm (3/8 inch) Length 12 mm to 15 mm (1/2 inch to 5/8 inch)
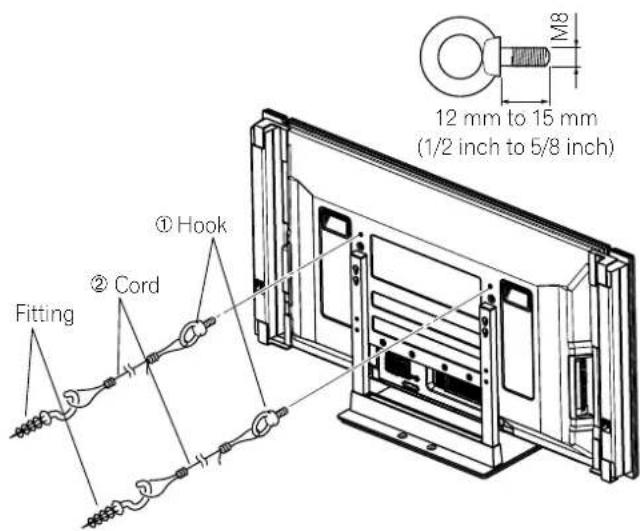
Attaching/detaching the PIONEER stand (for PRO-940HD only)
The PRO-940HD comes with the PIONEER table top stand attached. You can mount the display in a rack by detaching the stand. The method for attaching/detaching the stand varies depending on the particular panel.

CAUTION
- If mounting the panel on a stand, use only the attached stand for this model. Other stand models are not authorized for this panel.
- Two or more people are required to assemble and install this unit.
Detaching the stand
1 Loosen the two installation bolts ① using the enclosed hexagonal wrench.

2 Remove the two installation bolts ② using the same hexagonal wrench.

3 Lift the Plasma Display from the stand.
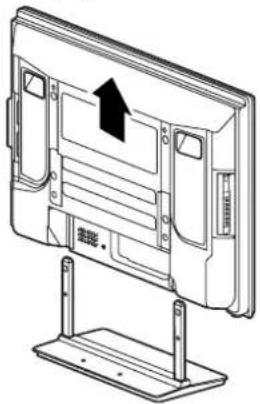
natural_image
Line drawing of a computer monitor with an upward arrow and '电源' label, mounted on a stand (no text or symbols beyond basic labels)- Keep the installation bolts ① and ② for reattaching the stand to the Plasma Display at a later date.

NOTE
• Install the panel on a flat, stable location to avoid warping the glass components.
Reattaching the stand
1 Fit the stand's support columns under the Plasma Display shown below. Slowly ease the panel down on the supports.
- Be extremely careful not to insert the stand supports into any part of the Plasma Display other than the stand insertion slots. If the panel is mounted improperly, the communication ports could be damaged or the stand could be warped.

2 Bolt the Plasma Display to the stand at the points indicated by the arrows.

3 Tighten the installation bolts ① firmly using the enclosed hexagonal wrench.
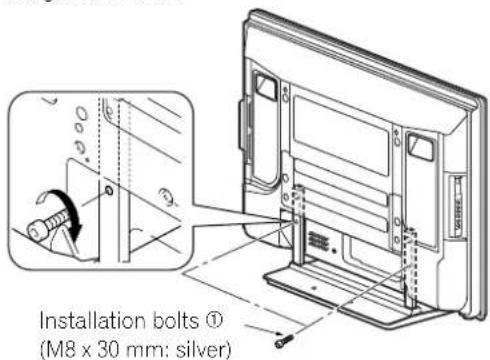

NOTE
• Install the panel on a flat, stable location to avoid warping the glass components.
- Insert the screws in the holes vertically.
- Do not tighten them with more force than necessary.
Cable connections for watching digital and/or conventional TV channels
This system is equipped with two terminals for inputting TV broadcasting signals, ANT/CABLE A IN and ANT B IN. The ANT/CABLE A IN terminal accepts both digital and conventional TV broadcasting signals while the ANT B IN terminal accepts only conventional TV broadcasting signals. When using cable TV to watch digital and/or conventional TV channels, connect to the ANT/CABLE A IN terminal as shown. To add an outdoor antenna for clearer pictures, connect an antenna to the ANT B IN terminal. If your outdoor antenna uses a 75-ohm coaxial cable with an F-type connector, plug it into the antenna terminal at the rear of the Plasma Display.
Connecting VHF/UHF antennas and a Cable
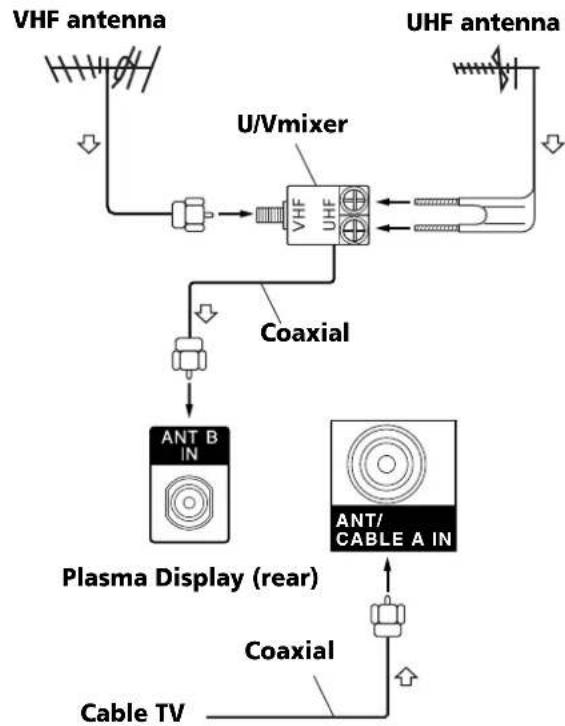
flowchart
graph TD
    A["VHF antenna"] --> B["Coaxial"]
    C["UHF antenna"] --> D["Coaxial"]
    B --> E["Plasma Display (rear)"]
    D --> F["Cable TV"]
    E --> G["Ant B IN"]
    F --> H["Coaxial"]
    G --> I["Ant/CABLE A IN"]
    H --> J["Coaxial"]
    I --> K["Plasma Display (rear)"]
    J --> L["Cable TV"]

NOTE
- Connect coaxial cables as shown above. Signal reception may fail if cables are connected improperly.
- In order to watch cable TV channels, be sure to connect the cable to the ANT/CABLE A IN terminal.
- The ANT/CABLE A IN and ANT B IN terminals must not receive the same signals. For example, do not connect the cable TV line to both the ANT/CABLE A IN and ANT B IN terminals. Similarly, do not connect an antenna cable to both the ANT/CABLE A IN and ANT B IN terminals.
- The TV Guide On Screen™ system may not be available in all areas and is not available with satellite systems. In addition, as content providers move to digital programming and broadcasting, TV Guide data may be unavailable or become unavailable.
Inserting the CableCARD™
The Plasma Display provides a slot for inserting a CableCARD™. When you are watching digital and/or High Definition TV channels over cable, the card allows you to use the cable company's Point of Deployment (POD) service. This service presents various types of useful information in Internet-styled text.
1 Confirm that the ANT/CABLE A IN terminal is connected to the Cable Converter box using a coaxial cable.
2 Slide the slot cover tab on the rear of the Plasma Display to the left then remove the cover while pulling the tab's latch down.

3 Insert the specified CableCARD™ completely into the slot.
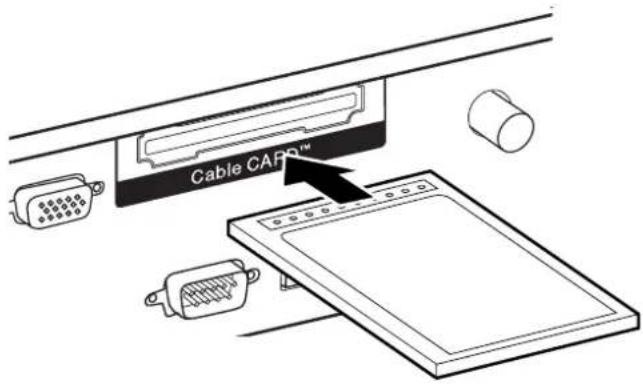

NOTE
- Be sure to insert only the specified CableCARD™.
- Do not insert a PC card.
- The CableCARD™ automatically generates a cable channel list. It is unnecessary to activate the "Auto Channel Preset" option.
Switching between antenna A and B
To watch broadcasts via the two antennas, press ANT on the remote control.
- While watching a broadcast, press ANT to view the feed from the other antenna.
- While watching in the 2-screen mode (TV image and video image) with TV selected, press ANT to view the feed from the other antenna.
- Pressing ANT while watching in the 2-screen mode with two TV images displayed has no effect.
Preparing the remote control unit
Inserting batteries
1 Open the battery cover.

natural_image
Simple line drawing of a mechanical component with a lever and curved arrow indicating rotation (no text or symbols)2 Load the supplied two AA batteries. Insert the negative polarity (−) ends first.

natural_image
Line drawing of a battery pack with four cylindrical components and a rectangular base (no text or symbols)- The battery polarities must correspond with the (+) and (−) indicators in the battery compartment.
3 Close the battery cover.

natural_image
Simple line drawing of a slide with a slide and a slide, showing a curved arrow indicating rotation (no text or symbols)Cautions regarding batteries
- The remote control unit cannot operate the system if the batteries in the unit are weak. When this happens, replace the batteries with new ones.
- Use alkaline batteries rather than manganese batteries.
- Do not mix battery brands. Different brands have different characteristics.
- Do not mix old and new batteries. Mixing old and new batteries can shorten the life of new batteries or cause chemical leakage in old batteries.
- Do not leave dead batteries in the remote control. Dead batteries leak chemicals. If you find any chemical leakage, wipe thoroughly with a clean cloth.
- The batteries supplied with this product may have a shorter life expectancy due to storage conditions.
- If you will not use the remote control unit for an extended period of time, remove the batteries.
Battery disposal
When disposing of used batteries, please comply with governmental regulations or environmental public institution's rules that apply in your country/area.
Allowed operation range of the remote control unit
To use the remote control, point it at the sensor located at the bottom right corner of the Plasma Display. The distance from the remote control sensor must be within 7 m (23 feet) and the angle relative to the sensor must be within 30 degrees left or right.


NOTE
- Although the SR logo also appears in the lower right corner on the PRO-940HD, the sensor is in the same location for both panels.
Cautions regarding the remote control unit
- Do not expose the remote control to shock, liquid, or high humidity.
- Do not place the remote control unit under direct sunlight, the unit may deform.
- The remote control may not work properly if the panel's remote sensor window is under direct sunlight or strong room lighting. If the remote control fails to function in a bright environment, try changing the signal angle or move closer to the panel.
- Objects placed between the remote control and the panel sensor may block the signal.
- As the batteries become weak, the remote control may need to be used closer to the panel. Replace the batteries with new ones if necessary.
- The Plasma Display emits very weak infrared rays from its screen. Other nearby equipment using an infrared remote control such as a VCR may receive scrambled or incomplete commands from its remote control. In this situation, move the equipment away from the Plasma Display.
- Depending on the environment, infrared rays from the Plasma Display may corrupt signals sent by the remote control. These IR waves could also require that the remote control be used closer to the panel. The strength of infrared rays emitted from the screen differs, depending on the image being displayed.
Connecting the power cord
Connect the power cord last, after all other components are connected.
Plasma Display (rear view)


CAUTION
- Use only the supplied power cord.
- Use only the specified power supply voltage; neglecting this can result in fire or electric shock.
- For the Plasma Display System, a three-core power cord with a ground terminal is used for safety reasons. Always connect the power cord to a three-pronged outlet and make sure that the cord is properly grounded.

NOTE
- Always turn the panel's power OFF when connecting or disconnecting power cords.
- Disconnect the power cord from the wall outlet when the Plasma Display Panel is not going to be used for a long period of time.
Routing cables
When the speakers are installed on the sides
Rear view

Attaching speed clamps to the main unit
Attach the speed clamps using the 3 holes (42 inches: 2 holes) marked with an arrow (▲) below, depending on your routing system.
for PRO-1140HD
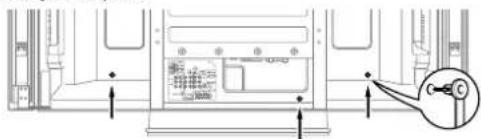
for PRO-940HD

Attaching and removing speed clamps
Insert [1] into an appropriate hole on the rear of the Plasma Display then snap [2] into the back of [1] to lock the clamp. Speed clamps are designed to be difficult to release once in place. Please attach them carefully. Use pliers to twist the clamp 90°, pulling outward. The clamp may deteriorate over time and become damaged if removed.


NOTE
- Use the supplied speed clamps as necessary.
- Bundle speaker cables so that none are pinched.
Turning on the power
(from Standby)
1 Press ⏻ POWER on the Plasma Display if the POWER ON and STANDBY indicators are off.
• The STANDBY indicator on the Plasma Display lights up red.
2 Press TV ⏻ on the remote control unit or STANDBY/ON on the Plasma Display to turn the system on.
- The POWER ON indicator on the Plasma Display lights up blue.
Turning off the power
(to Standby)
1 Press TV ⏻ on the remote control unit or STANDBY/ON on the Plasma Display.
- The system enters the standby mode and the image on the screen disappears.
• The STANDBY indicator lights up red. - This allows the system to automatically receive digital TV program information while in Standby.

NOTE
- If you are not going to use this system for a long period of time, unplug the power cord from the power outlet.
Plasma Display status indicators
The table below shows the operational status of the Plasma Display Panel. Panel indicators reflect the current status of the Plasma Display.
| Indicator Status | System Status | |
| POWER ON | STANDBY | |
| The Plasma Display has been unplugged or the Plasma Display is off. | ||
| Power to the system is on. | ||
| The system is in Standby. | ||
For other than the above, see "Troubleshooting" on page 101.

CAUTION
- If the POWER ON and STANDBY indicators are off, the system cannot be powered ON. Pressing the TV ⏻ or STANDBY/ON button has no effect. Press POWER then wait for the Standby indicator to light (red).
- The Plasma Display System consumes some power as long as the plug is inserted into an outlet.
Plasma Display
(PRO-1140HD)

(PRO-940HD)
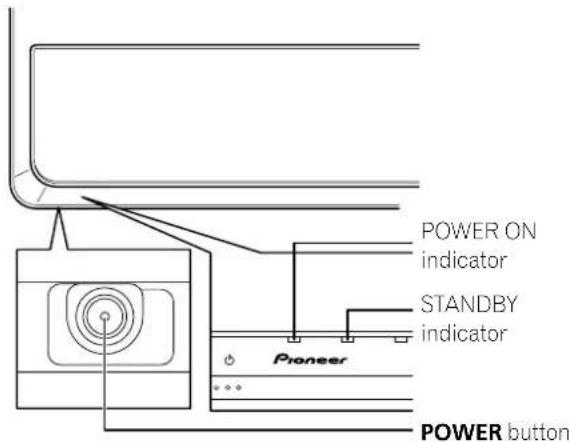
Viewed from below of the display (left).

(Right side view)

Watching TV channels
TV channels must be programmed into your panel. Refer to "Setting up TV channels" on page 35.

NOTE
- When watching a digital TV program, you may see emergency alert messages scrolling at the top of the screen. Those messages are broadcasted by TV stations as necessary when in emergency situations.
Selecting the antenna
After confirming that the Mode switch on the remote control has been set to "TV", press ANT on the remote control unit to select antenna A or B.
- This selection depends on the connections to the panel's antenna input terminals (page 21).
Changing channels
To increase the channel number, press CH + on the remote control. To decrease the channel number, press CH -
- CHANNEL +/- on the Plasma Display operates the same as CH +/- on the remote control.
- Press CH RETURN to switch back to the previous channel. Press CH RETURN again to return to the current channel.
Using 0 - 9 and • (dot) on the remote control unit
Press any combination of buttons 0 to 9 to select a specific channel. To select subchannels, use the • (dot) button.
EXAMPLE
• To select channel 5 (1-digit channel), press 5.
• To select channel 25 (2-digit channel), press 2 then 5.
• To select channel 125 (3-digit channel), press 1, 2, then 5.
• To select subchannel 10.01, press 1, 0, • (dot), 0, then 1.
• To select subchannel 10.001 (for cable TV), press 1, 0,
• (dot), 0, 0, then 1.

NOTE
• After entering a channel or subchannel number, press CH ENTER to tune in the channel more quickly.
• Each time you change a channel, a channel banner appears that shows information about the currently selected channel. To clear the channel banner, press INFO.
- If you do not activate the TV Guide On Screen™ system, the channel banner may not display certain types of program information.
Plasma Display (right side view)

Channel banner

Changing the volume and sound
To increase the volume, press VOL + on the remote control. To decrease the volume, press VOL -
• VOLUME +/- on the Plasma Display operates the same as VOL +/- on the remote control.
- To mute the sound output, press MUTING. The symbol "×" appears on the screen. To return to the previous volume, press MUTING again. Pressing VOL + also quits muting.
Plasma Display (right side view)

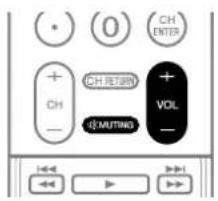
Volume adjustment display

Muting display

Changing the language
If you have selected a digital TV program that provides multi-language services, switch among the languages by pressing MTS on the remote control.

Each time you press MTS, the language switches.

NOTE
- Switchable languages differ depending on the broadcast.
- If the language selected through language setting is available when the channel or program is changed, you hear that language.
- If you are watching a digital TV program without sound or without language information, "N/A" appears on the screen. If a language other than English, French, or Spanish is selected, "Others" appears on the screen.
Setting MTS/SAP mode
When watching conventional TV programs, use the Multichannel Television Sound (MTS) function to enjoy stereo sound and/or Secondary Audio Programs (SAP).
- Stereo broadcasts
Sports, shows, and concerts can be shown with dynamic stereo sound.
- SAP broadcasts
MAIN sound: The normal program soundtrack (either in mono or stereo).
SAP sound: Listen to a second language, supplementary commentary and other information. (SAP is mono sound.)

NOTE
- Conventional TV channels: TV channels received through the conventional VHF/UHF frequencies or conventional cable TV channels
- When stereo sound is difficult to hear, manually switch to MONO for clearer sound.
- Once MONO is selected, the Plasma Display sound remains mono even if the system receives a stereo broadcast. You must reselect STEREO to hear stereo sound again.
- Selecting MTS while the source is from an INPUT (1 to 6) or a PC does not change the type of sound. The video source determines the type of sound.
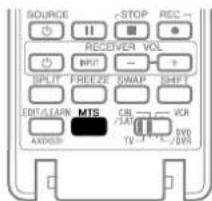
Press MTS to cycle through the types of sound.

flowchart
graph LR
    A["STEREO mode"] --> B["SAP mode"]
    B --> C["MONO mode"]

NOTE
- The MTS button is disabled while the TV Guide On Screen™ system is displayed.
- In each of the sound types, the display changes according to the broadcast signals.
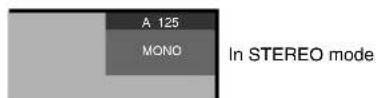
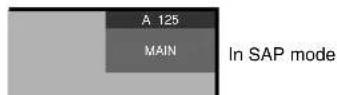
When receiving STEREO sound signals
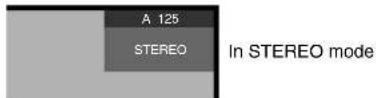


When receiving MONO + SAP sound signals

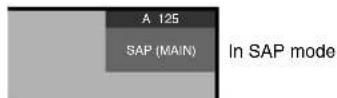

When receiving STEREO + SAP sound signals

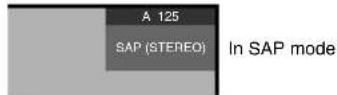
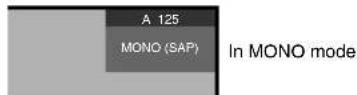
When receiving MONO sound signals

Viewing a channel banner
While watching a TV program, pressing INFO causes a banner to appear. Pressing INFO again causes the banner to disappear.

1 Station name
2 Current time
3 Channel number
4 Input (Ant. A or Ant. B)
5 Program title
6 Program time schedule
7 Channel logo
8 TV rating name or icon

NOTE
- The above information is not displayed unless included in broadcast signals.
- If you do not activate the TV Guide On Screen™ system, the channel banner may not display certain types of program information.
Using the POD service
If you watch digital and/or High Definition TV channels over cable, you can use the POD service provided by the cable TV company. This service presents various types of useful information, using Internet-style text.

Press HOME MENU, 9, 9, then 9 to view the POD display.
Using the multiscreen functions
Splitting the screen
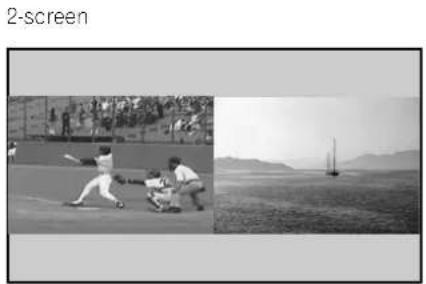
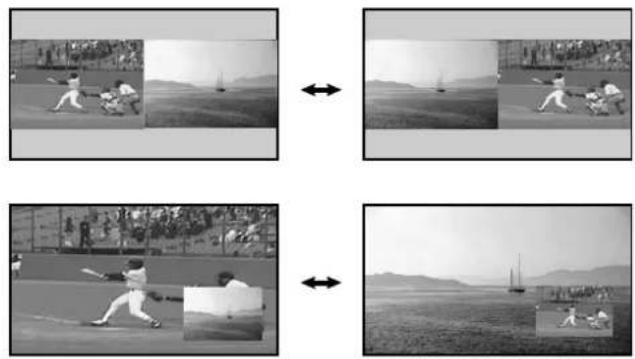
Use the following procedure to select the 2-screen or picture-in-picture mode.
natural_image
Two-panel black-and-white photo showing baseball players in action and a sailboat on the beach (no text or symbols)Picture-in-picture

natural_image
Black-and-white photo of a baseball pitcher in action on the field, with spectators and fence in background (no visible text or symbols)
1 Press SPLIT to select the display mode.
- Press SPLIT to cycle through the display options: 2-screen, picture-in-picture, and single-screen.
- In 2-screen or picture-in-picture mode, press SWAP to switch the position of the 2 screens. The active screen (left side) is indicated by a "J" symbol. The active screen's picture and sound can be adjusted.
natural_image
Sequence of black-and-white photos showing a baseball pitcher in action, with no visible text or symbols.- In 2-screen mode, press SCREEN SIZE to change the size of the left screen.
- In picture-in-picture mode, press SHIFT to move the position of the small screen counter-clockwise.

natural_image
Sequence of four black-and-white photos showing a baseball pitcher in action, with no visible text or symbols.2 To select an input source, press the appropriate input source button.
- If watching conventional TV, press CH +/- to change the channel.

NOTE
- The SPLIT button is disabled while the TV Guide On Screen™ system is displayed.
- The multiscreen function cannot display images from the same input source or two external input sources at the same time. Attempting to do so causes a warning message to appear.
- Press HOME MENU to return to single-screen viewing. The corresponding menu appears.
- When the two screens show the same analog broadcasting coming through antenna A and B, the picture quality may differ between the two screens.
- If you select 1920×1080p@24 Hz for the main screen in the SPLIT mode, video images may not display properly.
- Displaying pictures in multi-screen mode for an extended period may cause an after-image.
Freezing images
Use the following procedure to capture and freeze one frame.
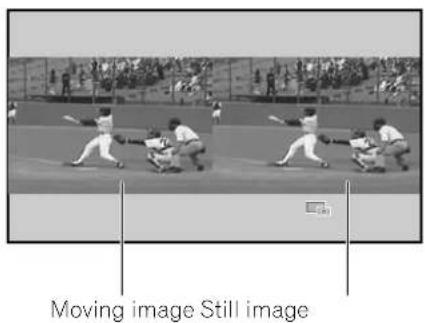

1 Press FREEZE.
A still image appears on the right screen while action continues on the left screen.
2 Press FREEZE again to cancel the function.

NOTE
- Freeze is not available when watching in Split Screen.
- If this function is not available, a warning message appears.
- Unless another action is taken, FREEZE automatically cancels after five minutes.
- Displaying pictures in FREEZE mode for an extended period may cause an after-image.
About the TV Guide On Screen™ system
The TV Guide On Screen™ system is a free, interactive on-screen television program guide. The system offers program listings, searching by keyword, timer recording, reminders and more. The TV Guide On Screen™ system is a convenient way to find out what's on right now or during the coming week. Listings can be arranged by channel or by genre. It also allows you to automatically set your viewing and recording selections quickly and easily.
Before you can use the TV Guide On Screen™ system, you'll need to set it up.
Legal Notices
In the United States, TV GUIDE and other related marks are registered marks of Gemstar-TV Guide International, Inc. and/or one of its affiliates. In Canada, TV GUIDE is a registered mark of Transcontinental, Inc. and is used under license by Gemstar-TV Guide International, Inc.

NOTE
- The TV Guide On Screen™ interactive program guide provides listings for cable-ready and digital cable services as well as conventional broadcasts. It does not provide listings for satellite services.
- Depending on the current settings and selected items, the setup screen order may differ from the one given in this manual. Follow the instructions shown on your panel's screen.
• TV Guide may not be available in all areas. As content providers move to digital programming and broadcasting, TV Guide data may be unavailable or become unavailable.
Setting up the TV Guide On Screen™ system
When the Plasma Display is powered On for the first time, you are automatically taken through the setup process. Once the panel's setup is complete, the TV Guide On Screen ^™ setup Welcome Screen appears. Access the TV Guide On Screen ^™ setup menu from the initial Setup reminder screens, or by pressing TV GUIDE for the first time.

NOTE
- Once you set up the TV Guide On Screen™ system it may take up to 24 hours for TV program listings to appear. Initially, all eight days of listings may take up to one week to load (see Screen 7).
Welcome Screen
Panel setup includes the TV Guide On Screen™ Welcome screen.
Or press TV GUIDE to begin setup.
• The Welcome Screen lists features in the Guide.
- Press ENTER to display Screen 1.

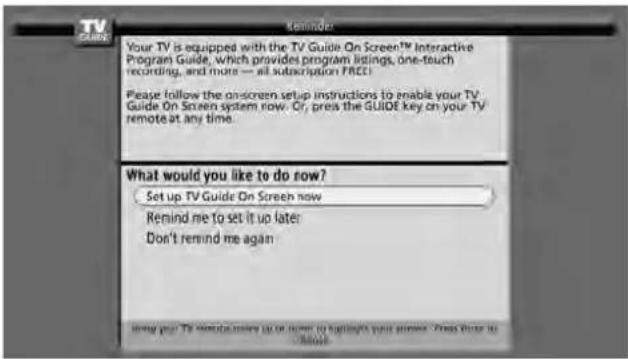
Reminder Screen
If you previously skipped TV Guide setup, the Reminder Screen appears when you power On the panel.
To make a selection, press ↑ to highlight an option then press ENTER.
- "Set up TV Guide On Screen now" displays the first setup screen.
- "Remind me to set it up later" returns you to watching TV.
- "Don't remind me again" returns you to watching TV and stops the reminder screen from appearing upon power On.

NOTE
- If you decide not to set up the Guide immediately, this reminder screen appears each time you power On the panel unless "Don't remind me again" is selected.
System Setup Screens

NOTE
- Once you start the setup procedure, you cannot return to the previous screens. If you realize you entered incorrect information, continue with setup. The last screen of the procedure gives you the opportunity to correct any mistakes before you exit TV Guide On Screen™ setup.
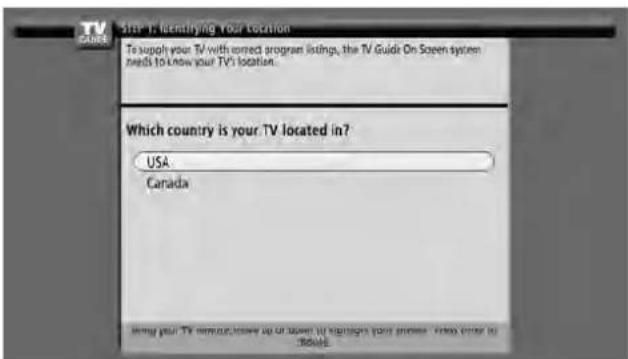
Screen 1: Country
• This screen asks for the location of your panel.
- Press /▲to highlight a country.
- Press ENTER to display Screen 2.
TV Guide On Screen™ System Setup
Screen 2: Enter ZIP or Postal Code
- If you selected USA in Screen 1, you see the ZIP Code screen.
- Input ZIP Code.
Press the number keys or use to display a number then to move to another field.
- Press ENTER to display Screen 3.

- If you selected Canada in Screen 1, you see the Postal Code screen.
- Input Postal Code by pressing ↗to↓ display a character or number then ↓→remove to another field.
- Press ENTER to display Screen 3.
Screen 3: Do you have Cable?
- If you select "Yes", you see Screen 4.
- If you select "No", you see Screen 5.

Screen 4: Which input terminal is the system plugged into?
- Select "ANT/CABLE A IN" or "ANT B IN" (automatically advances to Screen 5 after the selection)

Screen 5: Do you have an antenna connected?
- If you select "Yes", you see Screen 6. (Depending on your setup configuration, you may see an additional screen. After that screen, you see Screen 6.)
- If you select "No", you see Screen 6.
NOTE
- If you selected "No" in Screen 3 then you must select "Yes" in this screen to receive a channel lineup and listings.

Screen 6: Are the settings correct?
- If you select "Yes", you see Screen 7.
- If you select "No", you see Screen 1.

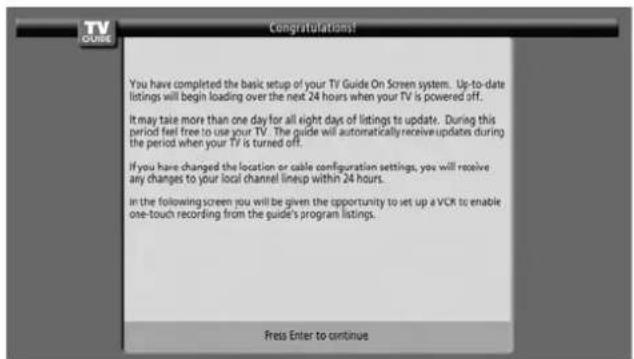
Screen 7: Congratulations
- Press ENTER to display Screen 8.
Screen 8: Is a VCR Connected?
- If you select "Yes", you see Screen 9.
- If you select "No", you see Screen 14.

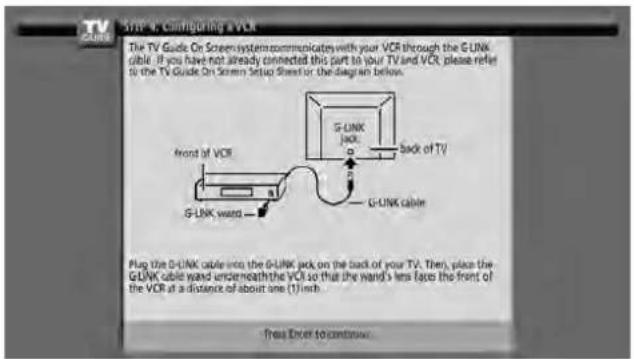
Screen 9: VCR Configuration Diagram
- This screen shows the correct way to install the G-LINK cable from the back of the device to the recording device. Make sure the G-LINK cable is properly installed.
- Press ENTER to advance to Screen 10.
Screen 10: VCR Brand Name
- Press to select the brand of the recording device.
- Press ENTER to advance to Screen 11.

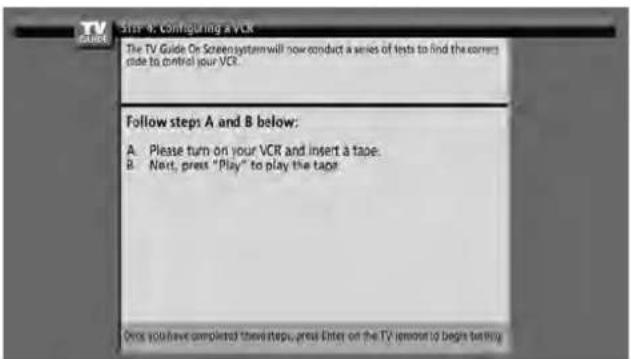
Screen 11: VCR Preparation
- Follow the on-screen instructions then press ENTER to display Screen 12.
Screen 12: VCR Code Testing
- When testing is done, Screen 13 displays automatically.

Screen 13: Did your VCR stop playing?
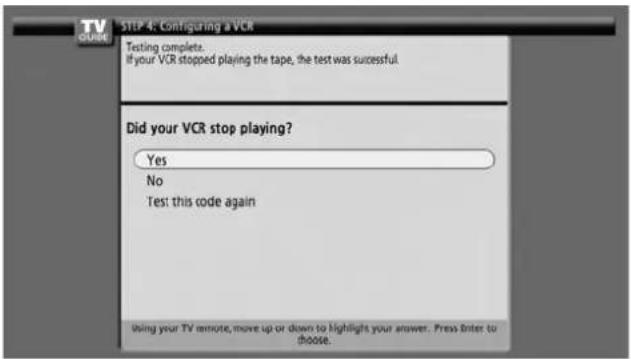
- If you select "Yes", you see Screen 14.
- If you select "No", a different code is tested from Screen 12.

NOTE
- Many VCRs require testing of more than one code to ensure proper operation with the TV Guide On Screen™ system. If you select "Test this code again", the same code from Screen 12 is sent again.
Screen 14: Confirming Your Settings
Verify that the Setup information is correct.
- If it is, select "Yes, end setup" to advance to Screen 15.
- If it is not, select "No, repeat setup process", to return to Screen 1.

Screen 15: Congratulations
- You have successfully completed Setup!
- Press ENTER to advance to Screen 16.

Screen 16: Helpful Information
- This screen provides valuable information on using the TV Guide.
- Press ENTER to watch TV.

Menu Configuration
AV mode menus
| Home Menu Item Page | ||
| Picture AV Selection 55 | ||
| Contrast 56 | ||
| Brightness 56 | ||
| Color 56 | ||
| Tint 56 | ||
| Sharpness 56 | ||
| Pro Adjust 56 | ||
| Reset | 56 | |
| Sound | Treble | 60 |
| Bass | 60 | |
| Balance | 60 | |
| Reset | 60 | |
| FOCUS 61 | ||
| Front Surround | 61 |
| Power Control | Energy Save | 61 |
| No Signal off | 61 | |
| No Operation off | 62 |
| Sleep Timer | —— | 55 |
| Option | Position | 62 |
| Auto Size | 64 | |
| 4:3 Mode | 64 | |
| Side Mask 65 | ||
| HDMI Input | 67 | |
| Monitor Out | 68, 69 | |
| Digital Audio Out | 70 | |
| Language | 65 |
| Tuner Setup | Parental Control | 36 – 40 |
| Favorites | 41 | |
| Channel Setup | 35 | |
| Closed Captions | 41 – 42 | |
| Clock | 42 |
| Home Media Gallery | —— | 73 - 89 |
PC mode menus
| Home Menu Item Page | ||
| Picture AV Selection 55 | ||
| Contrast 56 | ||
| Brightness 56 | ||
| Red | 56 | |
| Green | 56 | |
| Blue | 56 | |
| Reset | 56 | |
| Sound | Treble | 60 |
| Bass | 60 | |
| Balance | 60 | |
| Reset | 60 | |
| FOCUS 61 | ||
| Front Surround | 61 |
| Power Control | Energy Save | 61 |
| Power Management | 62 |
| Sleep Timer | —— | 55 |
| Option | Auto Setup | 62 |
| Manual Setup | 63 |
| Home Media Gallery | —— | 73 – 89 |
Menu operations
The following describes the typical procedure for setting up the menus. For the actual procedures, see the appropriate pages that describe individual functions.
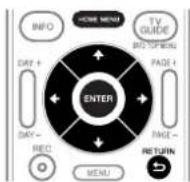
1 Press HOME MENU.
2 Press / ♦scroll) to select a menu item then press ENTER.
3 Scroll down to the desired submenu item.
- The number of menu layers differs depending on the menu items.
- If you select "Tuner Setup", a menu bar appears at the bottom of the screen. To select a submenu item on the bar, press ♦ instead of /. ♦
4 Press / to select an option (or parameter) then press ENTER.
- For some menu items, press instead of /.
5 Press HOME MENU to exit the menu.

NOTE
• To return to the upper menu levels, press RETURN.
Setting up TV channels
This section describes how to search and set up TV channels. Unless you set up TV channels using Auto Channel Preset, you may not be able to tune in all available channels.
Using Auto Channel Preset
Auto Channel Preset automatically searches and sets up TV channels. Press ENTER after each selection.
1 Press HOME MENU.
2 Select "Tuner Setup". (↑/↓ then ENTER)
3 Select "Channel Setup". (←/→ then ENTER)
4 Select "Ant. A" or "Ant. B". (↑/↓ then ENTER)
5 Select "Auto Channel Preset". (↑/↓ then ENTER)
6 Select "Air" or "Cable". (↑/↓ then ENTER)
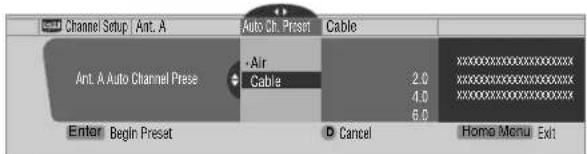
- Channel search automatically starts.

• To quit Auto Channel Preset, press D.
7 After Auto Channel Preset finishes, press HOME MENU to exit the menu.

NOTE
- When using the Cable Converter, you may need to manually add Cable Converter output channels.
- When a CableCARD is functioning, select "Ant.B" in step 4 to run Auto Channel Preset.
Setting for skipping unwanted channels
From among TV channels added using Auto Channel Preset, you can select channels to be skipped using CH+/-. Press ENTER after each selection.
1 Press HOME MENU.
2 Select "Tuner Setup". (↑/↓ then ENTER)
3 Select "Channel Setup". (←/→ then ENTER)
4 Select "Ant. A" or "Ant. B". (↑/↓ then ENTER)
5 Select "Channel Keep/Skip". (↑/↓ then ENTER)
6 Select a channel to be skipped. (↑/↓ then ENTER)

• The check mark next to the channel disappears.
7 Press HOME MENU to exit the menu.
NOTE
- To restore skipped channels, use the above procedure but select (add a check mark) a channel in step 6.
- When using the Cable Converter, you may need to manually add Cable Converter output channels. Press ENTER after each selection.
Setting up TV channels manually
This section describes how to manually set up TV channels that have not been set up by Auto Channel Preset. Press ENTER after each selection.
1 Press HOME MENU.
2 Select "Tuner Setup". (↑/↓ then ENTER)
3 Select "Channel Setup". (←/→ then ENTER)
4 Select "Ant. A" or "Ant. B". (↑/↓ then ENTER)
5 Select "Add Channel". (↑/↓ then ENTER)
6 Select a channel number to be added. (↑/↓ then ENTER)
- You can also use buttons 0 - 9 to enter a channel number.
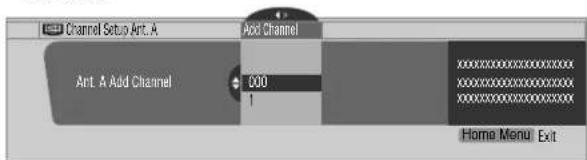
- A confirmation screen appears after ENTER is pressed.
7 Press A to complete the setup process.
8 Press HOME MENU to exit the menu.
NOTE
• To include analog channels, manually add these channels. Digital channels cannot be added manually.
Checking signal strength
When you have selected antenna A, check the current channel's signal strength. Also, use this function when receiving a channel through a VHF/UHF antenna. Press ENTER after each selection.
1 Press HOME MENU.
2 Select "Tuner Setup". (▲/▼ then ENTER)
3 Select "Channel Setup". (←/→ then ENTER)
4 Select "Ant. A". (↑/↓ then ENTER)
5 Select "Signal Strength". (▲/▼ then ENTER)

- Adjust the antenna direction to maximize the signal strength.
6 Press HOME MENU to exit the menu.

NOTE
- This function is available only when receiving digital broadcasting signals.
- When you use the TV Guide On Screen™ system with a cable service, select "Cable" for "Auto Channel Preset".
- Executing more than one scan for cables can cause broadcast reception to fail.
Checking the CableCARD ID
The Plasma Display has a slot for a CableCARD that is used for managing your information by the cable TV company. The CableCARD slot is located on the rear of the Plasma Display. To check your CableCARD ID and the Host ID, follow these steps.
1 Press HOME MENU.
2 Select "Tuner Setup". (▲/▼ then ENTER)
3 Select "Channel Setup". (◄/► then ENTER)
4 Select "POD ID". (/)↑ ↓
• The Host ID and CableCARD ID appear.
5 Press HOME MENU to exit the menu.
Parental Control
With the Parental Control, adults can prevent younger audiences from watching inappropriate TV programs, VCR tapes or DVD contents. When an attempt is made to watch a blocked program (or content), the Plasma Display shows a message over a black screen. The Parental Control applies to both conventional and digital TV channels.
There are three rating systems in the United States: the TV ratings, TV Parental Guidelines, and movie ratings. Movie ratings are provided by the Motion Picture Association of America (MPAA) and are used for original movies not edited for television.
For the rating system in Canada, see page 38.

NOTE
- In the U.S. TV Parental Guideline Rating System, programs with a rating of "None" may be blocked on this product. Examples of programs with a "None" rating include:
• Emergency Bulletins (such as EAS messages, weather warning and others) - Locally originated programming
- News
- Political
• Public Service Announcements - Religious
- Sports
- Weather
- No Parental Control settings can be entered for INPUT 5 and INPUT 6.
Voluntary movie rating system (MPAA)
| Rating Description | |
| Age-Base | N/A Not applicable for MPAA ratings |
| G General audiences. All ages admitted. | |
| PG Parental guidance suggested. Some material may not be suitable for children. | |
| PG-13 Parents strongly cautioned. Some material may be inappropriate for children under 13. | |
| R Restricted. Under 17 requires accompanying parent or adult guardian (age varies in some jurisdictions). | |
| NC-17 No one 17 and under admitted. | |
| NR Not rated. |

NOTE
• The voluntary movie rating system uses an age-based rating.
TV ratings
| Rating Description | |
| Age-Base | TV-Y All children |
| TV-Y7 Children 7 and above | |
| TV-G General audiences | |
| TV-PG Parental guidance suggested | |
| TV-14 Parents strongly cautioned | |
| TV-MA Mature audiences only |

NOTE
- The system also allows you to select "None", which blocks programs with a rating of "None".
Changing the password
Using a password prevents others from changing Parental Control settings. The 4-digit password is 1234. Use the following procedure to change the password.
1 Press HOME MENU.
2 Select "Tuner Setup". (▲/▼ then ENTER)
3 Select "Parental Control". (◄/► then ENTER)
4 Select "Password". (↑/↓ then ENTER)
5 Select "Change Password". (↑/↓ then ENTER)

6 Enter the current 4-digit password, using the number buttons.
7 Enter a 4-digit password to be newly set, using the number buttons.
8 When prompted, enter the same password again.
• A confirmation screen appears.
9 Press A.
10 Press HOME MENU to exit the menu.

NOTE
- Write down the password and keep it somewhere safe.
Clearing the password
Use the following procedure to clear the password.
1 Press HOME MENU.
2 Select "Tuner Setup". (↑/↓ then ENTER)
3 Select "Parental Control". (◄/► then ENTER)
4 Select "Password". (↑/↓ then ENTER)
5 Select "Clear Password". (▲/▼ then ENTER)

6 Enter the current 4-digit password, using the number buttons.
• A confirmation screen appears.
7 Press A.
8 Press HOME MENU to exit the menu.

NOTE
- The above procedure resets the password to the factory default (1234).
Activating the Parental Control
1 Press HOME MENU.
2 Select "Tuner Setup". (▲/▼ then ENTER)
3 Select "Parental Control". (◄/► then ENTER)
4 Select "Status". (↑/↓ then ENTER)
5 Select "On". (↑/↓ then ENTER)
• The password entry screen appears.
6 Enter your 4-digit password using the number buttons.
7 Press HOME MENU to exit the menu.
Setting the voluntary movie rating system (MPAA)
1 Press HOME MENU.
2 Select "Tuner Setup". (↑/↓ then ENTER)
3 Select "Parental Control". (←/→ then ENTER)
4 Select "MPAA Ratings". (↑/↓ then ENTER)
5 Select the desired rating and change the setting. (/ ↑ ↓ then ENTER)

• The password entry screen appears.
6 Enter your 4-digit password using the number buttons.
• Each time you press ENTER, the setting is switched.
- A lock icon appears beside the blocked rating.
• The Plasma Display ships with all ratings unblocked.
7 Press HOME MENU to exit the menu.

NOTE
- Blocking a rating causes more severe ratings to be automatically blocked as well. Likewise, unblocking a rating causes less severe ratings to be automatically unblocked.
Setting the TV ratings
1 Press HOME MENU.
2 Select "Tuner Setup". (↑/↓ then ENTER)
3 Select "Parental Control". (←/→ then ENTER)
4 Select "TV Ratings". (↑/↓ then ENTER)
5 Select the desired rating and change the setting. (/ ↑ ↓ then ENTER)

• The password entry screen appears.
6 Enter your 4-digit password using the number buttons.
• Each time you press ENTER, the setting is switched.
- A lock icon appears beside the blocked rating.
• The Plasma Display ships with all ratings unblocked.
7 Press HOME MENU to exit the menu.
We suggest you write down your password and keep in a safe place.

If you forget the password
When the message "Enter your Password" is displayed in step 6 under "Clearing the password", press the ENTER button on the remote control unit and hold it down for 3 seconds or longer. The password reverts to "1234".

NOTE
- Blocking a rating causes more severe ratings to be automatically blocked. Likewise, unblocking a rating causes less severe ratings to be automatically unblocked.
Setting the TV Parental Guidelines (TV Guidelines)
1 Press HOME MENU.
2 Select "Tuner Setup". (▲/▼ then ENTER)
3 Select "Parental Control", (◄/► then ENTER)
4 Select "TV Parental Guidelines". (↑/↓ then ENTER)
5 Select the desired rating and change the setting. (/ ↑ ↓ then ENTER)

• The password entry screen appears.
6 Enter your 4-digit password using the number buttons.
• Each time you press ENTER, the setting is switched.
- A lock icon appears beside the blocked rating.
• The Plasma Display ships with all ratings unblocked.
7 Press HOME MENU to exit the menu.
Blocking Not Rated TV programs
Use the following procedure to block TV programs whose rating information is unavailable.
1 Press HOME MENU.
2 Select "Tuner Setup". (↑/↓ then ENTER)
3 Select "Parental Control". (◄/► then ENTER)
4 Select "Unavailable Ratings". (↑/↓ then ENTER)
5 Select "Block" or "Don't Block". (↑/↓ then ENTER)

• The password entry screen appears.
6 Enter your 4-digit password using the number buttons.
• The Plasma Display ships with all ratings unblocked.
7 Press HOME MENU to exit the menu.
Canadian rating systems
Choose either the Canadian English ratings or the Canadian French ratings. These ratings are based on the Canadian Radio-Television and Telecommunications Commission (CRTC) policy.
Canadian English ratings
| Rating Description | |
| Age-Base | E Exempt: Includes news, sports, documentaries and other information programming; talk shows, music videos, and variety programming. |
| C Children: Intended for younger children under the age of 8 years. Pays careful attention to themes that could threaten their sense of security and well-being. | |
| C8+ Children over 8 years old: Contains no portrayal of violence as the preferred, acceptable, or only way to resolve conflict; nor encourages children to imitate dangerous acts which they may see on the screen. | |
| G General: Considered acceptable for all age groups. Appropriate viewing for the entire family, contains very little violence, physical, verbal or emotional. | |
| PG Parental Guidance: Intended for a general audience, but may not be suitable for younger children (under the age of 8) because it could contain controversial themes or issues. | |
| 14+ Over 14 Years: Could contain themes where violence is one of the dominant elements of the storyline, but it must be integral to the development of plot or character. Language usage could be profane and nudity present within the context of the theme. | |
| 18+ Adults: Intended for viewers 18 years and older and might contain depictions of violence, which while related to the development of plot, character or themes, are intended for adult viewing. Could contain graphic language and portrayals of sex and nudity. | |
Canadian French ratings
| Age-Base | Rating Description |
| E Exempt programming. | |
| G General: All ages and children, contains minimal direct violence, but may be integrated into the plot in a humorous or unrealistic manner. | |
| 8ans+ General but inadvisable for young children: May be viewed by a wide public audience, but could contain scenes disturbing to children under eight who cannot distinguish between imaginary and real situations. Recommended for viewing with parent. | |
| 13ans+ Over 13 years: Could contain scenes of frequent violent scenes and therefore recommended for viewing with parent. | |
| 16ans+ Over 16 years: Could contain frequent violent scenes and intense violence. | |
| 18ans+ Over 18 years: Only for adult viewing. Could contain frequent violent scenes and extreme violence. |
Setting Canadian English ratings
1 Press HOME MENU.
2 Select "Tuner Setup". (↑/↓ then ENTER)
3 Select "Parental Control". (←/→ then ENTER)
4 Select "Canadian English Ratings". (↑/↓ then ENTER)
5 Select then change to the desired rating. (/ then ENTER)

• The password entry screen appears.
6 Enter your 4-digit password using the number buttons.
• Each time you press ENTER, the setting is switched.
- A lock icon appears beside the blocked rating.
• The Plasma Display ships with all ratings unblocked.
7 Press HOME MENU to exit the menu.

NOTE
- Blocking a rating causes more severe ratings to be automatically blocked. Likewise, unblocking a rating causes less severe ratings to be automatically unblocked.
Setting Canadian French ratings
1 Press HOME MENU.
2 Select "Tuner Setup". (↑/↓ then ENTER)
3 Select "Parental Control". (◄/► then ENTER)
4 Select "Canadian French Ratings". (↑/↓ then ENTER)
5 Select the desired rating and change the setting. (/ ↑ ↓ then ENTER)
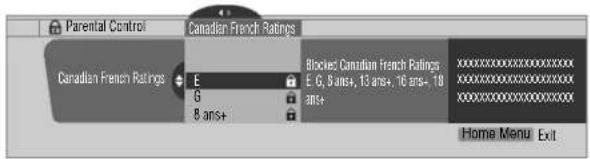
• The password entry screen appears.
6 Enter your 4-digit password using the number buttons.
• Each time you press ENTER, the setting is switched.
- A lock icon appears beside the blocked rating.
• The Plasma Display ships with all ratings unblocked.
7 Press HOME MENU to exit the menu.

NOTE
- Blocking a rating causes more severe ratings to be automatically blocked. Likewise, unblocking a rating causes less severe ratings to be automatically unblocked.
Setting new ratings
Digital broadcasts now carry new ratings that are not compatible with the Plasma Display Panel's original Parental Control settings. When you first tune in one of these broadcasts, a New Parental Control menu appears on the screen. This tells you that you must now change your Parental Control settings to handle these new ratings. Otherwise, previously blocked ratings may become unblocked.
1 Press HOME MENU.
2 Select "Tuner Setup". (↑/↓ then ENTER)
3 Select "Parental Control". (◄/► then ENTER)

- The new menu is displayed when Status is selected. The message "Regional ratings have changed. Set Parental Control ratings again," appears on the right of the screen.
4 Select and change the desired rating. (↑/↓ then ENTER)

- The menu appears between "Unavailable Ratings" and "Password".
• The password entry screen appears.
5 Enter your 4-digit password using the number buttons.
• Each time you press ENTER, the setting is switched.
- A lock icon appears beside the blocked rating.
- When you are finished, the word "New" disappears from the Parental Control menu.
6 Press HOME MENU to exit the menu.
Deleting new ratings
You can delete a New Parental Control menu. When the menu is deleted, all blocks are removed.
1 Press HOME MENU.
2 Select "Tuner Setup". (↑/↓ then ENTER)
3 Select "Parental Control". (←/→ then ENTER)
4 Select "Status" and then "Off". (↑/↓ then ENTER)

• The password entry screen appears.
5 Enter your 4-digit password using the number buttons.
6 Select A for "Accept" or D for "Cancel".

- The New Parental Control menu remains. However, if no settings are entered within 60 seconds, the selection screen for deleting new ratings disappears.
7 Press HOME MENU to exit the menu.

NOTE
- Broadcasts with new (arriving) ratings are not reflected while the Parental Control menu is open.
- Blocking a rating causes more severe ratings to be automatically blocked. Likewise, unblocking a rating causes less severe ratings to be automatically unblocked.
Temporarily deactivating the Parental Control
When the activated Parental Control senses a blocked TV program (or content), the Plasma Display shows a message over a blank screen.
The method for temporarily deactivating the Parental Control differs, depending on the selected input source.
Antenna A or antenna B:
The following screen appears. Press ENTER.

Enter your 4-digit password.

- The password entry screen appears for approximately 60 seconds. If the screen disappears prematurely, press ENTER to reveal the screen again.
Input 1 - 4:
Enter your 4-digit password. Pressing ENTER again causes the password entry screen to disappear.

- The above password entry screen also appears during 2-screen mode, picture-in-picture, and while freezing an image.
- The password entry screen appears for approximately 60 seconds. After the screen disappears, pressing ENTER causes it to appear again.
Setting your favorite channels
Set up to 10 TV channels for each of the four color buttons on the remote control (40 channels in total).
1 Press HOME MENU.
2 Select "Tuner Setup". (↑/↓ then ENTER)
3 Select "Favorites". (←/→ then ENTER)
4 Select a color button (A, B, C, D). (↑/↓ then ENTER)
5 Select a TV channel to be registered. (↑/↓ then ENTER)

- A star appears beside the favorite channels currently selected.
• To register another TV channel under the same color button, repeat step 5. To register another TV channel under a different color button, repeat steps 4 and 5.
6 Press HOME MENU to exit the menu.
Setting up closed captions
Your Plasma Display System is equipped with an internal closed caption decoder. Closed caption allows you to view conversations, narration, and sound effects in TV programs and home videos as subtitles on your Plasma Display screen.
Many digital TV programs also offer closed captioning. Digital closed captions support changing parameters such as fonts and colors.
- Not all programs and videos offer closed caption. Please look for the "symbol to check for closed captioning on a program or video.
Activating the closed caption
1 Press HOME MENU.
2 Select "Tuner Setup". (↑/↓ then ENTER)
3 Select "Closed Captions". (←/→ then ENTER)
4 Select "Status". (↑/↓ then ENTER)
5 Select "On" or "On If Mute". (↑/↓ then ENTER)
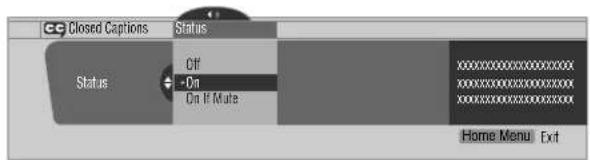
Item Description
Off Does not show closed captions (factory default)
On Always shows closed captions
On If Mute Shows closed captions only when sound is being muted
6 Press HOME MENU to exit the menu.
Selecting the type of conventional closed captions
Select a conventional TV channel before deciding on a type of closed captioning. Some digital TV programs provide only conventional closed captions.
- "CC1", "CC2", "CC3", or "CC4" displays subtitles of TV dramas and news programs while allowing a full view of the picture.
- "Text1", "Text2", "Text3", or "Text4" superimposes information over the picture (e.g. TV guide, weather) that is independent from the TV program in progress.
1 Press HOME MENU.
2 Select "Tuner Setup". (↑/↓ then ENTER)
3 Select "Closed Captions". (◄/► then ENTER)
4 Select "Analog Settings". (↑/↓ then ENTER)
5 Select the desired closed caption. (↑/↓ then ENTER)

• The factory default is "CC1".
6 Press HOME MENU to exit the menu.
Selecting digital closed captions
Use the following procedure to select digital closed captions: Service 1 to 6.
1 Press HOME MENU.
2 Select "Tuner Setup". (▲/▼ then ENTER)
3 Select "Closed Captions". (◄/► then ENTER)
4 Select "Digital Settings". (↑/↓ then ENTER)
5 Select "Digital Service". (↑/↓ then ENTER)
6 Select the desired closed caption. (↑/↓ then ENTER)

• The factory default is "Service 1".
7 Press HOME MENU to exit the menu.

NOTE
- When available, the Primary Caption Service is usually offered for Service 1, and the Secondary Language Service is usually offered for Service 2.
Selecting digital closed caption parameters
Use the following procedure to change digital closed captions parameters such as font size, font type, foreground and background colors.
1 Press HOME MENU.
2 Select "Tuner Setup". (↑/↓ then ENTER)
3 Select "Closed Captions". (◄/► then ENTER)
4 Select "Digital Settings". (↑/↓ then ENTER)
5 Select "Font Size", "Font", or any other item. (▲/▼ then ENTER)
6 Select the desired parameter. (↑/↓ then ENTER)
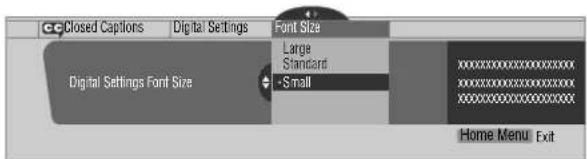
7 Repeat steps 5 and 6 as necessary. ( . ↗) ↑ ↓
8 Press HOME MENU to exit the menu.
The following table shows the available parameters for each item.
Item Selection
Font Size Auto/ Large/ Standard/ Small
| Font1 | Auto/ Font 1/ Font 2/ Font 3/ Font 4/ Font 5/ Font 6/ Font 7 |
| Font Color | Auto/ Black/ White/ Red/ Green/ Blue/ Yellow/ Magenta/ Cyan |
| Font Opacity | Auto/ Solid/ Transparent/ Translucent/Flashing |
| Background Color | Auto/ Black/ White/ Red/ Green/ Blue/ Yellow/ Magenta/ Cyan |
| Background Opacity | Auto/ Solid/ Transparent/ Translucent |
1 Font 1 (monospaced with serifs)/ Font 2 (proportionally spaced with serifs)/ Font 3 (monospaced without serifs)/ Font 4 (proportionally spaced without serifs)/ Font 5 (casual font)/ Font 6 (cursive font)/ Font 7 (small capitals font)
With "Auto" selected, parameters specified by the provider are used. If not specified by the provider, the bolded default parameters are used. Selected parameters override any other parameters, including those from the provider.
Clock Setting
With "Auto Set" selected for Clock Setting, the system acquires and sets the time automatically. You can also manually set the time. If power is lost (unplugged or power outage), the set time is cleared.
1 Press HOME MENU.
2 Select "Tuner Setup". (▲/▼ then ENTER)
3 Select "Clock". (←/→ then ENTER)
4 Select "Time Zone". (↑/↓ then ENTER)
5 Select a time zone for your area. (↑/↓ then ENTER)

6 Select "D.S.T.". (←, ↑/↓, then ENTER)
7 Select "Applies" or "Does Not Apply". (↑/↓ then ENTER)
- Set this option if your area uses Daylight Savings Time.
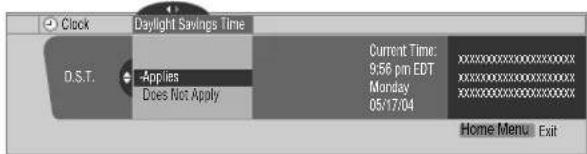
8 Select "Auto/Manual Set". (←, ↑/↓, then ENTER)
9 Select "Auto Set" or "Manual Set". (↑/↓ then ENTER)
Tuner Setup
10 If you chose "Auto Set", select an antenna (A or B) and a channel number using and ENTER.

- The date and time is corrected automatically using data from the selected channel.
If you select "Manual Set", manually set the date and time u s ↑↓ ↓ → / , / and ENTER.

11 Press HOME MENU to exit the menu.

NOTE
- If the TV Guide On Screen™ system is active, the Plasma Display accesses time through the TV Guide On Screen™ system. When the TV Guide is providing the time data, you cannot set up the clock using the menu. If you select a parameter for the Clock menu then press ENTER, the menu screen disappears and a dialog box appears. Press A to clear the dialog box.
Using the TV Guide On Screen™ system
Before you can use the TV Guide On Screen™ system, you'll need to set it up. If you haven't already done this, please turn to "TV Guide On Screen™ System Setup" on page 30 before proceeding.
In order to record TV programs with a VCR, you need to correctly connect the equipment to the Plasma Display. For VCR connection information, see page 69.

NOTE
- The TV Guide On Screen™ interactive program guide provides listings for cable-ready and digital cable services as well as conventional broadcast. It does not provide listings for satellite services.
- Once the TV Guide On Screen™ system is activated it may take up to 24 hours to begin receiving TV program listings. Initially, of all eight days of listings may take up to one week to load.
• TV Guide may not be available in all areas. As content providers move to digital programming and broadcasting, TV Guide data may be unavailable or become unavailable.
Screen components
Many of the screens have common elements to make using the system easier.

1 TV GUIDE logo
2 C l o c k – Shows the current time
3 Time slot – Half-hour time slots are displayed horizontally
4 Time t a b – Indicates the currently selected
5 Current service label – Indicates the currently selected service
6 Service bar – Gives access to the various TV Guide services.
7 Title – Shows the title of the TV program
8 Info Bar – Shows various icons to convey information or show the status of an item
9 Video window – Allows you to continue watching the current program while using the Guide
10 Panel ads and panel menu entry – Space for show or product advertising (and the panel menu)
11 Channel logo
12 Info Box – Shows information about the highlighted item
13 Channel ads – Space to advertise upcoming programs and specials
TV Guide On Screen™ icons
Various icons are used to convey information or show the status of an item. These icons can be on the Info Bar, inside the Info Box, or beside program titles.
- icon – Alerts that additional information is available (press INFO to display)
- Progress Bar – Shows the elapsed time of the current program
- HDTV – Indicates that a program is a high-definition broadcast
- New – The program is new (not a repeat)
- stereo – The program is broadcast in stereo
- CC – The program is broadcast with closed captioning
• TV Rating – Indicates the age rating for the program
- Record Once – One-time only recording
- Record Daily – Records the same channel and time every Monday through Friday (manual recording only)
- Record Regularly – Records the same program any day it airs on the same channel at the same time
- Record Weekly – Records a program every week at the same time/day
- Record Suspend – The program is set to record, but is suspended because of a conflict with another recording or auto tune reminder. The recording resumes when the conflict is cleared.
- Record Off – The program remains in the SCHEDULE list but is not recorded until the frequency is changed to one of the above
- Remind Once – One-time only reminder
- Remind Daily – Reminds for the same channel and time every Monday through Friday (manual reminder only)
- Remind Regularly – Reminds the same program any time slot. Day it airs on the same channel at the same time
- Remind Weekly – Reminds every week at the same time/day
- mind Suspend – A reminder is set for the program, but is suspended because of a conflict with another auto tune reminder or recording. The reminder resumes when the conflict is cleared.
- Remind Off – The program remains in the SCHEDULE list but the reminder is held until the frequency is changed to one of the above.
TV Guide On Screen™ navigation
The table below summarizes the TV Guide On Screen™ system navigation buttons for the remote control.
Key What it does
| TV GUIDE Press to display the TV Guide On ScreenTM system(also use to exit). | |
| ↑/↓/←/→ | Use to navigate screens (highlight an item) |
| ENTER | Press to confirm a selection or execute an actionCan also be used to display the panel menu whena future program is highlighted |
| MENU Press to display a panel menu | |
| INFO Press to cycle through the available informationfor the current program or screen | |
| ● REC | Press to set the highlighted program to record |
| Number buttons Use for numeric entry | |
| PAGE +/- Press to select the previous/next page ofinformation (where applicable) | |
| DAY +/- | Press to jump to the next/previous day of programlistings (if applicable) |
You can also use the panel's buttons, TV GUIDE, ENTER, UP/DOWN, and LEFT/RIGHT to make selections. The UP/DOWN and LEFT/RIGHT buttons operate the same as the ↑ and / ← → buttons on the remote control.

The Listings screen
The Listings screen is the main menu for the TV Guide On Screen™ system. This is the screen you see when you press TV GUIDE.
Options on the Listings screen include:
• View eight days of program listings.
• Display information about individual programs.
- Select a program to start watching.
- Set a reminder about a program.
- Set a program to record.
• See a thumbnail of any channel in the video window.
- Access panel and channel ads.
1 Press TV GUIDE to display the Listings screen.

- With "LISTINGS" highlighted in the Service bar (top of the screen), press INFO to display (then close) Help information.
- Press TV GUIDE anytime to exit.
2 P r e ↑s ↓s ← → / / t o n a v i g a t e t h e L
- With a program highlighted, press ENTER to start watching that program.
- Move right for programs showing at later times.
- Press PAGE+/- to scroll one menu page at a time.
- Press INFO to display additional information (if available) about the currently selected show.
- Press DAY+/- to jump to the next/previous day in the listings grid.
3 To set the highlighted program to record, press ● REC.

Pressing ● REC just once sets the program to record. Press ● REC repeatedly to change the frequency of the recording:
- Once – Just records the highlighted program
- Regularly – Records the same program any day it airs on the same channel at the same time ^1
• Weekly – Records the same program at the same time 1/ day every week
- No record icon – Does not record.
1 The program is recorded if it starts any time up to the midway point of the originally scheduled program. For example, up to 9:15 for a 9:00 to 9:30 program.
These recording options use the default settings.
To record using settings other than the defaults, use the panel menu recording option described below.

NOTE
- When TV Guide On Screen™ is not being displayed, you can record a program simply by pressing the REC button on the remote control. Press the REC button to record the current program episode. Recording begins immediately. If the program is listed in the TV Guide On Screen™, recording stops at the end of the program. If the program is not listed in the TV Guide On Screen™ system, recording continues for 30 minutes.
- When TV Guide On Screen™ is not displayed, pressing the REC button more than once has no effect.
Recording programs
The simplest way to record a program is to highlight it then press ● REC (as described above). However, if you want to set the recording options to anything other than the default, use the Recording Options panel menu. Here you can adjust the start and end times, the destination of the recording, etc.
1 From LISTINGS, SCHEDULE, or SEARCH, highlight the program you want to record.

2 Press MENU to display the Episode Options menu.

3 Highlight "set recording" then press ENTER.
4 Set the recording options:
Press ♠t◆highlight a field then press / t◆orange the setting.
- frequency – select whether the program will be recorded Once, Regularly (at the same time on the same channel), or Weekly (every week at the same time/day). The Off option adds the program to the recording schedule but doesn't record it (you can set it to record later).
- start – set the start time of the recording to On time, or up to 120 minutes before or after the scheduled time.
- end – set the end time of the recording to On time, or up to 120 minutes before or after the scheduled time.
- recorder – select a recorder to be used for recording.
- If you want to cancel the recording, highlight cancel then press ENTER.
5 Once all the settings have been made, press ENTER to highlight "schedule recording" then press ENTER again.

- The recording is now set (listed in SCHEDULE) and the appropriate icon appears on the show title.
If there is a time conflict with a previously scheduled recording or auto-tune reminder, you will be alerted by one of the messages below. You can select to record the conflicting program, or cancel the recording.

When the recording is about to start
The TV Guide On Screen™ system alerts you when a scheduled recording is about to start and gives you the chance to cancel the recording.
When you see the on-screen alert, select the next action;
- "change channel, start recording"
- "don't change channel: cancel recording"

Depending on the situation, the following screens may appear.

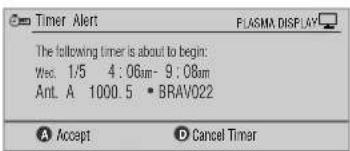
Press A to start recording as scheduled or D to cancel recording.
While recording is in progress
If you attempt to change the channel during recording, the following screen appears.
Select the next action:
- "don't change; keep recording"
- "change; stop recording"

Depending on the situation, the following screens may appear. This reminder remains on-screen for 15 seconds.
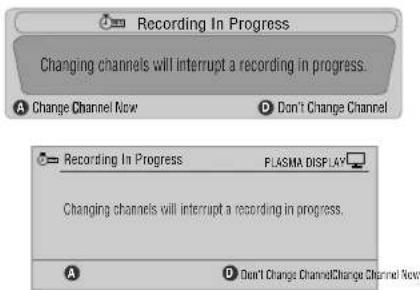
Press A to change the channel and quit recording; or press D not to change the channel and to continue recording.
Setting program reminders
By setting a program reminder you can have the TV alert you when a program is about to start on another channel. You can set reminders for individual episodes, or for every time a program airs.
1 From LISTINGS, SCHEDULE, or SEARCH, highlight the program.
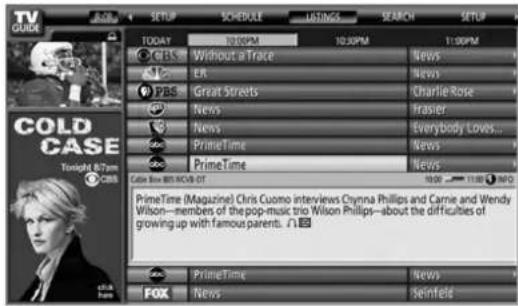
2 Press MENU to display the Episode Options menu.
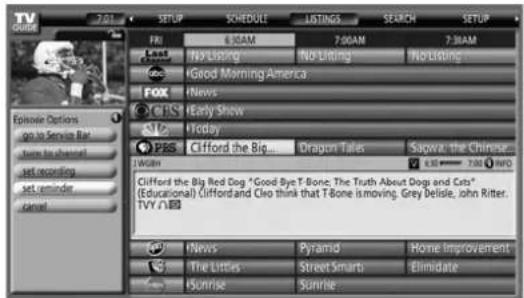
3 Highlight "set reminder" then press ENTER.
4 Set the reminder options.
Press ♦ t♦ highlight a field; press / t♦○→ange the setting.
- frequency – select whether to be reminded just Once, Regularly (at the same time on the same channel), or Weekly (every week at the same time/day). The Off option adds the program to the reminder schedule but no reminder is given (to be set later).
- auto tune – choose whether the TV should automatically change channels when a reminder is due.
- when – set when the reminder appears (before, on time, or after a program has started).
5 Once all the settings have been made, press ENTER to highlight "schedule reminder", then press ENTER again.

- The reminder is now set (listed in SCHEDULE) and the appropriate icon appears on the show title.
If there is a time conflict with a previously scheduled auto-tune reminder or recording, you will be alerted. One of the messages below will appear. You can select to set a reminder for the conflicting program or cancel the reminder.

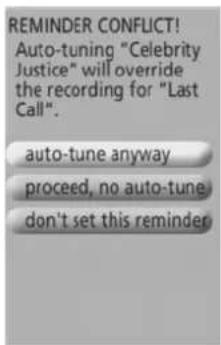
When a scheduled reminder is due (auto-tune is OFF)
Depending on your settings, the reminder will appear on your TV screen shortly before the program is scheduled to start. This happens when you have selected "NO" for the auto tune. The reminder remains on-screen for three minutes before it automatically disappears.
Press ENTER to switch to the highlighted program in the reminder or highlight "hide reminders" to dismiss the reminder.

If more than one reminder is set for the same time, press to select which program to watch.
Depending on the situation, the following screens may appear. The reminder remains on-screen for 15 seconds.
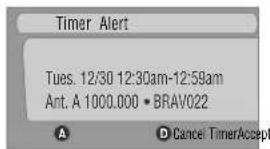

Press A to leave the reminder in effect, or D to dismiss the reminder.
When scheduled reminder is due (auto-tune is ON)
If the "auto-tune" setting was set to "yes" in the Remind Options, one of the following screens appears, depending on the situation.
The screen remains visible for 15 seconds.


Press A to make the Timer Alert screen disappear.
Searching for programs
The Search screen lets you search for programs alphabetically, by category, or by keyword. You can also search for HDTV programs.
Searching by category
This option supports searching for programs by category, and then by a further sub-category.
1 Select "SEARCH" from the Service bar at the top of the screen.
2 Press to move to the search category bar, then press
←/→to select a search category.

• Available categories may include:
- Movies
- Sports
- Children
• Educational - News
- Variety
- Series
• HDTV
3 Press to highlight the search sub-categories then select a sub-category.

- Sub-categories availability depends upon the category you choose.
4 Press ENTER to list upcoming programs that match the categories you chose.

5 Highlight a program listing then press MENU to display the Episode Options menu.
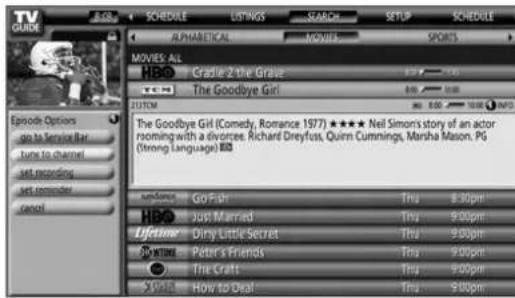
- If the program is currently showing, press ENTER to start watching it immediately.
Searching by keyword
This option supports searching for shows based on keywords you enter. The keywords you create are stored so you can use them again.
1 Select "SEARCH" from the Service bar at the top of the screen.
2 Press to move to the search category bar, then press /to select "KEYWORD".

- Previously entered keywords are displayed. Simply select one to search for it again.
- To edit or delete a keyword, highlight it then press MENU. From the panel menu you can choose "edit search" or "delete search".
3 Press ENTER to display the Keyword Search menu.

4 Select "new search".
5 If you want to change the category, scroll up to select the category you want.

- To search using only the keyword, leave the category set to "All".
- If you select a category ("HDTV", for example) then you'll only see programs in that category that also match the keyword.
6 Highlight "enter keyword" then press ENTER.
7 Input the keyword for the search.
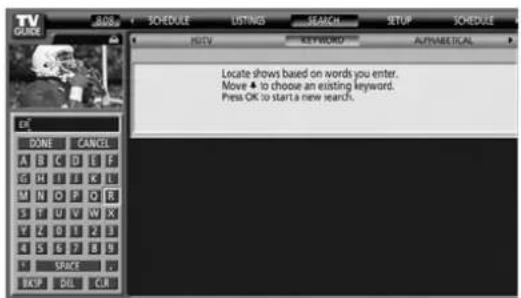
- Highlight c↑↓←→cters by ENTER to input the letter or number.
- The new keyword is stored for future searches.
8 Select "DONE" to start the search process.
9 Highlight a program listing, then press MENU to display the Episode Options menu.

- If the program is currently showing, press ENTER to start watching it immediately.
Alphabetical search
This search is designed to display all programs that start with a particular letter.
1 Select "SEARCH" from the Service bar at the top of the screen.
2 Press to move to the search category bar, then press ↕/→ to select "ALPHABETICAL".
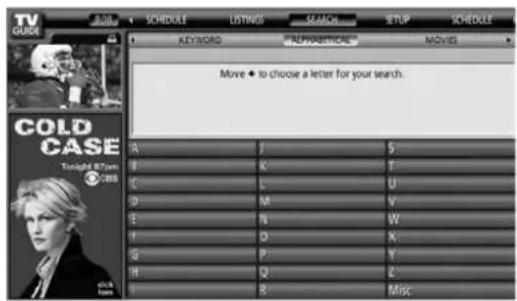
3 Press ENTER.
4 Select a letter, then press ENTER to display all programs starting with that letter.
5 Highlight a program then press MENU to display the Episode Options menu.

- If the program is currently showing, press ENTER to start watching it immediately.
The search Episode Options menu
From the Episode Options menu you can select:
- go to Service bar – closes the panel menu and returns to the Service bar at the top of the screen
- tune to channel / watch now – exits the TV Guide On Screen™ guide and tunes to the channel
- set recording – goes to the Record Options menu
- set reminder – goes to the Remind Options menu
- cancel – closes the panel menu and returns to the highlighted program
Navigation and search tips
- The buttons move the highlight between options in the menu. Use the number buttons to input information.
- If a highlighted field has arrows on either side, press to cycle through the options.
- Press ENTER on any option to highlight the default command (e.g., Done) then press ENTER again to execute and close the menu.
- Select Cancel then press ENTER to close the menu and return to the previous screen, or press MENU to close the menu without saving the changes.
Scheduling recordings and reminders
From the Schedule area you can review, edit or delete future recording sessions and reminders.
1 Select "SCHEDULE" from the Service bar at the top of the screen.

Programs marked for reminding or to be recorded (referred to as scheduled 'events') are listed. The icon on the right indicates the status of the event.
- Once only recording
• Daily Records the same channel and time every Monday through Friday (manual recording only)
- Regularly – Records the same program any day it airs on the same channel at the same time ^1
• Weekly recording (every week at the same time/day)
- Record Suspend – The program is set to record, but is suspended because of a conflict with another recording or auto tune reminder. The recording resumes when the conflict is cleared.
- Off: The program remains in the SCHEDULE list, but is not recorded.
- Once only reminder
• Daily Reminds for the same channel and time every Monday through Friday (manual reminder only)
- Regularly – Reminds the same program any day it airs on the same channel at the same time ^2
• Weekly reminder (every week at the same time/day)
- Remind Suspend – A reminder is set for the program, but is suspended because of a conflict with another auto tune reminder or recording. The reminder activates when the conflict is cleared.
• Off: The program remains in the SCHEDULE list but the reminder is not sent.
1 The program records if it starts any time up to the midway point of the originally scheduled program. For example, up to 9:15 for a 9:00 to 9:30 program.
^2 The reactivated reminder appears if the program starts any time up to the midway point of the original schedule. For example, up to 9:15 for a 9:00 to 9:30 program.
2 Highlight a program in the list then press MENU to display the Schedule Options menu.

- Highlight a program in the list to see information related to that program (data appears in the Info Box).
The Schedule Options menu
Press MENU with either "SCHEDULE" (in the Service bar) or a program highlighted to access the Schedule Options menu.
When "SCHEDULE" is highlighted in the service bar:
- go to Service Bar – closes the menu and returns to the Service bar at the top of the screen
- sort by – select a sort order for the program listings
- new manual recording – select then fill in the necessary fields to set the recording Select "schedule recording" to save and exit or select "cancel" to exit without saving.
- new manual reminder – select and then fill in all the necessary fields to set the reminder. Select "schedule reminder" when you're done to save and exit, or select "cancel" to exit without saving.
- done – closes the menu and returns to the Service bar at the top of the screen
- cancel – closes the menu without saving changes and returns to the Service bar at the top of the screen
When a program is highlighted:
- go to Service Bar – closes the menu and returns to the Service bar at the top of the screen
- watch now – selected program appears (this option is "tune to channel" for a future program)
- cancel – closes the menu and returns to the highlighted program listing
For recording:
- set recording – set the program to record (opens the Record Options menu)
- delete recording – remove the recording from the schedule (requires confirmation)
- edit recording – edit the recording settings (opens the Record Options menu)
For reminder:
- set reminder – set a reminder notice for the program (opens the Remind Options menu)
- delete reminder – remove the reminder from the schedule (requires confirmation)
- edit reminder – edit the reminder settings (opens the Remind Options menu)
Changing setup options
You can change TV Guide On Screen™ settings from the Setup menu. Setup options are divided into three categories: System Settings, Channel Display, and Default Options.
1 Select "SETUP" from the Service bar at the top of the screen.

2 Press to select a Setup option.

Adjustment options appear with each highlighted menu item.
- System Settings – ZIP/postal code, cable setup, etc.
- Channel Display – Channel position, tuning channel, display on/off, etc.
- Default Options – General, recording and reminder defaults
Changing the System Settings
The System Settings include your ZIP/postal code and your cable TV setup.
1 Highlight the "Change System Settings" item.

2 Press ENTER to display the current settings and the options to change them.

3 Select one of the options, then follow the on-screen instructions.
- Yes, everything is correct (displays a helpful information screen). Press ENTER to quit the TV Guide On Screen™ System.
- Yes, but my channel lineup is incorrect (displays a screen with alternate channel lineups). Press ENTER to display the Channel Editor screen.
- No, repeat setup process (displays Screen 1 shown on page 30).
Changing the Channel Display settings
From the Channel Display settings you can set/change:
- the display setting to always display (On), never display (Off), or display only when channel information is available (Auto Hide)
• the tuned channel number
• the channel position in the channel listing
1 Highlight the "Change Channel Display" item.

2 Press ENTER to display the channel editor.

3 Press ↑/↓ to highlight a channel then press ENTER to go to the Grid Options menu.

From the Grid Options menu you can set:
- channel – On (display in channel list), Off (don't display) or Auto Hide (hide when no program information is available)
- service – the type of service that the channel operates on (cable, etc.)
- tune channel – the channel number that the channel listing is tuned to
- position – place that the channel appears in the channel list
4 After making all selections for the channel, highlight "done" then press ENTER.
- To cancel without saving the changes, select "cancel".
Changing the Default Options
The menu provides options to change the default settings for recordings, reminders, and other general settings.
1 Select the "Change Default Options" item.
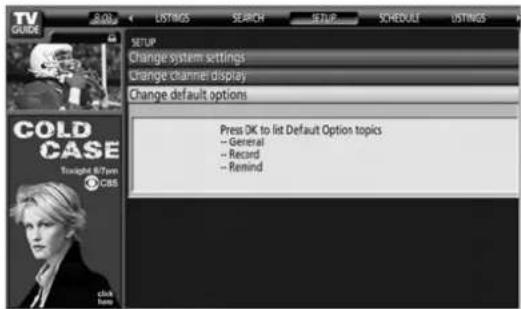
2 Select a default option category.
A different panel menu appears for each option.
General default options
- box size – the initial size of the Info Box (no, small, large, last used)
- box cycle – the cycle behavior of the Info Box (no only, small only, large only, no & small, no & large, small & large, all)
- auto guide – Display TV Guide On Screen™ guide automatically when you turn on the TV
Record defaults
- start – when to start a recording (up to 120 minutes earlier or later than the program start time, or On time)
- end – when to end a recording (up to 120 minutes earlier or later than the program end time, or On time)
- recorder – selects a recorder to be used for recording.
Remind defaults
- auto tune – automatically tunes to the correct channel when a reminder becomes due (Yes or No)
- when – set the display time for the reminder (15 minutes early to 15 minutes late, or On time)
3 When the settings are complete, highlight "done" then press ENTER.
- To cancel without saving the changes, select "cancel".
Sleep Timer
When the selected time elapses, the Sleep Timer automatically places the system into standby.
Press SLEEP to select the desired time.
• The timer starts counting.
• Each time you press SLEEP, the selection cycles as below:

• The factory default is "Off".

NOTE
- To cancel the Sleep Timer, select "Off" by pressing SLEEP.
- Five minutes before the selected time elapses, the remaining time appears every minute.
You can also use this menu to set the Sleep Timer.
1 Press HOME MENU.
2 Select "Sleep Timer". (↑/↓ then ENTER)
3 Select the desired time. (▲/▼ then ENTER)
4 Press HOME MENU again to exit the menu.
AV Selection
Viewing options depend upon the current environment (e.g., room brightness), the type of the current TV program, or the type of images input from external equipment. To change the view, follow the directions below.
1 Press AV SELECTION.
• The current AV Selection mode appears.
2 Press AV SELECTION again before the displayed mode disappears.
- For AV source, the mode cycles in this order; STANDARD, DYNAMIC, MOVIE, GAME, PURE and USER.
- For PC source, the mode toggles between STANDARD and USER.
You can also use the menu to change the options.
1 Press HOME MENU.
2 Select "Picture". (↑/↓ then ENTER)
3 Select "AV Selection". (▲/▼ then ENTER)
4 Select the desired option. (↑/↓ then ENTER)

For AV source
| Item Description | |
| STANDARD | For a highly defined image in a normally bright roomThis selection is shared by the external input and TV input sources. |
| DYNAMIC For a very sharp image with maximum contrastThis mode does not allow manual image quality adjustment.This selection is shared by the external input and TV input sources. | |
| MOVIE For moviesThis selection is shared by the external input and TV input sources. | |
| GAME Lowers image brightness for easier viewingThis selection is shared by the external input and TV input sources | |
| PURE Reflects input signals as faithfully as possibleFor example, you may select this option to check image materials. | |
| USER Allows you to customize settings as desiredYou can set the mode for each input source. | |
For PC source
Item Description
STANDARD For a highly defined image in a normally bright room
USER Allows you to customize settings as desired You can set the mode for each input source.
5 Press HOME MENU again to exit the menu.

NOTE
- You can also press AV SELECTION on the remote control unit to change the viewing option.
- Selecting the DYNAMIC viewing setting causes all other viewing options to become unavailable (grayed out).
Basic picture adjustments
Adjust the picture to your preference unless DYNAMIC was selected. The DYNAMIC setting automatically adjusts the image.
1 Press HOME MENU.
2 Select "Picture". (↑/↓ then ENTER)
3 Select an item to be adjusted. (↑/↓ then ENTER)

4 Select the desired level. (/)←→

- When an adjustment screen is displayed, you can also press ♠ change the item to be adjusted.
5 Press HOME MENU to exit the menu.
For AV source
| Item | ← button button | → |
| Contrast For less contrast For more contrast | ||
| Brightness For less brightness For more brightness | ||
| Color For less color intensity For more color intensity | ||
| Tint Skin tones become purplish | Skin tones become greenish | |
| Sharpness For less sharpness For more sharpness | ||
For PC source
| Item | ← button button | → |
| Contrast For less contrast For more contrast | ||
| Brightness For less brightness For more brightness | ||
| Red For weaker red | For stronger red | |
| Green | For weaker green | For stronger green |
| Blue | For weaker blue | For stronger blue |
For PC source, the following screen appears:
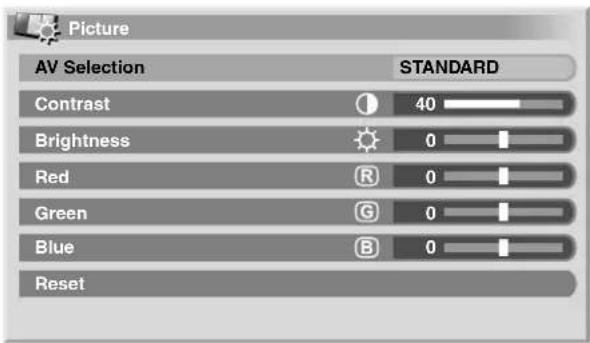

NOTE
- To perform advanced picture adjustments, select "Pro Adjust" in step 3 then press ENTER. For the subsequent procedures see "Advanced picture adjustments" on page 57.
- To restore the factory defaults for all items, press to highlight "Reset" in step 3 then press ENTER. A confirmation screen appears. Press to select "Yes" then press ENTER.
Advanced picture adjustments
The Plasma Display System provides various advanced functions for optimizing the picture quality. For details on these functions, see the following tables.
Using PureCinema
1 Press HOME MENU.
2 Select "Picture". (↑/↓ then ENTER)
3 Select "Pro Adjust". (↑/↓ then ENTER)
4 Select "PureCinema". (↑/↓ then ENTER)
5 Select the desired parameter. ( / then ENTER)
- For the selectable parameters, refer to the table below.
PureCinema
Automatically detects a film-based source (originally encoded at 24 frames/second), analyzes it, then recreates each still film frame for high-definition picture quality.
Selections Off Deactivates the PureCinema.
Standard Produces smooth and vivid moving images (film specific) by automatically detecting recorded image information when displaying DVD or high-definition images (e.g., movies) having 24 frames per second.
ADV Produces smooth and quality moving images (as shown on theatre screens) by converting to 72 Hz when displaying DVD images (e.g., movies) having 24 frames per second.

NOTE
- "Standard" is unavailable for 480p or 720p@60 Hz or 1080p@24 Hz (HDMI) signals.
- "ADV" is unavailable for 1080p@24 Hz (HDMI) signals.
Using Color Temp
1 Press HOME MENU.
2 Select "Picture". (↑/↓ then ENTER)
3 Select "Pro Adjust". (↑/↓ then ENTER)
4 Select "Color Detail". (↑/↓ then ENTER)
5 Select "Color Temp". (↑/↓ then ENTER)
6 Select the desired parameter. (↑/↓ then ENTER)
- If you have selected a desired parameter in this step, skip steps 7 and 8.
- An option is to apply a fine adjustment. To do this, select "Manual" first and then press and hold ENTER for at least three (3) seconds. The manual adjustment screen appears. Continue to step 7.
Color Temp
Adjusts the color temperature, resulting in a better white balance.
Selections High White with bluish tone
Mid-High Intermediate tone between High and Mid
Mid Natural tone
Mid-Low Intermediate tone between Mid and Low
Low White with reddish tone
Manual Color temperature adjusted to your preference
7 Select an item to be adjusted. (↑/↓ then ENTER)
8 Select the desired level. (/)
| Item | ← button | → button | |
| R High | Fine adjustment for bright portions | For weaker red | For stronger red |
| G High | For weaker green | For stronger green | |
| B High | For weaker blue | For stronger blue | |
| R Low | Fine adjustment for dark portions | For weaker red | For stronger red |
| G Low | For weaker green | For stronger green | |
| B Low | For weaker blue | For stronger blue | |
- To adjust another item, press RETURN, then repeat steps 7 and 8.
- Press to select another item for adjustment.
9 Press HOME MENU again to exit the menu.
Using CTI
1 Press HOME MENU.
2 Select "Picture". (↑/↓ then ENTER)
3 Select "Pro Adjust". (↑/↓ then ENTER)
4 Select "Color Detail". (↑/↓ then ENTER)
5 Select "CTI". (↑/↓ then ENTER)
6 Select the desired parameter. (↑/↓ then ENTER)
CTI
Color Transient Improvement (CTI) provides images with clearer color contours.
Selections Off Deactivates CTI
On Activates CTI
7 Press HOME MENU again to exit the menu.
Using Color Management
1 Press HOME MENU.
2 Select "Picture". (↑/↓ then ENTER)
3 Select "Pro Adjust". (↑/↓ then ENTER)
4 Select "Color Detail". (↑/↓ then ENTER)
5 Select "Color Management". (↑/↓ then ENTER)
6 Select an item to be adjusted. (↑/↓ then ENTER)

7 Select the desired level. (/)
| Item | ← button button | → |
| R Closer to magenta Closer to yellow | ||
| Y Closer to red Closer to green | ||
| G Closer to yellow Closer to cyan | ||
| C Closer to green Closer to blue | ||
| B Closer to cyan Closer to magenta | ||
| M | Closer to blue | Closer to red |
- To adjust another item, press RETURN then repeat steps 6 and 7.
- Press to select another item for adjustment.
8 Press HOME MENU again to exit the menu.
Using Color Space
1 Press HOME MENU.
2 Select "Picture". (↑/↓ then ENTER)
3 Select "Pro Adjust". (↑/↓ then ENTER)
4 Select "Color Detail". (↑/↓ then ENTER)
5 Select "Color Space". (↑/↓ then ENTER)
6 Select the desired parameter. (↑/↓ then ENTER)
Color Space
Changes the color reproduction space.
Selections 1 Optimized for vivid, vibrant color reproduction
2 Standard color reproduction
7 Press HOME MENU again to exit the menu.
Using Intelligent Color
1 Press HOME MENU.
2 Select "Picture". (↑/↓ then ENTER)
3 Select "Pro Adjust". (↑/↓ then ENTER)
4 Select "Color Detail". (↑/↓ then ENTER)
5 Select "Intelligent Color". (↑/↓ then ENTER)
6 Select the desired parameter. (↑/↓ then ENTER)
Intelligent Color
Intelligent Color (IC) automatically selects the optimum color tones for an image.
Selections Off Deactivates Intelligent Color
On Activates Intelligent Color
7 Press HOME MENU again to exit the menu.
Eliminating noise from images
1 Press HOME MENU.
2 Select "Picture". (↑/↓ then ENTER)
3 Select "Pro Adjust". (↑/↓ then ENTER)
4 Select "NR". (↑/↓ then ENTER)
5 Select an item to be adjusted. (↑/↓ then ENTER)
• Choose "DNR", "MPEG NR" or "BNR".
6 Select the desired parameter. (↑/↓ then ENTER)
DNR
Digital Noise Reduction (DNR) eliminates video noise for clean, crisp images.
Selections Off Deactivates DNR
High Enhanced DNR
Mid Standard DNR
Low Moderate DNR
MPEG NR
MPEG NR, video noise reduction for MPEG-encoded content, eliminates mosquito noise (tiny irregularities in the image) from video when a DVD is played. The result is a noise-free image.
Selections Off Deactivates MPEG NR
High Enhanced MPEG NR
Mid Standard MPEG NR
Low Moderate MPEG NR
BNR
Block Noise Reduction (BNR) helps reduce mosquito noise appearing in high-definition images.
Selections Off Deactivates BNR
On Activates BNR
7 Press HOME MENU again to exit the menu.
Using the Dynamic Range Expander (DRE) functions
1 Press HOME MENU.
2 Select "Picture". (↑/↓ then ENTER)
3 Select "Pro Adjust". (↑/↓ then ENTER)
4 Select "DRE". (↑/↓ then ENTER)
5 Select an item to be adjusted. (↑/↓ then ENTER)
- Choose "Dynamic Contrast", "Black Level", "ACL", "Gamma" or "Intelligent DRE".
6 Select the desired parameter. (↑/↓ then ENTER)
Dynamic Contrast
Dynamic Contrast (DC) emphasizes image contrast so that the difference between bright and dark areas become more distinct.
Selections Off Deactivates Dynamic Contrast
High Enhanced Dynamic Contrast
Mid Standard Dynamic Contrast
Low Moderate Dynamic Contrast
Black Level
Black Level (BL) emphasizes the dark portions of images so that the difference between bright and dark areas become more distinct.
Selections Off Deactivates Black Level
On Activates Black Level
ACL
Automatic Contrast Limiter (ACL) automatically selects the optimum contrast for an image.
Selections Off Deactivates ACL
On Activates ACL
Gamma
Gamma adjusts the image gradation characteristics.
Selections 1 Selects gamma characteristics 1
2 Selects gamma characteristics 2
3 Selects gamma characteristics 3
Intelligent DRE
Intelligent Dynamic Range Expander (DRE) optimizes the image quality.
Selections Off Deactivates Intelligent DRE
On Activates Intelligent DRE
7 Press HOME MENU again to exit the menu.
Using the 3DYC and I-P Mode
1 Press HOME MENU.
2 Select "Picture". (↑/↓ then ENTER)
3 Select "Pro Adjust". (↑/↓ then ENTER)
4 Select "Others". (↑/↓ then ENTER)
5 Select an item to be adjusted. (↑/↓ then ENTER)
- Choose "3DYC" or "I-P Mode".
6 Select the desired parameter. (↑/↓ then ENTER)
3DYC
3DYC optimizes characteristics for separating brightness signals and color signals. This works for both video and still images.
Selections Off Deactivates 3DYC
High Enhanced 3DYC
Mid Standard 3DYC
Low Moderate 3DYC
I-P Mode
I-P Mode optimizes conversion from interlace signals to progressive signals. This works for both video and still images.
Selections 1 Optimum for video images
2 Standard setting
3 Optimum for still images
7 Press HOME MENU again to exit the menu.

NOTE
- In I-P Mode, the individual parameters are unavailable for 480p and 720p@60 Hz signals.
Sound adjustments
Adjust the sound to your preference. See page 55.
1 Press HOME MENU.
2 Select "Sound". (↑/↓ then ENTER)
3 Select an item to be adjusted. (/)↑↓
4 Select the desired level. (/)←→
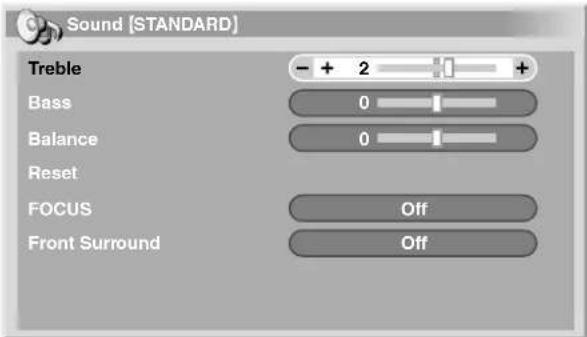
Item

button

on

Treble For weaker treble For stronger treble
Bass For weaker bass For stronger bass
Balance Decreases audio from the right speaker Decreases audio from the left speaker
5 Press HOME MENU again to exit the menu.

NOTE
- To restore all factory defaults, press Ato select "Reset" in step 3 then press ENTER. A confirmation screen appears. Press to select "Yes" then press ENTER.
FOCUS
Focus shifts the sound-source direction (sound image) upward and produces clear sound contours.
1 Press HOME MENU.
2 Select "Sound". (▲/▼ then ENTER)
3 Select "FOCUS". (/)↑↓
4 Select the desired parameter. (/)
Item Description
off Deactivates FOCUS
On Activates FOCUS
5 Press HOME MENU again to exit the menu.
Front Surround
Front Surround provides three-dimensional sound effects and/or a deep, rich bass.
1 Press HOME MENU.
2 Select "Sound". (↑/↓ then ENTER)
3 Select "Front Surround". (/)↑↓
4 Select the desired parameter. (/)
Item Description
Off Deactivates both SRS and TruBass
| SRS | Reproduces highly effective three-dimensional sound |
| TruBass(factory default) | Provides deep, rich bass using a new technology |
TruBass + SRS Provides both TruBass and SRS effects
5 Press HOME MENU again to exit the menu.

NOTE
• SRS(1)A FOCUS is on and TruBass + SRS is selected for Front Surround
• SRS (●) WOEMark of SRS Labs, Inc.
- WOW technology is incorporated under license from SRS Labs, Inc.
Power Control
Power Control provides convenient power saving options.
Energy Save
There are three Energy Save modes to reduce power consumption.
1 Press HOME MENU.
2 Select "Power Control". (↑/↓ then ENTER)
3 Select "Energy Save". (↑/↓ then ENTER)
4 Select "Save1", "Save2" or "Picture Off". (/ new ENTER)
Item Description
| Standard | Maximum picture brightness; may increase glass panel buzzing |
| Save1 | Slightly reduced power consumption and brightness; optimal setting for most uses |
| Save2 | Lowest power consumption; slightly decreased brightness |
| Picture Off | Deactivates the screen to save power. To restore the screen display, press any button other than VOL +/- and MUTINGThis setting is not memorized by the system. |
5 Press HOME MENU again to exit the menu.

NOTE
- When the signal is coming from a PC, use the Home menu to set this option.
No Signal off (AV mode only)
The system automatically enters Standby if no signal is received for 15 minutes.
1 Press HOME MENU.
2 Select "Power Control". (↑/↓ then ENTER)
3 Select "No Signal off". (↑/↓ then ENTER)
4 Select "Enable". (↑/↓ then ENTER)
| Item | Description |
| Disable (factory default) | Does not place the system into Standby |
| Enable | Places the system into Standby if no signal is received for 15 minutes |
5 Press HOME MENU again to exit the menu.

NOTE
- Five minutes before the system is placed into Standby, a message appears as each minute counts down.
- The system may not enter Standby if the TV program signal has a high video noise level.
No Operation off (AV mode only)
The system automatically enters Standby when no operation is performed for three hours.
1 Press HOME MENU.
2 Select "Power Control", (▲/▼ then ENTER)
3 Select "No Operation off". (▲/▼ then ENTER)
4 Select "Enable". (↑/↓ then ENTER)
Item Description
Disable Does not place the system into Standby (factory default)
Enable Places the system into Standby if no operation is performed for three hours
5 Press HOME MENU again to exit the menu.

NOTE
- Five minutes before the system is placed into Standby, a message appears as each minute counts down.
Power Management (PC mode only)
The system automatically enters Standby when no signal is received from the PC.
1 Press HOME MENU.
2 Select "Power Control". (↑/↓ then ENTER)
3 Select "Power Management". (↑/↓ then ENTER)
4 Select "Mode1" or "Mode2". (↑/↓ then ENTER)
Item Description
Off (factory default) No power management
Mode1 • Places the system into Standby when no signal is received from the PC for eight minutes
- Although the PC is accessed and a signal is received again, the system stays off.
- Press STANDBY/ON on the Plasma Display or TV Ⓧ on the remote control to turn the panel On
Mode2 • Places the system into Standby when no signal is received for eight seconds
- Access the PC (a signal is received again), the system turns On
- Press STANDBY/ON on the Plasma Display or TV ⏻ on the remote control to turn the panel On.
5 Press HOME MENU again to exit the menu.
Image position adjustment (AV mode only)
This function adjusts an image's horizontal/vertical position on the Plasma Display.
1 Press HOME MENU.
2 Select "Option". (↑/↓ then ENTER)
3 Select "Position". (↑/↓ then ENTER)
4 Select "H/V Position Adjust". (↑/↓ then ENTER)
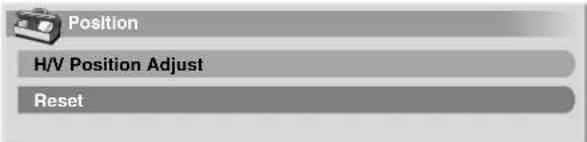
5 Adjust the vertical position ( / ) or horizontal position ( / ).
6 Press HOME MENU again to exit the menu.

NOTE
- To restore the factory defaults, press to select "Reset" in step 4 then press ENTER. A confirmation screen appears. Press to select "Yes" then press ENTER.
- Adjustments are stored separately for each input source.
- Depending on the displayed video, the image position may not change even after adjustment.
Automatic image position and clock (Hertz) adjustments (PC mode only)
Use Auto Setup to automatically adjust image positions and clock speeds when coming from a PC.
1 Press HOME MENU.
2 Select "Option". (↑/↓ then ENTER)
3 Select "Auto Setup". (▲/▼ then ENTER)

- Auto Setup begins.
4 Press HOME MENU again to exit the menu.

NOTE
- When Auto Setup is finished, "Auto Setup completed." appears.
- Although "Auto Setup completed." appears, Auto Setup may have failed, depending on conditions.
- Auto Setup may fail with a PC image composed of similar patterns or a monochrome picture. If Auto Setup fails, change the PC image and try again.
- The PC and the Plasma Display must be turned On before starting Auto Setup.
Manual image position and clock adjustments (PC mode only)
Usually you can easily adjust the positions and clock of images using Auto Setup. Use Manual Setup to optimize the positions and clock of images when necessary.
1 Press HOME MENU.
2 Select "Option". (↑/↓ then ENTER)
3 Select "Manual Setup". (▲/▼ then ENTER)
4 Select an item to be adjusted. (↑/↓ then ENTER)
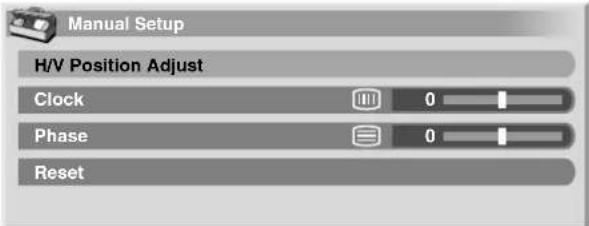
5 Perform adjustment. (/←r→) ↑↓
- With "Clock" or "Phase" selected, you can change the parameter using .
6 Press HOME MENU again to exit the menu.

NOTE
- To restore all factory defaults, press to select "Reset" in step 4 then press ENTER. A confirmation screen appears. Press to select "Yes" then press ENTER.
Selecting a screen size manually
In single-screen mode, press SCREEN SIZE to change the size of the screen. The Video signal determines the available screen size options.
- The selectable screen sizes differ depending on the type of input signal.
AV mode
| Item Description | |
| 4:3 | For 4:3 “standard” pictures (side bar appears on each side) |
| FULL For 16:9 squeezed pictures | |
| ZOOM | For 16:9 letterbox pictures (bars may appear on the top and bottom on some programs) |
| CINEMA | For 14:9 letterbox pictures (bars may appear on the top and bottom on some programs) |
| WIDE In this mode pictures are stretched to fill the screen, side to side | |

NOTE
- Avoid displaying signals that do not completely fill the screen. This may cause temporary or permanent image retention depending on the frequency and duration.
PC mode except for XGA signals
| Item Description |
| 4:3 Fills the screen without altering the input signal aspect ratio |
| FULL Full 16:9 screen display |
| Dot by Dot Matches input signal to the same number of screen pixels |
PC mode for XGA signals
| (Ex. 1024 × 768 input with PRO-1140HD) |
Item Description
| 4:3 Matches input signal to the same number of screen pixelsOptimized for 1024 × 768 display |
| FULL1 Full 16:9 screen displayOptimized for 1024 × 768 display |
| FULL2 For wide signal displayUse when displaying 1360 × 768 signal resolution |

NOTE
- In 2-screen mode, press SCREEN SIZE to change the size of the left screen.
- For the PRO-940HD the number of panel pixels is different. Signal processing and actual viewing conditions vary slightly.
11
Adjustments and Settings
- When watching a High Definition TV broadcast, press SCREEN SIZE to cycle through FULL, ZOOM, WIDE, and 4:3.
- High Definition TV broadcasting with WIDE selected may hide some of the screen image. If this is the case, select FULL.
- Some HD broadcasts may display 4:3 content with side masks. Extended viewing with the sides masked can cause uneven wear. After viewing 4:3 content, try watching a program in full screen motion video.
AV mode

flowchart
graph TD
    A["4:3"] --> B["WIDE FULL"]
    A --> C["CINEMA ZOOM"]
    B --> D
    C --> E
PC mode except for XGA signals

flowchart
graph TD
    A["4:3"] --> B["Dot by Dot"]
    A --> C["FULL"]
PC mode for XGA signals
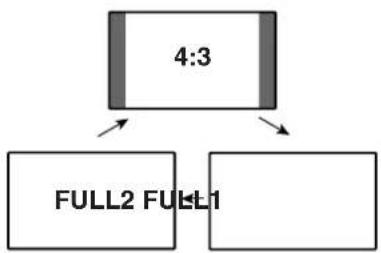
flowchart
graph TD
    A["4:3"] --> B["FULL2 FULL1"]

NOTE
- The selectable screen sizes may differ depending on the conditions.
Selecting a screen size automatically
The Plasma Display automatically selects an appropriate screen size when video signals are received from a connected HDMI device (see page 67). To activate this function, use the following procedure.
1 Press HOME MENU.
2 Select "Option". (↑/↓ then ENTER)
3 Select "Auto Size". (↑/↓ then ENTER)
4 Select "On". (↑/↓ then ENTER)
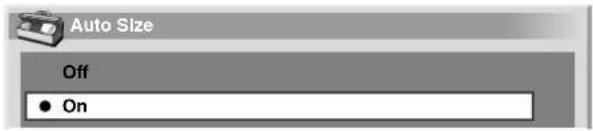
Item Description
Off Deactivates the Auto Size function (factory default)
On Activates the Auto Size function
5 Press HOME MENU again to exit the menu.

NOTE
- Manually select an appropriate screen size if an image does not automatically switch to the correct screen format.
- When the video signal contains no aspect ratio information, automatic screen sizing is unavailable.
Selecting a screen size for 4:3 aspect ratio signals
With the Auto Size function activated, choose whether the Plasma Display should choose the 4:3 mode or WIDE mode when 4:3 aspect ratio signals are received.
1 Press HOME MENU.
2 Select "Option". (↑/↓ then ENTER)
3 Select "4:3 Mode". (↑/↓ then ENTER)
4 Select "WIDE" or "4:3". (↑/↓ then ENTER)

Item Description
WIDE (factory default) Wide image without side masks
4:3 4:3 aspect ratio with side masks
4:3WIDE

natural_image
Exterior view of a two-story house with trees and a paved courtyard (no signage or text visible)
natural_image
Exterior view of a two-story house with trees and a clear sky (no signage or text visible)5 Press HOME MENU again to exit the menu.
Changing the brightness on both sides of the screen (Side Mask)
With the 4:3 screen size selected for the AV mode, you can change the brightness of the gray vertical bars (side masks) that appear on the sides of the screen.
1 Press HOME MENU.
2 Select "Option". (↑/↓ then ENTER)
3 Select "Side Mask". (↑/↓ then ENTER)
4 Select the desired parameter. (↑/↓ then ENTER)
Item Description
| Fixed (factory default) | Always sets the same brightness for the gray side masks |
Auto Adjusts the brightness of the gray side masks according to the brightness of images
5 Press HOME MENU again to exit the menu.

NOTE
- Displaying pictures in 4:3 screen mode for an extended period may cause an after-image. View another program at full screen afterwards to avoid this issue.
Language setting
To change the language being used for on-screen displays (such as menus in French or Spanish instead of English), follow the instructions below.
1 Press HOME MENU.
2 Select "Option". (↑/↓ then ENTER)
3 Select "Language". (↑/↓ then ENTER)
4 Select a language. (/)

5 Press HOME MENU again to exit the menu.
About External Equipment
You can connect many types of devices to your Plasma Display System. Some examples are a DVD player, VCR, PC, game console, or camcorder.
To view images coming from external equipment, select the input source using the INPUT buttons on the remote control or the INPUT button on the Plasma Display.

CAUTION
- To protect equipment, always unplug the Plasma Display from the power outlet before adding to a DVD player, VCR, PC, game console, camcorder, or other device.

NOTE
- Refer to the device's operating instructions (DVD player, PC, etc.) before connecting the equipment.
Watching a DVD image
Connecting a DVD player
Use the INPUT 2 terminals when connecting a DVD player or other audio/visual equipment.
Plasma Display (rear view)
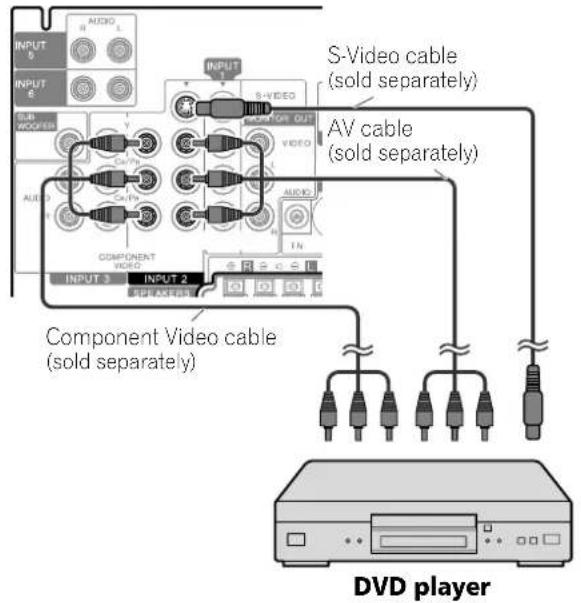
Displaying a DVD image
To watch a DVD image, press INPUT 2 on the remote control unit or press INPUT on the Plasma Display to select INPUT2.

NOTE
- Refer to your DVD player instruction manual for the signal type.
- The INPUT 2 terminals are checked whether they are connected in the following order; 1) Component Video, 2) S-Video, 3) Video. Use the desired connection for viewing.
- Connect external equipment to only terminals that are to be actually used.
Watching a VCR image
Connecting a VCR
Use the INPUT 1 terminals when connecting a VCR or other audio/visual equipment.
Plasma Display (rear view)

Displaying a VCR image
To watch a VCR image, press INPUT 1 on the remote control unit or press INPUT on the Plasma Display to select INPUT1.

NOTE
- INPUT 1 checks for S-Video connections first then for Video. Use the desired connection for viewing.
Using HDMI Input
The INPUT 5 and INPUT 6 terminals are HDMI terminals for digital video and audio signals. To use the HDMI terminal, specify the types of video and audio signals being sent from the connected equipment. For signal types refer to the device's operating manual.
Before bringing up the menu, press INPUT 5 (or INPUT 6) on the remote control or press INPUT on the Plasma Display to select INPUT 5 (or INPUT 6).
Input signal correlation table
| 1920×1080i@59.94/60 Hz |
| 720×480p@59.94/60 Hz |
| 1280×720p@59.94/60 Hz |
| 720(1440)×480i@59.94/60 |
| 1920×1080p@24 Hz |
For audio, the panel supports the following:
• Linear PCM (STEREO 2ch)
• Sampling frequency: 32 kHz, 44.1 kHz, 48 kHz

NOTE
• PC signals are not supported.
• Images are sometimes slow to appear with some external devices.
Connecting HDMI equipment
Plasma Display (rear view)

To specify the digital video signal type:
1 Press HOME MENU.
2 Select "Option". (↑/↓ then ENTER)
3 Select "HDMI Input". (↑/↓ then ENTER)
4 Select "Video". (▲/▼ then ENTER)
5 Select the type of digital video signals. (▲/▼ then ENTER)
• If you select "Auto", the panel automatically attempts to identify the type of digital video signal.
Item Description
| Auto (factory default) | Automatically identifies input digital video signals |
Color-1 Digital Component Video signals (4:2:2) locked
Color-2 Digital Component Video signals (4:4:4) locked
Color-3 Digital RGB signals locked
6 Press HOME MENU again to exit the menu.

NOTE
- If you select a parameter other than "Auto", verify that the setting results in the appropriate colors.
- If no image appears, specify another digital video signal type.
- Refer to the external device's operating instructions for digital video signal types.
To specify the type of audio signals:
1 Press HOME MENU.
2 Select "Option". (↑/↓ then ENTER)
3 Select "HDMI Input". (▲/▼ then ENTER)
4 Select "Audio". (▲/▼ then ENTER)
5 Select the type of audio signals. (↑/↓ then ENTER)
- If you select "Auto", the panel automatically attempts to identify the type of audio signal.
Item Description
| Auto (factory default) | Automatically identifies input audio signals |
Digital Accepts digital audio signals
Analog Accepts analog audio signals
6 Press HOME MENU again to exit the menu.

NOTE
- If there is no sound, specify another audio signal type.
- Refer to the external device's operating instructions for audio signal types.
- Depending on the equipment to be connected, you may also need to connect analog audio cables.
Using a game console or watching camcorder images
Connecting a game console or camcorder
Use the INPUT 4 terminals to connect a game console, camcorder, or other audio/visual equipment.
Plasma Display (left side view)
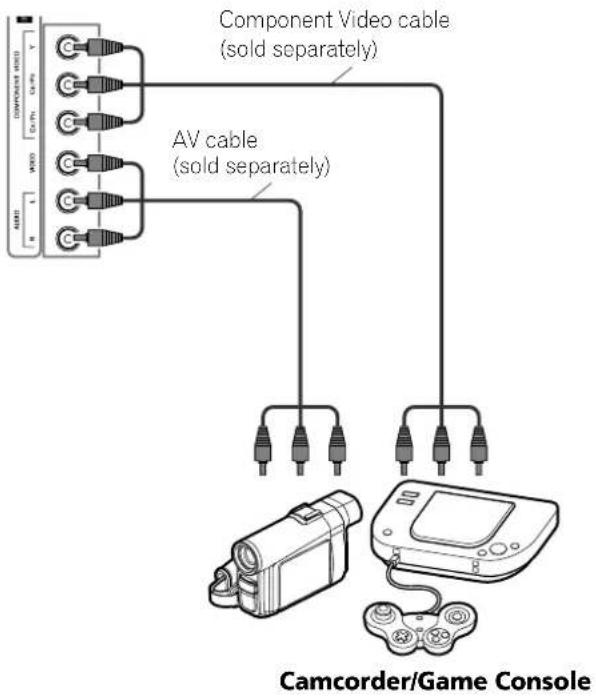

NOTE
- INPUT 4 checks for Component Video connections first then for Video. Use the desired connection for viewing.
- Only connect external equipment to terminals that are to be actually used.
Displaying an image of the game console or camcorder
To watch an image coming from the game console or camcorder, press INPUT 4 on the remote control or press INPUT on the Plasma Display to select INPUT4.
Recording digital TV programs using a VCR
To record, connect recording equipment such as a VCR to the panel's MONITOR OUT terminals (rear of the Plasma Display). You can also record digital TV programs more easily by using the TV Guide On Screen™ system. Connect the supplied G-LINK cable to the G-LINK terminal on the rear of the Plasma Display. Position the G-LINK cable's wand so that its light emitting section faces the remote control sensor on the recording equipment. For more information, see page 71.
Avoiding unwanted feedback
You can prevent unwanted feedback from affecting the image quality. To block the signal from the output terminal causing interference, follow the steps below.
1 Press HOME MENU.
2 Select "Option". (♠/↓ then ENTER)
3 Select "Monitor Out". (▲/▼ then ENTER)
4 Select "INPUT1 Prohibit", "INPUT2 Prohibit", "INPUT3 Prohibit", "INPUT4 Prohibit", "INPUT5 Prohibit" or "INPUT6 Prohibit". (↑/↓ then ENTER)
5 Press HOME MENU again to exit the menu.
Connecting a recorder
Plasma Display (rear view)


NOTE
- About the MONITOR OUT terminals
The MONITOR OUT terminals cannot output the following signals:
• Video signals input from the COMPONENT VIDEO terminal
• Video signals from a PC
• Digital video and audio signals from the HDMI terminals - When watching images from a VCR connected to the panel's MONITOR OUT, select an input source (e.g., TV channel reception) on the VCR other than an external input source. Selecting an external input source may cause distorted images or noise.
- Place the VCR in Standby when selecting TV programs to record using the TV Guide On Screen™ system.
- Using MONITOR OUT may cause delays between the speaker and AUDIO. If this delay occurs, try muting the speakers on the Plasma Display. However, you may still experience some delay between audio and video.
- The MONITOR OUT terminals cannot output any signals for networked audio or video.
- If degraded picture quality is observed while viewing copy-protected VOD movies connect the Plasma Display directly to other TV sets. Do not connect through a VCR.
Connecting other audio equipment
The panel's digital audio output terminal (optical) can output Dolby Digital signals. Using an optical digital cable, connect an AV receiver to the optical terminal on the rear of the Plasma Display. This allows high-quality audio, such as during a digital TV broadcast, to play.
If your AV receiver does not have a digital audio input terminal (optical), connect MONITOR OUT (AUDIO) on the rear of the Plasma Display to the audio input terminals on the AV receiver. This method may cause sound delays between the speakers and AUDIO. Try muting the speakers on the Plasma Display, however, you may still experience a delay between audio and video.

NOTE
- When using the digital audio output terminal (optical), set according to the AV receiver's requirements. For more information, refer to the AV receiver's operating instructions.
Connecting an AV receiver
Plasma Display (rear view)


NOTE
- For details, refer to the audio device's operating instructions.
- The audio accompanying the images shown on the display is always output to the SUBWOOFER OUTPUT terminal.
- When signals are input from the HDMI terminals, no digital or analog signals are output from the DIGITAL OUT terminal.
- Input signals from the Home Media Gallery may cause audio delays between the speakers and OPTICAL. Try muting the speakers on the Plasma Display; however, you may still experience delays between audio and video.
Switching the optical audio signal type
Set up for the DIGITAL AUDIO output terminal (OPTICAL), according to your AV receiver's operating instructions.
1 Press HOME MENU.
2 Select "Option". (↑/↓ then ENTER)
3 Select "Digital Audio Out". (▲/↓ then ENTER)
4 Select "Dolby Digital" or "PCM". (▲/▼ then ENTER)
Item Description
| Dolby Digital (factory default) | Dolby Digital: outputs in the Dolby Digital formatPCM: outputs in the PCM format |
PCM Always outputs in the PCM format regardless of the types of signals
5 Press HOME MENU again to exit the menu.
Watching an image from a computer
Connecting a personal computer
Use the PC terminals to connect a personal computer (PC).

NOTE
• The PC input terminals are DDC2B-compatible.
- Ability to use Plug & Play depends on the computer.
Plasma Display (rear view)

Personal Computer
Displaying an image from a PC
When connected to a PC, the input signal type is automatically identified. If the image from the PC does not come in clearly, you may need to use Auto Setup. See page 62.
To watch an image coming from the PC, press PC on the remote control or press INPUT on the Plasma Display to select "PC".

NOTE
- The PC terminals are for PC use only. Do not connect audio/visual equipment to PC terminals.
Signal names for 15-pin mini D-sub connector

(front view)
Pin No. Signal name
| 1 R |
| 2 G |
| 3 B |
| 4 Not connected |
| 5 Not connected |
| 6 GND (ground) |
| 7 GND (ground) |
| 8 GND (ground) |
| 9 +5V |
| 10 GND (ground) |
| 11 Not connected |
| 12 SDA |
| 13 HD |
| 14 VD |
| 15 SCL |

NOTE
- An Apple ^® Macintosh ^® adaptor may be required for use with some Macintosh computers.
Computer compatibility chart
Resolution Frequency
| 720 × 400 70 Hz | |
| 640 × 480 60 Hz | |
| 72 Hz | |
| 75 Hz | |
| 800 × 600 56 Hz | |
| 60 Hz | |
| 72 Hz | |
| 75 Hz | |
| 1024 × 768 60 Hz | |
| 70 Hz | |
| 75 Hz | |
| 1360 × 768 60 Hz | |
G-LINK™ connection
To record with a VCR through the TV Guide On Screen™ system, connect the VCR to the panel using the G-LINK cable.

NOTE
- In order to use a VCR with the TV Guide On Screen™ system, confirm the factors listed below. See "TV Guide On Screen™ System Setup" on page 30.
- The G-LINK cable's wand must be positioned so that its light emitting section faces the VCR's remote control sensor.
- The VCR is in Standby when selecting TV programs to record using the TV Guide On Screen™ system.
- Avoid the cable loops when making the connection.
Attaching the ferrite core
To help prevent noise, attach the supplied ferrite core to the connector end of the G-LINK cable as shown.

flowchart
graph TD
    A["Ferrite core"] --> B["G-LINK cable"]
    B --> C["Pull the cable slightly to take up any slack Ⓐ"]
    C --> D["Slack with Austria symbol"]
As close as possible

CAUTION
- Regarding the G-LINK cable, attach the supplied ferrite core. If you do not do this, this Plasma Display will not conform to mandatory FCC standards.
When connecting the VCR
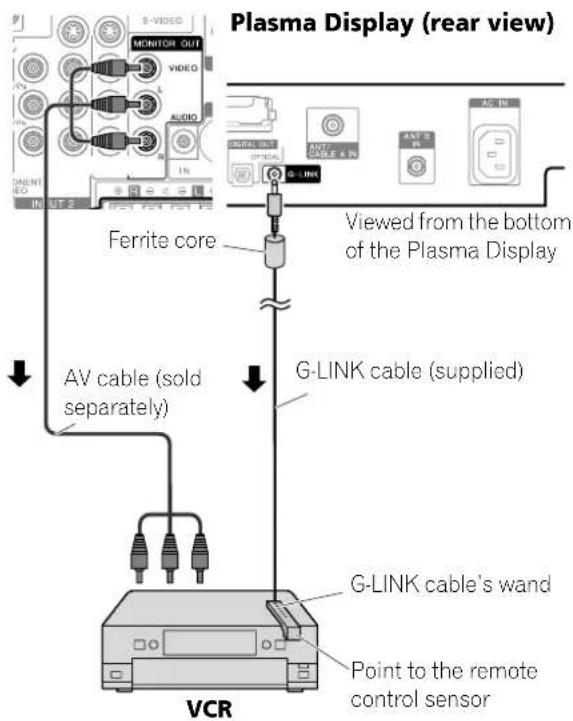
Connecting control cables
Connect control cables between the Plasma Display and other PIONEER equipment having the sp go. These control cables carry commands from a Pioneer device through its remote control to the remote control sensor on the Plasma Display. After the CONTROL IN terminals have been connected, the remote control sensors on the device does not accept commands from the remote control. Point the remote control at the remote control sensor on the Plasma Display to operate the device.

NOTE
- Make sure that the power is turned Off when connecting cables.
- Connect all components before plugging cables into the panel.
About SR+
The CONTROL OUT terminal on the rear of the Plasma Display supports SR+. This terminal supports linked operations with a PIONEER AV receiver. SR+ includes functions such as input switch linkage operation and DSP surround display. For more information, see the Pioneer AV receiver's operating instructions regarding SR+ support.

NOTE
- When connecting control cables, use the SR+ cable.
- When connecting one or more Pioneer devices, directly connect the Plasma Display and an SR+ supported Pioneer amplifier. Do not daisychain other equipment between the Pioneer units.
- When operating devices using SR+, volume on the Plasma Display is lowered temporarily.
Plasma Display (rear view)

flowchart
graph TD
    A["COMPONENT VIDEO INPUT 3"] --> B["COMPONENT VIDEO OUT"]
    B --> C["OUTPUT"]
    C --> D["CONTROL IN OUT"]
    D --> E["PRODUCTIONS BY/100/50Hz"]
    E --> F["PRODUCTIONS BY/100/50Hz"]
    F --> G["PRODUCTIONS BY/100/50Hz"]
    G --> H["PRODUCTIONS BY/100/50Hz"]
    H --> I["PRODUCTIONS BY/100/50Hz"]
    I --> J["PRODUCTIONS BY/100/50Hz"]
    J --> K["PRODUCTIONS BY/100/50Hz"]
    K --> L["PRODUCTIONS BY/100/50Hz"]
    L --> M["PRODUCTIONS BY/100/50Hz"]
    M --> N["PRODUCTIONS BY/100/50Hz"]
    N --> O["PRODUCTIONS BY/100/50Hz"]
    O --> P["PRODUCTIONS BY/100/50Hz"]
    P --> Q["PRODUCTIONS BY/100/50Hz"]
    Q --> R["PRODUCTIONS BY/100/50Hz"]
    R --> S["PRODUCTIONS BY/100/50Hz"]
    S --> T["PRODUCTIONS BY/100/50Hz"]
    T --> U["PRODUCTIONS BY/100/50Hz"]
    U --> V["PRODUCTIONS BY/100/50Hz"]
    V --> W["PRODUCTIONS BY/100/50Hz"]
    W --> X["PRODUCTIONS BY/100/50Hz"]
    X --> Y["PRODUCTIONS BY/100/50Hz"]
    Y --> Z["PRODUCTIONS BY/100/50Hz"]
When SR+ is not used:
Use mono sound control cables with mini plugs, no resistance (sold separately)
When SR+ is used:
Use the SR+ cable (sold as an option).
Enjoying the Home Media Gallery
With Home Media Gallery, you can enjoy digital content such as movies, music and photo files. These files can be saved on one or more media servers connected by a home network (LAN) or from content stored on USB devices. After connecting via an Ethernet hub to a media server with network software*, you can navigate through the server's digital content using the Plasma Display. For USB interface, the Plasma Display supports Mass Storage Class devices.
* Referred to as a "media server" that contains digital content such as movies, music and photo files. PCs that have pre-installed media server software and recorders with a media server function are considered the media server. Use PCs that have a Windows Media Connect (WMC) server or DLNA compliant server for the Home Media Gallery function.
Take a Windows Media Connect (WMC) server for example: Microsoft Media Server is freeware and works with any music jukebox-type software, although is optimized for Windows Media Player.
Installing Windows Media Connect
Before installing Windows Media Connect, make sure that Windows XP SP2 and other required software are installed. See Microsoft Website for details regarding minimum system requirements and installation procedures.
1 Download the most recent version of Windows Media Player
This can be downloaded either directly from the Microsoft Website, or using the Windows Update Installer.
2 Download the most recent Windows Media Connect software
This can be downloaded either directly from the Microsoft Website, or using the Windows Update Installer.
Supported file formats
The table below shows supported file formats that can be played back or displayed on the Plasma Display. These formats are applicable to both network and USB sources. However, media server content protected by digital rights management, such as WMDRM10 (Digital Rights Management for Windows Media 10), may not play on the Plasma Display.
Type of files Format
| Movie MPEG PS (mpg, mpeg, mpe, m2p), MPEG-2 TS/TTS, WMV (asf, wmv), MPEG4 (mp4) |
| Music MP3 (mp3), LPCM, WAV (wav), WMA (asf, wma) |
| Photo JPEG (jpg, jpeg), BMP (bmp), PNG (png), TIFF (tif, tiff), GIF (gif) |
- Some formats may not be supported depending on the server type or version used.

NOTE
- Content may not play or display properly depending on the conditions of use.
- Sources for this panel include media servers that support DLNA (Digital Living Network Alliance) and Windows Media Connect (WMC) running on the LAN network, or SD Card, MS, MMC, xD Picture and CF that comply with the Mass Storage File System through a USB interface.
- Supported formats and contents are subject to change. Visit the Pioneer website for updated information: http://www.pioneerelectronics.com
- The Home Media Gallery functions as a WMDRM10-ND (Microsoft Windows Media DRM for networked devices). Content can only be navigated from the media servers that support WMDRM10-ND.
- The system may not be able to display content from incompatible memory cards.
- You cannot use the Home Media Gallery until dimmed elements on the menu screen turn white.
Digital Audio Output terminal (Optical)

NOTE
- When using the optical output terminal for networked audio or video:
If the Plasma Display and audio system are in the same room, you may experience an audio delay between the plasma speakers and the audio system. Try muting the speakers on the Plasma Display to correct this delay. However, this action may cause delays between audio and video.
Making network connections
To connect to a network, set up the Home Media Gallery through the panel's menu. Connect to a home network (LAN) via an Ethernet hub or cable directly to a media server.

NOTE
- Although the Home Media Gallery supports 10BASE-T, it is better to use 100BASE-TX for improved display quality and speed.
Connecting via an Ethernet hub
If you already operate one or more media servers on a local area network (LAN), connect the Plasma Display to the Ethernet (LAN) hub using a standard ("straight-through") Ethernet (LAN) cable. See the diagram below.

flowchart
graph TD
    A["Media Server 1"] --> B["Ethernet Hub (Router with hub function)"]
    B --> C["Plasma Display (rear view)"]
    C --> D["Viewed from the bottom of the Plasma Display"]
    D --> E["Straight-through Cable"]
    E --> F["Plasma Display (rear view)"]
    F --> G["Computer"]
    H["Media Server 2"] --> I["Computer"]
    I --> J["Plasma Display (rear view)"]
    J --> K["Computer"]
    L["Media Server 1"] --> M["Computer"]
    M --> N["Plasma Display (rear view)"]
    N --> O["Computer"]
Connecting directly to a Media Server
To run a PC as a media server, connect the Plasma Display directly to the PC using a twisted ("cross-over") Ethernet (LAN) cable. See the diagram below.

Confirming the IP Address
After making the network connection, follow the instructions below to confirm the panel's IP Address before accessing the network. (The setup is effective for "Auto" only. To perform the procedure, DHCP on your server or router must be valid.)
1 Press HOME MENU.
2 Select "Home Media Gallery" (↑/↓ then ENTER).
3 Select "Setup" (▲/▼ then ENTER).
4 Select "Network Setup" (▲/▼ then ENTER).
5 Select "Automatically acquire IP" (//▲ther←→ ENTER).
- The screen turns from "Select" mode to "Input" mode.
6 Select "Yes" (↑/↓ then ENTER).
• The IP Address is automatically assigned.
- The Home Media Gallery supports Auto IP and DHCP (Dynamic Host Configuration Protocol). If the system failed to acquire the IP Address or if you want to obtain different addresses, select "No" then enter "IP Address" and "Subnet mask". Use the 0 to 9 and /// buttons to enter an address, then press ENTER. You do not need to enter "Default Gateway" and "DNS Server".
7 Select "OK" (▲/↓ then ENTER).
- The "Reset" dialog appears on screen.
8 Select "OK" and press ENTER.
• The home network module restarts.
- A message "Setting up Home Media Gallery. Please wait until initialized." appears on screen.
- When the initialization is finished, setting values become effective and the top menu of the Home Media Gallery returns.

NOTE
- For information on DHCP, refer to network device's operating instructions.
- You may need to contact your service provider or network administrator when manually entering an IP Address.
- Some media servers block or are programmed to block access to client servers. When connecting the Plasma Display, check the media server for client server access rights.
Connecting a USB device
You can also enjoy content stored on memory cards by connecting a USB device to the Plasma Display. When you insert a USB memory or multi-card reader into the USB port, the root directory or the Device List screen appears. In addition, you can connect your digital camera directly to the Plasma Display using a USB connector cable.
1 Press HOME MENU.
2 Select "Home Media Gallery" (↑/↓ then ENTER).
3 Select "USB" (↑/↓ then ENTER).
- The Device List is displayed on screen with the selected device highlighted if you have not checked in the "Single Server/USB" box after selecting "Setup" and then "Auto Connection Setup". If you have checked in the box, the list is skipped.
4 Select the desired device ( / then ENTER).
- You can select a device only when the Device List is displayed.
5 Press ENTER to navigate to a folder or play a file/content.
• To return to the previous screen, press RETURN.
6 Press HOME MENU again to exit the Home Media Gallery.

NOTE
- If the Home Media Gallery is launched and the "Single Server/USB" box is checked after selecting "Setup" and then "Auto Connection Setup", the system displays the root directory immediately after inserting a USB device. In this case, you can start from step 5. When a multi-card reader is inserted, the Device List appears with the selected device highlighted. In this case, you can start from step 4.

flowchart
graph TD
    A["USB flash memory"] --> B["Plasma Display"]
    C["Digital Camera with USB Mass Storage Class"] --> B
    D["Computer"] --> B
Flash media via USB adapter (Multi-card Reader)
Readable memory cards
This system reads FAT12, FAT16, FAT32, or VFAT Memory Cards.
Readable data files
Movie, music and photo files can also be played with the exception of Digital Rights Management for Windows Media 10 (DRM) protected files.

NOTE
- A single USB device can be connected at a time and no USB hub connected.
- This system may not be able to display modified or edited content from a PC or other equipment.
• This system supports the USB Mass Storage Class.
Removing a USB device
To remove a USB device, exit the Home Media Gallery first and then disconnect the device.

NOTE
- Be sure to exit the Home Media Gallery screen before removing the USB device. If you remove the USB device while the Home Media Gallery screen is displayed, data inside the memory may be damaged.
- Do not insert or remove the USB device immediately after the system is switched On or Off. This action may cause data inside the memory to be damaged.
- PIONEER is not liable for any loss or damage to the data inside the USB memory.
Starting the Home Media Gallery function
1 Press HOME MENU.
2 Select "Home Media Gallery" (↑/↓ then ENTER).
3 Select "Media Navigator", "USB", "My Playlist" or "Setup" (↑/↓ t h e n ENTER).
• To return to the previous screen, press RETURN.
4 Press HOME MENU again to exit the Home Media Gallery.

Navigating the files and folders
By selecting Media Navigator, the previously selected server menu is automatically displayed on the screen by default (page 88). When only one server is found, the system automatically connects the server. You can also use the Tool Menu to switch to another server or manually select a server from the Server List. The display is automatically changed to a server list if there are no previously navigated servers.
1 Press HOME MENU.
2 Select "Home Media Gallery" (↑/↓ then ENTER).
3 Select "Media Navigator" (↑/↓ then ENTER).
- A server menu appears. The file/folder configuration may vary depending on the server selected.
- After selecting a category, folder or container and navigating on subsequent screens, you can find a file and start the appropriate Player depending on the selected file.
4 Select the desired folder to navigate or file/content to play
(←/→ o ↑ ↓ then ENTER).
5 Press ENTER to display a subsequent screen.
- Subsequent screen(s) appears.
• To return to the previous screen, press RETURN.
6 Press HOME MENU again to exit the Home Media Gallery.
Selectable screen display
Menu display options are: "List", "Thumbnail" or "Thumbnail List". Press D then select "Change view" from the Tool Menu to choose from the screen display options.
List screen

Using the Tool Menu
Press D on the remote control to access the pop-up Tool Menu. Various play and display modes can be selected from the Tool Menu. The selectable menu items differ depending on the submenu (see the table below).
| Menu items Function | Screen on which Tool Menu is available | |
| Update to Latest Information | Updates the server connection status | Server List (connected/not connected) |
| Delete Server | Deletes the server(s) that are dimmed on the list | Server List (server not connected) |
| USB Devices List | Moves to the USB Devices List screen | Folder Contents List (USB)/Contents List (USB) |
| Consecutive Playback | Continuously plays video content starting from the selected item | Media Navigator/Folder Contents List/Contents List |
| Detailed Display | Displays the detailed information on the selected content | Media Navigator/Folder Contents List/Contents List |
| Sort Sorts items in Folder or Contents List | Media Navigator/Folder Contents List/Contents List | |
| Search Searches the desired items in Folder or Contents List by word | Folder Contents List/Contents List | |
| Menu items Function | Screen on which Tool Menu is available | |
| Slide Show Setup | Used to set up a slide-show on the Photo Player | Server List/Media Navigator/USB/My Playlist/Playlist List (Movie/Music/Photo)/Folder Contents List/Contents List/Photo Player |
| Add to My Playlist*1 | Adds the selected files to My Playlist | Media Navigator/Folder Contents List/Contents List/Movie Player/Music Player/Photo Player |
| Select Server | Moves to the Server List screen | Media Navigator/Folder Contents List/Contents List |
| Stop Music*2 | Stops playback of a music file | Media Navigator/ Playlist List (Movie/ Music/ Photo)/Folder Contents List/Contents List/Music Player/Photo Player |
| Change Name | Used to change content names in My Playlist | Playlist List (Movie/ Music/Photo) |
| Change view | Switches the screen display to List, Thumbnail, or Thumbnail List | Folder Contents List/ Contents List |
| Time Search | Starts playback at the preset time on the Movie or Music Player screen | Movie Player/Music Player |
| Slow Playback | Plays back in the slow mode on the Movie or Music screen | Movie Player/Music Player |
| BGM Setup | Used to set up the slide-show BGM on the Photo Player | Photo Player |
| Move | Moves the order of content in My Playlist | Contents List (Playlist) |
| Delete from My Playlist*1 | Deletes the selected content from My Playlist | Contents List (Playlist) |
*1 When a file is selected
*2 While music is played

Media Navigator
While navigating through the folders a media server provides, you can select the desired file to start the corresponding player by pressing ENTER.
Screen Components

1 Thumbnail of the file selected (if obtained)
2 Name of the server currently selected
3 Current menu level
4 Item being selected (highlighted in yellow)
5 File number/total number of files
6 Number of servers connected
7 Key guide

NOTE
- The Media Navigator is not launched depending on the option selected in "Auto Connection Setup" (page 88). The screen displays after selecting a server in the server list.

USB
Like navigating through the media servers, you can select the desired file contained in the device selected on the USB Devices List screen to start the corresponding player by pressing ENTER. You can also select the menu displayed on either "List", "Thumbnail" or "Thumbnail List" screen. Press D and select "Change view" from the Tool Menu.

NOTE
- The USB Devices List screen may not be displayed depending on the option selected in "Auto Connection Setup". "Single Server/USB" is selected for "Auto Connection Setup" by default. You don't need to select a device in the USB Devices List when you use a single directory device (USB memory).

My Playlist
Each category (Movie, Music and Photo) has five different Playlists in which you can register up to 100 files each. The My Playlist option can contain sound and image files selected in the "Media Navigator". To edit a Playlist, use the Tool Menu (page 76).
1 Press HOME MENU.
2 Select "Home Media Gallery" (↑/↓ then ENTER).
3 Select "My Playlist" (↑/↓ then ENTER).
4 Select a Playlist list from "Movie Playlist", "Music Playlist" or "Photo Playlist" (▲ then ENTER).
5 Select the desired content (←/→ or ↑/↓ then ENTER).
- The menu can be displayed as a "List", "Thumbnail" or "Thumbnail List" screen. Press D then select "Change view" from the Tool Menu (▲then ENTER).
6 Press ENTER to play or display.
• To return to the previous screen, press RETURN.
7 Press HOME MENU again to exit the Home Media Gallery.
Enjoying movie files
You can display the menu as a "List", "Thumbnail" or "Thumbnail List" screen. Press D then select an option under "Change view" on the Tool Menu. You can also navigate through the subsequent or preceding menu levels in the server
or USB de e ◆ ◆ e by press in select movie content from the server menu on the Media Navigator screen, the Movie Player automatically launches. Select a category, folder, or device to access the submenu containing the required file or content.
The Movie Player screen appears when you select a movie file from My Playlist, just like selecting a file in the server.
Screen Components
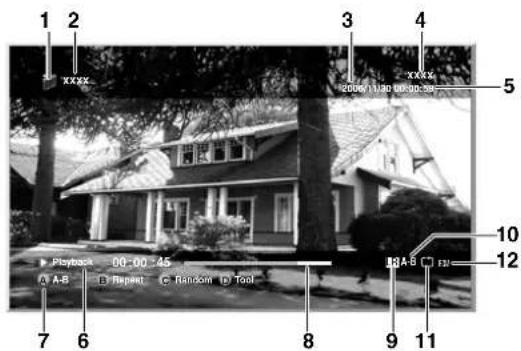
1 Movie icon
2 Title (Category or Folder name)
3 Date
4 Album name
5 Play time
6 Play status
7 Key guide
8 Progress bar
9 Audio mode icon
10 A-B repeat mode icon
11 Repeat mode icon
12 Random mode icon (appears when the mode is valid)
Movie Player key guide
| ENTER: | Pauses while playback or plays back while in PAUSE |
| ←: | Fast reverse during playback or when in PAUSE. Each press toggles the reverse speed between x 2, x 4, x 8, x 20, x 50, and x 100 or the slow mode speed between x 1/2, x 1/4, x 1/8, and x 1/16. When the beginning of the content is reached, it pauses. |
| →: | Fast forward while playback or PAUSE. Each press toggles the forward speed between x 2, x 4, x 8, x 20, x 50, and x 100 or the slow mode speed between x 1/16, x 1/8, x 1/4, and x 1/2. When the end of the content is reached, it pauses. |
| ↑: | Skips 15 seconds backward and plays back or pauses while in PAUSE |
| ↓: | Skips 15 seconds forward and plays back or pauses while in PAUSE |
| ▶ (PLAY): Plays back the content | |
| II (PAUSE): Pauses the playback | |
| ■ (STOP): | Stops the Player and returns to the previous screen (List/Thumbnail/Thumbnail List) |
| ▶▶ (FF): | Same as →only fast forward function while in the slow mode) |
| ◀◀ (RWD): | Same as ←only fast reverse function while in the slow mode) |
| A (BLUE): Sets A-B repeat mode. Sets the desired point A to start and B to end during playback. To cancel the mode, press A (BLUE) on the remote control. | |
| B (RED): Every press toggles the repeat mode between “No Repeat” and “Repeat Once” or between “No Repeat”, “Repeat Once” and “Repeat All” while in Playlist | |
| C (GREEN): | Available only in Playlist or “Consecutive Playback” mode. Every press toggles the random mode between “Random Off” and “Random On”. |
| D (YELLOW): Switches the Tool Menu display on and off. Even if the Tool Menu is displayed while content is played back, a movie is kept playing but the time counter and progress bar do not function. | |
| INFO: Displays the Player status at the bottom of the screen while a movie is played back. Another press of the key displays a key guide, as well. Pressing the key once more cancels all the information display. | |
| MTS: | Every press of the key toggles the audio mode between “L + R”, “L” and “R” |
| RETURN: | Same function as STOP |
| VOL+, VOL-: | Adjusts the sound volume |
| MUTING: | Mutes the sound |
| HOME MENU: Quit the Home Media Gallery and returns to the last entry screen. Resumes the content selected again on the Home Media Gallery. | |
Play modes
| Time Search | (Tool Menu) | Plays back the selected content from the time preset on the Movie Player |
| Slow Playback | (Tool Menu) | Plays back the content in slow mode on the Movie or Music Player |
| Add to My Playlist | (Tool Menu) | Adds the selected content to My Playlist List (Not available while movie content in the Playlist is played back.) |
| Stop Movie Player | ■ (STOP), RETURN | Stops the Movie Player |
| Fast Forward/ Fast Reverse | ←/→.←/→ | See the key guide table |
| Forward/ Reverse (15 sec.) | ↑/↓ | See the key guide table |
| Play | ENTER, ▶ (PLAY) | See the key guide table |
| A-B Repeat Mode | A (BLUE) | See the key guide table |
| Repeat Mode | B (RED) | See the key guide table |
| Random Mode | C (GREEN) | See the key guide table |
| (Tool Menu) | D (YELLOW) | See the key guide table |

NOTE
- Some functions may not be supported depending on the server type or version used.
Time Search
1 In playback mode or PAUSE, press D then select "Time Search" from the Tool Menu (▲ then ENTER).
- A "Time Search" dialog screen appears.
2 Select "Hour" and/or "Minute" for "Input Time" (/ then ENTER).
- Enter the desired time using buttons 0 to 9.

3 Press ENTER after the entry is complete.
4 Select "OK" (↑/↓ then ENTER).
- The movie begins playing from the time you set. - To cancel the Time Search, select "Cancel" and press ENTER.
5 Press HOME MENU to exit the Home Media Gallery.
Slow Playback
1 In playback mode or PAUSE, press D then select "Slow Playback" from the Tool Menu.
2 Press ENTER.
- Slow playback begins.
- You can change the playback speed by pressing while in the slow mode.
- To discontinue slow playback, press ENTER or PLAY. The system returns to the normal playback mode.
3 Press HOME MENU to exit the Home Media Gallery.
Add to My Playlist
1 While navigating or playing, select the file to be added to My P i st ( / / / then
2 Press D then select "Add to My Playlist" from the Tool Menu (▲ then ENTER).
- A "Playlist Selection" dialog screen appears.
3 Select a Playlist (↑/↓ then ENTER).
- A check mark is provided beside the selected Playlist.
- When you select a different Playlist and press ENTER, the mark jumps to the new Playlist from the previously selected one.

4 Select "OK" (↑/↓ then ENTER).
- The file is added to the selected Playlist.
- To cancel the operation, select "Cancel" then press ENTER.
5 Press HOME MENU to exit the Home Media Gallery.
Fast Forward/Fast Reverse
1 While playing content, press and hold ← for Fast Reverse or press and hold → for Fast Forward.
Forward/Reverse (15 sec.)
1 While playing content, press and hold or to jump backward or forward in 15-second increments.
A-B Repeat Mode
1 While playing content, press A where you want repeat to start.
2 Press A again where you want repeat to end.
- The Player status appears on the screen and the A-B mode icon changes.
• The selected movie scenes are repeatedly played back. - To return to normal mode, press A again while in the A-B repeat mode.
3 Press HOME MENU to exit the Home Media Gallery.

NOTE
- The A-B repeat function is only available during playback in normal mode. ENTER).
Repeat Mode
1 While playing content in the Media Navigator or USB device, press B to select "Repeat Once".
• The title being played is repeated.
2 Press B again to cancel the repeat mode ("Repeat Off" is selected).
• After playing the currently selected title, the Player stops.
3 Press HOME MENU to exit the Home Media Gallery.

NOTE
- When playing content in the Playlist, you can select from "Repeat Off", "Repeat All" (plays all items in the Playlist repeatedly) or "Repeat Once" (plays the content being watched repeatedly).
Random Mode
1 While playing content in the Playlist, press C to select "Random On".
• Random Repeat playback starts.
2 Press C again to cancel the random mode ("Random Off" is selected).
3 Press HOME MENU to exit the Home Media Gallery.

NOTE
- The Random Repeat mode is only available for content in the Playlist, or in "Consecutive Playback" mode.
Enjoying music files
You can display the menu as a "List", "Thumbnail" or "Thumbnail List" screen. Press D then select an option under "Change view" on the Tool Menu. You can also navigate through the subsequent or preceding menu levels in the server or USB de bypres When you select music content from the server menu on the Media Navigator screen, the Music Player automatically launches. Select a category, folder, or device to access the submenu containing the required file or content. The Music Player screen appears when you select a music file from My Playlist, just like selecting a file in the server.

NOTE
- The Music Player only displays a "List" screen.
Screen Components
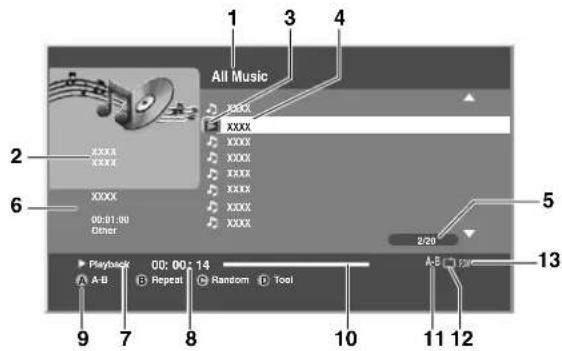
| ↑: | Moves up a cursor to a title above |
| ↓: | Moves down a cursor to a title below |
| ENTER: ring / | Plays back the selected music content. Pauses the music content being played if it is highlighted in the Playlist screen or plays the selected music content if different content is highlighted by pressing ↑/↓. |
| ←: | Fast reverse during playback or when in PAUSE. Each press toggles the reverse speed between x 2, x 4, x 8, x 20, x 50, and x 100. When the beginning of the content is reached, it pauses. |
| →: | Fast forward during playback or when in PAUSE. Each press toggles the forward speed between x 2, x 4, x 8, x 20, x 50, and x 100. When the end of the content is reached, it pauses. |
| RETURN: | Returns to the previous screen (List/Thumbnail/Thumbnail List). Content being played does not stop. |
| ▶(PLAY): | Plays back the selected content. Pauses while in playback and plays while in PAUSE. |
| II(PAUSE): | Pauses the playback |
| ■(STOP): | Stops the Player and does not return to the previous screen (Selecting the "Stop Music" from the Tool Menu also stops the Player.) |
| ▶▶(FF): | Same as → |
| ◀◀(RWD): | Same as ← |
| A(BLUE): | Sets A-B repeat mode. Sets the desired point A to start and B to end during playback. To cancel the mode, press A(BLUE) on the remote control. |
| B(RED): | Every press toggles the repeat mode between "No Repeat", "Repeat Once" and "Repeat All" |
| C(GREEN): | Every press toggles the random mode between "Random Off" and "Random On" |
| D(YELLOW): | Displays the Tool Menu. Even if the Tool Menu is displayed while content is played back, music is kept playing but the time counter and progress bar do not function. |
| PAGE+, PAGE-: | Available only when there are one or more pages in the content. Change the pages back and forth. |
| VOL+, VOL-: | Adjusts the sound volume |
| MUTING: | Mutes the sound |
| HOME MENU: | Quit the Home Media Gallery and returns to the last entry screen |
Play modes
| Add to My Playlist (Tool Menu) Adds the selected content to My Playlist List (Not available while music content is played back.) | ||
| Time Search (Tool Menu) Plays back the selected content from the time preset on the Music Player | ||
| Stop Music (Tool Menu). ■ (STOP) | Stops the Music Player | |
| Fast Forward/ Fast Reverse | ←/→, ←/→ | See the key guide table |
| Moves Up/Down a cursor | ↑/↓ | See the key guide table |
| Play | ENTER, ▶ (PLAY) | See the key guide table |
| A-B Repeat Mode | A (BLUE) | See the key guide table |
| Repeat Mode | B (RED) | See the key guide table |
| Random Mode | C (GREEN) | See the key guide table |
| (Tool Menu) | D (YELLOW) | See the key guide table |
- Setup procedures for the above play modes are the same as for the Movie Player.
• Refer to page 76 for the color button D (Tool Menu).

NOTE
- Some functions may not be supported depending on the server type or version used.
A-B Repeat Mode
1 While playing content, press A where you want repeat to start.
2 Press A again where you want repeat to end.
- The Player status appears on the screen and the A-B repeat mode icon changes.
- The selected part of the title is repeatedly played back.
- To return to normal mode, press A again while in the A-B repeat mode.
3 Press HOME MENU to exit the Home Media Gallery.

NOTE
- The A-B repeat function is only available during playback in normal mode.
Repeat Mode
1 While playing content in the Media Navigator, USB device or Playlist, press B to select "Repeat All".
- All titles in the folder or Playlist are played repeatedly.
2 Press B again to cancel the repeat mode ("Repeat Once" is selected).
• The title being played is repeated.
3 Press B once more to cancel the repeat mode ("Repeat Off" is selected).
• After playing the currently selected title, the Player stops.
4 Press HOME MENU to exit the Home Media Gallery.
Random Mode
1 While playing content in the Playlist, press C to select "Random On".
• Random Repeat playback starts.
2 Press C again to cancel the random mode ("Random Off" is selected).
3 Press HOME MENU to exit the Home Media Gallery.
Enjoying photo files
You can display the menu as a "List", "Thumbnail" or "Thumbnail List" screen. Press D then select an option under "Change view" on the Tool Menu. You can also navigate through the subsequent or preceding menu levels in the server
or USB device by press in
When you select photo content from the server menu on the Media Navigator screen, the Photo Player automatically launches. The selected content is displayed in full screen by pressing ENTER. Select a category, folder or device to access the submenu containing the required file or content.
Pressing ENTER again allows a slideshow to begin. After a slideshow launches, pressing ENTER toggles between "PLAY" and "PAUSE". Instead of pressing ENTER twice, you can press PLAY to start the slideshow immediately.
The Photo Player screen appears when you select a photo file from My Playlist, just like selecting a file in the server.
Screen Components

1 Photo icon
2 Title (Category or Folder name)
3 Album name
4 Date
5 Number of items
6 Play status
7 Key guide
8 Progress bar
9 Repeat mode icon
10 Random mode icon
Photo Player key guide
| ENTER: | Starts displaying a photo or playing a slideshow. Pauses while playback or plays back while in PAUSE. |
| RETURN: | Stops the Player and returns to the previous screen (List/Thumbnail/Thumbnail List) |
| ←, ↑: | Displays the previous image content |
| ↓, ➤: | Display the next image content |
| ► (PLAY): | Plays a slideshow |
| II (PAUSE): | Pauses the slideshow |
| ■ (STOP): | Stops the Player and returns to the previous screen (List/Thumbnail/Thumbnail List) |
| ►► (FF): | Rotates the image 90 ^o clockwise. Each press toggles the rotation angle by 90° between 90°, 180°, 270° and 0°. |
| ◄◄ (RWD): | Rotates the image 90° counter-clockwise. Each press toggles the rotation angle by 90° between 270°, 180°, 90°, and 0°. |
| A (BLUE): | Rotates the image 90° clockwise. Each press toggles the rotation angle by 90° between 90°, 180°, 270° and 0°. |
| B (RED): | Every press toggles the repeat mode between "No Repeat" and "Repeat All" |
| C (GREEN): | Every press toggles the random mode between "Random Off" and "Random On" |
| D (YELLOW): | Displays the Tool Menu. If the Tool Menu is displayed while a slideshow is played, the slideshow and BGM are paused. |
| INFO: | Displays the Player status at the bottom of the screen while image content is played. Another press of the key displays a key guide, as well. No Player information is displayed when an image is shown in full screen (no slideshow has been started). Other information may display. Pressing the key once more cancels all the information display. |
| VOL+, VOL-: | Adjusts the sound volume |
| MUTING: | Mutes the sound |
| HOME: | Replaced by the Home Menu key. Quit the Home Media Gallery and returns to the last entry screen. |
Play modes
| BGM Setup | (Tool Menu) | Sets up BGM |
| Slide Show Setup | (Tool Menu) | Allows various slideshow setups on the Photo player |
| Add to My Playlist | (Tool Menu) | Adds the selected content to My Playlist List (Not available while photo content is displayed.) |
| Stop Photo Player | ■ (STOP), RETURN | Stops the Photo Player |
| Move File Forward/ Backward | (←/→/↑/↓) | See the key guide table |
| Slideshow | ENTER, ▶ (PLAY) | See the key guide table |
| Rotate | A (BLUE), ◀◀/▶▶ | See the key guide table |
| Repeat Mode | B (RED) | See the key guide table |
| Random Mode | C (GREEN) | See the key guide table |
| (Tool Menu) | D (YELLOW) | See the key guide table |
- Setup procedures for the above play modes are the same as for the Movie Player.
- Refer to page 76 for the color button D (Tool Menu).

NOTE
- Some functions may not be supported depending on the server type or version used.
Setting up the slideshow
You can enjoy a slideshow with music in the background. To activate this feature, you must register music content in My Playlist List beforehand (see "My Playlist" on page 77 and "Setting up BGM" on page 83).
1 Press HOME MENU.
2 Select "Home Media Gallery" (↑/↓ then ENTER).
3 Select "Media Navigator" ( ↑/↓ then ENTER).
4 Press D.
- A pop-up screen of the Tool Menu appears.
5 Select "Slide Show Setup" (▲/↓ then ENTER).
6 Select the desired setup item (↑/↓ then ENTER).
7 Enter the setting in the "Effect" or "Interval" box (/ ↑ ↓ then ENTER).
- Repeat steps 6 and 7 to enter another setup.
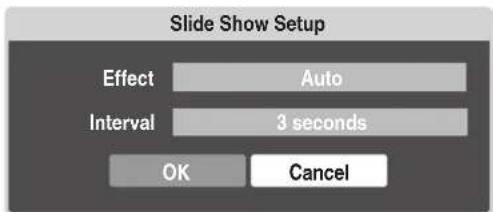
8 Select "OK" (↑/↓ then ENTER).
• The slideshow setup finishes.

NOTE
- After setting the "Interval" time, it may take longer than the preset time until the next image is obtained.
Starting the slideshow
1 Press HOME MENU.
2 Select "Home Media Gallery" ( / then ENTER).
3 Select photo content in the Media Navigator, USB device or My → ↓ → y list ( / / / t
• The photo content is displayed in full screen.
4 Press ENTER or ▶(Play) to start a slideshow.
- The slideshow starts and photo images in the folder automatically display one by one. See "Setting up the slideshow" (page 82) for setting up the interval time. - To display a key guide, press INFO.
5 Press ENTER or II (Pause) to stop the slideshow. • The Photo Player goes into "PAUSE".
6 Press ENTER again to resume the slideshow. • To cancel the slideshow and stop the Photo Player, press RETURN or ■ (Stop) during the playback. The previous screen returns.

NOTE
- When you press /// , / while photo content is displayed, the Photo Player goes into "PAUSE".
Setting up BGM
1 Press HOME MENU.
2 Select "Home Media Gallery" (↑/↓ then ENTER).
3 Select photo content in the Media Navigator, USB device or My → ← → y list ( / / / t
• The Photo Player launches and photo content is displayed in full screen.
4 Press D then select "BGM Setup" from the Tool Menu ( / then ENTER).
• A "BGM Setup" dialog screen appears.
5 Select a Playlist from the list as BGM ( / then ENTER).
• A check mark is provided beside the selected Playlist.
• When you select a different Playlist and press ENTER, the mark jumps to the new Playlist from the previously selected one.
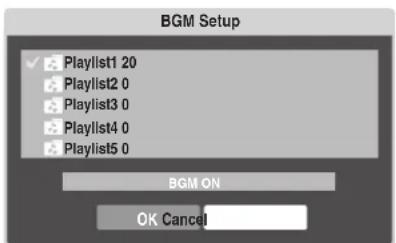
6 Select "BGM ON", "BGM ON (Random)" or "BGM OFF" from the BGM status box (▲ then ENTER).
7 Select "OK" (↑/↓ then ENTER).
Rotating the image
1 Press HOME MENU.
2 Select "Home Media Gallery" (↑/↓ then ENTER).
3 Select photo content in the Media Navigator, USB device
n eonr ENTER). R ↓ ← → list ( / / / t h e r
• The photo content is displayed in full screen.
- To stop the slideshow, press ENTER again.
4 Press ENTER or ▶(Play) to start a slideshow.
- The slideshow starts and photo images in the folder automatically display one by one.
• To display a key guide, press INFO.
5 While using Photo Player, press A to rotate a photo.
- The displayed image rotates by one quarter clockwise. Each time A is pressed, the image rotates; 90^ , 180^ , 270^ and "Rotate Off".
- The Photo Player goes into "PAUSE" (the slideshow is in Stop mode).
6 Press ENTER again to resume the slideshow.
- The selected rotation mode is only effective for the image being displayed. The default setting ("Rotate Off") returns when you move and display content on a different screen.
Repeating the slideshow
1 While playing a slideshow, press B to select "Repeat Once".
- The slideshow being played is repeated.
h2 e Press ENTER to cancel the repeat mode ("Repeat Off" is selected).
• After playing the currently selected slideshow, the Player stops.
3 Press HOME MENU to exit the Home Media Gallery.
Playing the slideshow at random
1 While playing a slideshow, press C to select "Random On".
- Random Repeat playback starts.
2 Press C again to cancel the random mode ("Random Off" is selected).
3 Press HOME MENU to exit the Home Media Gallery.
Other useful functions
Search
You can search the desired items contained in the Folder or Contents List by word. Searched results are displayed on the screen.
1 Press HOME MENU.
2 Select "Home Media Gallery" (↑/↓ then ENTER).
3 Select the desired folder and/or content in the Media
N a v i↑g↓←→ o r ( / / / t h e n
4 Press D then select "Search" from the Tool Menu (↑/↓ then ENTER).
• A "Search" dialog screen appears.
5 Select the "Contains the following" box in "Set the search condition:" (▲then ENTER).
• The software keyboard appears on the screen.

6 Enter the word for search on the software keyboard ( ↑/↓/←/→ then ENTER).
7 Select "OK" on the software keyboard (↑/↓ then ENTER).
• The software keyboard disappears.
- To cancel the search, select "Cancel" then press ENTER.
8 Select "OK" on the "Search" dialog screen ( / then ENTER).
- The searching starts based on the word entered and search results are displayed.
- Even while searching, you can select content to play. To return to the search screen, press RETURN during playback.
9 Press RETURN to cancel the search mode.
Sort
You can sort the items contained in the Folder or Contents List.
1 Press HOME MENU.
2 Select "Home Media Gallery" (↑/↓ then ENTER).
3 Select the desired folder and/or content in the Media
N a v i↑g↓ a ↑ o r ( / / / t h e n
4 Press D then select "Sort" from the Tool Menu (↑/↓ then ENTER).
• A "Sort" dialog screen appears.
5 Select "Bottom-Up" or "Top-Down" in the "Sort Order" box (♠/▼t h e n ENTER).
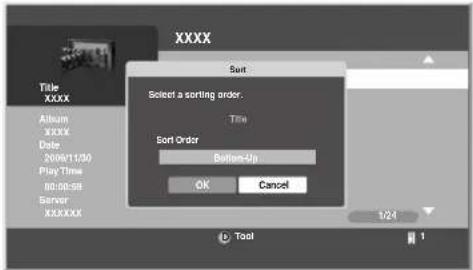
ENTER).
6 Select "OK" on the "Sort" dialog screen (/ then ENTER).
- The sorting starts based on your selection and sort results are displayed.
- Even while sorting, you can select content to play. To return to the sort screen, press RETURN during playback.
7 Press RETURN to cancel the sort mode.

NOTE
- The "Select a sorting order." screen can be displayed while navigating through the music categories.
Adding files to My Playlist
The Home Media Gallery function provides "My Playlist" - a self-contained play list that allows you to bookmark your favorite movie, music and photo files from the network. You can register, edit, and sort up to 100 files in each Playlist List.
1 Press HOME MENU.
2 Select "Home Media Gallery" (▲/▼ then ENTER).
3 Select "Media Navigator" (↑/↓ then ENTER).
4 Select the desired music content to add to "My Playlist" (↑/↓ then ENTER).
5 Press D to open the Tool Menu.
• A dialog screen appears.
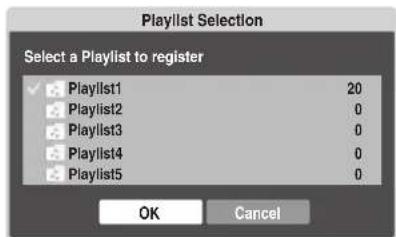
6 Press ENTER.
- A check mark is provided in the box at the selected ENTER)Playlist List.
7 Press to select "OK".
8 Press ENTER.
• The selected content is added to the Playlist.
9 Press HOME MENU again to exit the Home Media Gallery.

Setup
The "Setup" is used for "Network Setup", "Auto Connection Setup", "Default Settings", "Software Update" and "Home Media Gallery Version".

1 Press HOME MENU.
2 Select "Home Media Gallery" (↑/↓ then ENTER).
3 Select "Setup" (↑/↓ then ENTER).
4 Select "Network Setup", "Auto Connection Setup", "Default Settings", "Software Update" and "Home Media
G a l l e ↗ ↘ ↕ → e r s i o n " (/ / /
"Network Setup"
When you select "Network Setup" from the "Setup" menu, a submenu is displayed to select "Auto" or "Manual" for network connections.
To automatically set:
The following setup is effective for "Auto" only. To perform the procedure, DHCP on your server or router must be valid.
1 Select "Automatically acquire IP" then press ENTER.
2 Select "Yes" (↑/↓ then ENTER).
3 Select "OK". (↑/↓/←/→ then ENTER).
• A restart dialog screen appears.
4 Press ENTER again on the dialog screen.
- The setup finishes.
- The system restarts then the Home Media Gallery screen returns.
To manually set:
Before setting up, check your media server for IP Address and Subnet mask.
1 Select "Automatically acquire IP" then press ENTER.
2 Select "No" (↑/↓ then ENTER).
3 Select the setup item's box (↑/↓/←/→ then ENTER).
- The screen turns to entry mode for "IP Address" and "Subnet mask".
- No need to enter "Default Gateway" and "DNS Server".
4 Enter the figures using buttons 0 to 9.
- Subnet mask (such as 255.255.255.0) Enter the same figures as you checked.
• IP Address (such as 192.168.201.*** )
Enter the same figures as used in the media server (PC, etc.) you use. For ***, enter 3-digit figures (0 – 254) that have not been used for network connections yet.
5 Press ENTER on the setup item's box after the entry is complete.
• The screen turns to setup selection mode.
- Repeat steps 2 to 4 to complete the necessary setup.
6 Select "OK" (↑/↓/←/→ then ENTER).
• A restart dialog screen appears.
7 Press ENTER again on the dialog screen.
- The setup finishes.
- The system restarts then the Home Media Gallery screen returns.
"Auto Connection Setup"
When you enjoy content on the network, you can select from the following options: "Last Connected Server" and "Single Server/USB". See "Auto Connection Setup" on page 88.
"Wake on LAN (WOL)" functions to turn the last accessed server's power on if the server is WOL-compliant and is in Slandby or sleep mode, then display the Media Navigator screen. During the WOL is activated, the "Start Server" dialog screen displays and a message "The server is starting up." appears. If the server is not WOL-compliant or the WOL function fails, the "Start Server" dialog appears on the "Server List" screen and a message "Failed to start server." displays on the dialog screen.
For USB content, the Device List is displayed on the screen if you have not checked in the "Single Server/USB" box after selecting "Setup" and then "Auto Connection Setup". You can select the desired device and then content in it. If you have checked in the box, the list is skipped (default setting) and you can see the folder(s) or file(s) in the USB device that has a single directory.
"Default Settings"
Setups you have entered within the Home Media Gallery function return to default. When you select "Reset", a confirmation screen "To activate the default settings, restart Home Media Gallery." will appear. Press ENTER to reset to default. When you select "Cancel", the previous screen displays (▲then ENTER).
"Software Update"
Select "Next" to follow the procedure on the subsequent screens or "Cancel" to return to the previous screen (✗)
→ then ENTER). When update is completed, a confirmation message "To activate the updated software, restart Home Media Gallery." appears. See "Software Update" on page 87.
"Home Media Gallery Version"
You can confirm the version and copyright information on the Home Media Gallery software. Select "OK" to return to the previous screen (ENTER).
8 Press HOME MENU again to exit the Home Media Gallery.
Editing files in My Playlist
1 Press HOME MENU.
2 Select "Home Media Gallery" (↑/↓ then ENTER).
3 Select "My Playlist" (▲/▼ then ENTER).
4 Select "Movie Playlist", "Music Playlist" or "Photo Playlist" from the Playlist category (▲ then ENTER).
- Five playlists are displayed.
- Press D to open the Tool Menu and select an item on this screen or next contents list screen (▲ then ENTER).
- Check the appropriate box: "Change Name", "Move" or "Delete f←r→o→m↓ My P I a
"Change Name"
1 Select "Change Name" from the Tool Menu.
• A dialog screen appears.
2 Select "Playlist Name" ( then ENTER).
• The software keyboard appears.
3 Select "OK" o n+→↑↓s o ENTER).
- The software keyboard disappears and "Playlist Name" in the "Change Name" dialog screen returns.
4 Select "OK" when the new name is entered (/ then ENTER).
- The editing finishes and "Change Name" dialog screen disappears.
• The new Playlist displays.
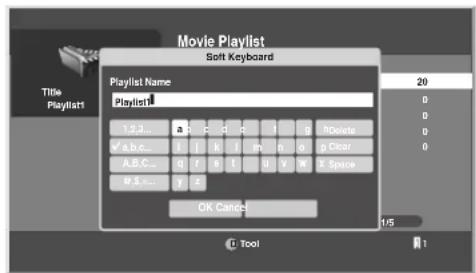
- The on-screen keyboard ("Software Keyboard") is displayed only when you select "Search" or "Change Name".
"Move"
You can change the listing order of the content registered in My Playlist.
1 Select "Move" from the Tool Menu.
- The content selected is placed in a yellow box ("Source Selection" mode).
2 Select the desired content (↑/↓ then ENTER).
- The selected content is highlighted in the yellow box. A specific icon appears on the left ("Destination Selection mode").
3 Press ↑/↓ to move the content up or down, then ENTER.
- The highlight in the yellow box disappears and the specific icon returns to the original one.
- Repeat steps 2 and 3 to move another content.
4 Press RETURN.
- A "Playlist" dialog screen appears.
5 Select "OK" (↑/↓ then ENTER).
- The dialog screen disappears and moving content finishes.
- To cancel, select "Cancel" then ENTER.
"Delete from My Playlist"
1 Select "Delete from My Playlist" from the Tool Menu.
- A dialog screen appears.
y2 | Splest "∅K" (←/→/then ENTER) en ENTER).
- The dialog screen disappears and the selected content is deleted from My Playlist.
- To cancel, select "Cancel" then ENTER.
Playing/displaying files from My Playlist
1 Press HOME MENU.
2 Select "Home Media Gallery" (↑/↓ then ENTER). 3 f t w a r e k y b o a r d (/ / / t h e n
3 Select "My Playlist" (↑/↓ then ENTER).
4 Select the desired Playlist from "Movie Playlist", "Music Playlist" or "Photo Playlist".
5 Select the desired Playlist List (↑/↓ then ENTER).
6 Select the desired content ( /// then ENTER).
• The selected content is played or displayed.
- To return to the previous screen, press RETURN.
7 Press HOME MENU again to exit the Home Media Gallery.
Switching the server
When one or more servers are connected within the network, you can switch between servers.
1 Press HOME MENU.
2 Select "Home Media Gallery" (↑/↓ then ENTER).
3 Select "Media Navigator" (▲/↓ then ENTER).
- The previous server is selected.
4 Press D to open the Tool Menu.
5 Choose "Select Server" (↑/↓ then ENTER).
• The Server List is displayed.
- Pressing RETURN changes the screen to the Home Media Gallery.
6 Select the desired server (↑/↓ then ENTER).
- The screen changes from the selected server to the Home Media Gallery.
7 Press HOME MENU again to exit the Home Media Gallery.

NOTE
- The Home Media Gallery can memorize previously connected servers. When the Media Navigator is launched, available servers are automatically searched and connected. To switch between connected servers, choose server to another one, select "Select Server" from the Tool Menu.
Using External Equipment
- If a previously connected server can not be found or if the server is in the sleep mode, the server name is dimmed (grayed out).
- In some cases, you may be able to start a media server if it supports "Wake On LAN". Select the server and press ENTER to have it transmit a "Wake On LAN" command to the Plasma Display.
- You cannot select a server unless that media server has been set up.
Resetting to default
You can reset the setups you have entered within the Home Media Gallery function to default (See "Default Settings" on page 85).
1 Press HOME MENU.
2 Select "Setup" (↑/↓ then ENTER).
3 Select "Default Settings" ( / then ENTER).
4 Select "Reset" (←/→ then ENTER).
- A restart dialog screen appears.
5 Press ENTER on the dialog screen.
- The setup finishes.
- The system restarts then the Home Media Gallery screen returns.
Other convenient features
Screen saver
During navigation, the screen saver launches automatically if no activity is sensed within five minutes.
- No screen saver is available while a movie or slideshow is played.
- Pressing any key cancels screen saver. When canceled with a USB device being connected, connecting operation resumes.

NOTE
- Pressing INFO to display the Player status or key guide before screen saver is activated may cause image retention to appear. Do not display the Player status and key guide for an extended period of time while playing a movie or slideshow.
Software Update
Software update is available on the Pioneer website (http://www.pioneerelectronics.com). Make sure that you have a USB flash memory. First download the software according to the guidelines on the website and perform the following procedure for update:
1 Press HOME MENU.
2 Select "Home Media Gallery" (↑/↓ then ENTER).
3 Select "Setup" (↑/↓ then ENTER).
4 Select "Software Update" (↑/↓ then ENTER).
- A "Software Update" submenu appears.
5 Select "Next" (←/→ then ENTER).
- The next screen appears. Complete the procedure following the guidelines on the screen.
6 Press ENTER after the following steps are complete: "Download", "Write" and "Verify"
• A restart dialog screen appears.
7 Press ENTER after reading a notice on the screen.
- The system is restarted then the Home Media Gallery screen returns.
- Software update finishes.
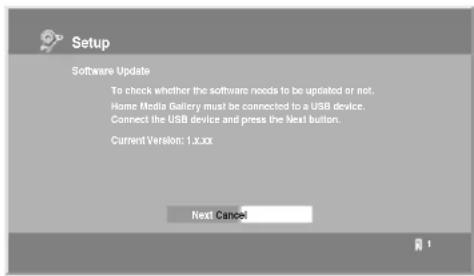

NOTE
- On average, it may take 15 minutes or more to complete a software update.
"Auto Connection Setup"
For extra convenience, you can toggle between the following features:
| "Last Connected Server" | When you check in the "Last Connected Server" box, the Plasma Display accesses the last server using WOL ("Wake On LAN") first as the Media Navigator is selected from the Home Media Gallery. The Media Navigator displays the last server when WOL succeeds, while a server list is displayed when WOL fails.WOL is activated to turn the last accessed serverOn if the server is WOL-compliant and is in Standby or sleep mode. |
| "Single Server/USB" | This function is used only when a USB memory device or a single server is connected. You do not need this function when a multi-card reader, or two or more servers are connected.USB:When USB memory is connected, the Devices List is skipped as long as you have checked in the "Single Server/USB" box. If not, the list may be displayed at any time.Media Navigator (Server):When a single server is connected, the Server List is skipped as long as you have checked in the "Single Server/USB" box. If not, the list may be displayed at any time. When the "Last Connected Server" box is checked, the other server setup option – "Single Server/USB" – becomes invalid. |
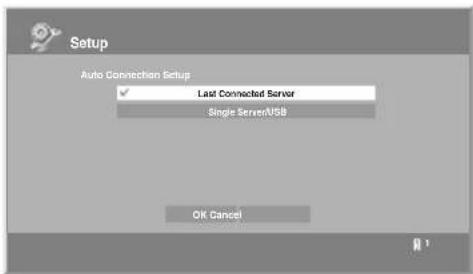
Dialog Screen Message
| No. Message Problem | ||
| 001 Content playback failed(001). | No details are available for the error | |
| 100 A communication error occurred (100). | No further details are available for the error | |
| 101 No response from the server (101). | Timeout period reaches due to delayed server response | |
| 102 Disconnected from the network (102). | Cables are disconnected | |
| 103 Invalid response was received from the server (103). | Invalid response from the server | |
| 300 This format is not supported (300). | A file that is not supported is selected | |
| 500 Authorization failed(500). | Failed to obtain WMDRM authorization | |
| 501 Authorization failed(501). | Failed to obtain WMDRM authorization | |
| 503 Authorization failed(503). Please check for trouble in routers, hubs, and other network devices. | Failed to obtain WMDRM authorization | |
| 504 Authorization failed(504). The maximum allowed number of devices are connected to the server. | Failed to obtain WMDRM | |
| 505 Authorization failed(505). The content license is off. Please turn on the license from the server. | Failed to obtain WMDRM authorization | |
- The message consists of "Error", "Warning" and "Information" and is displayed for 5 seconds.
Displaying pictures in the Home Media Gallery for an extended period may cause an after-image.
Glossary
Default Gateway
Default gateway is a node on a computer network that serves as an access point to another network. A default gateway (such as a computer and router) is used to forward all traffic that is not addressed to a station within the local subnet.
DHCP (Dynamic Host Configuration Protocol) Server
Provides a mechanism to allocate IP addresses to client hosts. In most cases, a broadband router serves as a DHCP server in a home network.
DLNA (Digital Living Network Alliance)
The DLNA authorized logo makes it easy for consumers to recognize products that meet the new standard for home network PCs and other digital devices, as set down in the DLNA Guidelines for interoperability. This allows music, video, etc. to be enjoyed from various devices over a home network. This unit is compatible with music, photo and video content, and is based on the DLNA Interoperability Guidelines v1.0. This unit can be used to playback music, photos and video stored on a DLNA-compatible server connected through a LAN cable. Digital Living Network Alliance (DLNA) is dedicated to the simplified sharing of digital content, such as digital music, photos and video among networked consumer electronics (CE) and PCs. By establishing a platform of interoperability based on open industry standards, DLNA delivers technical design guidelines that companies can use to develop digital home products that share content through wired or wireless networks in the home.
DNS (Domain Name Service) Server
DNS Server is a server that determines the name of network-computer within the Internet. The server functions to exchange IP address to the hostname, hostname to the IP address.
Ethernet
A frame-based computer networking technology for local area networks (LANs). The Plasma Display supports 100BASE-TX.
IP (Internet Protocol) Address
A unique number that devices use in order to identify and communicate with each other on a network utilizing the Internet Protocol standard, such as "192.168.1.xxx". No duplicate numbers are allowed within the network.
LAN Cable
A cable that has an 8-pin modular plug on each end and is different from a telephone plug which has 4 pins. A straight cable is used when connecting the Plasma Display to a home network via a hub. A cross-over cable is used when connecting directly to a PC. Use category 5 (CAT-5) LAN cables.
MAC (Media Access Control) Address
An address attached to the port of any network device with an IP address. The MAC address is expressed as "00:e0:36:01:23:xx" and cannot be changed.
Mass Storage Class devices
The standard provides an interface to a variety of storage devices, such as USB flash memory and digital cameras.
PlaysForSure
This unit incorporates PlaysForSure. "PlaysForSure" is a new logo program from Microsoft Corporation. You can check for the PlaysForSure logo at various online stores. Where you see the PlaysForSure logo, you can be sure that the digital media you are purchasing (music, video, pictures) will play on this unit.
Subnet mask
Used when IP addresses are broken into several parts. It is expressed as "255.255.255.0". In most cases, the Subnet mask is automatically assigned by the DHCP server.
USB (Universal Serial Bus)
USB provides a serial bus standard for connecting devices, usually to computers such as PCs. The Plasma Display supports the Mass Storage Class.
Windows Media Connect
Microsoft Windows Media Connect is a new technology to distribute music, photos and video stored on a PC with Windows XP installed to a stereo system of TV. Using this technology you can playback files stored on the PC from various devices wherever you like in your home.
Windows Media DRM
Windows Media DRM is copyright protection technology developed by Microsoft Corporation. It enables content providers to distribute over the Internet music, video and other digital media content in a protected, encrypted file format.
Learning function of the remote control unit
You can operate the connected AV products (AV Receiver, Cable Box, SAT tuner, VCR, DVD, DVD recorder, LD) using the remote control's learning function. The remote control can memorize other remote control's codes.

Using the learning function
1 Slide the Mode switch to match the type of device to be learned.
2 Press EDIT/LEARN and 2 at the same time.
- The LED flashes.
3 Press a button to be learned.
- The LED lights up.
- For the functions that can be learned, see pages 97 to 100.
- When the device's remote is memorized, the LED flashes.
4 Press EDIT/LEARN again to exit the Learn mode.

NOTE
- To exit the Learn mode before it is complete, press EDIT/LEARN again.
- If the Mode switch selection is changed when EDIT/LEARN and 2 are pressed (the LED is flashing), the Learn session is canceled.
- If the Mode switch selection is changed when a button to be learned is pressed after EDIT/LEARN and 2 have been pressed (the LED lights up), the Learn session is not canceled and the selected mode and button remain effective.
- If no operation is performed for more than one minute after having pressed EDIT/LEARN and 2 (the LED is flashing), the Learn session is canceled.
- If a button to be learned is pressed after having pressed EDIT/LEARN and 2 (the LED is lit), the Learn session is canceled in 30 seconds and the LED restarts blinking again.
- Code transmission finishes in approximately two seconds. Do not interrupt it halfway. Wait until the LED flashes again.
- When using any of the receiver buttons (☐, INPUT, or VOL +/-), the learned manufacturer code remains the same regardless of the Mode switch position or even if the switch is shifted to a different position.
Presetting manufacturer codes to control other devices
Presetting manufacturer codes
1 Slide the Mode switch to match the type of device to be preset.
2 Press EDIT/LEARN and 1 at the same time.
- The LED flashes.
3 Press 0 - 9 to enter the manufacturer code. See page 92.
- Preset mode is finished when the LED blinks Off.
Library Search
In the event that the device code for a particular target unit is unknown, cycle through the available codes for that type of device. Sample the functions from each code in order to find the code that properly operates the target device.
1 Slide the Mode switch to match the type of device to be preset.
2 Press EDIT/LEARN and 3 at the same time.
- The LED indicator flashes and the remote control unit enters the Library Search programming mode.
3 Press either SOURCE POWER, PLAY, 1 or CH+ to sample the selected code.
4 If the code is missing, press / to advance to the next code or return to the previous code and repeat step 3.
5 Press ENTER when the code that properly operates the target device is found.
- All the available buttons for the selected mode are programmed to the remote control. The remote control unit returns to normal operation (LED lights for one second to confirm addition).
Delete Learning
You can delete a learned code by either overwriting it with a new code on the same button or performing the procedure below.
1 Press EDIT/LEARN and 2 at the same time.
- The LED indicator flashes and the remote control unit enters the Learning mode.
2 Press and hold TV ⏻ for more than two seconds.
- The remote control unit starts deleting all learned codes in the selected mode (marked by a lit LED).
- When completed, the LED blinks Off and the remote control unit returns to normal operation.
Manufacturing Reset
All learned and preset codes can be returned to the factory defaults regardless of the mode.
1 Press EDIT/LEARN and TV ⏻ at the same time. The Mode switch setting is ignored.
- The LED indicator flashes and the remote control unit enters the Manufacturing Reset mode.
2 Press D (yellow) to reset the remote control.
- The manufacturing reset is complete. The LED flashes for one second then the remote control unit returns to normal operation.

NOTE
- To exit the Edit mode before it is complete, press EDIT/LEARN again.
- If the Mode switch selection is changed when in the Edit mode, the Edit session is canceled.
- If no operation is performed within one minute, the Edit session is canceled.
- When you enter an unlisted code, the LED flashes repeatedly.
- If the tables on pages 92 to 96 do not include your device's manufacturer or the remote control does not work, use the Learn mode.
- The initial mode is "PIONEER".
- When using any of the receiver buttons (☐, INPUT, or VOL +/-) to cancel the Learn mode, follow the procedure with the Mode switch set to "TV". You cannot cancel the mode otherwise.
Programming codes
CABLE
| Brand Codes Brand Codes Brand | Codes Brand Codes | ||||||
| ABC 0003 0008 0014 00110017 | General Instrument 0014 0011 Panasonic 0000 | 0008 0107 0021 Sony 1006 1506 1606 | |||||
| Global 1327 Panther 0637 Sprucer 0021 | |||||||
| Americast | 0899 | GoldStar | 0144 | Paragon | 0000 | Starcom | 0003 0014 |
| Amino | 1602 1822 | Hamlin | 0009 0273 | Philips | 1305 0317 | Supercable | 0276 |
| Bell & Howell | 0014 | Hitachi | 0014 0011 0154 | Pioneer | 1877 0877 0144 0533 | Supermax 0883 | |
| Bell South | 0899 | i3 Micro | 1602 | 0023 0260 1021 | Thomson | 1256 | |
| Bringham Cable Communications | 0276 Jerrold | 0476 0810 0276 0003 | Pulsar 0000 Tocom | 0012 | |||
| British Telecom | 0003 | PVP Stereo Visual Matrix | 0003 Torx | 0003 | |||
| Clearmaster | 0883 | KNC | 0008 | Quasar | 0000 | Toshiba | 0000 |
| ClearMax | 0883 | LG | 0144 | RadioShack | 0883 | Trans PX | 0276 |
| Cleartron | 1327 | Memorex | 0000 | RCA | 1256 0021 | Tristar | 0883 |
| Coolmax | 0883 Motorola | 1376 0476 0810 0276 | Regal | 0279 0273 TS | 0003 | ||
| Daeryung | 1877 0877 0477 0008 | Remorandt | 0011 | United Cable | 0003 | ||
| Digeo | 1187 | Multitech | 0883 | Runco | 0000 | V2 | 0683 |
| Digi | 0637 | MultiVision | 0012 | Samsung | 0000 0144 | Viewmaster | 0883 |
| Director | 0476 | Myrio | 1602 1822 | Scientific Atlanta | 1877 0877 0477 0008 | ViewmaxPro | 1544 |
| Dumont | 0637 | NTL | 0003 | 0017 | Vision | 0883 | |
| Gehua | 0476 | Optimus | 0021 | Sejin | 1602 | Vortex View | 0883 |
| General Instrument | 0476 0810 0276 0003 | Pace | 1877 0237 0008 | Signature | 0011 | Zenith | 0000 0525 0899 |
SATELLITE
| Brand Codes Brand Codes Brand | Codes | Brand Codes | |||||
| AlphaStar | 0772 | Fortec Star | 1550 | Legend | 0269 | Realistic | 0052 |
| Amino | 1815 | Galaxis | 0270 | LG | 1226 1414 1750 | Samsung | 1377 1142 1276 1108 |
| BeauSAT | 1586 | GE | 0392 0566 | Magnavox | 0724 0722 | 1109 0270 1243 1442 | |
| Century 0856 General Instrument 0869 MegaSat | 1551 | 1609 | |||||
| Channel Master | 0212 | GOI | 0775 1775 | Memorex | 0724 0269 | Sanyo | 1219 |
| Chaparral | 0053 0209 0216 | Goodmans | 1246 | Mitsubishi | 0749 | SKY | 0656 1856 0099 |
| Coolsat | 1806 | Gradiente | 0856 | Motorola | 0869 0856 | Sony | 0639 1639 1640 |
| Crossdigital | 1109 Hisense | 1535 | NEC | 0102 0176 1270 | Star Choice 0869 | ||
| Digiturk | 1076 | Hitachi | 0819 1250 | Netsat | 0099 | Star Trak | 0180 |
| DirecTV 1377 0392 0566 0639 | Homecable | 0238 Next Level 0869 STS | 0210 | ||||
| HTS | 0775 1775 | OctalTV | 1505 | Tivo | 1142 1442 1443 1444 | ||
| Hughes 0749 1749 1442 | Panasonic 0247 0701 0152 | 1538 | |||||
| Hughes Network Systems | 1142 0749 1749 1442 | Pansat | 0647 1551 1807 | Toshiba | 0749 1749 0790 0819 | ||
| 1392 1414 1442 1443 | 1443 1444 1538 1750 | Paysat | 0724 | 0082 1285 | |||
| 1444 1538 1609 1640 | Humax | 1790 Philips | 1142 0749 1749 0724 | UltimateTV | 1392 1640 | ||
| 1750 | Lo | 1535 | 0819 0856 1076 0722 | Ultrasat 1806 | |||
| Dish Network System | 1505 1005 0775 1170 | Innova | 0099 | 0099 1442 | Uniden | 0724 0722 | |
| 1775 | IQ | 0210 Pioneer | 0329 1442 | 0076 0238 | |||
| Dishpro | 1505 1005 0775 1775 | IQ Prism | 0210 | Proscan | 0392 0566 | US Digital | 1535 |
| Eastern | 1812 | Janeil | 0152 | Proton | 1535 | USDTV | 1535 |
| Echostar | 1505 1005 0775 0159 | Jarroid | 0869 RadioSnack | 0869 Vocm | 0869 | ||
| 0269 0280 1170 1775 | JVC | 0775 1170 1775 | RCA | 0392 0566 0855 0143 | Zenith 0856 1856 | ||
| Expressvu 0775 1775 Lava 1631 | 1392 | ||||||
0052
VCR
| Brand Codes Brand Codes Brand | Codes Brand Codes | |||||||
| ABS 1972 Craig 0271 Go Video 0240 0432 0526 0649 | 0072 | 0663 11370280 | LG 0067 0045 0042 0209 | |||||
| Admiral | 0048 | 0209 | 0479 | Crown | 0020 | 0038 0040 1037 1137 | ||
| Adventura 0000 Curtis Mathes 0060 0035 0162 0041 | GoldHand 0072 Linksys 1972 | |||||||
| Aiko 0278 GoldStar | 0037 0209 0038 0225 | 0760 1035 | Lloyd's | 0000 0208 | ||||
| Aiwa | 0037 0000 0124 0307 | Cybermex | 0240 Loewe | 0037 0081 | 0226 1137 1237 | |||
| 0479 1137 | CyberPower | 1972 Goodmans | 1137 | 0020 0062 | Logik 0240 0072 | |||
| Akai | 0041 006* 0106 0175 | Cyrus | 0081 Lunatron | |||||
| 0242 | Daewoo | 0045 0104 0278 0020 | Gradiente | 0000 0008 Luxor | 0048 0104 0043 0046 | |||
| Akiba | 0072 | 0046 0210 0212 0561 | Graetz | 0240 0104 0041 | ||||
| Akura | 0271 | 1137 1278 | Granada | 0081 0104 0046 | LXI | 0037 | ||
| Alba | 0209 0072 0278 0020 | Dansai | 0072 | Grandin | 0037 0000 0072 | M Electronic | 0000 0038 | |
| Alienware | 1972 | Daytron | 0020 | Grundig | 0081 0072 0034 0207 | Magnasonic | 0593 1278 | |
| Allegro | 1137 | De Graaf | 0042 0166 | 0226 0378 | Magnavox | 0035 0039 0081 0000 | ||
| Ambassador | 0020 | Decca | 0081 0000 | Hanseatic | 0037 | 0149 0563 0593 1781 | ||
| America Act on 0278 Dell | 1972 Haojie 0240 Magnin | 0240 | ||||||
| American High | 0035 | Denon | 0042 | Harley Davidson | 0000 | Manesh | 0045 0072 | |
| Amcisonic | 0479 | DirecTV | 0739 | Harman/Kardon | 0081 0038 0075 | Marantz | 0035 0081 0062 | |
| Amstrad | 0000 | Dual | 0041 | Harwood | 0072 | Marta | 0037 | |
| Anam | 0162 0037 0240 0278 | Dumont | 0081 0000 0104 0105 | HCM | 0072 | Matsui | 0209 0208 | |
| 0226 1037 | Durabrand | 0039 0038 | Headquarter | 0046 | Matsushita | 0035 0162 0226 0227 | ||
| Anam National | 0162 0226 | Dynatech | 0000 | Hewlett Packard | 1972 | 1162 | ||
| Anitech | 0072 | Elbe | 0038 | HI-Q | 0047 | Media Center PC | 1972 | |
| ASA | 0037 0081 | Elcatech | 0072 | Hinari | 0240 0072 0208 | MEI | 0035 | |
| Asha | 0240 | Electrohome | 0037 0043 | Hitachi | 0037 0240 0000 0042 | Memorex | 0035 0162 0037 0048 | |
| Asuka | 0037 Electrophonic | 0037 | 0041 0065 0082 0089 | 0039 0047 0240 0000 | ||||
| Audiovox | 0037 0278 | Emerex | 0032 | 0105 0166 0235 0292 | 0104 0209 0046 0307 | |||
| Awa | 0043 Emerson | 0035 0037 0184 0240 | 1037 | 0479 1037 1048 1162 | ||||
| Baird | 0000 0104 0041 | Howard Computers | 1972 | 1237 1262 | ||||
| Basic Line | 0072 0278 0020 | HP | 1972 | Memphis | 0072 | |||
| Beaumark | 0240 | Hughes Network Systems | 0042 0739 | Micronic | 0081 | |||
| Bell & Howell | 0104 | Humax | 0739 | Metz | 0162 0037 0227 | |||
| Blaupunkt | 0162 0034 0226 0227 | ESA | 1137 | Hush | 1972 | MGA | 0240 0043 0061 | |
| BPL | 0046 | ESC | 0240 0278 | Hyoson | 0072 | MGN Technology | 0240 | |
| Brand Electronique | 0041 | EverFocus | 1346 | IBUYPOWER | 1972 | Microsoft | 1972 | |
| Broksonic | 0164 0121 0209 0032 | Ferguson | 0041 Imperial | 0000 Mind | 1972 | |||
| 0479 1479 1815 | Fidelity | 0000 | Interfunk | 0081 | Minolta | 0042 0105 | ||
| Bush | 0209 0072 0278 | Finlandia | 0081 0104 | ITT | 0240 0104 0041 0046 | Mitsubishi | 0081 0067 0043 0041 | |
| Calix | 0037 Finlux | 0081 0000 0042 0104 | 0106 | 0061 0075 0173 0214 | ||||
| Canon | 0035 1143 | ITV | 0037 0278 | 0242 0443 0807 | ||||
| Capehart | 0020 Firstline | 0037 0045 0043 0209 | Jensen | 0041 | Morola | 0035 0048 | ||
| Carver | 0081 | MC | 00852 | 0067 | 0041 | 0008 | MTC | 0240 0000 |
| Catron | 0020 | Fisher | 0047 0104 0046 | 0206 0207 0366 1162 | Multitech | 0000 0072 | ||
| CCE | 0072 0278 | Frontech 0020 Murphy | 0000 | 1707 | ||||
| CGE | 0000 | Fuji | 0035 0033 | Kaisui | 0072 | Myriad | 0081 | |
| Changhong | 0048 0281 | Fujitsu | 0045 0000 0366 | KEC | 0037 0278 | NAD | 0104 0058 | |
| Cimline | 0272 | Funai | 0000 0593 1335 1693 | Kendo | 0209 0106 | National | 0226 | |
| Cineral | 0278 | Garraro | 0000 | Kenwood | 0067 0041 0038 | NEC | 0035 0037 0048 0104 | |
| CineVision | 1137 | Gateway | 1195 1196 1972 | KLH | 0072 | 0067 0041 0038 0038 | ||
| Citizen | 0037 0278 1278 GE | 0060 0035 0240 0065 | Kodak | 0035 0037 | 0040 0050 0082 0206 | |||
| Clatronic | 0020 Kolin | 0043 0041 | 0202 0226 0760 0761 | 0457 | ||||
| Colt | 0072 | Korpel | 0800 0835 1060 | Neckermann | 0081 | |||
| Cordor | 0020 | GEC | 0081 | Lenco | 0278 | Nesco | 0072 | |
| Craig | 0037 0047 0240 0072 | General | 0045 0220 0366 | Leyco | 0072 | Newave | 0037 | |
VCR
| Brand Codes Brand Codes Brand | Codes Brand Codes | ||||||
| Nikko 0037 Pye 0081 SEG 0240 Tensai 0000 | |||||||
| Nikon 0034 Qisheng 0060 SEI 0081 Thomas 0000 | |||||||
| Niveus Media | 1972 | Quarter | 0046 | Seleco | 0041 | Thomson | 0060 0067 0041 0202 |
| Nobix | 0240 | Quartz | 0046 | Semp | 0045 | Thom | 0104 0041 |
| Nokia | 0240 0104 0041 0046 | Quasar | 0035 0162 0077 1035 | Sensory Science | 0649 1155 | Tivo | 0618 0636 0739 1337 |
| 0106 | 1162 | Sentra | 0020 | 1996 | |||
| Nordmende | 0241 | Quelle | 0081 | Sharp | 0048 0209 0062 0807 | TMK 0240 0208 | |
| Northgate | 1972 | Radiola | 0081 | 0848 1048 | Toshiba | 0081 0045 0042 0067 | |
| Oceanic | 0000 0041 | RadioShack | 0000 1037 | Shinco | 0000 | 0043 0209 0041 1996 | |
| Olympus | 0035 0226 | Radix | 0037 | Shintom | 0104 0072 | 1972 1145 1008 0845 | |
| Onkyo 0222 Randex | 0037 Shogun | 0240 | 0377 0366 02'2 0210 | ||||
| Optimus | 1062 0162 0037 0048 | RCA | 0060 0035 0240 0000 | Siemens | 0037 0081 0104 | 0057 0008 | |
| 0104 0058 0432 0593 | 0042 0149 0077 0105 | Silva | 0037 Totevision | 0037 0240 | |||
| 1048 1162 1262 | 0106 0065 0202 0226 | Singer | 0045 0072 | Touch | 1972 | ||
| Ootonica | 0062 | 0058 0760 0761 0807 | Sinudyne | 0081 Triumph | 0208 | ||
| Orion | 0184 0121 0209 0002 | 0880 1035 1080 | Solevox | 0020 Uher | 0240 | ||
| 0208 0479 1479 1815 | Realistic | 0035 0037 0048 0047 | Sonic Blue | 0614 0616 1137 | Unitech | 0240 | |
| Osaki | 0037 0000 0072 | 0000 0104 0046 0062 | Sonolor | 0046 0062 | Universum | 0037 0081 0240 0000 | |
| Otto Versand | 0081 | ReplayTV | 0614 0616 | Sontec | 0037 | 0106 | |
| Palladium | 0037 0041 0072 | Rex | 0041 | Sony | 0035 0032 0033 0000 | Vector 0045 | |
| Panasonic | 1062 0035 0162 0077 | Ricavision | 1972 | 0011 0022 0034 0275 | Vector Research | 0038 0040 | |
| 0225 0226 0227 0246 | Ricon | 0034 | 0636 1032 1232 1546 | Victor | 0067 0041 0008 | ||
| 0378 0616 1035 1162 | Rio | 1137 | 1702 1703 1896 1972 | Video Concepts | 0045 0040 0061 | ||
| 1262 | Roadstar | 0037 0240 0072 0278 | Stack 9 | 1972 | Videomagic | 0037 | |
| Pathe Marconi | 0041 | Runco | 0039 | STS | 0042 | Videosonic | 0240 |
| Penney | 0035 0037 0240 0042 | Saba | 0041 0206 0207 | Sunstar | 0000 | Viewsonic | 1972 |
| 0038 0040 1035 1237 | Saisho | 0209 0208 | Suntronic | 0000 | Villain | 0000 | |
| Pentax | 0042 0065 0105 | Salora | 0043 0046 0075 0106 | Sylvania | 0035 0081 0000 0043 | Vocdoc | 1972 |
| Perdic | 0000 | 0443 | 0593 1593 1781 | Wards | 0060 0035 0048 0047 | ||
| Philco 0035 0000 0209 | 0035 | Sampo | 0037 0048 | Symphonic | 0000 0593 1593 | 0061 0240 0000 0042 | |
| 0226 0479 0561 | Samsung | 0240 0045 0210 0212 | Systemax | 1972 | 0072 0149 0062 0212 | ||
| Philips | 0035 0081 0000 0062 | 0432 0649 0683 0739 | Tagar Systems | 1972 | 0760 | ||
| 0226 0563 0593 0618 | 0760 1014 | Tandy 0000 0104 Wharfedale 0593 | |||||
| 0739 1081 1181 1266 | Sanky | 0048 0039 | Tashiko | 0037 0000 | White Westinghouse | 0209 0072 | |
| Phorola | 0081 | Sansui | 0000 0067 0209 0041 | Tatung 0081 0045 0000 0067 | XR-1000 | 0035 0000 0072 | |
| Pilot | 0037 | 0082 0271 0479 1479 | Yamaha | 0041 0038 | |||
| Pioneer | 0081 0042 0067 0058 | Sanyo | 0047 0240 0104 0046 | Teac | 0000 0041 0278 0307 | Yamishi | 0072 |
| 0168 0206 0235 1337 | 0159 0372 | 0526 0593 | Yokan | 0072 | |||
| Polk Audio | 0081 | SBR | 0081 | Tec | 0020 | Yoko | 0240 0020 |
| Portland | 0020 | Schaub Lorenz | 0000 0104 0041 | Technics | 0035 0162 0226 0246 | Zenith | 0039 0033 0000 0209 |
| Profitronic | 0240 | Schneider | 0081 0000 0072 | Teco | 0035 0037 0048 0041 | 0034 0479 1137 1139 | |
| Proline | 0000 | Scott | 0184 0045 0121 0043 | 0038 0040 | 1479 | ||
| Proscan | 0060 0202 0760 0761 | 0210 0212 | Teknika | 0035 0037 0000 | ZT Group | 1972 | |
| 1060 | Sears | 0035 0037 0047 0000 | Teavia | 0041 | |||
| Protec | 0072 | 0042 0104 0046 0057 | Telefunken | 0041 | |||
| Pulsar | 0039 | 0105 1237 | Tenosal | 0072 | |||
PVR
| Brand Codes Brand Codes Brand | Codes Brand Codes | ||||||
| ABS 1972 HP 1972 Niveus Media 1972 Systemax 1972 | |||||||
| Alienware 1972 Hughes Network Systems 0739 Northgate 1972 Tagar Systems 1972 | |||||||
| CyberPower | 1972 | Humax | 0739 | Panasonic | 0618 | Tivo | 0618 0636 0739 |
| Dell | 1972 | Hush | 1972 | Philips | 0618 0739 | Toshiba | 1008 1972 |
| DirecTV | 0739 | iBUYPOWER | 1972 | RCA | 0680 | Touch | 1972 |
| EverFocus | 1346 | Linksys | 1972 | ReplayTV | 0514 0616 | Viewsonic | 1972 |
| Gateway | 1195 1196 1972 | Media Center PC | 1972 | Sonic Blue | 0614 0616 | Woodco | 1972 |
| Hewlett Packard | 1972 Microsoft | 1972 | Sony | 0636 1972 ZT Group | 1972 | ||
| Howard Computers | 1972 | Mind | 1972 | Stack 9 | 1972 | ||
DVD
| Brand Codes Brand Codes Brand | Codes Brand Codes | ||||||
| Acoustic Solutions | 0730 1242 | CineVision | 0876 0833 0869 | Gateway | 1073 1077 1158 1194 | Landel | 0826 |
| Adcom | 1094 | Citizen | 1277 | GE | 0522 0815 0717 | Lasonic | 0798 1173 |
| Advent | 1016 | Classic | 1385 | Go Video | 0744 0715 0741 0783 | Lecson 1533 | |
| Afreey | 0698 | Clatronic | 1185 | 0833 0869 1044 1075 | Lenoxx | 1127 | |
| Aiwa | 0641 | Coby | 0778 0852 1086 1107 | 1099 1144 1148 1158 | LG | 0591 0741 0801 0869 | |
| Akai 0695 0770 0899 1089 | 1165 1177 1351 | 1304 1443 1730 | 1526 | ||||
| Alba | 0672 0539 0717 | Craig | 0831 | Go Vision | 1071 1072 | LiteOn | 1058 1158 1416 1440 |
| Alico | 0790 Curtis Mathes | 1087 | GoldStar | 0741 Loewe | 0511 0741 | ||
| Allegro | 0889 | CyberHome | 0816 0874 1019 1023 | Goodmans | 0790 1004 Logix | 0783 | |
| Altacom | 1224 | 1024 1117 1129 1502 | GPX | 0699 0769 | Lunatron | 0741 | |
| Amphion Media Works | 0872 1176 1245 | 1557 | Gradiente | 0490 0651 | Magnavox | 0503 0539 0646 0675 | |
| AMW | 0872 1176 1245 | Cydecin | 1074 | Greenhill | 0717 | 0821 1268 1506 | |
| Apex Digital | 0672 0717 0755 0794 | Daewoc | 0784 0705 0770 0833 | Grundig | 0539 0895 0705 | Malata | 0782 1159 |
| 0796 0797 0830 1004 | 0869 1169 1172 1234 | GVG | 1169 | Marantz | 0539 | ||
| 1020 1056 1061 1100 | 1242 1441 1443 | H & B | 1421 | Matsui | 0672 | ||
| Arcam | 0732 | Dansai | 0770 | Harman/Kardon | 0582 0702 | McIntosh | 1533 1273 1373 |
| Aspire Digital | 1168 1407 | Dantax | 1089 | Hitachi | 0573 0664 0695 1247 | Memorex | 0690 0895 0831 1270 |
| Audiologic | 0736 | Daytek | 0872 | Hiteker | 0672 | Metronic | 0690 |
| Audiovox | 0790 1041 1071 1072 | Decca | 0770 | iLo | 1348 1472 | Microsoft | 0522 |
| 1121 1122 | Denon | 0490 0634 | Initial | 0717 1472 | Minato | 0752 | |
| Axion | 1071 1072 1193 | Denver | 0778 1107 1316 | Innovative Technology | 1542 | Minowa | 1165 |
| B & K | 0655 0662 | Desay | 1407 1455 | Integra | 0571 0627 | Mintek | 0839 0717 1472 |
| BBK | 1224 | Diamond Vision | 1316 1609 1610 | IRT | 0783 | Mirror | 0752 |
| Bel Canto Design | 1571 | Dick Smith Electronics | 0833 1730 | Jaton | 1078 | Mitsubishi | 152' 0521 |
| Bellagio | 1245 | Digitor | 0690 | JBL | 0702 | MixSonic | 1130 1611 |
| Blaupunkt | 0717 | Digitrex | 0672 1056 | Jensen | 1016 | Momitsu | 1082 |
| Blue Parade | 0571 | Digix | 1272 | JMB | 0695 | MTlogic | 1265 |
| Broksonic | 0695 0868 1419 | Disney | 0675 1270 | JSI | 1423 | Mustek | 0730 1730 |
| Bush | 0690 | DiVIDo | 0705 | JVC | 0558 0623 0867 1184 | Myryad | 0894 |
| Bydsign | 0872 | DSE | 0833 1730 | 1275 1602 | NAD | 0591 0692 0741 | |
| California Audio Labs | 0490 | Dual | 1068 1085 | JWin | 1049 1051 | Nakamichi | 1222 |
| Cambridge Soundworks | 0690 | Durabrand | 1127 | Kawasaki | 0790 | NEC | 0785 0869 |
| Cary Audio Design | 1477 | DVD2000 | 0521 | Kenwood | 0490 0534 0682 0737 | Nesa | 0717 |
| CAVS | 1057 | ECC | 0730 | KLH | 0717 0790 1020 1149 | Next Base | 0826 |
| Celestial | 1020 | Emerson | 0591 0675 0821 1268 | 1261 | NexTech | 1402 | |
| Centrex | 0672 1004 | Enterprise | 0691 | Konka | 0711 0719 0720 0721 | Nintaus | 1051 |
| Centrios | 1577 | ESA | 1443 | Koss | 0651 0896 1423 | Norcent | 1003 0872 1107 1265 |
| Changhong | 0627 1061 | Fintec | 1169 | Kreisen | 1421 | 1457 | |
| Cinea | 0831 | Fisher | 0670 | Krell | 1498 | Oolidata | 0672 |
| Cinego | 1399 | Funai | 0675 1268 1334 | Lafayette | 1369 | Onkyo | 0503 0827 0792 |
DVD
| Brand Codes Brand Codes Brand | Codes Brand Codes | ||||||
| Oppo 1224 Proscan 0522 Shinco 0717 Toshiba | 0503 0695 1045 1154 | ||||||
| OptoMedia Electronics 0896 ProVision 0778 Sh | insonic 0533 0839 TRANS-continents 0831 1165 | ||||||
| Orion | 1413 | Qwestar | 0651 | Sigma Designs | 0674 | Tredex | 0799 0800 0803 0804 |
| Oritron | 0651 RCA | 0522 0571 0717 0790 | Slim Art | 0784 TYT | 0705 | ||
| Otic | 0826 | SM Electronic | 0690 0730 | Umax | 0690 | ||
| Pacific | 0831 | Recco | 0698 | Sonic Blue | 0669 1099 | Universum | 0591 |
| Palsonic | 0672 0852 | Reoc | 0752 | Sony | 0533 1533 0964 1033 | Urban Concepts | 0503 |
| Panasonic | 0503 0490 0632 0703 | Revoy | 0699 | 1069 1070 1431 1432 | US Logic | 0839 | |
| 1010 1011 1362 1462 | Rio | 0869 | 1433 1548 | Venturer | 0790 | ||
| 1490 1762 | RJTech | 1360 Sova | 1122 Vialta 1509 | ||||
| peeKTon | 1224 | Roadstar | 1051 | Sungale | 1074 1342 1532 | Viewmaster | 1224 |
| Philco | 0690 0790 | Rotel | 0623 1178 | Superscan | 0821 | Vizio | 1064 1226 |
| Philips | 0503 0539 0646 0575 | Rowa | 0623 1004 | SVA | 0717 0860 1105 | Vocopro | 1027 |
| 0854 1158 1260 1267 | Sampo | 0698 0752 1501 | Sylvania | 0675 0821 1268 | Wesder | 0699 | |
| 1354 | Samsung | 0490 0573 0744 0820 | Symphonic | 0675 1268 Wintel | 1130 | ||
| PlanoDisc | 1024 | 0899 1044 1075 | TAG McLaren | 0894 | Xbox | 0522 | |
| Pioneer 0525 0571 0631 0632 | Sansui | 0695 Tatung | 0770 XMS 0770 | ||||
| Sanyo | 0670 0695 0873 | Teac | 0571 0717 0692 0790 | Xoro | 1173 | ||
| Polaroid 1020 1061 1086 1245 | Schneider | 0783 | 0809 0833 | Xwave | 1001 | ||
| Schwaiger | 0752 | Technics | 0490 0703 | Yamada | 0872 1004 1056 1158 | ||
| Polk Audio | 0539 | Semp | 0503 | Technosonic | 0730 | 1416 | |
| Portland | 0770 | Sensory Science | 1158 | Techwood | 0692 | Yamaha | 0490 0539 0545 0817 |
| Prima | 1016 | Sharp | 0630 0675 0752 1256 | Tedelox | 0690 Yamakawa | 0872 | |
| Primare | 0886 1467 1618 | 1419 | Terapin | 1031 | Zenith | 0503 0591 0741 0869 | |
| Princeton | 0674 | Sharper Image | 1117 | Theta Digital | 0571 | Zeus | 0784 |
| Proceed | 0672 | Sherwood | 0633 0770 1043 1077 | Thomson | 0522 | Zoece | 1265 |
DVD-R
| Brand Codes Brand Codes Brand | Codes Brand Codes | ||||||
| Apex Digital | 1056 | Funai | 0675 1334 | Loewe | 0741 | Sensory Science | 1158 |
| Asoire Digital | 1168 | Gateway | 1073 1'58 1194 | Magnavox | 0646 1506 | Sharp | 0630 0675 1419 |
| Coby | 1086 | Go Video | 0741 1158 1304 1730 | Mustek | 1730 | Sony | 1033 1069 1070 1431 |
| CyberHome | 1123 1502 | H & B | 142' | Panasonic | 0490 10'10 10'11 | 1432 1433 | |
| Denon | 0490 | iLo | 1348 | Philips | 0648 1158 | Sylvania | 0675 |
| Dick Smith Electronics | 1730 | JVC | 1154 1275 | Pioneer | 0631 1475 1476 | Yamada | 1056 1158 1416 |
| Digitrex | 1056 | Kreisen | 1421 | Polaroid | 1086 | Zenith | 0741 |
| DSE | 1730 LG | 0741 | RCA | 0522 | |||
| Emerson | 0675 | LiteOn | 1158 1416 1440 | Samsung | 0490 | ||
LD
| Brand Codes Brand Codes Brand | Codes Brand Codes | ||||||
| Aiwa | 0203 | Magnavox | 0194 0217 0241 | Philips | 0064 0194 | Sega | 0023 |
| Carver | 0084 0194 0323 | Marentz | 0064 0194 | Pioneer | 0059 0023 | Sharp | 0001 |
| Denon | 0059 0172 0241 | Mitsubishi | 0059 0241 | Polk Audio | 0194 | Sony | 0193 0201 0270 |
| Disco Vision | 0023 | NAD | 0059 | Quasar | 0204 | Technics | 0204 |
| Funai | 0203 | Nagsmi | 0059 | Realistic | 0203 | Telefunken | 0059 |
| GoldStar | 0172 | NEC | 0286 | Renaissance | 0323 | Tneta Digital | 0194 |
| Harrman/Kardon | 0194 | Optimus | 0059 | Salora | 0064 | Victor | 0245 |
| Hitachi | 0023 0395 Panasonic | 0204 | Samsung | 0323 Yamaha | 0217 | ||
Using the remote control unit to control other devices

Receiver control buttons
When a Pioneer receiver is connected to the display, use buttons 1 to 3 to operate the receiver.
When a non-Pioneer receiver is connected to the display, the signals for 1 to 3 must first be "learned". See page 90.
1 RECEIVER (STANDBY/ON)
Turns the Pioneer receiver power On and Off.
2 RECEIVER INPUT
Selects the input source connected to the Pioneer receiver.
3 RECEIVER VOL +/-
Adjusts the Pioneer receiver volume level
Press VOL + to increase the volume and VOL - to decrease it.

NOTE
- The color-highlighted buttons on the remote control can memorize the control signal from another device's remote control.

CBL/SAT control buttons
When the CBL/SAT function has been preset by the remote control's learning function, the remote control buttons function as shown below.
- When the Mode switch is set to CBL/SAT, the cable converter or satellite broadcast tuner connected to the display, use the buttons shown below to operate the device (3, 4, 5, 8 and 9 for cable converters and 1 to 7 for satellite tuners):
- Cable converters or satellite broadcast tuners made by other manufacturers not listed in the system can be controlled using the remote control if buttons 1 to 9 have already learned the functions. See page 90.
1 SAT MENU
Displays the satellite broadcasting menu screen
2 E N T↑←R, / / /
ENTER: Activates the selected function
+/↓/←/→: Selects items on the SAT GUIDE screen or SAT MENU screen
30-9
Press a button (or buttons) that corresponds to the channel that you want to watch
4 C H + / -
Selects a higher or lower channel
5 SOURCE ⏻
Turns the device sending the image On and Off
6 SAT GUIDE
Displays the satellite broadcasting guide screen
- Set up this button with the learning function if necessary
7 RETURN
When the CBL/SAT menu is displayed, restores the immediately previous screen
8 C H E N T E R \*
Enters the selected channel with the direct channel selection buttons
9 CH RETURN\*
Switches between the current channel and the previous channel you were watching
* Some cable converter manufacturers do not preset CH ENTER and CH RETURN. Set up these buttons with the learning function if necessary.

NOTE
- CABLE and SAT cannot be selected at the same time.
- The color-highlighted buttons on the remote control can learn the control signal from another device's remote control.
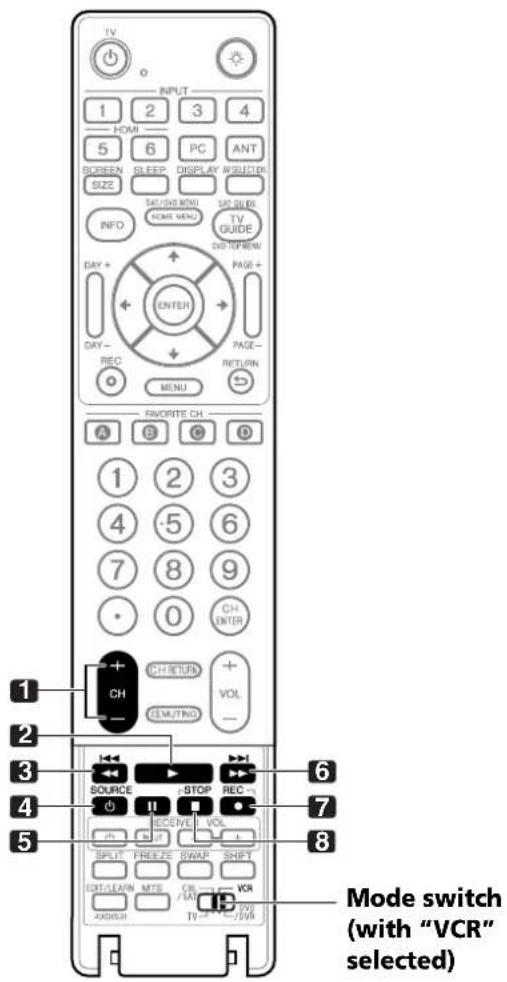
VCR control buttons
When the VCR is preset by the remote control's learning function, the remote control buttons function as follows: (Mode switch must be set to VCR).
- Press the input selector button (INPUT 1–6) that matches the input terminal connected to the VCR. The VCR can be operated using 1 to 8.
- VCRs made by manufacturers not listed in the system can be controlled using the remote control if buttons 1 to 8 have learned the functions. See page 90.
1 C H + / - Selects the channel on the VCR
2 ▶ (PLAY) Selects playback
3 ◀◀ (RWD) Rewinds the tape and allows picture search
4 SOURCE ☐ Turns the power of the VCR On and Off
5 II (PAUSE/ STILL) Pauses playback and displays still pictures
6 ▶▶ (FF) Rapidly advances the tape and allows picture search
7 ● (REC) Starts recording
8 ■ (STOP) Stops tape transport
NOTE
- The color-highlighted buttons on the remote control can learn the control signal from another device's remote control.
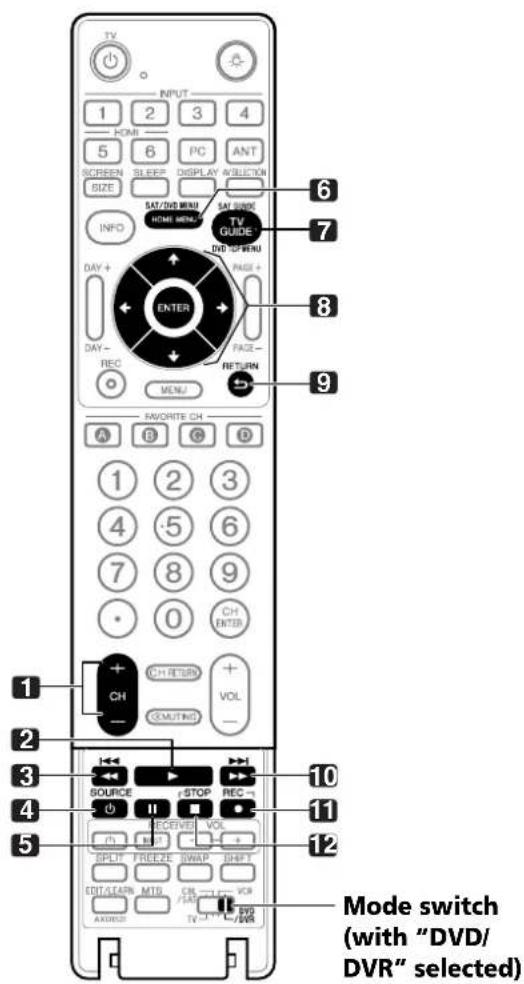
DVD/DVR control buttons
When the DVD/DVR is preset by the learning function of the remote control, the remote control unit buttons will function as follows when the Mode switch of the remote control unit is set to DVD/DVR.
- When the input selector button having the same number as the input terminal connected to a DVD player or DVD recorder is pressed, these players can be operated using 1 to 12.
- DVD players or DVD recorders made by other manufacturers and not preset can also be operated using the remote control unit if 1 to 12 have learned the functions. See page 90.
1 CH +/- (DVD recorder only)
Changes the channel of the tuner built into the DVD recorder

(PLAY)
Selects playback


(SCAN)/
(CHAPTER SEARCH)
Continue pressing to go backward
Pressing quickly once takes you to the start of the playing chapter. Each time it is pressed, playback jumps to the start of previous chapter.
4 SOURCE ⏻
Turns the power of the DVD player or DVD recorder On and Off

(PAUSE/STILL)
Pauses playback and displays still pictures

VD MENU (DVD, DVD recorder)
Displays the DVD menu

VD TOP MENU (DVD, DVD recorder)
Displays the DVD top menu

ENT→E↓R
I I I ( D V
DVD rec
ENTER: Activates the selected function

/←/→:

cts i

on

DVD

NL

een


E T

R

[Non-Text]

[Non-Text]

[Non-Text]

[Non-Text]

Whe
n the
DVD me
nu is
dis
playe
d, re
stor
es
he
[Non-Text]

n the
DVD me
nu is
dis
d, re
stor
es
he
n the
DVD me
nu is
disp
laye
d, re
stor
es
he
n the
DVD me
(DVD,
op menu
n the
DVD me
disp
laye
d, re
stor
es
he
n the
MENU
(DV
D,
DVI
O re
cor
de
r)
[Non-Text]
[Non-Text]
[Non-Text]
[Non-Text]
n the
DVD me

APT
ER
SEA
.RCH
1)
[Non-Text]


inue p
ressing
for fas
st fo
nwa
rd
[Non-Text]
分
[Non-Text]

Pressing qi
vickly on
ce tak
es
YOU
oth
e sta
rt c
of the

chapter.Ea
ch time
t is pr
pss
ed, p
layb
ack je
im
os to

of the next
chapter.
[Non-Text]
[Non-Text]
[Non-Text]
[Non-Text]
[Non-Text]


REC)
DVD r
ecor
de
r o
nly)
m = 311
[Non-Text]

Start
s r

(S
TOP)
Stops playback
If pressing
once fair
s to s
op
play
back
on t
he
oper
the

12 STOP
REC (I
DVD
re
cor
der
on
y)
S ■
to st
op re
CO
DV
O rec

NO
OTE

DVD
play

me t
ime.

e col
or-h

arn t
ne c

ntro

e ren
note

e sup
opor

ge 9
6.

(1)
广力云

[Non-Text]
[Non-Text]

[Non-Text]
[Non-Text]

[Non-Text]
[Non-Text]

[Non-Text]
[Non-Text]

[Non-Text]
[Non-Text]

[Non-Text]
[Non-Text]

[Non-Text]
[Non-Text]

[Non-Text]
[Non-Text]

[Non-Text]
[Non-Text]

[Non-Text]
[Non-Text]

[Non-Text]
[Non-Text]

[Non-Text]
[Non-Text]

[Non-Text]
[Non-Text]

[Non-Text]
[Non-Text]
Troubleshooting
| Problem Possible Solution | |
| GENERAL | |
| No power • Is the power cord disconnected? (See page 23)Has POWER been turned on? (See page 24)Check if you pressed TV on the remote control. (See page 24)If the indicator on the system lights up red, press TV. | |
| Power is suddenly turned off • Is the sleep timer set? (See page 55)Check the power control setting. (See page 61)The system's internal temperature has increased. Clear/clean the vents. (See page 18)A malfunction may have occurred in the home network module. | |
| The system cannot be operated | External influences such as lightning, static electricity, etc., may cause failures.Try turning off the Plasma Display or unplugging the power cord. Wait one to two minutes then restore power to the panel. |
| Remote control unit does not operate | Check if POWER is Off. Activate the button when the POWER ON and STANDBY indicators are Off.Is the Mode switch set correctly? Slide it to the TV position. (See page 17)Are the batteries inserted with polarity aligned (+,-)? (See page 22)Are the batteries low? (Replace with new batteries.) (See page 22)Point the remote control directly at the panel's remote control sensor. (See page 22)Is the panel under strong or fluorescent lighting?Is fluorescent light blinding the remote control sensor? |
| POWER ON indicator or STANDBY indicator is blinking | The unit's internal protective circuits may have been activated.Unplug the panel's power cord from the power outlet. Wait one to two minutes then plug in the panel again.If the problem is not solved with this, contact the nearest Pioneer Authorized Independent Service Company,or the Customer Support Division (see back cover). |
| PICTURE/SOUND | |
| Image and sound are absent | Verify that the input source is a TV channel rather than from a PC or a DVD player. (See page 25)Check the Parental Control function. (See page 36)Enter a password to temporarily cancel the Parental Control function. (See page 40)Check the cable connection with the antenna. (See page 21)Check the cable connection with the source device. (See pages 66 to 72) |
| No picture • Is the connection to other components correct? (See pages 66 to 71)Is a non-compatible PC signal being input? (See page 70)Is picture adjustment correct? (See page 56) | |
| Sound but no picture | Check if energy-saving "Picture Off" option is selected. With this option selected, the screen is deactivated;only audio is output. To restore the screen display, press any button other than VOL +/- and MUTING. (See page 61) |
| Picture but no sound • Verify that the volume is set high enough to hear. (See page 26)Check if the sound is muted. (See page 26)When using a video or PC input source, verify that the audio terminals are also connected.(See pages 66 to 68 and 70) | |
| Sound is reversed between the right and left speakersSound but from only one speaker | Check if the speaker cable connections have been reversed between the right and left or if the speaker cable from either speaker has been disconnected. (See page 19)Has the balance been correctly adjusted? (See page 60) |
| Picture is cut off • Is the image position correct? (See page 62)Has the correct screen size been selected? (See page 64) | |
| Colors are too dark/light or appear strange | Adjust the picture tone. (See page 56)Is the room too bright? The picture may appear dim in a room that is too bright. |
| OTHER | |
| • TV-Guide data is unavailable | • If TV-Guide data cannot be obtained with ANTA selected for cable connection, select ANT.B for over the air. In addition, perform the TV-Guide setup again (see page 31):- Select "No" for cable service on Screen 3.- Select "Yes" for antenna service on Screen 5.- Select "ANT B IN" on Screen 4. |
| • An external device connected to the USB terminal does not operate | • Confirm that the device is connected to the display. (See page 74)• Disconnect then reconnect the USB cable. (See page 74)• Check that the USB cable is shorter than 5 m. (See page 74)• Check if the USB cable is properly connected. (See page 74)• Turn Off then On the main power to confirm that the USB device is working.• Check if the external device works correctly after the USB device was restarted.• Verify that the digital camera is set to take a picture.• Confirm that the digital camera is placed in Mass Storage mode.• To change the digital camera's configuration, refer to the camera's instruction manual. |
| • Photo data stored in a digital still camera cannot be read through USB interface | • Confirm that the device is connected to the display. (See page 74)• Verify that the digital camera is turned On. |
| • Panel sounds/noises | • Panel generated sounds, examples: Fan motor noise, Electrical Circuit Humming/Glass Panel buzzing are normal operation of a phosphor-based matrix display. Experiment with the available Energy Save modes to find the best setting for your use. (See page 61) |
| • Screen shows uneven brightness on the sides | • Play content that completely fills the screen until unevenness is minimized. Some signals may require the AV mode setting to be changed. (See page 63) |
| Home Media Gallery/NETWORK | |
| • No servers are found | • Confirm that the PC is On and not in Standby or Sleep. (nothing is chosen in "Select Servers"). When the PC has started with the "Wake On LAN" (WOL), check if the PC complies with WOL or if the WOL setup has been properly done on the device manager for BIOS or Windows.• Check the physical connections (hub, 100BASE-TX/10BASE-T, or crossed cable and other cable quality when cabled directly to a PC). It is strongly recommended to use 100BASE-TX for playback quality and display speed.• Check the logical connections (IP Address setup, DHCP, etc.). Confirm the IP Address is correct if acquired by Auto IP and Firewall setup. Also check if the IP Address is properly acquired with DHCP on the "Network Setup" screen that follows the "Setup" menu.• Check the PC if its media server (Windows Media Connect or DLNA compliant) is running. Restart if necessary. Check if one or more servers are On (this may cause malfunction).• Check if the PC is operating properly. Reboot the PC after confirming its specifications and setup.• Check the media server setup. If a client is registered manually the setup procedure may have to be run again. An option "Not Allowed" may have been selected for connections.• Wait for a short period then select "Update to Latest Information" from the Tool Menu. (See page 76) |
| • No previously connected server(s) found (items in "Select Servers" are dimmed) | • Confirm that the PC is On and not in Standby or Sleep. (nothing is chosen in "Select Servers"). When the PC has started with the "Wake On LAN" (WOL), check if the PC complies with WOL or if the WOL setup has been properly done on the device manager for BIOS or Windows.• Check the physical connections (hub, 100BASE-TX/10BASE-T or crossed cable and other cable quality when cabled directly to a PC). It is strongly recommended to use 100BASE-TX for playback quality and display speed.• Check the logical connections (IP Address setup, DHCP, etc.). Confirm the IP Address when acquired by Auto IP and Firewall setup. Also check if the IP Address is properly acquired with DHCP on the "Network Setup" screen that follows the "Setup" menu.• Check the PC if its media server (Windows Media Connect or DLNA compliant) is running. Restart if necessary. Check if one or more servers are On (this may cause malfunction).• Check if the PC is operating properly. Reboot the PC after confirming its specifications and setup.• Check the media server setup. A setup procedure may be required for connections if a client is registered manually. An option "Not Allowed" may have been selected for connections.• Wait for a while and select "Update to Latest Information" from the Tool Menu. (See page 76) |
| • An available server is selected but cannot be navigated | • Check if the server is correctly set up for file sharing, if the target folder has been deleted, or if one or more folders have been corrupted on the server.• Check if there are too many files in each folder. |
| • A server is arbitrarily selected | • This arbitrary selection happens when the server you used before had been set to display the top menu screen (if you reset it, other servers connected are also reset). When the "Single Server/USB" option is selected on the "Auto Connection Setup" screen that follows the "Setup" menu, the server is automatically accessed if only one server is connected. Use the Tool Menu to select the proper server. (See page 76) |
| • File/folder configuration differs from one server to another (strange configuration) | • The Media Navigator displays the server contents as classified by the server.• If no information (such as ID3 tag) is contained in the file, files cannot be classified on the server. |
Problem Possible Solution
| Home Media Gallery/PLAYBACK | |
| ·Image or sound is interrupted or distorted (Block noise appears) | ·Check the physical connections (hub, 100BASE-TX/10BASE-T, or crossed cable and other cable quality when cabled directly to a PC). It is strongly recommended to use 100BASE-TX for playback quality and display speed.·Check if the PC is operating properly. Reboot the PC after confirming its specifications and setup.·Check if the file complies to the supported format, bit rate or profile. Also check if the file is damaged.·When connected by a wireless LAN, check if the bit rate is sufficient.·Some files that comply with the supported format may not be played back or displayed. |
| ·Cannot play or display | ·Check the physical connections (hub, 100BASE-TX/10BASE-T, or crossed cable and other cable quality when cabled directly to a PC). It is strongly recommended to use 100BASE-TX for playback quality and display speed.·Check if the PC is operating properly. Reboot the PC after confirming its specifications and setup.·Check if the file complies to the supported format, bit rate or profile. Also check if the fileis damaged.·Check if the leasing contract for the server has expired.·When connected by a wireless LAN, check if the bit rate is sufficient.·Some files that comply with the supported format may not be played back or displayed.·It takes time to capture and display a large-sized image. If this is the case, no operation may be performed.·See the Pioneer website (www.pioneerelectronics.com) for the formats that are supported. |
| Home Media Gallery/FIRMWARE | |
| ·No updates are possible on USB | ·Check if the device is Mass Storage Class compliant, if it is connected properly, nothing is damaged (power unit, mode such as Mass Storage mode and media format, etc.), if it contains the supported files, and if the speed of the device is sufficient (poor device speed may result in interrupted or delayed display of images due to a bit-rate problem). When using a digital camera that is not Mass Storage Class compliant, insert the Flash Memory card into the multi-card reader.·Confirm that the device is correctly inserted or removed.·Check that the firmware file has been correctly downloaded. Also check the file size.·See the Pioneer website (www.pioneerelectronics.com) for details. |
| Home Media Gallery/USB | |
| ·USB devices are not properly recognized | ·Check if the device is Mass Storage Class compliant, if it is connected properly, nothing is damaged (power unit, mode such as Mass Storage mode and media format, etc.), if it contains the supported files, and if the speed of the device is sufficient (poor device speed may result in interrupted or delayed display of images due to a bit-rate problem). When using a digital camera that is not Mass Storage Class compliant, insert the Flash Memory card into the multi-card reader.· Confirm that the device is correctly inserted or removed.·No USB hub is supported. When you connect a home network, connect directly to the device's USB port. |
| ·Image or sound is interrupted or distorted (Block noise appears) | ·Verify that the file complies with the supported format, bit rate or profile. Also check the file for damage.·Some files that comply with the supported format may not play back or display properly.·Check if the device is Mass Storage Class compliant, if it is connected properly, nothing is damaged (power unit, mode such as Mass Storage mode and media format, etc.), if it contains the supported files, and if the speed of the device is sufficient (poor device speed may result in interrupted or delayed display of images due to a bit-rate problem). When using a digital camera that is not Mass Storage Class compliant, insert the Flash Memory card into the multi-card reader. |
If one of the following error codes appear on screen, check the corresponding message.
Code Message Check
| SD04 and SD11 | Powering off. Internal temperature too high.Check temperature around PDP. | Check if the ambient temperature of the Plasma Display is high. |
| SD05 (PRO-1140HD) | ||
| Internal protection circuit turns power off.Is there a short in speaker cable?(PRO-940HD) | Check the speaker cable connections between the Plasma Display and the speakers. | |
| Internal protection circuit turns power off. | Contact the nearest Pioneer Authorized Independent Service Company or the Customer Support Division. (See back cover) | |
This product in part uses "OpenSSL" software.
To the extent the OpenSSL software is being used, the following notification applies:
Copyright (c) 1998-2006 The OpenSSL Project. All rights reserved.
Redistribution and use in source and binary forms, with or without modification, are permitted provided that the following conditions are met:
- Redistributions of source code must retain the above copyright notice, this list of conditions and the following disclaimer.
- Redistributions in binary form must reproduce the above copyright notice, this list of conditions and the following disclaimer in the documentation and/or other materials provided with the distribution.
- All advertising materials mentioning features or use of this software must display the following acknowledgment: "This product includes software developed by the OpenSSL Project for use in the OpenSSL Toolkit. (http://www.openssl.org/)"
- The names "OpenSSL Toolkit" and "OpenSSL Project" must not be used to endorse or promote products derived from this software without prior written permission. For written permission, please contact openssl-core@openssl.org.
- Products derived from this software may not be called "OpenSSL" nor may "OpenSSL" appear in their names without prior written permission of the OpenSSL Project.
- Redistributions of any form whatsoever must retain the following acknowledgment: "This product includes software developed by the OpenSSL Project for use in the OpenSSL Toolkit (http://www.openssl.org/)"
THIS SOFTWARE IS PROVIDED BY THE OpenSSL PROJECT "AS IS" AND ANY EXPRESSED OR IMPLIED WARRANTIES, INCLUDING, BUT NOT LIMITED TO, THE IMPLIED WARRANTIES OF MERCHANTABILITY AND FITNESS FOR A PARTICULAR PURPOSE ARE DISCLAIMED. IN NO EVENT SHALL THE OpenSSL PROJECT OR ITS CONTRIBUTORS BE LIABLE FOR ANY DIRECT, INDIRECT, INCIDENTAL, SPECIAL, EXEMPLARY, OR CONSEQUENTIAL DAMAGES (INCLUDING, BUT NOT LIMITED TO, PROCUREMENT OF SUBSTITUTE GOODS OR SERVICES; LOSS OF USE, DATA, OR PROFITS; OR BUSINESS INTERRUPTION) HOWEVER CAUSED AND ON ANY THEORY OF LIABILITY, WHETHER IN CONTRACT, STRICT LIABILITY, OR TORT (INCLUDING NEGLIGENCE OR OTHERWISE) ARISING IN ANY WAY OUT OF THE USE OF THIS SOFTWARE, EVEN IF ADVISED OF THE POSSIBILITY OF SUCH DAMAGE.
This product includes cryptographic software written by Eric Young (eay@cryptsoft.com). This product includes software written by Tim Hudson (tjh@cryptsoft.com).
Original SSLeay License
Copyright (C) 1995-1998 Eric Young (eay@cryptsoft.com)
All rights reserved.
This package is an SSL implementation written by Eric Young (eay@cryptsoft.com). The implementation was written so as to conform with Netscapes SSL.
This library is free for commercial and non-commercial use as long as the following conditions are ahered to. The following conditions apply to all code found in this distribution, be it the RC4, RSA, Ihash, DES, etc., code; not just the SSL code. The SSL documentation included with this distribution is covered by the same copyright terms except that the holder is Tim Hudson (tjh@cryptsoft.com).
Copyright remains Eric Young's, and as such any Copyright notices in the code are not to be removed. If this package is used in a product, Eric Young should be given attribution as the author of the parts of the library used. This can be in the form of a textual message at program startup or in documentation (online or textual) provided with the package.
Redistribution and use in source and binary forms, with or without modification, are permitted provided that the following conditions are met:
- Redistributions of source code must retain the copyright notice, this list of conditions and the following disclaimer.
- Redistributions in binary form must reproduce the above copyright notice, this list of conditions and the following disclaimer in the documentation and/or other materials provided with the distribution.
- All advertising materials mentioning features or use of this software must display the following acknowledgement: "This product includes cryptographic software written by Eric Young (eay@cryptsoft.com)" The word 'cryptographic' can be left out if the routines from the library being used are not cryptographic related :-).
- If you include any Windows specific code (or a derivative thereof) from the apps directory (application code) you must include an acknowledgement: "This product includes software written by Tim Hudson (tjh@cryptsoft.com)"
THIS SOFTWARE IS PROVIDED BY ERIC YOUNG "AS IS" AND ANY EXPRESS OR IMPLIED WARRANTIES, INCLUDING, BUT NOT LIMITED TO, THE IMPLIED WARRANTIES OF MERCHANTABILITY AND FITNESS FOR A PARTICULAR PURPOSE ARE DISCLAIMED. IN NO EVENT SHALL THE AUTHOR OR CONTRIBUTORS BE LIABLE FOR ANY DIRECT, INDIRECT, INCIDENTAL, SPECIAL, EXEMPLARY, OR CONSEQUENTIAL DAMAGES (INCLUDING, BUT NOT LIMITED TO, PROCUREMENT OF SUBSTITUTE GOODS OR SERVICES; LOSS OF USE, DATA, OR PROFITS; OR BUSINESS INTERRUPTION) HOWEVER CAUSED AND ON ANY THEORY OF LIABILITY, WHETHER IN CONTRACT, STRICT LIABILITY, OR TORT (INCLUDING NEGLIGENCE OR OTHERWISE) ARISING IN ANY WAY OUT OF THE USE OF THIS SOFTWARE, EVEN IF ADVISED OF THE POSSIBILITY OF SUCH DAMAGE.
The licence and distribution terms for any publicly available version or derivative of this code cannot be changed. i.e. this code cannot simply be copied and put under another distribution licence [including the GNU Public Licence.]
Appendix
Copyright (c) 1998, 1999, 2000 Thai Open Source Software
Center Ltd and Clark Cooper
Copyright (c) 2001, 2002, 2003, 2004, 2005, 2006 Expat maintainers.
THE SOFTWARE IS PROVIDED "AS IS", WITHOUT WARRANTY OF ANY KIND, EXPRESS OR IMPLIED, INCLUDING BUT NOT LIMITED TO THE WARRANTIES OF MERCHANTABILITY, FITNESS FOR A PARTICULAR PURPOSE AND NONINFRINGEMENT. IN NO EVENT SHALL THE AUTHORS OR COPYRIGHT HOLDERS BE LIABLE FOR ANY CLAIM, DAMAGES OR OTHER LIABILITY, WHETHER IN AN ACTION OF CONTRACT, TORT OR OTHERWISE, ARISING ROM, OUT OF OR IN CONNECTION WITH THE SOFTWARE OR THE USE OR OTHER DEALINGS IN THE SOFTWARE.
"Portions of this software are copyright (c)
If only executable code is distributed, then the accompanying documentation must state that "this software is based in part on the work of the Independent JPEG Group"
COPYRIGHT NOTICE, DISCLAIMER, and LICENSE:
If you modify libpng you may insert additional notices immediately following this sentence.
libpng version 1.2.6, September 12, 2004, is Copyright (c) 2004 Glenn Randers-Pehrson, and is distributed according to the same disclaimer and license as libpng-1.2.5 with the following individual added to the list of Contributing Authors
Cosmin Truta
libpng versions 1.0.7, July 1, 2000, through 1.2.5 - October 3, 2002, are Copyright (c) 2000-2002 Glenn Randers-Pehrson, and are distributed according to the same disclaimer and license as libpng-1.0.6 with the following individuals added to the list of Contributing Authors
Simon-Pierre Cadieux
Eric S. Raymond
Gilles Vollant
and with the following additions to the disclaimer:
There is no warranty against interference with your enjoyment of the library or against infringement. There is no warranty that our efforts or the library will fulfill any of your particular purposes or needs. This library is provided with all faults, and the entire risk of satisfactory quality, performance, accuracy, and effort is with the user.
libpng versions 0.97, January 1998, through 1.0.6, March 20, 2000, are Copyright (c) 1998, 1999 Glenn Randers-Pehrson, and are distributed according to the same disclaimer and license as libpng-0.96, with the following individuals added to the list of Contributing Authors:
Tom Lane
Glenn Randers-Pehrson
Willem van Schaik
libpng versions 0.89, June 1996, through 0.96, May 1997, are Copyright (c) 1996, 1997 Andreas Dilger
Distributed according to the same disclaimer and license as libpng-0.88, with the following individuals added to the list of Contributing Authors:
John Bowler
Kevin Bracey
Sam Bushell
Magnus Holmgren
Greg Roelofs
Tom Tanner
libpng versions 0.5, May 1995, through 0.88, January 1996, are Copyright (c) 1995, 1996 Guy Eric Schalnat, Group 42, Inc.
For the purposes of this copyright and license, "Contributing Authors" is defined as the following set of individuals:
Andreas Dilger
Dave Martindale
Guy Eric Schalnat
Paul Schmidt
Tim Wegner
The PNG Reference Library is supplied “AS IS”. The Contributing Authors and Group 42, Inc. disclaim all warranties, expressed or implied, including, without limitation, the warranties of merchantability and of fitness for any purpose. The Contributing Authors and Group 42, Inc. assume no liability for direct, indirect, incidental, special, exemplary, or consequential damages, which may result from the use of the PNG Reference Library, even if advised of the possibility of such damage.
Permission is hereby granted to use, copy, modify, and distribute this source code, or portions hereof, for any purpose, without fee, subject to the following restrictions:
- The origin of this source code must not be misrepresented.
- Altered versions must be plainly marked as such and must not be misrepresented as being the original source.
- This Copyright notice may not be removed or altered from any source or altered source distribution.
The Contributing Authors and Group 42, Inc. specifically permit, without fee, and encourage the use of this source code as a component to supporting the PNG file format in commercial products. If you use this source code in a product, acknowledgment is not required but would be appreciated.
A "png_get_copyright" function is available, for convenient use in "about" boxes and the like: printf("%s", png_get_copyright(NULL)); Also, the PNG logo (in PNG format, of course) is supplied in the files "pngbar.png" and "pngbar.jpg (88x31) and "pngnow.png" (98x31). Libpng is OSI Certified Open Source Software. OSI Certified Open Source is a certification mark of the Open Source Initiative.
Glenn Randers-Pehrson
glennrp@users.sourceforge.net
September 12, 2004
Copyright (c) 2002, Xiph.org Foundation
Redistribution and use in source and binary forms, with or without modification, are permitted provided that the following conditions are met:
- Redistributions of source code must retain the above copyright notice, this list of conditions and the following disclaimer.
- Redistributions in binary form must reproduce the above copyright notice, this list of conditions and the following disclaimer in the documentation and/or other materials provided with the distribution.
- Neither the name of the Xiph.org Foundation nor the names of its contributors may be used to endorse or promote products derived from this software without specific prior written permission.
THIS SOFTWARE IS PROVIDED BY THE COPYRIGHT HOLDERS AND CONTRIBUTORS ``AS IS" AND ANY EXPRESS OR IMPLIED WARRANTIES, INCLUDING, BUT NOT LIMITED TO, THE IMPLIED WARRANTIES OF MERCHANTABILITY AND FITNESS FOR A PARTICULAR PURPOSE ARE DISCLAIMED. IN NO EVENT SHALL THE FOUNDATION OR CONTRIBUTORS BE LIABLE FOR ANY DIRECT, INDIRECT, INCIDENTAL, SPECIAL, EXEMPLARY, OR CONSEQUENTIAL DAMAGES (INCLUDING, BUT NOT LIMITED TO, PROCUREMENT OF SUBSTITUTE GOODS OR SERVICES; LOSS OF USE, DATA, OR PROFITS; OR BUSINESS INTERRUPTION) HOWEVER CAUSED AND ON ANY THEORY OF LIABILITY, WHETHER IN CONTRACT, STRICT LIABILITY, OR TORT (INCLUDING NEGLIGENCE OR OTHERWISE) ARISING IN ANY WAY OUT OF THE USE OF THIS SOFTWARE, EVEN IF ADVISED OF THE POSSIBILITY OF SUCH DAMAGE.
The GIFLIB distribution is Copyright (c) 1997 Eric S. Raymond
THE SOFTWARE IS PROVIDED "AS IS", WITHOUT WARRANTY OF ANY KIND, EXPRESS OR IMPLIED, INCLUDING BUT NOT LIMITED TO THE WARRANTIES OF MERCHANTABILITY, FITNESS FOR A PARTICULAR PURPOSE AND NONINFRINGEMENT. IN NO EVENT SHALL THE AUTHORS OR COPYRIGHT HOLDERS BE LIABLE FOR ANY CLAIM, DAMAGES OR OTHER LIABILITY, WHETHER IN AN ACTION OF CONTRACT, TORT OR OTHERWISE, ARISING FROM, OUT OF OR IN CONNECTION WITH THE SOFTWARE OR THE USE OR OTHER DEALINGS IN THE SOFTWARE.
Copyright (c) 1988-1997 Sam Leffler
Appendix
Copyright (c) 1991-1997 Silicon Graphics, Inc.
THE SOFTWARE IS PROVIDED "AS-IS" AND WITHOUT WARRANTY OF ANY KIND, EXPRESS, IMPLIED OR OTHERWISE, INCLUDING WITHOUT LIMITATION, ANY WARRANTY OF MERCHANTABILITY OR FITNESS FOR A PARTICULAR PURPOSE.
IN NO EVENT SHALL SAM LEFFLER OR SILICON GRAPHICS BE LIABLE FOR ANY SPECIAL, INCIDENTAL, INDIRECT OR CONSEQUENTIAL DAMAGES OF ANY KIND, OR ANY DAMAGES WHATSOEVER RESULTING FROM LOSS OF USE, DATA OR PROFITS, WHETHER OR NOT ADVISED OF THE POSSIBILITY OF DAMAGE, AND ON ANY THEORY OF LIABILITY, ARISING OUT OF OR IN CONNECTION WITH THE USE OR PERFORMANCE OF THIS SOFTWARE.
Copyright (C) 1995-2004 Jean-loup Gailly and Mark Adler
"Copyright (c) 1998-2003 The OpenSSL Project. All rights reserved."
This product includes software developed by the OpenSSL Project for use in the OpenSSL Toolkit. (http://www.openssl.org/)
Linux Source Notice
The Pioneer Plasma Television is powered by utilizing the Linux operating system. The machine readable copy of the corresponding source code is available for the cost of distribution. To obtain a copy, please visit http://www.pioneerelectronics.com/ for more information.
GNU General Public License
Version 2, June 1991
Copyright (C) 1989, 1991 Free Software Foundation, Inc.
59 Temple Place - Suite 330, Boston, MA 02111-1307, USA
Everyone is permitted to copy and distribute verbatim copies of this license document, but changing it is not allowed.
Preamble
The licenses for most software are designed to take away your freedom to share and change it. By contrast, the GNU General Public License is intended to guarantee your freedom to share and change free software to make sure the software is free for all its users. This General Public License applies to most of the Free Software Foundation's software and to any other program whose authors commit to using it. (Some other Free Software Foundation software is covered by the GNU Library General Public License instead.) You can apply it to your programs, too.
When we speak of free software, we are referring to freedom, not price. Our General Public Licenses are designed to make sure that you have the freedom to distribute copies of free software (and charge for this service if you wish), that you receive source code or can get it if you want it, that you can change the software or use pieces of it in new free programs; and that you know you can do these things.
To protect your rights, we need to make restrictions that forbid anyone to deny you these rights or to ask you to surrender the rights. These restrictions translate to certain responsibilities for you if you distribute copies of the software, or if you modify it.
For example, if you distribute copies of such a program, whether gratis or for a fee, you must give the recipients all the rights that you have. You must make sure that they, too, receive or can get the source code. And you must show them these terms so they know their rights.
We protect your rights with two steps: (1) copyright the software, and (2) offer you this license which gives you legal permission to copy, distribute and/or modify the software.
Also, for each author's protection and ours, we want to make certain that everyone understands that there is no warranty for this free software. If the software is modified by someone else and passed on, we want its recipients to know that what they have is not the original, so that any problems introduced by others will not reflect on the original authors' reputations.
Finally, any free program is threatened constantly by software patents. We wish to avoid the danger that redistributors of a free program will individually obtain patent licenses, in effect making the program proprietary. To prevent this, we have made it clear that any patent must be licensed for everyone's free use or not licensed at all.
The precise terms and conditions for copying, distribution and modification follow.
GNU General Public License
TERMS AND CONDITIONS FOR COPYING, DISTRIBUTION AND MODIFICATION
- This License applies to any program or other work which contains a notice placed by the copyright holder saying it may be distributed under the terms of this General Public License. The "Program", below, refers to any such program or work, and a "work based on the Program" means either the Program or any derivative work under copyright law: that is to say, a work containing the Program or a portion of it, either verbatim or with modifications and/or translated into another language. (Hereinafter, translation is included without limitation in the term "modification".) Each licensee is addressed as "you".
Activities other than copying, distribution and modification are not covered by this License; they are outside its scope. The act of running the Program is not restricted, and the output from the Program is covered only if its contents constitute a work based on the Program (independent of having been made by running the Program). Whether that is true depends on what the Program does.
- You may copy and distribute verbatim copies of the Program's source code as you receive it, in any medium, provided that you conspicuously and appropriately publish on each copy an appropriate copyright notice and disclaimer of warranty; keep intact all the notices that refer to this License and to the absence of any warranty; and give any other recipients of the Program a copy of this License along with the Program.
You may charge a fee for the physical act of transferring a copy, and you may at your option offer warranty protection in exchange for a fee. - You may modify your copy or copies of the Program or any portion of it, thus forming a work based on the Program, and copy and distribute such modifications or work under the terms of Section 1 above, provided that you also meet all of these conditions:
a) You must cause the modified files to carry prominent notices stating that you changed the files and the date of any change.
b) You must cause any work that you distribute or publish, that in whole or in part contains or is derived from the Program or any part thereof, to be licensed as a whole at no charge to all third parties under the terms of this License.
c) If the modified program normally reads commands interactively when run, you must cause it, when started running for such interactive use in the most ordinary way, to print or display an announcement including an appropriate copyright notice and a notice that there is no warranty (or else, saying that you provide a warranty) and that users may redistribute the program under these conditions, and telling the user how to view a copy of this License.
(Exception: if the Program itself is interactive but does not normally print such an announcement, your work based on the Program is not required to print an announcement.)
These requirements apply to the modified work as a whole. If identifiable sections of that work are not derived from the Program, and can be reasonably considered independent and separate works in themselves, then this License, and its terms, do not apply to those sections when you distribute them as separate works. But when you distribute the same sections as part of a whole which is a work based on the Program, the distribution of the whole must be on the terms of this License, whose permissions for other licensees extend to the entire whole, and thus to each and every part regardless of who wrote it.
Thus, it is not the intent of this section to claim rights or contest your rights to work written entirely by you; rather, the intent is to exercise the right to control the distribution of derivative or collective works based on the Program.
In addition, mere aggregation of another work not based on the Program with the Program (or with a work based on the Program) on a volume of a storage or distribution medium does not bring the other work under the scope of this License. - You may copy and distribute the Program (or a work based on it, under Section 2) in object code or executable form under the terms of Sections 1 and 2 above provided that you also do one of the following:
a) Accompany it with the complete corresponding machine-readable source code, which must be distributed under the terms of Sections 1 and 2 above on a medium customarily used for software interchange; or,
b) Accompany it with a written offer, valid for at least three years, to give any third party, for a charge no more than your cost of physically performing source distribution, a complete machine-readable copy of the corresponding source code, to be distributed under the terms of Sections 1 and 2 above on a medium customarily used for software interchange; or,
c) Accompany it with the information you received as to the offer to distribute corresponding source code. (This alternative is allowed only for noncommercial distribution and only if you received the program in object code or executable form with such an offer, in accord with Subsection b above.)
The source code for a work means the preferred form of the work for making modifications to it. For an executable work, complete source code means all the source code for all modules it contains, plus any associated interface definition files, plus the scripts used to control compilation and installation of the executable. However, as a special exception, the source code distributed need not include anything that is normally distributed (in either source or binary form) with the major components (compiler, kernel, and so on) of the operating system on which the executable runs, unless that component itself accompanies the executable.
If distribution of executable or object code is made by offering access to copy from a designated place, then offering equivalent access to copy the source code from the same place counts as distribution of the source code, even though third parties are not compelled to copy the source along with the object code. - You may not copy, modify, sublicense, or distribute the Program except as expressly provided under this License. Any attempt otherwise to copy, modify, sublicense or distribute the Program is void, and will automatically terminate your rights under this License.
However, parties who have received copies, or rights, from you under this License will not have their licenses terminated so long as such parties remain in full compliance. - You are not required to accept this License, since you have not signed it. However, nothing else grants you permission to modify or distribute the Program or its derivative works. These actions are prohibited by law if you do not accept this License. Therefore, by modifying or distributing the Program (or any work based on the Program), you indicate your acceptance of this License to do so, and all its terms and conditions for copying, distributing or modifying the Program or works based on it.
- Each time you redistribute the Program (or any work based on the Program), the recipient automatically receives a license from the original licensor to copy, distribute or modify the Program subject to these terms and conditions. You may not impose any further restrictions on the recipients' exercise of the rights granted herein. You are not responsible for enforcing compliance by third parties to this License.
Appendix
- If, as a consequence of a court judgment or allegation of patent infringement or for any other reason (not limited to patent issues), conditions are imposed on you (whether by court order, agreement or otherwise) that contradict the conditions of this License, they do not excuse you from the conditions of this License. If you cannot distribute so as to satisfy simultaneously your obligations under this License and any other pertinent obligations, then as a consequence you may not distribute the Program at all. For example, if a patent license would not permit royalty-free redistribution of the Program by all those who receive copies directly or indirectly through you, then the only way you could satisfy both it and this License would be to refrain entirely from distribution of the Program.
If any portion of this section is held invalid or unenforceable under any particular circumstance, the balance of the section is intended to apply and the section as a whole is intended to apply in other circumstances.
It is not the purpose of this section to induce you to infringe any patents or other property right claims or to contest validity of any such claims; this section has the sole purpose of protecting the integrity of the free software distribution system, which is implemented by public license practices. Many people have made generous contributions to the wide range of software distributed through that system in reliance on consistent application of that system; it is up to the author/donor to decide if he or she is willing to distribute software through any other system and a licensee cannot impose that choice.
This section is intended to make thoroughly clear what is believed to be a consequence of the rest of this License.
-
If the distribution and/or use of the Program is restricted in certain countries either by patents or by copyrighted interfaces, the original copyright holder who places the Program under this License may add an explicit geographical distribution limitation excluding those countries, so that distribution is permitted only in or among countries not thus excluded. In such case, this License incorporates the limitation as if written in the body of this License.
-
The Free Software Foundation may publish revised and/or new versions of the General Public License from time to time. Such new versions will be similar in spirit to the present version, but may differ in detail to address new problems or concerns.
Each version is given a distinguishing version number. If the Program specifies a version number of this License which applies to it and "any later version", you have the option of following the terms and conditions either of that version or of any later version published by the Free Software Foundation. If the Program does not specify a version number of this License, you may choose any version ever published by the Free Software Foundation.
- If you wish to incorporate parts of the Program into other free programs whose distribution conditions are different, write to the author to ask for permission. For software which is copyrighted by the Free Software Foundation, write to the Free Software Foundation; we sometimes make exceptions for this. Our decision will be guided by the two goals of preserving the free status of all derivatives of our free software and of promoting the sharing and reuse of software generally.
NO WARRANTY
-
BECAUSE THE PROGRAM IS LICENSED FREE OF CHARGE, THERE IS NO WARRANTY FOR THE PROGRAM, TO THE EXTENT PERMITTED BY APPLICABLE LAW. EXCEPT WHEN OTHERWISE STATED IN WRITING THE COPYRIGHT HOLDERS AND/OR OTHER PARTIES PROVIDE THE PROGRAM "AS IS" WITHOUT WARRANTY OF ANY KIND, EITHER EXPRESSED OR IMPLIED, INCLUDING, BUT NOT LIMITED TO, THE IMPLIED WARRANTIES OF MERCHANTABILITY AND FITNESS FOR A PARTICULAR PURPOSE. THE ENTIRE RISK AS TO THE QUALITY AND PERFORMANCE OF THE PROGRAM IS WITH YOU. SHOULD THE PROGRAM PROVE DEFECTIVE, YOU ASSUME THE COST OF ALL NECESSARY SERVICING, REPAIR OR CORRECTION.
-
IN NO EVENT UNLESS REQUIRED BY APPLICABLE LAW OR AGREED TO IN WRITING WILL ANY COPYRIGHT HOLDER, OR ANY OTHER PARTY WHO MAY MODIFY AND/OR REDISTRIBUTE THE PROGRAM AS PERMITTED ABOVE, BE LIABLE TO YOU FOR DAMAGES, INCLUDING ANY GENERAL, SPECIAL, INCIDENTAL OR CONSEQUENTIAL DAMAGES ARISING OUT OF THE USE OR INABILITY TO USE THE PROGRAM (INCLUDING BUT NOT LIMITED TO LOSS OF DATA OR DATA BEING RENDERED INACCURATE OR LOSSES SUSTAINED BY YOU OR THIRD PARTIES OR A FAILURE OF THE PROGRAM TO OPERATE WITH ANY OTHER PROGRAMS), EVEN IF SUCH HOLDER OR OTHER PARTY HAS BEEN ADVISED OF THE POSSIBILITY OF SUCH DAMAGES.
END OF TERMS AND CONDITIONS
How to Apply These Terms to Your New Programs
If you develop a new program, and you want it to be of the greatest possible use to the public, the best way to achieve this is to make it free software which everyone can redistribute and change under these terms.
To do so, attach the following notices to the program. It is safest to attach them to the start of each source file to most effectively convey the exclusion of warranty; and each file should have at least the "copyright" line and a pointer to where the full notice is found.
Copyright (C) yyyy name of author
This program is free software; you can redistribute it and/or modify it under the terms of the GNU General Public License as published by the Free Software Foundation; either version 2 of the License, or (at your option) any later version.
This program is distributed in the hope that it will be useful, but WITHOUT ANY WARRANTY; without even the implied warranty of MERCHANTABILITY or FITNESS FOR A PARTICULAR PURPOSE. See the GNU General Public License for more details.
You should have received a copy of the GNU General Public License along with this program; if not, write to the Free Software Foundation, Inc., 59 Temple Place - Suite 330, Boston, MA 02111-1307, USA.
Also add information on how to contact you by electronic and paper mail.
If the program is interactive, make it output a short notice like this when it starts in an interactive mode:
Gnomovision version 69, Copyright (C) year name of author
Gnomovision comes with ABSOLUTELY NO WARRANTY; for details type 'show w'. This is free software, and you are welcome to redistribute it under certain conditions; type 'show c' for details.
The hypothetical commands 'show w' and 'show c' should show the appropriate parts of the General Public License. Of course, the commands you use may be called something other than 'show w' and 'show c'; they could even be mouse-clicks or menu items whatever suits your program.
You should also get your employer (if you work as a programmer) or your school, if any, to sign a "copyright disclaimer" for the program, if necessary. Here is a sample; alter the names:
Yoyodyne, Inc., hereby disclaims all copyright interest in the program 'Gnomovision' (which makes passes at compilers) written by James Hacker.
signature of Ty Coon, 1 April 1989
Ty Coon, President of Vice
This General Public License does not permit incorporating your program into proprietary programs. If your program is a subroutine library, you may consider it more useful to permit linking proprietary applications with the library. If this is what you want to do, use the GNU Lesser General Public License instead of this License.
GNU Lesser General Public License
Version 2.1, February 1999
Copyright (C) 1991, 1999 Free Software Foundation, Inc.
59 Temple Place, Suite 330, Boston, MA 02111-1307, USA
Everyone is permitted to copy and distribute verbatim copies of this license document, but changing it is not allowed.
[This is the first released version of the Lesser GPL. It also counts as the successor of the GNU Library Public License, version 2, hence the version number 2.1.]
Preamble
The licenses for most software are designed to take away your freedom to share and change it. By contrast, the GNU General Public Licenses are intended to guarantee your freedom to share and change free software to make sure the software is free for all its users. This license, the Lesser General Public License, applies to some specially designated software packages typically libraries of the Free Software Foundation and other authors who decide to use it. You can use it too, but we suggest you first think carefully about whether this license or the ordinary General Public License is the better strategy to use in any particular case, based on the explanations below.
When we speak of free software, we are referring to freedom of use, not price. Our General Public Licenses are designed to make sure that you have the freedom to distribute copies of free software (and charge for this service if you wish); that you receive source code or can get it if you want it; that you can change the software and use pieces of it in new free programs; and that you are informed that you can do these things.
To protect your rights, we need to make restrictions that forbid distributors to deny you these rights or to ask you to surrender these rights. These restrictions translate to certain responsibilities for you if you distribute copies of the library or if you modify it.
For example, if you distribute copies of the library, whether gratis or for a fee, you must give the recipients all the rights that we gave you. You must make sure that they, too, receive or can get the source code. If you link other code with the library, you must provide complete object files to the recipients, so that they can relink them with the library after making changes to the library and recompiling it. And you must show them these terms so they know their rights.
We protect your rights with a two-step method: (1) we copyright the library, and (2) we offer you this license, which gives you legal permission to copy, distribute and/or modify the library.
To protect each distributor, we want to make it very clear that there is no warranty for the free library. Also, if the library is modified by someone else and passed on, the recipients should know that what they have is not the original version, so that the original author's reputation will not be affected by problems that might be introduced by others.
Finally, software patents pose a constant threat to the existence of any free program. We wish to make sure that a company cannot effectively restrict the users of a free program by obtaining a restrictive license from a patent holder.
Therefore, we insist that any patent license obtained for a version of the library must be consistent with the full freedom of use specified in this license.
Most GNU software, including some libraries, is covered by the ordinary GNU General Public License. This license, the GNU Lesser General Public License, applies to certain designated libraries, and is quite different from the ordinary General Public License. We use this license for certain libraries in order to permit linking those libraries into non-free programs.
When a program is linked with a library, whether statically or using a shared library, the combination of the two is legally speaking a combined work, a derivative of the original library. The ordinary General Public License therefore permits such linking only if the entire combination fits its criteria of freedom. The Lesser General Public License permits more lax criteria for linking other code with the library.
We call this license the "Lesser" General Public License because it does Less to protect the user's freedom than the ordinary General Public License. It also provides other free software developers Less of an advantage over competing non-free programs. These disadvantages are the reason we use the ordinary General Public License for many libraries. However, the Lesser license provides advantages in certain special circumstances.
For example, on rare occasions, there may be a special need to encourage the widest possible use of a certain library, so that it becomes a de-facto standard. To achieve this, non-free programs must be allowed to use the library.
Appendix
A more frequent case is that a free library does the same job as widely used non-free libraries. In this case, there is little to gain by limiting the free library to free software only, so we use the Lesser General Public License.
In other cases, permission to use a particular library in non-free programs enables a greater number of people to use a large body of free software. For example, permission to use the GNU C Library in non-free programs enables many more people to use the whole GNU operating system, as well as its variant, the GNU/Linux operating system.
Although the Lesser General Public License is Less protective of the users' freedom, it does ensure that the user of a program that is linked with the Library has the freedom and the wherewithal to run that program using a modified version of the Library.
The precise terms and conditions for copying, distribution and modification follow. Pay close attention to the difference between a "work based on the library" and a "work that uses the library". The former contains code derived from the library, whereas the latter must be combined with the library in order to run.
GNU Lesser General Public License
TERMS AND CONDITIONS FOR COPYING, DISTRIBUTION AND MODIFICATION
- This License Agreement applies to any software library or other program which contains a notice placed by the copyright holder or other authorized party saying it may be distributed under the terms of this Lesser General Public License (also called "this License"). Each licensee is addressed as "you".
A "library" means a collection of software functions and/or data prepared so as to be conveniently linked with application programs (which use some of those functions and data) to form executables.
The “Library”, below, refers to any such software library or work which has been distributed under these terms. A “work based on the Library” means either the Library or any derivative work under copyright law: that is to say, a work containing the Library or a portion of it, either verbatim or with modifications and/or translated straightforwardly into another language. (Hereinafter, translation is included without limitation in the term “modification”.)
"Source code" for a work means the preferred form of the work for making modifications to it. For a library, complete source code means all the source code for all modules it contains, plus any associated interface definition files, plus the scripts used to control compilation and installation of the library.
Activities other than copying, distribution and modification are not covered by this License; they are outside its scope. The act of running a program using the Library is not restricted, and output from such a program is covered only if its contents constitute a work based on the Library (independent of the use of the Library in a tool for writing it). Whether that is true depends on what the Library does and what the program that uses the Library does.
- You may copy and distribute verbatim copies of the Library's complete source code as you receive it, in any medium, provided that you conspicuously and appropriately publish on each copy an appropriate copyright notice and disclaimer of warranty; keep intact all the notices that refer to this License and to the absence of any warranty; and distribute a copy of this License along with the Library.
You may charge a fee for the physical act of transferring a copy, and you may at your option offer warranty protection in exchange for a fee.
- You may modify your copy or copies of the Library or any portion of it, thus forming a work based on the Library, and copy and distribute such modifications or work under the terms of Section 1 above, provided that you also meet all of these conditions:
a) The modified work must itself be a software library.
b) You must cause the files modified to carry prominent notices stating that you changed the files and the date of any change.
c) You must cause the whole of the work to be licensed at no charge to all third parties under the terms of this License.
d) If a facility in the modified Library refers to a function or a table of data to be supplied by an application program that uses the facility, other than as an argument passed when the facility is invoked, then you must make a good faith effort to ensure that, in the event an application does not supply such function or table, the facility still operates, and performs whatever part of its purpose remains meaningful.
(For example, a function in a library to compute square roots has a purpose that is entirely well-defined independent of the application. Therefore, Subsection 2d requires that any application-supplied function or table used by this function must be optional: if the application does not supply it, the square root function must still compute square roots.) These requirements apply to the modified work as a whole. If identifiable sections of that work are not derived from the Library, and can be reasonably considered independent and separate works in themselves, then this License, and its terms, do not apply to those sections when you distribute them as separate works. But when you distribute the same sections as part of a whole which is a work based on the Library, the distribution of the whole must be on the terms of this License, whose permissions for other licensees extend to the entire whole, and thus to each and every part regardless of who wrote it.
Thus, it is not the intent of this section to claim rights or contest your rights to work written entirely by you; rather, the intent is to exercise the right to control the distribution of derivative or collective works based on the Library.
In addition, mere aggregation of another work not based on the Library with the Library (or with a work based on the Library) on a volume of a storage or distribution medium does not bring the other work under the scope of this License.
- You may opt to apply the terms of the ordinary GNU General Public License instead of this License to a given copy of the Library. To do this, you must alter all the notices that refer to this License, so that they refer to the ordinary GNU General Public License, version 2, instead of to this License. (If a newer version than version 2 of the ordinary GNU General Public License has appeared, then you can specify that version instead if you wish.) Do not make any other change in these notices.
Once this change is made in a given copy, it is irreversible for that copy, so the ordinary GNU General Public License applies to all subsequent copies and derivative works made from that copy. This option is useful when you wish to copy part of the code of the Library into a program that is not a library.
- You may copy and distribute the Library (or a portion or derivative of it, under Section 2) in object code or executable form under the terms of Sections 1 and 2 above provided that you accompany it with the complete corresponding machine-readable source code, which must be distributed under the terms of Sections 1 and 2 above on a medium customarily used for software interchange.
If distribution of object code is made by offering access to copy from a designated place, then offering equivalent access to copy the source code from the same place satisfies the requirement to distribute the source code, even though third parties are not compelled to copy the source along with the object code.
- A program that contains no derivative of any portion of the Library, but is designed to work with the Library by being compiled or linked with it, is called a "work that uses the Library". Such a work, in isolation, is not a derivative work of the Library, and therefore falls outside the scope of this License. However, linking a "work that uses the Library" with the Library creates an executable that is a derivative of the Library (because it contains portions of the Library), rather than a "work that uses the library". The executable is therefore covered by this License. Section 6 states terms for distribution of such executables.
When a “work that uses the Library” uses material from a header file that is part of the Library, the object code for the work may be a derivative work of the Library even though the source code is not. Whether this is true is especially significant if the work can be linked without the Library, or if the work is itself a library. The threshold for this to be true is not precisely defined by law.
If such an object file uses only numerical parameters, data structure layouts and accessors, and small macros and small inline functions (ten lines or less in length), then the use of the object file is unrestricted, regardless of whether it is legally a derivative work. (Executables containing this object code plus portions of the Library will still fall under Section 6.)
Otherwise, if the work is a derivative of the Library, you may distribute the object code for the work under the terms of Section 6. Any executables containing that work also fall under Section 6, whether or not they are linked directly with the Library itself.
- As an exception to the Sections above, you may also combine or link a "work that uses the Library" with the Library to produce a work containing portions of the Library, and distribute that work under terms of your choice, provided that the terms permit modification of the work for the customer's own use and reverse engineering for debugging such modifications.
You must give prominent notice with each copy of the work that the Library is used in it and that the Library and its use are covered by this License. You must supply a copy of this License. If the work during execution displays copyright notices, you must include the copyright notice for the Library among them, as well as a reference directing the user to the copy of this License.
Also, you must do one of these things:
a) Accompany the work with the complete corresponding machine-readable source code for the Library including whatever changes were used in the work (which must be distributed under Sections 1 and 2 above); and, if the work is an executable linked with the Library, with the complete machine-readable "work that uses the Library", as object code and/or source code, so that the user can modify the Library and then relink to produce a modified executable containing the modified Library. (It is understood that the user who changes the contents of definitions files in the Library will not necessarily be able to recompile the application to use the modified definitions.)
b) Use a suitable shared library mechanism for linking with the Library. A suitable mechanism is one that (1) uses at run time a copy of the library already present on the user's computer system, rather than copying library functions into the executable, and (2) will operate properly with a modified version of the library, if the user installs one, as long as the modified version is interface-compatible with the version that the work was made with.
c) Accompany the work with a written offer, valid for at least three years, to give the same user the materials specified in Subsection 6a, above, for a charge no more than the cost of performing this distribution.
d) If distribution of the work is made by offering access to copy from a designated place, offer equivalent access to copy the above specified materials from the same place.
e) Verify that the user has already received a copy of these materials or that you have already sent this user a copy.
For an executable, the required form of the "work that uses the Library" must include any data and utility programs needed for reproducing the executable from it. However, as a special exception, the materials to be distributed need not include anything that is normally distributed (in either source or binary form) with the major components (compiler, kernel, and so on) of the operating system on which the executable runs, unless that component itself accompanies the executable.
It may happen that this requirement contradicts the license restrictions of other proprietary libraries that do not normally accompany the operating system. Such a contradiction means you cannot use both them and the Library together in an executable that you distribute.
- You may place library facilities that are a work based on the Library side-by-side in a single library together with other library facilities not covered by this License, and distribute such a combined library, provided that the separate distribution of the work based on the Library and of the other library facilities is otherwise permitted, and provided that you do these two things:
a) Accompany the combined library with a copy of the same work based on the Library, uncombined with any other library facilities. This must be distributed under the terms of the Sections above.
b) Give prominent notice with the combined library of the fact that part of it is a work based on the Library, and explaining where to find the accompanying uncombined form of the same work.
-
You may not copy, modify, sublicense, link with, or distribute the Library except as expressly provided under this License. Any attempt otherwise to copy, modify, sublicense, link with, or distribute the Library is void, and will automatically terminate your rights under this License. However, parties who have received copies, or rights, from you under this License will not have their licenses terminated so long as such parties remain in full compliance.
-
You are not required to accept this License, since you have not signed it. However, nothing else grants you permission to modify or distribute the Library or its derivative works. These actions are prohibited by law if you do not accept this License. Therefore, by modifying or distributing the Library (or any work based on the Library), you indicate your acceptance of this License to do so, and all its terms and conditions for copying, distributing or modifying the Library or works based on it.
Appendix
- Each time you redistribute the Library (or any work based on the Library), the recipient automatically receives a license from the original licensor to copy, distribute, link with or modify the Library subject to these terms and conditions. You may not impose any further restrictions on the recipients' exercise of the rights granted herein. You are not responsible for enforcing compliance by third parties with this License.
- If, as a consequence of a court judgment or allegation of patent infringement or for any other reason (not limited to patent issues), conditions are imposed on you (whether by court order, agreement or otherwise) that contradict the conditions of this License, they do not excuse you from the conditions of this License. If you cannot distribute so as to satisfy simultaneously your obligations under this License and any other pertinent obligations, then as a consequence you may not distribute the Library at all.
For example, if a patent license would not permit royalty-free redistribution of the Library by all those who receive copies directly or indirectly through you, then the only way you could satisfy both it and this License would be to refrain entirely from distribution of the Library.
If any portion of this section is held invalid or unenforceable under any particular circumstance, the balance of the section is intended to apply, and the section as a whole is intended to apply in other circumstances.
It is not the purpose of this section to induce you to infringe any patents or other property right claims or to contest validity of any such claims; this section has the sole purpose of protecting the integrity of the free software distribution system which is implemented by public license practices. Many people have made generous contributions to the wide range of software distributed through that system in reliance on consistent application of that system; it is up to the author/donor to decide if he or she is willing to distribute software through any other system and a licensee cannot impose that choice.
This section is intended to make thoroughly clear what is believed to be a consequence of the rest of this License. - If the distribution and/or use of the Library is restricted in certain countries either by patents or by copyrighted interfaces, the original copyright holder who places the Library under this License may add an explicit geographical distribution limitation excluding those countries, so that distribution is permitted only in or among countries not thus excluded. In such case, this License incorporates the limitation as if written in the body of this License.
- The Free Software Foundation may publish revised and/or new versions of the Lesser General Public License from time to time. Such new versions will be similar in spirit to the present version, but may differ in detail to address new problems or concerns.
Each version is given a distinguishing version number. If the Library specifies a version number of this License which applies to it and "any later version", you have the option of following the terms and conditions either of that version or of any later version published by the Free Software Foundation. If the Library does not specify a license version number, you may choose any version ever published by the Free Software Foundation. - If you wish to incorporate parts of the Library into other free programs whose distribution conditions are incompatible with these, write to the author to ask for permission. For software which is copyrighted by the Free Software Foundation, write to the Free Software Foundation; we sometimes make exceptions for this. Our decision will be guided by the two goals of preserving the free status of all derivatives of our free software and of promoting the sharing and reuse of software generally.
NO WARRANTY
-
BECAUSE THE LIBRARY IS LICENSED FREE OF CHARGE, THERE IS NO WARRANTY FOR THE LIBRARY, TO THE EXTENT PERMITTED BY APPLICABLE LAW. EXCEPT WHEN OTHERWISE STATED IN WRITING THE COPYRIGHT HOLDERS AND/OR OTHER PARTIES PROVIDE THE LIBRARY "AS IS" WITHOUT WARRANTY OF ANY KIND, EITHER EXPRESSED OR IMPLIED, INCLUDING, BUT NOT LIMITED TO, THE IMPLIED WARRANTIES OF MERCHANTABILITY AND FITNESS FOR A PARTICULAR PURPOSE. THE ENTIRE RISK AS TO THE QUALITY AND PERFORMANCE OF THE LIBRARY IS WITH YOU. SHOULD THE LIBRARY PROVE DEFECTIVE, YOU ASSUME THE COST OF ALL NECESSARY SERVICING, REPAIR OR CORRECTION.
-
IN NO EVENT UNLESS REQUIRED BY APPLICABLE LAW OR AGREED TO IN WRITING WILL ANY COPYRIGHT HOLDER, OR ANY OTHER PARTY WHO MAY MODIFY AND/OR REDISTRIBUTE THE LIBRARY AS PERMITTED ABOVE, BE LIABLE TO YOU FOR DAMAGES, INCLUDING ANY GENERAL, SPECIAL, INCIDENTAL OR CONSEQUENTIAL DAMAGES ARISING OUT OF THE USE OR INABILITY TO USE THE LIBRARY (INCLUDING BUT NOT LIMITED TO LOSS OF DATA OR DATA BEING RENDERED INACCURATE OR LOSSES SUSTAINED BY YOU OR THIRD PARTIES OR A FAILURE OF THE LIBRARY TO OPERATE WITH ANY OTHER SOFTWARE), EVEN IF SUCH HOLDER OR OTHER PARTY HAS BEEN ADVISED OF THE POSSIBILITY OF SUCH DAMAGES.
END OF TERMS AND CONDITIONS
How to Apply These Terms to Your New Libraries
If you develop a new library, and you want it to be of the greatest possible use to the public, we recommend making it free software that everyone can redistribute and change. You can do so by permitting redistribution under these terms (or, alternatively, under the terms of the ordinary General Public License).
To apply these terms, attach the following notices to the library. It is safest to attach them to the start of each source file to most effectively convey the exclusion of warranty; and each file should have at least the "copyright" line and a pointer to where the full notice is found.
Copyright (C) year name of author
This library is free software; you can redistribute it and/or modify it under the terms of the GNU Lesser General Public License as published by the Free Software Foundation; either version 2.1 of the License, or (at your option) any later version.
This library is distributed in the hope that it will be useful, but WITHOUT ANY WARRANTY; without even the implied warranty of MERCHANTABILITY or FITNESS FOR A PARTICULAR PURPOSE. See the GNU Lesser General Public License for more details.
You should have received a copy of the GNU Lesser General Public License along with this library; if not, write to the Free Software Foundation, Inc., 59 Temple Place, Suite 330, Boston, MA 02111-1307, USA
Also add information on how to contact you by electronic and paper mail.
You should also get your employer (if you work as a programmer) or your school, if any, to sign a "copyright disclaimer" for the library, if necessary. Here is a sample; alter the names:
Yoyodyne, Inc., hereby disclaims all copyright interest in the library 'Frob' (a library for tweaking knobs) written by James Random Hacker.
signature of Ty Coon, 1 April 1990
Ty Coon, President of Vice
That's all there is to it!
Specifications
| Item | 50" Plasma DisplayModel: PRO-1140HD | 42" Plasma DisplayModel: PRO-940HD | ||
| Number of pixels 1365 × 768 pixels 1024 × 768 pixels | ||||
| Audio Amplifier | 13 W + 13 W (1 kHz, 10 %, 8 Ω) | 13 W + 13 W (1 kHz, 10 %, 8 Ω) | ||
| Speakers — Woofer: 4.8 cm × 13 cm cone type | Tweeter: 2.5 cm semidome type | |||
| Surround System SRS/FOCUS/TruBass SRS/FOCUS/TruBass | ||||
| Power Requirement 120 V AC, 60 Hz, 355 W (26 W Standby) 120 V AC, 60 Hz, 312 W (26 W Standby) | ||||
| Weight | Main unit: 34.3 kg (75.7 lbs.) | Main unit: 29.2 kg (64.4 lbs.)Stand: 2.5 kg (5.5 lbs.) (including bolts)Total: 31.7 kg (69.9 lbs.) | ||
| Reception System (Digital) | ATSC Digital TV system | |||
| Circuit type | 8VSB/64QAM/256QAM/QPSK demodulation | |||
| Tuner VHF/UHF | VHF Ch. 2 to 13 UHF Ch. 14 to 69 | |||
| CATV Ch. 2 to 135 | ||||
| Audio format | Dolby Digital | |||
| Reception System (Analog) | American TV standard NTSC system | |||
| Circuit type | Video signal detection PLL full synchronous detection, PLL digital Synthesizer system | |||
| Tuner VHF/UHF | VHF Ch. 2 to 13 UHF Ch. 14 to 69 | |||
| CATV ANT/CABLE A IN Ch. 1 to 135 ANT B IN Ch. 1 to 125 | ||||
| Audio multiplex | BTSC system | |||
| Terminals | Rear | ANT/CABLE A IN | 75 Ω UNBAL, F Type for DTV/VHF/UHF/CATV in | |
| ANT B IN | 75 Ω UNBAL, F Type for VHF/UHF/CATV in Loop out | |||
| INPUT 1 | S-VIDEO in, VIDEO in, AUDIO in | |||
| INPUT 2 | COMPONENT VIDEO in, S-VIDEO in, VIDEO in, AUDIO in | |||
| INPUT 3 | COMPONENT VIDEO in, AUDIO in | |||
| PC | Analog RGB in, AUDIO in | |||
| INPUT 5 | HDMI in*, AUDIO in | |||
| INPUT 6 | HDMI in*, AUDIO in | |||
| MONITOR OUT | VIDEO out, AUDIO out | |||
| Digital Audio Output | Optical | |||
| G-LINK | 1 | |||
| ETHERNET | 1 | |||
| CONTROL IN | 1 | |||
| CONTROL OUT | 1 | |||
| SPEAKER | 8 Ω to 16 Ω | - | ||
| SUB WOOFER OUTPUT | Variable | |||
| CableCARD | Point of Deployment | |||
| Side | INPUT 4 | COMPONENT VIDEO in, VIDEO in, AUDIO in | ||
| USB | USB in** | |||
| On-screen display languages English/French/Spanish | ||||
* This conforms to HDMI1.1 and HDCP1.1.
HDMI (High Definition Multimedia Interface) is a digital interface that sends both video and audio signals through a single cable.
HDCP (High-bandwidth Digital Content Protection) is a technology used to protect copyrighted digital content that use Digital Visual Interface (DVI).
** This conforms to USB 1.1 and 2.0 specifications.
- Design and specifications are subject to change without notice.
Dimensions
PRO-1140HD
Unit: mm (inch)

PRO-940HD
Unit: mm (inch)

Trademarks
- In the United States, TV GUIDE and other related marks are registered trademarks of Gemstar-TV Guide International, Inc. and/or one of its affiliates. In Canada, TV GUIDE is a registered mark of Transcontinental, Inc. and is used under license by Gemstar-TV Guide International, Inc.
- FOCUS, WOW, SRS and (●)® symbol are trademarks of SRS Labs, Inc. FOCUS and WOW technologies are incorporated under license from SRS Labs, Inc.
- Manufactured under license from Dolby Laboratories. "Dolby" and the double-D symbol are trademarks of Dolby Laboratories.
- HDMI, the HDMI logo and High-Definition Multimedia Interface are trademarks or registered trademarks of HDMI Licensing LLC.
- This product includes FontAvenue® fonts licensed by NEC Corporation. FontAvenue is a registered trademark of NEC Corporation.
- DDC is a registered trademark of Video Electronics Standards Association.
- CableCARD is a trademark of Cable Television Laboratories, Inc.
- This software is based in part on the work of the independent JPEG Group.
- The names of the companies or institutions are trademarks or registered trademarks of the respective companies or institutions.
- The PlaysForSure logo, Windows Media and the Windows logo are trademarks or registered trademarks of Microsoft Corporation in the United States and/or other countries.
- DLNA and DLNA CERTIFIED™ are trademarks and/or service marks of Digital Living Network Alliance.
License
- The TV Guide On Screen system is manufactured under license from Gemstar-TV Guide International, Inc. and/or one of its affiliates.
- Content owners use Windows Media digital rights management technology (WMDRM) to protect their intellectual property, including copyrights. This device uses WMDRM software to access WMDRM-protected content. If the WMDRM software fails to protect the content, content owners may ask Microsoft to revoke the software's ability to use WMDRM to play or copy protected content. Revocation does not affect unprotected content. When you download licenses for protected content, you agree that Microsoft may include a revocation list with the licenses. Content owners may require you to upgrade WMDRM to access their content. If you decline an upgrade, you will not be able to access content that requires the upgrade.
- This product is protected by certain intellectual property rights of Microsoft. Use or distribution of such technology outside of this product is prohibited without a license from Microsoft.
- The DLNA logo is permitted to the product that has obtained a DLNA (Digital Living Network Alliance) certificate.
Patent
- The TV Guide On Screen system is protected by one or more of the following United States patents 4,908,713; 6,498,895; 6,850,693; 6,396,546; 5,940,073; 6,239,794 to Gemstar-TV Guide International, Inc. and/or its subsidiaries.
Disclaimer Notice
- Gemstar-TV Guide International Inc. and/or its related affiliates are not in any way liable for the accuracy or availability of the program schedule information or other data in the TV Guide On Screen system and cannot guarantee service availability in your area. In no event shall Gemstar-TV Guide International, Inc. and/or its related affiliates be liable for any damages in connection with the accuracy or availability of the program schedule information or other data in the TV Guide On Screen system.
Copyright protection
- This product incorporates copyright protection technology that is protected by U.S. patents and other intellectual property rights. Use of this copyright protection technology must be authorized by Macrovision Corporation, and is intended for home and other limited consumer uses only unless otherwise authorized by Macrovision. Reverse engineering or disassembly is prohibited.
Important Notice about software upgrade from Pioneer
Attention Pioneer PDP Owners:
Thank you for purchasing a Pioneer Digital Cable Ready (DCR) compatible Plasma TV.
You have purchased the most advanced product of its kind available today.
However, as technology advances, DCR systems may continue to evolve. To maintain compatibility with DCR systems and features, your Plasma TV may benefit from, or require software upgrades.
As part of our commitment to our customers, Pioneer will send you upgrade software and instructions as needed to keep your DCR compatible Plasma TV up to date with this technology.
Please take the time to register your DCR compatible Plasma TV at
www.pioneerelectronics.com
This registration enables us to keep you up to date on changes that may occur.
Thank you very much.
Note:
DCR function works only in the USA.
DCR is unavailable in Canada.
Software update for the Home Media Gallery
You can also update the software for the Home Media Gallery at the Pioneer website above. For details, see page 87.
Published by Pioneer Corporation.
Copyright © 2006 Pioneer Corporation.
All rights reserved.
Should this product require service in the U.S.A. and you wish to locate the nearest Pioneer Authorized Independent Service Company, or if you wish to purchase replacement parts, operating instructions, service manuals, or accessories, please call the number shown below.
800-421-1625
Please do not ship your product to Pioneer without first calling the Customer Support Division at the above listed number for assistance.
Pioneer Electronics (USA) Inc.
Customer Support Division
P.O. BOX 1760
Long Beach, CA 90801-1760 USA
For warranty information please see the Limited Warranty sheet included with your product.
Should this product require service in Canada, please contact a Pioneer Canadian Authorized Dealer to locate the nearest Pioneer Authorized Service Company in Canada. Alternatively, please contact the Customer Satisfaction Department at the following address:
Pioneer Electronics of Canada, Inc.
Customer Satisfaction Department
300 Allstate Parkway, Markham, Ontario L3R OP2
(905)479-4411
1(877)283-5901
For warranty information please see the Limited Warranty sheet included with your product.
300, Allstate Parkway, Markham, Ontario L3R OP2
(905)479-4411
1(877)283-5901
Published by Pioneer Corporation.
Copyright © 2006 Pioneer Corporation.
All rights reserved.



- Pioneer sound.vision.soul
- PLASMA DISPLAY SYSTEM
- PRO-1140HD
- PRO-940HD
- ELITE
- IMPORTANT
- CAUTION
- RISK OF ELECTRIC SHOCK DO NOT OPEN
- IMPORTANT SAFETY INSTRUCTIONS
- NOTE TO CATV SYSTEM INSTALLER
- VENTILATION CAUTION:
- Information to User
- [For Canadian model]
- FEDERAL COMMUNICATIONS COMMISSION DECLARATION OF CONFORMITY
- CAUTION: Operating Environment
- Contents
- Thank you for buying this Pioneer product.
- Important User Guidance Information
- Safety Precautions
- Supplied Accessories
- Part Names
- Preparation
- Basic Operations
- TV Guide On Screen™ System Setup
- Menu Setup
- Tuner Setup
- TV Guide On Screen™ System Operation
- Adjustments and Settings
- Using External Equipment
- Useful Remote Control Features
- Appendix
- Usage guidelines
- Installation guidelines
- NOTE
- Plasma Display protection function
- Information of pixel defect
- Infrared rays
- Radio interference
- Plasma Display driving sound
- Do not attach such items as labels and tape to the product.
- When not using the product for a long time
- Condensation
- Cleaning the surface of the screen and the glossy surface of the front cabinet
- Cleaning the cabinet
- Handles at the rear of the Plasma Display
- Fan motor noise
- About the menu window size following video format switch
- Image Retention
- Panel sticking and after-image lag
- After-image lagging due to remaining electric load
- After-image (lag image) due to burning
- Preventing damage from screen burning
- Installation Precautions
- When using the optional brackets or equivalent items
- When using other items
- Plasma Display
- (Side view)
- Remote control unit
- Location
- Moving the Plasma Display
- Preventing the Plasma Display from Falling Over
- Stabilizing on a table or floor
- Using a wall for stabilization
- Attaching/detaching the PIONEER stand (for PRO-940HD only)
- Detaching the stand
- Reattaching the stand
- Cable connections for watching digital and/or conventional TV channels
- Inserting the CableCARD™
- Switching between antenna A and B
- Preparing the remote control unit
- Inserting batteries
- Cautions regarding batteries
- Battery disposal
- Allowed operation range of the remote control unit
- Cautions regarding the remote control unit
- Connecting the power cord
- Routing cables
- Attaching speed clamps to the main unit
- Attaching and removing speed clamps
- Turning on the power
- Turning off the power
- Plasma Display status indicators
- Watching TV channels
- Selecting the antenna
- Changing channels
- Using 0 - 9 and • (dot) on the remote control unit
- EXAMPLE
- Changing the volume and sound
- Changing the language
- Setting MTS/SAP mode
- - Stereo broadcasts
- - SAP broadcasts
- Viewing a channel banner
- Using the POD service
- Using the multiscreen functions
- Splitting the screen
- Press SPLIT to select the display mode.
- Freezing images
- About the TV Guide On Screen™ system
- Legal Notices
- Setting up the TV Guide On Screen™ system
- Welcome Screen
- Reminder Screen
- System Setup Screens
- Screen 1: Country
- TV Guide On Screen™ System Setup
- Screen 2: Enter ZIP or Postal Code
- Screen 3: Do you have Cable?
- Screen 4: Which input terminal is the system plugged into?
- Screen 5: Do you have an antenna connected?
- Screen 6: Are the settings correct?
- Screen 7: Congratulations
- Screen 8: Is a VCR Connected?
- Screen 9: VCR Configuration Diagram
- Screen 10: VCR Brand Name
- Screen 11: VCR Preparation
- Screen 12: VCR Code Testing
- Screen 13: Did your VCR stop playing?
- Screen 14: Confirming Your Settings
- Screen 15: Congratulations
- Screen 16: Helpful Information
- Menu Configuration
- Menu operations
- Setting up TV channels
- Using Auto Channel Preset
- Press HOME MENU.
- Setting for skipping unwanted channels
- Setting up TV channels manually
- Checking signal strength
- Checking the CableCARD ID
- Parental Control
- Changing the password
- Clearing the password
- Activating the Parental Control
- Setting the voluntary movie rating system (MPAA)
- Setting the TV ratings
- If you forget the password
- Setting the TV Parental Guidelines (TV Guidelines)
- Blocking Not Rated TV programs
- Canadian rating systems
- Canadian English ratings
- Setting Canadian English ratings
- Setting Canadian French ratings
- Setting new ratings
- New (xxx)
- Deleting new ratings
- Temporarily deactivating the Parental Control
- Antenna A or antenna B:
- Input 1 - 4:
- Setting your favorite channels
- Setting up closed captions
- Activating the closed caption
- Item Description
- Selecting the type of conventional closed captions
- Selecting digital closed captions
- Selecting digital closed caption parameters
- Clock Setting
- Tuner Setup
- Using the TV Guide On Screen™ system
- Screen components
- TV GUIDE logo
- Channel logo
- TV Guide On Screen™ icons
- TV Guide On Screen™ navigation
- The Listings screen
- Recording programs
- When the recording is about to start
- While recording is in progress
- Setting program reminders
- When a scheduled reminder is due (auto-tune is OFF)
- When scheduled reminder is due (auto-tune is ON)
- Searching for programs
- Searching by category
- Searching by keyword
- Alphabetical search
- The search Episode Options menu
- Navigation and search tips
- Scheduling recordings and reminders
- The Schedule Options menu
- When "SCHEDULE" is highlighted in the service bar:
- When a program is highlighted:
- For recording:
- For reminder:
- Changing setup options
- Changing the System Settings
- Changing the Channel Display settings
- Changing the Default Options
- General default options
- Record defaults
- Remind defaults
- Sleep Timer
- AV Selection
- For PC source
- Basic picture adjustments
- Advanced picture adjustments
- Using PureCinema
- PureCinema
- Using Color Temp
- Color Temp
- Select an item to be adjusted. (↑/↓ then ENTER)
- Select the desired level. (/)
- Press HOME MENU again to exit the menu.
- Using CTI
- CTI
- Using Color Management
- Using Color Space
- Color Space
- Using Intelligent Color
- Intelligent Color
- Eliminating noise from images
- DNR
- MPEG NR
- BNR
- Using the Dynamic Range Expander (DRE) functions
- Dynamic Contrast
- Black Level
- ACL
- Gamma
- Intelligent DRE
- Using the 3DYC and I-P Mode
- 3DYC
- I-P Mode
- Sound adjustments
- FOCUS
- Front Surround
- Power Control
- Energy Save
- No Signal off (AV mode only)
- No Operation off (AV mode only)
- Power Management (PC mode only)
- Image position adjustment (AV mode only)
- Automatic image position and clock (Hertz) adjustments (PC mode only)
- Manual image position and clock adjustments (PC mode only)
- Selecting a screen size manually
- 11
- Adjustments and Settings
- Selecting a screen size automatically
- Selecting a screen size for 4:3 aspect ratio signals
- Changing the brightness on both sides of the screen (Side Mask)
- Language setting
- About External Equipment
- Watching a DVD image
- Connecting a DVD player
- Displaying a DVD image
- Watching a VCR image
- Connecting a VCR
- Displaying a VCR image
- Using HDMI Input
- Connecting HDMI equipment
- Plasma Display (rear view)
- To specify the digital video signal type:
- To specify the type of audio signals:
- Using a game console or watching camcorder images
- Connecting a game console or camcorder
- Displaying an image of the game console or camcorder
- Recording digital TV programs using a VCR
- Avoiding unwanted feedback
- Connecting a recorder
- Connecting other audio equipment
- Connecting an AV receiver
- Switching the optical audio signal type
- Watching an image from a computer
- Connecting a personal computer
- Displaying an image from a PC
- Signal names for 15-pin mini D-sub connector
- Computer compatibility chart
- G-LINK™ connection
- Attaching the ferrite core
- Connecting control cables
- About SR+
- Enjoying the Home Media Gallery
- Installing Windows Media Connect
- Download the most recent version of Windows Media Player
- Download the most recent Windows Media Connect software
- Supported file formats
- Digital Audio Output terminal (Optical)
- Making network connections
- Connecting via an Ethernet hub
- Connecting directly to a Media Server
- Confirming the IP Address
- Connecting a USB device
- Readable memory cards
- Readable data files
- Removing a USB device
- Starting the Home Media Gallery function
- Navigating the files and folders
- Selectable screen display
- Using the Tool Menu
- Media Navigator
- USB
- My Playlist
- Enjoying movie files
- Time Search
- Slow Playback
- Add to My Playlist
- Fast Forward/Fast Reverse
- Forward/Reverse (15 sec.)
- A-B Repeat Mode
- Repeat Mode
- Random Mode
- Enjoying music files
- Enjoying photo files
- Setting up the slideshow
- Press D.
- Select "OK" (↑/↓ then ENTER).
- Starting the slideshow
- Setting up BGM
- Rotating the image
- Repeating the slideshow
- Playing the slideshow at random
- Other useful functions
- Search
- Sort
- ENTER).
- Adding files to My Playlist
- Setup
- "Network Setup"
- "Auto Connection Setup"
- "Default Settings"
- "Software Update"
- "Home Media Gallery Version"
- Editing files in My Playlist
- "Change Name"
- "Move"
- "Delete from My Playlist"
- Playing/displaying files from My Playlist
- Switching the server
- Using External Equipment
- Resetting to default
- Other convenient features
- Screen saver
- Software Update
- Glossary
- Default Gateway
- DHCP (Dynamic Host Configuration Protocol) Server
- DLNA (Digital Living Network Alliance)
- DNS (Domain Name Service) Server
- Ethernet
- IP (Internet Protocol) Address
- LAN Cable
- MAC (Media Access Control) Address
- Mass Storage Class devices
- PlaysForSure
- Subnet mask
- USB (Universal Serial Bus)
- Windows Media Connect
- Windows Media DRM
- Learning function of the remote control unit
- Using the learning function
- Presetting manufacturer codes to control other devices
- Presetting manufacturer codes
- Library Search
- Delete Learning
- Manufacturing Reset
- Programming codes
- Using the remote control unit to control other devices
- Receiver control buttons
- RECEIVER (STANDBY/ON)
- RECEIVER INPUT
- RECEIVER VOL +/-
- CBL/SAT control buttons
- SAT MENU
- E N T↑←R, / / /
- 30-9
- C H + / -
- SOURCE ⏻
- SAT GUIDE
- RETURN
- C H E N T E R \*
- CH RETURN\*
- VCR control buttons
- DVD/DVR control buttons
- CH +/- (DVD recorder only)
- SOURCE ⏻
- This product in part uses "OpenSSL" software.
- To the extent the OpenSSL software is being used, the following notification applies:
- Original SSLeay License
- Appendix
- Linux Source Notice
- GNU General Public License
- Preamble
- NO WARRANTY
- How to Apply These Terms to Your New Programs
- GNU Lesser General Public License
- TERMS AND CONDITIONS FOR COPYING, DISTRIBUTION AND MODIFICATION
- How to Apply These Terms to Your New Libraries
- Dimensions
- Trademarks
- License
- Patent
- Disclaimer Notice
- Copyright protection
- Important Notice about software upgrade from Pioneer
- Attention Pioneer PDP Owners:
- www.pioneerelectronics.com
- Note:
Brand : PIONEER
Model : PRO-1140HD
Category : Television