
Impression I7 - Graphic tablet Leader - Free user manual and instructions
Find the device manual for free Impression I7 Leader in PDF.


| Product Type | Graphic Tablet |
| Brand | Leader |
| Model | Impression I7 |
| Active Area | 7.5 x 5.5 inches (approx.) |
| Dimensions (W x D x H) | 11.0 x 7.4 x 0.3 inches (approx.) |
| Weight | 320 g (approx.) |
| Pressure Sensitivity | 8192 levels |
| Resolution | 5080 LPI |
| Pen Technology | Battery-free electromagnetic resonance |
| Pen Buttons | 2 programmable side buttons |
| Connectivity | USB-C cable (included) |
| Power Supply | USB powered (no external adapter needed) |
| Compatibility | Windows 7/8/10/11, macOS 10.12+, Linux, Chrome OS |
| Supported Software | Adobe Photoshop, Illustrator, Corel Painter, Clip Studio Paint, Krita, GIMP |
| Shortcut Keys | 8 express keys (customizable) |
| Touch Ring | Multi-function touch ring (zoom, scroll, brush size) |
| Plug and Play | Basic functions without driver; full features with driver |
| Driver Required | Yes (download from Leader official website) |
| Maintenance | Clean with a soft, lint-free cloth; avoid liquids |
| Safety | Keep away from water and extreme temperatures; do not disassemble |
| Spare Parts | Replacement pen nibs (standard size) available; pen and USB cable separately |
| Warranty | 1 year limited warranty |
Frequently Asked Questions - Impression I7 Leader
User questions about Impression I7 Leader
0 question about this device. Answer the ones you know or ask your own.
Ask a new question about this device
Download the instructions for your Graphic tablet in PDF format for free! Find your manual Impression I7 - Leader and take your electronic device back in hand. On this page are published all the documents necessary for the use of your device. Impression I7 by Leader.
USER MANUAL Impression I7 Leader
Leader © 2011 Leader International Inc.
Impression is a trademark and service mark of Leader International Inc.
All products distributed by Leader International Inc. Unless otherwise indicated.
All other brand names, trademark and service marks are property or their owners. 225 S. Lake Avenue Suite 300, Pasadena, CA 91101
www.inaderinternationalincs.com
7" ANDROID TABLET
Instruction Manual
Contents
Controls 2
Function Keys....3
Touch Screen Interface 6
Screen Interface 9
Settings 10
Web Browsing 18
Task Manager 20
File Manager....21
Music Player 23
Video Player 26
Email Setup....27
Clock Settings....30
APK Installer....32
Specifications....33
FCC Statement....35
Contents

- Power
- Reset
- Volume +/-
- USB Host
- Mini USB
- Head Phone
- Micro SD Slot
- DC-In Jack
- Menu Key
- Home Key
- Backspace Key
- Search Key
- Camera
- Microphone
Function Keys
Home Key
• In the option program, menu or webpage, press home key to return to the main interface.
- Press & hold the home key and it will show your recently opened applications.
Menu Key
- Press the Menu key to open the sub-menu for this page.
- Press the menu key again to close the sub-menu.
- Press & hold the menu key in an application to open/close the virtual keyboard.
- When the screen is locked, press the Menu key to enable the screen. Press it again to unlock the screen.
• (If you have set the unlock mode, you can unlock the screen based on your settings.)
Backspace Key
- Press the BACKSPACE key to return to the previous operation or previous screen.
Search Key
- Press search to enter search input interface.
On/Off Key
Turn ON
- Press and hold Power ON/OFF key to turn on the tablet pc.
- Press ON/OFF key to lock the screen and enter sleep mode.
Turn OFF
Accessories Included in The Package:
1 Tablet pc
2 Power adapter
3 USB cable
4 Instruction Manual
5 Warranty Card
6 Stop card
7 Registration card
8 Protective case
Touch Screen Interface

Screen Interface
Main screen interface is similar to a computer desktop.
Place application shortcuts and widgets here.
Touch and "swipe" to go to next page, move things on the screen, etc.
Widgets
Add Widgets:
Press the “Menu Key”. The “Add to Home screen” menu will pop up offering you options to add widgets, change wallpaper, etc.
Deleting Widgets:
Press and hold down the widgets on the screen, then a trash can icon will pop up on the right side of screen. Drag the widgets to the trash can and delete widgets.
Status Bar
Pay attention to the status bar on the top of screen. If icons show on the left, it is a reminder that applications are running.
Status Bar Icons
The icons in the status bar at the top of screen give information about i7 and convince to access your device.
| Icon | ||
 | SD Card preparing |  Volume up Volume up |
 | SD Card but removed |  Volume down Volume down |
| [TTW6] | Removed SD Card |  Menu Key Menu Key |
 | Downloading |  Backspace Key Backspace Key |
 | Clock activated |  ScreenShorts ScreenShorts |
 | Silent mode |  Refresh Media Refresh Media |
 | Wi-Fi connected |  Battery empty Battery empty |
 | Battery status |  Charging battery Charging battery |
Application List
Click the Application List icon to show the application library.

Touch an application icon to start it up.
Press and hold the application icon the trash can icon will pop up on the right side of the interface.
Drag the icon to trash can and delete the icon.
Press the "Menu Key" on this page one sub-menu will pop up, then click "Add Applications" to recover the icon you delete.
Press the "Home" key in the application list interface to return to the home screen.
Settings
Language Settings
Touch: "Settings" > "Language & keyboard" > "Select language" > Choose Language

Screen Brightness Settings
Touch: "Settings" > "Display" > "Brightness" > Adjust slider and hit "OK"
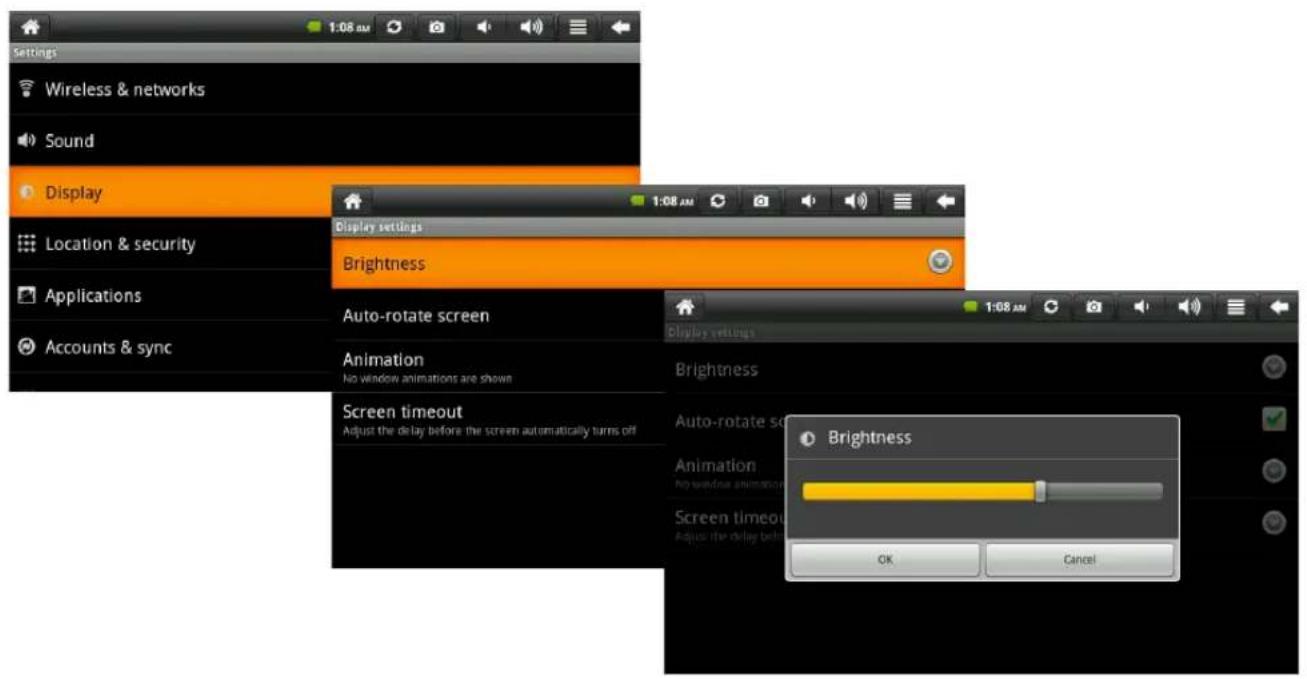
Screen Timeout Settings
Touch: "Settings" > "Display" > "Screen Timeout" > Choose Time

SD card Mount / Un-Mount
After inserting a Micro-SD card to the tablet, do the following to install the card. Touch: "Settings" > "SD Card & Tablet Storage" > "SD1"> "Mount/Unmount SD1"
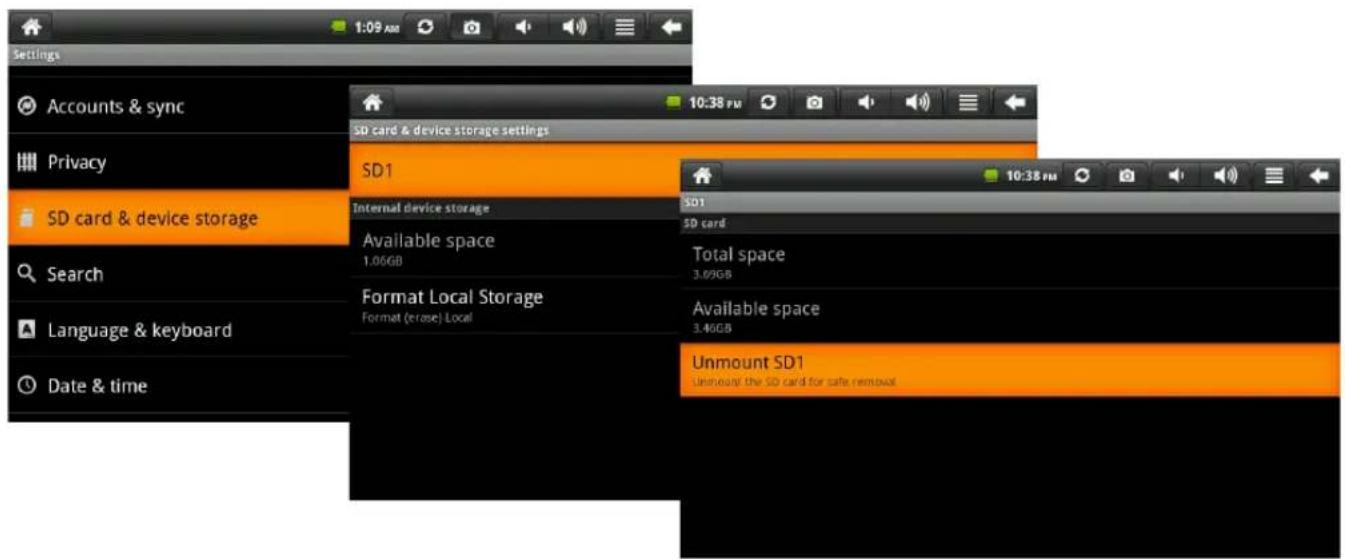
The Settings screen will also show how much memory is available on the card as well as on the internal memory.
After mounting a card, the selection will change to "Unmount SD card"
To uninstall the card select this option.
Settings—SD card & Internal Storage
Have 1.06GB for APK installation

File manage can provide 1.99GB for music, video and kinds of file.

USB Connections

To connect a USB device such as a flash drive, plug it into Mini USB Slot, the USB connection icon will be displayed, however you must first install the device.
First, touch the status bar and swipe down to open the dialog box, and you will see the following picture:

Click on the button: "Turn on USB Storage", then you will see the following picture:

Then you can switch the USB storage on or off.

Wi-Fi Settings
Touch: "Settings" > "Wireless & Networks" > "Wi-Fi Settings"
- Click Wi-Fi (turn on Wi-Fi). Tablet will start searching for available networks.
- Choose available network, input password and click "Connect".
For advanced settings, touch menu icon at right of status bar and choose "Advanced"

Web Browsing
Before using the internet browser, please make sure Wi-Fi service is turned on.
Click the "Browser" icon to open the browser.
Click on the menu icon at the right side of the status bar for browser commands.
New Window: Opens a new browser window.
Bookmarks: You can also just tap on the bookmark icon on the top right of each page. Here you can see your list of bookmarks. Just tap on one of them to open it in the current window.
New Windows: When you have several windows currently opened, tap on Windows to display the list of currently open windows. Tap on one to open it
Refresh / Stop: Will stop loading the web page, if it is currently loading. Will refresh the current web page once it has stopped loading.
Forward: Will go to the next page that you browsed.
More: Will give you access to other options (Find on page to search for a specific word on the current page, Select text to select a section of text to put into the system clipboard -- which you can then paste into another application such as an e-mail by holding down your finger in a text field), Page info to get information about the current web page, Downloads to view the list of items you have downloaded from the Internet. Go to Home > Files > Downloads to see the actual files that are saved on your device.
Settings to adjust the way the browser works.
Please note that some Web features requiring special plug-in software or Active X controls may not work in this special version of the Web Browser.


Task Manager
In the application list screen, click the "Task Manager"
The Task Manager shows all the running applications and how much memory they are using.
Click on an application to end it (kill it) or uninstall it.
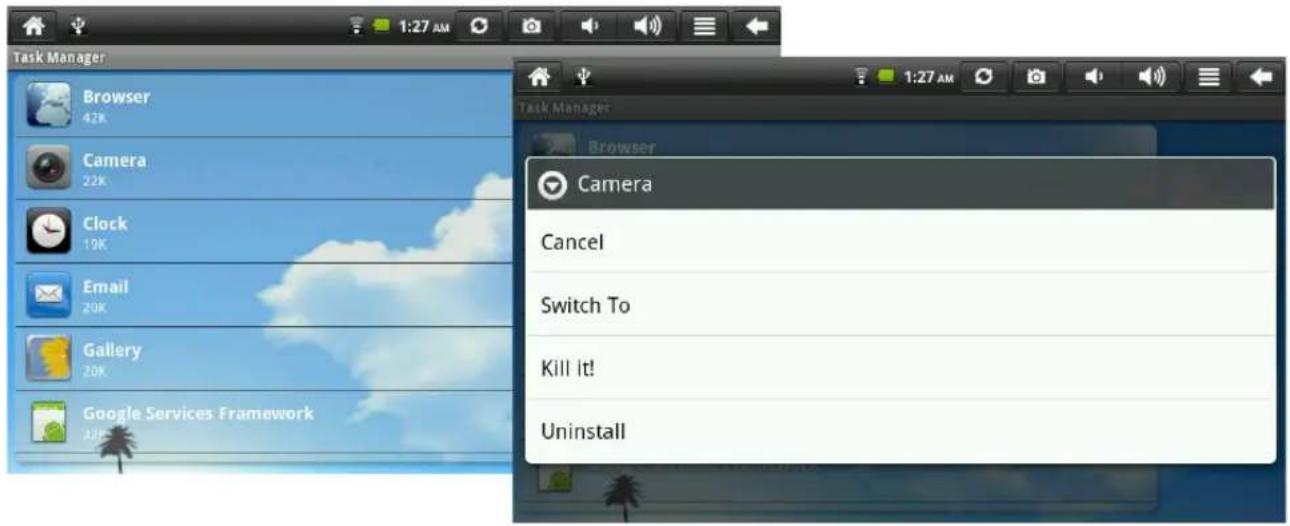
Warning: Use this screen with caution to avoid accidentally removing applications.

File Manager
In the application list screen, click the "File Manager" Use the file manager to organize files

The icons across the top are for navigating to files on the LOCAL, SD1 and to move up and down within the folders.
There is some bottoms menu on the top of screen.
| Icon | Description | |
 | P ress this icon to return the previo u s page. | |
 | P ress this icon to change the in terrace as a desktop. | |
 | Yo u can sele ct m multiple files after you click this ico n | |
 | P ress this icon to copy th e files you selecte d. | |
 | P ress this icon to cut th e file s you selected . | |
 | P ress this icon to paste th e files you copied or cut. | |
 | P ress this icon to cre ate a n ew fo lder on th e current page. | |
 | P ress this icon to renam e th e file you sele cted. | |
 | P ress this icon to dele te th e files you se lecte d . | |

Music Player
In the application list screen, click the "Music" icon:
Press the icon "Music" you will see all the music files will be show on the screen. (If you cannot see the music on the list, please press the 📄 icon)
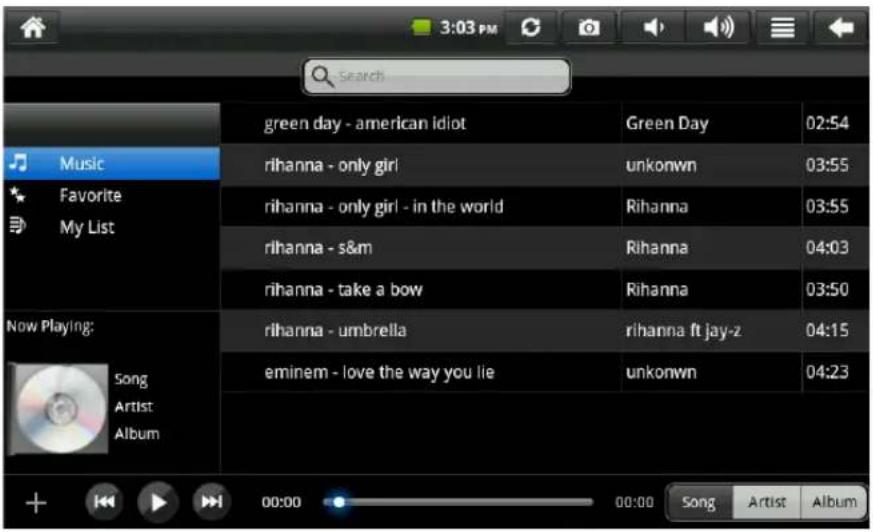
| Icon | Description |
 | Play/Stop the music |
 | Previous song |
 | Next song |
 | Create a new play list |
 | Show the songs as file name |
 | Show the songs as artist's name |
 | Show the songs as album's name |
When you playing the music you will see the following picture:


Video Player
In the application list screen, click the "Video Player" icon:
Press the icon "Video Player" you will see all the video files will be show on the screen. (If you cannot see the video on the list, please press the 📄 icon)

-
Select SD card source or USB
-
Select video from list
-
Video screen will appear and video will start.
Email Setup
In the Application List screen, click the "EMAIL" icon:
-
Input email address and password. Click "Next".
-
Select type of email account.


3.Follow the prompts to set up your email account.

Note: The values in the fields on the left are for illustration only. Set all fields to the appropriate settings for your account.
Select "Next" to go to the next page.
If you are unsure about the settings, contact your email host for details.

Select how often to check for new email.
Enable / disable email notification.
Enter a name for this email account.
Enter how you want your name to be displayed for outgoing messages.
Select "Done"

Clock Settings
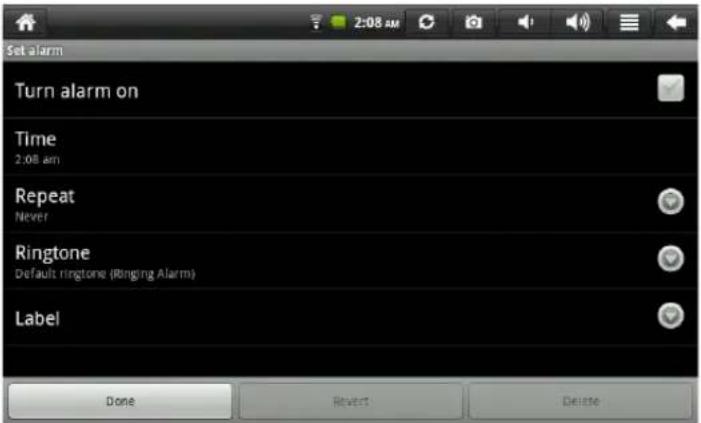
In the Application List screen, click the "Clock"

Enter "Alarm Settings" screen (see page 30)
Click "Add Alarm"
Set Time
Set time and alarm options


APK Installer
You can manage applications in your device by this program.
Press the application and you will see all the Installation files and all the applications have been installed in your device and Micro-SD card, like the following picture:

You can install/uninstall the applications here.
Press the icon

you can select multiple applications to install or uninstall.
Specifications
| CPU | Infotmic IMAPX210,ARM11 1GHz | |
| Screen | Display | 7 inch , TFT with resistance touch |
| Resolution | 800x480 | |
| Memory | Flash ROM | 4GB Nand |
| RAM | 512MB DDR2 | |
| Antenna | Real built-in antenna (Wifi) | |
| Wifi | 802.11 b/g/n | |
| G-Sensor | Support | |
| Camera | 0.3M pixel Front | |
| Audio | MP3, AAC, WMA, AMR-nb/wb | |
| Video | MPEG4 H264, H263 | |
| Photo | JPG, PNG | |
| Input/Output | Touch Panel | Resistance two point touch panel | |
| Speaker | Built-in single loud speaker | ||
| Headphone | 3.5mm stereo Jack | ||
| MIC | Internal MIC-phone | ||
| SD / MMC | TF slot, capacity up to 32GB (support TF HC) | ||
| USB | USB Host ( A type) Mini USB Connector (Include USB 2.0 device) | ||
| Buttons / Switches | 1. Hardware Power ON/OFF key and Reset key2. Volume Up, Volume Down3. Back key, Home key, Menu key, Search key, | ||
| Battery | Type | Built-in rechargeable 3.7V/3000mAh Li polymer | |
| Active | More than 4hrs with video play | ||
| Charger Output | 5V, 2.0A, DC-JACK | ||
| Certification & Regulation | CE, FCC, RoHS | ||
FCC Statement
FCC Caution:
This equipment has been tested and found to comply with the limits for Class B digital device, pursuant to part 15 of the FCC Rules. These limits are designed to provide reasonable protection against harmful interference in a residential installation. This equipment generates uses and can radiate radio frequency energy and, if not installed and used in accordance with the instructions, may cause harmful interference to radio communications. However, there is no guarantee that interference will not occur in a particular installation. If this equipment does cause harmful interference to radio or television reception, which can be determined by turning the equipment off and on, the user is encouraged to try to correct the interference by one or more of the following measures:
- Reorient or relocate the receiving antenna.
- Increase the separation between the equipment and receiver.
- Connect the equipment into an outlet on a circuit different from that to which the receiver is connected.
- Consult the dealer or an experienced radio/TV technician for help.
FCC Compliance:
- To assure continued compliance, follow the attached installation instructions.
- Use only the provided shield interface cables when connecting to computer.
Any unauthorized changes or modifications to this equipment would void the user's authority to operate this device.
This device complies with part 15 subpart B of the FCC Rules. Operation is subjected to the following conditions: (1) This device may not cause harmful interference, and (2) This device must accept any interference received, including interference that may cause undesired operation.
This product may receive radio interference caused by mobile telephones or other products during operation. If such interference is apparent, please increase separation between the product and the mobile telephone or other product.
Industry Canada Requirement:
This Class B apparatus complies with Canadian ICES-003.
Other names of systems and products mentioned in these instructions are usually the registered trademarks or trademarks of the manufacturers who developed the system or product concerned. The TM and ® marks are not used to identify registered trademarks and trademarks in these instructions.
This manual was correct and complete at the time of printing. However, new specifications and updates can occur at any time without prior notice. No part of this manual may be copied, republished, reproduced, transmitted or distributed in any way without prior written consent of Leader International Inc.. Any unauthorized distribution of this manual is expressly forbidden
Leader International Inc may find it necessary to modify, amend or otherwise change or update this manual. We reserve the right to do this at any time, without any prior notice. All specifications and features are subject to change without notice. All screen shots shown are simulated and may not represent the actual screen on production units sold to consumers.
For instruction manuals or other information, be sure to visit our website at: www.leaderinternationalinc.com
Or write to us at:
Leader International Inc
225 S. Lake Avenue, Suite 300
Pasadena, CA 91101
USA
Copyright © 2011

- 7" ANDROID TABLET
- Contents
- Function Keys
- Home Key
- Menu Key
- Backspace Key
- Search Key
- On/Off Key
- Turn ON
- Turn OFF
- Accessories Included in The Package:
- Touch Screen Interface
- Screen Interface
- Widgets
- Add Widgets:
- Deleting Widgets:
- Status Bar
- Status Bar Icons
- Application List
- Settings
- Language Settings
- Screen Brightness Settings
- Screen Timeout Settings
- SD card Mount / Un-Mount
- Settings—SD card & Internal Storage
- USB Connections
- Wi-Fi Settings
- Web Browsing
- Task Manager
- File Manager
- Music Player
- Video Player
- Email Setup
- Clock Settings
- APK Installer
- FCC Statement
- FCC Caution:
- FCC Compliance:
Brand : Leader
Model : Impression I7
Category : Graphic tablet