
iBN6 - Loudspeaker IHOME - Free user manual and instructions
Find the device manual for free iBN6 IHOME in PDF.


| Product Type | Portable Bluetooth Speaker |
| Brand | iHome |
| Model | iBN6 |
| Waterproof Rating | IPX7 (submersible up to 1m for 30 minutes) |
| Bluetooth Version | 4.0 (with NFC) |
| Battery Life | Up to 14 hours (ECO mode) |
| Charging Time | Approximately 8 hours (first use) |
| Power Input | DC 5V 3A (included AC adapter) |
| USB Charging Output | 5V 1A |
| Speakerphone | Yes (built-in microphone) |
| Auxiliary Input | 3.5mm stereo line-in |
| Dimensions (approx.) | 8.5 x 3.5 x 3.5 inches |
| Weight (approx.) | 1.5 lbs |
| ECO Battery Mode | Yes (extends battery life) |
| Automatic Power Off | After 15 minutes of no audio |
| Pairing Range | Up to 30 feet (10 meters) |
| Reset Feature | Yes (side reset button) |
| Maintenance | Clean with damp cloth; rinse after salt water use |
| Safety Certifications | FCC, IC, CE |
| Warranty | 1 year limited |
Frequently Asked Questions - iBN6 IHOME
User questions about iBN6 IHOME
0 question about this device. Answer the ones you know or ask your own.
Ask a new question about this device
Download the instructions for your Loudspeaker in PDF format for free! Find your manual iBN6 - IHOME and take your electronic device back in hand. On this page are published all the documents necessary for the use of your device. iBN6 by IHOME.
USER MANUAL iBN6 IHOME
Waterproof Rechargeable
NFC Bluetooth
Stereo Speaker System
with speakerphone and USB mobile device charging
CHARGE BEFORE USE
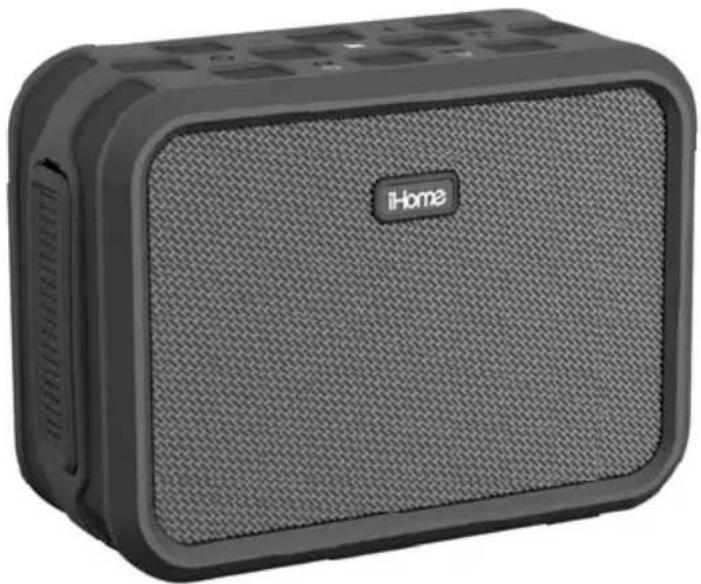
natural_image
iHome brand portable electronic device with textured surface and logo (no visible text or symbols beyond branding)BC
instruction manual

Bluetooth®
iBN6
Introduction
Thank you for purchasing the iHome iBN6. This product is designed to provide high quality wireless sound for your iPad, iPhone, iPod, computer, or other Bluetooth audio device.
Along with the included Quick Bluetooth Connection Guide this instruction booklet explains the basic operation and care of the unit. Please read them carefully and keep for future reference.
This unit features NFC (near field communication) technology which allows you to wirelessly connect your NFC-enabled device to instantly 'pair and play'. See your device's user manual for details on how to interact with NFC devices. If your Bluetooth device does not support NFC, you can pair it manually with this unit.
FCC/IC Information
FCC ID:EMOIBN6
IC:986B-IBN6
FCC Radiation Exposure Statement
This equipment complies with FCC RF radiation exposure limits set forth for an uncontrolled environment. This transmitter must not be co-located or operating in conjunction with any other antenna or transmitter.
This device complies with Industry Canada license-exempt RSS standard(s). Operation is subject to the following two conditions:
(1) This device may not cause interference, and
(2) This device must accept any interference, including interference that may cause undesired operation of the device.
This device complies with Part 15 of the FCC Rules, operation is subject to the following two conditions: (1) This device may not cause harmful interference, and (2) this device must accept any interference received, including interference that may cause undesired operation.
- Warning: Changes or modifications to this unit not expressly approved by the party responsible for compliance could void the user's authority to operate the equipment.
NOTE: This equipment has been tested and found to comply with the limits for a Class B digital device, pursuant to Part 15 of the FCC Rules.
These limits are designed to provide reasonable protection against harmful interference in a residential installation. This equipment generates, uses and can radiate radio frequency energy and, if not installed and used in accordance with the instructions, may cause harmful interference to radio communications. However, there is no guarantee that interference will not occur in a particular installation. If this equipment does cause harmful interference to radio or television reception, which can be determined by turning the equipment off and on, the user is encouraged to try to correct the interference by one or more of the following measures:
• Reorient or relocate the receiving antenna.
- Increase the separation between the equipment and receiver.
- Connect the equipment into an outlet on a circuit different from that to which the receiver is connected.
- Consult the dealer or an experienced radio/TV technician for help.
CAN ICES-3 (B)/NMB-3(B)
The device meets the exemption from the routine evaluation limits in section 2.5 of RSS 102 and compliance with RSS-102 RF exposure, users can obtain Canadian information on RF exposure and compliance.
QDID: B020415
iBN6
Maintenance
- Place the unit on a level surface away from sources of direct sunlight or excessive heat.
- Protect your furniture when placing your unit on a natural wood and lacquered finish. A cloth or other protective material should be placed between it and the furniture.
- Clean your unit with a soft cloth moistened only with mild soap and water. Stronger cleaning agents, such as thinner or similar materials can damage the surface of the unit. Rinse unit with tap water and wipe dry after submersion in salt water or swimming pool.
Long-term Storage of Your Product
- Store in a cool, dry place.
- Unit should be charged before storing.
- If stored for a long period of time, unit may be unresponsive until charged for a number of hours (depending on discharge level)
- Do not store for more than a year without charging as this can permanently harm the battery.
- After long term storage, if unit is unresponsive after charging, RESET unit while connected to AC and recharge the unit.
Internal Rechargeable Lithium-ion Battery
This device uses an internal rechargeable lithium-ion battery that should last the lifetime of the device. If you suspect your battery may be dead, try charging it several times and try resetting the unit.
WARNING/DISPOSAL OF UNIT
Please do NOT attempt to change the battery yourself. If the battery has died and you do not want us to replace your battery, you should follow the disposal instructions below:
- Never dispose of used batteries/electronics with ordinary solid wastes, since they contain toxic substances.
- Always dispose of used batteries/electronics in accordance with the prevailing community regulations that apply to the disposal of batteries/electronics. If there are no local regulations concerning battery/electronics disposal, please dispose of the device in a waste bin for electronic devices.
- Many electronics retailers now recycle batteries and other electronic components at no charge. Check to see which ones in your area do so.
GENERAL BATTERY PRECAUTIONS
- Never use or charge a battery if it appears to be leaking, discolored, deformed, or in any way abnormal.
- Never disassemble the unit or attempt to remove battery as that could cause leakage of alkaline solution or other electrolytic substance.
- Always confirm that the temperature is 5^ C - 35^ C ( 41^ - 95^ Fahrenheit) before you charge the battery. Leakage or deterioration of the battery may occur if this warning is not heeded.
- Never expose a battery to any liquid.
- Never expose a battery to excessive heat such as direct sunlight or fire. Never use a battery pack in an unventilated vehicle where excessive internal temperatures may be encountered.
• Always keep batteries out of the reach of infants and small children.
iBN6
Table of Contents
Included / Meet Your iBN6 1-2
Setting Up the Unit / Turning the Unit ON and OFF....3
Waterproof Operation 4
Charging the iBN6/ECO Battery Mode....5
Using Bluetooth: Pairing Your Device Using NFC 6
Using Bluetooth: Pairing Your Device Manually....7
Playing Audio Via Bluetooth....8
Using the Speakerphone feature....9
Playing Audio Via Aux line-in....9
Charging Devices Via USB Port....10
Consumer Product Safety Guide.... 11-12
Troubleshooting....13
Warranty....14
iBN6
Included
- iBN6 Speaker
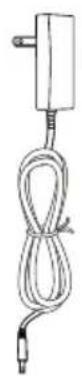
- 100V-240V universal AC adaptor
- Stereo 3.5 mm audio cable
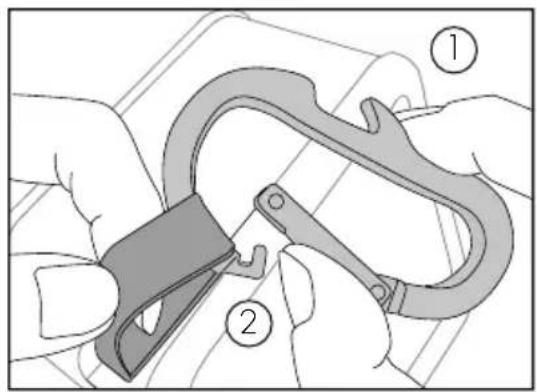
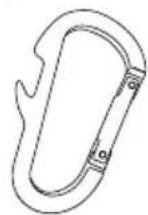
- Bottle opener/carabiner clip
To remove carabiner clip:
- Hold clip sideways to unit.
- Press clip hinge post inwards and slide strap loop off of hinge post.
natural_image
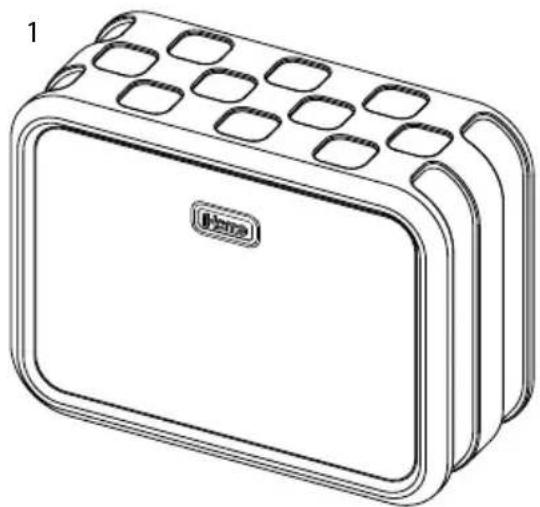
Line drawing of a rectangular device with multiple compartments and a label 'Home' on the front panel (no text or symbols on the device itself)2
3

4
Meet Your iBN6
iBN6
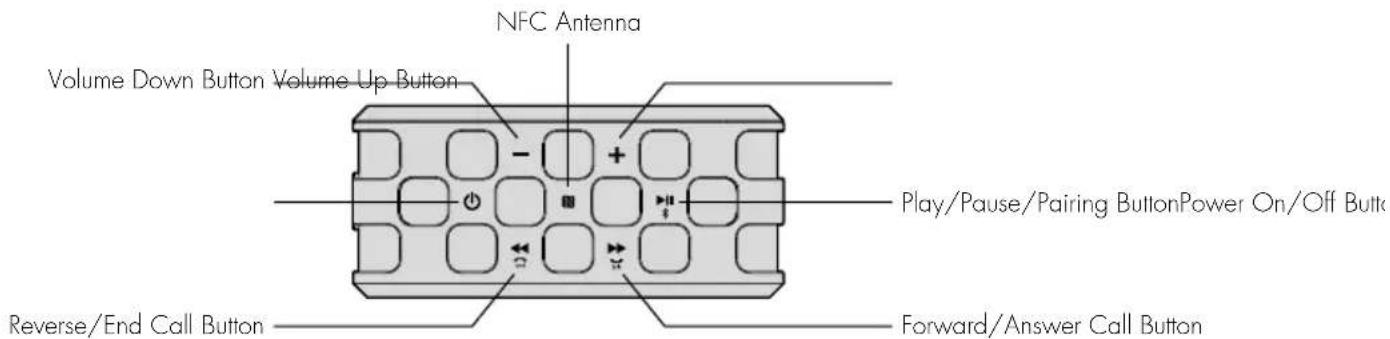
Top view
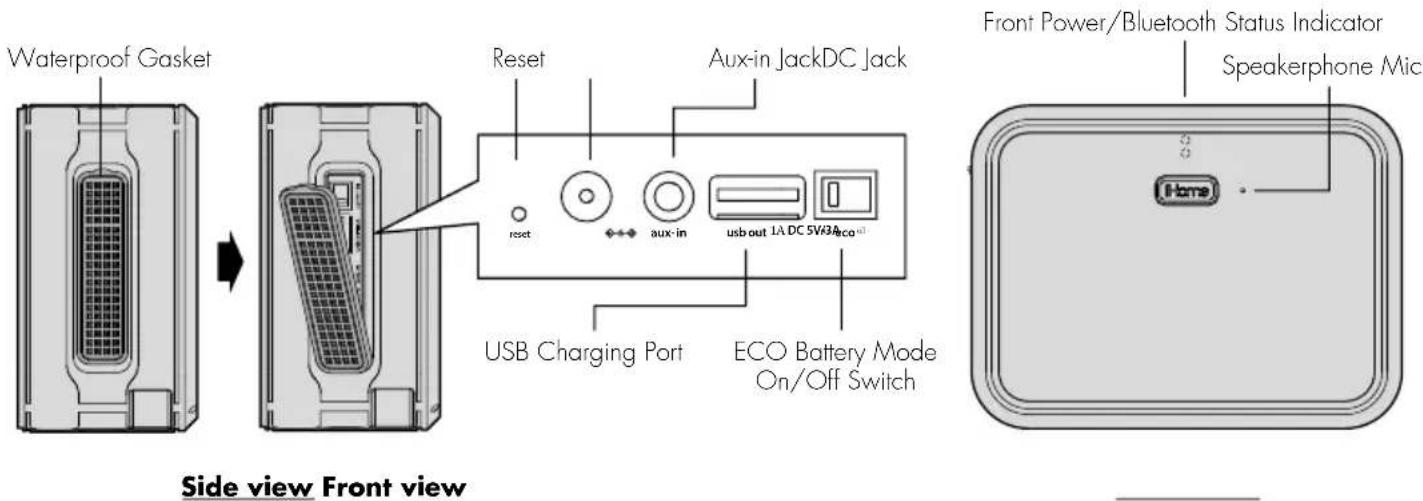
Setting Up the Unit
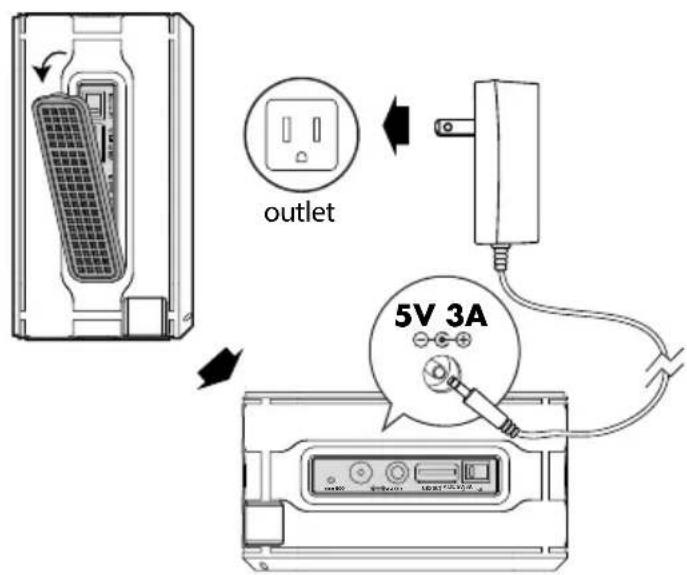
To charge the unit and operate the unit on AC power, connect the included AC adaptor to the DC jack located on the side of the unit and connect the other end to a working wall outlet.
For first time use, make sure to fully charge the internal battery for about 8 hours.
Turning the Unit ON and OFF
- Press the ⏻ Power Button located on top of the unit to turn the unit ON. The green/red battery status and blue Bluetooth status LED indicators on the front of the unit will light and ascending tones will sound.
- Press the ⏻ Power Button to turn the unit OFF. Descending tones will sound. Note: if no audio is detected for 15 minutes, the unit will power off automatically to save battery life.
Using the iBN6
| Status Indicators at Power On | |
| Solid Red Unit is charging | |
| Solid Green | Unit is charged |
| Flashing Blue | Attempting to pair |
| Solid Blue | Paired device connected |
Using the iBN6
IMPORTANT INFORMATION ABOUT WATERPROOF OPERATION
For proper waterproof operation, make sure the waterproof gasket on the left side of the unit is completely flush with the unit by pressing along the entire edge of the gasket until it is completely and securely in place.
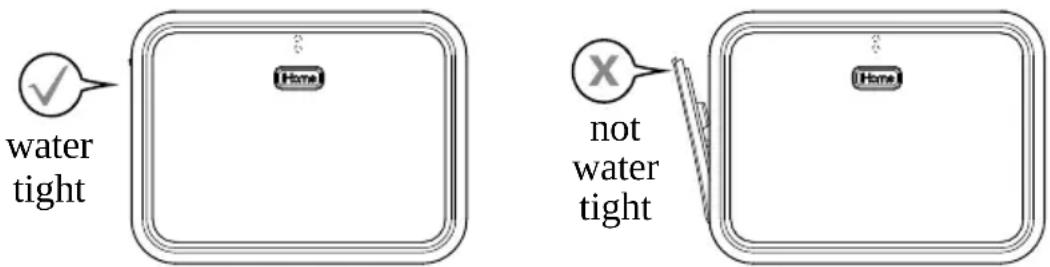
- The unit is IPX7 waterproof rated, meaning it is immersible for up to 30 minutes at a depth of 1 meter (3 feet). It will typically withstand rain, snow and being submersed in shallow water. Longer duration or deeper immersion that exceeds the tested limits may cause product failure and void the warranty.
- DO NOT immerse the unit in water for extended periods.
- DO NOT immerse the unit in water deeper than 1 meter (\~ 3 feet).
- Make sure gasket and surrounding surfaces are completely dry before opening gasket to prevent moisture from damaging the internal electronics.
- Keep rubber gasket free of dirt, sand, or other objects that can interfere with proper sealing. If for any reason the waterproof gasket is not making a tight waterproof seal water may enter the unit.
- Rinse with tap water after immersion in salt water or swimming pool.
- DO NOT clean unit with oily soaps or use chemicals or solvents. Clean with damp cloth.
Charging the Unit
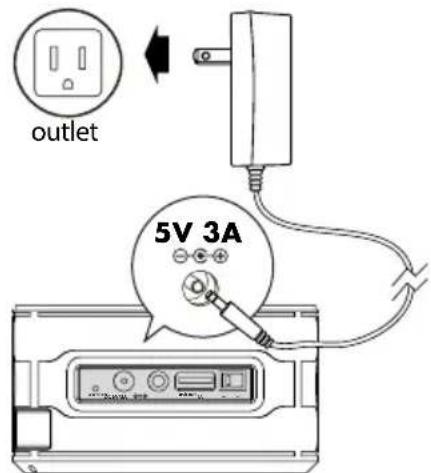
To charge the internal battery for portable operation, connect the included AC adaptor to the DC jack located on the side of the unit and connect the other end to a working wall outlet. While charging, the Battery Charge Indicator light on the front of the unit will glow solid red. Once fully charged the light will glow solid green.
For first time use, make sure to fully charge the internal battery for about 8 hours.
Charging and Battery Status
While operating on the internal battery, when the unit is ON the Battery/Charging Status Indicator light on the front of the unit automatically appears every 5 minutes.
ECO Battery Mode
ECO Battery Mode allows for extended battery life when playing unit for up to 14 hours without charging. In ECO mode, the volume level decreases slightly as the battery discharges. Set Eco Battery Mode Switch to On for Eco Mode. Set to Off for normal listening. Note: The ECO switch is disabled while the unit is operating on AC adaptor. The switch position has no effect on the battery charging.
Using the iBN6
TIP: To check battery status at any time (whether unit is on or off, operating on battery or AC power), press and hold both the - Button or + Button at the same time for 2 seconds.
| Battery Charge Status Indicator | USB Charge | |
| Flashing Red | LOW needs charging | X |
| Fading Red | MED partially charged | √ |
| Fading Green | HIGH fully charged | √ |
Using the iBN6
Using Bluetooth: Pairing and Playing Your Device Using NFC
This unit features wireless NFC pairing, which allows playing NFC-enabled devices to pair and play instantly. For pairing non-NFC devices, please see the following section “Pairing Your Device Manually”.
- Turn on your Bluetooth-enabled/NFC-enabled device and turn on NFC capability as described in the device's user manual.
- Place your NFC-enabled device in play mode.
- Touch the N area of your playing NFC device against the a nenna area on top of the iBN6. The iBN6 will turn on and enter automatic pairing mode, a tone will sound and the light will flash blue while the unit attempts to pair. “iHome iBN6” should appear on your device’s menu. If your device asks if you wish to pair, accept (select “Yes” or similar). Once paired with a device, the blue indicator light will glow steadily, a confirmation tone will sound and your music will play through the unit.
- Press the ▶ Button to play or pause audio.
- Press the Button to go to the start of a track, press twice to play the previous track. Press the Button to advance to the next track. Press and hold or for rapid search backwards or forwards within a track.
- Press the - Button or + Button to adjust the volume on the unit. Press and hold for rapid volume change. The LED indicator on the front of the unit will flash 3X when the volume is at maximum OR minimum. You can also adjust volume on your device.
- When done listening, press the Power Button to turn the unit OFF. Remember to turn off your audio device, too.
NOTE: To disconnect your device, simply touch it again on the antenna area on top of the unit. To pair a device manually, please see the following “Pairing Your Device Manually” section.
Using the iBN6
Using Bluetooth: Pairing Your Device Manually
- Turn on your Bluetooth-enabled device and turn on Bluetooth capability as described in the device's user manual.
- Press the ⏻ Power Button located on top of the unit to turn the unit ON. The first time the unit is turned on it will enter auto pairing mode: ascending tones will sound and the indicator light on the front of the unit will flash blue while the unit attempts to pair. "iHome iBN6" should appear on your device's menu. If "Not Paired", "Not Connected" or similar message appears, select "iHome iBN6" on device to begin/complete pairing. If your device asks for a password, enter 1234 on the keyboard of your device. If no device is paired within 3 minutes, the unit will revert to its previous state.
- If auto-pairing is unsuccessful, or if you are trying to pair with a different Bluetooth device, make sure unit is powered on then press and hold the Button (located on top of the unit) for 2 seconds. 2 tones will sound and the indicator light on front of the unit will flash blue while the unit attempts to pair. "iHome iBN6" should appear on your device's menu. If "Not Paired", "Not Connected" or similar message appears, select "iHome iBN6" on device to begin/complete pairing. If your device asks for a password, enter 1234 on the keyboard of your device. To retry pairing, repeat step 3.
- Once paired with a device, the blue indicator light will glow steadily and a confirmation tone will sound. There should be an indication on your device that pairing is complete. On some devices, you must then select "Use as Audio Device (stereo)" or similar on the device's Bluetooth menu. Once paired, your device should link to the powered on iBN6 whenever within range.
Using the iBN6
Pairing with a Different Device
When you power ON the speaker, it will automatically link with the previously paired Bluetooth device as long as that device is still within range (about 30 feet). To pair with a different device by NFC, follow steps 1–3 on page 6. Also pair with a different device manually, please follow step 3 on page 7.
Playing Audio Via Bluetooth
- Press the ⏻ Power Button to turn on the unit. The light on front of the unit will flash blue and ascending tones will sound and the unit will search for a previously paired device. The light will turn solid blue once a previously paired device is detected. You can then listen to audio streamed wirelessly from your paired iPad, iPhone, iPod or other Bluetooth device.
- Press the ▶ Button to play or pause audio.
- Press the Button to go to the start of a track, press again to play the previous track. Press the Button to advance to the next track. Press and hold or for rapid search backwards or forwards within a track.
- Press the - Button or + Button to adjust the volume on the unit. Press and hold for rapid volume change. The LED indicator on the front of the unit will flash 3X when the volume is at maximum OR minimum. You can also adjust volume on your device.
- When done listening, press the ⏻ Power Button to turn the unit OFF. Remember to turn off your audio device, too.
Note: Do not play a Bluetooth device while an aux-in device is playing or you will hear both.
Using the iBN6
Using the Speakerphone feature
NOTE: The unit must be powered on to receive a call. A Bluetooth phone must be linked.
- When a call is received, playing music is muted to hear the ring tone. Press the ▶ Talk Button to answer the call, or press the ◀ End Button to ignore it. For call waiting function, press the ▶ Talk Button to place a currently active call on hold and answer a new call; press the ▶ Talk Button to switch between the calls.
- When a call is completed, press the ◀ End Button to end the call and resume previous function.
Playing Audio via Aux In
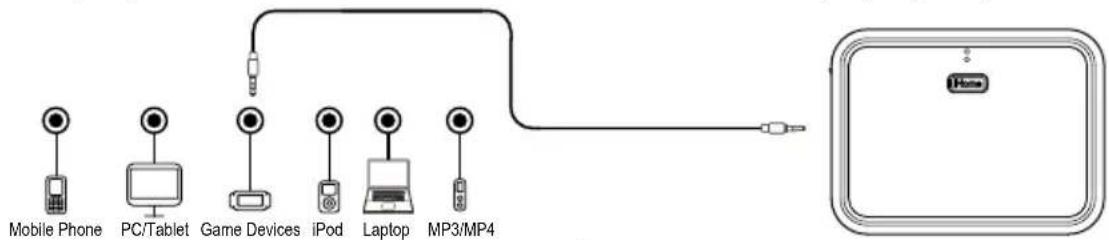
- Connect one end of the included 3.5mm stereo audio cable to the Aux in jack on the side of the unit under the waterproof gasket and connect the other end to the headphone or line-out jack on your audio device.
- Press the ⏻ Power Button on the unit to turn it on.
- Power on the audio device and use the controls on the device to play or pause audio, and navigate tracks
- Adjust the volume on the unit as described previously.
- When done listening, press the ⏻ Power Button to turn the unit OFF. Remember to turn off your audio device, too.
Note: Do not play an aux-in device while a Bluetooth device is playing or you will hear both.
flowchart
graph LR
    A["Mobile Phone"] --> B["PC/Tablet"]
    B --> C["Game Devices"]
    C --> D["iPod"]
    D --> E["Laptop"]
    E --> F["MP3/MP4"]
    F --> G["Home"]
9
Using the iBN6
Charging Devices via USB Port
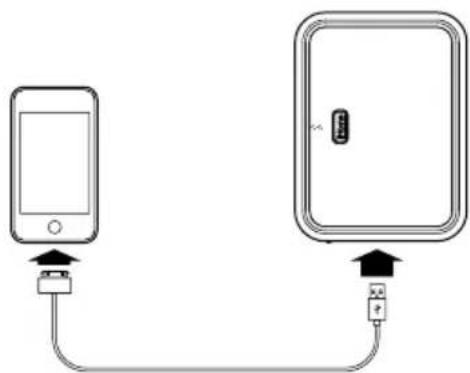
Note: When operating on internal battery, the unit must be powered ON to charge devices via the USB Port. The iBN6 will charge devices when connected to AC power OR when operating on the internal battery (provided the battery has enough charge). To charge devices via USB while operating on the internal battery, we recommend that the unit be fully charged first. The iBN6 will not charge external devices via USB when internal rechargeable battery is too low (red indicator is blinking). To save battery power, USB charging is limited to 1 hour when no audio is playing.
- Lift water resistant gasket located on the side of the unit to expose the USB Port.
- Connect the standard size end of a USB cable (not included) to the USB Port and connect the other end to the charging port on your device.
- Press the ⏻Power Button on the unit to turn it on.
- Monitor the charging on your device. If your device does not charge, you must charge your device using the charger that came with it.
natural_image
Diagram showing two devices connected by a cable, one with an external connector and the other with a switch (no text or symbols present)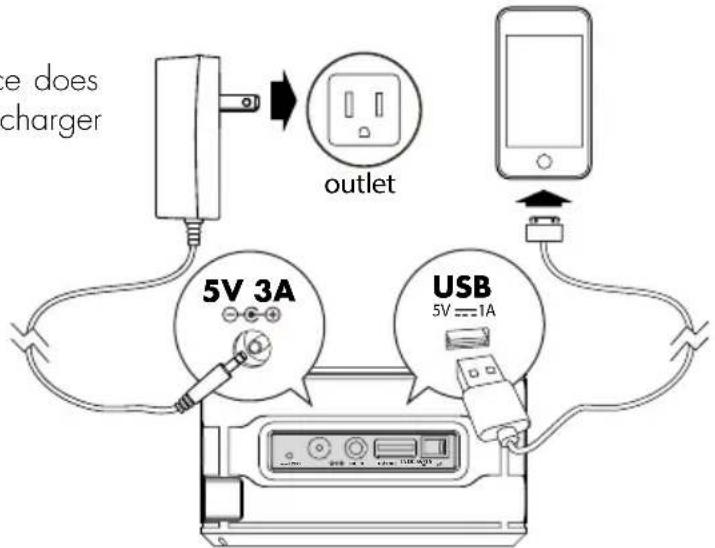
Consumer Product Safety Guide
IMPORTANT SAFETY INSTRUCTIONS
When used in the directed manner, this unit has been designed and manufactured to ensure your personal safety. However, improper use can result in potential electrical shock or fire hazards. Please read all safety and operating instructions carefully before installation and use, and keep these instructions handy for future reference. Take special note of all warnings listed in these instructions and on the unit.
-
Water and Moisture – This unit is rated iPX7 (will withstand submersion for 30 minutes at a depth of 1 meter (3 feet)), but should not be operated under water.
-
Gasket must be properly sealed before use near water.
- Dry unit completely before opening gasket.
-
Do NOT open gasket if wet or in a wet environment.
-
Ventilation – The unit should be situated so that its location or position does not interfere with its proper ventilation. For example, it should not be situated on a bed, sofa, rug or similar surface that may block ventilation openings.
- Heat – The unit should be situated away from heat sources such as radiators, heat registers, stoves or other appliances (including amplifiers) that produce heat.
- Power Sources – The unit should be connected to a power supply only of the type described in the operating instructions or as marked on the appliance.
-
Power-Cable Protection – Power supply cables should be routed so that they are not likely to be walked on or pinched by items placed upon or against them. It is always best to have a clear area from where the cable exits the unit to where it is plugged into an AC socket.
-
Cleaning – The unit should be cleaned only using a warm damp cloth. Do not use oily solvents or chemicals. Rinse the unit off with tap water after use in salt water or swimming pool.
- Objects and Liquid Entry – Care should be taken so that objects do not fall and liquids are not spilled into any openings or vents located on the product. Keep gasket free of dirt, sand, or objects that could interfere with a proper watertight seal.
- Attachments – Do not use attachments not recommended by the product manufacturer.
- Lightning and Power Surge Protection – Unplug the unit from the wall socket and disconnect the antenna or cable system during a lightning storm or when it is left unattended and unused for long periods of time. This will prevent damage to the product due to lightning and power-line surges.
- Overloading – Do not overload wall sockets, extension cords, or integral convenience receptacles as this can result in a risk of fire or electric shock.
- Damage Requiring Service – The unit should be serviced by qualified service personnel when:
A. the power supply cable or plug has been damaged.
B. objects have fallen into or liquid has been spilled into the area under the rubber gasket.
C. the unit has been dropped or the enclosure damaged.
D. the unit exhibits a marked change in performance or does not operate normally.
-
Periods of Nonuse – If the unit is to be left unused for an extended period of time, such as a month or longer, the power cable should be unplugged from the unit to prevent damage or corrosion.
-
Servicing – The user should not attempt to service the unit beyond those methods described in the user's operating instructions. Service methods not covered in the operating instructions should be referred to qualified service personnel.
Questions? Visit www.ihome.com
or call 1-800-288-2792 Toll Free
Troubleshooting
Unit doesn't respond (no power)
- Check that all connections are correct and properly plugged in.
- For internal battery operation, make sure the unit is fully charged.
- Make sure your device is properly paired with the iBN6.
• Make sure the Power is ON.
Unit doesn't respond
- If the unit appears to be “frozen” or locked up or hasn’t been used in a long time, you may need to reset it. To do so, use a straightened paper-clip, toothpick, or similar device to press the reset button located under the water resistant gasket on the side of the unit. The blue LED indicator on the front of the unit will flash rapidly 5 times to indicate the unit has been reset. If unit hasn’t been used in a long time, charge unit for a number of hours before attempting to reset.
Trouble pairing device with iBN6
Bluetooth implementation varies depending on your device's hardware and operating system. Please see our website for updates on pairing.
- If auto “Pair and play” on your NFC–enabled device fails, make sure Bluetooth is turned on and screen is active (not dark) on NFC device. If pairing still fails, try to pair manually by powering on the unit then pressing and holding the Pairing Button on the top of the unit for 2 seconds.
- Make sure your device is working properly. Check your device's manual for details on Bluetooth pairing and linking.
For further information and to see the latest instructions, visit www.ihome.com/support
Limited 1 Year Warranty
iHome Products, a division of SDI Technologies Inc. (hereafter referred to as SDI), warrants this product to be free from defects in workmanship and materials, under normal use and conditions, for a period of one (1) year from the date of original purchase.
Should this product fail to function in a satisfactory manner, it is 'best to first return it to the store where it was originally purchased. Should this fail to resolve the matter and service still be required by reason of any defect or malfunction during the warranty period, SDI will repair or, at its discretion, replace this product without charge. This decision is subject to verification of the defect or malfunction upon delivery of this product to the Factory Service Center authorized by Customer Service.
If service is required, please call Customer Service at 1-800-288-2792 to obtain a Return Authorization Number and shipping instructions.
Disclaimer of Warranty
NOTE: This warranty is valid only if the product is used for the purpose for which it was designed. It does not cover (i) products which have been damaged by negligence or willful actions, misuse or accident, or which have been modified or repaired by unauthorized persons; (ii) cracked or broken cabinets, or units damaged by excessive heat; (iii) damage to digital media players, CD's or tape cassettes (if applicable); (iv) the cost of shipping this product to the Factory Service Center and its return to the owner.
This warranty is valid only in the United States of America and does not extend to owners of the product other than to the original purchaser. In no event will SDI or any of its affiliates, contractors, resellers, their officers, directors, shareholders, members or agents be liable to you or any third party for any consequential or incidental damages, any lost profits, actual, exemplary or punitive damages. (Some states do not allow limitations on implied warranties or exclusion of consequential damages, so these restrictions may not apply to you.) This warranty gives you specific legal rights, and you may also have other rights which vary from state to state.
Your acknowledgement and agreement to fully and completely abide by the above mentioned disclaimer of warranty is contractually binding to you upon your transfer of currency (money order, cashier's check, or credit card) for purchase of your SDI product.
© 2014 SDI Technologies, Inc. All rights reserved
Questions? Visit www.ihome.com
or call 1-800-288-2792 Toll Free


- Waterproof Rechargeable
- NFC Bluetooth
- Stereo Speaker System
- iBN6
- Introduction
- FCC/IC Information
- FCC Radiation Exposure Statement
- Maintenance
- Long-term Storage of Your Product
- Internal Rechargeable Lithium-ion Battery
- WARNING/DISPOSAL OF UNIT
- GENERAL BATTERY PRECAUTIONS
- Table of Contents
- Included
- To remove carabiner clip:
- Meet Your iBN6
- Setting Up the Unit
- Turning the Unit ON and OFF
- Using the iBN6
- IMPORTANT INFORMATION ABOUT WATERPROOF OPERATION
- Charging the Unit
- Charging and Battery Status
- ECO Battery Mode
- Using Bluetooth: Pairing and Playing Your Device Using NFC
- Using Bluetooth: Pairing Your Device Manually
- Pairing with a Different Device
- Playing Audio Via Bluetooth
- Using the Speakerphone feature
- Playing Audio via Aux In
- Charging Devices via USB Port
- Consumer Product Safety Guide
- IMPORTANT SAFETY INSTRUCTIONS
- Troubleshooting
- Unit doesn't respond (no power)
- Unit doesn't respond
- Trouble pairing device with iBN6
- Limited 1 Year Warranty
- Disclaimer of Warranty
Brand : IHOME
Model : iBN6
Category : Loudspeaker