
PD908B - Portable DVD Player GPX - Free user manual and instructions
Find the device manual for free PD908B GPX in PDF.


| Type | Portable DVD Player |
| Brand | GPX |
| Model | PD908B |
| Display | 9" TFT LCD |
| Aspect Ratio | 16:9 (widescreen) with 4:3 option |
| Disc Compatibility | DVD-R/RW, DVD+R/RW, CD/CD-R/CD-RW, JPEG |
| Video Output | Composite via 3.5mm AV output |
| Audio Output | Stereo headphone jacks (2), built-in speaker |
| Video Input | 3.5mm AV input |
| Power Source | AC/DC adapter (120V, 60Hz) or DC car adapter (9V-12V) |
| Battery | Built-in rechargeable, up to 2.5 hours |
| Remote Control | Full-feature remote with CR2025 battery |
| Languages (OSD) | English, French, Spanish |
| Playback Features | Multi-angle, zoom, slow motion, subtitle, audio language selection |
| Programming | Programmable play order for DVDs and CDs |
| Dimensions (approx.) | Not specified (estimate: 10" x 7" x 2") |
| Weight (approx.) | Not specified (estimate: 1.5 lbs) |
Frequently Asked Questions - PD908B GPX
User questions about PD908B GPX
0 question about this device. Answer the ones you know or ask your own.
Ask a new question about this device
Download the instructions for your Portable DVD Player in PDF format for free! Find your manual PD908B - GPX and take your electronic device back in hand. On this page are published all the documents necessary for the use of your device. PD908B by GPX.
USER MANUAL PD908B GPX
natural_image
Black-and-white photo of a portable electronic device with a screen displaying a landscape image (no visible text or symbols)PD908B
INSTRUCTION MANUAL
Contents
Warnings & Precautions 2
Important Safety Instructions.... 3
In the Box & Features....4
Powering the Unit 5
Playing a DVD 6
Programming a DVD 7
Playing a CD....8
Programming a CD....9
Using the Video/Audio Output 10
Using the Video/Audio Input....11
Controls & Definitions 12-18
The Setup Menu.... 19
Service Information....20
Warnings and Precautions

This symbol, located on back or bottom of the unit, is intended to alert the user to the presence of uninsulated "dangerous voltage" within the product's enclosure that may be of sufficient magnitude to constitute a risk of electric shock to persons.

This symbol, located on back or bottom of the unit, is intended to alert the user in the presence of important operating and maintenance (servicing) instructions in the literature accompanying the appliance.
CAUTION: TO PREVENT ELECTRIC SHOCK, MATCH WIDE BLADE OF PLUG TO WIDE SLOT, FULLY INSERT.
To reduce the risk of electric shock, do not remove cover (or back). There are no user-serviceable parts inside. Please refer any servicing to qualified service personnel.
This product utilizes a Class I laser to read Compact Disc. This laser Compact Disc Player is equipped with safety switches to avoid exposure when the CD door is open and the safety interlocks are defeated. Invisible laser radiation is present when the CD Player's lid is open and the system's interlock has failed or been defeated. It is very important that you avoid direct exposure to the laser beam at all times. Please do not attempt to defeat or bypass the safety switches.
WARNING: Changes or modifications to this unit not expressly approved by the party responsible for compliance could void the user's authority to operate the equipment.
WARNING: Danger of explosion if the remote control's batteries are incorrectly installed. Replace only with the same or equivalent battery.
WARNING: The remote control's button cell battery contains mercury. Do not put in the trash, instead recycle or dispose of as hazardous waste
WARNING: Use of this unit near fluorescent lighting may cause interference regarding use of the remote. If the unit is displaying erratic behavior move away from any fluorescent lighting, as it may be the cause.
WARNING: To reduce the risk of fire or electric shock, do not expose this apparatus to rain or moisture.
Do not mix old and new batteries.
Do not mix alkaline, standard (carbon-zinc), or rechargeable (ni-cad, ni-mh, etc) batteries.
NOTE: This equipment has been tested and found to comply with the limits for a Class II digital device, pursuant to Part 15 of the FCC Rules. These limits are designed to provide reasonable protection against harmful interference in a residential installation. This equipment generates, uses, and can radiate radio frequency energy and, if not installed and used in accordance with the instructions, may cause harmful interference to radio communications. However, there is no guarantee that interference will not occur in a particular installation. If this equipment does cause harmful interference to radio or television reception, which can be determined by tuning the equipment off and on, the user is encouraged to try to correct the interference by one or more of the following measures:
- Reorient or relocate the receiving antenna.
- Increase the separation between the equipment and receiver.
- Connect the equipment into an outlet on a circuit different from that to which the receiver is connected.
- Consult the dealer or an experienced radio/TV technician for help.
Where the mains plug or an appliance coupler is used as the disconnect device, the disconnect device shall remain readily operable.
Important Safety Instructions
- Read Instructions - All the safety and operating interactions should be read before the product is operated.
- Retain instructions - The safety and operating instruction could be retained for future reference.
- Head Warnings - All warning on /no product and in the operating instructions should be adhered to.
- Follow instructions. As operating and re-quisitions should be followed.
- Cleaning - Upraling this product from the wall order before cleaning. Do not use liquid cleansers or manual cleansers. Clean only with a dry cloth.
b. Attachments. Do not use attachments net recommended by the product manufacturer as they may cause hazards. - Water and Moisture - Do not use this product near water - for example, near a ballitub, wash bowl, kitchen sink, or laundry mix in a wet basement, or near a swimming pool, and the like. The apparatus shall not be exposed to dripping or splashing and that no objects fill with bapins, such as vases, shall be placed on apparatus.
- apparaient se dont peut être acquel avec écréduavaux au cours échéances et ne un objet ne contenant de água, tel que sur vise, ne dont être plansé sur l'objet.
- Accessories Do not place this product or an adjustable cart, stand-trip, bucket, or table. The product may fall, causing serious injury to a child or adult, and serious damage to the product. Use only with a cart, stand-trip, bucket, or table recommended by the manufacturer, or will with the product. Any mounting of the product should follow the manufacturer's instructions, and shall use a mounting accessory recommended by the manufacturer.
- Use only with the cart, stand, ring, bracket, or side specified by the manufacturer, or sold with the apparatus. When a cart is used, use caution when moving the cart'appartus combustion or sound injury from tip over.
Se jupar

- Ventilation: Slots and openings in the cabinet are provided for ventilation and to ensure reliable operation of the product and to protect it from overheating, and three openings must not be blocked or covered. The openings should never be blocked by placing the product on a bed, sofa, rug, or other outer surfaces. This product should not be placed in a built-in installation such as a wardrobe or each unless proper ventilation is provided or the manufacturer's circulation have been adhered to.
- Power Sources - This product should be operated only from the type of power source indicated on the marking label. If you are not sure that the type of power supply in your home, consult your product center or local power company. For products intended to operate from battery power, or other sources, refer to the operating attraction.
- Grounding or Polarization - This product may be equipped with a polarized alternating-current plug (i.p. plug having one blade wider than the other). This plug will fit into the power outlet only one way. This is a safety feature. If you are unable to enter the plug fully into the outlet, try reversing the plug. If the plug should still fall in it, contact your electrical power to replace your
obsolete cutter. Do not defeat the safety purpose of the palatrice play
Alternate Warnings - This product is equipped with a fine-ring grounding-type plug, a plug having a third (grounding) pin. This plug will only fit into a grounding-type power outlet. This is a safety feature. If you are unable to insert the plug into the outlet, contact your decrease to replace your obsolete outlet. Do not detreat the safety purpose of the grounding-type plug.
13. Power-Card Protection - Power supply cards should be renal so that they are not likely to be walked on or pinchial by items placed open or against them, praying particular attention to cards at plugs, convenience receptacles, and point, where they exit from the product.
14. Protective Attachment Plug - The product is equipped with an attachment plug having overhead protection. This is a safety fixture. See Instruction Manual for replacement or resetting of protective devices. If replacement of the plug is required, he has the service between has local a replacement plug specified by the manufacturer but has the same material protection as the original plug.
15. Outdoor Antenna Grounding - If an abelian antenna is connected to the receiver, be and the antenna system is grounded so as to provide some protection against voltage surges and built-up static charges. Article 810 of the Natural Electrical Code, ANSINTPA 70, provides information with regard to proper grounding of the mast and supporting structure, grounding of the mast and separating structure, grounding of the lead-on wire or an antenna discharge unit, size of grounding modulation, indication of antenna discharge unit, connection to grounding electrodes, and requirements for the grounding electrode.
Set Agate.

- Lightning. For asking pressure for the product during a lightning storm, or when it is left unattended and unusual for long periods of time, urging it from the wall outlet and discounting the antenna or cable system. This will present damage to the product due to lightning and power line surges.
- Power Lines - An automatic antenna system should turn to be located in the vicinity of mechanical power lines or other electric light or power circuits, or where it can fall into such power lines or circuits. When installing an outside antenna system, extreme care should be taken to keep front touching and power lines or circuits as contact with them might be fatal.
- Overfolding - Do not overload wall outlets, extension crabs, or integral incontinence receptacles to this can result in a risk of fire or electric shock.
- Object and Liquid Entry - Never push objects of any kind into this product through openings at they may touch dangerous voltage points or short-cash ports that could result in a free or electric shock. Never spill liquid of any kind on the product.
- Servicing - Do not attempt to service this product yourself is opening or removing covers may expose you to dangerous voltage in other
hazards. Refer all servicing to qualified service personnel?
- Damage Requiring Service - Unpiling this product from the wall outlet and refer servicing to qualified service personnel under the following conditions:
a) When (in power supply and or plug is damaged.
b) If liquid has been spilled, or impacts have fallen into the product.
c) If he product has been exposed to rain, water or moisture.
d) If the product does not operate normally by following the operating instructions. Adjust only these controls that are covered by the operating instructions as an improper adjustment of other controls may result in damage and will often require extensive work by a qualified manner to restore the product to its normal operation.
c) If the product has been dropped or damaged in any way, and
When the product exhibits a distinct change in performance – this indicates a need for service - Replacement Parts - When replacement parts are required, he sure the service requirement has used replacement parts specified by the manufacturer or have the same characteristics to the original part. Unauthorized substitutions may result in fire, electric shock, or other hazards.
- Safety Checks - Upon completion of any service or repairs to this product, ask the service technician to perform safety checks to determine that the product is in proper operating conditions.
- Wall or Ceiling Mounting. The product should be mounted to a wall or ceiling only as recommended by the manufacturer.
- Heat - the product should be situated away from heat sources such as radiators, heat registers, stairs, or other products (including amplifiers) that produce heat. Battery shall not be exposed in extensive heat such as suraining fire, or the like.
Les pliers ne doivent pas être apérents à de faire chaleur, qui qu'à le lumière de vaillé, au lieu ou autres choses de contable. - Main plug is used to disconnect device and it should remain really openable during internal use. In order to disconnect the apparatus item the mains completely, the mains plug should be discontinued from the mains socket outlet completely.
La prise du secteur ne doit plus être abstruire en dont être facilement accretable pendant van attifinition. Pour faire compteurant d'eau quarté de l'orientation d'entre. La prise doit être abîneurées du prise - Excessive small pressure from airplanes and headpluses can cause hearing loss.
De prévisions associées effectives provenant d'activité de des activités passifs principaux des parties de l'analienne. - To prevent fire or shock hazard, do not use this plug with an extension until, noptacle or other outlet unless the blades can be fully inserted to prevent kinds exposure.
- Symbol is used to indicate that a specific component shall be replaced only by the component specified in that documentation for safety reasons
- Rating label and "CAUTION MARKING" are natural at bottom of enclosure.
- a symbol indicates that this product incorporates double involution.
In the Box

natural_image
Line drawing of a portable electronic device with attached cable, earphones, and a power plug (no text or symbols)• PD908R
- Remote Control
- AC/DC Adapter
• DC Power Car Adapter
• 1-set Stereo Earbuds
- Documentation
Features
- Plays DVD-R/RW, DVD+R/RW & JPEG Discs
- Plays CD/CD-R/CD-RW Audio Tracks
• Chapter / Title Search & Select
• Supports Multiple Languages and Language Sub Titles - Zoom Feature
- Multi-Language OSD: On-Screen Display in English, French and Spanish
- Multi-Angle Play
- Still Picture & Slow Motion
- NTSC
• Built-In Speaker
• 9" TFT LCD Screen - Screen Display Swivels for adjustable viewing angle
• 16:9 Aspect Ratio
• Composite Output
• Stereo Headphone Jacks
• Video/Audio Input Jack, 3.5mm type
• Video/Audio Output Jack, 3.5mm type
• Full-Feature Remote-Uses CR2025 Button Cell Battery
- AC/DC Adapter
- Dual Voltage AC/DC Adapter, UL/CUL Listed
- Rechargeable Battery built in-Battery Life: Up to 2.5 Hours
• 1-set Stereo Earbuds
Powering the Unit
Power the unit and charge the internal battery by plugging it into a standard AC (120V - 60Hz) Outlet, using the included AC/DC Adapter, or by plugging it into the DC Power Outlet in an automobile, using the included DC Power Car Adapter.

natural_image
Technical line drawing of two electronic devices with connected cables and a separate electrical outlet (no text or symbols)Battery Information
The internal battery can be charged by using the included AC/DC Adapter, or the DC Car Adapter.
With a full charge, the internal battery can last up to 2.5 hours.
Remote Battery Information
Danger of explosion if the remote control's batteries are incorrectly installed. Replace only with the same or equivalent battery. Battery type: CR2025

Location of Controls
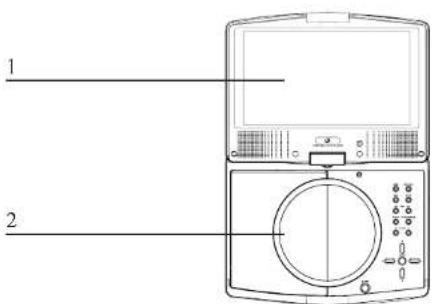

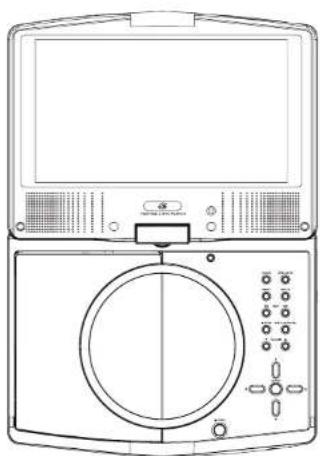
Control Definitions
1 LCD Display
9" TFT LCD Screen.
2 DVD/CD Door
Open the DVD/CD Door to expose the DVD/CD Drive.
3 Audio Button
In DVD Mode, press the Audio Button to cycle through available audio languages for a specific DVD.
4 Menu Button
Press the Menu Button in DVD Mode to access a DVD's main menu.
5 Stop Button
Press the Stop Button to stop a CD or DVD during play.
6 Volume Buttons
Press the Volume Buttons to adjust the volume of the audio output from the unit.
7 DVD/AV In Button
Press the DVD/AV In Button to switch between DVD and AV In Mode.
8 Setup Button
In DVD Mode, press the Setup Button to access the DVD Setup Menu.
9 Skip Buttons
Press the Skip Buttons to skip through the chapter or tracks of a loaded DVD or CD.
10 Play/Pause Button
Press the Play/Pause Button to play or pause a loaded DVD or CD.
11 Directional Buttons
Use the Directional Buttons to navigate through a DVD or CD.
12 Enter Button
Press the Enter Button to select media on a DVD or CD.
13 Open Button
Press the Open Button to open the DVD/CD Door.
Location of Controls

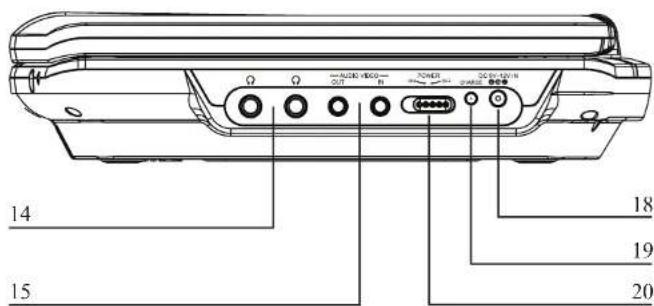
Control Definitions
14 Headphone Jacks
Connect headphones or earbuds to the Headphone Jacks to listen to the unit in private.
15 Audio/Video Input and Output
Use the Audio/Video Input and Output to connect the unit to a television, DVD Player, or other audio device. See pages 8 and 9.
16 Power Indicator Light
When the Power Indicator Light is lit green, the unit is powered on.
17 Infrared Receiver
The Infrared Receiver receives signals sent from the remote.
18 DC In (9V-12V)
Use the DC In to connect the unit to an AC Outlet or a DC Car Outlet to power the unit.
19 Charge Indicator Light
When the Charge Indicator Light blinks red, the internal battery is being charged. If the Charge Indicator Light is not blinking, the internal battery is fully charged.
20 Power Switch
Adjust the Power Switch to turn the unit off or on.
Location of Controls

Control Definitions
21 Display Button
Press the Display Button to view the on screen display and see time information on the DVD or CD that is playing.
22 DVD/AV In/Power Button
Press the DVD/AV In/Power Button to switch between DVD and AV In Mode. Press the Power Button once to turn the unit on, and press and hold the Power Button to turn the power off.
23 Volume Buttons
Press the Volume Buttons to adjust the volume of the unit.
24 Repeat A-B and 1/ALL
When playing a DVD, press the Repeat A-B and 1/All Button once to designate an "A" point. Press the Repeat A-B and 1/All Button a second time to designate a "B" point and repeat the section of DVD movie between point "A" and point "B". When playing a CD, press the Repeat A-B and 1/All Button once to repeat an individual track of a CD. Press the Repeat A-B and 1/All Button twice to repeat an entire CD.
25 Menu Button
Press the Menu Button in DVD Mode to access a DVD's main menu.
26 Subtitle Button
In DVD Mode, press the Subtitle Button to cycle through available subtitle options for a specific DVD.
27 Play Button
Press the Play Button to play a loaded DVD or CD.
28 Title Button
In DVD Mode, press the Title Button to view the title screen on a DVD.
• The Title Button will only work with compatible DVDs.
29 Audio Button
In DVD Mode, press the Audio Button to cycle through available audio languages for a specific DVD.
30 Pause/Step Button
In DVD Mode, press the DVD Pause & Step Button once to pause a DVD during play. Press the DVD Pause & Step Button consecutively to skip one frame at a time while playing a DVD.
31 Search Buttons
Press the Search Buttons to search through a DVD or an individual CD track.
Control Definitions
32 Angle Button
In DVD Mode, press the Angle Button to view alternate angles.
• The Angle Button will only work with compatible DVDs.
33 Zoom Button
In DVD Mode, press and hold the Zoom Button to zoom in and out during a DVD movie.
34 Setup Button
In DVD Mode, press the Setup Button to access the DVD Setup Menu.
35 TFT Set Button
Press the TFT Set Button to adjust the Contrast or Brightness of the TFT Display.
36 Number Keypad
Use the Number Keypad when entering numbers in for operations.
37 Wide Button
In DVD Mode, press the Wide Button to switch between a 4:3 viewing ratio and a 16:9 (wide screen) viewing ratio.
38 Stop Button
Press the Stop Button to stop a DVD or CD during play.
39 Directional Buttons
Use the Directional Buttons to navigate through a DVD or CD.
40 Enter Button
Press the Enter Button to select media on a DVD or CD.
41 Slow Button
In DVD Mode, press the Slow Button to view a DVD movie in slow motion.
42 Skip Buttons
Press the Skip Buttons to skip between DVD chapters or CD tracks.
43 Search Button
In DVD Mode, press the Search Button and type in, using the Number Keypad, a specific title and chapter number or DVD time, and go to that spot on the DVD immediately.
44 Program Button
In CD or DVD Mode, press the Program Button to program tracks or chapters and titles to play in a designated order. (See the Operations section for instructions on Programming a CD or DVD)
Setup Menu
To enter the Setup Menu, press the Setup Button on the remote control.
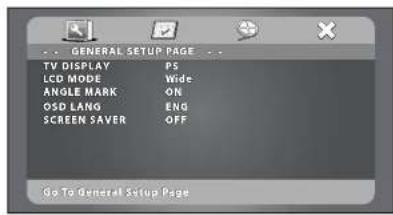
General Setup Page
TV Display - The TV Display setting is automatically locked to Wide.
LCD Mode - The LCD Mode can be switched between 4:3 (Low) or 16:9 (Wide) aspect ratios.
Angle Mark - When the Angle Mark is on, an icon will appear on-screen to indicate that DVD supports different angle views.
OSD LANG - The On-Screen-Display Language can be adjusted to English, French, or Spanish.
Screen Saver - The screen saver can be turned off or on.
Preference Page
TV Type - NTSC
Audio - Use the Audio Setting to adjust the Audio Language of a loaded DVD.
Subtitle - Use the Subtitle Setting to adjust the Subtitle Language of a loaded DVD.
Disc Menu - Use the Disc Menu Setting to adjust the Disc Menu Language of a loaded DVD.
Default - Press the default setting to adjust the preferences to their default settings.
Video Setup Page
TV Quality - The TV Quality setting allows the Brightness, Contrast, Hue, and Saturation to be adjusted for the output video signal.
LCD Quality - The LCD Quality setting allows the Brightness, Contrast, Hue, and Saturation to be adjusted for the LCD screen.
Exit
Press the Exit icon (X) to exit the setup menu.
Playing a DVD
- Press the Open Button to open the DVD/CD Drive.
- Load a DVD into the DVD/CD Drive of the unit.
The DVD will begin to play automatically. If the DVD does not begin to play automatically, press the Play/Pause Button. - Press the Play/Pause Button to play or pause the DVD.
- Press the Stop Button to stop the DVD during play.
- Press the Skip Buttons to skip backwards or forwards through the DVD's chapters. Press and hold the Skip Buttons to search backwards or forwards through a DVD.
- Press the Volume Buttons to adjust the volume of the unit.
Playing a JPEG Disc
- Press the Open Button to open the DVD/CD Drive.
- Load a JPEG disc into the DVD/CD Drive of the unit.
- Press the Play/Pause Button to play a slideshow or pause the JPEG disc.
- Press the Stop Button to stop the JPEG disc during a slideshow.
- Press the Skip Buttons to skip backwards or forwards through the JPEG disc's images.
Programming a DVD
- Insert a DVD into the unit. See the "Playing a DVD" operation on page 6.
- After the DVD is inserted and loaded, press the Program Button on the remote control to display the Program Menu.
- Use the Directional Buttons to move through the different program slots.
- Highlight a slot and enter a Title (TT) number and Chapter (CH) number using the Number Keypad on the remote control. Repeat steps 3 and 4 until the desired titles and chapters are programmed.
- Press the Enter Button to begin playing the programmed titles and chapters.

natural_image
Line drawing of a vintage kitchen appliance with front panel and control panel (no text or symbols)
Playing a CD
- Press the Open Button to open the DVD/CD Drive.
- Load a CD into the DVD/CD Drive of the unit.
The CD will begin to play automatically. If the CD does not begin to play automatically, press the Play/Pause Button.
- Press the Play/Pause Button to play or pause the CD.
- Press the Stop Button to stop the CD during play.
- Press the Skip Buttons to skip backwards or forwards through the CD's tracks. Press and hold the Skip Buttons to search backwards or forwards through a CD.
- Press the Volume Buttons to adjust the volume of the unit.

natural_image
Line drawing of a portable electronic device with a circular button and control panel, no text or symbols presentProgramming a CD
- Insert a CD into the unit. See the "Playing a CD" operation on page 7.
- After the CD is inserted and loaded, press the Program Button on the remote control to display the Program Menu.
- Use the Directional Buttons on the remote to move through the twenty different program slots.
- Highlight a slot and enter CD track numbers using the Number Keypad on the remote control. Repeat steps 3 and 4 until the desired tracks are programmed.
- Press the Enter Button to begin playing the programmed tracks.
natural_image
Line drawing of a vintage television set with front panel, screen, and control panel (no text or symbols)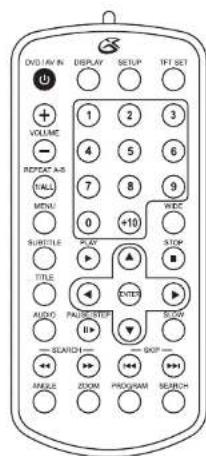
Using the Video/Audio Output
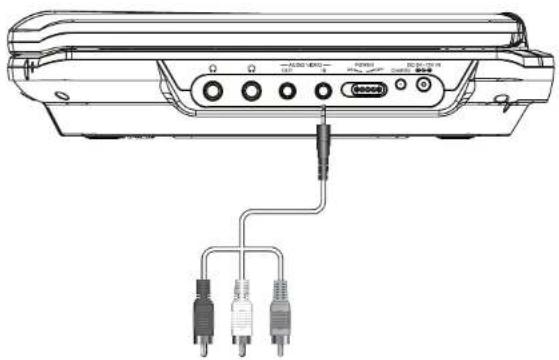
When connecting two products using an RCA Cable, match the colored ports with the same colored connection. (Red to Red, White to White, and Yellow to Yellow)
- Connect the 3.5mm - RCA Cable (not included) to the AV Output on the unit and the audio/video inputs on the Television.
- Turn the unit on by switching the Power Button to the On position.
- Change the television to the correct audio/video input setting.
- Audio and video played through the unit will now be seen and heard on the connected television.

natural_image
Line drawing of a device rear panel with three connected cables (no text or symbols)Television
Using the Video/Audio Input
When connecting two products using an RCA Cable, match the colored ports with the same colored connection. (Red to Red, White to White, and Yellow to Yellow)
- Connect the 3.5mm - RCA Cable (not included) to the AV Input on the unit and the audio/video inputs on the DVD Player, Television, or Audio Device.
- Turn the unit on by adjusting the Power Button to the On position.
- Press the DVD/AV In Button to switch between DVD and AV In Mode.
- Adjust the DVD Player, Television, or Audio Device to the correct audio/video output setting.
- Audio and video played through the DVD Player, Television, or Audio Device will now be seen and heard on the unit.
natural_image
Line drawing of a device rear panel with three connected cables (no text or symbols)DVD Player, Television, or Audio Device
Parts Information
Address: 2116 Carr Street, St. Louis MO, 63106
Phone: 1-314-621-2881
Fax: 1-314-588-1805
Email: partsinfo@dpi-global.com
Service Information
Address: 2116 Carr Street, St. Louis MO, 63106
Phone: 1-314-621-2881
Fax: 1-314-588-1805
Email: prodinfo@gpx.com
Website: www.gpx.com
Version: v. 080509
To download this Instruction Manual in English, Spanish, or French visit the Support section at www.gpx.com.


- PD908B
- INSTRUCTION MANUAL
- Contents
- Warnings and Precautions
- CAUTION: TO PREVENT ELECTRIC SHOCK, MATCH WIDE BLADE OF PLUG TO WIDE SLOT, FULLY INSERT.
- Important Safety Instructions
- In the Box
- Features
- Powering the Unit
- Battery Information
- Remote Battery Information
- Location of Controls
- Control Definitions
- Headphone Jacks
- Audio/Video Input and Output
- Power Indicator Light
- Infrared Receiver
- DC In (9V-12V)
- Charge Indicator Light
- Power Switch
- Display Button
- DVD/AV In/Power Button
- Volume Buttons
- Repeat A-B and 1/ALL
- Menu Button
- Subtitle Button
- Play Button
- Title Button
- Audio Button
- Pause/Step Button
- Search Buttons
- Angle Button
- Zoom Button
- Setup Button
- TFT Set Button
- Number Keypad
- Wide Button
- Stop Button
- Directional Buttons
- Enter Button
- Slow Button
- Skip Buttons
- Search Button
- Program Button
- Setup Menu
- General Setup Page
- Preference Page
- Video Setup Page
- Exit
- Playing a DVD
- Playing a JPEG Disc
- Programming a DVD
- Playing a CD
- Programming a CD
- Using the Video/Audio Output
- Using the Video/Audio Input
- Parts Information
- Service Information
Brand : GPX
Model : PD908B
Category : Portable DVD Player