
SDVD1566 - Portable DVD Player SYLVANIA - Free user manual and instructions
Find the device manual for free SDVD1566 SYLVANIA in PDF.


| Product Type | Portable DVD Player |
| Brand | Sylvania |
| Model | SDVD1566 |
| Display | High-definition TFT LED screen |
| Disc Compatibility | DVD, VCD, MPEG4, CD, MP3, CD-R, DVD-RW, JPEG |
| Playback Features | Play, pause, fast forward, fast rewind, slow motion, zoom, A-B repeat |
| Aspect Ratio | 16:9 and 4:3 selectable |
| Media Inputs | USB port, SD/MMC card slot |
| Video Output | 1 Vp-p 75 Ohm unbalanced (AV out) |
| Audio Output | 1.4V RMS / 10 kOhm (headphone jack, AV out) |
| Power Source | DC 12V (via AC adapter or car adapter); built-in Li-polymer battery |
| Battery Type | Lithium-polymer rechargeable |
| Battery Life | Up to 2 hours |
| Charging Time | Approximately 6 hours |
| Dimensions | Approx. 20.0 x 15.0 x 3.5 cm (estimate) |
| Weight | Approx. 0.8 kg (estimate) |
| Remote Control | Included, with full function buttons |
| Accessories Included | AC adapter, car adapter, remote control, earphone, AV cable, instruction manual |
| Safety Features | Overcharge protection, temperature monitoring, automatic shutdown |
| Maintenance | Clean exterior with damp cloth; avoid liquids; handle discs by edges |
| Operating Temperature | 5°C to 40°C |
| Country of Origin | China |
Frequently Asked Questions - SDVD1566 SYLVANIA
User questions about SDVD1566 SYLVANIA
0 question about this device. Answer the ones you know or ask your own.
Ask a new question about this device
Download the instructions for your Portable DVD Player in PDF format for free! Find your manual SDVD1566 - SYLVANIA and take your electronic device back in hand. On this page are published all the documents necessary for the use of your device. SDVD1566 by SYLVANIA.
USER MANUAL SDVD1566 SYLVANIA
IMPORTANT SAFETY INSTRUCTIONS
When using electronic equipment, basic safety precautions should be followed, including the following: WARNING: To reduce the risk of electric shock, fire or injury to persons:
- Read all instructions before using the unit.
- Use this unit only for its intended use as described in this manual.
-
Do not operate this unit if it has a damaged cord or plug, is not working properly or has been damaged or dropped. If the supply cord is damaged, it must be replaced by the manufacturer or its service agent or a similarly qualified person in order to avoid a hazard.
-
WARNING: Do not allow children to use the unit without supervision.
-
WARNING: Liquids and foodstuffs must not be spilled or dropped into the unit.
-
WARNING: It is hazardous for anyone other than a trained person to carry out any service or repair operation.
-
This unit is not intended for use by persons (including children) with reduced physical, sensory or mental capabilities, or lack of experience and knowledge, unless they have been given supervision or instruction concerning use of the product by a person responsible for their safety.
-
Children should be supervised to ensure that they do not play with the unit.
-
Never leave the product unsupervised. Switch off the product when it is not in use, even if this is only for a short while.
-
The unit must be free-standing. It must not be placed in a cabinet.
-
The temperature of accessible surfaces may increase when the unit is operating.
-
This unit is not intended to be operated by means of an external timer or separate remote control.
-
If smoke is emitted, switch off and unplug the unit immediately.
-
Cleaning: Unplug this product from the wall outlet before cleaning. Do not use liquid cleaners or aerosol cleaners. Use a slightly dampened cloth for cleaning and immediately wipe dry.
-
Attachments: Use only attachments recommended by the manufacturer. Use of other attachments may be hazardous.
-
Water and Moisture: Do not use this product near water (e.g., near a bath tub, washbowl, kitchen sink, laundry tub, in wet basements, or near a swimming pool and the like).
-
Ventilation: Slots and openings in the cabinet are provided for ventilation to ensure reliable operation of the product and to protect it from overheating. These openings should never be blocked by placing the product on a bed, sofa, rug, or other similar surface. This product should not be placed in a built-in installation such as a bookcase or rack unless proper ventilation is provided.
-
This unit must not be exposed to dripping or splashing and objects filled with liquids, such as vases, must not be placed on the apparatus.
-
Replacement Parts: When replacement parts are required, be sure that your service technician has used replacement parts specified by the manufacturer or that have the same characteristics as the original part. Unauthorized substitutions may result in fire, electric shock, or other hazards.
-
Safety Check: Upon completion of any service or repairs to this product, ask the service technician to perform safety checks to ensure that the product is in proper operating condition.
-
Overloading: Do not overload wall outlets, extension cords, or integral convenience receptacles as this may cause a fire or an electric shock.
-
When the AC/DC adapter is used as the disconnect device, the disconnect device must remain readily operable. To completely disconnect the power input, the AC/DC adapter must be completely disconnected from the mains.
CONTENTS
TABLE OF CONTENTS....1
PRECAUTIONS AND WARNINGS 2
PACKAGE CONTENTS 3
FRONT/REAR PANEL....4
REMOTE CONTROL 5
PANEL KEYS....6
KEY FUNCTIONS....7
GENERAL SETUP....9
SYSTEM SETUP....12
PLAYBACK....13
SPECIFICATIONS....14
TROUBLESHOOTING 15
Please read through this manual before making connections and operating your unit.
Please retain this manual for future reference.
This unit is small, lightweight and utilises the latest state of the art electronics. It is easy to install, conveniently portable and may be used at home, in the office or on holiday.
Features
• High-definition TFT LED screen
Headphone jack
• USB/MMC/SD card slot
• Compatible with DVD, VCD, MPEG4, CD, Mp3, CD-R, DVD-RW, JPEG, etc.
• Supports playback control : play , pause, fast forward playback , fast rewind playback ,etc
• Two optional aspect ratios 16:9 and 4:3
• Working voltage : DC 12V
PRECAUTIONS AND WARNINGS
1. Placement:
• To prevent fire or shock hazard, do not expose this appliance to rain or moisture.
• Do not expose this appliance to direct sunlight.
- Keep this appliance away from strong magnets, heat sources and excessive dust.
• Do not place this appliance on an unstable surface.
- If the unit is brought directly from a cold place to a warm one, moisture may condense inside the unit and cause a malfunction. If this occurs leave the unit turned on for a few hours until the moisture evaporates.
2. Installation:
Ensure that the portable DVD player is installed according to the instructions and illustrations provided in this manual.
3. Caution:
• Do not drop any objects into the unit through the openings.
• Do not spill or spray liquid of any kind on or in the unit (this may result in a fire or electric shock).
• Do not place anything heavy on the unit.
- To ensure proper ventilation and proper operation, never cover or block the slots and openings with a cloth or other materials.
- Keep the unit away from open flames such as fire, candles etc.
• Install the batteries correctly as incorrect replacement is hazardous.
- Dispose of batteries in accordance with local regulations.
• The maximum working temperature is 95 degrees fahrenheit or 35 degrees celsius.
4. No Disassembling:
Never attempt to disassemble the unit as this is very dangerous and may cause an electric shock and/or harm from exposure to the laser beam.
Please refer all servicing and maintenance to an authorised service centre.
5. Cleaning unit:
1) When cleaning, please make sure the unit is unplugged from the power source.
2) Do not use chemicals or detergents when cleaning.
3) Use a soft cloth lightly dampened with water to clean the exterior of the unit only and immediately wipe dry.
6. Disc handling:
• Do not leave discs near heat sources, in direct sunlight, or in high humidity.
• Store discs in their cases when they are not being used.
- Stacking discs or standing them at an angle without putting them in the case can cause the disc to warp.
• Do not touch the disc surface when handling a disc; hold it by the edges.
- Fingerprints, dust, dirt or scratches on the disc can distort the picture or reduce sound quality. Always handle carefully and make sure discs are clean before use.
• Do not stick paper or tape onto the disc.
- Do not write on the disc with a marker etc. Clean discs using a soft cloth, lightly wiping from the centre outwards.
- Do not use solvents such as benzene, commercially available cleaners not intended for CDs or anti-static spray intended for vinyl LPs, as these may damage your disc.
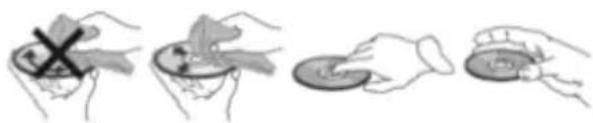
natural_image
Illustration of four hands holding circular objects with a cross mark, no text or symbols presentCleaning and handling the disc
NOTE:
Do not use or leave the device in direct sunlight or a hot environment such as a vehicle etc. that is in hot environment. Overheating can damage the device
- Do not overcharge the device – do not leave the device on the charger for very long after the battery has been fully charged
- Device should be protected from any physical impact or damage and care should be taken not to drop the device
- Only use the factory supplied charger. The use of unapproved charger or cable may cause the battery to fail, explode and/or damage the device.
- Do not disassemble, puncture, crush or expose your device to temperatures above 40 °C / 104 °F
- Keep your device away from fire or water.
- Keep your device from moisture and extreme temperatures.
- Should your battery swell or expand, please immediately discontinue use of your device.
A probable cause is it having been overheated at some point or overcharged. Please contact us for support.
PA CKAGE CO N T ENT S
- AC ADAPTOR
2.REMOT E CONTROL
3.EARPHONE
4.AV CAB LE
5.C AR A DAPTOR
6.INSTRU CTION MANUAL
FRONT/REAR PANEL:
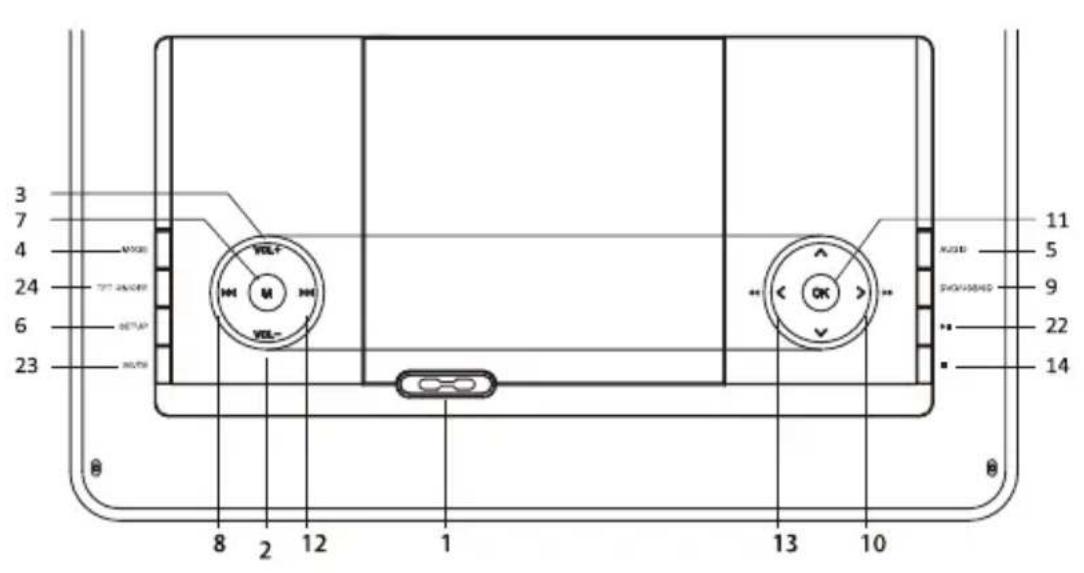

- OPEN
- PREV
- DC IN
- PLAY
- VOL -
- DVD/USB/SD
- POWER ON/OFF
- MUTE
- VOL +
- FWD
- AV IN
- DISPLAY ON/OFF
- MODE
- OK
- AV OUT
5.LCD MENU(AUDIO) - NEXT
- EARPHONE SOCKET
- SETUP
- REV
- SD/MMC CARD SLOT
- MENU
- STOP
- USB PORT
REMOTE CONTROL:
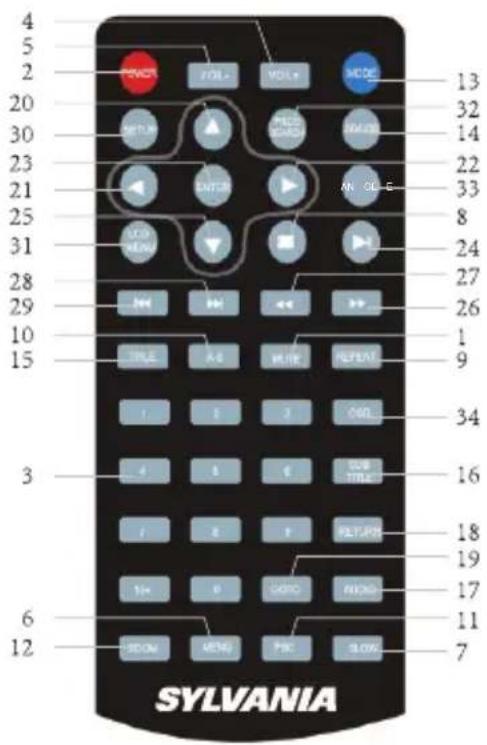
- MUTE 18. RETURN
- POWER 19. GOTO
3.0-9, 10+ NUMBERS 20. UP ▲ - VOL + 21. LEFT
- VOL - 22. RIGHT ▶
- MENU 23. PLAY ENTER
- SLOW 24. PAUSE II
- EXIT STOP 25. DOWN ▼
- REPEAT 26. FWD
- A-B 27. REV
- PBC 28. NEXT
- ZOOM 29. PREV
- MODE 30. INFO/SETUP
- SD/USB 31. LCD MENU
- TITLE 32. PROG SEARCH
- SUBTITLE 33. ANGLE
- AUDIO 34. OSD
PANEL KEYS
Common key functions on the panel:
Menu
Press to return to the root menu for DVD.
Stop
Press to suspend current broadcast.
Play/Pause
Press once to pause play, press again to resume.
Setup
Press to enter the setup menu, then use the direction keys and OK to set the system menu.
USB/SD
Press repeatedly to switch input source: Disc/ SD card/USB mode
Direction Keys
Use direction keys for: Previous/Next/Fast forward/ Fast rewind
OK
Press to enter the selected item or choice.
Open
Press to open the door.
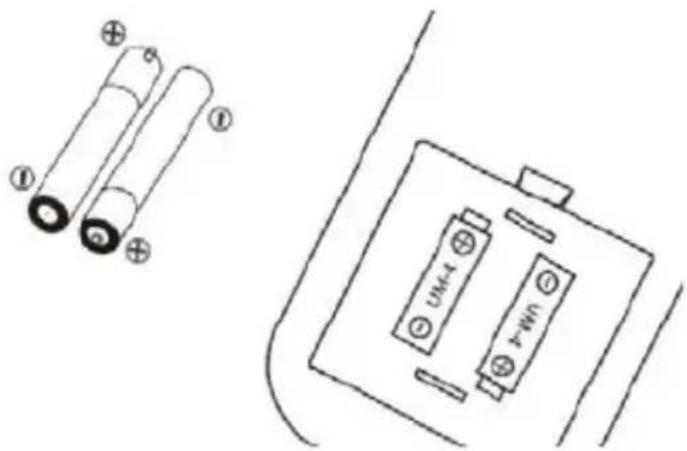
Battery Installation and replacement
* Unscrew battery cover and remove.
* Properly dispose of exhausted batteries.
* Insert 2 new AAA batteries (not included).
* Be sure the positive(+) and negative (-) ends of the batteries are facing the correct direction.
* Replace the battery cover.
* Do not mix old and new batteries.
* Do not mix alkaline, standard (carbon-zinc) or rechargeable (nickel-cadmium) batteries.
KEY FUNCTIONS
Note: Some of the following buttons are only on the remote, some are only on the unit and some are on both the unit and the remote.
Switch on / off the unit
Press repeatedly to switch between Disc, SD card, USB source input.

Press to enter/exit the setup menu.
The digit keys can be used to input numbers or to select a track or chapter number.

Press to enter an item in the menu or to confirm and execute a selection.

The direction keys can be used to move the highlight in the menu.

Press button to switch to DVD or AV INPUT.

Press to switch repeat modes. (Note: This function is invalid when the PBC function is activated.)

Use to repeat specific sections of a disc. Press this button to mark the starting point(A) and press it again to mark the ending point(B) and the unit will play the selected section over and over again. Press a third time to cancel A-B repeat and resume normal playback. (Note: Points A and B must be in the same title/track).

Skip to the previous chapter/track.

Skip to the next chapter/track.

Press to start a playback or resume normal playback from fast forward, fast reverse, slow-motion, frame-by-frame playback, etc.

Press to temporarily pause a playback; press again or press ▶ to resume the playback.

Press once to pause a playback, then press ■ to continue the playback. Press twice to stop a playback and the disc will reset to the starting point.

Fast forward playback. Available speeds: 2x, 4x, 8x, 16x, 32x and normal speed.

Fast reverse playback. Available speeds: 2x, 4x, 8x, 16x, 32x and normal speed.

Press to enter the TIME menu. Use the digit keys to select a title, chapter, track, track time or disc time to play. Press again to exit the TIME menu.

Press this button to temporarily switch off the sound. Press it again to switch it on.
Press VOLUME+ to turn up the volume. Press VOLUME- to turn down the volume.

Press repeatedly to select the available audio languages provided by the disc (for DVD). Press repeatedly to switch the available audio channels provided by the disc (for VCD)

Press to return to the main menu when playing DVD.

Press repeatedly to switch/show the subtitles or turn off the subtitle function. (Note: this function only works if the disc is encoded with subtitles.)

Press repeatedly to switch or hide the relative information of the playing disc.

Press this button to zoom in the scene. The available zoom ratios are: 2x, 3x and 4x. In zoomed-in mode, the direction keys can be used to move the zooming centre (Note: Applies to DVD, VCD, MPEG4, etc).

Press "REV" to search backward, "FWD" to search forward.
GENERAL SETUP
CHARGING THE UNIT
This player is powered by a lithium-polymer battery. It features a high ratio of energy to weight. It has no memory effect and it can be recharged at any time regardless of whether it is fully or partially discharged. It takes about six hours to fully charge the battery and a fully charged battery can be used for up to two hours.
Connect the attached AC/DC adaptor to the DC INPUT jack on the unit, then plug the adaptor into a 100-240V AC outlet.
Note: Make sure to switch off the unit before charging. The charging indicator LED will change from RED to GREEN to indicate that the battery has been fully charged.
Usage and Maintenance of the rechargeable battery.
- The working temperature of the rechargeable battery ranges from 0 °C to 45 °C
- Always unplug the unit when it is not being used unless it is being charged.
- Heat is inevitably produced during playback, this is normal. However switch off and allow it to cool down.
- Avoid banging the battery and keep it away from heat and moisture.
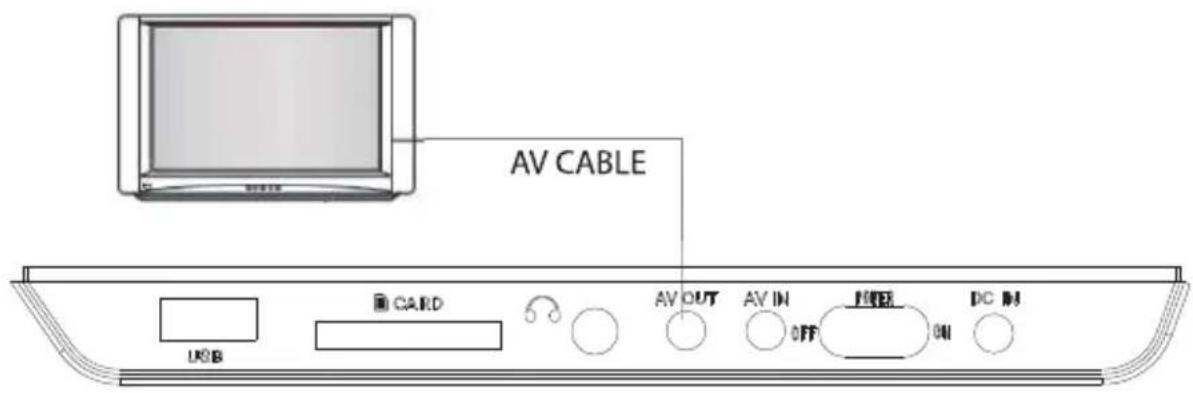
CONNECTING TO THE TV
This unit can be connected to a TV in order to enjoy high quality music, movies etc with a TV. Use an AV cable to connect the AV OUT jack on the unit to the AV IN jack of a TV. DVD player has sound and video input jacks for connecting external audio and video inputs.
Menu Operation
- Press [SETUP] on the remote control or on the unit to show the setup menu.
- Press [LEFT]/[RIGHT] to select an item. The submenu of the selected item will be instantly shown.
- Press [UP]/[DOWN] to select an item in the submenu, then press [OK]/[ENTER]/[RIGHT] to enter. Use [UP]/[DOWN] to select an option, then press [OK]/[ENTER] to confirm or press [LEFT] to cancel.
- Press [UP]/[DOWN] to continue to set other items in the submenu.
- Press [LEFT] to go back to the superior menu of the current one.
- Press [SETUP] again and press [ENTER]/[OK] to exit the setup menu.
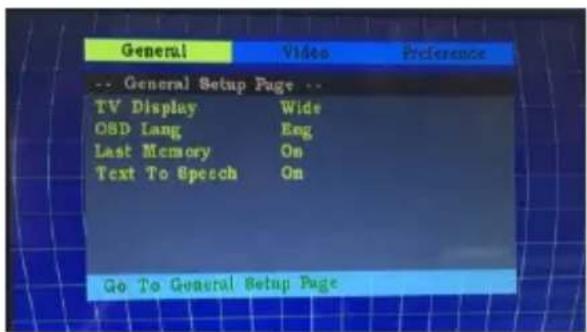
1. GENERAL SETUP PAGE
There are four items in the GENERAL SETUP PAGE. They are TV DISPLAY, OSD LANGUAGE, LAST MEMORY, Text To Speech.
1.1 TV DISPLAY
4:3 PANSCAN
If the unit is connected to a conventional TV set, a wide-screen image will be displayed on the screen in its native aspect ratio with some part on the left and right cut off.
4:3 LETTERBOX
If the unit is connected to a conventional TV set, a wide-screen image will be displayed in its native aspect ratio with black borders on the top and on the bottom.
16:9 WIDE:
Select this option if the unit is connected to a wide-screen TV set. A wide-screen image will be displayed in full screen in its native aspect ratio while the 4:3 image will be stretched out horizontally to fit the screen.
1.2 OSD(on-screen display)language
Set the on-screen display language in this item.
1.3 LAST MEMORY
ON: Each time you turn off the unit or stop the disc, it will memorize the last play time. Next time you turn on the unit and play the same disc, the unit will play from that memorized point.
OFF: Disable the last memory function.
1.4 TEXT TO SPEECH
ON: set this on, it will speech when you press any buttons.
OFF: Disable the text to speech function.
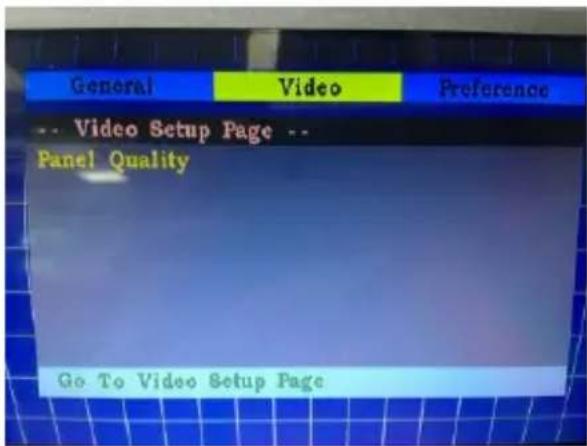
2. VIDEO SETUP PAGE
This menu is used to set up the picture quality of the unit.
3.1 QUALITY
Adjust items according to your personal preference.
3.1.1 SHARPNESS
There are three options (HIGH, MEDIUM and LOW) for you to choose in this item.
3.1.2 BRIGHTNESS AND CONTRAST
Enter an item and use the direction keys [LEFT] /[RIGHT] to adjust the value, then press [ENTER] to confirm.
SYSTEM SETUP
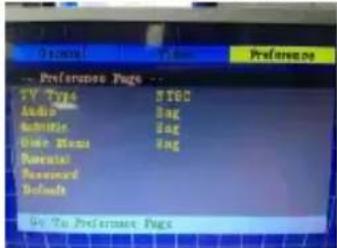
4. PREFERENCE SETUP
If there is no disc in the disc tray, the disc tray is open or the disc in the disc tray is stopped, this item is available.
4.1 TV TYPE
Press to change TV TYPE (NTSC/AUTO/PA L)
4.2 AUDIO, SUBTITLE and DISC MENU
Select a preferred audio language, subtitle language and disc menu language in these items.
You can also change the audio language by pressing [AUDIO] and the subtitle language by pressing [SUBTITLE] on the remote control.
NOTE: If the selected languages in these items are not available for the currently playing disc, the disc will be played in the default settings.
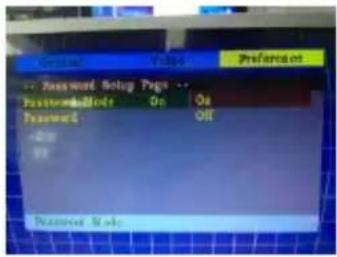
4.3 PARENTAL
This item allows the user to set a maximum rating for the movies that can be viewed. Movies rated higher than the level set for the parental lock cannot be viewed without inputting the correct password.
To reset the level, the correct password must be entered. The default password is 0000.
NOTE: This function only works for discs that have parental control function.
4.4 DEFAULT
Press to restore the default settings except the settings in the PASSWORD setup page and the PARENTAL item.
5. PASSWORD SETUP PAGE
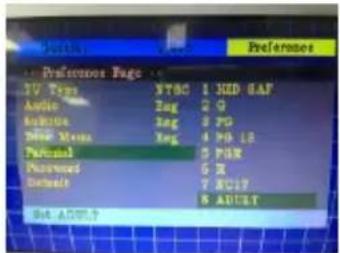
5.1 PASSWORD MODE
Switch password function ON/OFF.
NOTE: Key in the correct password and press [ENTER] before you change the option in this item.
The default password is 0000.
5.2 PASSWORD
Reset the password.
The default password is (0000) to change the parental level.
PLAYBACK
After all the connections are correctly made, switch on the unit.
Loading and Playing a Disc
A. After connecting power to the unit, set the power switch to the ON position.
B. Push[OPEN] to open the disc tray. Place a disc in it with the label side facing up.
C. Close the disc tray. The unit will load the disc and start playing.
MP3/MPEG4 Disc Playback
After the unit loads a MP3/MPEG4 disc, a menu showing the contents of the disc will display on the screen.
- Press the direction key [UP]/[DOWN] to select a file or a folder.
2.1 Press [OK] to enter the selected folder. The file or the folder in it will be listed instantly.
2.2 Press [OK] to begin to play the selected file.
- When the disc is stopped press [LEFT] to return to the superior menu.
Insert a U drive or a card reader into the USB port. Press [USB/SD from the remote or DVD/USB/SD from the DVD] to select USB mode to play the readable files in it. insert a SD/MMC card into the S D/MMC card port. Press [USB/SD from the remote or DVD/USB/SD from the DV D] to select MCR mode to play the readable files in it.
SPECIFICATIONS
| Compatible discs | DVD/CD/MP3/MPEG4 |
| Frequency response | 20HZ to 20KHZ |
| Video output | 1 Vp-p75 Ohm unbalanced |
| Audio output | 1.4V Rms/ 10 K Ohm |
| Dynamic range | Better than 85dB |
| Laser | Semi-conductor laser, Wavelength: 650 |
| Power source | DC 12V |
| Operating temperature | 5-40 |
| Battery type | Li-polymer |
TROUBLESHOOTING
Before resorting to maintenance service, please check the following chart.
| Symptom | Solution |
| No sound or distorted sound | Make sure your DVD is connected properly and all cables are securely inserted into the appropriate jack. |
| Cannot advance through a movie | You can not advance through the opening credits and warning information that appears at the beginning of movies because the disc is programmed to prohibit that action. |
| The icon 🎨 appears on screen | The feature or action cannot be completed at this time because:1. The disc software restricts it2. The disc software does not support the feature3. The feature is not available at the moment |
| Picture is distorted | The disc might be damaged. Try another disc.It is normal for some distortion to appear during forward or reverse scan. |
| No forward or reverse scan | Some disc have a section that prohibits rapid scanning or title and chapter skip.The movie is often programmed to prohibit skipping through the warning information and the credits at the beginning of a movie. |
| The player breaks down when a U drive or memory card is inserted into the player | The connected U drive or the memory card is probably not an original version.The player cannot play a U drive or memory card of a non-original version.If the player breaks down, turn it off and unplug it from the power supply.Reconnect it to the power supply and switch it on again. The player will resume normal status. |
WARRANTY EXCLUSIONS
The warranty will not be valid if:
- The product has not been installed, operated or maintained in accordance with the manufacturers operating instructions provided with the product.
- The product has been used for purposes other than its intended function.
3.The product has been used for purposes other than household use. -
The damage or malfunction of the product is caused by any of following conditions:
-
Incorrect voltage
• Accidents (including liquid or moisture damage)
• Misuse or abuse of the product
• Faulty or improper installation
• Mains supply problems including power spikes or lightning damage
• Infestation by insects
• Tampering or modification of the product by persons other than authorised service personnel
• Exposure to abnormally corrosive materials
• Insertion of foreign objects into the unit
• Used with accessories not pre-approved
Please refer to and heed all warnings and precautions in the User Manual.
Made in China
- IMPORTANT SAFETY INSTRUCTIONS
- CONTENTS
- Features
- PRECAUTIONS AND WARNINGS
- Placement:
- Installation:
- Caution:
- No Disassembling:
- Cleaning unit:
- Disc handling:
- NOTE:
- PA CKAGE CO N T ENT S
- PANEL KEYS
- Battery Installation and replacement
- KEY FUNCTIONS
- GENERAL SETUP
- CHARGING THE UNIT
- Usage and Maintenance of the rechargeable battery.
- CONNECTING TO THE TV
- Menu Operation
- GENERAL SETUP PAGE
- TV DISPLAY
- 4:3 PANSCAN
- 4:3 LETTERBOX
- 16:9 WIDE:
- OSD(on-screen display)language
- LAST MEMORY
- TEXT TO SPEECH
- VIDEO SETUP PAGE
- QUALITY
- SHARPNESS
- BRIGHTNESS AND CONTRAST
- SYSTEM SETUP
- PREFERENCE SETUP
- TV TYPE
- AUDIO, SUBTITLE and DISC MENU
- PARENTAL
- DEFAULT
- PASSWORD SETUP PAGE
- PASSWORD MODE
- PASSWORD
- PLAYBACK
- Loading and Playing a Disc
- MP3/MPEG4 Disc Playback
- TROUBLESHOOTING
- WARRANTY EXCLUSIONS
Brand : SYLVANIA
Model : SDVD1566
Category : Portable DVD Player