
TK30 - Car kit MOTOROLA - Free user manual and instructions
Find the device manual for free TK30 MOTOROLA in PDF.


| Product Type | Car Handsfree & Music Kit |
| Brand | Motorola |
| Model | TK30 |
| Category | Car Kit |
| Power Supply | 12V DC negative ground, <10A |
| Audio Amplification | True 4-channel |
| Bluetooth Profiles | HFP, A2DP, AVRCP (v1.3+) |
| Multipoint Connection | Up to 2 phones simultaneously |
| Supported Music Sources | Bluetooth, iPod/iPhone, USB, Auxiliary (3.5mm) |
| Audio Format Support | AAC, M4A, MP3, WMA |
| Display | User Interface Module (UIM) with backlit screen |
| Microphone | External, wired, clip/velcro/screw mount |
| Text Message Support | Read aloud and quick reply (phone dependent) |
| Call Management | Answer, reject, hold, swap, mute, DTMF, privacy mode |
| Installation | Professional installation recommended |
| Compatibility | iPod, iPhone, MP3 players, USB drives, Bluetooth devices |
| Operating Temperature | -10°C to 60°C (accessory), charge 0°C to 45°C |
| Safety Certifications | CE, FCC Part 15B |
| Manual Number | 68014301013 |
| User Interface | Scroll knob, menu/play/pause/call buttons |
Frequently Asked Questions - TK30 MOTOROLA
User questions about TK30 MOTOROLA
0 question about this device. Answer the ones you know or ask your own.
Ask a new question about this device
Download the instructions for your Car kit in PDF format for free! Find your manual TK30 - MOTOROLA and take your electronic device back in hand. On this page are published all the documents necessary for the use of your device. TK30 by MOTOROLA.
USER MANUAL TK30 MOTOROLA
Your Motorola TK30 Music & Handsfree Car Kit is a professionally installed system dedicated to hands-free conversation and music enjoyment. Following your installation, you can enjoy:
- Premium Audio—The TK30 includes true 4-channel audio amplification to drive your car's speakers for rich, loud audio performance.
- Plugging In Your Music—The TK30 is compatible with iPod®, iPhone®, MP3 players and offers a USB connection to play your personal music collection through your car's vehicle entertainment system. You can also stream music via Bluetooth to your TK30 from a compatible music device.
- Advanced Multipoint System—Allows you to connect two phones at the same time and allows you to place a call on hold while receiving a new incoming call from your second phone.
- Convenient Text Messaging—The TK30 smartly "speaks" incoming text messages and provides the convenience of a quick response with the touch of a button.
Note: Text message readout is not supported for all TK30 display languages or by all phones.
Contents
Contents 2
Installation 3
Before you begin. 3
Install the vehicle
integration kit 3
Connect the audio cable(s) ..... 4
Set install preferences ..... 11
Selective mute feature ..... 12
Basics.... 13
Buttons and scroll knob ..... 13
Home screen 13
Icons 14
Text prompts 15
Pair & connect.... 16
Pair to Bluetooth devices ..... 16
Connect to devices ..... 16
Set Bluetooth
device preferences ..... 17
Calls 18
Receive a call.... 18
Make a call 18
While on a call 19
Swap phones.... 21
Music 22
From a Bluetooth device ..... 22
From an iPod/iPhone 23
From a USB storage device....23
From an auxiliary device ..... 24
Control your music 24
Volume 24
Set music preferences ..... 25
Phonebook 25
Synchronize contacts
from your phone 25
Messages.... 26
Read new messages..... 26
Read existing messages ..... 26
Reply to message 26
Call message sender..... 26
Preferences. 27
Set user preferences ..... 27
Set audio prompt preferences..27
Set display preferences ..... 27
View software version ..... 27
Safety, Regulatory & Legal.....28
Installation
Before you begin
Caution: Only qualified personnel should install this car kit. Because of the wide variety of vehicle types and models, it may be necessary to contact the vehicle manufacturer for detailed installation information.
Caution: An air bag inflates with great force. Do not place objects, including communication equipment, in the area over the air bag or in the air bag deployment area. If the communication equipment is improperly installed and the air bag inflates, serious injury could occur. If needed, contact the vehicle manufacturer for air bag information specific to the vehicle.
Please follow these guidelines:
- Mount components securely on strong surfaces to prevent shifting that could cause injury or interfere with safe vehicle operation. Use the supplied mounting hardware as needed.
- Mounted components and attached wires or cables must not interfere with seating or leg space.
- Route cables so they are protected from pinching, sharp edges and crushing. Keep all in-line connectors easily accessible.
- The car kit is intended for use in 12 Volt negative ground systems only. The car kit draws less than 10 Amps. Confirm that the vehicle's electrical system can supply this current.
Install the vehicle integration kit
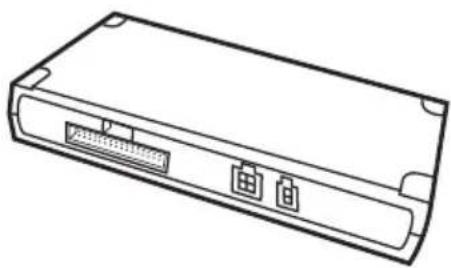
The vehicle integration kit is the central connection point for the car kit. Connections to the vehicle, microphone, audio input device, and user interface module (UIM) are made from the vehicle integration kit.
natural_image
Line drawing of a rectangular electronic device with two ports and a central connector (no text or symbols)The vehicle integration kit should be secured to the vehicle after the rest of the car kit components are installed and cables are secured
Installation
Mount the vehicle integration kit securely. The best location for the kit is under the dashboard. The kit should be protected from dirt and moisture, have adequate space for cooling, and allow for cable connections.
Caution: The User Interface Module (UIM) should be connected before vehicle power is applied to the vehicle integration kit, otherwise damage may occur.
Caution: The location must not interfere with the vehicle's air bag.
The vehicle integration kit consists of these connectors:

Installation
Connect the audio cable(s)
Use the audio cable(s) to connect the car kit to your music input device(s). You can connect:
- an iPod/iPhone
- a USB storage device with music (AAC, M4A, MP3, and WMA audio files are supported)
• a music device with 3.5mm headphone jack
To connect the audio cable:
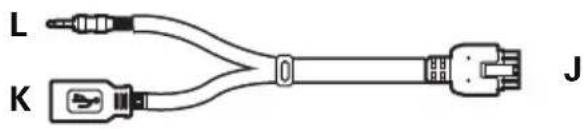
1 Connect cable connector J to vehicle integration kit connector D (shown on page 4).
natural_image
Pure electrical connector diagram showing two labeled terminals L and K connected to a terminal connector J (no text or symbols beyond labels)2 Connect your music device to the audio cable(s):
- To play music from a USB storage device connect cable connector K to the USB storage device.
Note: Only one USB device at a time can be connected to your car kit.
- To play music from an auxiliary device, connect cable connector L to the 3.5mm headphone jack on the auxiliary music device.
- Connecting or disconnecting your music player from the Auxiliary input while that source is selected on your TK30 could result in a short static or pop noise.
- To play music from an iPod/iPhone, use the second audio cable (supplied):
1 Connect cable connector O to the iPod/iPhone.

2 Connect cable connectors K and L on first audio cable to connectors M and N on second audio cable.

Note: Route the cable so the USB connector and the 3.5mm connector are accessible to the end user.
Mount and connect the user interface module Use the User Interface Module (UIM) to operate your car kit.

natural_image
Line drawing of a handheld electronic device connected to a USB cable (no text or symbols)Installation
The UIM can be mounted in two different configurations:
- directly on a flat spot within easy reach of the driver using the supplied mounting tape
• using the supplied mounting bracket.
Caution: Do not mount in a location that obstructs driver's vision or interferes with operation of the vehicle.
For optimal adhesion to the vehicle dashboard:
- Ensure the adhesive and the dashboard surface are warm (temperature above 15^ C). For better adhesion in cold conditions, ensure the vehicle interior and adhesive are heated for 30 minutes before applying the adhesive, and 30 minutes after applying the adhesive.
- Prepare the dash surface with an appropriate adhesion promoter. Test the cleaner on a small, inconspicuous area of the mounting surface to ensure it does not result in blemishing. The surface must be completely dry before moving to the next step.
- Position and install the mount with the supplied adhesive.
- Optimal curing time at room temperature is 24 hours, and in cold conditions the adhesive needs 48 hours to properly cure.
Direct to flat surface
To install the UIM directly on a flat service:
Note: It is recommended to install the UIM directly on a flat surface as a curved surface can cause difficulties in pushing the buttons, and can cause the UIM to come loose.
Caution: The location of the UIM must not interfere with the vehicle's air bag deployment.
1 Clean mounting surface thoroughly with an alcohol wipe (not supplied).
2 Select UIM orientation (controls on left or right of display).

natural_image
Line drawing of a handheld electronic device with a circular button and scroll (no text or symbols)optimal for right-handed operation

natural_image
Line drawing of a handheld electronic device with a circular lens and rectangular body (no text or symbols)optimal for left-handed operation
Note: To change screen display orientation, see "Set install preferences" on page 11.
3 Remove adhesive backing from and press key tabs (supplied) onto UIM:
- Place key at top position.
- Place \ key at bottom position.
4 Verify cable is fitted into a groove on the back of the UIM. The cable must be contained in the slot to provide a flat surface for mounting.
5 Connect cable connector P (shown on page 5) to the vehicle integration kit connector B (shown on page 4).
6 Remove one side of mounting tape (supplied) and press firmly onto rear of the UIM.
7 Remove other side of mounting tape and attach UIM to flat spot location on your vehicle.
Use mounting bracket
To install the UIM using the mounting bracket:
Caution: The location of the UIM must not interfere with the vehicle's air bag deployment.
1 Clean mounting surface thoroughly with an alcohol wipe (not supplied).
2 Select UIM orientation (controls on left or right of display).
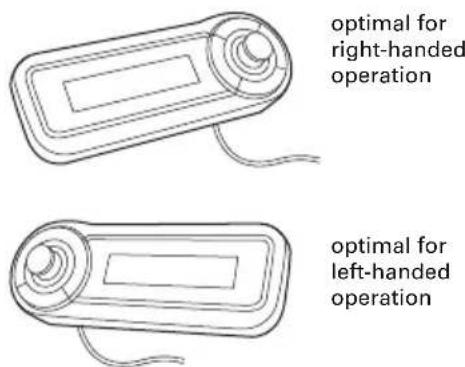
Note: To change screen display orientation, see "Set install preferences" on page 11.
3 Remove adhesive backing from and press key tabs (supplied) onto UIM:
- Place key at top position.
- Place \ key at bottom position.
4 Verify cable is fitted into a groove on the back of the UIM. The cable must be contained in the slot to provide a flat surface for mounting.
5 Connect cable connector P (shown on page 5) to the junction box connector B (shown on page 4).
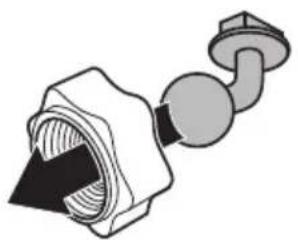
6 Place mounting nut (straight or curved) onto selected mounting arm.
natural_image
Diagram of a mechanical component with internal layered structure and connecting pipe (no text or symbols)7 Push arm into mounting base, and fasten onto base using mounting nut.
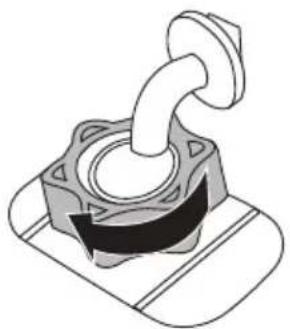
natural_image
Mechanical component diagram showing a knob and base plate assembly (no text or symbols)8 Slide mounting bracket onto arm.

9 Attach mounting base to flat spot location on your vehicle.
10 Attach one side of mounting tape (supplied) to back of mounting bracket.
11 Remove other side of mounting tape on bracket, and press the UIM firmly into place.
Install the microphone
Caution: The location of the microphone and microphone cable must not interfere with the vehicle's air bag deployment. In particular, side airbags located with the windshield pillar or door jamb.
1 Mount the microphone in a suitable location using either the screw, velcro, or clip (supplied).
- For optimal hands-free performance, mount the microphone on the overhead console/dome light assembly near the front center of the vehicle, away from the window, pointed toward the driver's mouth.
- Locate the microphone no more than 16 inches (40 cm) from the driver.
- Do not allow anything (such as a rear-view mirror or sun visor) to block the path between the microphone and the driver.
- Mount the microphone firmly so that vibrations do not affect audio quality.
- Refrain from locating the microphone directly in the path of heat/AC vents.
- Refrain from mounting the microphone on door pillars or windows that can transmit exterior wind noise to it.
- Do not attach microphone to the vehicle's visor.
2 Route the microphone cable down the side of the windshield, through the dash, and to the vehicle integration kit.
3 Connect the microphone to the vehicle integration kit connector C (shown on page 4).
Connect the ISO cable
Use the ISO cable to connect the car kit to your vehicle. It connects the vehicle's power, ignition, and entertainment system to the car kit.

Installation
Install third-party vehicle specific adapter harness (if needed)
Some vehicles require a vehicle-specific adapter harness (not supplied) that allows integration of the harness into the vehicle entertainment system. The connectors on the ISO cable are designed to connect directly to such a third-party harness. If you choose to use a vehicle-specific harness, follow the guidelines provided with that harness.
Install the ISO cable
Failure to follow these steps may result in product malfunction or damage.
1 Disconnect battery from vehicle.
Caution: Removing battery power may set trouble codes that can only be reset by a factory diagnostic tool on some vehicles. Please check with your vehicle manufacturer if you are unsure how your vehicle may react.
2 Disconnect appropriate connections on the vehicle entertainment system to allow installation of the ISO cable (and adapters, if needed).
3 Connect cable connectors H and I to the vehicle entertainment system (or adapters, if needed).
4 Connect cable connector G to the vehicle wiring harness ISO connectors (or adapters, if needed).
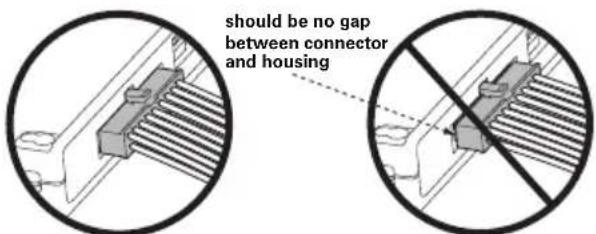
5 Connect cable connector F to vehicle integration kit connector A (shown on page 4).
Note: Make sure cable connector is plugged all the way into the vehicle integration kit.
6 If needed, the connection points for mute, battery and ignition can be configured to match your vehicle's harness using the alternate connection points on the ISO harness.
7 Reconnect battery to vehicle.
Install to auxiliary input (optional)
If you wish to connect your car kit's music audio output to a stereo auxiliary input on your vehicle entertainment system:
Note: Not all vehicle entertainment systems offer a stereo auxiliary audio input. In some cases, if your system does not support this input, one may be created using an adapter from a third-party vendor.
1 Connect an RCA cable (not supplied) to connector E on the ISO cable.
2 Connect the other connectors on the RCA cable to the vehicle entertainment system's Auxiliary input.
3 From the Installer menu, set the Line Out parameter to ON (see "Set install preferences" on page 11 for details).
Set install preferences
1 Turn off your vehicle's ignition.
2 Turn on your vehicle's ignition while pressing and holding the Green button for at least 5 seconds.

Installer Menu
Note: See page 13 for location of buttons and knobs on UIM.
3 Use the scroll knob to view and change settings.
| Setting... | |
| Language set language displayed on the UIM. | |
| Display Orientation | set the display orientation for left- or right-hand operation. |
| Line Out set to ON when using an auxiliary input to your vehicle entertainment system for music. | |
| Privacy Mute set whether to unmute the vehicle entertainment system when a call is switched to privacy mode. | |
| Install Test test and verify:ignition sourceleft-side speakersright-side speakersauxiliary input to vehicle entertainment system (if used). | |
| Factory Reset | reset all settings back to standard default factory settings |
| About list car kit's software version | |
4 Turn vehicle's ignition off and on to store settings.
Installation
Selective mute feature
Whenever your car kit plays music or a hands-free call, it automatically disconnects (or “takes over) the speakers from the vehicle’s entertainment system.
However, some vehicles have features that play audio prompts over the vehicle entertainment system (such as audio navigation, parking sensors, etc.). In these scenarios, you will still need to maintain an audio path (or "channel") to the vehicle entertainment system.
On the vehicle integration kit, the multi-position switch allows you to select a channel to remain connected to the vehicle entertainment system during hands-free calls.

natural_image
Diagram of a rectangular electronic device rear panel with two ports and connectors (no text or labels)Selective Mute Switch
Each position on the switch corresponds to one of the four speaker channels.
| switch speaker channel |
| 1 right - rear |
| 2 right - front |
| 3 left - rear |
| 4 left -front |
When the switches are all down (or "on"), then the channels are all connected to car kit audio. When one of the switches is moved up (or "off"), the audio from the vehicle entertainment system will pass-through to the speaker.
Note: Do not disable both front speaker channels or hands-free call audio will not be heard.
Basics
Use a combination of buttons, scroll knob, and menus to operate your car kit.
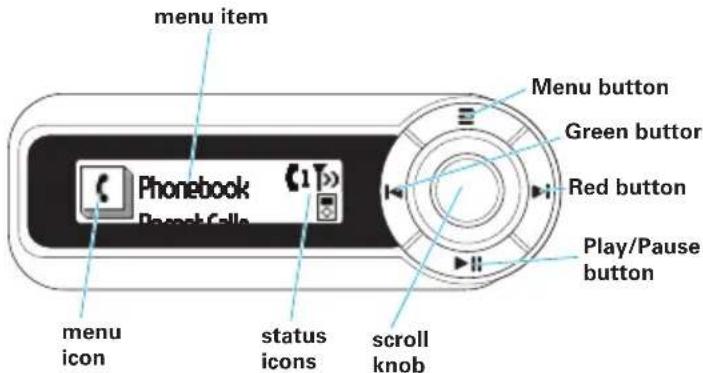
Buttons and scroll knob
Buttons have different functions based on the car kit's current operating mode (music, calls, etc.). To execute a function, you will either "press" or "press and hold" the button.
The Green and Red buttons change to blue when the car kit is in music playing mode.
The scroll knob allows you to scroll through and select menu items, and adjust call and music volume.
Home screen
The home screen is your entry into the car kit's menus. It displays the top item of the main menu.

Which menus are displayed is dependent on whether phone(s) are currently connected to your car kit.
| Menu Displays when... | |
| Phonebook, Recent Calls, Voice Commands, Dial Number, Messages | a phone is connected to your car kit |
| Music always displayed | |
| Go totwo phones are connected to your car kit | |
| Settings always displayed | |
Use the scroll knob to move through menu options. To select a menu item, press the scroll knob. To scroll back in the menus, press key.
Basics
Icons
Your car kit shows icons to provide status and identify menu and phonebook contact types.
Status icons
On the right side of menu and music playing screens, status icons show car kit connection status.

flowchart
graph TD
    A["Phonebook"] --> B["phone 1 connect status"]
    A --> C["phone 1 (or "primary") phone service status"]
    A --> D["phone 2 connect status"]
    A --> E["music connect status"]
These icons show overall status of your car kit:
| 1 | hands-free connection to phone 1 |
| 2 | hands-free connection to phone 2 |
| ∞ | no hands-free connection to phone(s) |
| » | in network phone service (phone 1) |
| roaming (phone 1) | |
| no phone service (phone 1) | |
| new text message | |
| low battery (on phone) | |
| music connection (iPod) | |
| music connection (Bluetooth) | |
| music connection (USB) | |
| music connection (auxiliary) |
Hands-free call icons
You'll see these icons during hands-free call operation.
| incoming call | |
| outgoing call | |
| call connected | |
| call ended | |
| call muted | |
| call rejected | |
| call in privacy mode |
Music playing icons
You'll see these icons when playing music.
| play music | |
| pause music | |
| stop music | |
| fast-forward music | |
| rewind music |
Phonebook icons
You'll see these icons in your car kit's phonebook.
| home phone number | |
| work phone number | |
| mobile phone number |
Text prompts
Occasionally you'll see a prompt to answer a yes/no question like shown below.
| To... |
| accept/yes press Green button |
| decline/no press Red button |
| ignore or go back in press ≡ menus |
Basics
Pair & connect
Pair to Bluetooth devices
To use the hands-free calling and/or streaming music features of your Bluetooth device with your car kit, they must first be paired together.
1 Turn on the Bluetooth feature on your device.
2 From the home screen, select Settings > Bluetooth > Pair Device.
Pairing Mode - Enter 0000, if pin code required
3 Set your phone or music device to search for Bluetooth devices.
4 Select Motorola TK30 from the search results on your device.
5 Select OK or Yes to pair your car kit with your Bluetooth device.
Note: If prompted, enter 0000 for the passkey.
When successful, you'll see:

connected
Once paired and connected, your car kit automatically downloads contact names and numbers from your phone's contact list.
To cancel pairing mode, press the Red button.
Connect to devices
Your car kit turns on automatically when starting your vehicle. Once turned on, the car kit establishes a wireless connection with paired Bluetooth devices, (phone and/or music devices) as well as a wired connection to your iPod, USB, or auxiliary device.
Note: To connect with your car kit, your Bluetooth devices must be paired first. See "Pair to Bluetooth devices" on page 16 to do this.
Once connected to your device(s), you see the home screen:

Status icons tell you which devices are connected to your car kit (see "Status icons" on page 14 for reference).
If connecting to a Bluetooth device is unsuccessful, press and hold the Green button to try again.
Your car kit turns off when you turn off your vehicle.
Set Bluetooth device preferences
1 From the home screen, select Settings > Bluetooth.
2 Using scroll knob, locate and select Bluetooth device.
| To... | |
| connect/disconnect device | select Connect or Disconnect |
| delete device from paired list | select Delete |
| make device primary phone on car kit | select Make primary phone? |
| select type of phone audio sent to car speakers | select Audio Pass-thru, then:select No to allow only call audio to pass throughselect Yes to allow all audio (key tones, audio prompts, etc.,) to pass through |
Calls
Note: Your car kit supports the Hands-free (HFP) Bluetooth Profile. Accessing call functions depends upon which profile features your phone supports. See the instructions that came with your phone.
Note: Some call features are phone/network dependent.
Receive a call
When there's an incoming call, you hear a ringtone and caller ID over your speakers, and you see the incoming call icon on the screen.

John Hutchinson
If music is playing when a call is received, it is automatically paused (except for music from an auxiliary device or Bluetooth device not supporting AVRCP profile).
To...
answer call press Green button
reject call press Red button
Make a call
To make a call with your car kit, you can:
• use a phonebook contact
• use voice dialing on phone
• use number dialing from the car kit
- use recent call list
• dial a number from your phone
Note: Calls are made using the primary phone. To make a call on the other phone, you must swap phones (see "Swap phones" on page 21. for details).
Use a phonebook contact
1 From the home screen, select Phonebook.

2 Using scroll knob, locate and select name you want to call.
3 Press the scroll knob or Green key to call.
Use phone voice commands
1 From the home screen, select Voice Commands (or press and hold Green button).
Say the phone voice command
2 Follow phone voice prompts to place call.
Use car kit dialing
1 From the home screen, select Dial Number.
2 Using scroll knob, locate and select numbers to dial.
Note: To clear a digit, press Red button. To clear all digits, press and hold Red button until you hear a tone.
3 Press the Green key to call.
Use recent call list
1 From the home screen, select Recent Calls (or press Green button).
Note: If recent call list is empty, the last number is redialed.
2 Using the scroll knob, locate and select name/number you want to call (or locate and press Green button).
Use last number redial
To redial last number, press Green button to view recent call list, then press Green button again to select the number to redial. If list has only one number, a single press of the Green button dials the last number.
Use phone dialing
You can dial a hands-free call directly from your phone in the normal manner.
While on a call
| To... | |
| adjust volume turn scroll knob | |
| end call press Red button | |
| mute/unmute call press , then select Mute (or Unmute), or press ▶II | |
| make a second call from same phone | Press ≡.Select Make CallSelect Phonebook, Recent Calls, or Dial Number |
Calls
| To... | |
| transfer call between phone and car kit | press then select Privacy (for phone) or Handsfree (for car kit), or press and hold Green button. |
| send DTMF tones Press . ≡Select DTMF tonesUsing scroll knob, locate and select numbers to send. | |
| place/resume call on hold | press then select Hold Call (or Resume Call), or press Green button. |
| place call from second phone | Press ≡.Select Go toSelect Phonebook, Recent Calls, or Dial Number |
Two calls on same phone
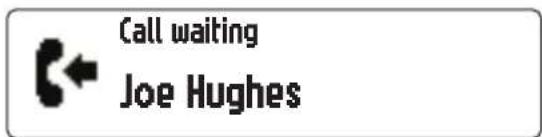
When there's a second incoming call on the same phone, you'll see a screen like this:
| To... | |
| answer second incoming call (same phone) | press Green button (first call is placed on hold) |
| reject second incoming call (same phone) | press Red button |
When you have two connected calls on the same phone:
| To... | |
| switch between calls | press , then select SwitchCall or press Green button. |
| end active call press Red button | |
| end both calls press and hold Red button | |
| join both calls(3-way call) | press then select Join Calls |
| reject 3rd incoming call from other second phone | press Red button. |
| make a call on the other phone | press then select Go to |
Two calls on different phones
When there's a second incoming call on the other phone, you'll see a screen like this:

Joe Hughes
To...
answer second
incoming call
(different phones)
press Green button (first call
is placed on hold)
| To... | |
| reject second incoming call (different phones) | press Red button |
When you have two connected calls on different phones:
| To... | |
| switch to call on the other phone | press then select Go to |
| end active call press Red button (call on other phone is resumed) | |
| end both calls press and hold Red button | |
Swap phones
To switch between connected phones, select Go to
Swapping Phones
When complete, you'll see the home screen.
Calls
Music
Your car kit can play music from your:
- Bluetooth music device (via wireless audio streaming)
- iPod/iPhone (via cable)
• USB storage device (via cable)
• Auxiliary device (via cable)
From a Bluetooth device
Note: Your car kit supports the Advanced Audio Distribution (A2DP) and Audio/Video Remote Control (AVRCP) Bluetooth profiles. Accessing audio playing and controlling functions depends upon both which profile and profile features your Bluetooth device supports. See the instructions that came with your device.
1 From the home screen, select Music > Bluetooth Music.
2 Select Play
| To... | |
| play music select Play | |
| choose a different Bluetooth music device | select Other |
| shuffle playback of songs | select Shuffle |
| pair with another music device | select Pair Music Device |
You'll see a screen like this when music begins playing from your Bluetooth music device:
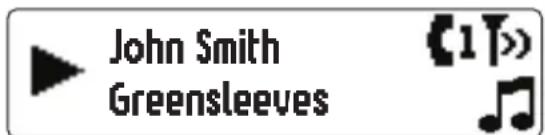
Note: If your Bluetooth device does not support AVRCP version 1.3 or later, the device name is displayed (instead of the artist and song name).
From an iPod/iPhone
1 From the home screen, select Music > iPod.
2 Scroll to selection using menus.
To...
| play selection select Now Playing |
| play all songs select Play all |
| choose a genre select Genres |
| choose an artist select Artists |
| choose an album select Albums |
| choose a song select Tracks |
| choose a playlist select Playlists |
| shuffle playback select Shuffle of songs |
| choose equalizer select Equalizer setting |
You'll see a screen like this when music begins playing from your iPod or iPhone:

From a USB storage device
1 From the home screen, select Music > USB.
2 Scroll to selection using menus.
| To... | |
| play all songs select Play all | |
| choose a playlist select PlaylistsYour car kit supports M3U playlists. | |
| change to a different folder containing music | select Folders |
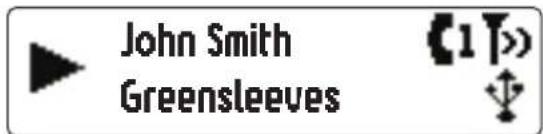
You'll see a screen like this when music begins playing from your USB device:
From an auxiliary device
1 From the home screen, select Music > Auxiliary Music.
2 Press the scroll knob to play music.
You will then see this screen:

Control your music

Music
| To... | |
| go to next track press | ▶I |
| fast-forward track | press and hold ▶I |
| stop, exit music mode and return to car stereo | press and hold ▶II |
Note: For music played from a Bluetooth device, when remote control capabilities (AVRCP profile) are not supported by your Bluetooth device, music cannot be controlled on your car kit.
Note: For music played from a Bluetooth device supporting remote control capabilities, the rewind track and fast-forward track controls are not supported.
Note: Music played from an auxiliary device cannot be controlled by your car kit.
Volume
To adjust music volume, turn the scroll knob clockwise to increase or counterclockwise to decrease
You'll hear a tone when maximum or minimum volume is reached on your car kit.
Note: The volume setting on your music player may impact volume on your car kit.
Note: Volume cannot be adjusted from your car kit when Line Out is set to ON in the Install menu and is connected to a stereo auxiliary input on your vehicle entertainment system. Use your vehicle entertainment system's volume control instead.
Set music preferences
From the home screen, select Music > Music Settings.
Note: These features are not available for auxiliary devices and Bluetooth devices that do not support shuffle mode.
| To... | |
| set playback equalization | select Equalizer then music type |
| set playback mode | select Shuffle then playback setting |
Phonebook
Synchronize contacts from your phone
Select Settings > User Settings > Synchronize Phonebook from the home screen.

Downloading Phonebook...
When complete, you'll see this screen:
Download complete.
Messages
Your car kit can receive and read your text messages to you over your vehicle entertainment system, and send replies using pre-defined templates.
Note: To use this feature, it must by supported by your phone.
Read new messages
When you receive a new text message on one of your connected phones, you'll see a screen like this.

Read new message?
Max Chin
To...
read message press the scroll knob (or Green button)
skip message press Red button
reply to message press, then select Reply (after reading)
call message press, then select Call sender (after reading)
Read existing messages
1 From the home screen, select Messages.
Note: Unread messages are bulleted.
2 Using scroll knob, locate and select message sender.
3 Select Read to read message.
Reply to message
1 From the home screen, select Messages.
2 Using scroll knob, locate and select message sender.
3 Select Reply.
4 Select pre-defined template to use for reply.
5 Press select knob to send.
Call message sender
1 From the home screen, select Messages.
2 Using scroll knob, locate message sender.
3 Select Call to make a call to the message sender.
Preferences
Set user preferences
From the home screen, select Settings > User Settings.
| To... | |
| set caller ID preference | select Show Caller ID |
| enable/disable voice prompts | select Voice Menu |
| enable/disable forgotten device alerts | select Forgotten Device Alert |
| enable/disable new message alerts | select New Message Alert |
| synchronize contacts from your phone | select Synchronize Phonebook (see page 25 for more details) |
In the menus, the currently selected item is bulleted.
Set audio prompt preferences
From the home screen, select Settings > Audio.
| To... | |
| set audio prompt volume | select Prompt Volume |
| enable/disable audio prompts for menus | select Voice Menu |
Set display preferences
From the home screen, select Settings > Display.
| To... |
| set brightness select Brightness |
| set sleep mode select Sleep Mode |
View software version
From the home screen, select Settings > About.
Safety, Regulatory & Legal
European Union Directives Conformance Statement
Hereby, Motorola declares that this product is in compliance with:
- The essential requirements and other relevant provisions of Directive 1999/5/EC
• All other relevant EU Directives

The above gives an example of a typical Product Approval Number.
You can view your product's Declaration of Conformity (DoC) to Directive 1999/5/EC (to R&TTE Directive) at www.motorola.com/rtte. To find your DoC, enter the Product Approval Number from your product's label in the "Search" bar on the Web site.
Software Copyright Notice
Motorola products may include copyrighted Motorola and third-party software stored in semiconductor memories or other media. Laws in the United States and other countries preserve for Motorola and third-party software providers certain exclusive rights for copyrighted software, such as the exclusive rights to distribute or reproduce the copyrighted software. Accordingly, any copyrighted software contained in Motorola products may not be modified, reverse-engineered, distributed, or reproduced in any manner to the extent allowed by law. Furthermore, the purchase of Motorola products
shall not be deemed to grant either directly or by implication, estoppel, or otherwise, any license under the copyrights, patents, or patent applications of Motorola or any third-party software provider, except for the normal, non-exclusive, royalty-free license to use that arises by operation of law in the sale of a product.
Safety & General Information
IMPORTANT INFORMATION ON SAFE AND EFFICIENT OPERATION. READ THIS INFORMATION BEFORE USING YOUR DEVICE.
Approved Accessories
Use of accessories not approved by Motorola, including but not limited to batteries, antennas, and convertible covers, may cause your mobile device to exceed RF energy exposure guidelines and may void your mobile device's warranty. For a list of approved Motorola accessories, visit our Web site at: www.motorola.com
Batteries & Chargers
Your battery, charger, or mobile device may contain symbols, defined as follows:
| Symbol Definition | |
 | Important safety information follows. |
 | Do not let your battery, charger, or mobile device get wet. |
Use & Safety for Battery-Powered Accessories
- Do not store or use your battery-powered accessory (such as a Bluetooth® headset or other device) in temperatures below -10°C (14°F) or above 60°C (140°F).
-
Do not recharge your accessory in temperatures below 0^ C ( 32^ F) or above 45^ C ( 113^ F).
-
Conditions inside a parked car can exceed this range. Do not store your accessory in a parked car.
- Do not store your accessory in direct sunlight.
- Storing your fully charged accessory in high-temperature conditions may permanently reduce the life of the internal battery.
- Battery life may temporarily shorten in low-temperature conditions.
Caution About High Volume Usage
Warning: Exposure to loud noise from any source for extended periods of time may temporarily or permanently affect your hearing. The louder the volume sound level, the less time is required before your hearing could be affected. Hearing damage from loud noise is sometimes undetectable at first and can have a cumulative effect. To protect your hearing:
- Start your volume control at a low setting and use as low a volume as possible.
- Limit the amount of time you use headsets or headphones at high volume.
- Where possible, use your headset in a quiet environment with low background noise.
- Avoid turning up the volume to block out noisy surroundings.
- Turn the volume down if you can't hear people speaking near you.
If you experience hearing discomfort, including the sensation of pressure or fullness in your ears, ringing in your ears, or muffled speech, you should stop listening to the device through your headset or headphones and have your hearing checked by your doctor.
Driving Precautions
Using a mobile device while driving may cause distraction. End a call if you can't concentrate on driving. Input information about your destination and route prior to your drive. Do not input data or engage in text messaging while driving. Keep your eyes on the road while driving. Listen to the audible turn-by-turn directions, if available.
Also, using a mobile device or accessory may be prohibited or restricted in certain areas. Always obey the laws and regulations on the use of these products.
Responsible driving practices can be found at www.motorola.com/callsmart (in English only).
FCC Notice to Users
The following statement applies to all products that have received FCC approval. Applicable products bear the FCC logo, and/or an FCC ID in the format FCC-ID:xxxxxx on the product label.
Motorola has not approved any changes or modifications to this device by the user. Any changes or modifications could void the user's authority to operate the equipment. See 47 CFR Sec. 15.21.
This device complies with part 15 of the FCC Rules. Operation is subject to the following two conditions: (1) This device may not cause harmful interference, and (2) this device must accept any interference received, including interference that may cause undesired operation. See 47 CFR Sec. 15.19(3).
This equipment has been tested and found to comply with the limits for a Class B digital device, pursuant to part 15 of the FCC Rules. These limits are designed to provide reasonable protection against harmful interference in a residential installation. This equipment generates, uses and can radiate radio frequency energy and, if not installed and used in accordance with the instructions, may cause harmful interference to radio communications. However, there is no guarantee that interference will not occur in a particular installation. If this equipment does cause harmful interference to radio or television reception, which can be determined by turning the equipment off and on, the user is encouraged to try to correct the interference by one or more of the following measures:
• Reorient or relocate the receiving antenna.
- Increase the separation between the equipment and the receiver.
- Connect the equipment to an outlet on a circuit different from that to which the receiver is connected.
- Consult the dealer or an experienced radio/TV technician for help.
Caring for the Environment by Recycling
This symbol on a Motorola product means the product should not be disposed of with household waste.
Disposal of your Mobile Device & Accessories
Please do not dispose of mobile devices or electrical accessories (such as chargers, headsets, or batteries) with your household waste. Do not dispose of your battery or mobile device in a fire. These items should be disposed of in accordance with the national collection and recycling schemes operated by your local or regional authority. Alternatively, you may return unwanted mobile devices and electrical accessories to any Motorola Approved Service Center in your region. Details of Motorola approved national recycling schemes, and further information on Motorola recycling activities can be found at:
www.motorola.com/recycling
Disposal of your Mobile Device Packaging & Product Guide
Product packaging and product guides should only be disposed of in accordance with national collection and recycling requirements. Please contact your regional authorities for more details.


Motorola, Inc.
Consumer Advocacy Office
600 N US Hwy 45
Libertyville, IL 60048
www.motorola.com
www.motorola.com/Bluetoothsupport
www.motorola.com/Bluetoothconnect
Note: Do not ship your accessory product to the above address. If you need to return your product for repairs, replacement, or warranty service, please contact the Motorola Customer Support Center at 0870-9010-555.
MOTOROLA and the Stylized M Logo are registered in the US Patent & Trademark Office. The Bluetooth trademarks are owned by their proprietor and used by Motorola, Inc. under license. iPod and iPhone are registered trademarks of Apple Inc. All other product or service names are the property of their respective owners
© 2010 Motorola, Inc. All rights reserved.
Bluetooth QD ID: B015332
Manual Number: 68014301013
www.motorola.com

MOTOROLA

68014301013
- Contents
- Installation
- Before you begin
- Install the vehicle integration kit
- Connect the audio cable(s)
- Direct to flat surface
- Use mounting bracket
- Install the microphone
- Connect the ISO cable
- Install third-party vehicle specific adapter harness (if needed)
- Install the ISO cable
- Install to auxiliary input (optional)
- Set install preferences
- Installer Menu
- Selective mute feature
- Basics
- Buttons and scroll knob
- Home screen
- Icons
- Status icons
- Hands-free call icons
- Music playing icons
- Phonebook icons
- Text prompts
- Pair & connect
- Pair to Bluetooth devices
- Pairing Mode - Enter 0000, if pin code required
- connected
- Connect to devices
- Set Bluetooth device preferences
- Calls
- Receive a call
- John Hutchinson
- To...
- Make a call
- Use a phonebook contact
- Use phone voice commands
- Say the phone voice command
- Use car kit dialing
- Use recent call list
- Use last number redial
- Use phone dialing
- While on a call
- Two calls on same phone
- Two calls on different phones
- Swap phones
- Music
- From a Bluetooth device
- From an iPod/iPhone
- From a USB storage device
- From an auxiliary device
- Control your music
- Volume
- Set music preferences
- Phonebook
- Synchronize contacts from your phone
- Messages
- Read new messages
- Read new message?
- Max Chin
- Read existing messages
- Reply to message
- Call message sender
- Preferences
- Set user preferences
- Set audio prompt preferences
- Set display preferences
- View software version
- Safety, Regulatory & Legal
- European Union Directives Conformance Statement
- Software Copyright Notice
- Safety & General Information
- IMPORTANT INFORMATION ON SAFE AND EFFICIENT OPERATION. READ THIS INFORMATION BEFORE USING YOUR DEVICE.
- Approved Accessories
- Batteries & Chargers
- Use & Safety for Battery-Powered Accessories
- Caution About High Volume Usage
- Driving Precautions
- FCC Notice to Users
- Caring for the Environment by Recycling
- Disposal of your Mobile Device & Accessories
- www.motorola.com/recycling
- Disposal of your Mobile Device Packaging & Product Guide
Brand : MOTOROLA
Model : TK30
Category : Car kit