
Walkman NW-E70 - Mp3 player SONY - Free user manual and instructions
Find the device manual for free Walkman NW-E70 SONY in PDF.


| Product Type | Portable IC Audio Player (Network Walkman) |
| Model | NW-E70 |
| Memory Capacity | 256 MB built-in flash memory |
| Dimensions (W x H x D) | 56 x 37.3 x 15 mm (excluding projecting parts) |
| Weight | Approx. 40 g (battery not included) |
| Power Source | 1 x LR03 (Size AAA) alkaline battery |
| Battery Life (Continuous Playback) | ATRAC3: approx. 70 h; ATRAC3plus: approx. 60 h; MP3: approx. 50 h |
| Recording Time (ATRAC3plus 48 kbps) | More than 11 h 40 min |
| Supported Audio Formats | ATRAC3, ATRAC3plus, MP3 (8–320 kbps, VBR), WAV |
| Frequency Response | 20–20,000 Hz (single signal measurement) |
| Output | Stereo mini-jack (headphone) |
| Signal-to-Noise Ratio | 80 dB or more (excluding ATRAC3 66 kbps) |
| Playback Functions | Normal, All Repeat, Single Repeat, Group Repeat, Group Shuffle Repeat, All Groups Shuffle Repeat, A-B Repeat, Sentence Repeat |
| Sound Adjustment | Digital Sound Preset with bass and treble adjustment (SOUND1, SOUND2, OFF) |
| Volume Control | Manual (0–31) or Preset (LO, MID, HI) with AVLS limiter |
| Display | Backlit LCD displaying track info, time, battery, repeat mode, sound preset |
| Group Function | Organizes tracks by album/artist; supports up to 400 groups |
| Computer Connectivity | USB 1.1 via dedicated cable; requires SonicStage software for ATRAC transfer; MP3 File Manager pre-installed for MP3 transfer |
| Accessories Included | Headphones, earbuds (S, L), USB cable, carrying pouch, neck strap, extension headphone cord, CD-ROM, operating instructions |
| Safety Features | AVLS (Automatic Volume Limiter System), HOLD switch to lock controls, warnings against high volume and use while driving |
| Maintenance | Clean casing with soft cloth and mild detergent; periodically clean headphone plug |
| Battery Replacement | User-replaceable AAA alkaline battery; remove if not used for extended period |
| Operating Temperature | 5°C to 35°C (67°F to 95°F) |
Frequently Asked Questions - Walkman NW-E70 SONY
User questions about Walkman NW-E70 SONY
0 question about this device. Answer the ones you know or ask your own.
Ask a new question about this device
Download the instructions for your Mp3 player in PDF format for free! Find your manual Walkman NW-E70 - SONY and take your electronic device back in hand. On this page are published all the documents necessary for the use of your device. Walkman NW-E70 by SONY.
USER MANUAL Walkman NW-E70 SONY
Portable IC Audio Player
Network Walkman
网络随身听网络随身听
Operating Instructions GB
使用说明书 CS
在使用产品前,请仔细阅读本使用说明书

"WALKMAN" is a registered trademark of Sony Corporation to represent Headphone Stereo products.
W. WALKMAN is a trademark of Sony Corporation.
NW-E50/E70/E90
WARNING
To prevent fire or shock hazard, do not expose the unit to rain or moisture.
Do not install the appliance in a confined space, such as a bookcase or built-in cabinet.
To prevent fire, do not cover the ventilation of the apparatus with news papers, table cloths, curtains, etc. And don't place lighted candles on the apparatus.
To prevent fire or shock hazard, do not place objects filled with liquids, such as vases, on the apparatus.
Note on installation
If you use the unit at a place subject to static or electrical noise, the track's transferring information may be corrupted. This would prevent successful transferring authorization on your computer.
企标编号 (NW-E50/E70):Q/YXPD123-2004
企标编号 (NW-E90):Q/YXPD164-2004
Notice for users
On the supplied software
• Copyright laws prohibit reproducing the software or the manual accompanying it in whole or in part, or renting the software without the permission of the copyright holder.
- In no event will SONY be liable for any financial damage, or loss of profits, including claims made by third parties, arising out of the use of the software supplied with this player.
- In the event a problem occurs with this software as a result of defective manufacturing, SONY will replace it.
However, SONY bears no other responsibility.
- The software provided with this player cannot be used with equipment other than that which is so designated.
- Please note that, due to continued efforts to improve quality, the software specifications may be changed without notice.
- Operation of this player with software other than that provided is not covered by the warranty.
- Depending on the type of the text and characters, the text shown on SonicStage and MP3 File Manager may not be displayed properly on device. This is due to:
– The capability of the connected player.
– The player is not functioning normally.
- The ID3 TAG information for the track is written in the language or the character that is not supported by the player.
Program ©2001, 2002, 2003, 2004 Sony Corporation Documentation ©2004 Sony Corporation
This manual explains how to operate your Network Walkman and how to use the MP3 file manager (pre-installed software). For details on how to use the SonicStage (supplied software), refer to the SonicStage operating instructions.
OpenMG and its logo are trademarks of Sony Corporation.
SonicStage and SonicStage logo are trademarks or registered trademarks of Sony Corporation.
ATRAC, ATRAC3, ATRAC3plus and their logos are trademarks of Sony Corporation.
Microsoft, Windows and Windows Media are trademarks or registered trademarks of Microsoft Corporation in the United States and/or other countries.
All other trademarks and registered trademarks are trademarks or registered trademarks of their respective holders.
In this manual, ^TM and ^® marks are not specified.
Table of Contents
Overview 4
What you can do with your Network Walkman....4
Other features 5
Step 1: Checking the package contents .... 6
Step 2: Inserting the battery...... 7
Locating controls 8
Front side 8
Rear side 8
Display 9
Basic Operations
Transferring audio files from the computer to your Network Walkman 10
Note on playing songs with a limited playing period (Timeout contents)...... 11
Note on playing songs with a limited playing count .... 11
Listening to music with your Network Walkman 12
What is the Group function? ...... 13
On other operations 13
Advanced Operations
Repeat mode 14
Selecting the repeat mode ..... 14
Playing the tracks repeatedly (Track Repeat) 15
Playing a specified section repeatedly (A-B Repeat) ..... 15
Playing specified sentences repeatedly (Sentence Repeat) 16
Setting the repeat counts ..... 17
Changing the display mode 17
Selecting the group display mode 18
Adjusting treble and bass (Digital sound preset) ...... 19
Selecting the Sound quality ..... 19
Adjusting the sound quality ..... 19
Locking the controls (HOLD) ...... 20
Storing non-audio data 21
Adjusting the settings of your Network Walkman
Adjusting the time setting of your Network Walkman to a computer's built-in clock 22
Adjusting the current time setting (DATE-TIME) 23
Limiting the volume (AVLS) ...... 24
Setting the volume using the preset volume function 24
Setting a volume level of the preset mode 24
Switching to the manual mode ..... 25
Turning off the beep sound (BEEP) 26
Changing the backlight setting ...... 26
Other functions
Regrouping songs (REGROUP) ..... 27
Formatting memory (FORMAT) ..... 28
Other Information
Precautions 29
Troubleshooting 30
To reset the player 30
What happened? 30
Messages 33
Specifications 34
Glossary 35
Menu list 36
MP3 file manager software operation
What you can do with the MP3 file manager 37
Transferring MP3 audio files from the computer to your Network Walkman 37
Display of MP3 file manager ...... 39
Erasing audio file.... 40
Ordering audio file 40
Index 41
Overview
What you can do with your Network Walkman
First, you need to install the “SonicStage” software into your computer (MP3 file manager software is pre-installed in your Network Walkman). You can easily transfer digital audio files from your computer to the built-in flash memory and carry it anywhere to enjoy.
1 Store digital audio files on your computer.

flowchart
graph TD
    A["EMD (Electric Music Distribution) Services"] --> B["Audio CDs"]
    B --> C["MP3, WAV and Windows® Media Format Audio Files"]
    D["Download the latest audio files! Store favorite songs!"]    A --> B
    B --> C
2 Transfer files to your Network Walkman.
When you transfer MP3 format audio files to your Network Walkman, use MP3 file manager software (pre-installed software) to transfer and store them as MP3 format audio files.

natural_image
Illustration of a vintage desktop computer connected to a device with sound waves (no text or symbols)USB connection
3 Enjoy music with your Network Walkman.
You can display the data stored in the built-in flash memory using Windows Explorer when your Network Walkman is connected to the computer. However, an MP3 format audio file cannot be played back if you drag or copy the file directly on the Windows Explorer screen. When you transfer an MP3 format audio file to your Network Walkman, be sure to use the MP3 file manager software (see page 37).
natural_image
Cartoon illustration of a man running while holding a device with musical notes (no text or symbols)Other features
- Compact size, light weight, skip-proof operation, high portability.
- The pre-installed MP3 file manager software enables you to transfer MP3 format audio files to your Network Walkman and listen to them with your Network Walkman as MP3 format files.
- Continuous playback time with a battery NW-E50/NW-E70/NW-E90: Approximately 70^*1 hours
- Recording time ^*2 NW-E50: 128MB built-in flash memory, more than 5 hours 50 minutes. NW-E70: 256MB built-in flash memory, more than 11 hours 40 minutes. NW-E90: 512MB built-in flash memory, more than 23 hours 20 minutes.
- The supplied SonicStage software enables you to record songs from audio CDs to the hard disk of your computer using the ATRAC3plus format (high sound quality, high compression).
- Sentence Repeat: Useful function for learning a foreign language.
• High-speed data transfer using the dedicated USB cable. - Backlight LCD screen: song titles and artist names can be displayed.
- Group function: you can select songs to be played by album.
- Storage function: you can store a variety of data as well as audio files.
*1 Differs according to the data format. In this case, the figure for the battery duration is when continuously playing ATRAC3 format audio files.
*2 Differs according to the bit rate when recording. In this case, the figure for the recordable time is when recording at 48kbps ATRAC3plus format.
NOTES:
- The recorded music is limited to private use only. Use of the music beyond this limit requires permission of the copyright holders.
- Sony is not responsible for incomplete recording/downloading or damaged data due to problems of the Network Walkman or computer.
Step 1: Checking the package contents
Please check the accessories in the package.
NW-E50:
• Network Walkman (1)
- Headphones (1)

natural_image
Line drawing of a portable electronic device with earphones and cables (no text or symbols)NW-E70:
NW-E90
• Network Walkman (1)
• Headphones (1)
• Earbuds (Size S, L) (1)

natural_image
Line drawing of a portable electronic device with earbuds and cable (no text or symbols)• Dedicated USB cable (1)

natural_image
Coiled network cable with connectors and connectors (no text or symbols visible)Earbuds (Size S)

Earbuds (Size L)

- Carrying pouch (1)
- Neck strap (1)
• Extension headphone cord (1) - CD-ROM (1)
- Operating instructions (1)
- SonicStage operating instructions (1)
About the Serial Number
The serial number provided for your device is required for the customer registration. The number is on the rear side of your Network Walkman.

Record the serial number in the space provided below. Refer to it whenever you call upon your Sony dealer regarding this product.
Serial No. ____
For the customers of NW-E70/E90
Notes
The supplied headphones are a close-up design to create Powerful Bass Sound. Do not use headphones while driving.
- Do not use headphones while driving, cycling, or operating any motorized vehicle.
- It can also be potentially dangerous to play your headphones at high volume while walking, especially at pedestrian crossings. You should exercise extreme caution or discontinue use in potentially hazardous situations.
When you wear the headphones, you may hear noise, such as the cord rubbing against your clothes. This is not a malfunction.
Step 2: Inserting the battery
Insert the LR03 (size AAA) alkaline battery with correct polarity. Be sure to insert it from the ● side as illustrated.

Battery duration\*
ATRAC3 format: Approximately 70 hours
ATRAC3plus format: Approximately 60 hours
MP3 format: Approximately 50 hours
* The battery life may be shorter due to operating conditions and the temperature of the location.
On the remaining battery indication
The battery icon in the display changes as shown below.
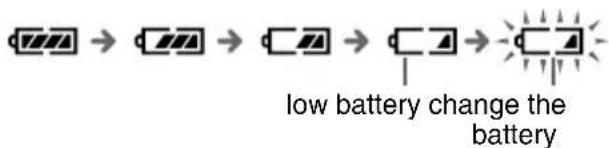
If "LOW BATT" is displayed in the display, you need to change the battery.
Notes
If you do not use the battery correctly, it may become damaged from leakage and corrosion. For best results:
- Use the alkaline battery.
- Make sure the polarity is correct.
- Do not charge a dry cell battery.
- Remove the battery, if you do not intend to use the player for an extended period of time.
- If you have battery leakage, replace with a new battery after cleaning the battery compartment.
If the battery compartment lid is accidentally detached, attach it as illustrated.

natural_image
Diagram showing a device being inserted into a car intake manifold, with no text or symbols present.Locating controls
For details about each part, refer to the pages in parentheses.
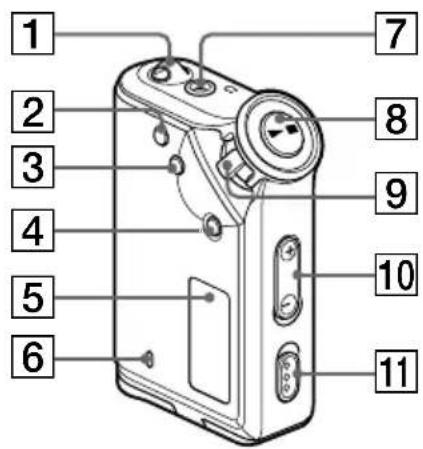
1 Strap hole for attaching the strap
2 REPEAT/SOUND button (page 15 to 16, 19)
3 MENU button (page 14, 17 to 20, 22 to 28) You can switch to the Time display by pressing the MENU button for a while.
4 GROUP button (page 13, 18)
5 Display (page 9, 15, 33)
For details on the display and icons, refer to page 9.
6 ACCESS lamp (page 10, 38)
Rear sideFront side

7 Headphone jack (page 12)
8 ▶■ button
(page 12 to 20, 22 to 28)
9 Shuttle switch (page 13 to 20, 22 to 28)
10 VOLUME +/- button (page 12, 24)
11 HOLD (Locking controls) switch (page 12, 20)
12 USB jack (page 10, 37)
13 Battery compartment (page 7)
Display

1 Text/graphic information display (page 14) Displays track number, track name, current date and time (page 17 to 23), MESSAGE (page 11, 33) and menu. Press the MENU button to switch the display mode. For details, refer to “Changing the display mode” on page 17.
2 Repeat mode indication (page 14) The current repeat mode is displayed.
3 AVLS indication (page 24) The indication appears while the AVLS function is activated.
4 Digital sound preset indication (page 19 to 20) The current sound setting is displayed.
5 Remaining battery indication (page 7) The remaining battery power is displayed.
Transferring audio files from the computer to your Network Walkman
Note
Before connecting your Network Walkman to the computer for the first time, be sure to install the "SonicStage" software from the supplied CD-ROM in your computer. Even if the SonicStage software is already installed, you need to install the SonicStage software supplied with this Network Walkman before connecting your Network Walkman to the computer (update programs may be available).
You can transfer ATRAC3, ATRAC3plus format audio files from the computer to your Network Walkman using the installed SonicStage software. Follow the procedure below.
You can also transfer MP3 format audio files, using the MP3 file manager that is pre-installed in your Network Walkman. For details, refer to “MP3 file manager software operation” on page 37.
1 Install the SonicStage software in your computer using the supplied CD-ROM.
Follow step 1 only for the first time when you connect your Network Walkman to the computer. For details, refer to the SonicStage operating instructions.
2 Import audio files into the SonicStage software.
For details, refer to the manual "SonicStage operating instructions."
3 Connect your Network Walkman to your computer.
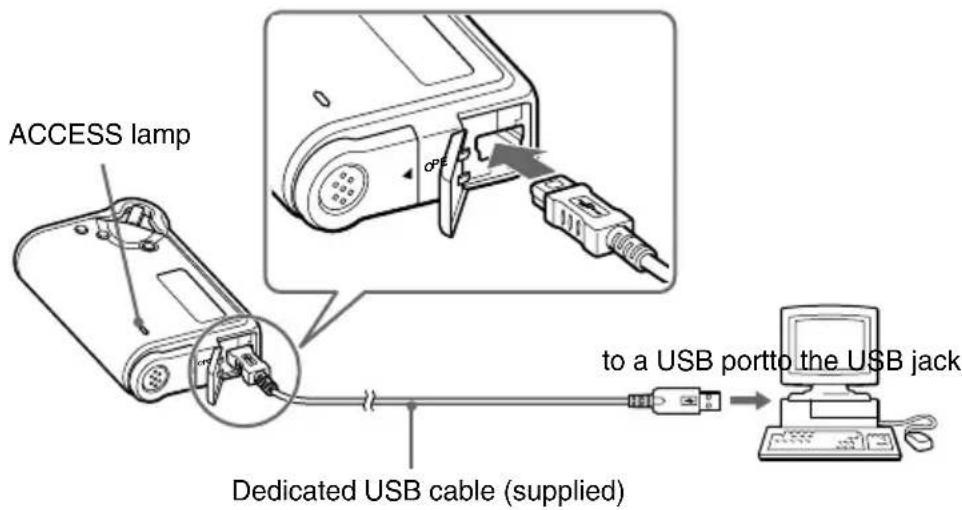
Connect the small connector of the dedicated USB cable into the USB jack on the Network Walkman, then the large connector to a USB port on your computer. "CONNECT" appears in the display.
Notes
• The ACCESS lamp blinks while your Network Walkman accesses the computer.
- Do not disconnect the USB cable when the ACCESS lamp is blinking. The data being transferred may be destroyed.
- Use of your Network Walkman with a USB hub or a USB extension cable is not guaranteed. Always connect your Network Walkman to the computer directly using the dedicated USB cable.
- Some USB devices connected to the computer may interfere with the proper operation of your Network Walkman.
- The control buttons on your Network Walkman are all disabled while it is connected to a computer.
- You can display the data stored in the built-in flash memory using Windows Explorer when your Network Walkman is connected to the computer.
4 Transfer audio files to your Network Walkman.
For information on transferring audio files to the built-in flash memory, refer to the separate manual "SonicStage operating instructions."
z Tip
For information on transferring audio files back to the computer, refer to the manual “SonicStage operating instructions” or online Help for the SonicStage software.
Note on playing songs with a limited playing period (Timeout contents)
Some songs distributed via the Internet (EMD service) have a limited playing period.
If you try to play an expired song, “EXPIRED” blinks and the next song will be played after a moment.
In addition, an expired song cannot be played using the SonicStage software, or transferred to your
Network Walkman. Delete any songs as needed.
Note on playing songs with a limited playing count
Your Network Walkman does not support contents with a limited playing count.
When you try to play a song with a limited playing count, “EXPIRED” will be displayed and the song will not be played.
Listening to music with your Network Walkman
Please insert the battery before use (see page 7).
Note
When using Network Walkman, be sure do disconnect it from the computer.
1 Connect the headphones.
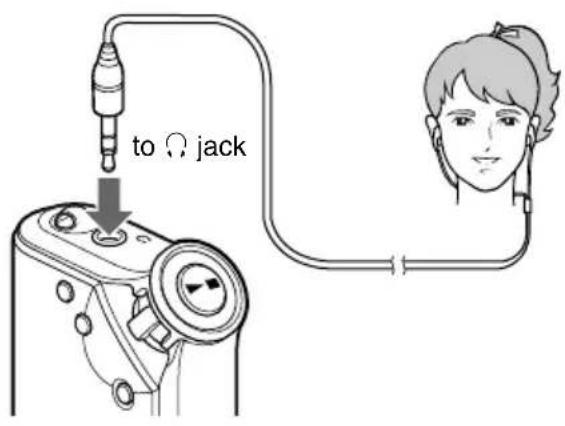
To use the headphones extension cord

2 Start playback.

Tip
If your Network Walkman is not operated for 10 seconds while in stop mode, the display automatically turns off. When scrolling track titles, etc., the display turns off after scrolling is finished.
When the normal playback mode is selected, playback stops automatically after the last song is played.
If playback does not start
Make sure that the HOLD switch is set to off (page 20).
To stop playback
Press the ▶■ button.
To adjust the volume
The volume can be set in the PRESET and MANUAL mode (page 24 to 25).
How to install the earbuds correctly
For the customers of NW-E70/E90
If the earbuds do not fit your ears correctly, low bass sound may not be heard. To enjoy better sound quality, adjust the earbuds position to sit on your ears comfortably or push them into the inside of your ears so that they fit your ears snugly. At purchase, M size earbuds are installed. If the earbuds do not fit your ears, try one of the other supplied sizes S or L.

natural_image
Diagram of a mechanical assembly showing two hands connecting a cylindrical component to a terminal block (no text or symbols present)What is the Group function?
The Group function enables you to select favorite music conveniently on your Network Walkman. You can transfer to audio files or play songs by album or artist using the Group function.
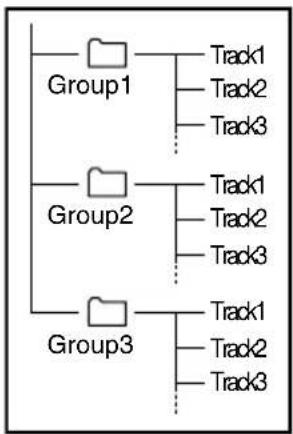
flowchart
graph TD
    A["Group1"] --> B["Track1"]
    A --> C["Track2"]
    A --> D["Track3"]
    E["Group2"] --> F["Track1"]
    E --> G["Track2"]
    E --> H["Track3"]
    I["Group3"] --> J["Track1"]
    I --> K["Track2"]
    I --> L["Track3"]
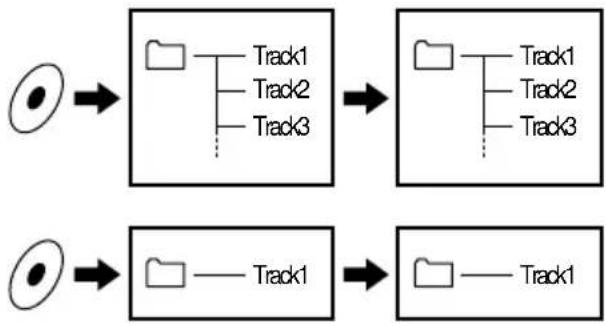
flowchart
graph LR
    A["Input"] --> B["Process Step 1"]
    B --> C["Process Step 2"]
    C --> D["Output"]
    E["Input"] --> F["Process Step 3"]
    F --> G["Output"]
- The track number is the order of songs in each group.
- You can switch between Track Name mode and Group mode by pressing the GROUP button.
- In the Group mode, group names are displayed instead of track names. In addition, any shift operations, such as Skip or Repeat, are performed by group.
Transferring by group
The audio files transferred to the SonicStage software are always grouped when transferred to the built-in flash memory.

Tip
A group created by SonicStage software has priority over one created by MP3 file manager software on your Network Walkman.
On other operations


Tip
You can switch to the Group mode by pressing the Group mode button.
| To | Shuttle switch operation |
| Skip to the beginning of the next track/ group*1 | Rotate the Shuttle switch clockwise once (+/▶▶I). |
| Skip to the beginning of the current track/ group*1 | Rotate the Shuttle switch counterclockwise once (|◀◀/-). |
| Fast-forward*2 | Rotate the Shuttle switch clockwise (+/▶▶I) and hold it. |
| Fast-rewind*2 | Rotate the Shuttle switch counterclockwise (|◀◀/-) and hold it. |
^*1 Rotating and holding of the Shuttle switch during stop mode allows you to skip to the beginning of the next (current and previous) track/group continuously.
*2 Fast-forward and fast-rewind speed become faster if the operation is continued for five seconds.
Advanced Operations
Repeat mode
There are three types of repeat mode: Track Repeat, A-B Repeat and Sentence Repeat.
- Track Repeat (TRK Rep)
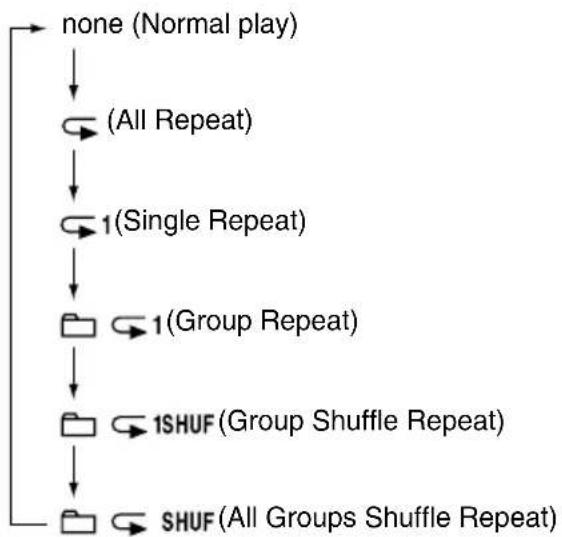
This mode plays back tracks repeatedly in the following five ways.
| Track Repeat mode | Operation |
| All Repeat | All tracks repeatedly |
| Single Repeat | Current track repeatedly |
| Group Repeat | Current group repeatedly |
| Group Shuffle Repeat | Current group repeatedly in random order |
| All Groups Shuffle Repeat | All groups repeatedly in random order |
• A-B Repeat (A-B Rep)
This mode plays back the specified section in a track repeatedly.
- Sentence Repeat (SENTENCE Rep)
This mode plays back voice data within a specified section in a track repeatedly.
Selecting the repeat mode
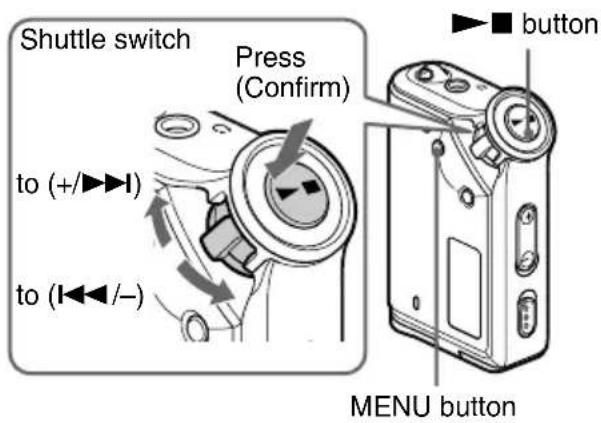
1 Press the MENU button in stop mode. The menu screen is displayed.

2 Rotate the Shuttle switch to select "REPEAT MODE >" and press the ▶ button to confirm.
3 Rotate the Shuttle switch to select a desired repeat mode and press the ▶ button to confirm.
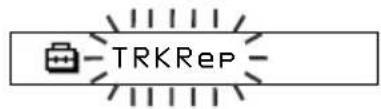
You can choose one mode among "TRK Rep," "A-B Rep" and "SENTENCE Rep."
4 Press the MENU button.
The display returns to the normal screen. You can operate each repeat mode you selected, as refer to the below.
- TRK Rep: see “Playing the tracks repeatedly (Track Repeat).”
- A-B Rep: see “Playing a specified section repeatedly (A-B Repeat).”
- SENTENCE Rep: see "Playing specified sentences repeatedly (Sentence Repeat)."
To cancel the Menu mode
Select [RETURN] in the menu screen or press the MENU button.
Notes
- The display automatically returns to the normal playback screen if you do not operate any button for 60 seconds.
- When there is no audio files in the built-in flash memory, you cannot set any repeat mode.
- When you connect the Network Walkman to your computer, the selected desired mode will be cancelled.
- You can select repeat mode only in stop mode.
Playing the tracks repeatedly (Track Repeat)
The Track Repeat mode is changed by pressing the REPEAT/SOUND button. You can check the current Track Repeat mode with the icon of the display.
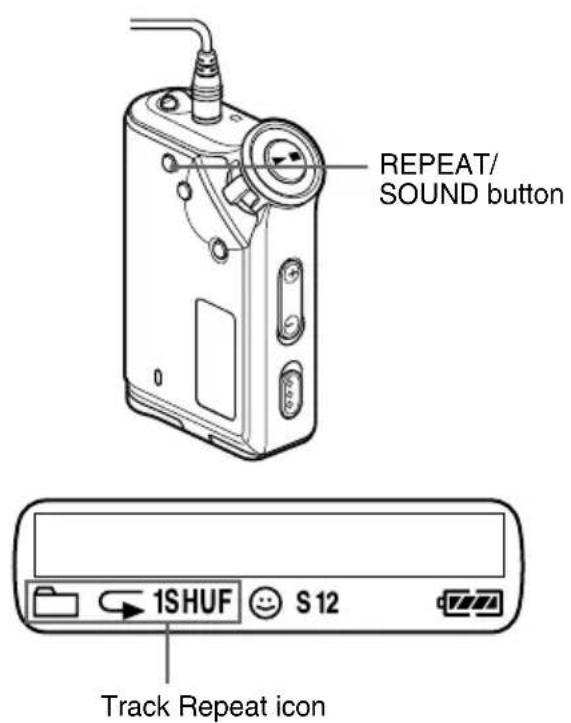
Select the Track Repeat mode (TRK Rep) first (page 14). Then, press the REPEAT/SOUND button repeatedly to select the repeat mode you want.
Each press changes the Track Repeat icon as follows:
flowchart
graph TD
    A["none (Normal play)"] --> B["(All Repeat)"]
    B --> C["1(Single Repeat)"]
    C --> D["1(Group Repeat)"]
    D --> E["1SHUF (Group Shuffle Repeat)"]
    E --> F["SHUF (All Groups Shuffle Repeat)"]
Playing a specified section repeatedly (A-B Repeat)
While playing a track, you can set the start point (A) and end point (B) for a section you wish to play repeatedly.
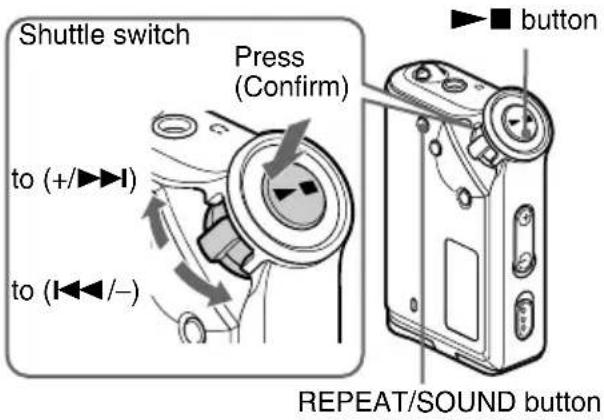
1 Select the A-B Repeat mode (A-B Rep) (page 14).
2 Press the ▶■ button to start playback.
3 Press the REPEAT/SOUND button to set the start point (A) while playing back.
“B” blinks.
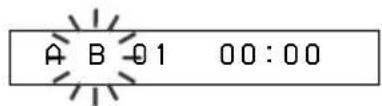
4 Press the REPEAT/SOUND button to set the end point (B).
"A B" is displayed and the specified section is played back repeatedly.

Notes
- You cannot set A-B Repeat for a section that overlaps two or more tracks.
- If you do not set the end point (B), the end point is automatically set at the end of the track.
- You cannot use A-B Repeat in the Group mode or when the current time is displayed.
Repeat mode (continued)

Tips
- You can fast-forward or fast-rewind by rotating the Shuttle switch, after the start point (A) is set. If the track reaches the end while fast-forwarding, the end point is set as point (B) and fast-forwarding continues. A-B Repeat starts when you release the Shuttle switch. If the track reaches the beginning while fast-rewinding, it jumps to the end of the track, the end point is set as point (B), and fast-rewinding continues.
- You can fast-forward or fast-rewind by rotating the Shuttle switch, during A-B Repeat playback. If the track reaches the track start/end while fast-forwarding or fast-rewinding, playback is stopped (enters Standby). A-B Repeat restarts when you release the Shuttle switch.
To clear the start point (A) and end point (B)
- Press the REPEAT/SOUND button during A-B Repeat playback.
- Press the MENU button during A-B Repeat playback.
- Select the Group mode by pressing the GROUP button during A-B Repeat playback.
- Select the previous or next track by rotating the Shuttle switch during A-B Repeat playback. (The A-B Repeat mode is not canceled.)
To cancel the A-B Repeat mode
Change the Repeat mode in the menu screen (page 14).
Playing specified sentences repeatedly (Sentence Repeat)
This function automatically detects only voice data from the setting point and repeats the voice data for setting counts. It is useful for learning a foreign language.

Tip
The default repeat counts setting is 2 times for one sentence. But you can change the repeat counts setting. Refer to "Setting the repeat counts" on page 17.

REPEAT/SOUND button
1
Select the Sentence Repeat mode (SENTENCE Rep) (page 14).
2
Press the ▶■ button to start playback.
3
Press the REPEAT/SOUND button to place the setting point during playback. The Network Walkman detects spoken sections and non-spoken sections from the set point, and Sentence Repeat starts. (The spoken section is repeated once (during detection), and the setting is counted.)

Notes
- You cannot use Sentence Repeat in the Group mode, or when the current time is displayed.
- A spoken or non-spoken section of less than 1 second will not be detected.
- If a non-spoken section is not detected until the track end, the track end point is recognized as a non-spoken section and Sentence Repeat begins from the previous spoken section.
To clear the setting point
- Press the REPEAT/SOUND button during Sentence Repeat playback.
- Press the MENU button during Sentence Repeat playback.
- Select the Group mode by pressing the GROUP button during Sentence Repeat playback.
- Select the previous or next track by rotating the Shuttle switch during Sentence Repeat playback. (The Sentence Repeat mode is not canceled.)
To cancel the Sentence Repeat mode
Change the Repeat mode in the menu screen (page 14).
Setting the repeat counts
You can set the repeat counts (1-9) of one sentence for the Sentence Repeat mode.

1 Press the MENU button.
The menu screen is displayed.

REPEAT MODE>
2 Rotate the Shuttle switch to select "REPEAT MODE >" and press the ▶ button to confirm.
3 Rotate the Shuttle switch to select "SENTENCE Rep" and press the ▶ button to confirm. "COUNT:" is displayed on the screen.
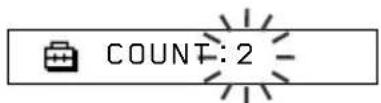
4 Rotate the Shuttle switch to select a desired repeat counts and press the ▶■ button to confirm.
5 Press the MENU button. The display returns to the normal screen.
To cancel the Menu mode
Select [RETURN] in the menu screen or press the MENU button.
Changing the display mode
You can view information such as track numbers or titles in the display while music is played or stopped. Change the display mode by operating the Shuttle switch in the Menu mode.
- Lap Time: Elapsed time display mode The following will be displayed after a music title and artist name are displayed.
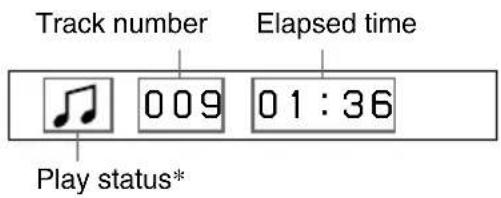
* Play: Displays and alternately.
Stop: Displays
Search track: Displays ▶▶▶ or ◀◀◀.
Fast-forward/Fast-rewind: Displays ▶▶ or ◀◀.
• Title: Title display mode When the music title includes more than 12 characters, the title will be automatically scrolled.

- Track info: Track information display mode The track title, CODEC, and bit rate are displayed. When the information includes more than 12 characters, the information will be automatically scrolled.

While searching, fast-forwarding, or fast-rewinding a track, the current playing position is displayed.
Changing the display mode (continued)
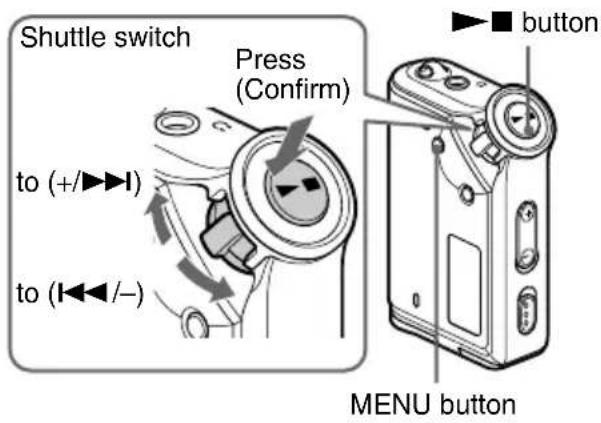
1 Press the MENU button.
The menu screen is displayed.

REPEAT MODE>
2 Rotate the Shuttle switch to select
“DISPLAY >” and press the ▶■
button to confirm.
The selected display mode blinks.
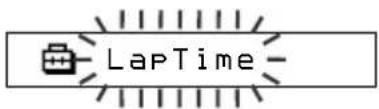
3 Rotate the Shuttle switch to select a desired display mode and press the
▶■ button to confirm.
The display switches to the selected display mode.

DISPLAY>
4 Press the MENU button.
The display returns to the normal screen.
To cancel the menu mode
Select [RETURN] in the menu screen or press the MENU button.
Note
The display automatically returns to the normal playback screen if you do not press any buttons for 60 seconds.
Selecting the group display mode
For any menu mode, you can select the group display by pressing the GROUP button.

To cancel the group mode
Press the GROUP button in the group mode screen.
Note
The display automatically returns to the normal playback screen if you do not operate any button for 30 seconds.
Adjusting treble and bass (Digital sound preset)
You can adjust the treble and bass. You can preset two settings, which can be selected during playback.
Selecting the Sound quality
Default settings
| Sound SOUND 1 SOUND 2 SOUND OFF | ||
| quality | (S1) (S2) | (NORMAL SOUND) |
| Bass +1 +3 ±0 | ||
| Treble ±0 ±0 ±0 | ||

Press and hold the REPEAT/SOUND button for half a second.
The Sound quality setting is changed as follows:

To return to the normal Sound quality Select "SOUND OFF."
Adjusting the sound quality
You can adjust the sound quality of bass and treble parts.
Sound quality Emphasis level
| Bass -4 to +3 |
| Treble -4 to +3 |
You can preset desired sound quality settings as "Sound 1" and "Sound 2." While playing music, you can assign a preset sound quality to music.

1 Press the MENU button. The menu screen is displayed.

2 Rotate the Shuttle switch to select "SOUND >" and press the ▶■ button to confirm.
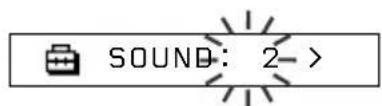
Adjusting treble and bass (Digital sound preset) (continued)
3 Set the tone for "SOUND 1."
① Rotate the Shuttle switch to select "SOUND 1 >" and press the ▶■ button to confirm.
② “BASS:+1” appears, rotate the Shuttle switch to adjust the emphasis level of bass sound and press the ▶■ button to confirm.
③ “TREBLE: 0” appears, rotate the Shuttle switch to adjust the emphasis level of treble sound and press the ▶■ button to confirm.
4 Press the MENU button
The display returns to the normal screen.
To adjust the "SOUND 2" setting
Select "SOUND 2" in step 3.
To cancel the menu mode
Select [RETURN] in the menu screen or press the MENU button.
Locking the controls (HOLD)
You can protect your Network Walkman against accidental operation by using the HOLD function when carrying it.

natural_image
Technical line drawing of a mechanical device with ports and a dial (no text or symbols)HOLD switch
Slide the HOLD switch in the direction of the arrow.
All operation buttons are disabled.
If you press buttons while the HOLD switch is on, "HOLD" blinks in the display.
To release the HOLD function
Slide the HOLD switch in the opposite direction of the arrow.
Storing non-audio data
You can transfer data from the hard disk of your computer to the built-in flash memory using Windows Explorer.
The built-in flash memory is displayed in Windows Explorer as an external drive (for example: as the D drive).
Notes
- You cannot operate the SonicStage software while operating the data storage function of your Network Walkman to use files stored in the built-in flash memory. The error message “Cannot access the Device/media.” will be displayed when you try to operate both of them simultaneously.
- If you store a lot of non-audio data into the built-in flash memory, the space for audio data is reduced by the same amount.
Adjusting the settings of your Network Walkman
Adjusting the time setting of your Network Walkman to a computer's built-in clock
If the function is set to "ON," the time setting of your Network Walkman is automatically adjusted to the computer's built-in clock when your Network Walkman is connected and audio file transferring is executed (the SonicStage software must be started). "ON" is selected by default.
You cannot play a song with a limited playing period without the time setting of your Network Walkman. Be sure to adjust the time setting.
To set the date and time on your Network Walkman, refer to “Adjusting the current time setting (DATE-TIME)” on page 23.
Changing the setting to "OFF"
The time setting of your Network Walkman does not change even when your Network Walkman is connected to a computer.
1 Press the MENU button.
The menu screen is displayed.

REPEAT MODE>
2 Rotate the Shuttle switch to select "PC CLK:" and press the ▶■ button to confirm.

3 Rotate the Shuttle switch to select "OFF" and press the ▶■ button to confirm.
4 Press the MENU button The display returns to the normal screen.
To change the setting to "ON"
Select "ON" in step 3.
To cancel the menu mode
Select [RETURN] in the menu screen or press the MENU button.
Adjusting the current time setting (DATE-TIME)
You can set and display the current time.
You can also adjust the time setting of your Network Walkman to a computer's built-in clock by connecting your Network Walkman to the computer (page 22).

1 Press the MENU button.
The menu screen is displayed.

REPEAT MODE>
2 Rotate the Shuttle switch to select "DATE-TIME" and press the ▶ button to confirm.
The "year" digit blinks.

3 Rotate the Shuttle switch to adjust the "year" setting and press the ▶■ button to confirm.
The “month” digit blinks.

4 As you did in step 3, adjust the settings for “month” and “date.”
After rotating the Shuttle switch to adjust the "date" setting and pressing the ▶■ button to confirm, the display switches to the time setting screen.
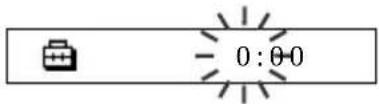
5 Rotate the Shuttle switch to adjust the "hour" setting and press the ▶■ button to confirm.
The "minute" digit blinks.

6 As you did in step 5, adjust the settings for “minute.”
After rotating the Shuttle switch to adjust the "minute" setting and pressing the ▶■ button to confirm, the display switches to the time setting screen.

DATE-TIME
7 Press the MENU button.
The display returns to the normal screen.
To cancel the menu mode
Select [RETURN] in the menu screen or press the MENU button.
To display the current time
Press the MENU button and hold it. You can display the current time while pressing the button.
Notes
- If the unit is not used for a long time, your settings of the date and time may be reset.
- If the current time is not set, the display for the date and time will be “-- --.”
- If PC CLK is set to "ON" (page 22), the time setting of your Network Walkman is automatically adjusted to a computer's built-in clock when your Network Walkman is connected to the computer.
- Depending on the shipping area, the time display format of the unit is set to a 12-hour display or a 24-hour display.
You cannot switch between a 12-hour display and a 24-hour display in the unit.
A 24-hour display is shown in this manual.
Limiting the volume (AVLS)
You can set AVLS (Automatic Volume Limiter System) to limit the maximum volume to prevent auditory disturbance or distraction. With AVLS, you can listen to music at a comfortable volume level.

1 Press the MENU button. The menu screen is displayed.

REPEAT MODE>
2 Rotate the Shuttle switch to select "AVLS" and press the ▶■ button to confirm. "OFF" blinks.

3 Rotate the Shuttle switch to select "ON" and press the ▶■ button to confirm. The (AVLS) indication is displayed. The volume is kept at a moderate level.
4 Press the MENU button.
To change the setting to "OFF" Select "OFF" in step 3.
To cancel the menu mode
Select [RETURN] in the menu screen, or press the MENU button.
Setting the volume using the preset volume function
There are two modes to adjust the volume level.
Manual mode: Press the VOLUME +/- button to adjust the volume level in the range of 0 to 31.
Preset mode: Press the VOLUME +/- button to set the volume level to any of three preset levels: LO, MID, or HI.

Setting a volume level of the preset mode
1 Press the MENU button. The menu screen is displayed.

REPEAT MODE>
2 Rotate the Shuttle switch to select "VOL: MAN."

VOL :MAN
3 Press the ▶■ button to confirm. "MAN" blinks.
4 Rotate the Shuttle switch to select "SET >."
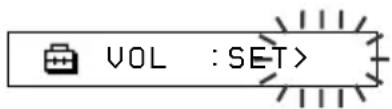
5 Press the ▶■ button to confirm.
"VOL LO xx"* blinks.
* “xx” stands for numeric values of the volume level.
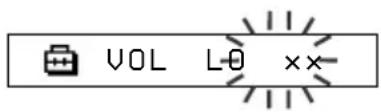
6 Set volume levels of three preset levels: LO, MID, or HI.
① Press the VOLUME +/- button to set the volume level of the LO preset.
② Rotate the Shuttle switch to select “VOL MID xx,” and then press the VOLUME +/- button to set the volume level of the MID preset.
③ Rotate the Shuttle switch to select “VOL HI xx,” and then press the VOLUME +/- button to set the volume level of the HI preset.
7 Press the ▶■ button to confirm.
8 Press the MENU button.
The display returns to the normal screen.
With these settings, you can adjust the volume level to any of three preset levels: LO, MID, or HI.
To cancel the menu mode
Select [RETURN] in the menu screen or press the MENU button.
Note
If AVLS (page 24) is set, the actual volume may be lower than the settings.
Switching to the manual mode
1 Press the MENU button. The menu screen is displayed.
2 Rotate the Shuttle switch to select "VOL: SET."

3 Press the ▶■ button to confirm. “SET >” blinks.
4 Rotate the Shuttle switch to select "MAN."

5 Press the ▶■ button to confirm.
6 Press the MENU button. The display returns to the normal screen. With this setting, you can adjust the volume level by pressing the volume button.
Turning off the beep sound (BEEP)
You can turn off the beep sounds of your Network Walkman.
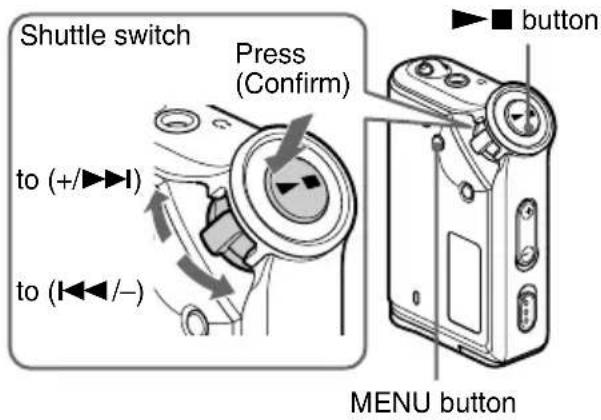
Shuttle switch
Press (Confirm)
▶■ button
to (+/▶▶)
to (◄◄◄ /—)
MENU button
1 Press the MENU button.
The menu screen is displayed.
REPEAT MODE>
2 Rotate the Shuttle switch to select
“BEEP:” and press the ▶■ button to confirm.
"ON" blinks.
BEEP:ON
3 Rotate the Shuttle switch to select
“OFF” and press the ▶■ button to confirm.
BEEP:OFF
4 Press the MENU button.
The display returns to the normal screen.
To change the setting to "ON"
Select "ON" in step 3.
To cancel the menu mode
Select [RETURN] in the menu screen, or press the MENU button.
Changing the backlight setting
You can select ON or OFF.
Menu Backlight mode
OFF Always off
ON Turns on for three seconds
after each operation
(or until scrolling is complete)
Shuttle switch
button
Press
(Confirm)
to (+/▶▶)
to (◀◀/−)
MENU button
To set "ON"
1 Press the MENU button.
The menu screen is displayed.
REPEAT MODE>
2 Rotate the Shuttle switch to select
“LIGHT:” and press the ▶■ button to confirm.
"OFF" blinks.
LIGHT:OFF
3 Rotate the Shuttle switch to select "ON"
and press the ▶■ button to confirm.
LIGHT:ON
4 Press the MENU button.
The display returns to the normal screen.
To change the setting to "OFF"
Select "LIGHT: OFF" in step 3.
To cancel the menu mode
Select [RETURN] in the menu screen or press the MENU button.
Other functions
Regrouping songs (REGROUP)
The songs group function may be disabled* when a song has been deleted from or added the built-in flash memory by operating the computer in which the SonicStage software is not installed (page 10). In such a case, you may enable the group function by regrouping audio file. When you need to edit audio file, make sure that you connect your Network Walkman to the computer and use the SonicStage software.
* The order of songs will not be changed even if the song group function is disabled.

1 Press the MENU button.
The menu screen is displayed.

REPEAT MODE>
2 Rotate the Shuttle switch to select
"REGROUP" and press the ▶■
button to confirm.

REGROUP: -N
You cannot regroup audio file while playing music.
3 Rotate the Shuttle switch to select "Y"
and press the ▶■ button to confirm.
"Really?" is displayed.

Really?
4 Press the ▶■ button.
Regrouping starts and “REGROUPING” blinks. When regrouping audio file is complete, “COMPLETE” is displayed and the display returns to the indication in step 2.
5 Press the MENU button.
The display returns to the normal screen.
To cancel the menu mode
Select [RETURN] in the menu screen or press the MENU button.
Note
You cannot regroup songs while playing music.
("REGROUP" will not be displayed in the menu screen.)

Tip
In some cases, you may not be able to restore the former grouping. When you need to edit audio file, connect your Network Walkman to the computer and use the SonicStage software.
Formatting memory (FORMAT)
You can use your Network Walkman to format the built-in flash memory.
If memory is formatted, all data previously stored in the memory will be erased. Be sure to verify the data stored in the memory prior to formatting.
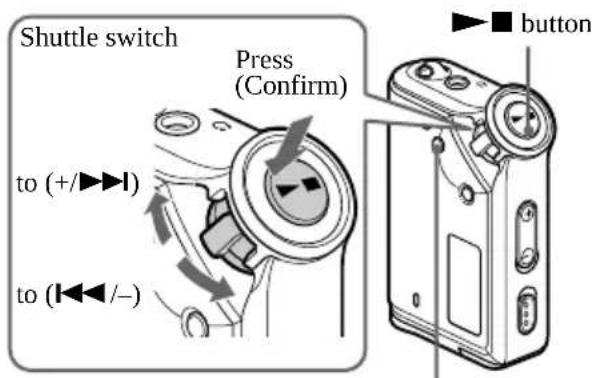
MENU button
1 Press the MENU button.
The menu screen is displayed.

REPEAT MODE>
2 Rotate the Shuttle switch to select
"FORMAT" and press the ▶■ button to confirm.

FORMAT:N-
You cannot format memory while playing music.
3 Rotate the Shuttle switch to select "Y"
and press the ▶■ button to confirm.
"Really?" is displayed.
4 Press the ▶■ button.
"FORMATTING" blinks and formatting starts.
When formatting is complete,
"COMPLETE" is displayed and the display returns to the indication in step 2.
5 Press the MENU button.
The display returns to the normal screen.
To cancel the menu mode
Select [RETURN] in the menu screen or press the MENU button.
To cancel formatting
Select "N" in step 3.
Notes
- You cannot format memory while playing music. ("FORMAT" will not be displayed in the menu screen.)
- The MP3 file manager software and the MP3 audio files transferred with this software are erased as a result of formatting. When you restore the MP3 file manager software, download it from the Sony customer service website. For details, refer to “MP3 file manager software operation” on page 37.
Other Information
Precautions
On installation
Never use your Network Walkman where it will be subjected to extremes of light, temperature, moisture or vibration.
On the headphones
Road Safety
Do not use headphones while driving, cycling, or operating any motorized vehicle. It may create a traffic hazard and is illegal in many areas. It can also be potentially dangerous to play your Network Walkman at a high volume while walking, especially at pedestrian crossings. You should exercise extreme caution or discontinue use in potentially hazardous situations.
Preventing hearing damage
Avoid using the headphones at a high volume. Hearing experts advise against continuous, loud and extended play. If you experience a ringing in your ears, reduce the volume or discontinue use.
Caring for others
Keep the volume at a moderate level. This will allow you to hear outside sounds and to be considerate to the people around you.
Warning
If there is lightning when you are using your Network Walkman, take off the headphones immediately.
On cleaning
- Clean your Network Walkman casing with a soft cloth slightly moistened with water or a mild detergent solution.
- Clean the headphone plug periodically.
Note
Do not use any type of abrasive pad, scouring powder or solvent such as alcohol or benzene as it may mar the finish of the casing.
If you have any questions or problems concerning your Network Walkman, please consult your nearest Sony dealer.
Troubleshooting
If you experience any of the following difficulties while using your Network Walkman, use this troubleshooting guide to help you to remedy the problem prior to consult a Sony dealer. Should any problem persist, consult your nearest Sony dealer. For trouble concerning operations while connected to your computer, please refer to “Troubleshooting” in the online help of the supplied software in addition.
To reset the player
If your Network Walkman does not operate normally or if there is no sound, even after checking the troubleshooting guide below, remove the battery, then re-insert it.
What happened?
On operating
| Symptom | Cause/Remedy |
| There is no sound. Noise is generated. | The volume level is set to zero.Turn the volume up (page 12).The headphone jack is not connected properly.Connect the headphone jack properly (page 12).The headphone plug is dirty.Clean the headphone plug with a soft dry cloth.Songs with a limited playing period is played.Songs with an expired playing period cannot be played.No audio files are stored in the memory.If “NO DATA” is displayed, transfer audio file(s) from the computer. |
| Buttons do not work. | The HOLD switch is set to on.Set the HOLD switch to off (page 20).Your Network Walkman contains moisture condensation.Keep your Network Walkman aside for a few hours.The remaining battery power is insufficient.Replace the battery (page 7). |
| The volume is not loud enough. | The AVLS is enabled.Disable the AVLS (page 24). |
| There is no sound from the right channel of the headphones. | The headphone jack is not fully connected.Connect the headphone jack fully (page 12).The extension headphone cord is not properly connected to the headphone jack of your Network Walkman or the headphone cord.Connect them properly (page 12). |
| Playback has stopped suddenly. | The remaining battery power is insufficient.Replace the battery (page 7). |
On the display window
| Symptom | Cause/Remedy |
| The backlight is not turned on. | LIGHT is set to “OFF.” In the menu mode, set “LIGHT” to “ON” (page 26). |
| “☐” is displayed for a title. | Characters that cannot be displayed on your Network Walkman are involved. Use the supplied SonicStage software to rename the title with appropriate characters. |
On the connection with the computer or supplied software
| Symptom | Cause/Remedy |
| The software cannot be installed. | An operating system not compatible with the software is used.→ For details, refer to the separate manual “SonicStage operating instructions.” |
| “CONNECT” is not displayed when connecting to the computer with the dedicated USB cable. | ·Please wait for the authentication of the SonicStage software.·Another application is running on the computer.→ Wait for a while and reconnect the USB cable. If the problem persists, disconnect the USB cable, restart the computer, and then reconnect the USB cable.·The dedicated USB cable is disconnected.→ Connect the dedicated USB cable.·A USB hub is used.→ Connecting via a USB hub is not guaranteed. Connect the dedicated USB cable directly to the computer. |
| Your Network Walkman is not recognized by the computer when it is connected to the computer. | The dedicate USB cable is disconnected.→ Connect the dedicated USB cable. |
| Song cannot be transferred to your Network Walkman. | ·The dedicated USB cable is not connected properly.→ Connect the USB cable properly.·The free space of the built-in flash memory to where you want to transfer audio files to is insufficient.→ Transfer any unnecessary songs back to your computer to increase free space.·You have already transferred to 400 songs or 400 groups to the built-in flash memory using the SonicStage software.→ The maximum number of songs or groups that you can transfer to the built-in flash memory using the SonicStage software is 400.·You have already transferred to 40,000 songs or 400 groups to the built-in flash memory using the MP3 file manager software.→ The maximum number of songs and groups that you can transfer to the built-in flash memory using the MP3 file manager software is 40,000 and 400 respectively. (The maximum number of songs contained in one group is 100.)·Audio files with a limited playing period or playing count may not be transferred due to restrictions set by copyright holders. For details on the settings of each audio file, contact the distributor. |
| The number of audio files that can be transferred to is limited. (Available recording time is short.) | · The free space of the built-in flash memory to where you want to transfer to is not enough for the size of audio files you wish to transfer.→ Transfer any unnecessary audio files back to the computer to increase free space.· Non-audio data is stored in the built-in flash memory to where you want to transfer audio files to.→ Move non-audio data to the computer to increase free space. |
| The operation of the Network Walkman becomes unstable while it is connected to the computer. | USB hub or USB extension cable is used.→ Connecting via a USB hub or USB extension is not guaranteed. Connect the dedicated USB cable directly to the computer. |
| “Failed to authenticate Device/Media” is displayed on the computer screen while connecting the Network Walkman to the computer. | Your Network Walkman is not connected to the computer properly.→ Quit the SonicStage software and verify the connection of the dedicated USB cable. Restart the SonicStage software. |
Other
| Symptom | Cause/Remedy |
| There is no beep sound when your Network Walkman is operated. | BEEP is set to “OFF.”→ In the menu mode, set “BEEP” to ”ON” (page 26). |
| Your Network Walkman gets warm. | Sometimes, during normal conditions, the player becomes slightly warm. |
Messages
Follow the instructions below if an error message appears in the display.
| Message | Meaning | Remedy |
| ACCESS | Accessing the built-in flash memory. | Please wait for access to complete. This message appears while transferring audio files and during initialization of the built-in flash memory. |
| AVLS | The volume level exceeds the rated value while the AVLS is enabled. | Turn the volume down or disable the AVLS. |
| CANNOT PLAY | ·Your Network Walkman cannot play certain files because of incompatible formats.·Transferring has been interrupted forcefully. | If the file cannot be played, you can erase it from the built-in flash memory.For details, refer to “To delete abnormal data from the built-in flash memory” (page 33). |
| CONNECT | Your Network Walkman is connected to the computer. | You can operate your Network Walkman using the SonicStage or MP3 file manager software, but you cannot operate the controls on your Network Walkman. |
| ERROR | A malfunction is detected. | Please consult your nearest Sony dealer. |
| EXPIRED | ·The song with a playback restriction has expired.·The current time has not been set to play the song with a playback restriction.·The song is protected by the playback restriction that is not compatible with your Network Walkman. | ·If the current time has not been set yet, set the current time in the menu mode (page 23).·If song cannot be played, you can erase it from the built-in flash memory.For details, refer to “To delete abnormal data from the built-in flash memory (page 33).·Your Network Walkman does not support contents with a limited playing count. For details, refer to “Note on playing songs with a limited playing count” (page 11). |
| FILE ERROR | ·The file cannot be read.·The file is not normal. | Transfer the normal audio file back to the computer and then format your Network Walkman. (For details, refer to “To delete abnormal data from the built-in flash memory” on page 33.) |
| HOLD | All operation buttons are disabled since the HOLD switch is set to on. | Set the HOLD switch to off to operate the buttons. |
| LOW BATT | The battery is low. | You must change the battery (page 7). |
| MEMORY FULL | The memory is full or there are 400 groups. | Delete songs or groups. A group without song is also regarded as one group. To delete groups without song, use the SonicStage software. |
| MG ERROR | An unauthorized distribution file is detected for copyright protection. | Transfer normal audio files back to the computer and then format the built-in flash memory of your Network Walkman. (For details, refer to “To delete abnormal data from the built-in flash memory” on page 33.) |
| NO AUDIO | There is no audio files in the built-in flash memory. | If there is no audio files in the built-in flash memory, use the SonicStage software to transfer audio files. |
To delete abnormal data from the built-in flash memory
If “CANNOT PLAY,” “EXPIRED,” or “FILE ERROR” is displayed, there is a problem with all or part of the data stored in the built-in flash memory.
Please follow the procedures below to erase data you cannot play.
1 Connect your Network Walkman to the computer, and start the SonicStage software.
2 If you have already specified the data with problems (such as expired songs), erase the data from the Portable Player window of the SonicStage software.
3 If the problem persists, click the button on the SonicStage software to transfer all data without problems while your Network Walkman is connected to the computer.
4 Disconnect your Network Walkman from the computer and then format the built-in flash memory using the FORMAT menu (page 28).
Specifications
Maximum recording time (Approx.)
NW-E50
| ATRAC3* | ATRAC3plus* |
| 2 hr. 00 min. (132 kbps) | 1 hr. 00 min. (256 kbps) |
| 2 hr. 30 min. (105 kbps) | 4 hr. 10 min. (64 kbps) |
| 4 hr. 10 min. (66 kbps) | 5 hr. 50 min. (48 kbps) |
| MP3 | |
| 1 hr. 00 min. (256 kbps) | |
| 2 hr. 00 min. (128 kbps) |
NW-E70
| ATRAC3* | ATRAC3plus* |
| 4 hr. 10 min. (132 kbps) | 2 hr. 00 min. (256 kbps) |
| 5 hr. 10 min. (105 kbps) | 8 hr. 30 min. (64 kbps) |
| 8 hr. 20 min. (66 kbps) | 11 hr. 40 min. (48 kbps) |
| MP3 | |
| 2 hr. 00 min. (256 kbps) | |
| 4 hr. 00 min. (128 kbps) |
NW-E90
| ATRAC3* | ATRAC3plus* |
| 8 hr. 20 min. (132 kbps) | 4 hr. 00 min. (256 kbps) |
| 10 hr. 30 min. (105 kbps) | 17 hr. 10 min. (64 kbps) |
| 16 hr. 50 min. (66 kbps) | 23 hr. 20 min. (48 kbps) |
| MP3 | |
| 4 hr. 00 min. (256 kbps) | |
| 8 hr. 00 min. (128 kbps) |
* The values for ATRAC3, ATRAC3plus apply if the MP3 file manager software has been erased from the built-in flash memory.
Sampling frequency
ATRAC3, ATRAC3plus, MP3: 44.1 kHz
Audio compression technology
Adaptive Transform Acoustic Coding3 (ATRAC3) Adaptive Transform Acoustic Coding3plus (ATRAC3plus) MPEG1 Audio Layer-3 (MP3): 8 to 320 kbps, variable bit rate-compliant
Frequency response
20 to 20,000 Hz (single signal measurement)
Output
Headphone: Stereo mini-jack
Signal-to-noise ratio (S/N)
80 dB or more (excluding ATRAC3 66 kbps)
Dynamic range
85 dB or more (excluding ATRAC3 66 kbps)
Operating temperature
5^ to 35^ (67°F to 95°F)
Power source
LR03 (Size AAA) alkaline battery
Battery life (continuous playback)
ATRAC3 format: Approximately 70 hours ATRAC3plus format: Approximately 60 hours MP3 format: Approximately 50 hours
Dimension
56 × 37.3 × 15 mm (w/h/d, projecting parts not included)
Mass
Approx. 40 g (battery not included)
Supplied accessories
Headphones (1) Dedicated USB cable (1) Carrying pouch (1) Neck strap (1) Earbuds (Size S, L) (NW-E70/E90) (1) Extension headphone cord (1) CD-ROM (1) Operating Instructions (1) SonicStage operating instructions (1)
Design and specifications are subject to change without notice.
US and foreign patents licensed from Dolby Laboratories.
Glossary
MagicGate
Copyright protection technology that consists of authentication and encryption technology. Authentication ensures that protected content is transferred only between compliant devices and media, and that protected content is recorded and transferred in an encrypted format to prevent unauthorized copying or playback.
is terminology denoting the copyright protection system developed by Sony. It does not guarantee conversion among other media.
OpenMG
Copyright protection technology that securely manages music content from the EMD/Audio CD on a personal computer. Application software that is installed on the computer encrypts the digital music content when recording on the hard drive. This allows you to enjoy music content on the computer, but prevents unauthorized transmission of this content across a network (or elsewhere). This PC copyright protection complies with “MagicGate”, and allows you to transfer digital music content from a PC’s hard drive to a compliant device.
SonicStage
Copyright protection technology that securely manages music content from the EMD/Audio CD on a personal computer. Application software that is installed on the computer encrypts the digital music content when recording on the hard drive. This allows you to enjoy music content on the computer, but prevents unauthorized transmission of this content across a network (or elsewhere). This PC copyright protection complies with “MagicGate”, and allows you to transfer digital music content from a computer’s hard disk to a compliant device.
ATRAC3
ATRAC3, which stands for Adaptive Transform Acoustic Coding3, is audio compression technology that satisfies the demand for high sound quality and high compression rates.
The ATRAC3 compression rate is approximately 10 times higher than that of the Audio CD, resulting in an increased data capacity for the media.
ATRAC3plus
ATRAC3plus, which stands for Adaptive Transform Acoustic Coding3plus, is audio compression technology that compresses data higher than ATRAC3. The ATRAC3plus is new audio compression technology that enables equal or higher quality sound comparing to ATRAC3.
Bit rate
Indicates the data amount per second. The rate is reflected in bps (bit per second).
64 kbps means 64000 bits of information per second. If the bit rate is large, that means a large amount of information is used to play music. Comparing music of the same format (e.g., ATRAC3plus), 64 kbps data offers better sound quality than 48 kbps data. However, audio files in formats such as MP3 have different encoding methods, and thus sound quality cannot be determined by simply comparing the bit rate.
MP3
MP3, which stands for MPEG-1 Audio Layer-3, is a format standard for music file compression. It was codified by the Motion Picture Experts Group, a working group of ISO (International Organization for Standardization). It compresses audio CD data to approximately one tenth its original size. Because the MP3 encoding algorithm has been made publicly available, there are various encoders and decoders that are compliant with this standard.
Menu list
Press the MENU button to display the menu mode and use the Shuttle switch (rotate: select/press: confirm) to change the settings of your Network Walkman.
For details about each menu, refer to the pages in parentheses. The menu with a “>” mark will be followed by a detailed-setting screen when you press the Shuttle switch to confirm.
| Display (Menu mode) | Purposes |
| REPEAT MODE > | You can select your favorite repeat mode. (page 14) |
| DISPLAY > (Display mode) | You can select your favorite display mode. (page 17) |
| VOL: (Preset volume) | You can preset your desired volume level. (page 24) |
| SOUND > (Digital sounds preset) | You can preset your desired sound quality. (page 19) |
| AVLS: (Automatic Volume Limiter System) | You can set to “ON” or “OFF.” (page 24) |
| BEEP: (Operation sounds setting) | You can set to “ON” or “OFF.” (page 26) |
| LIGHT: (LCD backlight setting) | “OFF”: Always off “ON”: Turns on for three seconds after each operation (page 26) |
| DATE-TIME (Current time setting) | You can set and display the current time. (page 23) |
| PC CLK: (Adjusting the time setting to a computer built-in clock) | You can adjust the time setting of your Network Walkman to a computer built-in clock. (page 22) |
| Display (Menu mode) | Purposes |
| FORMAT > (Formatting memory) | You can format the built-in flash memory. (page 28) |
| REGROUP > (Regrouping data) | You can restore the group function. (page 27) |
| [RETURN] | You can switch to the normal mode by selecting [RETURN] and pressing the ▶■ button. |
MP3 file manager software operation
What you can do with the MP3 file manager
You can transfer MP3 audio files easily, using the MP3 file manager software, to your Network Walkman in the same format (MP3), unlike the SonicStage software, which converts MP3 audio files into ATRAC3 or ATRAC3plus format.
The MP3 file manager software is pre-installed on the Network Walkman at the factory; thereby no installation is necessary.
However, be sure to install the SonicStage software from the supplied CD-ROM in your computer before using the MP3 file manager software. The computer will not recognize your Network Walkman unless you install the SonicStage software (in the supplied CD-ROM) first. If you use a computer that is not installed with the SonicStage software, you need to install the driver file for your Network Walkman from the Sony customer service website (http://www.css.ap.sony.com/).
System requirements
• OS: Windows XP Professional Windows XP Home Edition Windows 2000 Professional (Simplified Chinese)
• CPU: Pentium II 400MHz or higher
• RAM: 64MB or more
- HDD: 5MB or more
- Display: 16bit color or higher, 800 × 600 dots or better
- USB port (Supports USB (Previously called USB1.1))
Transferring MP3 audio files from the computer to your Network Walkman
1 Connect your Network Walkman to your computer.
Connect the small connector of the supplied dedicated USB cable into the USB jack on the Network Walkman, then the large connector to a USB port on your computer. "CONNECT" appears in the display.

2 Click [My Computer]-[removable disk:]* on your computer.
* [Memory Stick - MG] in the case of Windows XP Professional/Windows XP Home Edition
3 Click [Esys] folder to open in the removable disk.
4 Double-click [MP3FileManager.exe] to start it.
Transferring MP3 audio files from the computer to your Network Walkman (continued)
5 Drag the MP3 audio files you want to transfer to your Network Walkman and drop them to the MP3 File Manager screen.
You can also transfer MP3 format audio files to your Network Walkman by dragging a folder.

Notes
- Do not disconnect the USB cable or remove your Network Walkman when the MP3 File Manager software is running. If you do, operation is not guaranteed.
- The ACCESS lamp blinks while your Network Walkman accesses the computer.
- Do not disconnect the USB cable or remove your Network Walkman when the ACCESS lamp is blinking. The data being transferred may be destroyed.
• Install Service Pack 3 or later when you use Windows 2000. - With the Network Walkman, priority is given to the display of ID3 Tag information. (ID3 Tag is the format that adds music title or artist name information, etc., to an MP3 file. The Network Walkman supports version 1.0/1.1/2.2/2.3/2.4.)
- Use of your Network Walkman with a USB hub or a USB extension cable is not guaranteed. Always connect your Network Walkman to the computer directly using the dedicated USB cable.
- Some USB devices connected to the computer may interfere with the proper operation of your Network Walkman.
-
The control buttons on your Network Walkman are all disabled while it is connected to a computer.
-
You can display the data stored in the built-in flash memory using Windows Explorer when your Network Walkman is connected to the computer.
- MP3 audio files compliant with the MP3 File Manager software are the one sampling frequency rate of 44.1 kHz, bit rate 8 – 320 kbps.
If the MP3 File Manager software is accidentally erased by formatting, etc., you can restore it from the supplied CD-ROM by following the procedure below:
1 Connect your Network Walkman to your computer with the USB cable.
2 Insert the supplied CD-ROM into your computer.
3 Open the CD-ROM, select the [MP3FileManager] folder and open it with Windows Explorer.
4 Select the folder ([English], [Korean], [Simplified Chinese]) suitable for your computer's OS and open it with Windows Explorer.
5 Double-click the installation file ([MP3FileManager_1.1_Update_ENU.exe], [MP3FileManager_1.1_Update_KOR.exe], [MP3FileManager_1.1_Update_CHN.exe]). Installation starts. Follow the instructions of the installation wizard.
(You can also download the MP3 File Manager software from the Sony customer service website [http://www.css.ap.sony.com/].)
On language support
The ability to display the languages on your MP3 File Manager will depend on the installed OS on your PC. For better results, please ensure that the installed OS is compatible with the desired language you want to display.
- We do not guarantee all the languages will be able to be displayed properly on your MP3 File Manager
- User-created characters and some special characters may not be displayed.
Display of MP3 file manager

Double click this to show the included track list. Double click again to hide the track list.
2 Track list
3 (Erase)
Click this button to erase selected albums or tracks.
4 全部删除ase
Click this button to erase all the albums or tracks.
5 (主闭t)
Clicks this button to finish the MP3 file manager.
6 A selected line turns blue
You can select several albums or tracks simultaneously using the CTRL key or Shift key.
Note
Audio files transferred to the built-in flash memory using SonicStage software are not displayed on the MP3 file manager screen. In addition, audio files transferred to the built-in flash memory using MP3 file manager software are not displayed on the SonicStage software screen.
Erasing audio file
You can erase a song stored in the built-in flash memory by track or album using MP3 file manager.
Ordering audio file
You can move a song stored in the built-in flash memory by track or album using MP3 file manager.
1 Open the MP3 file manager.
2 Select the title you want to erase.
3 Click the (Erase) button in the screen.
1 Open the MP3 file manager.
2 Select the title you want to move.
3 Move it by drag and drop.

Tip
You can select several albums or tracks simultaneously using CTRL key or Shift key. However, albums and tracks cannot be selected simultaneously.
A
A-B Repeat 15
ACCESS lamp 10, 38
Accessories 6
ATRAC3 35
ATRAC3plus 35
Audio CDs 4
AVLS (Limiting the volume) 9, 24
B
Backlight 26
Battery 5, 7
BEEP (Beep sound) 26
Bit rate 35
C
CD (Audio CDs) 4
CD-ROM 6, 10
Clock 22, 23
Computer 4, 10, 37
D
DATE-TIME 23
Display 9, 15, 33
Display mode 17
Download 4
E
EMD service 4, 11
Explorer (Windows Explorer) 10, 21
F
Fast-forward 13
Fast-rewind 13
FORMAT 28
Formatting 28
G
Group 13,18
H
Headphones 6, 12, 29
HOLD 20
HOLD function (Locking the controls) 20
L
LIGHT 26
Limiting the volume (AVLS) 24
Listening 12
Locking the controls (HOLD function) 20
M
MENU button 14, 17-20, 22-28
Menu list 36
MP3 4,10,35,37
MP3 file manager software 37
0
OpenMG 35
P
PC CLK 22
Play 12
Index (continued)
R
Regroup 27
Remaining battery indication
7
Repeat 14
Repeat count 17
Reset 30
RETURN 36
s
Sentence Repeat 16
Serial Number 6
Shuffle Repeat 14
Shuttle switch 13-20, 22-28
Skip to the beginning of a track
13
SonicStage 35
Sound preset (Digital Sound Preset)
19
T
Time setting 22, 23
Title 17
Track Repeat 15
Transferring 4, 10, 37
Troubleshooting 30
U
USB cable 6, 10, 37
V
Volume 24
W
WAV format 4
Windows Explorer 10, 21, 38
警告
natural_image
Illustration of a vintage desktop computer connected to a device with sound waves (no text or symbols)USB 连接
natural_image
Cartoon illustration of a man running while holding a device with musical notes (no text or symbols)其它特征
natural_image
Line drawing of a portable electronic device with earphones and cable (no text or symbols)□□□□□□□
□□□□□□
•
•
•

natural_image
Line drawing of a portable electronic device with cables and earphones (no text or symbols)□□□□□□□□

•

natural_image
Coiled cable with connectors and connectors (no text or symbols visible)□□□□□□□□□□□□□□□□
□□□□□□□□□□□□□□□□□□□
□□
□□□□□□□□□□□□□□□□□□□□□□□
对于 NW-E70/E90 用户
注意事项
在驾
驶时请勿使用耳机。
natural_image
Diagram of a mechanical joint or connector assembly (no text or symbols visible)什么是组群功能?
natural_image
Line drawing of a mechanical device with ports and a dial (no text or symbols)HOLD 开关
按箭头方向滑动 HOLD 开关。
所有操作钮都将无效。
ATRAC3, ATRAC3plus, MP3: 44.1 kHz
音频压缩技术
Adaptive Transform Acoustic Coding3 (ATRAC3) Adaptive Transform Acoustic Coding3plus (ATRAC3plus) MPEG1 Audio Layer-3 (MP3): 8-320kbps,兼容可变比特率
频率响应
20 - 20,000 Hz (单一信号测量)
输出
耳机:立体声迷你插孔
信噪比(S/N)
- Portable IC Audio Player
- Network Walkman
- 网络随身听网络随身听
- WARNING
- To prevent fire or shock hazard, do not expose the unit to rain or moisture.
- Note on installation
- Notice for users
- On the supplied software
- Table of Contents
- Basic Operations
- Advanced Operations
- Adjusting the settings of your Network Walkman
- Other functions
- Other Information
- MP3 file manager software operation
- Overview
- What you can do with your Network Walkman
- Store digital audio files on your computer.
- Transfer files to your Network Walkman.
- Enjoy music with your Network Walkman.
- Other features
- NOTES:
- Step 1: Checking the package contents
- About the Serial Number
- For the customers of NW-E70/E90
- Notes
- Step 2: Inserting the battery
- Battery duration\*
- On the remaining battery indication
- Locating controls
- Display
- Transferring audio files from the computer to your Network Walkman
- Note
- z Tip
- Note on playing songs with a limited playing period (Timeout contents)
- Note on playing songs with a limited playing count
- Listening to music with your Network Walkman
- Connect the headphones.
- To use the headphones extension cord
- Start playback.
- Tip
- If playback does not start
- To stop playback
- To adjust the volume
- How to install the earbuds correctly
- What is the Group function?
- Transferring by group
- On other operations
- Repeat mode
- - Track Repeat (TRK Rep)
- • A-B Repeat (A-B Rep)
- - Sentence Repeat (SENTENCE Rep)
- Selecting the repeat mode
- Press the MENU button.
- To cancel the Menu mode
- Playing the tracks repeatedly (Track Repeat)
- Playing a specified section repeatedly (A-B Repeat)
- Repeat mode (continued)
- Tips
- To clear the start point (A) and end point (B)
- To cancel the A-B Repeat mode
- Playing specified sentences repeatedly (Sentence Repeat)
- 1
- 2
- 3
- To clear the setting point
- To cancel the Sentence Repeat mode
- Setting the repeat counts
- Changing the display mode
- Changing the display mode (continued)
- Selecting the group display mode
- Adjusting treble and bass (Digital sound preset)
- Selecting the Sound quality
- Press and hold the REPEAT/SOUND button for half a second.
- Adjusting the sound quality
- Adjusting treble and bass (Digital sound preset) (continued)
- Set the tone for "SOUND 1."
- Press the MENU button
- Locking the controls (HOLD)
- Storing non-audio data
- Adjusting the time setting of your Network Walkman to a computer's built-in clock
- Adjusting the current time setting (DATE-TIME)
- To display the current time
- Limiting the volume (AVLS)
- Setting the volume using the preset volume function
- Setting a volume level of the preset mode
- Switching to the manual mode
- Turning off the beep sound (BEEP)
- Changing the backlight setting
- Regrouping songs (REGROUP)
- Formatting memory (FORMAT)
- To cancel formatting
- Precautions
- On installation
- On the headphones
- Road Safety
- Preventing hearing damage
- Caring for others
- On cleaning
- Troubleshooting
- To reset the player
- What happened?
- Messages
- To delete abnormal data from the built-in flash memory
- Specifications
- Maximum recording time (Approx.)
- Sampling frequency
- Audio compression technology
- Frequency response
- Output
- Signal-to-noise ratio (S/N)
- Dynamic range
- Operating temperature
- Power source
- Battery life (continuous playback)
- Dimension
- Mass
- Supplied accessories
- Glossary
- MagicGate
- OpenMG
- SonicStage
- ATRAC3
- ATRAC3plus
- Bit rate
- MP3
- Menu list
- What you can do with the MP3 file manager
- System requirements
- Transferring MP3 audio files from the computer to your Network Walkman
- Transferring MP3 audio files from the computer to your Network Walkman (continued)
- If the MP3 File Manager software is accidentally erased by formatting, etc., you can restore it from the supplied CD-ROM by following the procedure below:
- On language support
- Display of MP3 file manager
- Erasing audio file
- Ordering audio file
- A
- B
- C
- D
- E
- F
- G
- H
- L
- M
- 0
- P
- Index (continued)
- R
- s
- T
- U
- V
- W
- 警告
- 其它特征
- 对于 NW-E70/E90 用户
- 注意事项
- 什么是组群功能?
- 按箭头方向滑动 HOLD 开关。
- 音频压缩技术
- 频率响应
- 输出
- 信噪比(S/N)
Brand : SONY
Model : Walkman NW-E70
Category : Mp3 player