
LOC-80 - Audio/video converter Scosche - Free user manual and instructions
Find the device manual for free LOC-80 Scosche in PDF.


| Product Type | Speaker Level Converter (Line Output Converter) |
| Brand | Scosche |
| Model | LOC-80 |
| Input Connections | Speaker level inputs (4 wires: Left +/-, Right +/-) |
| Output Connections | RCA jacks (Left white, Right red) |
| Gain Adjustment | Dual channel adjustable gain (screwdriver adjustment) |
| Construction | Non-electronic (passive) device |
| Application | Connect stereo without RCA outputs to amplifier/EQ booster |
| Wiring Color Codes | White: Left (+), White/Black: Left (-), Gray: Right (+), Gray/Black: Right (-) |
| Dimensions | Approximately 2 x 1.5 x 0.75 inches |
| Weight | Approximately 0.1 lbs |
| Warranty | 90 days from purchase date |
| Country of Origin | China |
| Included Accessories | None (unit only) |
| Installation | Requires soldering or butt connectors/wire nuts |
| Maintenance | None, keep dry and clean |
| Safety | Disconnect power before installation; avoid short circuits |
| Spare Parts & Repairability | Not user-serviceable; replacement recommended if defective |
Frequently Asked Questions - LOC-80 Scosche
User questions about LOC-80 Scosche
0 question about this device. Answer the ones you know or ask your own.
Ask a new question about this device
Download the instructions for your Audio/video converter in PDF format for free! Find your manual LOC-80 - Scosche and take your electronic device back in hand. On this page are published all the documents necessary for the use of your device. LOC-80 by Scosche.
USER MANUAL LOC-80 Scosche
Thank you for purchasing the LOC-80 Speaker Level Converter from Scosche Industries, Inc. The LOC-80 is a non-electronic device that allows any stereo to be connected to an amplifier/EQ booster. This is accomplished by converting the speaker high level outputs of any stereo into low level RCA jacks by electronically converting the signal as it passed through the LOC-80.
Use the LOC-80 whenever you wish to add an amplifier or EQ booster to a stereo that is not equipped with RCA (low-level) outputs. By simply connecting the speaker inputs of the LOC-80 to the speaker outputs of your radio, you can now add any amplifier or EQ booster to your car audio system. (See Illustration A).
ILLUSTRATION A:
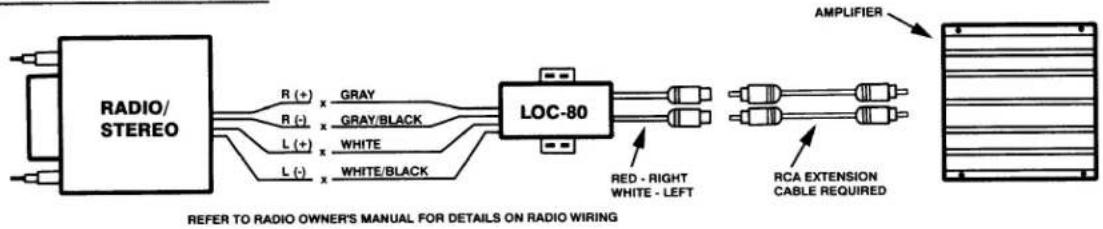
flowchart
graph LR
    A["RADIO/STEREO"] -->|R (+) x GRAY| B["LOC-80"]
    A -->|R (-) x GRAY/BLACK| B
    A -->|L (+) x WHITE| B
    A -->|L (-) x WHITE/BLACK| B
    B --> C["RED - RIGHT WHITE - LEFT"]
    B --> D["RCA EXTENSION CABLE REQUIRED"]
    E["AMPLIFIER"] --> F["Output Panel"]
DIRECTIONS - HELPFUL HINTS
■ The wiring colors of the LOC-80 may be different from the wiring colors found on your stereo.
■ Consult your stereo owner's manual to determine the correct wire functions.
■ Always work in an area with ample lighting.
■ For helpful hints on connecting wires, see the section entitled "Professional Wiring Tips".
CONNECTING THE LOC-80 TO YOUR RADIO:
1) Connect the left (+) speaker wire of your stereo to the white wire of the LOC-80. Connect the left (-) speaker wire to the white/black wire of the LOC-80. Connect the right (+) speaker wire to the gray wire of the LOC-80. Connect the right (-) speaker wire to the gray/black wire of the LOC-80. (See Illustration A.)
2) Connect the RCA output jacks of the LOC-80 to the RCA inputs of your amplifier/EQ booster. Red = Right, White = Left.
3) Check all connections and test the sound system.
The LOC-80 is equipped with output level controls that can be adjusted for proper sound level matching. This is done by inserting a small flat blade or Phillips head screwdriver into the gain adjustment holes, located on top of the LOC-80. By turning clockwise, the gain for that individual channel, or the amount of sound allowed to pass through the LOC-80 is increased. By turning counterclockwise, the gain for that individual channel is decreased. If you feel that after increasing the volume of your stereo, the sound is too quiet, then equally increase both the left and right gains of the LOC-80 until the sound level is adequate. If the sound level is too loud with only a slight increase in stereo volume, or distortion (poor sound quality) is noticeable, then equally decrease the gains of the LOC-80.
PROFESSIONAL WIRING TIPS
Warning: Never work with more than one connection at a time, as doing so may cause an electrical short circuit if two incompatible wires are allowed to touch.
Note: Soldering all wiring connections is recommended over simply twisting and taping connections. However, if a soldering iron is not available, butt connectors or wire nuts are recommended.
Soldering Wires:
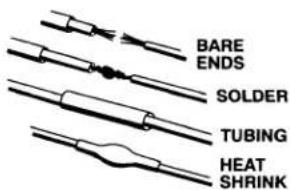
Strip back wire ends approximately 1/2" each. If using shrink tubing to protect your connection, slip a 1" section to be used later over one of the wires.
Twist wire ends together. Begin by heating the bare wires with a soldering iron. Then apply the solder until it is absorbed into the strands of the wire. Allow wires to cool and solder to harden. Once cool, cover the connection with heat shrink tubing if used previously, or a UL approved electrical tape. Then move on to the next connection.
Butt Connectors:
Strip back wire ends approx. 1/4 to 3/8" each. Crimp one end of the butt connector to one of the wires you wish to splice. Crimp the other end of the butt connector to the wire you wish to splice it to. Test crimp by gently tugging on both wires.
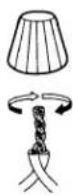
Wire Nuts: Twist together both ends of the wires you wish to connect. Slip the wire nut over the wire ends and twist until it is firmly seated over the wire ends. Test the connection by gently tugging the wires.

WARRANTY
Scosche Industries, Inc. warrants this product to be free from defects in material and workmanship, for a period of ninety days, from date of purchase. All Scosche products are sold with the understanding that the purchaser has independently determined the suitability of such products. This warranty does not cover any expenses incurred in the removal and reinstallation of the product. This warranty is offered to the original purchaser of the product only.
This warranty does not apply to the product which has been damaged by accident, or which has been misused, altered, or installed improperly.
If the product should prove defective within the warranty period return the product with sales slip, postage prepaid to Scosche Industries, Inc.
Your dated sales slip/proof of purchase will establish your warranty eligibility. Scosche, at its option will replace or repair the product free of charge and return the product to you postage prepaid.
In no event shall Scosche be responsible for claims beyond the replacement value of the defective product, or in any way liable or responsible for consequential or incidental damages. No express warranties and no implied warranties, whether for fitness or any particular use, or otherwise, except as set forth above (which is made expressly in lieu of all other warranties) shall apply to products sold by Scosche. No waiver, alteration, addition or modification of the foregoing conditions shall be valid, unless made in writing and signed by an executive officer of Scosche Industries, Inc.
No salesperson, representative or agent of Scosche is authorized to give any guarantee, warranty or make any representation contrary to the above.
Brand : Scosche
Model : LOC-80
Category : Audio/video converter