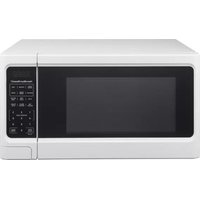
USER MANUAL P100N30AP-S3B HAMILTON BEACH
Model No. P100N30AP-S3B / P100N30AP-S3W
Hamilton Beach® is a registered trademark of Hamilton Beach Brands, Inc. used under license by Wal-Mart Stores, Inc.
Microwave Oven
Owner's Manual

Welcome....2
Grounding 4
Excessive Energy Warning....5
Features And Benefits, Specifications 5

Operating Your Microwave
Setting Up Your Microwave....7
Parts And Accessories....7
Turntable Installation....7
Control Panel....8
Operation....9

Baked Potato.... 11
Popcorn 11
Pizza....12
Beverage 12
Frozen Dinner.... 12
Reheat 12

Use And Care
Care And Cleaning.... 13
Troubleshooting 14
Warranty.... 15
Technical Support 15
2
7
11
13
Welcome!
Congratulations, you have acquired a high-quality Hamilton Beach™ Microwave Oven. This unit is packed with many extra features that you will find convenient to use, including six different one-touch cooking buttons provide for convenient meal preparation and tasty snacks. Follow the safety precautions and operating instructions provided in this easy-to-use manual. Please take the time to read it, and save these instructions for future use. Please also remember to record the model, series code and serial number. They are on the label on the back of the unit. Save your receipt by stapling it to this manual for convenient access.
Model number: P100N30AP-S3B / S3W
Serial number ____
Series code ____
Date of purchase
!! IMPORTANT SAFETY INSTRUCTIONS !!
When using electrical appliances, basic safety precautions should always be followed, including the following:
WARNING! - To reduce the risk of burns, electric shock, fire, injury to persons, or exposure to excessive microwave energy:
- Read all instructions before using the appliance.
- Read and follow the specific PRECAUTIONS TO AVOID POSSIBLE EXPOSURE TO EXCESSIVE MICROWAVE ENERGY found on page 5.
- This appliance must be grounded. Connect only to properly grounded outlet. See "IMPORTANT GROUNDING INSTRUCTIONS" found on page 4.
- Install or locate this appliance only in accordance with the provided installation instructions.
- Some products such as whole eggs and sealed containers, like closed glass jars, are able to explode and should not be heated in this oven.
- Use this appliance only for its intended use as described in the manual. Do not use corrosive chemicals or vapors in this appliance. This type of oven is specifically designed to heat, cook, or dry food. It is not designed for industrial or laboratory use.
- As with any appliance, close supervision is necessary when used by children.
Hamilton Beach®
- Do not operate this appliance if it has a damaged cord or plug, if it is not working properly, or if it has been damaged or dropped.
- This appliance should be serviced only by a qualified service personnel. Contact your nearest authorized service facility for examination, repair or adjustment.
- Do not cover or block any openings on this appliance.
- Do not store this appliance outdoors. Do not use this product near water. For example, do not use near a kitchen sink, in a wet basement, near a swimming pool, or similar locations.
- Do not immerse cord or plug in water.
- Keep cord away from heated surfaces.
- Do not let cord hang over edge of table or counter.
- When cleaning the surfaces between the door and the oven that come together upon closing, use only mild, nonabrasive soaps or detergents applied with a sponge or soft cloth.
-
To reduce the risk of fire in the oven cavity:
-
Do not overcook food. Carefully attend appliance when paper, plastic, or other combustible materials are placed inside the oven to facilitate cooking.
- Remove wire twist ties from paper or plastic bags before placing bag in oven.
- If materials inside the oven ignite, keep oven door closed, turn oven off and disconnect the power cord, or shut off power at the fuse or circuit breaker panel.
-
Do not use the cavity for storage purposes. Do not leave paper products, cooking utensils, or food in the cavity when not in use.
-
Liquids such as water, coffee, or tea are able to be overheated beyond the boiling point without appearing to be boiling. Visible bubbling or boiling when the container is removed from the microwave oven is not always present. THIS COULD RESULT IN VERY HOT LIQUIDS SUDDENLY BOILING OVER WHEN THE CONTAINER IS DISTURBED OR A UTENSIL IS INSERTED INTO THE LIQUID.
-
This appliance is intended for household use only.
!! SAVE THESE INSTRUCTIONS !!
Hamilton Beach®
Important Grounding Instructions
This appliance must be grounded. In the event of an electrical short circuit, grounding reduces the risk of electric shock by providing an escape wire for the electric current.
WARNING Improper use of the grounding plug can result in a risk of electric shock.
Three-pronged (grounding) plug


Electrical Requirements
The electrical requirements are 120 volt 60 Hz, AC only, 20 amp.
It is recommended that a separate circuit serving only the oven be provided.
The oven is equipped with a 3-prong grounding plug. It must be plugged into a wall receptacle that is properly installed and grounded.
Properly polarized and grounded outlet
Power Supply Cord
- A short power supply cord is provided to reduce the risks resulting from becoming entangled in or tripping over a longer cord.
- Longer cord sets or extension cords are available and may be used if care is exercised in their use.
- If long cord or extension cord is used:
a) The marked electrical rating of the cord set or extension cord should be at least as great as the electrical rating of the appliance.
b) The extension cord must be a grounding-type 3-wire cord, and the longer cord should be arranged so that it will not drape over the counter top or table top where it can be pulled on by children or tripped over unintentionally.
Notes:
If you have any questions about the grounding or electrical instructions, consult a qualified electrician or service person.
Neither manufacturer nor the dealer can accept any liability for damage to the oven or personal injury resulting from failure to observe the electrical connection procedures.
Radio or TV Interference
Should there be any interference caused by the microwave oven to your radio or TV, check that the microwave oven is on a different circuit, relocate the radio or TV as far away from the oven as feasible or check position and signal of receiving antenna.
Hamilton Beach®

Precautions To Avoid Possible Exposure To Excessive Microwave Energy
- Do not attempt to operate this oven with the door open since open-door operation can result in harmful exposure to microwave energy.
It is important not to defeat or tamper with the safety interlocks.
- Do not place any object between the oven front face and the door or allow soil or cleaner residue to accumulate on sealing surfaces.
- Do not operate the oven if it is damaged. It is particularly important that the oven door close properly and that there is no damage to the:
- Door (bent) 2. Hinges and latches (brokenor loosened)
- Door seals and sealing surfaces
- The oven should not be adjusted or repaired by anyone except properly qualified service personnel.
Features and Benefits
• 1.1 cu. ft. Oven Cavity
• 10 Power Levels
- Six Express Cook One-touch Settings
• Electronic Digital Display With Clock (LED)
- Turntable
- Time Cook
• Time And Weight Defrost
- Remind Signal
- Kitchen Timer
Specifications
Model P100N30AP-S3B / S3W
Power Source..... 120V \~ 60Hz
Power Consumption..... 1500W
Maximum Output ..... 1000W
Oven Capacity.... 1.1 cu. ft.
Turntable Diameter ..... 12.4 inches
External Dimensions..... 21.2x15.7x11.9 inches
Net Weight 34 lbs
How To Test For A Microwave-safe Dish
To determine if a dish is microwave-safe, place the dish in the microwave along with a glass measuring cup filled with one cup of water. Microwave for one minute on high and then carefully feel the dish. If it is warm, it is not microwave-safe.
Arcing - The microwave term for sparks in the oven. Caused by:
• Metal or foil touching the side of the microwave
- Upturned edges of foil not wrapped around the food
- Metals in the microwave such as twist ties, meat pins or metal rimmed dishes
• Recycled paper towels in the microwave that contain small flecks of metal
Hamilton Beach®
Materials For Use In Microwave
To avoid arcing and other hazards, follow these instructions for the use of safe materials in the microwave.
| Browning dish | Follow manufacturer's instructions. The bottom of browning dish must be at least 3/16 inch (0.5 cm) above the turntable. Incorrect usage may cause the turntable to break. |
| Dinnerware | Microwave-safe only . Follow manufacturer's instructions. Do not use cracked or chipped dishes. |
| Glassware | Heat-resistant oven glassware only. Make sure there is no metallic trim. |
| Oven cooking bags | Follow manufacturer's instructions. Do not close with metal tie. Make slits to allow steam to escape. |
| Paper plates/cups | Use for short-term cooking/warming only. Do not leave oven unattended while cooking. |
| Paper towels | Use to cover food for reheating and absorbing fat. Use with supervision for short-term cooking only. |
| Parchment paper | Use as a cover to prevent splattering or a wrap for steaming. |
| Plastic | Microwave-safe only. Follow the manufacturer's instructions. Boiling bags and tightly closed plastic bags should be slit, pierced or vented as directed by package. Due to various manufacturers you may receive varying performance results when using a bacon tray. |
| Plastic wrap | Microwave-safe only. Use to cover food during cooking to retain moisture. Do not allow plastic wrap to touch food. |
| Thermometers | Microwave-safe only. |
| Wax paper | Use as a cover to prevent splattering and retain moisture. |
Materials To Avoid In Microwave
• Metal pans and bakeware
• Recycled paper products
• Non-heat-resistant glass
- Food storage bags
• Dishes with metallic trim
- Brown paper bags
• Non-microwave-safe plastics (e.g. margarine tubs)
- Metal twist ties
Hamilton Beach®
Setting Up Your Microwave
Installation:
- Remove all packing materials and accessories. Examine the oven for any damage such as dents or broken door. Do not install if oven is damaged.
- Select a level surface that provides enough open space for ventilation. Allow for 3 inches of open space next to the sides and back of the microwave. Allow for 12 inches of open space above the microwave. Do not place any items on top of microwave and do not remove the legs from the bottom of the microwave.
- Place the microwave as far away as possible from radios and televisions. Microwave may cause interference to these appliances.
- Plug the microwave into a standard household outlet. Check the rating label of the microwave to ensure the voltage and frequency are compatible with the outlet.
- Do not install microwave oven over a range cook top or other heat-producing appliance. Heat can damage the microwave and void the warranty.
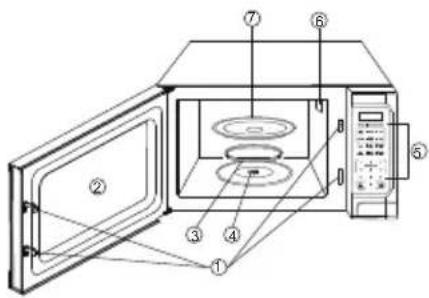
Names of Oven Parts and Accessories
Remove the oven and all materials from the carton. Your oven comes with the following accessories:
Glass tray 1
Turntable ring assembly 1
instruction maunal 1
- Safety interlock system
- Observation window
- Turntable ring assembly
- Turntable shaft
- Control panel
- Wave Guide (Do not remove)
- Glass tray
WARNING: FIRE AND SHOCK HAZARD.
Do not remove the mica board located on the right, inside wall of the cooking compartment. Unplug the microwave immediately and contact service support: 1-855-313-1612. if the mica board becomes damaged or is missing.
Turntable Installation
Hub (underside)
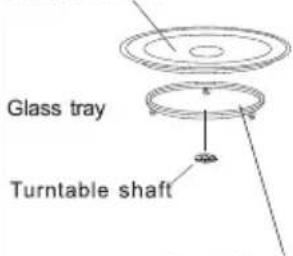
Turntable ring assembly
- Never place the glass upside down. The glass tray should never be restricted.
- Both glass tray and turntable ring assembly must always be used during cooking.
- All food and containers of food are always placed on the glass tray for cooking.
- The glass tray rotates either clockwise or counter-clockwise; this is normal.
- If the glass tray or turntable ring assembly cracks or breaks, contact service support: 1-855-313-1612.
To order a replacement turntable, pls call service support: 1-855-313-1612.
Hamilton Beach®
Control Panel Operation

Cooking time, power, indicators and present time are displayed.
Instant settings to cook popular foods.
3. EXPRESS COOK
NumberPads (1-6)
4. Number Pads (0-9)
Touch to set time, weight or the amount.
5. CLOCK
Touch to setthe clock.
6. POWER LEVEL
Use to set microwave power levels.
7. TIME COOK
Use for multi-stage cooking. It enables cooking at multiple power and time settings automatically.
8. KITCHEN TIMER
The KITCHEN TIMER function can be used alone, even in the process of cooking.
9. TIME DEFROST
Touch to set defrosting time.
10. WEIGHT DEFROST
Touch to set the weight of the food to be defrosted.
11. STOP/CLEAR
Clear all previous settings before cooking.
12. START/+30 SEC
Press to start a cooking program. It is also used to set quick start function or to increase cooking time during cooking.
Hamilton Beach®
Operation Instructions
1. Setting The Clock
This is a 24 or 12 hour clock, and you can select which by pressing CLOCK pad. During cooking, the current time can be seen by touching CLOCK pad.
FOR EXAMPLE: Suppose you want to set the oven clock time to 8:30.
1) In standby mode, touch CLOCK pad once to select 12 hour clock, press again to select 24 hour clock.

flowchart
graph LR
    A["CLOCK"] --> B["1 2 3"]
    B --> C["4 5 6"]
    C --> D["7 8 9"]
    D --> E["0"]
    F["START +30SEC"] --> G["Set the time with numeric buttons you want"]
    H["Once 12 hr Twice 24 hr"] --> A
    I["Setting the CLOCK"] --> B
    I --> C
    I --> E
2) Use the number pads to enter the cooking time (touch number pads 8、3、0 in order to enter 8:30).
3) Press START/+30SEC pad to complete the CLOCK setting.
2. Setting The Kitchen Timer
1) In standby state or during cooking, touch KITCHEN TIMER pad.
2) Enter the amount of time you want to count down by touching the number pads. The maximum time is 99 min. 99 sec.
3) Press START/+30SEC pad to start.

flowchart
graph LR
    A["KITCHEN TIMER"] --> B["1 2 3"]
    B --> C["4 5 6"]
    C --> D["7 8 9"]
    D --> E["0"]
    F["START +30SEC"] --> B
    G["Set the time with numeric buttons you want"] --> B
NOTE: The KITCHEN TIMER function can be used in any cooking process. You can check the countdown time by pressing KITCHEN TIMER pad, but if press STOP/CLEAR pad when the display shows the time, the function is cancelled.
Hamilton Beach®
3. Add 30 sec.
1) Touch once and cooking will start immediately for 30 seconds. Touching this button repeatedly with add 30 seconds each time.
2) During the time cook and time defrost, you can add 30 seconds for each push.
3) This function will not work for one-touch cooking menus and weight defrost function.
4. Time Cook
1) Touch TIME COOK pad.
2) Touch number pad to enter desired cooking time.
The maximum number can be entered is 99 min. 99 sec.
3) Touch POWER LEVEL pad.
4) Use the number pads to enter the power level as shown in the table below.
| NUMBER | Display | POWER | | NUMBER | Display | POWER |
| 1,0 | PL10 | 100% | 5 | PL-5 | 50% |
| 9 | PL-9 | 90% | 4 | PL-4 | 40% |
| 8 | PL-8 | 80% | 3 | PL-3 | 30% |
| 7 | PL-7 | 70% | 2 | PL-2 | 20% |
| 6 | PL-6 | 60% | 1 | PL-1 | 10% |
5) Touch START/+30SEC pad.
5. Setting "Time Defrost"
1) Touch TIME DEFROST pad.
2) Enter desired defrosting time by touching correct number pads.
The longest time you can set is 99 min. 99 sec.
3) Touch START/+30SEC pad.
Note: In standby mode, LED displays " : 0" by pressing "TIME DEFROST" one time, touch number pad "0\~9" for setting cooking time(the longest time is 99 min. 99 sec.) and press "START/+30SEC" to confirm that. System will work under the setting time and acquiescent 30 % microwave power level. When time pass by half, the system will remind to turn over food. If press "POWER LEVEL" when the microwave are working, LED displays the acquiescent power level time for 10 sec and could press number pad to reset the power level at this time.
Hamilton Beach®
6. Setting "Weight Defrost"
1) Touch WEIGHT DEFROST pad.
2) Use the number pad to enter food weight "OZ". If wrong weight is entered, touch "WEIGHT DEFROST" pad to start over again.
3) Touch START/+30SEC pad.
NOTE: The maximum weight is 96 OZ. During defrosting program, the system will pause and sound beeps to remind user to turn food over, and then press START/+30SEC to resume the defrosting.
7. One-Touch Cook
For the following menus, you do not need to input cooking power and time. Follow the steps below.
Steps:
1) Place food into oven and close it.
2) Touch the correct auto menu to select the weight or the amount.
Automatic menu system automatically starts the program.
| Code | Food | Note |
| 1 | Baked Potato(7~11 oz/ each) | 1) The result of auto cook depends on factors such as the shape and size of food ,your personal preference as to the doneness of certain foods and even how well you happen to place food in the oven. If you find the result at any rate not quite satisfactory, please adjust the cooking time a little bit accordingly.2) For Baked Potato, Pizza, Frozen Dinner and Reheat, parameters on display are not weight but number of servings. |
| 2 | Popcorn (3.5 oz) |
| 3 | Pizza (4~5 oz/ each) |
| 4 | Beverage (4oz / cup) |
| 5 | Frozen Dinner (7~9 oz / each) |
| 6 | Reheat (10~14 oz) |
1) Baked Potato
For potatoes (7\~11 oz/each):
- Touch BAKED POTARO pad.
- Touch the pad once for one potato, touch the pad twice for two potatoes, touch the pad three times for three potatoes and touch the pad four times for four potatoes.
- The oven starts immediately.
2) Popcorn
For a 3.5 oz. bag of microwave popcorn:
- Touch POPCORN once.
- The oven starts immediately.
Hamilton Beach®
Popcorn instructions:
- To pop popcorn package evenly and avoid burning, the bag must be able to turn freely while cooking.
- Please listen to the popping sound and watch the bag until popping is completed.
- Some brands of microwave popcorn bags may be larger. Make sure that the bag matches the correct weight.
Caution: Use an oven mitt or pot holder when removing the bag, as content can be very hot.
3) Pizza
Reheating pizza (4\~5 oz/ each):
- Touch PIZZA pad.
- Touch PIZZA pad once for one slice and touch the pad twice for two slices.
- The oven starts immediately.
4) Beverage
For cups (4 oz /cup)
- Touch BEVERAGE pad.
- Touch BEVERAGE pad once for 4 ounces, touch the pad twice for 8 ounces, touch the pad three times for 12 ounces and touch the pad four times for 16 ounces.
- The oven starts immediately.
5) Frozen Dinner
For frozen dinners (7\~9 oz/ each):
- Touch FROZEN DINNER pad.
- Touch the pad once for 7\~9 ounces and touch the pad twice for 14\~18 ounces.
- The oven starts immediately.
6) Reheat
For a plate of cool food (10\~14 oz)
-
Touch REHEAT pad once.
-
The oven starts immediately.
8. Express
Program will start immediately after touching the number pad(1-6). Suppose you want to set the quick cooking in 6 minutes.
1) Touch number pad 6.
2) 6:00 can be seen on display.
3) The program starts automatically.
Hamilton Beach®
| Touch number pad | Time minutes | | Touch number pad | Time minutes |
| 1 | 1 Minute | 4 | 4 Minutes |
| 2 | 2 Minutes | 5 | 5 Minutes |
| 3 | 3 Minutes | 6 | 6 Minutes |
9. Two-stage Cooking
Some recipes require different stages of cooking at different temperatures.
SET STAGE 1:
1) Place food into oven and close it. Touch TIME COOK pad.
2) Use the number pads to set a cooking time.
3) Touch POWER LEVEL pad.
4) Use the number pads to enter the power level.
SET STAGE 2:
5) Touch TIME COOK pad.
6) Use the number pads to set a cooking time.
7) Touch POWER LEVEL pad.
8) Use the number pads to enter the power level.
9) Touch START/+30SEC to start.
10. Setting Child Lock
The child lock prevents unsupervised operation by children.
To set, in standby mode, press and hold STOP/CLEAR for 3 seconds. LOCK is indicated on the display.
To cancel, press and hold STOP/CLEAR for 3 seconds. LOCK indication disappears.
Care and Cleaning
- Turn off the microwave and unplug the power cord from the wall socket when cleaning.
- Keep the inside of the microwave clean. When food splatters or spilled liquids adhere to microwave walls, wipe with a damp cloth. Mild detergents may be used if the microwave gets very dirty. Avoid using spray or other harsh cleaners. They may stain, streak, or dull the door surface.
- The outside of the microwave should be cleaned with a damp cloth. To prevent damage to the operating parts inside the microwave, water should not be allowed to seep into the ventilation openings.
- Wipe the window on both sides with a damp cloth to remove any spills or splatters.
Hamilton Beach®
- Do not allow the control panel to become wet. Clean with a soft, damp cloth. When cleaning the panel, leave the microwave door open to prevent it from accidentally turning on.
- If steam accumulates inside or around the outside of the door, wipe with a soft cloth. This may occur when the microwave is operated under high humidity. This is normal.
- It may be necessary to remove the glass tray for cleaning. Wash the tray in warm, soapy water or in a dishwasher. The roller ring and microwave floor should be cleaned regularly to avoid excessive noise. Wipe the bottom surface of the microwave with a mild detergent.
- The roller ring may be washed in mild, soapy water or in a dishwasher. When removing the roller ring, be sure to replace it in the proper position.
- Remove odors from your microwave by combining a cup of water with the juice and skin of one lemon in a microwaveable bowl. Microwave for 5 minutes. Wipe thoroughly and dry with a soft cloth.
- If the light bulb burns out, please contact a certified electrician to have it replaced.
- The microwave should be cleaned regularly and any food deposits should be removed. Failure to maintain the microwave in a clean condition could lead to deterioration of surfaces that could adversely affect the life of the unit and could possibly result in a hazardous situation.
- Please do not dispose of this appliance into a regular garbage receptacle. Please check to see where you can dispose of such appliances.

Troubleshooting
| Problem | Possible Causes | What to do |
| Dim oven light | In low power cooking, oven light may become dim | This is normal |
| Steam accumulating on door or hot air coming out of vents during cooking | Food releases steam during cooking | This is normal |
| Oven is started accidentally with no food in it | Microwave is started accidentally with no food in it | No damage will occur if the microwave runs for less than 20 seconds |
| Interference with TV reception | Microwave operation may affect radio and TV reception | This is normal |
| Microwave will not start | a. Power cord not plugged in tightly b. A fuse is blown or circuit breaker trips c. Problem with electrical outlet | Unplug, wait10 seconds, then plug in again Replace fuse or reset circuit breaker Consult with professional electrician |
| Glass turntable makes noise during operation | The microwave cavity is dirty | Clean the microwave and turntable with warm water and microwave-safe cleaning products |
| Popcorn is over-cooked or under-cooked with "Popcorn" easy setting | Incorrect power level selected for size of popcorn bag | Refer to page 11 for "Popcorn" setting instructions. Always follow manufacturer's instructions for popcorn if the cooking time for the pre-set setting differs from the manufacturer's recommended time. Never leave popcorn cooking unattended. |
Hamilton Beach®
ONE YEAR LIMITED WARRANTY
This is the only express warranty for this product and is lieu of any other warranty. This product carries a warranty that it will be free from defects in material and workmanship for a period of one year from the date of purchase. This warranty is valid for the original retail purchaser or gift recipient from the date of initial retail purchase and is not transferable. Keep your original sales receipt as proof of purchase is required to make a warranty claim.
IMPORTANT: This warranty does not cover damages resulting from use not in conformity with the printed directions, accident, misuse or abuse, alternation, theaffixing of any attachments not provided with the product, loss of parts, or subjecting the appliance to any but the specified voltage. (Read directions carefully.)
If service is required during the warranty period, properly pack your unit. We recommend using the original carton and packing materials. Within 90 days from point of purchase, return the product to your nearest Walmart store with the sales receipt. A replacement or refund may be offered at the discretion of Walmart. For service after 90 days, up to 1 year from the point of purchase, contact customer assistance at: 1-855-313-1612. For faster service, locate the model number and product name on your appliance.
Walmart expressly disclaims all responsibility for consequential damages or incidental losses caused by use of the appliance. Every implied warranty, including any statutory warranty of merchantability or fitness for a particular propose, is disclaimed except to the extent prohibited by law, in which case such warranty is limited to the duration of this written warranty. Some states do not allow this exclusion or limitation of incidental or consequential losses so the foregoing disclaimer may not apply to you. This warranty gives you specific legal rights, and you may also have other rights which may vary from state to state.
SAVE THIS FOR YOUR RECORDS
Hamilton Beach® is a registered trademark of Hamilton Beach Brands, Inc. used under license by Wal-Mart Stores, Inc. Bentonville, AR 72716.
Made in China
PART NO.20190101
515049001076-02
PARTE NO.20190101
515049001076-02
Hecho en China
14 Resolivendo Problems
Modelo No.P100N30AP-S3B / P100N30AP-S3W
LEER ANTES DE USAR