GPD359 - Browser CURTIS - Free user manual and instructions
Find the device manual for free GPD359 CURTIS in PDF.


| Product type | GPS navigator |
| Brand | Curtis |
| Model | GPD359 |
| Dimensions (L x W x H) | Approximately 12 x 7 x 2 cm |
| Weight | Approximately 150 g |
| Screen | 5-inch color touch screen |
| Power supply | Rechargeable lithium-ion battery, 5V AC adapter |
| Battery life | Up to 4 hours of use |
| Main functions | GPS navigation with preloaded maps, voice guidance, point of interest search, route planning |
| Connectivity | USB, Bluetooth |
| Internal storage | 8 GB, expandable via microSD card |
| Maintenance and cleaning | Clean the screen with a soft, dry cloth. Avoid abrasive products. |
| Safety | Use the provided mount for safe driving. Do not operate while driving. |
| Spare parts and repairability | Contact Curtis after-sales service for spare parts. Repairs by a recommended professional. |
| General information | Manual available in PDF format. Languages: French, English. |
Frequently Asked Questions - GPD359 CURTIS
User questions about GPD359 CURTIS
0 question about this device. Answer the ones you know or ask your own.
Ask a new question about this device
Download the instructions for your Browser in PDF format for free! Find your manual GPD359 - CURTIS and take your electronic device back in hand. On this page are published all the documents necessary for the use of your device. GPD359 by CURTIS.
USER MANUAL GPD359 CURTIS
The information hereof has been carefully checked to be accurate before publication. However, the check would not exclude all the printing or translating mistakes. Please contact our customer service center, if you find any of the mistakes.
Prior to using please read this user manual thoroughly. Use only the battery and the accessories the original factory provides, in order to avoid unanticipated damages. Once use this system not following the instruction or connect the device with incompatible components, the damages might even threaten your personal safety and should not be covered by our warranty, for which the company hereof holds no liability.
For the transportation construction development, it possibly appears the situation that the navigation electron map data with the actual transportation instruction incompletely consistent. It is your sole responsibility to place, secure and use these aids in such a manner that they will not cause accidents, personal injury or property damage, or in any manner obstructs your view. You, the user of this product, are solely responsible for observing safe driving practices at all time. The company hereby disclaims all liability for any use of this product in a way that may cause accidents, damage or violation of the law.
Specifications are subject to change without prior notice. Any renewal or upgrade, please check on related website. We reserve the right of final interpretation of this user manual.
Please keep a backup for important data. Please note that the manufacturer holds no liability for the data loss due to making no copy.
The pictures hereof are for your reference only, please subject to the real products.
Remarks
1) Storage
a. Please avoid placing the device directly in sunshine, sharply changed temperature, high temperature (above 60° C), low temperature (below -20° C), and high pressure, dusty or humid place.
b. Please avoid dropping or impacting upon the device.
c. Don't let causticity liquid drop on the surface of the device.
d. Please avoid placing the device in the radiation produced by other electronic device.
[NOTE] If you need to travel by air with the GPS navigator, we suggest you to put the device together with your luggage for X ray detection when you go through the security inspection gate in the airport. Please avoid detecting the device by magnetic detector or magnetic rod which may destroy the system data. Our company is not responsible for any loss arising out of this.
2) Cleanup
a. Wipe the surface with a dry and soft cloth to keep it in clean condition.
b. Please wipe the screen gently by soft cloth with light glass cleanser.
c. Please disconnect the device from computer and turn it off before cleaning.
3) Battery
a. Before using the navigator the battery will need to be charged. To maximize the life of the battery the first charge must be fully charge the battery.
b. Please use the battery of the same type when change the battery to avoid the battery exploding. Please ask career men for help if necessary.
c. Please don't disassemble any part of the unit. Any unauthorized
disassembly will cause the terminal of official warranty.
d. The battery contained in this unit must be recycled or disposed of properly. Do not dispose of in household waste or burn.
4) SD/MMC Card
a. Do not press or fold SD/MMC card; otherwise it would damage the card.
b. Avoid putting the card in humid or high temperature place or under direct sunlight. Keep the card far away from liquid and corrosive material.
c. Do not insert the card in wrong way; otherwise the memory card slot may be damaged.
5) Safety
a. When using your navigator while driving it is essential that you drive with care an attention.
b. Never modify the settings or program of your navigator while driving.
c. Only look at the navigation map when it is safe to do so.
d. Only follow the system instruction when the road regulations allow you to do so.
e. When mounting the navigator in your car make sure that it does not obscure your view or impede the operation of any driving controls.
6) Usage
a. Please don't use wet hand to plug /unplug or contact the device for preventing shock or damage.
c. Please don't judder; otherwise the device may be damaged.
d. Please ensure that the SD card has enough space to save new files.
e. Files or data stored in the device cannot completely avoid being destroyed or lost due to improper use or other reasons. Please copy the files and data to your computer when necessary.
Caution
Do not leave your navigator on display in your car- it could be stolen.
Catalog Listing
Declaration.... 1
Remarks 2
Catalog Listing 5
1. Introduction ...... 7
1.1 Features....7
1.2 Package Checklist....7
1.3 Buttons and Functions....7
2. Usage on the Computer......8
2.1 Data Transferring 9
2.2 Disconnection....9
3. Basic Operation....9
3.1 Battery.... 10
3.2 Power Button....10
3.3 Reset....11
3.4 Car Mount 11
3.5 Touch Pen....12
4. Mode Operation.... 12
4.1 Navigation 13
4.1.1 Function Features 13
4.1.2 Key Instructions.... 13
4.1.3 Operation Steps 14
4.2 Media 14
4.2.1 Photo 15
4.2.2 Music....17
4.2.3 Video 19
4.3 EBook....21
4.4 Setting 23
4.4.1 Volume 23
4.4.2 Power 23
4.4.3 Backlight....24
4.4.4 Date time....24
4.4.5 Language 25
4.4.6 Sys Info. 25
5. Specifications.... 28
6. FAQ....29
LIMITED PRODUCT WARRANTY 30
1. Introduction
Thanks for purchasing the portable GPS navigator system GPD359. It is a new type of portable GPS navigator, which combines digital movie & music playing, photo browsing and eBook reading.
Before using it, please read the user manual carefully. This user manual is applicable for GPD359 only.
1.1 Features
a. Support GPS navigation
b. Support movie files as WMV, AVI, ASF
c. Support WMA, MP3 and WAV audio files
d. Lyric (LRC file) display synchronously
e. Support photo browsing for JPG, BMP, GIF, TIF and PNG formats
f. Support eBook browsing for TXT formats
g. Support SD\MMC card
h. Built-in speaker
i. Mini USB port
1.2 Package Checklist
Please check that you have all of the following items. If any items are missing, please contact the local agent or distributor.
1) Portable navigator GPD359
2) Touch pen
3) Car adapter
4) AC adapter
5) USB cable
6) Car mount
7) User manual
1.3 Buttons and Functions
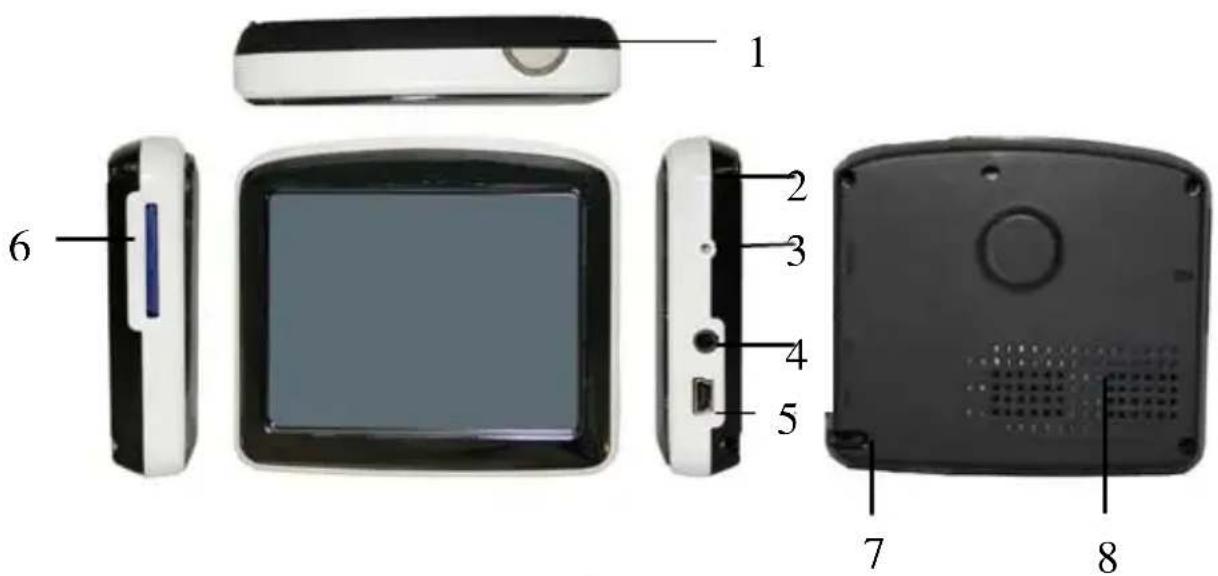
- Power button
- LED
- Reset hole
- Earphone jack
- MINI USB port
- SD/MMC card slot
- Touch pen slot
- Built-in speaker
Start up/shut down
Indicates the charging state
Reboot the system
Connect to stereo earphone
Connect with adapter to charge the battery or connect to the computer through USB cable
I o t In sert the SD/MMC card into it
Insert the touch pen into it
Play the sound of navigation voice prompt, music and movie
2. Usage on the Computer
Connect the portable navigator with the computer through USB cable. Connect standard port of USB cable to the computer and Mini port to the navigator. The interface will show on the screen of the navigator as follows.

[NOTE] The manual has been introduced on system above windows 98. If your computer is running on Windows 98, you will need to install Drivers, which are not included with the unit.
2.1 Data Transferring
- Touch the left icon on the above picture, the navigator will be connected with your computer directly. Double click “My Computer”, you would find a new icon named “Removable Disk” represents the SD card in GPD359. Double click the “Removable disk” and enter into the folder, then you can copy, delete or edit data in it, just as on a traditional hard disk.
[NOTE]Please avoid any operation on the navigator or unplugging USB cable while data is transferring between the navigator and the computer, otherwise the data may be lost.
- Touch the right icon on the above picture, the navigator will be charged by computer through USB cable.
2.2 Disconnection
Click the icon 📄 on the taskbar with the left key of the mouse, then click the “Stop USB Mass Storage Device-Driver” and click the pop-up window “The USB Mass Storage Device’ device can now be safely removed from the system”, then you can unplug the USB cable from the computer safely.
3. Basic Operation
3.1 Battery
- When the GPS navigator is used for the first time, you have to use the adapter to fully charge the battery. GPD359 uses the built-in lithium battery. Please connect the navigator with car adapter to charge for the battery.
[NOTE]During charging, the battery indicator light is showing the charge state. Please do not unplug the adapter while charging is uncompleted.
- Car adapter: When using your navigator we recommend you always use the car adapter to power the unit, especially on long journeys.
1) Plug the USB port of the car adapter into the MINI USB port on navigator.
2) Plug the other end on the adapter into the car cigar lighter socket with negative grounding.
[NOTE] Please use the cigarette adapter after the vehicle cranks up to avoid the damage to the device that may be caused by the shock of the current when starting the vehicle.
- When the battery is charging, the red charging indicator will light and you will find an icon 📄 at the top right of the screen. When the unit is fully charged the indicator becomes green and the icon at the top right of the screen becomes full. Generally, the fully charged battery can keep on power supply for about 5 hours.
3.2 Power Button
To shut down the system, please press and hold the power button for 2 seconds and the interface is displays as follows.

Touch Sleep or Power Off. The screen would be shut off.
To start up the system, please press the power button again. The screen will display the last picture showed before sleep automatically in the time of starting up.
3.3 Reset
In case the GPS navigator doesn't response to any operation, poke the reset hole on the right side of the device to reboot the system.
[NOTE]The data may be lost when you poke the reset hole to restart the system. Please copy the files and data to your computer when necessary.
3.4 Car Mount
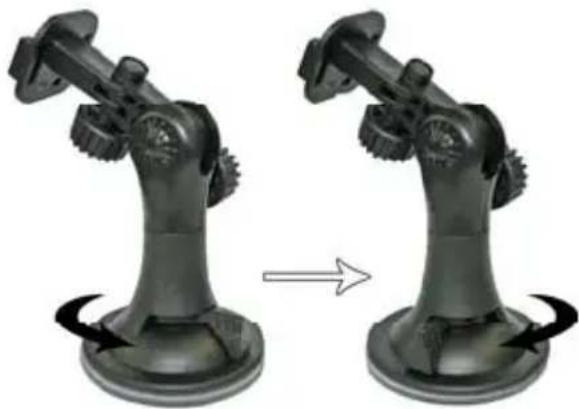
The navigator should be fixed on the windscreen of the car before using. Assemble the mount and the bracket then fix the unit into the bracket as shown below.
![graph TD A["Top Arm"] --> B["Bottom Arm"] B --> C["Top Arm"]](/content/2026/05/950631/images/e03f3897d52555abe1e84999854b3165756aa6244675702e7cc44c6b42d21c12.jpg)
The car mount has a suction pad that fits to the windscreen or a flat area of
dashboard. Place the pad on the windscreen and push the lever clockwise until it clicks into place.
[NOTE] The navigator must be mounted in a location that does not obscure the driver's vision, impede use of the car's controls or impede the operation of the car's airbags.
3.5 Touch Pen
The touch pen is an important tool, please keep it carefully.
a. Single click: click the screen once with the pen point to choose the wanted item.
b. Double Click: quickly click the screen twice with the pen point.
c. Drag: press a point on the screen with pen point and drag the touched item to the desired direction.
[NOTE] Please use touch pen to write on the LCD screen rather than other sharp objects when use the hand-writing function.
4. Mode Operation
There are 4 menus in the Main Menu: Navigation, Media, EBook and System.
Before using these functions, please copy the correlative files into SD/MMC card.

4.1 Navigation
4.1.1 Function Features
This GPS navigator uses intelligent navigation system which can pinpoint the position of mobile device by GPS satellite signal receiver and show it on the electronic map. The system will figure out an optimal path automatically after the users set the destination and help them reach the destination safely and quickly. The system makes you fully enjoy the charm of it in many aspects such as visual map, real-time animation, voice and letter reminding and enjoy a comfortable and happy trip.
4.1.2 Key Instructions
1. Map information
GPD359 navigator uses the newest electronic navigation map. But the product will be incompletely accordance with the actual information after produced because of the development of transportation construction. Please be sure to drive according to actual transportation condition and observe traffic rules and traffic control.
2. Navigation
This GPS navigator only provides the route for reference. Please decide by yourself whether you will follow that route or not. The way chosen by the driver who is familiar with the actual map may be more effective than the
route provided by GPS navigator.
3. Signal receiving
Satellite signals are required for this product to function in Navigation Mode. There may be occasions within your home or building when the signal strength is limited and Navigation Mode may not be possible. This is quite normal for products of this type.
4.1.3 Operation Steps
Please read the user manual of the navigation software in packing carefully and feel the charm of the powerful function of this car/portable GPS navigator.
4.2 Media
When you touch the Media icon, the Media menu is displayed as follows. There are 3 function icons in this menu: Photo, Video and Music.

Touch any one of these icons and enter the secondary folder. You can choose and open the ResidentFlash or SDMMC folder to see the media files.

4.2.1 Photo
- Touch the Photo icon to open the picture file folder.

 | Back | Turn back to the Media menu |
 | Previous page | Turn to the previous page |
 | Next page | Turn to the next page |
 | Upward | Return to the parent folder |

Display
Display the chosen picture ir
- Select a picture file and double click it to open the photo browser.

 | Back | Turn back to the Media menu |
 | Zoom in | Scaling up the current picture |
 | Zoom out | Scaling down the current picture |
 | Auto Play | Play all pictures in the selected with full screen from the current picture |
 | Previous | Show the previous picture |
 | Next | Show the next picture |
 | Folder | Return to the photo folder |
.[NOTE]
a. Double click the picture in the photo browser; it can also enter into the
auto playing mode. Then double click the picture played with full screen, it will turn back to the normal mode.
b. The picture can be dragged by touch pen in any mode.
4.2.2 Music
- Touch Music icon to open the audio file folder.

| Back | Turn back to the Media me | |
 | Previous page | Turn to the previous page |
 | Next page | Turn to the next page |
 | Upward | Return to the parent folder |
- Select an audio file and double click it to open the audio player.

 | Back | Turn back to the Media menu |
 | Play | Play/continue the selected and |
 | Pause | Pause the playing audio file |
 | Stop | Stop playing the current audio file |
 | Repeat | Sequential playing |
 | Random | Random playing |
 | Previous | Play the previous audio file |
 | Next | Play the next audio file |
 | Volume control | Drag the slider to adjust the volume |
 | Progress control | Adjust the playing progress |
 | Folder | Return to the audio folder |
[NOTE] Lyric show: GPD359 would automatically search the lyric file (LRC format, you can make it by yourself or download from Internet.).
1) Copy the audio file and the lyric file (LRC format) into the same folder.
2) Make sure the name of the lyric file is the same as the name of the audio file, otherwise the lyric can not be displayed;
3) Lyric would be shown synchronously in the lyric show area of the screen during playing.
4.2.3 Video
- Touch the Video icon and open the video file folder.

- Select a video file and double click it to open the video player.

 | Back | Turn back to the Media menu |
 | Play | Play the selected video file |
 | Pause | Pause the playing video |
 | Stop | Stop playing the current video file |
 | Previous | Play the previous video file |
 | Next | Play the next video file |
 | Full screen | Play the video file with full screen |
 | Folder | Return to the video folder |
 | Volume control | Drag the slider to adjust the volume |
 | Progress control | Adjust the playing progress |
[NOTE] Double click the picture; it would play in full screen mode. Double
click it again; it would turn back to the normal playing mode.
4.3 EBook
- Click "EBook" icon in main menu to open the e-book folder.

- Select a TXT file and double click it to open the e-book browser.
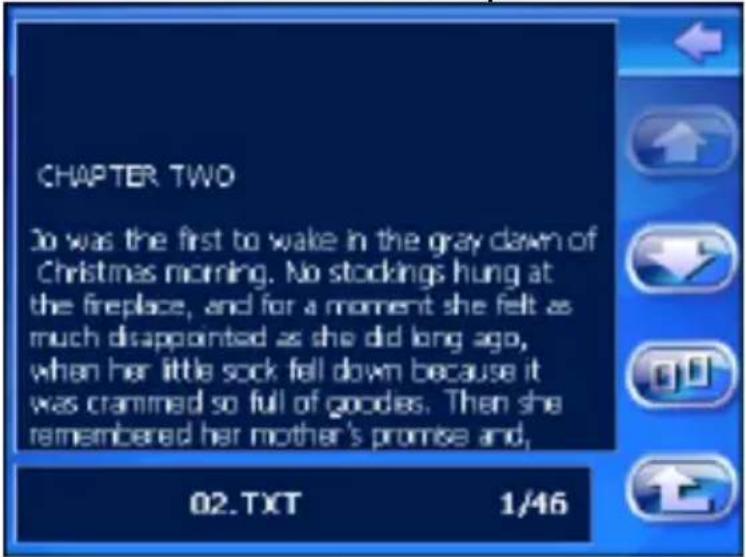
 | Back | Turn back to the main menu |
 | Previous page | Show the previous page of the current one |
 | Next page | Show the next page of the current one |
 | Folder | Return to the eBook folder |

Page selector Display the page selector panel
02.TXT
File's name Show the current file's name
1/46
Page number Show the current page/total page
- Click icon to select page number in the page selector and turn to the page you want to read.
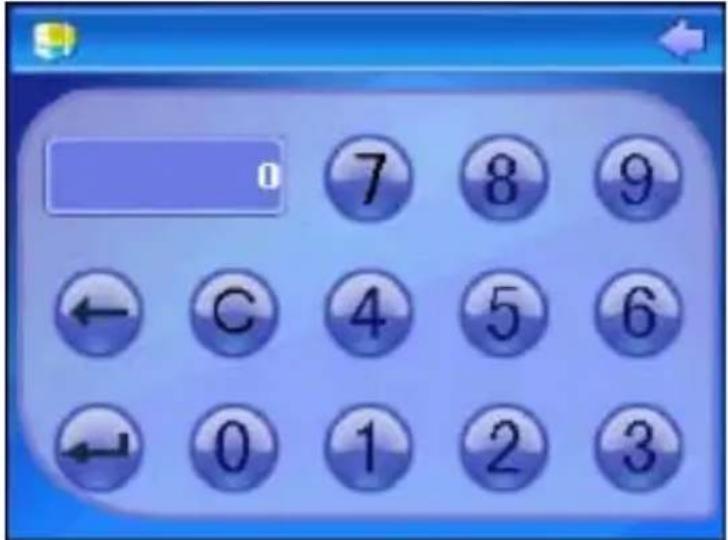

Number Key Used to input the page number

Number display area Display the inputted number

Delete Delete the last inputted ni

Clear Clear all inputted number

Turn page Turn to the selected page
4.4 Setting
Click System icon in the main menu and enter into the system setting menu.
In this menu, you can set: Volume, Power, Backlight, Date Time, Language, and Sys Info.

4.4.1 Volume
- Click the Volume icon to enter the volume setting interface.
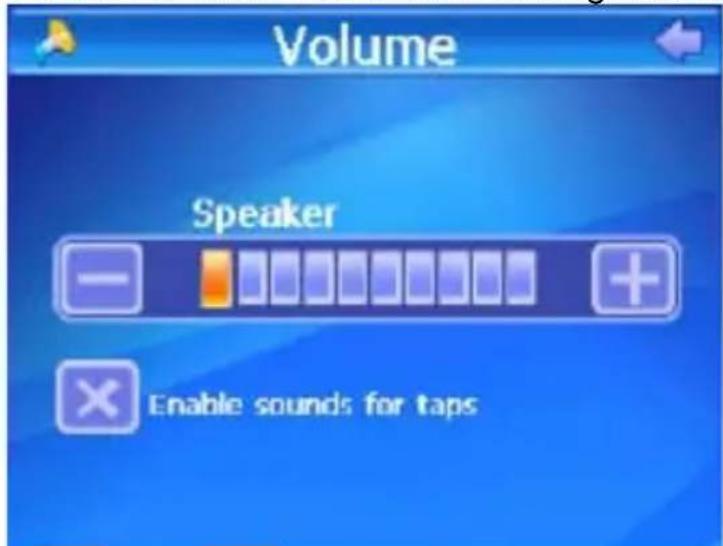
- Click the icons and to set the volume level.
- You can set the sounds for taps by selecting the check box below the volume bar.
4.4.2 Power
- Click the Power icon to enter the power setting interface.

- The "Battery Level" bar shows the current battery power.
4.4.3 Backlight
- Click "Backlight" icon to enter the backlight setting interface.

- Click the two icons
and - Click the two icons
and
automatically when the power is supplied by battery or external adapter.


4.4.4 Date time
- Click "Date Time" icon to enter the time setting interface.

- Click the icons on the left of the screen and enter the setting interface of time and date respectively. You can set the current clock and date by touching the icons and
4.4.5 Language
- Click the Language icon to enter the language setting interface.

- Click the icons and to choose a language. The system provides 2 languages for choice: Simplified Chinese, Traditional Chinese and English.
- Click the icons to choose a color of skin. The system provides 2 colors for choice: blue and orange.
4.4.6 Sys Info.
- Click the Sys Info. icon to enter the system information interface to look
over the detail system information.

- Click the USB icon to set the USB connecting mode. The setting interface displayed as shown below.
[Note] You must escape from the navigation procedure before connecting the device to your PC.

a. MASS STORAGE: Select this option, the navigator will be directly connected to your computer and you can just edit the files in the SD card. b. MS ACTIVESYNC: Before select this option, you must ensure that the Microsoft Activesync has been installed on your computer system. The data in the navigator will be synchronized with that in you computer system by Microsoft ActiveSync when you connect the navigator to your computer with USB cable. Meanwhile, users can edit the files and data in the SD card
and those in the navigator.
- Click the Calibration icon to enter the screen calibration interface. Click the center point of the cross cursor with touch pen. The cursor will move in the following path: center—top left—bottom left—bottom right—top right—center until the calibration succeeds. Then operate in accordance with the system prompt on the screen and the system will exit from the calibration and return to the system setting interface.
5. Specifications
| Dimension | 92mm*81mm*19.5mm |
| Net Weight 145±10g | |
| Capacity of SD/MMC Card | 128MB~2G |
| Power supply Powered | by Built-in lithium battery, 1100mAh/3.7V |
| Loudspeaker 1W | |
| Audio File WMA, MP3 and WAV | |
| Video File WMV, ASF and AVI | |
| Photo File | JPG、GIF、BMP and PNG |
| E-book File TXT | |
| Working temperature | -10 °C ~ 60 °C |
| Storage and Transportation Temperature | -20 °C ~ 60 °C |
| Relative Humidity under Working | 20% ~ 80%(40°C) |
| Relative humidity under Storage and transportation | 20% ~ 80%(40°C) |
| Atmospheric pressure | 86KPa ~ 106KPa |
| Language Simplified Chinese | se, Traditional Chinese, English |
6. FAQ
If your navigator can not work properly, please check it as follows. If the problems still can not be solved, please contact our company service center.
| Symptoms | Possible reason analysis | Remedy |
| Fail to power on. Low power Charge battery through adapter. | ||
| Power off shortly while power on | Low power | Charge battery through adapter. |
| No sound output | The volume is low. Turn up the volume. | |
| The earphone isn't connected well. | Connect earphone correctly. | |
| Fail to connect with computer. | USB cable isn't connected correctly. | Connect USB cable correctly. |
| No response to clicking icons | The screen isn't calibrated. | Calibrate the screen. |
| Fail to copy files. | 1. Check the system whether be accordance with requirements.2. Format the SD/MMC card and try again. | |
| No GPS signal | Please take the navigator to outdoors. It needs over 3 minutes to receive the signal and depends on the strength of local GPS signal, | |
| The e-map is lost. | Contact the local agent.The password needs to be input when using the navigation function again. | |
LIMITED PRODUCT WARRANTY

This quality product is warranted to be free from manufacturer's defects in material and workman-ship, provided that the unit is used under the normal operating conditions intended by the manufacturer.
Should you have any problem with this product, please and it is highly recommended to visit our website at www.curtisint.com before you take any other steps as we have additional copies of instruction manuals, operating manuals and trouble shooting tips on our website which gives you the answer on most of the questions you could have in operating the unit.
TERMS OF WARRANTY
C.I. Service Dept. warrants this product to be free from defects in materials and workmanship for 1 year on parts and 90 days on labor.
Nothing within this warranty shall imply that C.I. will be responsible or liable for any damage to any items placed in this product, whether due to any defect of the product, or its use, whether proper or improper.
EXCLUSIONS
Save as herein provided, C.I. Service Dept. (Canada) or C.I. Service Dept. (USA), there are no other warranties, conditions, representations or guarantees, express or implied, made or intended by C.I. or its authorized distributors and all other warranties, conditions, representations or guarantees, including any warranties, conditions, representations or guarantees under any Sale of Goods Act or like legislation or statute is hereby expressly excluded. Save as herein provided, C.I. Service Dept. (Canada) or C.I. Service Dept. (USA), shall not be responsible for any damages to persons or property, including the unit itself, howsoever caused or any consequential damages arising from the malfunction of the unit and by the purchase of the unit, the purchaser does hereby agree to indemnify and save harmless C.I. from any claim for damages to persons or property caused by the unit.
TO OBTAIN REPAIRS UNDER THE TERMS OF THIS WARRANTY
- The original purchaser must present a copy of the original bill of sale and the service warranty card.
- Any alterations, abuse, misuse, battery corrosion or accidental damage voids the warranty.
- The warranty does not cover cabinets and accessories.
- No warranty or insurance contained or set out shall apply when damage or repair is caused by power failure; damage in transit or when moving the unit; improper power supply; use for commercial or industrial purposes; service calls resulting in customer education, etc.
- The defective product should be mailed to:
Canada U.S.A C.I. Service Dept. C.I. Service Dept. 315 Attwell Dr 181 Cooper Avenue Unit
Toronto, Ontario Tonawanda, N.Y.
M9W 5C1
14150
For service assistance and product information, please call: 1-800-968-9853
If mailing the product, the freight must be prepaid and a money order for \$7.00 should be included to cover the cost of insurance and the return of the product.
- C.I. reserves the right to repair or replace the parts which have become defective.
Model No.
Date Purchased
Serial No.
Déclaration
4.1 Navigation
| Canada | U.S.A |
| C.I. Service Dept. | C.I. Service Dept. |
| 315 Attwell Dr | 181 Cooper Avenue |
| Unit |
Toronto, Ontario Tonawanda, N.Y.
M9W 5C1
14150
- REMARKS
- STORAGE
- CLEANUP
- BATTERY
- SD/MMC CARD
- SAFETY
- USAGE
- CAUTION
- CATALOG LISTING
- DECLARATION.... 1
- REMARKS 2
- CATALOG LISTING 5
- INTRODUCTION ...... 7
- USAGE ON THE COMPUTER......8
- BASIC OPERATION....9
- MODE OPERATION.... 12
- LIMITED PRODUCT WARRANTY 30
- INTRODUCTION
- 1.1 FEATURES
- 1.2 PACKAGE CHECKLIST
- 1.3 BUTTONS AND FUNCTIONS
- USAGE ON THE COMPUTER
- 2.1 DATA TRANSFERRING
- 2.2 DISCONNECTION
- BASIC OPERATION
- 3.1 BATTERY
- 3.2 POWER BUTTON
- 3.3 RESET
- 3.4 CAR MOUNT
- 3.5 TOUCH PEN
- MODE OPERATION
- 4.1 NAVIGATION
- 4.1.1 FUNCTION FEATURES
- 4.1.2 KEY INSTRUCTIONS
- MAP INFORMATION
- NAVIGATION
- SIGNAL RECEIVING
- 4.1.3 OPERATION STEPS
- 4.2 MEDIA
- 4.2.1 PHOTO
- DISPLAY
- DISPLAY THE CHOSEN PICTURE IR
- [NOTE]
- 4.2.2 MUSIC
- 4.2.3 VIDEO
- 4.3 EBOOK
- 4.4 SETTING
- 4.4.1 VOLUME
- 4.4.2 POWER
- 4.4.3 BACKLIGHT
- 4.4.4 DATE TIME
- 4.4.5 LANGUAGE
- 4.4.6 SYS INFO
- SPECIFICATIONS
- FAQ
- LIMITED PRODUCT WARRANTY
- TERMS OF WARRANTY
- EXCLUSIONS
- TO OBTAIN REPAIRS UNDER THE TERMS OF THIS WARRANTY
- DÉCLARATION
Brand : CURTIS
Model : GPD359
Category : Browser