
HDD-202 - Disk array Xcellon - Free user manual and instructions
Find the device manual for free HDD-202 Xcellon in PDF.


| Product Type | Disk Array (JBOD) |
| Brand | Xcellon |
| Model | HDD-202 |
| Form Factor | 2U Rackmount |
| Drive Bays | 8 x 3.5-inch SATA/SAS |
| RAID Support | RAID 0, 1, 5, 6, 10, JBOD |
| Interface | Mini-SAS HD (SFF-8644) x2 |
| Dimensions (W x D x H) | 483 x 430 x 88 mm |
| Weight | 12 kg (without drives) |
| Power Supply | 100-240V AC, 50/60Hz, 400W Redundant |
| Cooling | 3 x 80mm hot-swappable fans |
| Main Functions | Enterprise data storage, media streaming, backup target, virtualization storage |
| Maintenance & Cleaning | Dust with dry cloth; ensure adequate ventilation; check drive health periodically |
| Safety | CE, FCC, RoHS compliant; ensure rack stability; use grounded outlet |
| Spare Parts & Repairability | Hot-swap PSU and fan modules available; user-replaceable drives; contact Xcellon support for controller |
| General Information | Designed for 24/7 operation; supports up to 120TB raw capacity (with 15TB drives) |
Frequently Asked Questions - HDD-202 Xcellon
User questions about HDD-202 Xcellon
0 question about this device. Answer the ones you know or ask your own.
Ask a new question about this device
Download the instructions for your Disk array in PDF format for free! Find your manual HDD-202 - Xcellon and take your electronic device back in hand. On this page are published all the documents necessary for the use of your device. HDD-202 by Xcellon.
USER MANUAL HDD-202 Xcellon
USB-C 3.1 Gen 2 Two-Bay RAID System
User Manual

Thank you for choosing Xcellon.
The Xcellon HDD-202 is the most convenient way to create a two-disk RAID system with internal-type SATA drives. The HDD-202's tray-less, top-loading bays enable easy access with simple, tool-free installation—instead of dismantling your computer and installing your drives, just insert the drives directly into the dock. Five RAID modes deliver a variety of options when it comes to read/write functions, data storage, and backup, and are configured via the DIP switches located on the rear of the device.
The HDD-202 is equipped with a USB-C™ port that is capable of attaining SuperSpeed USB 10 Gbps transfer rates, when used with compatible devices. Designed to work with hard disk drives and solid state drives, the HDD-202 accommodates 2.5" laptop-sized and 3.5" desktop-sized SATA I/II/III drives with capacities up to 8 TB. The dock supports plug-and-play and hot-swapping and includes all necessary interface cables.
Precautions
» Please read and follow these instructions, and keep this manual in a safe place.
» Back up your data before using this product in order to prevent loss of important data. Xcellon will not be responsible for any data loss.
» Keep this product away from water and any flammable gases or liquids.
»Use only the correct, recommended voltage.
»Handle this product with care.
»Clean this product with only a soft, dry cloth.
»Keep this product away from children.
» Do not store this product in direct sunlight or in extreme high or low temperatures.
»All photos are for illustrative purposes only.
Overview
Top
1 SATA contacts
2 2.5" drive slot
3 3.5" drive slot
Front
4 HD 1 status LED (blue, purple, red)
5 HD 2 status LED (blue, purple, red)
6 Power LED (blue)
Rear
7 Power button
8 DC power port
9 USB-C port
10 Set button
11 RAID switches
12 Raid button instruction
Also Included
» USB Type-C to Standard-A cable
» USB Type-C to Type-C cable
» DC power adapter
» User manual

Plugging In and Setting Up
- Use the included power adapter to connect the dock to an AC power source. Make sure the dock is turned off by verifying that the power LED is not glowing.
- Use one of the included USB cables to connect the dock to the corresponding port on your computer.
- Align the SATA contacts on your disk drive and the dock, and fully insert the drive into the dock.
- Press the power button to turn on the dock. The power LED will glow blue and the status LED that corresponds to your hard disk will blink purple.
The HDD-202 works with one drive or two. In order to set up a RAID system, you will need to install two drives.
If your disk drive has been formatted, your computer will notify you that new hardware has been detected, and the drive will appear on the Desktop, in My Computer, or in the Finder.
If the drive has not been formatted, or if your computer cannot read or recognize it, you may need to format the drive. See Formatting Your Disk on page 11.
The HD LEDs will change color depending on the current status of the corresponding drive. The LEDs will glow blue during normal operation, purple when a drive is active, and red if a drive is damaged.
RAID Mode Configuration
The RAID mode options are 0, 1, Span (Big), JBOD, and Port Multiplier. The default mode is JBOD. Familiarize yourself with the advantages of each RAID mode before making a selection.

Important! Before configuring the RAID mode, make sure to back up your data. All data on the installed disk drives will be eliminated during the configuration process.
Make sure that both drives have the same rotational speed (RPM).
When using RAID modes 0 or 1, it is recommended that both hard drives have the same capacity. If possible, use identical drives.
RAID 0
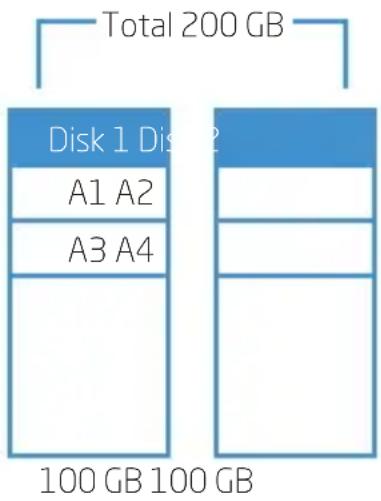
RAID 0 mode stripes data in blocks across the two disk drives. This mode links the drives installed in the dock, so they can function as a single drive with combined storage space. If you are using two 100 GB drives, they will combine to function as a single 200 GB drive.
bar_stacked
Total 200 GB | Component | Total (GB) | | :--- | :--- | | Disk 1 Disk 2 | 100 | | A1 A2 | 100 | | A3 A4 | 100 | 100 GB | 100 GB |Figure 1. In RAID 0 mode, both disks will appear as a single disk on your computer.
RAID 1
RAID 1 mirrors the data in blocks on the two disk drives, so the exact same data is stored on both drives. Data integrity is more reliable in this mode than in RAID 0 mode, although there is less accessible disk space and the transfer speed is slower. Mirroring makes it easier to recover lost data if one of the RAID drives is damaged (see Troubleshooting on page 16). Only one of the two drives is accessible in RAID 1 mode.

flowchart
graph TD
    A["Total 100 GB"] --> B["Disk 1 Dis"]
    B --> C["A1 A1"]
    B --> D["A2 A2"]
    B --> E["100 GB 100 GB"]
    F["Key"] --> G["Accessible"]
    F --> H["Not Accessible"]
Figure 2. RAID 1 mode, only one drive will appear on your computer.
When using RAID 0 and RAID 1 modes, you can use disk drives of varying capacities, although the capacity will be limited to the smallest of the disk drives. For example, if you are using a 100 GB and a 250 GB drive, then the 250 GB will be limited to the smaller 100 GB capacity, and the total combined capacity will be 200 GB.
JBOD
In JBOD mode, the two disk drives function independently of one another. JBOD is an acronym for Just a Bunch of Disks.

bar_stacked
Total 200 GB | Component | Total (GB) | |---|---| | Disk 1 Disk | 100 GB | | A1 B1 | 100 GB | | A2 B2 | 100 GB | | B3 | 100 GB | | Total | 200 GB |Figure 3. In JBOD mode, both disks will appear on your computer.
Span (Big)
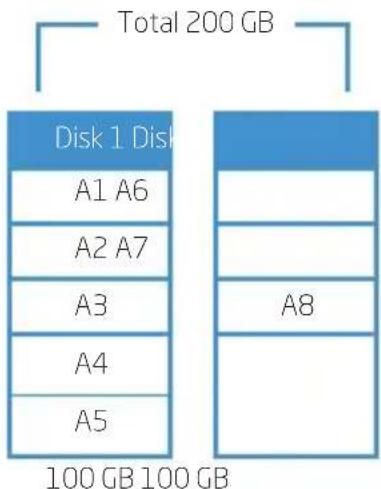
Span mode links the two disk drives, so they function as a single drive with combined storage space. This mode is similar to RAID 0 mode, but it does not stripe the data across the disks. Span mode is not as fast as RAID 0, but it is more secure.
bar_stacked
Total 200 GB | Component | Total (GB) | |---|---| | Disk 1 Disk | 100 GB | | A1 A6 | 100 GB | | A2 A7 | 100 GB | | A3 | 100 GB | | A4 | 100 GB | | A5 | 100 GB | A8 | 100 GB |Figure 4. In Span mode, both disks will appear as a single disk on your computer.
Port Multiplier:
In Port Multiplier (PM) mode, you can run up to 15 drives from a single SATA port via a PM cable. In a PM setup, the drives connected to the PM cable will function as a JBOD system.

Note: Separate power is required for the drives in a PM setup. All the drives will share the same SATA speed, so they will be unable to attain the maximum rate.
Configuring the RAID Mode
RAID modes are configured via the switches on the back of the dock. To configure the RAID mode, follow these steps:
- With both drives installed into the dock, set the RAID mode switches to the desired configuration as shown in the table to the right.
- Press and hold the Set button for ten seconds. This will start the RAID setup procedure, during which the HD status LEDs will blink purple intermittently.
- After ten seconds, let go of the Set button. At this point, the LEDs will have stopped blinking, and your computer will have recognized your drives in the new RAID mode.
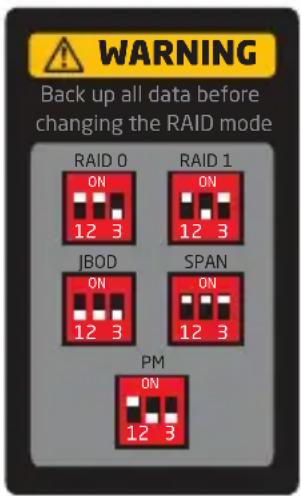

Note: If your disks are formatted, then you will not need to reformat them after reconfiguring the RAID mode, but you will lose your data. You may need to initialize your disk drives after configuring the RAID mode.
If your computer does not recognize your disks after reconfiguring the RAID mode, try rebooting the dock or your computer. For more information, refer to Troubleshooting on page 16.
Removing Your Disk Drive

Important! To prevent data loss, do not unplug the HDD-202, turn it off, or remove your disk drive from the enclosure until all steps have been completed.
Windows
- Close any programs that might be using the drive.
- Right-click on the mobile hardware icon in the right-hand corner of the task bar.
- Select the device you want to remove.
- After the computer indicates that it is safe to remove the device, gently pull the disk drive out of the dock.
Mac
- Click on the eject symbol next to the device's icon in the Finder.
- After the device disappears from the Finder, gently pull the disk drive out of the dock.
Formatting Your Disk Drive
If your disk drive has not been formatted, or if your computer cannot read or recognize it, then you may need to format the drive. Formatting a drive will erase all of its data. If you have data on your drive, make sure to back it up before formatting.

Note: The Windows XP and Vista 32-bit operating systems each have a maximum drive capacity of 2 TB.
Windows XP
- Right-click on My Computer and select Manage.
- In the right column of the Computer Management window, double-click on Storage and then Disk Management (Local).
- In the bottom half of the right column, you will see a list of the connected disk drives and their partitions. Formatted drives have a blue bar, and unformatted drives have a black bar and are labeled Unallocated.
- If your disk is unformatted, skip to the next step. If your disk is partitioned and formatted, right-click the partition labeled Primary partition and select Delete Partition. Confirm your selection in the dialog box that follows. Windows will delete the partition, and the box that was labeled Primary partition will now be labeled Unallocated.
- Right-click on the partition labeled Unallocated and click on New Partition. This will open the New Partition Wizard.
- When the New Partition Wizard opens, click on Next to continue.
- In the Select Partition Type window, select Primary partition. Click on Next to continue.
-
In the Specify Partition Size window, make sure the maximum disk space in megabytes (MB) is the same as the partition size in MB, in order to make a whole-drive partition. Click on Next to continue.
-
In the Assign Drive Letter or Path window, select a letter from the drop-down menu to assign to the disk drive. Click on Next to continue.
- In the Format Partition window, select Format this partition with the following settings.
a. From the File system drop-down menu, select the file system you want to use for the disk.
b. Set Allocation unit size to Default.
c. Type in a name for the disk in the Volume label text entry box. The default disk name is "New Volume".
d. You can opt to perform a quick format or a full format.
e. Make sure Enable file and folder compression is unselected.
f. Click on Next to continue.
- Review your settings and click on Finish. Windows will format the partition, which will appear as formatted in the Computer Management window, and the disk will appear as a usable drive in My Computer.
Windows Vista/7/8/8.1/10
These instructions will help create a formatted, whole-drive partition.
-
In Windows Vista and 7, right-click on My Computer and select Manage. In Windows 8, 8.1, and 10, press Windows key+X to open the Quick Links menu. Select Disk Management and skip to step 3.
-
In the middle column of the Computer Management window, double-click on Storage and then Disk Management.
-
In the bottom half of the middle column, you will see a list of all the connected disk drives and their partitions. Formatted drives have a blue bar, and unformatted drives have a black bar and are labeled Unallocated.
-
Right-click on the partition labeled Unallocated and click on New Simple Volume. This will open the New Simple Volume Wizard.
-
When the New Simple Volume Wizard opens, click on Next to continue.
-
In the Specify Volume Size window, make sure the maximum disk space in MB is the same as the simple volume size in MB, in order to make a whole-drive partition. Click on Next to continue.
-
In the Assign Drive Letter or Path window, select a letter from the drop-down menu to assign to the disk drive. Click on Next to continue.
-
In the Format Partition window, select Format this volume with the following settings.
a. From the File system drop-down menu, select the file system you want to use for the disk.
b. Set Allocation unit size to Default.
c. Type in a name for the disk in the Volume label text entry box. The default disk name is "New Volume".
d. You can opt to perform a quick format or a full format. Perform a quick format is the default option.
e. Make sure Enable file and folder compression is unselected.
f. Click on Next to continue.
- Review your settings and click on Finish. Windows will format the partition, which will appear as formatted in the middle column of the Computer Management window, and the disk will appear as a usable drive in My Computer.
Mac OS X
-
If your disk drive is unformatted, a dialog box will appear, stating that the computer cannot read the disk. Click on Initialize to open the Disk Utility application. Alternatively, you can go to Applications/Utilities/Disk Utility.
-
In the left column of the Disk Utility window, you will see a list of connected disk drives. Select the disk you want to erase and click on the Erase tab in the right-hand column.
-
From the Format drop-down menu, select the file system you want to use for the disk.
-
Type in a name for the disk in the Name text entry box. The default disk name is "Untitled".
-
Click on the Erase button and confirm your selection in the dialog box that follows. Mac OS will format the disk, and it will appear in the Finder under the Devices category.
Troubleshooting
| Problem Solution | |
| The dock will not turn on. | Make sure the DC power adapter is fully plugged into the dock's DC power port and your AC power source.Check your power source to make sure it's reliable. Try switching AC power sources. |
| The dock is turned on, but the disks do not appear in my computer. | Make sure the USB cable is fully plugged into your computer and the dock. Try another USB port on your computer.Make sure your drives are properly inserted into the dock.If you're using a PC, you may need to format the disks. For more information, refer to Formatting Your Disk Drive on page 11.Reboot the dock.Reboot your computer. |
| A disk in my RAID 1 system has failed. | If one of the two disks in a RAID 1 system fails, you will still be able to recover your data via the remaining undamaged disk. This is the advantage of a RAID 1 system—the data is mirrored on both disks installed in the dock.To recover your data, follow these steps:1. If one of the drives fails, do not immediately remove the damaged drive and install another drive. You will still have normal access to your data via the undamaged drive. |
| (Continued) | 2. Back up your data on a different drive.3. Remove the drive that corresponds to the blinking red status LED.4. Insert a new (working) drive into the dock and reset the RAID system. This requires initial-izing and reformatting your hard drives. |
| Pressing and holding the Set button does not initiate RAID setup.My computer does not recognize my drives in the newly reconfigured RAID mode. | Reboot the dock.Reboot your computer. |
| The red error LED won't turn off. | Clearing the red error LED will clear your RAID setup and configure it as a JBOD system.To clear the red error LED, follow these steps:1. Back up your data on a different drive.2. Set all of the RAID mode switches to Off position. 3. Press and hold the Set button for ten seconds.4. After ten seconds, let go of the Set button. At this point, the red error LED will have stopped blinking, and your computer will have recog-nized your drives as a JBOD system. 3. Press and hold the Set button for ten seconds.4. After ten seconds, let go of the Set button. At this point, the red error LED will have stopped blinking, and your computer will have recog-nized your drives as a JBOD system. |
| Specifications | |
| Drive types supported | 2.5" and 3.5" SATA I/II/III type HD |
| Maximum hard disk capacity | 8 TB (per drive) |
| Internal interface | SATA (×2) |
| External interface | USB Type-C |
| Data transfer rate (maximum) | 10 Gbps |
| Supported RAID modes | 0, 1, JBOD, Span (Big), Port Multiplier (PM) |
| Chipset | Asmedia 1352R |
| Protocols | UASP, BOT |
| System requirements | Windows XP/Vista/7/8/8.1/10Mac OS X 10.6.7 or higherLinuxAvailable USB port on the computer |
| Power requirements | External power supplyAC Input: 100-240 V, 50/60 Hz, 0.5 A maximumDC Output: 12 V, 2.5 A |
| Construction | Aluminum, plastic |
| Operating environment | Operation temperature: 41°F-104°F (5°C-40°C)Storage temperature: -4°F-158°F (-20°C-70°C) |
| Dimensions (W × H × D) | 5.3" × 2.6" × 4.6" (13.5 × 6.6 × 11.7 cm) |
| Weight (without drives) | 1.2 lb. (544.3 g) |
One-Year Limited Warranty
This Xcellon product is warranted to the original purchaser to be free from defects in materials and workmanship under normal consumer use for a period of one (1) year from the original purchase date or thirty (30) days after replacement, whichever occurs later. The warranty provider's responsibility with respect to this limited warranty shall be limited solely to repair or replacement, at the provider's discretion, of any product that fails during normal use of this product in its intended manner and in its intended environment. Inoperability of the product or part(s) shall be determined by the warranty provider. If the product has been discontinued, the warranty provider reserves the right to replace it with a model of equivalent quality and function.
This warranty does not cover damage or defect caused by misuse, neglect, accident, alteration, abuse, improper installation or maintenance. EXCEPT AS PROVIDED HEREIN, THE WARRANTY PROVIDER MAKES NEITHER ANY EXPRESS WARRANTIES NOR ANY IMPLIED WARRANTIES, INCLUDING BUT NOT LIMITED TO ANY IMPLIED WARRANTY OF MERCHANTABILITY OR FITNESS FOR A PARTICULAR PURPOSE. This warranty provides you with specific legal rights, and you may also have additional rights that vary from state to state.
To obtain warranty coverage, contact the Xcellon Customer Service Department to obtain a return merchandise authorization ("RMA") number, and return the defective product to Xcellon along with the RMA number and proof of purchase. Shipment of the defective product is at the purchaser's own risk and expense.
For more information or to arrange service, visit www.xcellongear.com or call Customer Service at 212-594-2353.

XCELLON™
A Gradus Group Brand
Product warranty provided by the Gradus Group.
www.gradusgroup.com
Xcellon is a registered trademark of the Gradus Group.
© 2015 Gradus Group LLC. All Rights Reserved.
- Thank you for choosing Xcellon.
- Precautions
- Overview
- Top
- Front
- Rear
- Also Included
- Plugging In and Setting Up
- RAID Mode Configuration
- RAID 0
- RAID 1
- JBOD
- Span (Big)
- Port Multiplier:
- Configuring the RAID Mode
- Removing Your Disk Drive
- Windows
- Mac
- Formatting Your Disk Drive
- Windows XP
- Windows Vista/7/8/8.1/10
- Mac OS X
- One-Year Limited Warranty
Brand : Xcellon
Model : HDD-202
Category : Disk array