
UB-440 - Microphone Senal - Free user manual and instructions
Find the device manual for free UB-440 Senal in PDF.


| Product Type | USB Condenser Microphone |
| Polar Pattern | Cardioid |
| Frequency Response | 20 Hz - 20 kHz |
| Sample Rate | 44.1 kHz / 48 kHz |
| Bit Depth | 16-bit |
| Connectivity | USB Type-C |
| Power Source | USB bus powered |
| Dimensions (H x D) | 12.5 cm x 5.5 cm |
| Weight | 480 g (with stand) |
| On-board Controls | Mute button, volume knob, gain dial |
| Headphone Output | 3.5 mm jack with volume control |
| Included Accessories | Adjustable desktop stand, USB-C cable |
| Compatibility | Windows, macOS, Linux |
| Maintenance | Wipe with a dry soft cloth |
| Safety | Keep away from liquids and extreme temperatures |
| Spare Parts Availability | Not available; device is not user-serviceable |
Frequently Asked Questions - UB-440 Senal
User questions about UB-440 Senal
0 question about this device. Answer the ones you know or ask your own.
Ask a new question about this device
Download the instructions for your Microphone in PDF format for free! Find your manual UB-440 - Senal and take your electronic device back in hand. On this page are published all the documents necessary for the use of your device. UB-440 by Senal.
USER MANUAL UB-440 Senal
natural_image
Black industrial camera with mesh grille and 'senal' logo, no visible text or symbols on bodyTable of Contents:
Introduction ...... 2
Overview 3
Precautions .....4
Assembling the UB-440 ....5
Plugging In and Setting Up ......6
Gain Control .....12
Using the Attenuation Pad .....12
Monitoring with Your Headphones .....12
High-Pass Filter .....13
Positioning the UB-440 .... 13
Troubleshooting ..... 14
Specifications .....15
Warranty 16

UB-440
PROFESSIONAL USB MICROPHONE
Thank you for choosing Senal.
Designed for use with today's sophisticated digital recording equipment, the Senal UB-440 Professional USB Microphone provides crystal-clear, crisp sound, perfect for home studio recording and ideal for podcasts, voiceovers, writing sessions, and rehearsals.
The cardioid condenser element combined with a studio-grade microphone preamp and analog-to-digital converter makes it easier than ever to create your own studio-quality recordings.
The built-in headphone amplifier provides real-time monitoring for playback and multitracking. Separate headphone and microphone gain controls plus the ease of plug-and-play connectivity make this the perfect choice for the professional and home recording aficionado.
Among the benefits you'll enjoy:
■ USB plug-and-play connectivity
■ Cardioid polar pattern
■ Integrated preamp with microphone gain control
- Headphone monitor output with integrated volume control
- -10 dB attenuation pad
■ High-pass filter at 80 Hz
■ 16 bit, 48 kHz sample rate
■ Full compatibility with Windows and Macintosh operating systems
Also Included:
Microphone.stand
USB.cable
User.manual
Precautions
- Please read and follow these instructions and keep this manual in a safe place.
- Exposure to high sound levels can cause permanent hearing loss. Avoid listening at high volumes for extended periods.
- Keep this product away from water and flammable gases or liquids.
- Do not attempt to disassemble or repair this product yourself. There are components inside that can produce a hazardous electric shock.
- Handle this product with care.
- Clean this product with a soft, dry cloth only.
- To avoid damage to this product, be careful to not overtighten or improperly thread any threaded fittings.
■ Make sure that this product is intact and that there are no missing parts.
Assembling the UB-440
Screw the shaft into the base. a
Screw the washer all the way onto the shaft. b
Screw the microphone mount onto the shaft © by three or four turns until it is centered over the base of the stand.
Tighten the microphone mount by rotating the washer d counterclockwise until secure.
Insert the UB-440's mounting thread into the microphone mount. e Make sure the Senal logo on the front of the UB-440 is facing you when the stand is tilted upward.
Screw the locking collar onto the mounting thread f until secure.

Plugging In and Setting Up
Windows XP
Setting Up the Microphone
-
Use the included USB cable to plug the UB-440 into your computer. One end of the cable corresponds with the USB port on the bottom of the microphone, and one end of the cable corresponds with the USB port on your computer. Once the UB-440 is plugged in, the power LED on the front of the microphone will glow blue.
-
Your computer will automatically detect the UB-440, but it may not set it as the default sound device. To set the UB-440 as the default, go to the Control Panel and then double-click on the Sounds and Audio Devices icon.
Sounds and Audio Devices
- Click on the Audio tab. In the drop-down menu under Sound playback, select USB PnP Sound Device as the default device.

- In the drop-down menu under Sound recording, select USB PnP Sound Device as the default device.

- Click OK to save your changes and exit.
Adjusting the Microphone Volume via the Computer
You can adjust the microphone's volume from the computer's Sounds and Audio Devices Properties window.
-
Go to the Control Panel and then double-click on the Sounds and Audio Devices icon.
-
Click on the Volume tab. Under Device volume, click on the Advanced... button to display the Speaker window.

- If the Microphone volume adjustment column appears on the right side of the window, skip to step 6.

If the Microphone volume adjustment column does not appear on the right side of the window, click Options in the menu bar, and then select Properties.

-
In the Mixer device drop-down menu, make sure USB PnP Sound Device is selected. Under Adjust volume for, make sure the Playback radio button is selected.
-
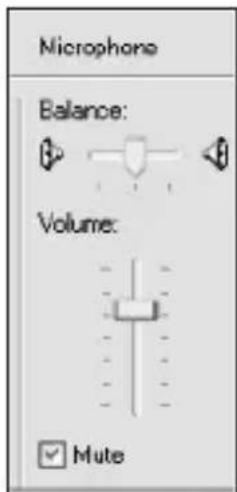
Under Show the following volume controls, click the checkbox next to Microphone to select it. Click OK to confirm your selection. The Microphone volume adjustment column should appear on the right side of the window.

- To adjust the microphone volume, click and drag the slider up or down. To mute the volume, click the checkbox labeled Mute. You can close the window when you are done adjusting the volume.
Macintosh OS X
-
Use the included USB cable to plug the UB-440 into your computer. One end of the cable corresponds with the USB port on the bottom of the microphone, and one end of the cable corresponds with the USB port on your computer. Once the UB-440 is plugged in, the power LED on the front of the microphone will glow.
-
Your computer will automatically detect the UB-440, but it may not set it as the default sound device. To set the UB-440 as the default, go to System Preferences and select Sound.

- Click on the Input tab and then click on USB PnP Sound Device to select it as the default sound input device.
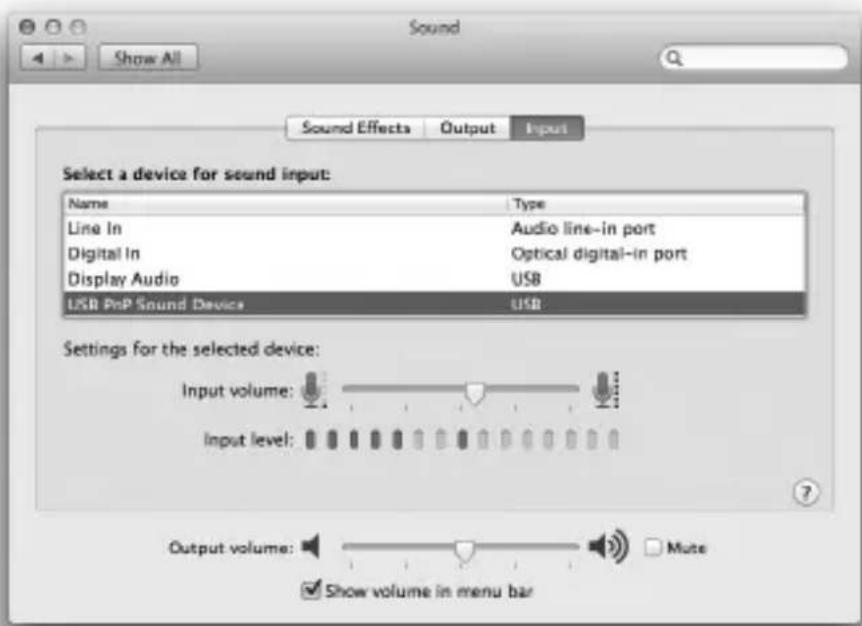
- Click on the Output tab and then click on USB PnP Sound Device to select it as the default sound output device.
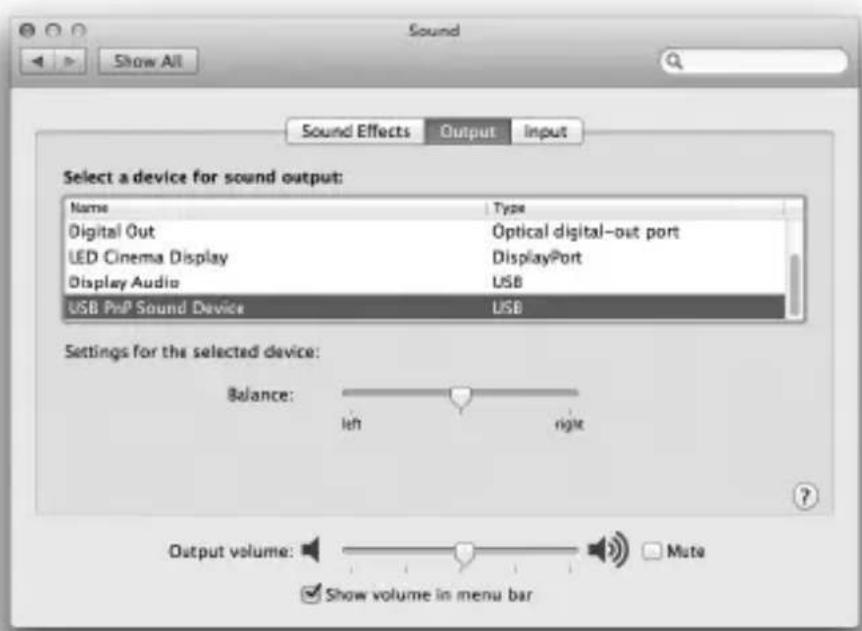
From the Sound window, you can adjust the computer's input and output volumes, adjust the stereo balance, and elect to show the volume in the menu bar.
Gain Control
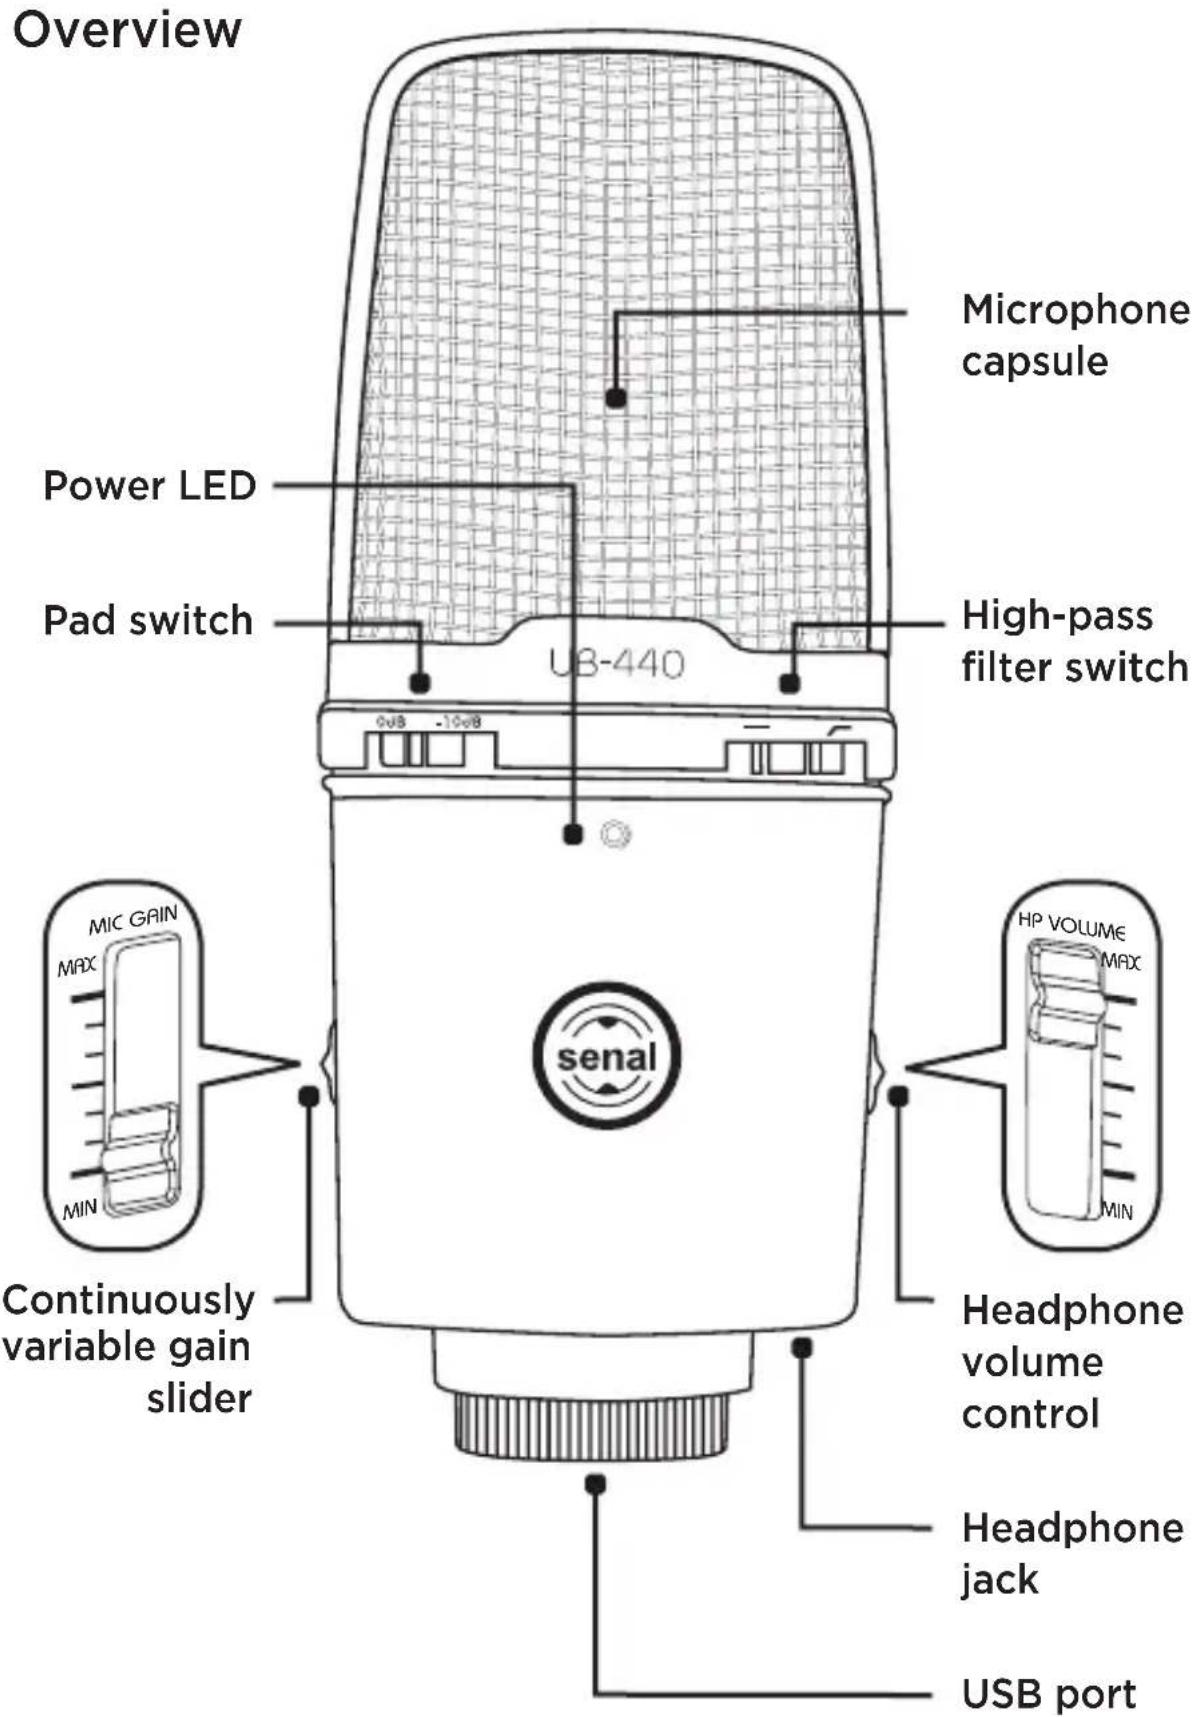
Use the continuously variable gain slider to adjust the UB-440's input gain. To increase the gain, raise the gain slider. To decrease the gain, lower the gain slider.
Higher gain is usually preferable when recording quiet subjects and lower gain is preferable for loud subjects, although your needs will depend upon your specific scenario.
Using the Attenuation Pad
The attenuation pad lowers the UB-440's output by 10 dB and is useful for preventing distortion when recording loud sounds like cymbals and electric guitar cabinets.
To turn on the attenuation pad, slide the pad switch so it rests under the -10 dB marking. To turn off the attenuation pad, slide the pad switch so it rests under the 0 dB marking.
Monitoring with Your Headphones
You can plug your headphones directly into the UB-440 to monitor your recording without the latency that often occurs when monitoring through a computer's headphone jack. To monitor through your UB-440, plug your headphones into the headphone jack on the bottom of the microphone. Use the headphone volume control to adjust the headphone volume.
To increase the headphone volume, raise the headphone volume control on the side of the microphone. To decrease the headphone volume, lower the headphone volume control.
Tip: To avoid an accidental burst of high volume, make sure to turn the headphone volume down before plugging in your headphones.
High-Pass Filter
The high-pass filter helps prevent the UB-440 from picking up low-frequency noises that may interfere with your recording, like a rumble from an air conditioner. The high-pass filter is programmed to 80 Hz.
To turn on the high-pass filter, slide the switch so it rests under the marking. To turn off the high-pass filter, slide the switch so it rests under the marking.
Positioning the UB-440
The UB-440's cardioid polar pattern will pick up sound mostly from in front of the microphone. You will usually want the front of the microphone—the side with the Senal logo—to face the sound source, although it is important to experiment with microphone placement and positioning to find the best solution for your specific needs.
You can adjust the angle of the microphone stand to aim the microphone toward the sound source.
When singing into the microphone, you may want to use a pop filter to reduce noise from aspirated plosives like p and b sounds and to keep corrosive moisture away.
Troubleshooting
| Problem Solution | |
| The microphone will not turn on. | Make sure the USB cable is plugged into the microphone and the computer's USB port. |
| There is no sound coming from the headphones or the headphones are too quiet. | Make sure the headphones are plugged into the microphone's headphone jack.Turn up headphone volume on the microphone.Turn up the volume on your computer.If your headphones have their own built-in volume control, turn it up. |
| The sound is distorted. | Turn down the microphone's gain control.Turn on the microphone's attenuation pad.Move the microphone away from the sound source. |
Specifications
| Transducer type: | Electret condenser |
| Sample Rate: | 48 kHz |
| Bit Rate: 16 Bit | |
| Frequency Response: | 50 Hz to 18 kHz |
| Signal-to-noise ratio: | 60 dB (at 1 kHz) |
| Sensitivity: | -46 dB ±4 dB (at 1 kHz 5.0 V 680 Ω, 0 dB = 1 V/u bar) |
| Power: | DC 5.0 V |
| Headphone out: | 3.5 mm (1/8") |
| Weight (microphone and stand): | 1.95 lb. (0.89 kg) |
| Compatible operating systems: | Windows 2000, Windows XP, Windows Vista, Windows 7, Windows 8, Macintosh OS X |
Two-Year Limited Warranty
This Senal product is warranted to the original purchaser to be free from defects in materials and workmanship under normal consumer use for a period of two (2) years from the original purchase date or thirty (30) days after replacement, whichever occurs later. The warranty provider's responsibility with respect to this limited warranty shall be limited solely to repair or replacement, at the provider's discretion, of any product that fails during normal use of this product in its intended manner and in its intended environment. Inoperability of the product or part(s) shall be determined by the warranty provider. If the product has been discontinued, the warranty provider reserves the right to replace it with a model of equivalent quality and function.
This warranty does not cover damage or defect caused by misuse, neglect, accident, alteration, abuse, improper installation or maintenance. EXCEPT AS PROVIDED HEREIN, THE WARRANTY PROVIDER MAKES NEITHER ANY EXPRESS WARRANTIES NOR ANY IMPLIED WARRANTIES, INCLUDING BUT NOT LIMITED TO ANY IMPLIED WARRANTY OF MERCHANTABILITY OR FITNESS FOR A PARTICULAR PURPOSE. This warranty provides you with specific legal rights, and you may also have additional rights that vary from state to state.
To obtain warranty coverage, contact the Senal Customer Service Department to obtain a return merchandise authorization (“RMA”) number, and return the defective product to Senal along with the RMA number and proof of purchase. Shipment of the defective product is at the purchaser’s own risk and expense.
For more information or to arrange service, visit www.senalsound.com or call Customer Service at 212-594-2353.
Product warranty provided by the Gradus Group.
www.gradusgroup.com
Senal is a registered trademark of the Gradus Group.
© 2015 Gradus Group LLC. All Rights Reserved.

SENAL™
A Gradus Group Brand
All other trademarks are the property of their respective owners.
All photos are for illustrative purposes only.
- Table of Contents:
- Thank you for choosing Senal.
- Among the benefits you'll enjoy:
- Precautions
- Assembling the UB-440
- Plugging In and Setting Up
- Windows XP
- Setting Up the Microphone
- Sounds and Audio Devices
- Adjusting the Microphone Volume via the Computer
- Macintosh OS X
- Gain Control
- Using the Attenuation Pad
- Monitoring with Your Headphones
- High-Pass Filter
- Positioning the UB-440
- Troubleshooting
- Specifications
- Two-Year Limited Warranty
Brand : Senal
Model : UB-440
Category : Microphone