
RoboStar T80 Pro - Vacuum Cleaner TESLA - Free user manual and instructions
Find the device manual for free RoboStar T80 Pro TESLA in PDF.


| Product Type | Robotic Vacuum Cleaner |
| Brand | TESLA |
| Model | RoboStar T80 Pro |
| Dimensions (approx.) | 33 cm diameter x 9 cm height |
| Weight (approx.) | 3.2 kg |
| Power Supply | 230 V power adapter |
| Battery Type | High-quality rechargeable cells |
| Charging Time | Full charge signaled by LCD icon |
| Cleaning Modes | Auto, Smart, Turbo, Spot, Wall/Edge, Scheduled |
| Wet Mopping | Yes, with water tank and mopping cloth |
| Filtration | HEPA filter, primary filter, cotton filter |
| Dust Container Capacity | Approx. 0.6 L |
| Water Tank Capacity | Approx. 180 mL |
| Remote Control | Yes, infrared, range 5 m |
| Sensors | Cliff, anti-bumper, gyroscopic navigation, object detection |
| Display | LCD display |
| Noise Level | Not specified (typical for robot vacs: ~65 dB) |
| Maintenance - Filter | Clean every 14 days; replace HEPA every 6 months |
| Safety | Indoor use only, max 40°C, do not use on wet floors |
| Warranty | 6 months battery warranty |
| Package Contents | Robot, charging station, power adapter, remote control, water tank, mopping cloth, brushes, filters |
Frequently Asked Questions - RoboStar T80 Pro TESLA
User questions about RoboStar T80 Pro TESLA
0 question about this device. Answer the ones you know or ask your own.
Ask a new question about this device
Download the instructions for your Vacuum Cleaner in PDF format for free! Find your manual RoboStar T80 Pro - TESLA and take your electronic device back in hand. On this page are published all the documents necessary for the use of your device. RoboStar T80 Pro by TESLA.
USER MANUAL RoboStar T80 Pro TESLA
REŽIM ÚKLIDU: TURBO
REŽIM ÚKLIDU: KRUHOVÝ
REŽIM ÚKLIDU: OBVODOVÝ
NÁVRAT DO NABÍJECÍ STANICE
NASTAVENÍ ČASU
natural_image
Line drawing of a hand inserting a power outlet into a train car, with cable wrapped around (no text or symbols)natural_image
Line drawing of a hand using a tool to lift a car trunk (no text or symbols)natural_image
Architectural floor plan showing a curved building with an arrow pointing to a specific area (no text or labels visible)natural_image
Diagram showing a device before and after transformation, with no visible text or symbolsnatural_image
Diagram showing a device being processed from a circular component, with an arrow indicating the process (no text or symbols present)HEPA filtr
natural_image
Technical line drawing of a mechanical component with internal structure and assembly details (no text or symbols)natural_image
Technical diagram of a vehicle interior with a magnified inset showing a component detail (no text or symbols)natural_image
Diagram of a mechanical component with a magnified inset showing internal structure (no text or symbols)natural_image
Technical line drawing of a circular electronic component with a magnified inset showing internal structure (no text or symbols)natural_image
Illustration of two hands interacting with a device, one pointing at a component and the other holding a device (no text or symbols present)POPIS CHYBOVÝCH HLÁŠENÍ
- Pripojte nabíjaciu stanicu pomocou 230 V napájacieho adaptéra do elektrickej zásuvky.
REŽIM UPRATOVANIA: SMART
REŽIM UPRATOVANIA: TURBO
REŽIM UPRATOVANIA: KRUHOVÝ
REŽIM UPRATOVANIA: OBVODOVÝ
NÁVRAT DO NABÍJACEJ STANICE
NASTAVENIE ČASU
V pohotovostnom režime stlačte na 2 sekundy stredovej tlačidlo na hornom paneli.
natural_image
Line drawing of a hand using a tool to lift a water tap into a container (no text or symbols)natural_image
Architectural floor plan diagram showing curved structural elements with a highlighted section (no text or labels)natural_image
Diagram showing a device before and after transformation, with no visible text or symbolsnatural_image
Diagram showing a device being processed from a circular container, with no visible text or symbols.HEPA filter
- Vyčistite filter každých 14 dní poklepaním, prachovým štetcom alebo vysajte klasickým vysávačom
• HEPA filter neumývaite vodou.
• Odporúčame výmenu HEPA filtru každých 6 mesiacov.
flowchart
graph LR
    A["Raw Material"] --> B["Process Step 1"]
    B --> C["Product Inspection"]
    C --> D["Final Product"]
natural_image
Technical line drawing of a mechanical component with internal structure and assembly detail (no text or symbols)natural_image
Top-down schematic of a vehicle dashboard with internal components and a magnified inset showing a close-up detail (no text or symbols)natural_image
Diagram of a vehicle interior with a magnified inset showing a hand holding a small object (no text or symbols present)natural_image
Diagram of a cylindrical electronic component with a magnified inset showing internal structure (no text or symbols)natural_image
Illustration of two hands interacting with a device, one holding a pen and the other holding a tablet (no text or symbols present)POPIS CHYBOVÝCH SPRÁV
| Tón | Displej | Príčina | Riešenie | ||
| 1. | 1x pípnutie | E11 |  | Chyba l'avé koliesko | Skontrolujte l'avé koliesko |
| 2. | 1x pípnutie | E12 |  | Chyba pravé koliesko | Skontrolujte pravé koliesko |
| 3. | 1x pípnutie | E13 |  | Chyba l'avá kefa | |
| 4. | 1x pípnutie | E14 | [64KH] | Chyba pravá kefa | Skontrolujte pravú kefu |
| 5. | 1x pípnutie | E15 |  | Chyba stredová kefa | Skontrolujte stredovú kefu |
| 6. | 2x pípnutí | E21 |  | Vysávač nie je na podlahe | Skontrolujte umiestnenie a reštartujte vysávač |
| 7. | 2x pípnutie | E22 |  | Chyba snímača pádu | Skontrolujte snímač pádu |
| 8. | 2x pípnutie | E23 |  | Chyba snímača pre detekciu predmetov | Skontrolujte, že predný nárazník nie je zaseknutý malým predmetom |
 | |||||
 | |||||
| 9. | 3x pípnutie | E31 |  | Vysavač uviazol | Skontrolujte umiestnenie a reštartujte vysávač |
| 10. | 3x pípnutie | E32 |  | Chyba odsávania | Skontrolujte, že žiadny predmet nebráni nasávaniu a reštartujte vysávač |
natural_image
Line drawing of a hand using a power outlet to connect electrical equipment to a train (no text or symbols present)Vypnite vysávač na hlavnom vypínači, aby ste zamedzili jeho prípadnému pohybu. Potom zapojte 230 V napájací adaptér napriamo do vysávača.
BATÉRIA
Thank you for choosing the TESLA RoboStar T80 Pro.
Please, read the safety rules carefully and follow all common safety rules before using a robotic vacuum cleaner.
- read through the instructions for use thoroughly before using
- keep the user manual for future reference
- follow the rules stated in this manual to reduce the risk of damage to the robotic vacuum cleaner and possible injury
IMPORTANT SAFETY WARNINGS
This device is a complex electromechanical device, please, pay attention to the following guidelines:
- The device is intended for indoor use at room temperature only (max. 40°C).
- Use the vacuum cleaner as often as possible for the maximum cleaning effect.
• Before using, make sure that the dust tray and filter are installed correctly. - Use only accessories provided by the authorised manufacturer. Using non-original accessories can cause damage the robotic vacuum cleaner, electric shock, or fire.
- Do not touch any of the parts plugged into the mains if you have wet hands.
- Do not leave the appliance unattended in the presence of children, do not use it in the room where the baby is asleep.
- Do not allow children to use the robotic vacuum cleaner even under the supervision of an adult.
- Only use original accessories designed for this model.
- Do not sit on the robotic vacuum cleaner or place other objects on it.
- Do not use the appliance if the power cord is damaged.
- Do not open or repair the unit, there is a risk of electric shock and loss of warranty.
- Do not use the device if you have wet hands or feet.
- Do not use the appliance on a wet or damp floor.
- Keep away from flammable and volatile substances.
- Do not use the device near objects containing liquids, the device may for example turn the objects over causing water spillage.
- Do not wash the vacuum cleaner with water, avoid radiant heat on the plastic surface of the device.
- Do not use the device in a too hot, dusty or damp environment.
- Do not let the device vacuum fluids, burning cigarettes, splinters and sharp objects, matches and other combustible substances, flour, cement, plaster, larger pieces of paper, plastic bags, or other objects that can cause damage to the vacuum cleaner.
-
Electrostatic charge may occur during the cleaning process, which may be dangerous to the user.
• Also inform your roommates about the use of the vacuum cleaner to avoid possible injury. -
Do not use the robotic vacuum cleaner if its dust container is full.
- The manufacturer and distributor for the European Union is not responsible for damage caused by the operation of the device such as injuries, scalding, fire, damage to other objects etc.
PACKAGE CONTENT
Carefully check you have unpacked all accessories, we recommend keeping the original paper box, user manual and packaging materials for the warranty period.
DESCRIPTION
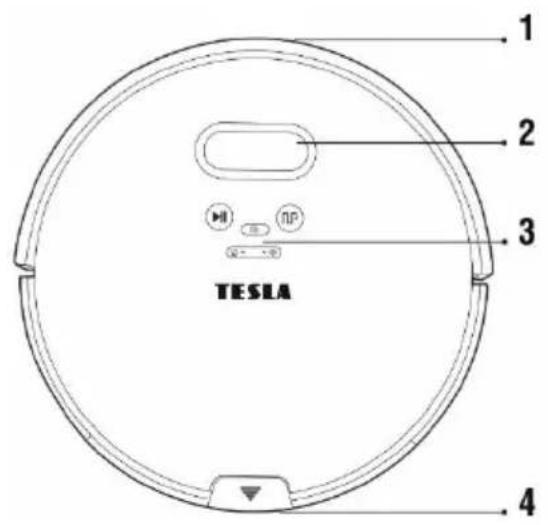
1 Front bumper
2 LCD display
3 Control panel
4 Dust/water tank button
5 Charging connectors
6 Battery cover
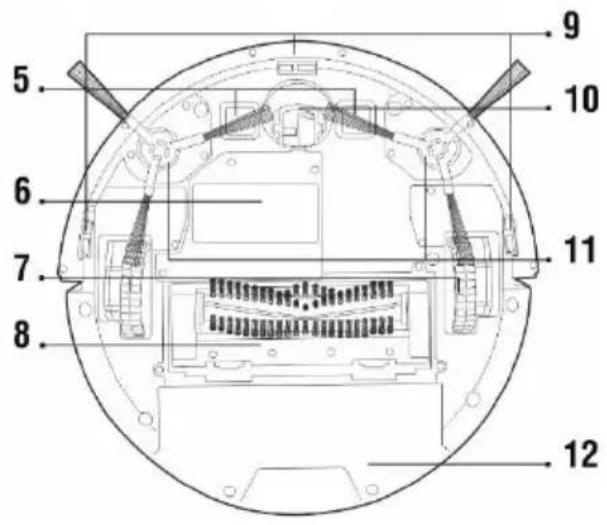
7 Left/Right wheel
8 Main brush unit
9 Cliff sensor
10 Nose wheel with under sensor
11 Left/Right brush
12 Dust/Water tank
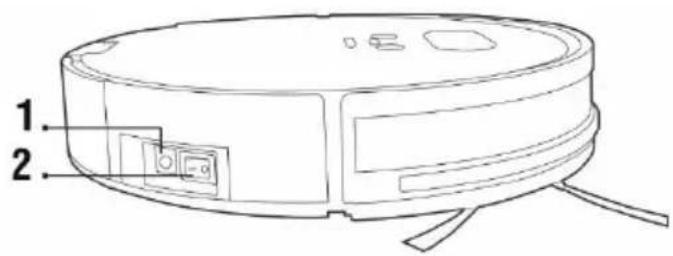
1 Charging connector
2 Power switch
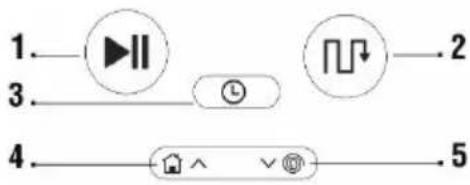
Control buttons on the top panel of the vacuum cleaner
flowchart
graph LR
    1 --> A["播放器"]
    3 --> B["播放器"]
    4 --> C["播放器"]
    5 --> D["播放器"]
1 AUTOMATIC cleaning
2 SMART cleaning
3 Schedule cleaning
4 Return to charging station/Increase value
5 Spot cleaning/Decrease value
Dust tank
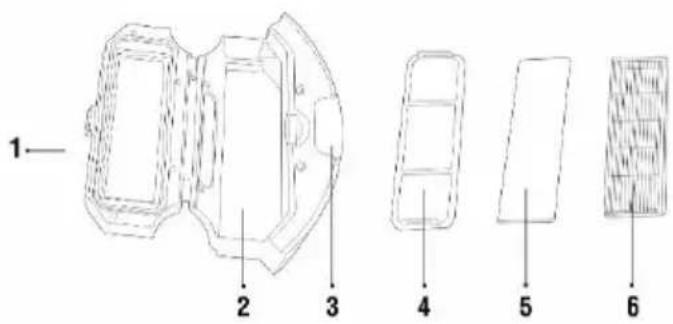
1 Dust bin lid
2 Dust bin
3 Dust bin button
4 Primáry filter
5 Cotton filter
6 HEPA filter
Water tank
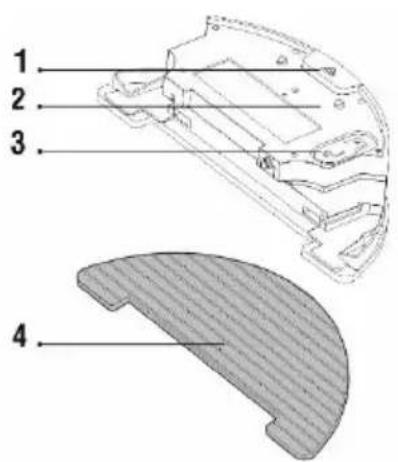
1 Water tank button
2 Water tank
3 Rubber cover
4 Mopping cloth
Remote controller
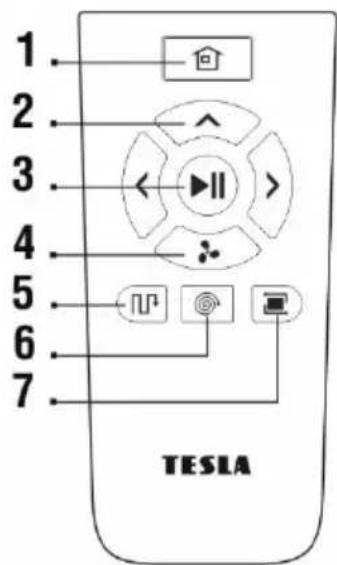
1 Return to charging station
2 Direction button
3 Start of AUTO cleaning/Pause
4 TURBO cleaning
5 SMART cleaning
6 Spot cleaning
7 Wall/Edge cleaning
Charging station
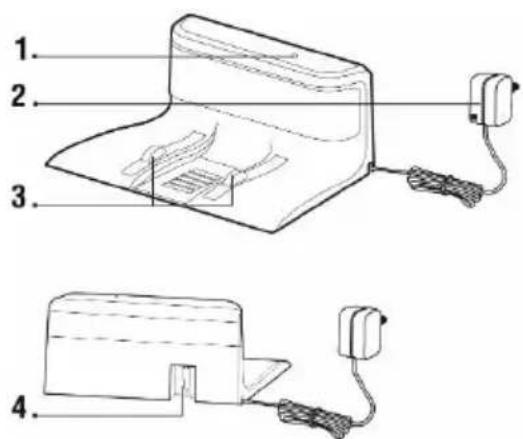
1 Power indicator
2 230 V power adaptor
3 Charging pins
4 230 V power adaptor port connector
FIRST CLEANING
- Remove all obstacles that can prevent effective cleaning.
- Also remove objects that can damage the robotic vacuum cleaner.
- The carpet must be secured so the robot cannot get on it when mopping. If the mopping pad with the water container is installed on the vacuum cleaner, it may interrupt the cleaning process or cause unwanted soaking of the carpet.
- Direct sunlight may cause a reduced sensitivity of the infrared sensors of the vacuum cleaner, please avoid direct sunlight light.
- Black furniture may not be properly detected due to the physical nature of infrared sensors. This may cause a slight impact, which will be reduced by the front bumper.
CLEANING MODE - AUTOMATIC CLEANING FIRST START
- This is the most common way of cleaning.
- Insert the batteries into the remote control, make sure the polarity is correct.
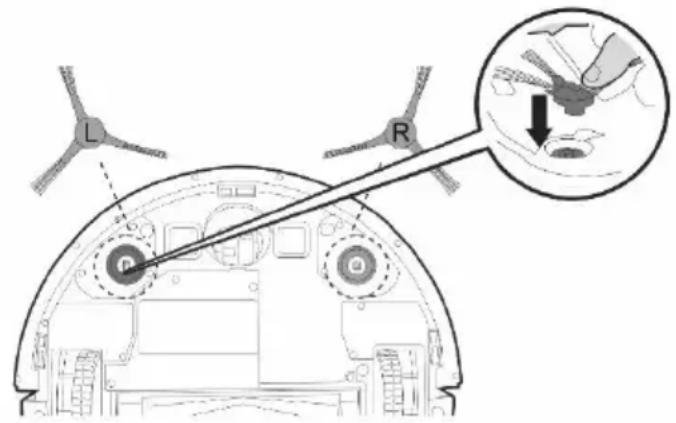
- Install the cleaning brushes, depending on the color.
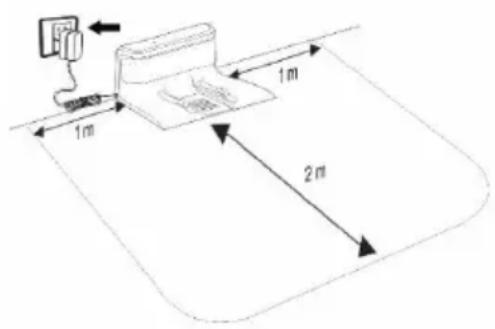
- Connect the charging station to an electrical outlet with a 230 V power adapter.
There must be no obstacles within 2 meters in front and 1 meter on the sides from the charging station. The charging station must be placed on a flat surface, we also recommend to fix the station to the wall or floor with a double-sided adhesive tape. Place the power cord so it does not get entangle in the cleaning brushes of the vacuum cleaner.
A mirror or other objects with strong reflection can not be placed in the area of the charging base 15 cm above the ground. The base should not be exposed to direct sunlight.
- Place the vacuum cleaner in the charging station.
- The vacuum cleaner battery will start charging automatically.
- Full battery charge will be signaled by the LCD icon on display.
- Before putting the vacuum cleaner into operation, prepare the room so there are no objects on the floor that may prevent the vacuum cleaner to operate properly (bigger sheets of paper, cables, stickers, small items, inappropriately placed carpet, etc.).
- Remove the chairs and other larger items so the vacuum cleaner can easily reach inaccessible places.
- Switch the ON/OFF button ("2") on the control panel to the "I" position."
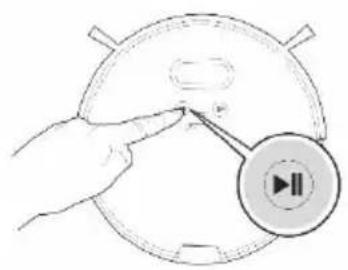
- Press the "1" button on the vacuum cleaner or on the remote control button "3" to place the unit in "Standby mode".
- To start up, press the "1" button on the top of the device or the "3" on the remote control.
natural_image
Hand pointing at a device with a circular button labeled 'II' (no text or symbols on the device itself)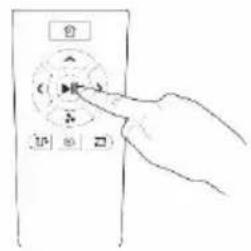
- The vacuum cleaner starts cleaning automatically until the battery is almost empty, then the vacuum cleaner automatically searches for the charging station and starts charging the battery.
- To stop/pause the vacuum cleaner, press the "1" button on the top of the appliance or the "3" button on the remote control. Once the cleaning has been interrupted and re-started, the cleaned area may be repeatedly cleaned.
- The vacuum cleaner automatically switches to "Standby" when it is idle for more than 10 minutes.
Remark: The "AUTO" mode is symbolized on the display as follows AU FO
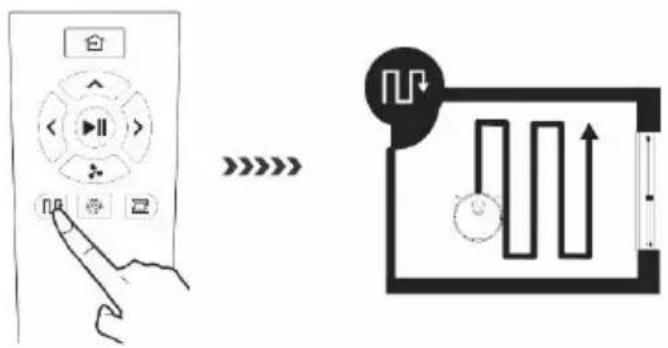
CLEANING MODE: SMART
The device uses gyroscopic guidance for the most effective cleaning of the floor. Press the "2" button on the top or the "5" remote control.
When activating „SMART“ cleaning, the vacuum cleaner should always be in the charging station.
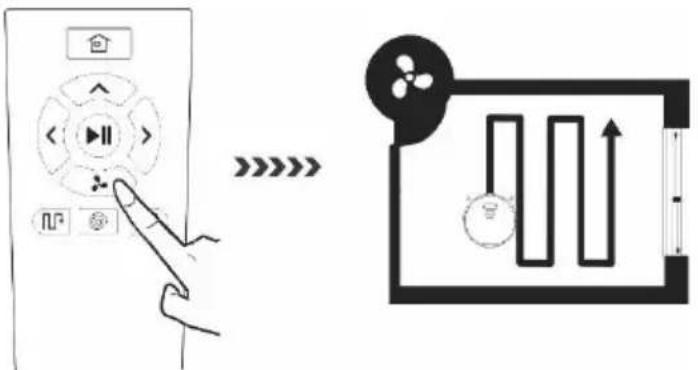
CLEANING MODE: TURBO
Pressing the "4" button on the remote control will increase the suction force, for deep cleaning. By activating it, you will increase the suction power of the vacuum cleaner to maximum power, "HI" appears on the display of the vacuum cleaner, press the "4" button on the remote control again to return to the standard mode. "LO" (standard power) will appear on the display of the vacuum cleaner.
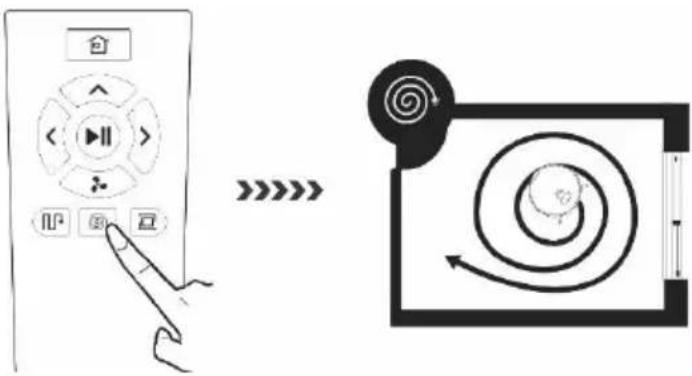
CLEANING MODE: SPOT
Used for larger local soil contamination, the vacuum cleaner starts cleaning in circles – targeted cleaning (spot cleaning). Press the "5" button on the top of the vacuum cleaner or push button „6" on the remote control.
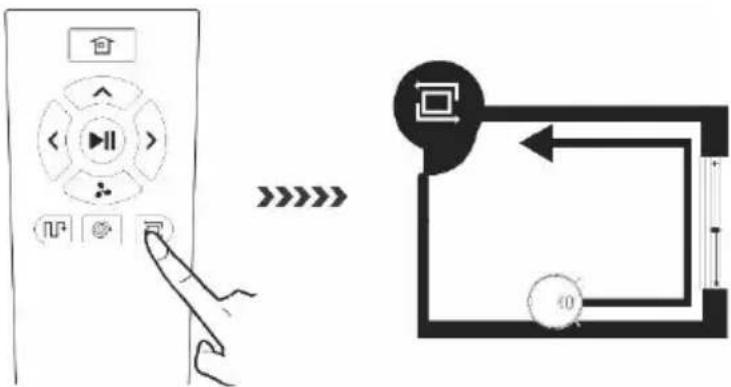
CLEANING MODE: WALL/EDGES
Place the vacuum cleaner near the wall, approx. 10 cm, after pressing the "7" button on the remote control, the vacuum cleaner starts cleaning along the wall.
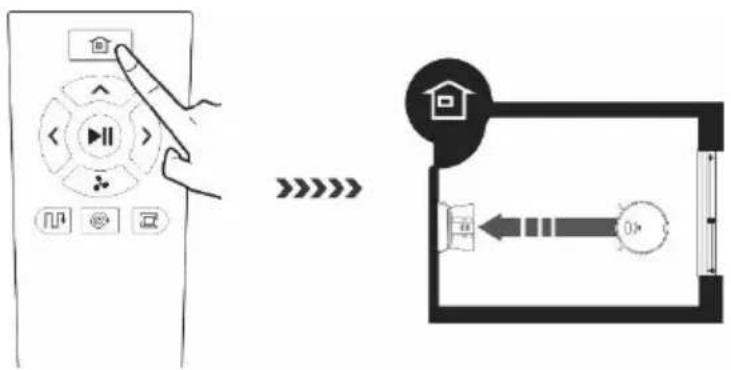
RETURN TO THE CHARGING STATION
After pressing the "1" button on the remote control or the "4" button on the vacuum cleaner, the vacuum cleaner searches for the charging station and starts charging automatically.
TIME SETTING
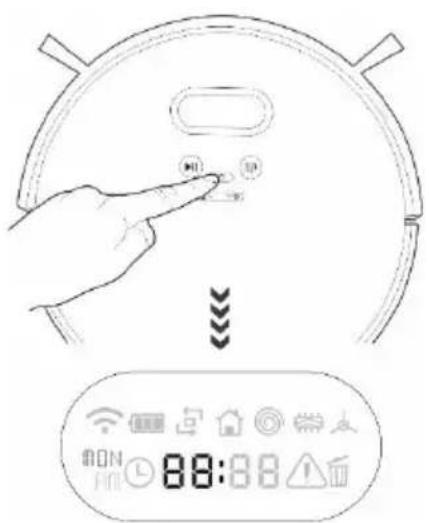
In standby mode, press the center button on the top panel for 2 seconds.
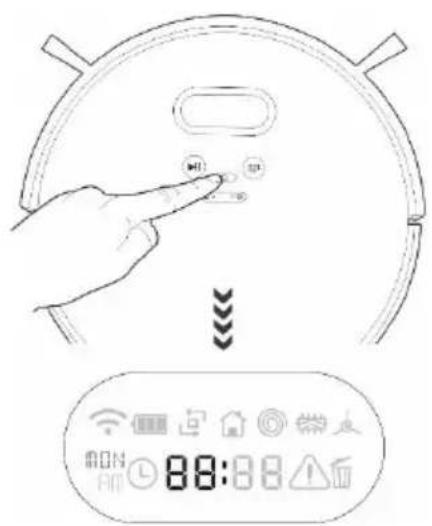
You will hear a beep, the display flashes and you can start to change the time on the display.
To increase and decrease values, press the buttons ∧ ∨
To switch between clock, minute, time display format (12 hours / 24 hours) and weekday, press

Changing the clock format
To change the 12/24 format, press button . The display will show ON / OFF. Use the OFF value for 24-hour format.
Saving into memory
To save the set values, press the button

SCHEDULED CLEANING
To set the cleaning time, briefly press the button, you will hear a beep, the icon will appear on the display at the same time as "MON" (Monday). Press the buttons to change the cleaning day.
Press to switch between hours and minutes. Press the buttons to change values.
Saving into memory
To save the set values, press the button

CANCEL A SCHEDULED CLEANING
To cancel the scheduled cleaning, press the button , you will hear a beep, the icon will flash on the display at the same time as "MON" (Monday). Press the buttons to ▲ ▼ display the cleaning day and the scheduled cleaning time. Press the button now □ ▼ The display will be displayed ,,-- : -- ,then press the button again ▶ ▼ to confirm deletion.
WET MOPPING
After dust cleaning, the dirt container can be replaced by the water tank. For best results, we recommend using this feature in one room and then moving with wet mopping to the next room.
- Do not use wet mopping on the carpet.
- Keep enough water in the water tank for water mopping.
- Remove the water tank after cleaning has finished.
- Do not charge the battery with the water tank for safety reasons.
VACUUM CLEANER RESET
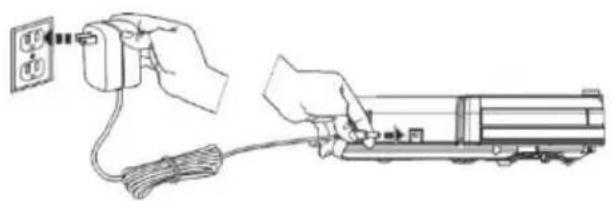
If the vacuum cleaner behaves in a non-standard way or you can not charge the battery properly to its full capacity, connect it directly to the 230 V power supply for a long time, such as overnight. The vacuum cleaner will be reset and the vacuum cleaner will be reset to original factory values.
natural_image
Line drawing of hands connecting a power outlet to a train car, with cable wrapped around (no text or symbols)Turn off the vacuum cleaner on the main switch to prevent it from moving. Then connect the 230 V power adapter directly to the vacuum cleaner.
natural_image
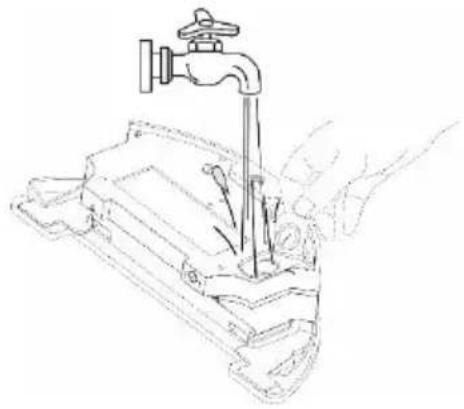
Line drawing of a hand using a tool to lift a car trunk (no text or symbols)Open the plastic cap and take the water into the plastic water tank. We recommend that the floor be wiped with clean water, the detergent may cause foam to soften water dripping on the mop, or cause smudges on the floor after drying.
natural_image
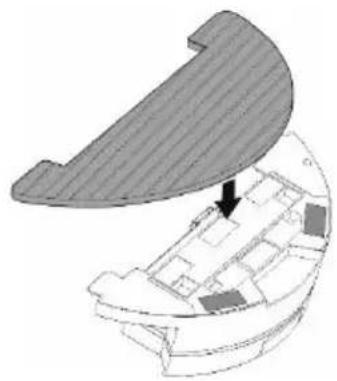
Architectural floor plan diagram showing a curved building with an arrow pointing to a specific section (no text or labels)Install the blue mopping fabric on the bottom with the water tank. Lightly dampen the mopping fabric for a faster and smoother wiping. When removing the mop from the holder, make sure you do not damage the velcro fastener on the bracket quickly.
If the mop is dirty after cleaning, you can clean it with lukewarm water.
natural_image
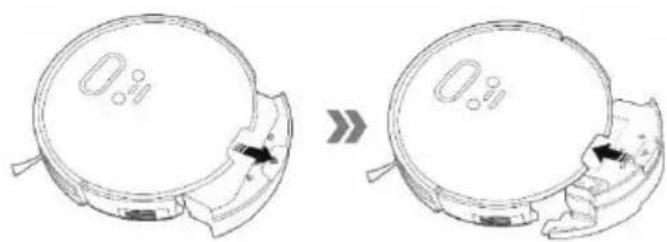
Diagram showing a device being processed, with one side showing internal components and the other showing a cutaway view (no text or symbols present)Remove the dirt trap from the unit and insert the water tank.
Press the button to start wiping with water. In this mode, vacuuming is switched off, only side cleaning brushes work.
To control the water flow during wet wiping, press the button on the remote control and the preset value will be displayed on the display.
- Low water dripping intensity
- Secondary water drip rate (factory set value)
- High water drip intensity
The water drips automatically, so do not let the vacuum cleaner stand in a place without movement or with any residual water in the water tank to prevent spillage of water on the floor.
DRY MOPPING
• Used to remove fine dust and polish the floor, use a dry mopping cloth.
- Do not use the microfiber mop for wiping on carpets and uneven surfaces.
MAINTENANCE
Dust tank
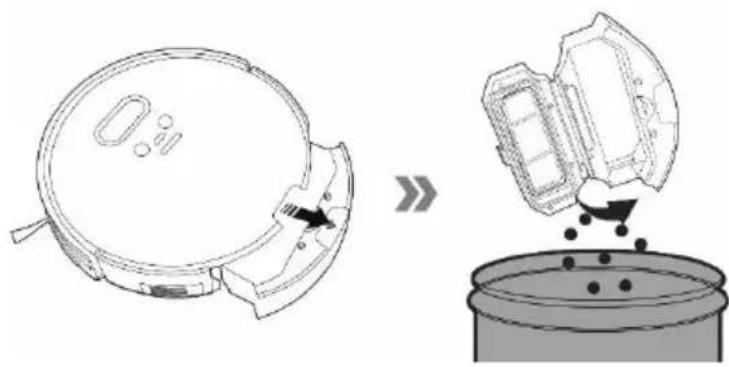
• Regularly empty the dust tray.
- The filling of the dust container greatly affects the suction power of the vacuum cleaner and the quality of the cleaning.
- Spread the contents of the magazine after cleaning into the trash.
- If you use water to clean the dustbin, carefully dry it before re-installing it in the vacuum cleaner.
natural_image
Diagram showing a device being processed from a container, with no visible text or symbols.HEPA filter
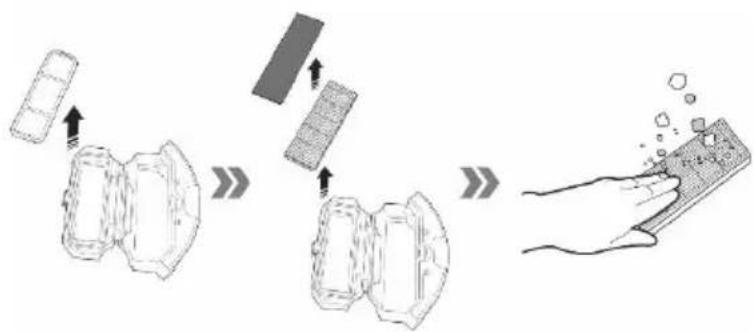
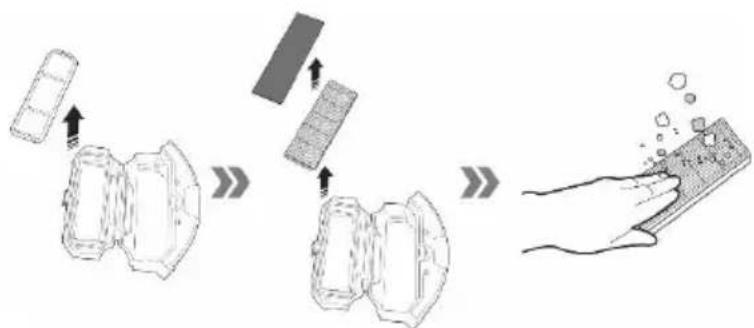
- Clean the filter every 14 days by tapping, brushing or vacuuming with a classic vacuum cleaner
- Do not wash the HEPA filter in water.
• We recommend replacing the HEPA filter every 6 months.
flowchart
graph LR
    A["Raw Material"] --> B{Transformation}
    B --> C["Intermediate Product"]
    C --> D["Processed Product"]
Water tank and mopping fabric cloth
- Remove the water tank from the vacuum cleaner, pour the remaining water and let it dry
- Rinse and dry the mopping fabric
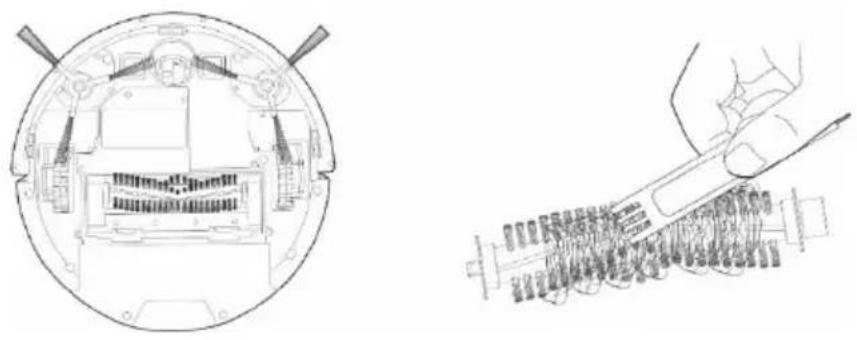
Center cleaning brush and side cleaning brushes
Keep a central cleaning brush without a lot of hair, dust, cotton etc.
natural_image
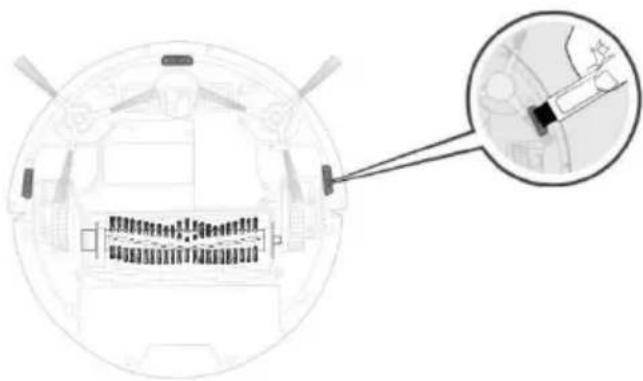
Technical line drawing showing internal components and a close-up of a tool interacting with a component (no text or symbols present)Anti-bumper and cliff sensors
Keep sensors clean.
natural_image
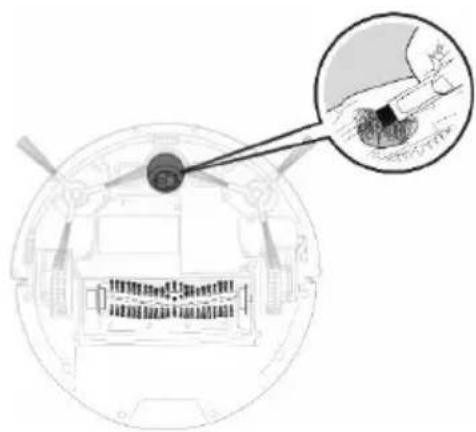
Top-down schematic of a vehicle interior with a magnified inset showing a close-up of the dashboard (no text or symbols)Keep the nose wheel without hair and dust. Remove the nose wheel from the vacuum cleaner and clean the rotary wheel sensor located underneath it.
natural_image
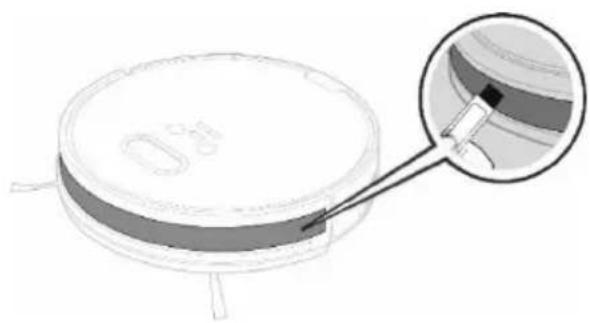
Diagram of a vehicle interior with a magnified inset showing a close-up of the engine compartment (no text or symbols present)Keep the front bumper underneath the sensor for detecting objects.
natural_image
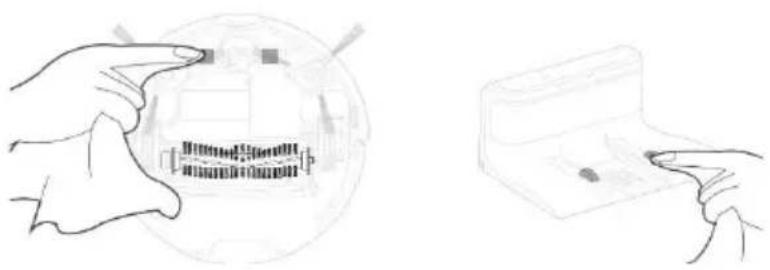
Diagram of a cylindrical electronic component with a magnified inset showing internal structure (no text or symbols)Charging contacts and charging base
Clean the contacts on the bottom of the vacuum cleaner and the charging base with a soft cloth.
natural_image
Illustration of two hands interacting with a device, one pointing at a screen and the other holding a card (no text or symbols present)DESCRIPTION OF ERROR MESSAGES
| Sound | Display | Cause | Solution | |
| 1. | 1x beep | E11  | Left wheel error | Check left wheel |
| 2. | 1x beep | E12  | Right wheel error | Check right wheel |
| 3. | 1x beep | E13  | Left brush error | Check left brush |
| 4. | 1x beep | E14  | Right brush error | Check right brush |
| 5. | 1x beep | E15 [7G8B] | Main brush error | Check main brush |
| 6. | 2x beep | E21  | The cleaner is not on the floor | Move cleaner into open space and try again |
| 7. | 2x beep | E22  | Cliff sensor error | Check cliff sensor |
| 8. | 2x beep | E23  | Anti-bumper error | Check anti-bumper |
| 9. | 3x beep | E31  | The cleaner get stuck | Move cleaner into open space and try again |
| 10. | 3x beep | E32  | Fan error | Restart cleaner please |
| 11. | 3x beep | E33  | Water tank error | Check if water tank is installed properly |
| 12. | 3x beep | E41  | Battery error | Turn off/on cleaner or replace battery |
| 13. | 4x beep | E42  | Anti-bump sensor error | Turn off/on cleaner or replace battery |
| 14. | 5x beep | E43  | Gyro navigation error | Turn off/on cleaner or replace battery |
| 15. | LO [HB6C] | Low capacity of battery | When robot is on standby, make sure it is charged so that it has enough power to work at any time | |
| 16. |  | HEPA filter blocked | Clean HEPA filter |
SOLVING PROBLEMS
| Problem | Cause | Solution | |
| 1 | The vacuum cleaner battery can not be charged. | The vacuum cleaner is not properly parked in the charging base. | Ensure that the charging contacts are properly connected when parked in the charging base. |
| The charging base is not connected to the mains and the vacuum cleaner is turned on by the main switch. | The charging base should always be connected to the mains, do not switch it off. The vacuum cleaner is then always ready for further cleaning with a fully charged battery. | ||
| The battery is completely discharged. | Activate the battery. Place the vacuum cleaner manually in the charging dock, then disconnect it from the dock after 3 minutes. Repeat 3 times and then let the battery recharge normally. | ||
| 2 | The vacuum cleaner has been trapped during cleaning. | The vacuum cleaner has been trapped in a small area, the loose brushes have been drilled on the cleaning brushes, such as power cords, curtains, carpets etc. | The vacuum cleaner automatically tries to release if it is not able to clear the obstacle yourself. |
| 3 | The vacuum cleaner interrupts cleaning and prematurely returns to the charging base. | If the battery level drops, the vacuum cleaner switches automatically to the recharge mode dock and returns to the charging base. | Normal status, let the vacuum cleaner charge to full battery capacity and start cleaning again. |
| The operating time varies depending on the floor surface, room complexity and the selected cleaning mode. | Normal state, no need to deal with. | ||
| 4 | The vacuum cleaner does not start cleaning as planned. | The vacuum cleaner is off or the battery is running low. | Turn on the vacuum cleaner and recharge the battery. |
| You did not save the planned cleaning in the vacuum cleaner's memory. | Re-enter the time and day into the vacuum cleaner's memory and make sure the vacuum cleaner is fully charged. | ||
| The vacuum cleaner is blocked. | Turn off the vacuum cleaner and clean it. | ||
| 5 | Remote control does not work (RC working range is 5 meters) | Low batteries in the remote controller. | Replace the batteries, make sure to insert the correct polarity. |
| The vacuum cleaner is not turned on or does not have a sufficiently charged battery to start cleaning. | Make sure the vacuum cleaner is on and recharge the vacuum cleaner battery. | ||
| The infrared sensor of the remote control is dirty or the infrared sensor on the vacuum cleaner is dirty. | Clean the remote control and the vacuum cleaner. | ||
| There is interference between the remote control and the vacuum cleaner. | Avoid using in the vicinity of other infrared devices. |
If the problem still occurs, check whether the battery is fully charged if it is, turn the vacuum cleaner off and on again with the main switch.
BATTERY
- In case of low battery detection during cleaning, the vacuum cleaner automatically searches the charging station and starts charging
- Keep the charging station switched on continuously, if it is not turned on, the vacuum cleaner can not find it.
- If you are carrying a robotic vacuum cleaner or you will not be using it for a long time, turn it off with the main switch.
• If you do not use the device for a long time, remove the batteries from the remote control.
• High-quality battery cells that do not require formatting are used to power the vacuum cleaner. - The vacuum cleaner is equipped with a special protection that stops supplying power after charging and prevents overcharging, so the battery does not require frequent replacement.
The warranty DOES NOT APPLY to:
• using the device for other purposes than it was designed to
- failure to observe the "Important Safety Instructions" stated in the user manual
• electrical or mechanical damage caused by improper use
- damage caused by natural elements such as water, fire, static electricity, power surges etcetera
• damage caused by an unauthorized repair
- unreadable serial number
- the battery capacity drops after 6 months of using
(6-months battery life warranty)
SERVICE AND SPARE PARTS
Warranty and post-warranty repairs, consumables and spare parts
www.tesla-electronics.eu
TECHNICAL SUPPORT
Need help with setup and operation of TESLA RoboStar T80 Pro?
Contact us: www.tesla-electronics.eu
DECLARATION OF CONFORMITY
We, INTER-SAT LTD, org. slozka, declare that this device complies with the essential requirements and other relevant provisions of the standards and regulations relevant to the type of equipment.

This product complies with the requirements of the Europe Community.
When this crossed-out wheeled bin symbol is attached to a product it means that the product is covered by the European Directive 2002/96/EC. Please inform yourself about the local separate collection system for electrical and electronic products. Please act according to your local rules and do not dispose of your old products with your normal household waste. Correct disposal of your old product helps to prevent potential negative consequences for the environment and human health.
Design and specification may be changed without prior notice, print errors reserved.
www.tesla-electronics.eu

TESLA
- REŽIM ÚKLIDU: TURBO
- REŽIM ÚKLIDU: KRUHOVÝ
- REŽIM ÚKLIDU: OBVODOVÝ
- NÁVRAT DO NABÍJECÍ STANICE
- NASTAVENÍ ČASU
- HEPA filtr
- POPIS CHYBOVÝCH HLÁŠENÍ
- REŽIM UPRATOVANIA: SMART
- REŽIM UPRATOVANIA: TURBO
- REŽIM UPRATOVANIA: KRUHOVÝ
- REŽIM UPRATOVANIA: OBVODOVÝ
- NÁVRAT DO NABÍJACEJ STANICE
- NASTAVENIE ČASU
- HEPA filter
- BATÉRIA
- IMPORTANT SAFETY WARNINGS
- PACKAGE CONTENT
- Control buttons on the top panel of the vacuum cleaner
- Dust tank
- Water tank
- Remote controller
- Charging station
- FIRST CLEANING
- CLEANING MODE - AUTOMATIC CLEANING FIRST START
- CLEANING MODE: SMART
- CLEANING MODE: TURBO
- CLEANING MODE: SPOT
- CLEANING MODE: WALL/EDGES
- RETURN TO THE CHARGING STATION
- TIME SETTING
- Changing the clock format
- Saving into memory
- SCHEDULED CLEANING
- CANCEL A SCHEDULED CLEANING
- WET MOPPING
- VACUUM CLEANER RESET
- DRY MOPPING
- MAINTENANCE
- Water tank and mopping fabric cloth
- Center cleaning brush and side cleaning brushes
- Anti-bumper and cliff sensors
- Charging contacts and charging base
- BATTERY
- The warranty DOES NOT APPLY to:
- SERVICE AND SPARE PARTS
- TECHNICAL SUPPORT
- DECLARATION OF CONFORMITY
- TESLA
Brand : TESLA
Model : RoboStar T80 Pro
Category : Vacuum Cleaner