
RS36A72U1N - Fridge Fisher & Paykel - Free user manual and instructions
Find the device manual for free RS36A72U1N Fisher & Paykel in PDF.


| Product Type | Built-in Refrigerator-Freezer |
| Brand | Fisher & Paykel |
| Model | RS36A72U1N |
| Technology | ActiveSmart™ with electronic temperature control |
| Control Panel | SmartTouch™ with display and touch keys |
| Main Functions | Fast Freeze, Ice Boost, Bottle Chill |
| Additional Functions | Door alarms, mute, key lock, Sabbath mode, silent keys |
| Humidity Control | Humidity control covers with adjustable slider for fruits and vegetables |
| Ice Maker | Automatic with removable bin (Ice & Water model) |
| Water Dispenser | Yes, with distribution plate (Ice & Water model) |
| Water Filter | Yes, replace every 6 months, cartridge available |
| Interior Lighting | Automatic when door is opened |
| Refrigerator Shelves | Cantilever glass shelves (half-width and full-width), adjustable |
| Refrigerator Bins | Fruit and vegetable bins with humidity control covers, slim bin |
| Bottle Racks | Single removable bottle racks |
| Freezer Bins | Three bins (upper, middle, lower) and ice tray |
| Exterior Cleaning | Stainless steel: soft cloth and liquid detergent, no abrasive products |
| Interior Cleaning | Mild liquid detergent and warm water, rinse and dry |
| Safety | Dispenser lock, alarms, refrigerant R600a isobutane (flammable) |
| Installation | Built-in, requires ventilation space, must be level |
| Service and Repairability | Spare parts available (filter, etc.), Fisher & Paykel technical service |
| Warranty | See separate care and warranty manual |
Frequently Asked Questions - RS36A72U1N Fisher & Paykel
User questions about RS36A72U1N Fisher & Paykel
0 question about this device. Answer the ones you know or ask your own.
Ask a new question about this device
Download the instructions for your Fridge in PDF format for free! Find your manual RS36A72U1N - Fisher & Paykel and take your electronic device back in hand. On this page are published all the documents necessary for the use of your device. RS36A72U1N by Fisher & Paykel.
USER MANUAL RS36A72U1N Fisher & Paykel
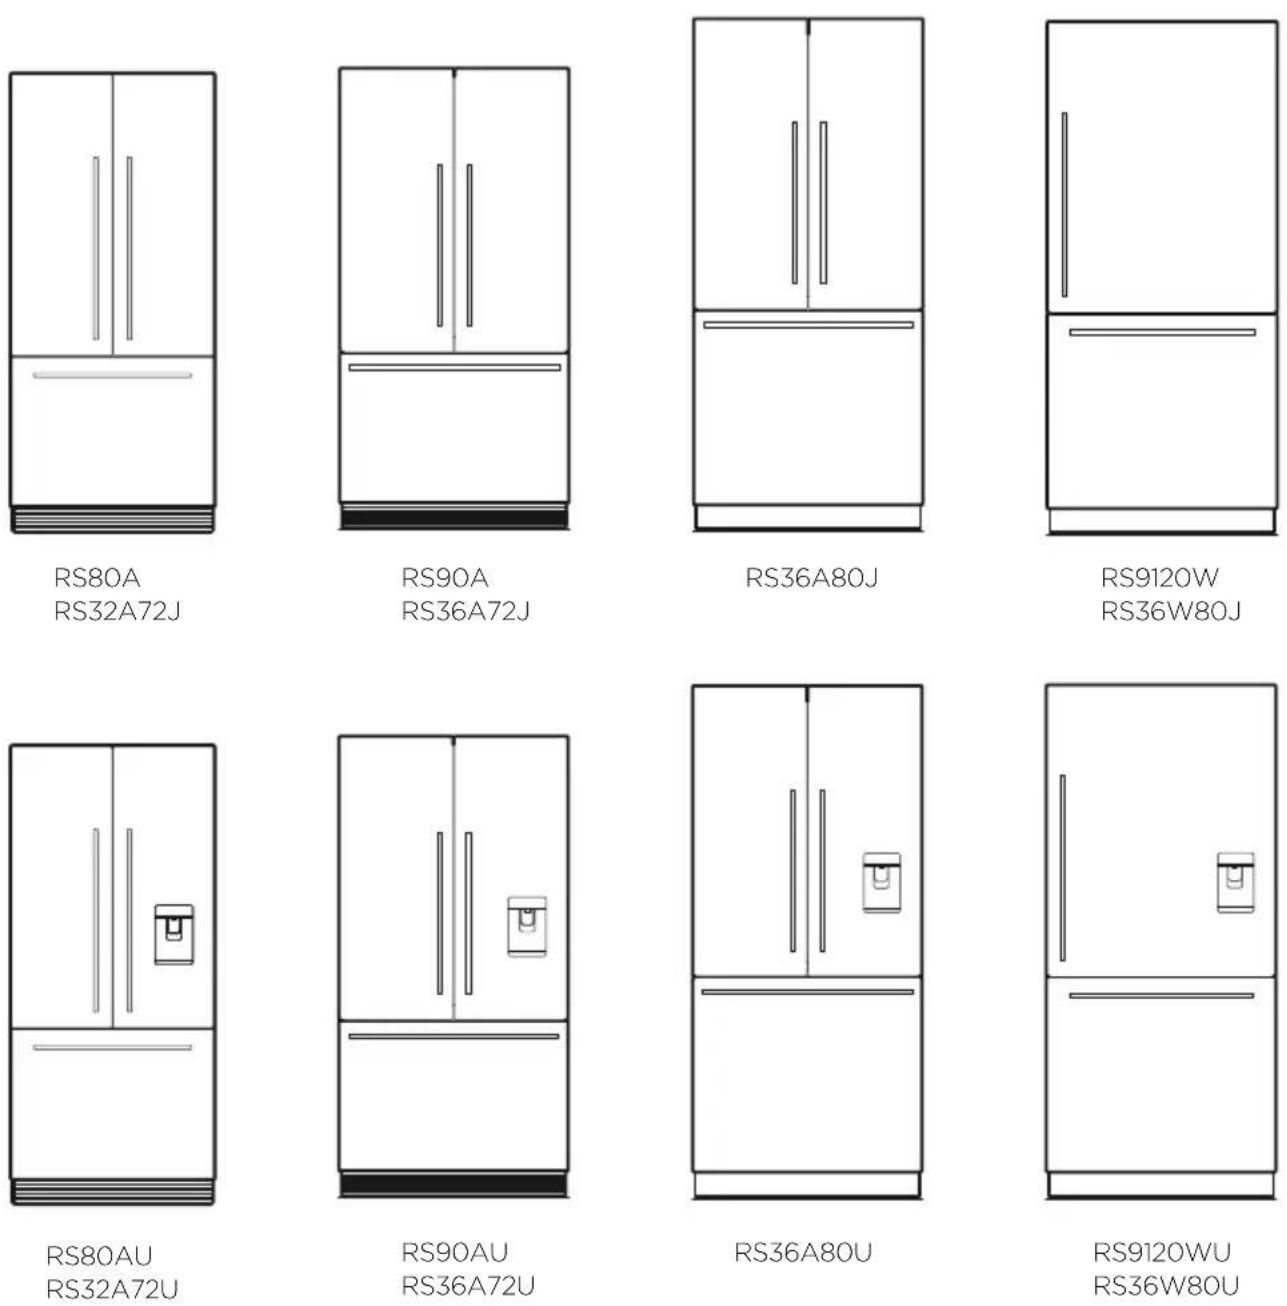
RS90A, RS9120W, RS80A, RS32A
RS36A72, RS36A80 & RS36W80 models
USER GUIDE
NZ AU GB IE HK SG IN US CA
849754B 07.19
Introduction 3
Safety and warnings 4
Storage features 12
RS80, RS90, RS36A72 and RS36A80 models 12
RS9120W and RS36W80 models 14
ActiveSmart™ special features 16
Control panel 16
External display (Ice & Water models only) 17
Humidity control system 18
Fast Freeze 19
Ice On/Off 19
Ice Boost 19
Bottle Chill 19
Operating instructions 20
Cleaning care 25
Food care 30
User warnings and sounds 31
Troubleshooting 32
European Directive 2012/19/EU on Waste Electrical and Electronic
Equipment (WEEE) 36
Service & Warranty 37
IMPORTANT!
SAVE THIS USER GUIDE
The models shown in this user guide may not be available in all markets and are subject to change at any time. For current details about model and specification availability in your country, visit our website fisherpaykel.com or contact your local Fisher & Paykel dealer.
Note: the word 'refrigerator', throughout this user guide, refers to the combination of refrigerator/freezer products.
Registration
Register your product with us so we can provide you with the best service possible.
To register your product visit our website: fisherpaykel.com
Thank you for buying this Fisher & Paykel integrated refrigerator.
Introducing the next generation in Fisher & Paykel refrigeration. With a new flush-fit design, and the ability to easily slide into existing kitchen spaces or be integrated behind kitchen cabinetry, these family-sized fridges offer a seamless look to the kitchen while providing excellent food care with ActiveSmart™ technology.
As your life changes, so can your refrigerator. This book explains the features and functions that will help you get the most out of your refrigerator.
We hope you enjoy your new integrated refrigerator.
| ! WARNING! | |
 | Electric Shock HazardRead and follow the safety and warnings outlined in this user guide before operating this appliance.Failure to do so can result in death, electric shock, fire or injury to persons. |
Use this appliance only for the intended purpose as described in the user guide.
IMPORTANT SAFETY INSTRUCTIONS
WARNING!
Read the entire user guide. Failure to follow all guides and rules could cause personal injury or property damage. When using this appliance always exercise basic safety precautions including the following:
- Children should be supervised to ensure that they do not play with the appliance.
- Children aged 3 to 8 years may load and unload this appliance under supervision.
- Cleaning and user maintenance shall not be undertaken by children without supervision.
- This appliance can be used by children aged from 8 years and above and persons with reduced physical, sensory or mental capabilities or lack of experience and knowledge if they have been given supervision or instruction concerning use of the appliance in a safe way and understand the hazards involved.
- The manufacturer's installation instructions for product and cabinetry ventilation must be followed when installing the appliance.
- To avoid hazard due to instability of the appliance, it must be fixed in accordance with installation guide.
- Keep ventilation openings, in the appliance enclosure or in the built-in structure, clear of obstruction.
-
Do not use mechanical devices or other means to accelerate the defrosting process, other than those recommended by the manufacturer.
-
Do not damage the refrigerant circuit.
- In case of damage to the refrigerant circuit, ventilate the area by opening all windows.
- Do not operate electrical equipment or any other equipment that may produce arcs, sparks or flames in the area. Contact your Fisher & Paykel trained and supported service technician immediately to arrange for the appliance to be repaired.
- It is hazardous for anyone other than a Fisher & Paykel trained and supported service technician to service this appliance. In Queensland, Australia, the service technician must hold a gas work license or authorization for hydrocarbon refrigerants to carry our service or repairs which involve removal of covers.
Electrical WARNING!
- This appliance must be installed in accordance with the installation instructions before use.
- To allow disconnection of the appliance from the supply after installation, incorporate a switch in the fixed wiring in accordance with the wiring rules.
- Never unplug your refrigerator by pulling on the power cord. Always grip the plug firmly and pull straight out from the outlet.
-
Do not plug in any other appliance at the same power point as your refrigerator or use extension cords or double adapters.
-
Repair or replace immediately all electric service cords that have become frayed or otherwise damaged. Do not use a cord that shows cracks or abrasion along its length or at either the plug or appliance end.
- If the power supply cord is damaged, it must only be replaced by your Fisher & Paykel trained and supported service technician because special purpose tools are required.
- When moving your appliance away from the wall, be careful not to roll over or damage the power cord.
- Do not use electrical appliances inside the food storage compartments of the appliance.
- When positioning the appliance, ensure the power cord is not trapped or damaged.
- Do not locate multiple portable socket-outlets or portable power supplies at the rear of the appliance.
IMPORTANT!
Your refrigerator is designed to operate for many years without the need for service checks. However, if your refrigerator is malfunctioning, have it attended to by your Fisher & Paykel trained and supported service technician as soon as possible. All electrical repairs must be carried out by an adequately trained service technician or qualified electrician.
- If you suspect that the product is not getting cold—items such as ice cream are melting—remove all perishable food and store in another appliance or cooler to prevent spoilage. Immediately call for a service technician.
Cleaning
- Use only soap-based cleaning products.
- Many commercially available cleaning products contain solvents that may degrade the plastic components of your refrigerator and cause them to crack.
- Avoid using anti-bacterial cleaning products on either the interior or exterior of the cabinet as they may cause rusting of metal components and cracking of plastic components.
- Regularly clean accessible draining systems and surfaces that come in contact with food.
- If the appliance will be left empty for long periods, switch off, defrost, clean, dry, and leave the door open to prevent mould developing within the appliance.
- Please refer to the ‘Cleaning care’ section of this user guide for further information.
Disposal
- Extreme care must be taken when disposing of your old appliance to avoid hazards:
- The flammable refrigerant gas must be safely removed by a qualified service technician.
- The thermal insulation foam in this appliance contains flammable insulation which can emit gases. Any exposed foam may be highly flammable and must be carefully treated during disposal.
- DANGER: The doors and panels should be removed and the shelves left in place so that children may not easily climb inside.
- DANGER: Risk of child entrapment. Before you throw away your old refrigerator or freezer, the doors and panels should be removed and the shelves left in place so that children may not easily climb inside.
- Consult your local energy authority or local codes as to the best way to dispose of your old appliance.
- Your Fisher & Paykel trained and supported service technician will be able to give advice on environmentally-friendly methods of disposing of your old refrigerator or freezer.
Storing food and drinks
- Store raw meat and fish in suitable containers in the refrigerator, so that it is not in contact with or drip onto other food.
- Do not store explosive substances such as aerosol cans with a flammable propellant in this appliance.
- Never store volatile or flammable materials in your appliance as they may explode.
- Never freeze liquids in glass containers. Liquid expands when it freezes and can cause the container to explode.
- Never freeze carbonated drinks to prevent the container from exploding.
- Do not consume food if it is too cold. Food removed from the freezer compartment may be cold enough to cause damage when brought into contact with bare skin, eg frozen ice cubes.
Water filter IMPORTANT!
- The water connection to your Ice & water refrigerator must be installed by an authorised plumber or Fisher & Paykel trained and supported service technician and comply with all state and local laws.
- Installation and use MUST comply with all state and local plumbing codes. Check with your local public works department for plumbing codes. You must follow their guidelines as you install the water filtration system.
- Connect to a safe drinking water supply only.
- Use new tubing supplied with the appliance. DO NOT reuse old tubing from old water and ice connections.
- Clean the water tanks if they have not been used for 48 hours. Flush the water system connected to the water supply if water has not been used for 5 days.
WARNING!
To reduce the risk associated with choking:
- DO NOT allow children under 3 years of age to have access to small parts during the installation of the water filter.
Power failure — food safety
Do not refreeze frozen foods that have thawed completely. The food may be dangerous to eat. Follow the recommendations below if you discover food in your freezer has thawed:
- Ice crystals still visible—food may be refrozen but should be stored for a shorter period than recommended.
- Thawed but refrigerator cold—refreezing generally not recommended. Fruit and some cooked food can be refrozen, but make sure it is use as soon as possible.
- Meat, fish, poultry—use immediately or cook then refreeze.
- Vegetables—discard as they usually become limp and soggy.
- Thawed and warmer than 5^ — discard all food.
Ice making IMPORTANT!
- Avoid contact with the moving parts of the ice maker ejector mechanism, and do not place your fingers on the automatic ice-making mechanism while the appliance is in operation.
- Do not use ice cubes that may have become discolored, usually with a green-blue color. If such discoloration is noted, discard the ice cubes and contact your Fisher & Paykel trained and supported service technician.
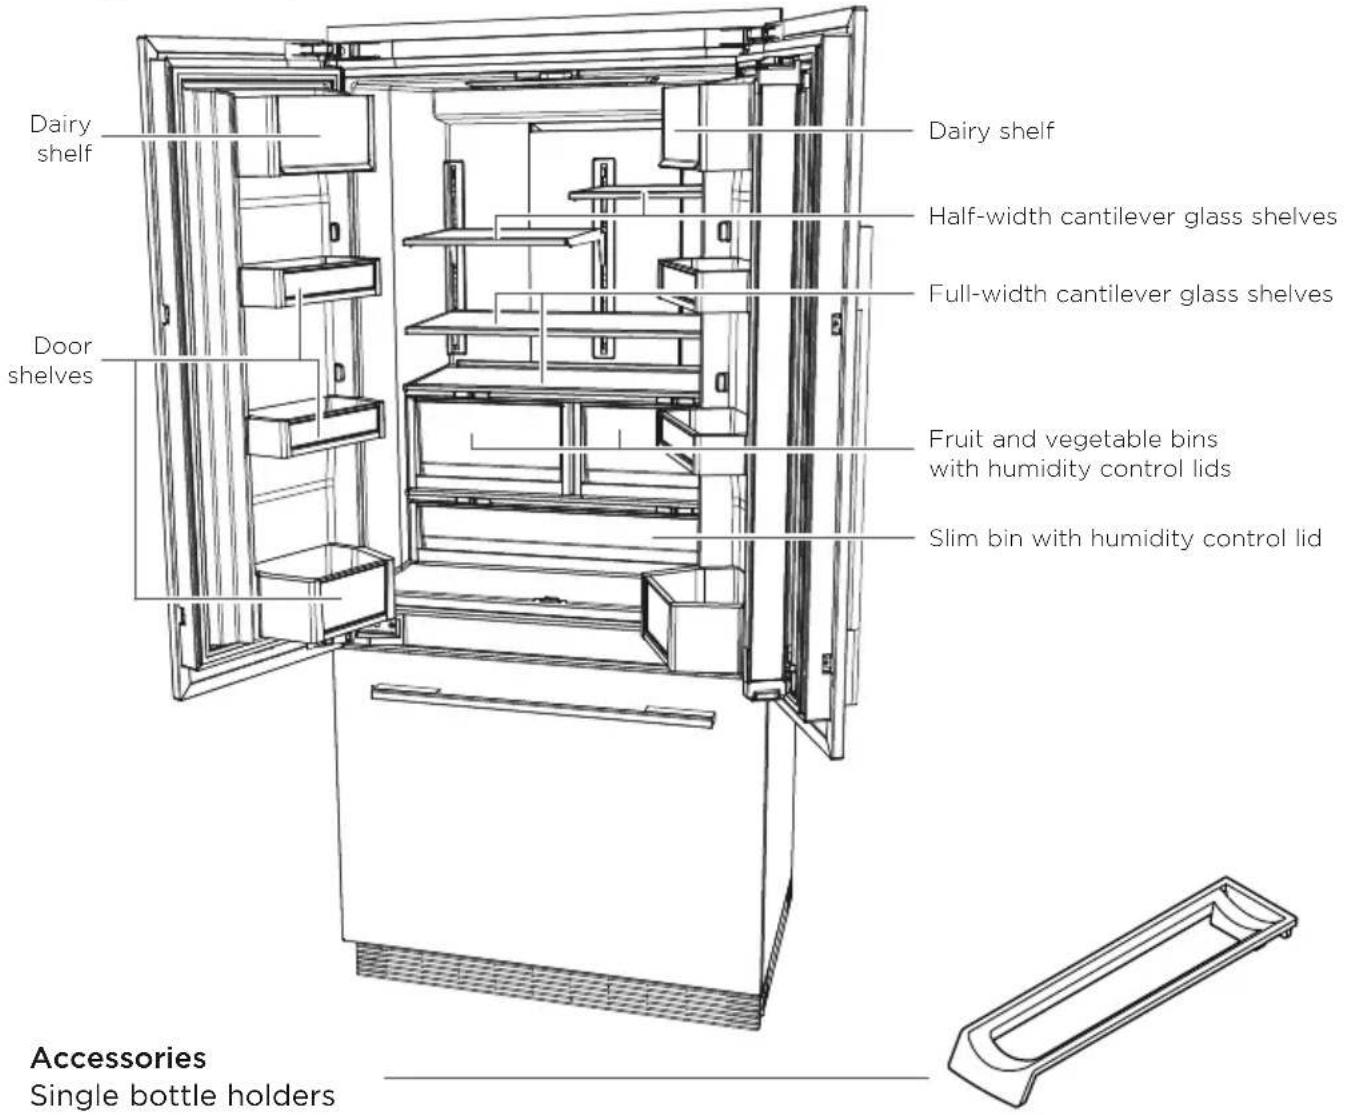
RS80, RS90 and RS36A72 models
Refrigerator compartment
Accessories
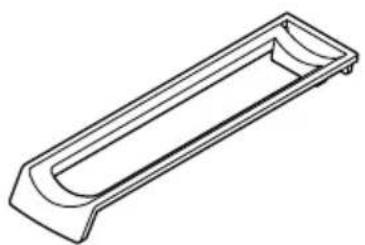
- Single bottle holders
natural_image
Line drawing of a rectangular mechanical part with rounded ends and a central slot (no text or symbols)Freezer compartment
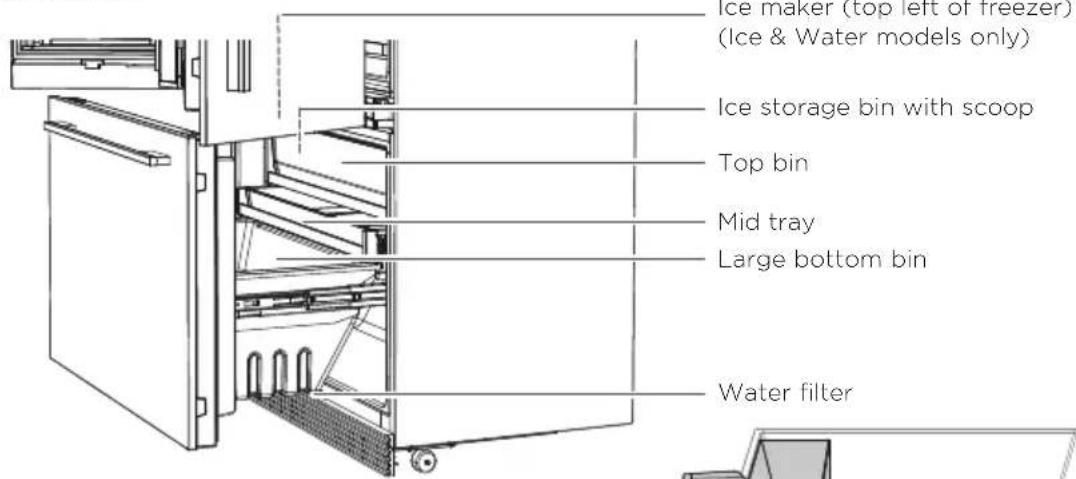
Accessories
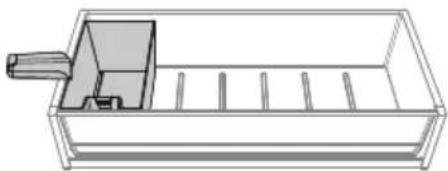
• Manual ice tray with lid (non-Ice & Water models only)
natural_image
Technical line drawing of a rectangular container with internal compartments and a handle (no text or symbols)| REFRIGERATOR COMPONENTS | |
| Fruit and vegetable bins with humidity control lids | Store all fruit and vegetables in separate bins without external packaging.Separate the fruit and vegetables to prevent the ethylene-sensitive produce from ripening too quickly—helps to extend their storage life. |
| Slim bin with humidity control lid | The slim bin stores long vegetables which cannot fit in the fruit and vegetable bins.Also used for storing deli items and beverages, or for defrosting foods. |
| Cantilever glass shelving | Heat treated safety glass.Can be removed and positioned at heights to suit your storage requirements.The half-width shelves can be positioned side by side; best when storing large items such as platters.Maximize the storage space when storing items of varying heights by positioning the half-width shelves at different levels. |
| Dairy shelf and door shelves | The top shelves are dairy compartments (designed to store butter and cheeses).The middle shelves are designed for general items, condiments and drinks.The bottom shelves are designed to store large drinks or those drinks you require frequent access to.Clear windows give ultimate visibility to what is being stored in the door shelves.Adjustable door shelves with dividers. |
| Single bottle holders | Placed along the length of any shelf to store a variety of bottles.Store bottles with the neck facing the front of the refrigerator.Unused bottle holders can be stacked on top of one another to maximize shelf space. |
| FREEZER COMPONENTS | |
| Ice maker(Ice & Water models only) | Removable ice container.Hygienic ice scoop. |
| Freezer bins | Allow for easy storage of frozen food items. |
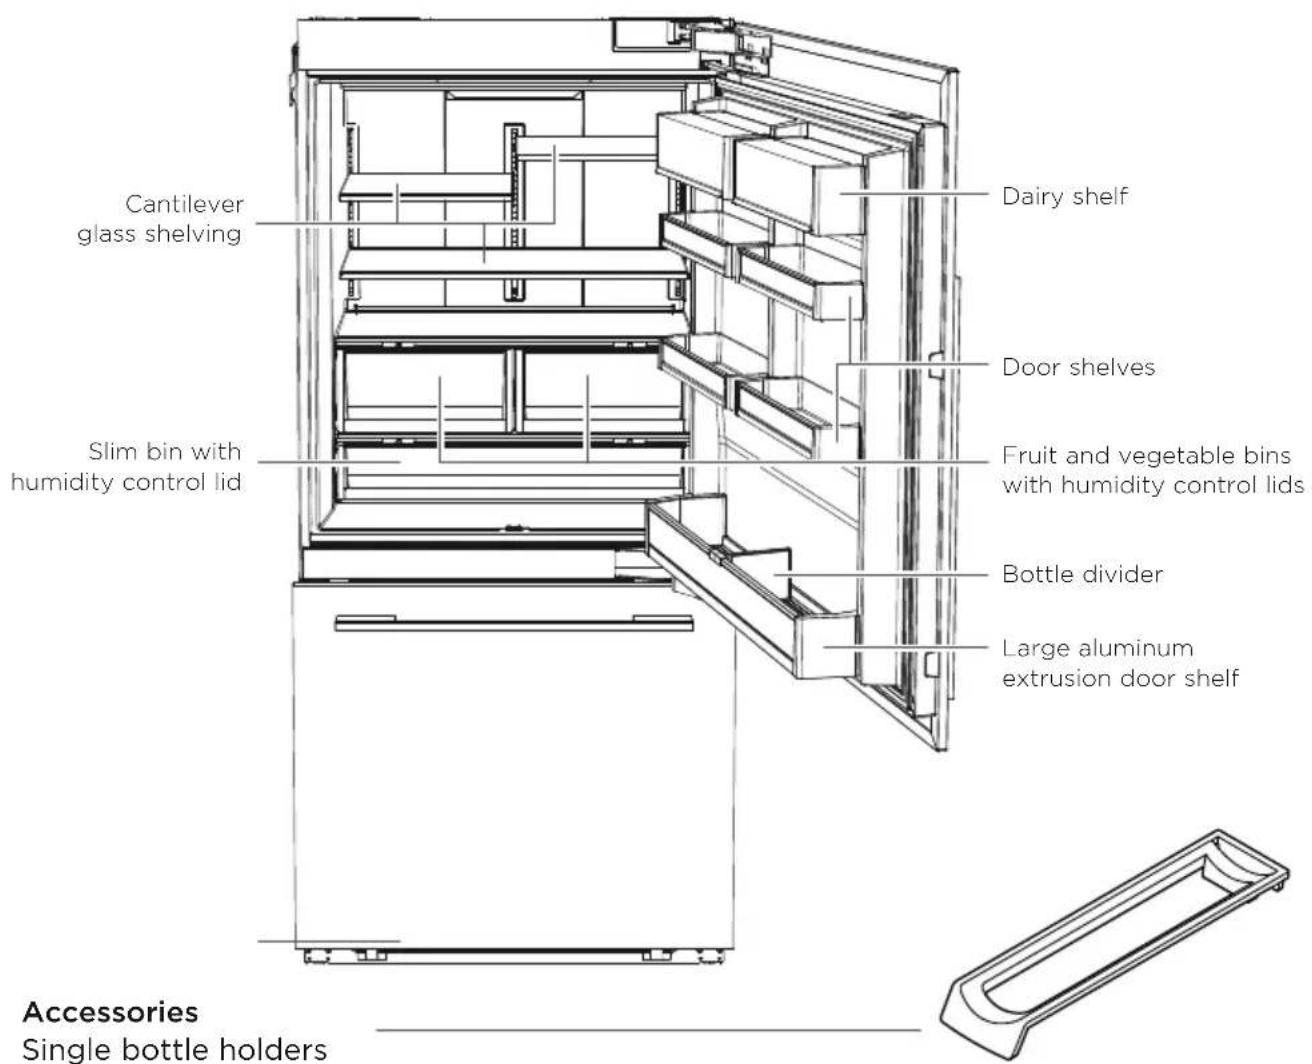
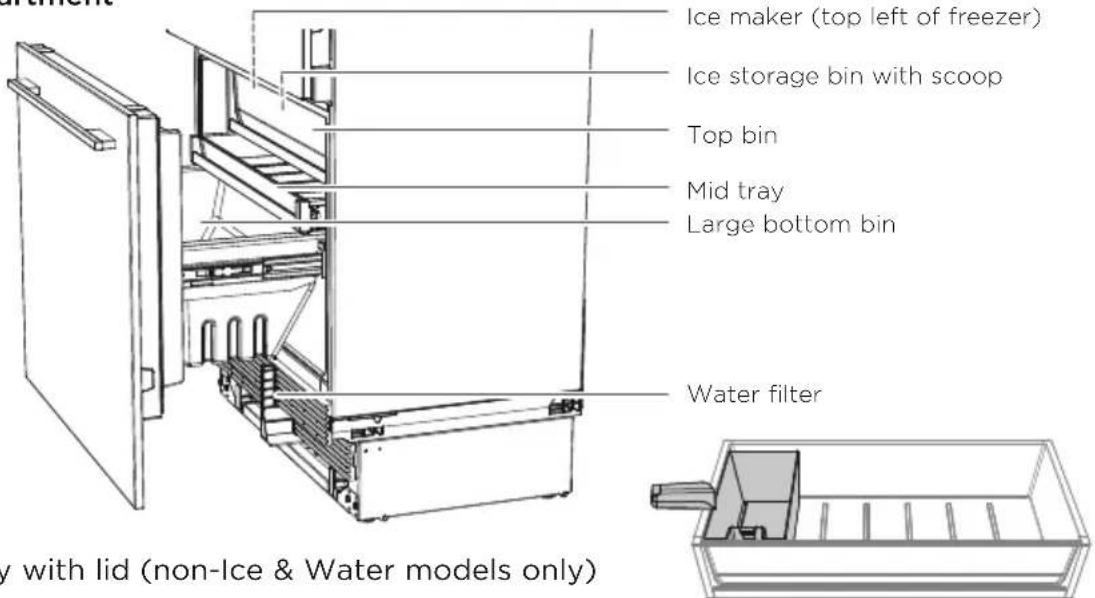
RS9120W, RS36A80 and RS36W80 models
Refrigerator compartment
Freezer compartment
- Single bottle holders
| REFRIGERATOR COMPONENTS | |
| Fruit and vegetable bins with humidity control lids | Store all fruit and vegetables in separate bins without external packaging.Separate the fruit and vegetables to prevent the ethylene-sensitive produce from ripening too quickly—helps to extend their storage life. |
| Slim bin with humidity control lid | The slim bin stores long vegetables which cannot fit in the fruit and vegetable bins.Also used for storing deli items and beverages, or for defrosting foods. |
| Cantilever glass shelving | Heat treated safety glass.Can be removed and positioned at heights to suit your storage requirements.The half-width shelves can be positioned side by side; best when storing large items such as platters.Maximize the storage space when storing items of varying heights by positioning the half-width shelves at different levels. |
| Dairy shelf and door shelves | The top shelves are dairy compartments (designed to store butter and cheeses).The middle shelves are designed for general items, condiments and drinks.The bottom shelves are designed to store large drinks or those drinks you require frequent access to.Clear windows give ultimate visibility to what is being stored in the door shelves.Adjustable door shelves with dividers. |
| Single bottle holders | Placed along the length of any shelf to store a variety of bottles.Store bottles with the neck facing the front of the refrigerator.Unused bottle holders can be stacked on top of one another to maximize shelf space. |
| FREEZER COMPONENTS | |
| Ice maker(Ice & Water models only) | Removable ice container.Hygienic ice scoop. |
| Freezer bins | Allow for easy storage of frozen food items. |
Control panel
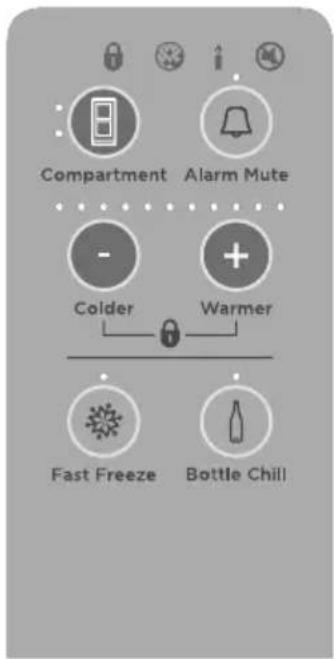
The control panel enables you to view and modify all the features and options of your refrigerator.
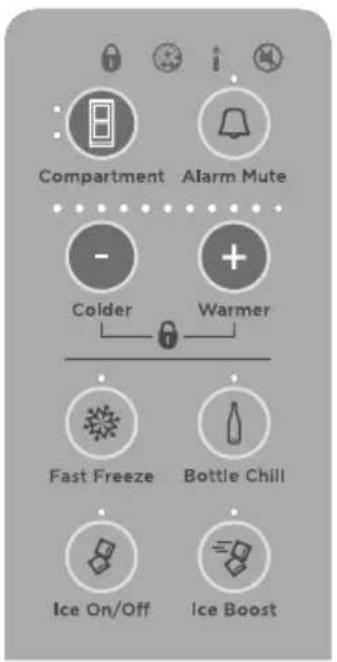
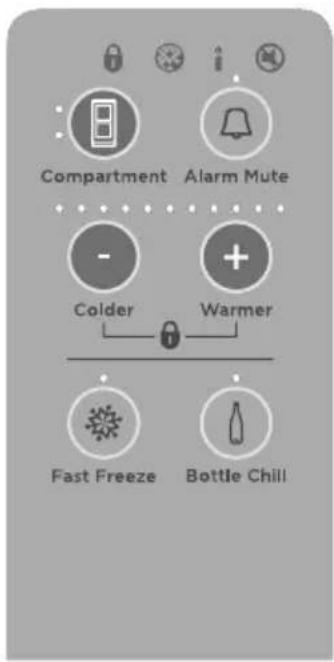
Ice & Water models Non-Ice & Water models
SmartTouch™ CONTROL PANEL FEATURES
| [45C] | Compartment Allows you to select which compartment to adjust the temperature. | |
| [75AH] | Alarm mute Deactivates the door alarm for 20 minutes. | |
| [972] | Colder Reduces the temperature of compartments. | |
| [HAVA] | Warmer Increases the temperature of compartments. | |
| [430Y] | Fast Freeze | Boosts the freezing speed by dropping the freezer to its coldest temperature for 12 hours. |
| [W60D] | Bottle Chill | Allows you to rapidly chill your beverage for a set time of 15 minutes. |
| [27XZ] | Ice On/Off Indicates when automatic ice maker is on or off. | |
| [207S] | Ice Boost | Increases ice production up to 30% from standard ice making, and deactivates automatically after 24 hours. |
| [88SW] | Key lock Allows you to disable the buttons on the control panel. | |
 | Filter change indicator | Icon will illuminate indicating that water filter requires changing. |
| [9W6Z] | Sabbath mode All alarms, lights and displays are deactivated for 80 hours. | |
| [208K] | Key mute Allows you to silence all button presses. | |
External display (Ice & Water models only)
The external display enables you to lock the water dispenser, indicates to you when 'Bottle Chill' is activated and when your water filter requires changing.
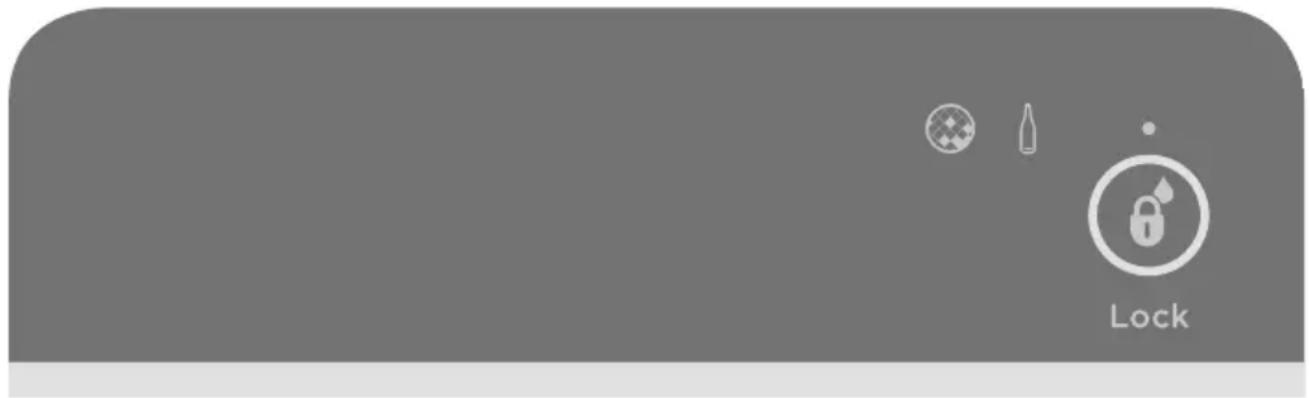
EXTERNAL DISPLAY FEATURES
 Lock Lock | Dispenser lock button and LED light | Locks/unlocks the water dispenser.When locked the LED above the button will illuminate. |
| [TST7] | Bottle Chill indicator | Icon illuminates to indicate when ‘Bottle Chill’ is activated and flashes when beverage is ready. |
| [K3CD] | Filter change indicator | Icon will illuminate indicating when water filter requires changing. Check online at fisherpaykel.com for information on how to reorder a filter. |
Humidity control system
Humidity control lids
The control lids are fitted to the fruit and vegetable bins and slim bin of your refrigerator.
- These lids seal the bins and provide a humid microclimate to extend the storage times of fruit and vegetables.
- The lids have specially designed grooves that retain moisture to prevent condensation from dripping onto the fruits and vegetables at times of high humidity.
Humidity slide
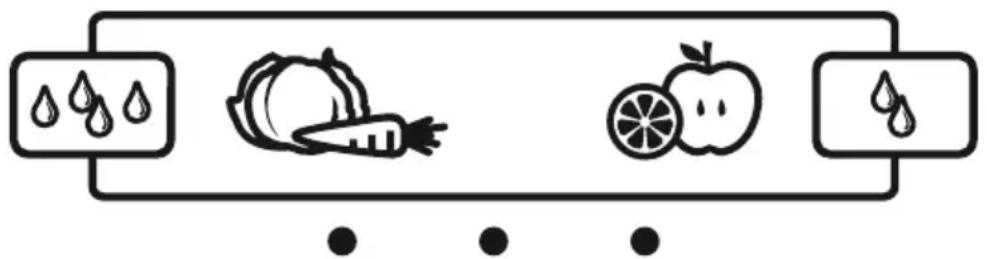
Each bin has an adjustable humidity slide that enables you to choose a fruit or vegetable setting depending on your storage needs.
- If there is too much water in the bins (due to high humidity), the control can be adjusted towards the fruit setting to reduce drips of water and/or wipe the water dry (if required).
- Be aware that a small amount of water in the bins is beneficial for fruit and vegetable storage.
- Use the vegetable setting when you store ethylene-sensitive vegetables such as lettuce, spinach, broccoli, cabbage, carrots.
- Use the fruit setting when you store high-ethylene fruits such as citrus fruits, stone fruits and some tropical fruits.
- We recommend adjusting the humidity slide to the center when you store both fruits and vegetables.
- We recommend storing all fruit and vegetables without external packaging and in separate bins.
- Separating the fruit and vegetables prevent ethylene-sensitive produce from ripening too quickly, and help extend their storage life.
natural_image
Simple line drawing of a kitchen utensil with vegetables and apples, no text or symbols presentHumidity control graphic

Fast Freeze
'Fast Freeze' boosts the freezing speed by dropping the freezer to its coldest temperature for 12 hours. This helps retain the freshness, texture and taste during the freezing process.
- To activate, press on the control panel. The light above illuminates to indicate this feature is activated.

Ice On/Off
The ice maker is off when you turn on your refrigerator for the first time after installation.
- To activate your automatic ice maker, press once. The light above illuminates to indicate the ice maker is on.

Ice Boost
Increases ice production by up to 30%, and deactivates automatically after 24 hours.
• The 'Ice Boost' feature is off when you turn on your ice maker for the first time.
- To activate, press “The light above will illuminate when the ‘Ice Boost’ feature is on.
- To deactivate 'Ice Boost' feature manually, press again. The light above button will not illuminate.
- Activating the 'Ice Boost' feature will automatically turn on the ice maker.
- Deactivating the ice maker automatically deactivates the 'Ice Boost' feature.

Bottle Chill
This feature allows you to rapidly chill your beverage for 15 minutes. The time taken to chill depends on the size of your beverage. If your beverage is not cold enough, return it to the freezer and reset the ‘Bottle Chill’ feature.
- To activate, press. The light above will illuminates to indicate this feature is activated. For Ice & Water model, the icon will illuminate on the external display.
- An alarm will sound after 15 minutes to remind you to remove your beverage from the freezer.
To silence the alarm—Automatic ice model
Open the fresh food compartment door and press the 🖱 button on the control panel.
To silence the alarm—Ice & Water model:
Open the fresh food compartment door and press the 🏠 button on the control panel, or press the 🔊 button once on the external display.
- When ‘Bottle Chill’ is deactivated, the light above will not illuminate and the icon is not visible on the external display (Ice & Water model only).
Temperature control
- Once you turn on your refrigerator for the first time, the cooling system will automatically cool all compartments to their set temperatures.
• This will take between 2-3 hours - The control panel enables you to change and control the temperatures of both compartments accurately and independently regardless of the temperature or humidity of the surroundings whether it is summer or winter.
- We recommend checking the operation of your refrigerator once every 4 hours for the first 24 hours.
- If at any time you notice that the refrigerator is not cooling properly, call your installer or Fisher & Paykel trained and supported service technician to verify if the unit is operating properly. Take immediate steps to prevent food from spoiling by storing in another refrigerator or freezer.
Adjusting the fresh food compartment temperature
When the fresh food compartment door is opened, the interior light automatically illuminates. The temperature for this compartment will show as a series of lights.
- To increase the temperature, press+. This will increase the number of lights.
- To decrease the temperature, press■. This will decrease the number of lights.
- Fewer lights illuminated indicates a colder temperature for the compartment selected.
Adjusting the freezer compartment temperature
- Press ☐ once, the freezer compartment light will be illuminated.
- To increase the temperature, press+. This will increase the number of lights.
- To decrease the temperature, press—. This will decrease the number of lights.
- Fewer lights illuminated indicates a colder temperature for the compartment selected. Note: successively pressing will automatically scroll between compartments.
When the door is re-opened the control panel will return automatically to the fresh food compartment setting.
Door alarms
- If the fresh food compartment door is left open, the alarm will beep after 90 seconds, if the freezer door is left open, the alarm will beep after 60 seconds.
- If either of the doors remains open, subsequent beeps will sound every 30 seconds for 5 minutes
- If either door remains open for 5 minutes or longer, an alarm will sound continuously and the interior compartment light(s) will turn off. The alarm will stop only when the door(s) is closed.

Alarm Mute
• To activate, press once.
- The light above 📁 will illuminate to indicate the appliance is muted.
- If the doors are left open for 5 minutes or more, the compartment light turns off and normal door alarms are suspended.
- 'Alarm Mute' will deactivate after 20 minutes.
• To deactivate manually, press again.
- Closing the door also deactivates the 'Alarm Mute'.

Key mute
Key mute allows you to silence all button presses.
• To activate key mute, press⚠ for 4 seconds.
• The icon on the control panel illuminates.
- Once key mute is activated, all key sounds are silenced.
- Door alarms and 'Bottle Chill' alarm are still operational.
• To deactivate, press 📄 for 4 seconds. The 📋 on will no longer illuminate.

Key lock
'Key Lock' allows you to disable the buttons on the control panel. This is useful when cleaning your appliance.
• To activate key lock, press- and +together for 4 seconds.
• The icon on the control panel will illuminate.
- Pressing any buttons will sound several beeps to let you know they are disabled.
• To deactivate, press- and +together for 4 seconds.
• The icon will not illuminate.

Sabbath mode
When activated—the display, all alarms and lights are deactivated for 80 hours.
• To activate Sabbath mode, press, and together for 4 seconds.
• The i icon on the control panel will illuminate.
• To deactivate manually, press, and together for 4 seconds.
Note: If you turn off your appliance while in Sabbath mode, it will resume automatically once the appliance is switched on again.
Before you start using the Ice & Water or automatic ice
- Ensure your ice and water system is correctly installed by following the installation guide supplied with your appliance.
- Check your refrigerator is switched on.
- Allow at least 2 hours for your refrigerator to cool before use.
- Complete all the flushing steps detailed in this user guide to ensure optimum performance of your water filter.
Water dispenser (Ice & Water model only)
Flushing out the water filtration system
- Press the water dispenser pad to dispense 1 gal (4L) of water.
- There may be carbon residue dispensed together with water. This is not harmful, and normal during flushing process.
- Wait for 4 minutes before dispensing again.
- Dispense another 1 gal (4L) of water. Your water dispenser is now ready for use.
- Water will continue to drip from the dispenser for a few more days after installation as the remaining trapped air is released from the system.
natural_image
Illustration of a hand inserting a device into a device (no text or symbols visible)Water dispenser
Dispensing
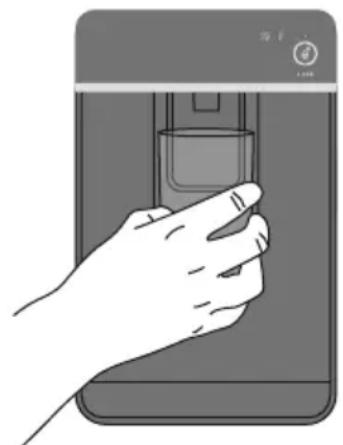
- Your water dispenser is designed for one-handed operation.
• To dispense water, gently press the dispensing pad with a glass or container.
• To stop the flow of water, simply pull your glass away from the dispensing pad. - Pressing hard against the dispensing pad will not increase the flow or dispense more water.
IMPORTANT!
To avoid damage to property or personal injury do not put hands, fingers or objects up the dispenser opening.

Dispenser lock
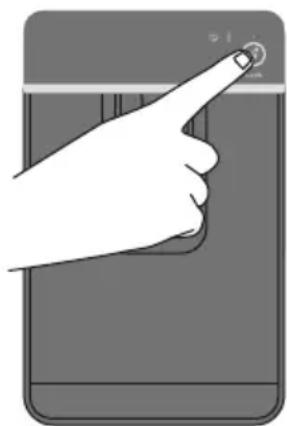
The dispenser lock is located on the external display and can be activated to prevent water from being dispensed. This is useful when you are cleaning the external display or when there are small children around.
- To activate dispenser lock, press for 4 seconds. The light above will illuminate.
- When the dispenser pad is pressed, several beeps will sound to alert the user that water cannot be dispensed.
- To deactivate dispenser lock and dispense water, press for 4 seconds. The LED above will not illuminate.
natural_image
Illustration of a hand pressing a button on a smartphone screen (no text or symbols visible)Dispenser lock
Automatic ice maker
Before turning on your automatic ice maker, the water filter must be installed (refer to your installation guide) and flushed to remove any impurities or trapped air in the filter system.
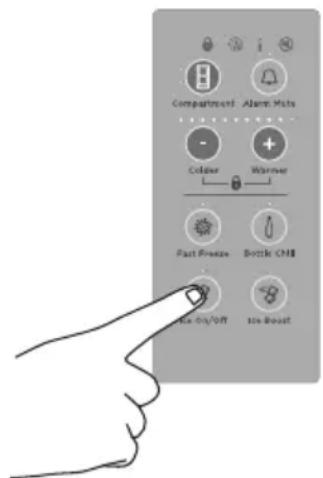
① To activate your automatic ice maker, press once. The light above illuminates to indicate the ice maker is on.
② Press the ⚠ and together for 4 seconds then close the doors. The ice tray will empty the water into the bin below. The ice tray will only empty after the doors are closed.
③ Repeat step ② to remove dust in the ice tray collected during manufacture and transport.
④ Empty the water, dry the bin and return it correctly.
⑤ Once your ice maker is turned on the first bin of ice may be discolored, this is not harmful and normal during the flushing process. Discard the first full bin of ice made. Your ice maker is now ready for use.
- For Ice & Water models, the water filter will reach optimum performance after two to three full bins of ice.
- For Ice only models, the water filter will reach optimum performance after four to five full bins of ice.
Turn the ice maker off if:
• There is no water supply for several hours.
- You are removing the ice storage bin for a period of time.
• You are going on holiday/vacation.
Collecting ice
Your automatic ice maker produces approximately eight cubes of ice every 3-4 hours, depending on the freezer compartment temperature and the number of times the door is opened.
• The ice cube tray is filled with filtered water.
- Frozen ice cubes are dispensed from the ice tray and into the ice storage bin below.
- Ice making will continue until the storage bin is full, and only resumes once you start to use the stored ice.
- When the 'Ice Boost' feature is activated, ice production will increase up to 30% from standard ice making. This function automatically deactivates after 24 hours.
- If large amounts of ice are needed, remove the ice storage bin and allow ice to fill the top freezer bin.
- For maximum ice storage, level the stored cubes with the ice scoop.
- If ice is not used often, the quality of ice cubes will deteriorate. Empty the ice storage bin periodically and wash in lukewarm water. Dry thoroughly and place back into the correct position.
IMPORTANT!
Avoid contact with the moving parts of the ice maker ejector mechanism, and do not place your fingers on the automatic ice making mechanism while the refrigerator is in operation.
Turning ice maker on

Water filter
The water supplied to your appliance for ice making is filtered to remove impurities through a filter located in the bottom front of your appliance. Replace your filter cartridge every 6 months.
- There is a replacement indicator icon on the control panel which will appear when the filter needs replacing.
- Replacement filter cartridges can be purchased online from fisherpaykel.com or by calling Fisher & Paykel Customer Care. Details of the replacement filter cartridge are labeled on the cartridge. Instructions on how to install your replacement water filter are provided with the filter.
To reset indicator:
- Press and together for 4 seconds.
- The ☑ on the control panel will turn off when reset.
IMPORTANT!
• We recommend the water filter to be used from the time of installation.
- Do not reset indicator before filter is changed or filter monitoring will be inaccurate.
To disable the filter indicator:
When no filter is fitted, you can disable the filter indicator.
- To disable filter indicator, press 📄, 🔔 and + together for 4 seconds to turn it off. The ⚙ will flash once on the internal and external displays.
- To turn on the filter indicator again, press ☐, 🔔 and + together for 4 seconds. The ⏻ on the control panel and external display will flash twice.
Exterior
Stainless exterior doors
- Clean the exterior door with liquid dishwashing detergent dissolved in warm water and a soft cloth.
• Dry the door with a lint-free cloth. - DO NOT use any stainless steel cleaners or solvents that are abrasive on the door surface.
Other exterior surfaces
- Clean all other exterior surfaces with a mix of warm water and liquid dishwashing detergent, and a soft cloth.
- Rinse with clean water and dry with a clean, lint-free cloth.
• For custom door panels follow manufacturers cleaning instructions
Door gasket
We recommend you clean the magnetic door gasket every three months with a toothbrush, and liquid detergent dissolved in warm water.
External display and water dispenser (Ice & Water models only)
Activate the 'Lock' function to prevent water from dispensing when cleaning, refer to 'Dispenser lock'. Clean the pad and interface panel with a damp, soft lint-free cloth.
Drip tray (Ice & Water models only)
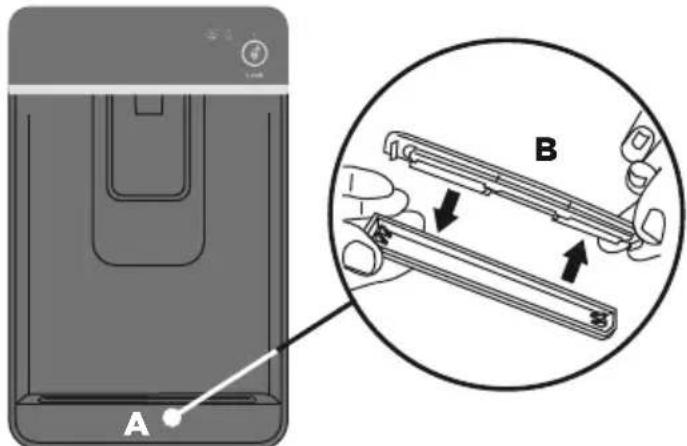
• To clean, remove the drip tray from the dispenser panel (A).
• Pull the two halves of the tray apart (B).
- Clean with liquid detergent dissolved in water and a soft lint-free cloth.
- Rinse with clean water and dry with a clean, lint-free cloth.
• Securely clip the two halves together.
- Re-insert the drip tray back into the dispenser panel.
Cleaning the drip tray
Toe kick grilles and filter
Your refrigerator is fitted with a toe kick grille and filter to protect the internal working components. We recommend cleaning the grille and filter in conjunction with changing your water filter cartridge (every 6 months).
IMPORTANT!
- Keep ventilation openings clear of obstructions by regularly vacuuming the flooring in front of your appliance to maximize the operating efficiency of your appliance.
- Clean your appliance regularly especially for houses that are dusty or houses with pets that shed hair.
RS80, RS90, RS32A72 and RS36A72 models only
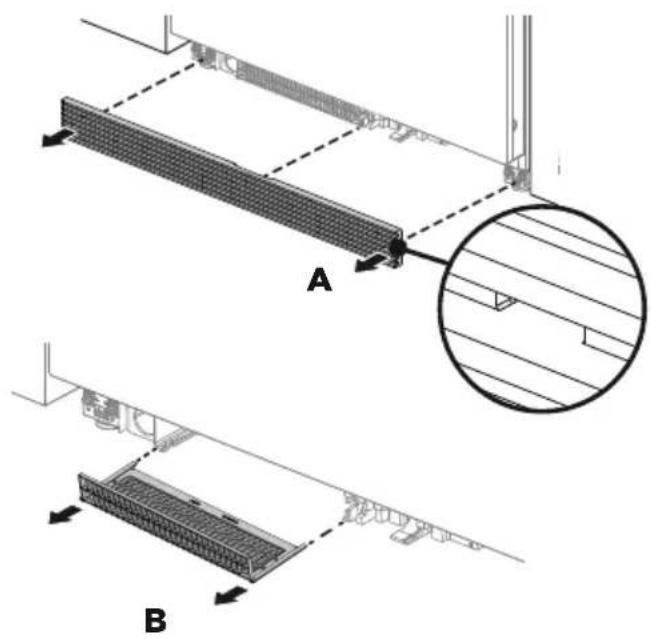
To clean the toe kick grille and filter
① Remove the toe kick grille by inserting fingers into the left and right square openings on the grille. Pull towards you (A).
② To remove toe kick filter, insert fingers into the left and right square openings on the filter. Pull towards you (B).
③ Clean both components with liquid dishwashing detergent dissolved in warm water and a soft lint-free cloth.
④ Rinse with clean water and dry with a clean, lint-free cloth.
natural_image
Technical diagram showing two views (A and B) of a mechanical component with no visible text or symbolsTo replace toe kick filter and grille
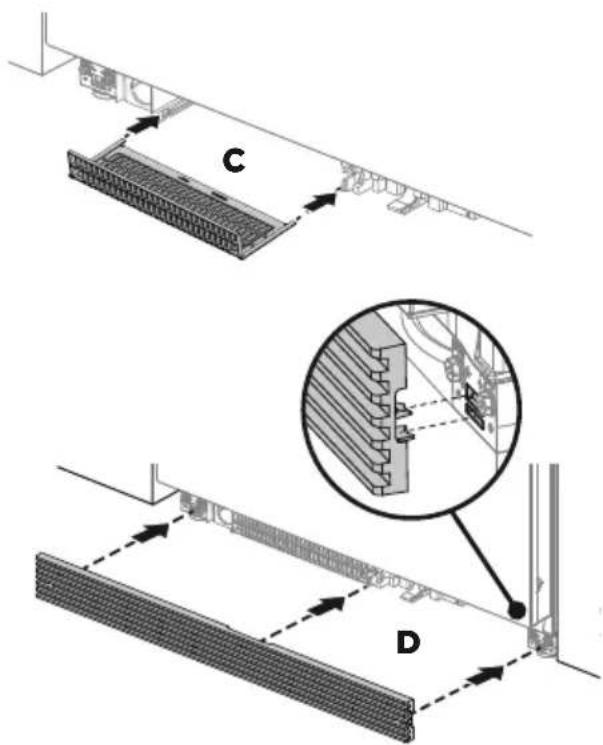
⑤ To replace toe kick filter, align filter tabs onto the rails and push to the rear until it clips securely (C).
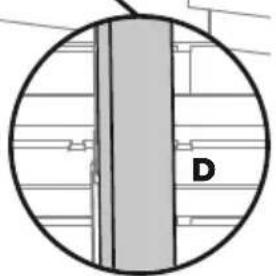
⑥ To replace toe kick grille, ensure spacers on the inside of the toe kick are positioned correctly. Align securing hooks then firmly push grille onto product until it clips securely (D).
RS36A80, RS36W80 and RS9120W models only
To clean the toe kick grille and filter:
① Remove the air flow divider by pulling towards you (A).
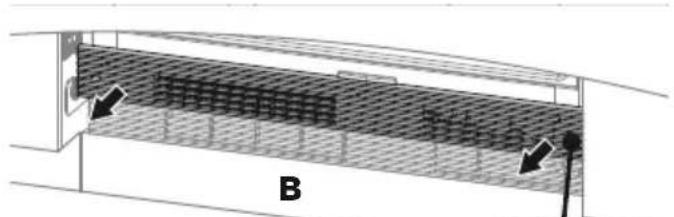
② To remove the top toe kick grille, insert fingers into the left and right square openings on the grille. Pull towards you (B).
③ To remove toe kick filter, insert fingers into the left and right square openings on the filter. Pull towards you. Refer to 'Removing and replacing toe kick filter' drawing.
④ Clean both components with liquid dishwashing detergent dissolved in warm water and a soft lint-free cloth.
⑤ Rinse with clean water and dry with a clean, lint-free cloth.
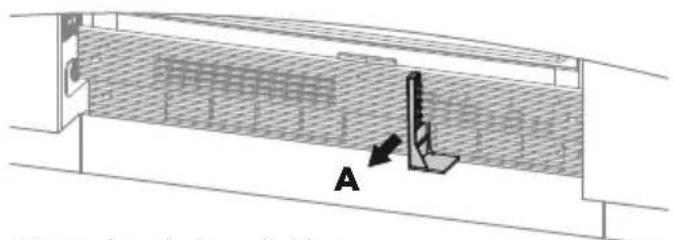
Removing air flow divider
natural_image
Diagram of a structural beam with internal grid pattern and directional arrows, labeled B (no text or symbols beyond label)Removing top toe kick grille
natural_image
Circular diagram with diagonal lines and two perpendicular markers, no text or symbols presentTo replace toe kick filter and toe kick grille:
⑥ To replace toe kick filter, align filter tabs onto the rails and push to the rear until it clips securely.
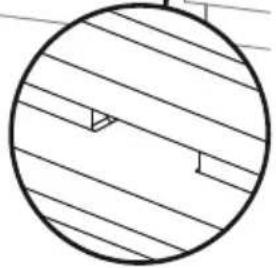
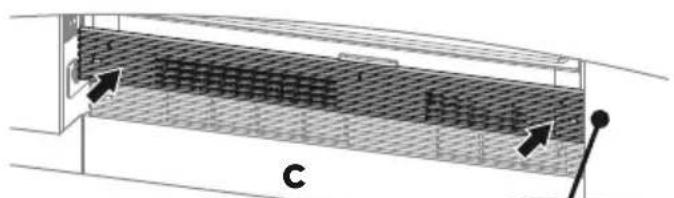
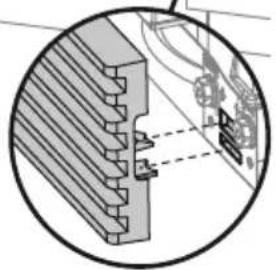
⑦ To replace top toe kick grille, align securing hooks then firmly push grille onto product until it clips securely (C).
⑧ To replace air flow divider, align the divider underneath the grille tabs indicator and clip onto the vanes of the bottom grille (D).
natural_image
Diagram of a mechanical or electrical component with internal grid structure and directional arrows (no text or symbols)Replacing top toe kick grille
natural_image
Technical illustration of a mechanical component with cross-sectional view (no text or symbols)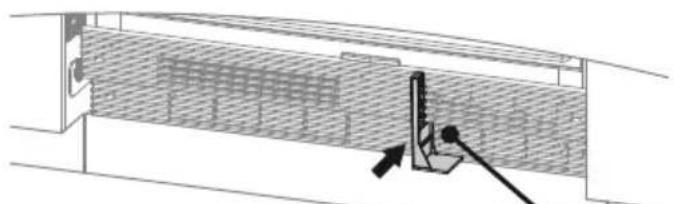
natural_image
Technical diagram of a structural assembly with hatched fill and directional arrows indicating force or movement (no text or symbols)Replacing air flow divider
natural_image
Circular diagram with a vertical gray bar and labeled point D, surrounded by faint lines (no text or symbols beyond the label)Interior
- It is important to keep the interior of the refrigerator clean to help prevent food from becoming contaminated during storage.
- The amount and types of food stored determines how often cleaning should be carried out in the refrigerator (ideally once every 1-2 weeks).
- For ease of cleaning, empty the refrigerator first and remove all glass shelves, door shelves and storage bins.
- Do not use harsh chemicals, abrasives, ammonia, chlorine, bleach, concentrated detergents, solvents or abrasive scouring pads on any part of your appliance.
Some of these chemicals may damage your appliance.
- Clean all surfaces with a mild liquid detergent dissolved in warm water and a soft cloth.
Rinse with clean water and dry with a clean, lint-free cloth.
Cantilever glass shelves
- Clean with liquid detergent dissolved in warm water and a soft lint-free cloth.
- Rinse with clean water and dry with a clean, lint-free cloth.
① To remove glass shelves, hold the front and back edge of the shelf firmly.
② Push the shelf up vertically to dislodge from back support lugs.
③ Pull the shelf towards you.
Single bottle holders
- Clean with liquid detergent dissolved in warm water and a soft lint-free cloth.
- Rinse with clean water and dry with a clean, lint-free cloth.
Humidity control system
- We recommend to use only liquid detergent dissolved in warm water and a soft lint-free cloth when you clean the glass shelf above the fruit and vegetable bins.
- Rinse with clean water and dry with a clean, lint-free cloth.
- You don't need to disassemble the parts when cleaning the humidity control lid that is attached to the underside of the glass shelf.
- Clean the lid by simply wiping the grooves with a damp, lint free cloth.
Fruit and vegetable bins and slim bin
When cleaning, use only liquid detergent dissolved in warm water and a soft lint-free cloth. Rinse with clean water and dry with a clean, lint-free cloth.
① To remove a bin, extend the bin on its runners, and make sure you empty the bin.
② Hold both sides of the bin corners and push the bin firmly upwards to dislodge from the securing tabs.
③ Pull the bin towards you to remove. Push both runners back into the refrigerator.
④ To return the bin, extend the runners and place the bin on top of the runners.
⑤ Push the bin slowly onto of the runners until you feel it clip onto the runners.
Ensure the bin tabs are clipped securely onto the runners before use.
IMPORTANT!
The runners are pre-lubricated to help opening and closing the bins.
They do not need to be lubricated again. Do not remove the grease from the runners to maintain smooth function. Do not immerse the runners in water.
Freezer bins and freezer tray
Removing the freezer bins and tray when cleaning is not necessary. Simply wipe clean with a soft lint-free cloth.
Ice storage bin
- We recommend that you regularly clean your ice bin and discard any old ice in the bottom of the bin(s) regularly. Cleaning the ice maker components is not necessary.
- Use only liquid detergent dissolved in warm water and a soft lint free cloth when cleaning. Rinse with clean water and dry with a clean, lint-free cloth.
- Ensure that the ice scoop is always placed in front of the bin.
- We recommend that you turn off the ice maker before you leave for a vacation/holiday. Refer to ‘Automatic ice maker’ section.
- On your return, turn on the automatic ice maker and discard the first full bin of ice. Refer to 'Automatic ice maker' section.
Holiday/Vacation
Leave your refrigerator operating while you are on holiday/vacation.
For Ice & Water models
- Turn the ice maker off on the control panel.
- Shut off the water supply to the refrigerator.
- On your return, turn on the water supply to the refrigerator.
- Dispense 1 gal (4L) of water and discard to ensure the water tank is refilled with fresh water.
- Turn on the ice maker.
• Discard the first full bin of ice.
For best food care
• Store only high-quality, fresh food in your appliance.
- Store perishable foods in the appliance immediately after purchase. Storing at room temperature increases the rate of deterioration and can allow harmful microbial growth.
- Foods such as meat, poultry and seafood should be well wrapped or sealed in suitable packaging to prevent dehydration, color deterioration, loss of flavor, and transfer of odor.
- We recommend storing these foods on the bottom shelf of your appliance or in one of the bins to prevent potential spills and cross-contamination with other foods.
- Ensure hot foods and beverages are cooled sufficiently before placing them into the appliance. Hot items may cause other foods to warm to unsafe temperatures. It may also cause sealed items to sweat/condensate—which is undesirable.
- Beverages are best stored standing upright in the door shelves or on the bottle racks provided.
- Ensure raw and cooked foods are stored separately to avoid cross-contamination.
- Consume food items within the recommended storage times. Discard foods that show sign of spoilage.
- Keep door openings to a minimum to maintain optimum storage temperatures inside your appliance.
- We recommend using ‘Fast Freeze’ when you are adding food items to your freezer, such as after grocery shopping. This feature will ensure the food is frozen within the shortest period of time, locking in the freshness and extending the shelf life of your food.
Items stored in your refrigerator
- Dairy items such as butter and cheeses should be stored in the covered door shelf to minimize any transfer of odor or odor absorption from other foods.
- Eggs should be stored in their carton to avoid absorption of strong odors through their porous shell structure.
Items stored in your freezer
- We recommend cooling carbonated beverages in your freezer only when the 'Bottle Chill' function is active.
- Do not store carbonated drinks without activating this function. Beverages stored for long periods of time can lead to freezing liquid and the possibility of bottle/can explosion.
- Ensure air is removed from packaging to avoid large formation of ice crystals and prevent freezer burn.
- We recommend defrosting foods in the refrigerator to maintain freshness and quality. Ensure partially or fully defrosted foods are never re-frozen—cook immediately.
Faults
• Count the number of beeps made when the fresh food compartment door is opened.
- Record the number and sequence of temperature lights displayed on the internal control panel and contact a Fisher & Paykel trained and supported service technician in order to repair the fault. You can do this by going online to fisherpaykel.com or by contacting our Customer Care Centre.
• To silence the fault alarm press any button on the internal control panel.
Normal refrigerator sounds
ActiveSmart™ refrigerators are designed to have excellent energy ratings and cooling performance. As a result, you may hear sounds somewhat different to your old refrigerator.
Normal operational sounds include:
- Fan air flow sound. ActiveSmart™ refrigerators have fans which change speed depending on demand. During cooling periods, such as after frequent door openings, fans circulate the cold air in the refrigerator and freezer compartments producing some air flow sound. This is quite normal.
- Cracking or popping sounds. This may occur when the automatic defrost function is operating.
- Running water sound. This is the liquid refrigerant in the system and can be heard as a boiling or gurgling noise.
- An audible hissing sound after closing the freezer door. This is due to the pressure difference between the warm air that has entered the cabinet and suddenly cooled, and the outside air pressure.
• Humming sounds. This is the compressor running and is quite normal. -
Gasket noises. Normally occur over time due to a build up of dirt and/or grime. See ‘Cleaning care’ section.
• Ice maker and water dispenser sounds: -
Motor operation (low humming).
- Running water as the ice maker and/or water tank fills.
- Water valve opening and closing (hissing sound).
- Loosened from the ice molding tray (cracking).
- ce dropping into bin (clunking).
• Other sounds may be heard for the following reasons:
- Cabinet not level
- Floor uneven or weak
- Bottles or jars rattling on shelves
If there is a problem with your appliance, check the following points before contacting your local Fisher & Paykel trained and supported service technician or the Customer Care Centre.
Product parts and accessories can be purchased through Fisher & Paykel Customer Care Centre or online at fisherpaykel.com (this service is available to selected markets only).
All models
| PROBLEM POSSIBLE CAUSES WHAT TO DO | ||
| Appliance does not operate | No electricity at power outlet. | Check that the plug is correctly connected and power switched on. |
| Check another appliance at the same outlet. | ||
| Check house fuse. | ||
| Light not working | Light not functioning. The light cannot be serviced by the user. Contact your Fisher & Paykel trained and supported service technician. | |
| Refrigerator not working. Check refrigerator is turned on at the wall or at the isolating switch. | ||
| Motor operates for long periods | Hot weather. Minimize door openings to allow frequent door openings. | temperature to stabilize. |
| Large amount of food recently added. | ||
| Temperature control set too low. | See ‘Operating instructions’ section. | |
| Doors not sealing properly. | Check that cabinet is level and gasket seals are clean. See ‘Cleaning Care’ section. | |
| Storage compartments too warm | Temperature setting not correct. | See ‘Operating instructions’ section. |
| Frequent door openings. Minimize door openings to allow temperature to stabilize. | ||
| Large amount of food recently added. | ||
| Food freezing in the fridge compartment | Temperature setting not correct. | See ‘Operating instructions’ section. |
| Food placed directly in front of air outlets. | Move chill sensitive foods away from the center back of the shelves. | |
| Unfamiliar noises | Cabinet not stable or level. See ‘Installation instructions’ booklet. | |
| Freezer is defrosting. This is normal. | ||
All models
| PROBLEM POSSIBLE CAUSES WHAT TO DO | ||
| Fault alarm sounds when the fresh food compartment door is opened | Record the number of beeps along with the number and sequence of temperature lights displayed on the internal control panel.Contact Customer Care Center. | |
| Water in the vegetable bins | Condensation is formed by the water produced by fruit and vegetables. | A small amount of condensation is beneficial for fruit and vegetable storage. |
| Wipe out water with a cloth. | ||
| Exterior of cabinet is warm | This is normal. | |
| Condensation on outside of refrigerator/freezer | Not unusual during periods of high humidity. | Wipe dry. |
| Condensation inside fridge compartment | Frequent or long door openings. | Minimize door openings. |
| Door gasket leaking. Check that gasket is sitting flat and sealing tightly. | ||
| Not unusual during periods of high humidity. | Wipe dry. | |
| Tray/bin does not slide in and out evenly | Packaging trapped. Check to ensure no food or packaging is trapped behind the tray/bin. | |
| Ice cubes taste tainted | Unsealed packages may be transmitting odor/taste. | Discard ice cubes and clean ice storage bin. See ‘Cleaning care’ section. |
| Wrap or cover strong smelling foods. | ||
| Excessive gasket noise | May be due to a build up of dirt and/or grime. | See ‘Cleaning care’ section. |
| Door not closing An obstruction is blocking door closing. | Move obstruction. | |
Ice & Water models only
| PROBLEM POSSIBLE CAUSES WHAT TO DO | ||
| Automatic ice maker does not work | Ice maker has not been turned on. | Switch on ice maker, see ‘Automatic ice maker’ section. |
| Water supply turned off or not connected. | Connect water supply. | |
| Freezer compartment not working. | Contact Customer Care Center. | |
| Water pressure too low. Check water pressure. | ||
| Water line kinked/squashed. Check water line for kinks/squashing. | ||
| Filter clogged. Water filter may need replacing. | ||
| Ice cubes stick in ice bin. Remove ice bin, loosen cubes and remove clumped ice. Refit ice box. | ||
| Ice cubes taste tainted | Unsealed packages may be transmitting odor/taste. | Discard ice cubes and clean ice storage bin. See ‘Cleaning care’ section. |
| Wrap or cover strong smelling foods. | ||
| Poor taste from incoming water. | Replacement filter cartridges can be purchased online from fisherpaykel.com or by calling Fisher & Paykel Customer Care. | |
| Slow ice cube freezing | Door may have been left ajar. Close door. | |
| Freezer compartment set too warm. | Turn temperature to a colder setting. (See ‘Operating instructions’ section). | |
| Small cubes Low water pressure. Check water pressure. | ||
| Wet ice/ice clumping | Long freezer door openings. Gently tap ice to unstick or, if large clumps occur, empty ice bin and make new ice. | |
| High ambient temperature. | ||
| Ice bin left out of freezer compartment for a length of time. | ||
| Ice will stick together over time. | ||
Ice & Water models only
| PROBLEM POSSIBLE CAUSES WHAT TO DO | ||
| Water has poor taste/odor | Refrigerator not used for an extended period. | Flush the water filtration system.Dispense and discard 1 gal (4L) of water, this will ensure the water tank is refilled with fresh water. |
| Poor incoming water quality | Refrigerator not used for an extended period. | Flush the water filtration system.Dispense and discard 1 gal (4L) of water, this will ensure the water tank is refilled with fresh water. |
| Water dispenser does not work | Water supply turned off or not connected. | Turn water on. |
| Supply line may be blocked. | Check incoming connection for kinks or leaks. | |
| On first installation there may be air in water system. | To remove air, run 1 gal (4L) of water through the dispenser. | |
| Filter may be blocked and needs replacing. | Replace filter cartridge. Replacement filter cartridges can be purchased online from fisherpaykel.com or by calling Fisher & Paykel Customer Care. | |
| Water frozen in tank. Increase | temperature to a warmer setting in fresh food compartment and freezer. | |
| Water in first glass is warm | Water dispenser not used for extended period. | Discard first glass of water dispensed. |
| Tank capacity used recently. | Allow water time to cool. | |
| Drips overflow drip tray | Air trapped in tank. Flush the new filter installed. | water filtration system.Dispense and discard 1 gal (4L) of water, then rest the dispenser pad for a further 2 minutes.Dispense and discard a further 1 gal (4L) of water. This will displace trapped air in the water tank and filter system. |
| Water flow rate has slowed down | Filter cartridge is restricted. Check if filter icon is illuminating. | Replace filter cartridge. Replacement filter cartridges can be purchased online from fisherpaykel.com or by calling Fisher & Paykel Customer Care. |
| Kinked water supply line. | ||
| Ice buildup inside freezer compartment | Freezer door not closing tightly. | Arrange items in freezer so door can close tightly. |
| Check and clean door gasket seal. | ||
| Ice maker sounds | Normal ice maker operation. | See 'User warnings and sounds' section. |
| Small or large ice cubes | Insufficient or excessive water pressure. | Check water pressure. |
EU This appliance is marked according to the European Directive 2012/19/EU on Waste Electrical and Electronic Equipment (WEEE). By ensuring this product is disposed of correctly, you will help prevent potential negative consequences for the environment and human health, which could otherwise be caused by inappropriate handling of this product.
The symbol 📁 marked on the serial plate, or on the documents accompanying the product, indicates that this appliance cannot be treated as household waste. It shall be handed over to the applicable collection point for the recycling of electrical and electronic equipment. Disposal of the appliance shall be carried out in accordance with the local environment regulations for waste disposal and ensure the refrigerant circuit is not damaged.
For more detailed information about treatment, recovery and recycling of this product, please contact your local city office, your household waste disposal service or your Fisher & Paykel retailer/dealer from whom you purchased this product.
For details of your manufacturer's warranty and contacts for servicing, refer to your separate service and warranty book provided with your appliance.
This product has been designed for use in a normal domestic (residential environment). This product is not designed for any commercial use. Any commercial use by the customer will affect this products manufacturer's warranty
Complete and keep for safe reference:
Model ____
Serial No. ____
Purchase Date ____
Purchaser ____
Dealer
City ____
State ____
Zip ____
Country ____
FISHERPAYKEL.COM
© Fisher & Paykel Appliances 2019. All rights reserved. The product specifications in this booklet apply to the specific products and models described at the date of issue. Under our policy of continuous product improvement, these specifications may change at any time. You should therefore check with your Dealer to ensure this booklet correctly describes the product currently available.
NZ AU GB IE HK SG IN US CA
849754B 07.19
FISHER & PAYKEL
RÉFRIGÉRATEUR ENCASTRABLE ACTIVESMART™
natural_image
Line drawing of a rectangular mechanical part with curved cutouts (no text or symbols)natural_image
Technical line drawing of a rectangular container with internal compartments and a handle (no text or symbols)natural_image
Technical line drawing of an open refrigerator with internal compartments and doorways (no text or labels)natural_image
Technical line drawing of a rectangular container with internal compartments and a handle (no text or symbols)Accessoires
natural_image
Simple line drawing of a food stall with vegetables, apples, and water droplets (no text or symbols)natural_image
Illustration of a hand holding a small object inside a device (no text or symbols visible)Distributeur d'eau
Distribution
natural_image
Illustration of a hand pressing a button on a smartphone screen (no text or symbols visible)natural_image
Technical diagram showing two views (A and B) of a mechanical component with no visible text or symbols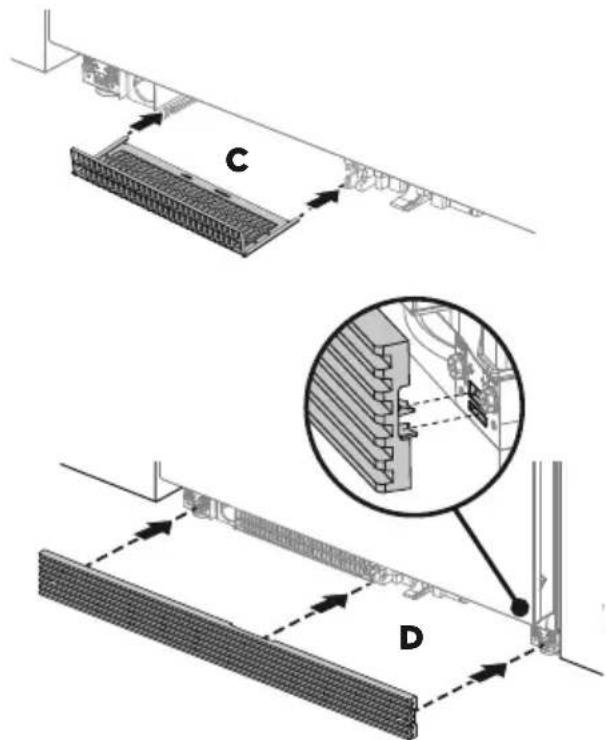
- IMPORTANT!
- SAVE THIS USER GUIDE
- Registration
- IMPORTANT SAFETY INSTRUCTIONS
- WARNING!
- Electrical WARNING!
- Cleaning
- Disposal
- Storing food and drinks
- Water filter IMPORTANT!
- Power failure — food safety
- Ice making IMPORTANT!
- RS80, RS90 and RS36A72 models
- Accessories
- RS9120W, RS36A80 and RS36W80 models
- Control panel
- External display (Ice & Water models only)
- Humidity control system
- Humidity control lids
- Humidity slide
- Fast Freeze
- Ice On/Off
- Ice Boost
- Bottle Chill
- To silence the alarm—Automatic ice model
- To silence the alarm—Ice & Water model:
- Temperature control
- Adjusting the fresh food compartment temperature
- Adjusting the freezer compartment temperature
- Door alarms
- Alarm Mute
- Key mute
- Key lock
- Sabbath mode
- Before you start using the Ice & Water or automatic ice
- Water dispenser (Ice & Water model only)
- Flushing out the water filtration system
- Dispensing
- Dispenser lock
- Automatic ice maker
- Turn the ice maker off if:
- Collecting ice
- Water filter
- To reset indicator:
- To disable the filter indicator:
- Exterior
- Stainless exterior doors
- Other exterior surfaces
- Door gasket
- External display and water dispenser (Ice & Water models only)
- Drip tray (Ice & Water models only)
- Toe kick grilles and filter
- RS80, RS90, RS32A72 and RS36A72 models only
- To clean the toe kick grille and filter
- To replace toe kick filter and grille
- RS36A80, RS36W80 and RS9120W models only
- To clean the toe kick grille and filter:
- To replace toe kick filter and toe kick grille:
- Interior
- Cantilever glass shelves
- Single bottle holders
- Fruit and vegetable bins and slim bin
- Freezer bins and freezer tray
- Ice storage bin
- Holiday/Vacation
- For Ice & Water models
- For best food care
- Items stored in your refrigerator
- Items stored in your freezer
- Faults
- Normal refrigerator sounds
- Normal operational sounds include:
- FISHERPAYKEL.COM
- FISHER & PAYKEL
- RÉFRIGÉRATEUR ENCASTRABLE ACTIVESMART™
- Accessoires
- Distribution
Brand : Fisher & Paykel
Model : RS36A72U1N
Category : Fridge