PS-200 - Steam cleaner Home Touch - Free user manual and instructions
Find the device manual for free PS-200 Home Touch in PDF.


| Product Type | Garment Steamer |
| Brand | Home Touch |
| Model | PS-200 |
| Power Supply | 120 V AC, 60 Hz |
| Heat-up Time | 45 seconds |
| Continuous Steam Time | 40 minutes |
| Water Tank Capacity | Approximately 1 liter (fill to 40 min. line) |
| Hose Length | 5 feet |
| Fabric Compatibility | Safe for all types of fabrics |
| Steamer Features | Quick heat-up, telescoping pole, integrated hanger, rolling casters, low water auto shut-off, easy-fill tank, drain at base |
| Attachments Included | Garment steamer brush, hanger attachment |
| Safety Features | Grounded plug, auto shut-off when water runs out, thermal protection |
| Cleaning & Maintenance | Use cold water; clean mineral buildup with vinegar solution (50/50); drain after each use |
| Storage | Collapsible telescoping pole, coil hose on hanger, store in cool dry place |
| Warranty | 2 years limited (valid in USA only) |
| Weight | Approximately 8 lbs (3.6 kg) |
| Dimensions (collapsed) | Approximately 40 x 12 x 12 inches (100 x 30 x 30 cm) |
| Dimensions (extended) | Approximately 63 x 12 x 12 inches (160 x 30 x 30 cm) |
Frequently Asked Questions - PS-200 Home Touch
User questions about PS-200 Home Touch
0 question about this device. Answer the ones you know or ask your own.
Ask a new question about this device
Download the instructions for your Steam cleaner in PDF format for free! Find your manual PS-200 - Home Touch and take your electronic device back in hand. On this page are published all the documents necessary for the use of your device. PS-200 by Home Touch.
USER MANUAL PS-200 Home Touch
PS-200C 1/27/05 10:32 AM Page 1

Dirección postal:
Consumer Relations
Home Touch
Service Center, Dept. 168
3000 Pontiac Trail
Commerce Township,
MI 48390
Correo electrónico:
cservice@hometouchproducts.com
GARANTÍA LIMITADA POR DOS AÑOS

natural_image
Hand holding a handheld hair dryer with a black cable, no visible text or symbolsInstruction Manual and Warranty Information
PS-200
2 year limited warranty
IMPORTANT SAFEGUARDS WHEN USING ELECTRICAL PRODUCTS, ESPECIALLY WHEN CHILDREN ARE PRESENT, BASIC SAFETY PRECAUTIONS SHOULD ALWAYS BE FOLLOWED, INCLUDING THE FOLLOWING:
WARNING - TO REDUCE THE RISK OF BURNS, ELECTROCUTION, FIRE OR INJURY TO PERSONS:
- Read all instructions before using
- To reduce the risk of contact with hot water emitting from steam vents, check appliance before each use by holding it away from body and operating steam button.
- Use appliance only for its intended use.
• To reduce the risk of electric shock, do not immerse the appliance in water or other liquids. - Never pull cord to disconnect from outlet; instead, grasp plug and pull to disconnect.
- Do not allow cord to touch hot surfaces. Let appliance cool completely before putting away. Loop cord loosely around appliance when storing.
• Always disconnect appliance from electrical outlet when filling with water or emptying, and when not in use.
- Do not operate appliance with a damaged cord, or if the appliance has been dropped or damaged. To reduce the risk of electric shock, do not disassemble or attempt to repair the appliance.
- Return to HoMedics Service Center for examination and repair. Incorrect reassembly or repair could cause a risk of fire, electric shock, or injury to persons when the appliance is used.
- Close supervision is necessary for any appliance being used by or near children. Do not leave appliance unattended while connected.
- Burns could occur from touching hot metal parts, hot water, or steam. Use care when you turn a steam appliance upside down – there may be hot water in the reservoir.
- Never drop or insert any object into any opening or hose.
- Do not use outdoors or operate where aerosol (spray) products are being used or where oxygen is being administered.
- Surfaces of this appliance may be hot when in use. Do not let eyes or bare skin touch heated surfaces.
- Do not place the steam nozzle directly on any surface or on the appliance power cord while it is hot or plugged in. Use the stand provided.
- Unplug this appliance before filling or emptying. Do not overfill.
• Always keep the hose and nozzle elevated above the water container. - To reduce likelihood of circuit overload, do not operate another high wattage appliance on the same circuit.
- Do not use an extension cord to operate the appliance. If an extension cord is absolutely necessary, a 15 ampere rated cord should be used. Cords rated for less amperage may overheat. Care should be taken to arrange the cord so that the cord cannot be pulled or tripped over.
- Never pour water directly into reservoir. Pour water in water tank only
- When changing attachments, please be sure the unit is off and no steam is being released to avoid contact with hot water.
- Use caution when changing attachments as they may contain hot water from condensation. Ensure the attachments are dry or cooled off to avoid contact with hot water.
SAVE THESE INSTRUCTIONS
PS-200C 1/27/05 10:32 AM Page 5
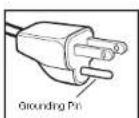
Figure A

Figure B

Figure C

Figure D

Figure E
Grounding Instructions
This product must be grounded. If it should malfunction or breakdown, grounding provides a path of least resistance for the electric current to reduce the risk of electric shock. This product is equipped with a cord having an equipment-grounding conductor and a grounding plug. The plug must be plugged into an appropriate outlet that is properly installed and grounded in accordance with all local codes and ordinances.
DANGER
Improper connection of the equipment-grounding conductor can result in a risk of electric shock. Check with a qualified electrician or serviceman if you are in doubt as to whether the product is properly grounded. Do not modify the plug provided with the product - if it will not fit the outlet, you may temporarily use an adapter (such as the one shown in Figure B) until you have a proper outlet (such as the one shown in Figure C) installed by a qualified electrician.
This product is for use on a nominal 120-volt circuit, and has a grounding plug that looks like the plug illustrated in Figure A. A temporary adapter that looks like the adapter illustrated in
Figure B may be used to connect this plug to a 2-pole receptacle as shown in Figure D if a properly grounded outlet is not available. The temporary adapter should be used only until a properly grounded outlet Figure C can be installed by a qualified electrician. The tab for grounding screw Figure B extending from the adapter must be connected to a permanent ground such as a properly grounded outlet box cover. Whenever the adapter is used, it must be held in place by a metal screw. See Figures D and E.
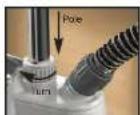
Figure 1
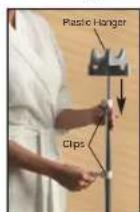
Figure 2

Figure 3
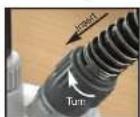
Figure 4
Perfect Steam Features
- Safe for use on all types of fabrics
- Quick heat-up feature emits steam in 45 seconds
• Convenient integrated garment hanger - Telescoping design for compact storage
- 5' flexible hose with Safe Touch ^™ hose cover for safe and comfortable handling
- Easy-fill water tank provides 40 minutes of continuous steam
- Rolling casters for excellent mobility
- Low water auto shut-off for safe use
- Convenient drain at base
Assembly Instructions
- Carefully remove all contents from packaging and inspect the product to make sure all components have been received (Fig. 9).
- Insert pole into top of unit. Match the grooves on the pole with the notches in the pole connector and push down. Securely screw the cap on the pole over the connector by turning it clockwise (Fig. 1).
- To attach the hanger attachment, align tabs in plastic hanger with grooves on pole and push down (Fig. 2).
- Fully extend the telescopic pole. To do so open the 3 clips on the pole and pull the pole upwards (Fig. 2). When fully extended close the clips. Make sure that the pole is securely locked into place and cannot be pushed downward.
- Attach the garment steamer brush to the nozzle by setting into place (Fig. 3).
- Attach handle & hose assembly to unit. Line up the arrow on the hose with the white dot on the hose connector. Insert and turn arrow on hose clockwise until it is lined up with the black dot (Fig. 4). It should now be locked into place. You may hang the steamer handle on the hanger attachment (Fig. 3). NOTE: Do not hang the hose on the hanger attachment until after it has been connected to the base to prevent the hose from falling on you.
PS-200C 1/27/05 10:32 AM Page 7

Figure 5

Figure 6

Figure 7

Figure 8
Instructions for Use
- Remove the water tank from the unit by grasping the handle and turn upside down. Unscrew the cap from the bottom of the water tank. Hold the tank under cold running water and fill to the desired level (Fig. 5). DO NOT fill past the 40 min. fill line. When you have finished filling the tank screw the cap back on and turn over (Fig. 6). Place water tank back into unit and make sure it is sitting properly & securely in the cavity. NOTE: Only fill the water tank with cold water, DO NOT use HOT water.
- Plug the steamer cord into a 120V AC electrical outlet.
- Turn the On/Off switch to the On position. The switch will light to indicate that the garment steamer is on. Steam will emit in 45 seconds from the nozzle.
- This unit has a reset button (Fig. 9). When the unit runs out of water it will automatically shut-off to ensure safe use and a red indicator light will come on (above reset button). If you wish to continue your steaming session:
- Turn On/Off switch to "Off" position
- Remove and refill water tank by following step 1 under Instructions for Use
- Push the reset button on side of unit
- Turn On/Off switch to "On" position
- When you are finished with your steaming session place the On/Off switch in the Off position and remove the plug from the outlet.
NOTE: Be cautious when handling until steamer has fully cooled.
Cleaning and Maintenance
- Allow the steamer to cool for at least 30 minutes.
- Empty any excess water from the water tank and allow it to air dry before replacing the cap and setting it back in the unit.
- Empty excess water from the reservoir by removing the drain plug (Fig. 7) and tipping unit.
Storing
- Open the 3 clips (Fig. 2) on the telescopic pole and glide it slowly to collapse being careful not to pinch your fingers. When it is all the way down close the 3 clips back into place.
- Coil the hose and place on the hanger attachment (Fig. 8)
- Store in a cool, dry place.
NOTE: Do not wrap the power cord around the unit.

Figure 9
Removing Mineral Buildup
One common problem with steamers is mineral buildup caused by the high mineral content in many municipal water supplies. Mineral residue inside of the internal pipes and heater can cause intermittent steaming or in severe cases no steaming at all.
The best way to avoid this is to use de-mineralized or distilled water in the unit. The procedure below can be used to clear mineral buildup. If you are unable to use de-mineralized or distilled water we recommend you use this procedure monthly to help avoid mineral buildup.
- Turn the unit off and unplug the power cord.
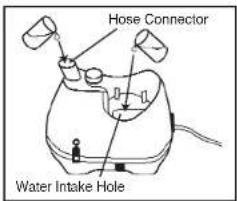
- Unscrew and remove the hose from the hose connector on the top of the unit.
- Remove the pole from the unit.
- Remove the water tank from the main unit and drain any water in the unit.
-
Make a mixture of 50% vinegar and 50% water. In most cases 1 cup of this mixture will be sufficient.
-
Slowly pour the water-vinegar mixture into the hose connector.
a. If the internal piping is only partially blocked by mineral buildup, the water-vinegar mixture will soon start flowing out of the water intake hole. If this happens proceed to step 8. b. If the internal piping is completely blocked, continue to pour the mixture into the hose connector till full.
-
Pour the water-vinegar mixture into the water intake hole until full.
-
Let stand for 40 minutes.
-
Drain the water using the drain plug.
-
Pour clean water through the hose base and water intake hole until the vinegar smell dissipates.
-
Reassemble the unit and operate normally.
If the procedure above does not return the unit to normal operation, the unit may need servicing.
9
Trouble Shooting the Steamer
PROBLEM CAUSE SOLUTION
| Steamer fails to heat Steamer not plugged in Plug in to electrical outlet |
| Auto shut off engaged Check water container to |
| insure it is not empty. If full, hit reset ON/OFF switch on side of unit. If empty, refill and push reset to begin. |
| No steam Water level is low Tum ON/OFF switch OFF and refill water container | ||
| Water drips from nozzle Condensation in hose | Hold the hose vertically and allow water to drain back into tank | |
| Nozzle gurgles | Condensation in hose | Hold the hose vertically and allow water to drain back into tank |
| Steam is intermittent Sediment build-up in container | Follow the procedure for removing mineral build-up |
NOTE: 1. Water mineral content and conditions will vary in different areas. To insure continued operation of the steamer, never store without cleaning and removing excess water from the reservoir and water container.
2. If the reset light comes on with water in the tank you
probably need to declarify (clean) the unit.
3. In areas where the voltage exceeds 120V, it may be necessary to clean your unit more frequently.
PS-200C 1/27/05 10:32 AM Page 11

TWO YEAR LIMITED WARRANTY
(Valid in USA only)
HoMedics, Inc., guarantees this product free from defects in material and workmanship for a period of two years from the date of original purchase, except as noted below.
This HoMedics product warranty does not cover damage caused by misuse or abuse; accident; the attachment of any unauthorized accessory; alteration to the product; or any other conditions whatsoever that are beyond the control of HoMedics. This warranty is effective only if the product is purchased and operated in the USA. A product that requires modification or adaptation to enable it to operate in any country other than the country for which it was designed, manufactured, approved and/or authorized, or repair of products damaged by these modifications is not covered under warranty. HoMedics shall not be responsible for any type of incidental, consequential or special damages. All implied warranties, including but not limited to those implied warranties of fitness and merchantability, are limited in the total duration of two years from the original purchase date.
Mail to:
Consumer Relations
Home Touch
Service Center, Dept. 168
3000 Pontiac Trail
Commerce Township,
MI 48390
Email:
cservice@hometouchproducts.com
To obtain warranty service on your HoMedics product, either hand deliver or mail the unit and your dated sales receipt (as proof of purchase), postpaid, along with check or money order in the amount of \$10.00 payable to HoMedics, Inc. to cover handling.
Upon receipt, HoMedics will repair or replace, as appropriate, your product and return it to you, postpaid. If it is appropriate to replace your product, HoMedics will replace the product with the same product or a comparable product at HoMedics' option. Warranty is solely through HoMedics Service Center. Service of this product by anyone other than HoMedics Service Center holds warranty.
This warranty provides you with specific legal rights. You may have additional rights which may vary from state to state. Because of individual state regulations, some of the above limitations and exclusions may not apply to you.
For more information regarding our product line in the USA, please visit: www.homedics.com
©2003 HoMedics, Inc. and its affiliated companies, all rights reserved.
Home Touch", Perfect Steam", and Safe Touch" are trademarks of
Homelloy's Inc. All rights reserved. IRRS200-C
IBPS200-C

TM

- IMPORTANT SAFEGUARDS WHEN USING ELECTRICAL PRODUCTS, ESPECIALLY WHEN CHILDREN ARE PRESENT, BASIC SAFETY PRECAUTIONS SHOULD ALWAYS BE FOLLOWED, INCLUDING THE FOLLOWING:
- WARNING - TO REDUCE THE RISK OF BURNS, ELECTROCUTION, FIRE OR INJURY TO PERSONS:
- SAVE THESE INSTRUCTIONS
- Grounding Instructions
- DANGER
- Perfect Steam Features
- Assembly Instructions
- Instructions for Use
- Cleaning and Maintenance
- Storing
- Removing Mineral Buildup
- Trouble Shooting the Steamer
- TWO YEAR LIMITED WARRANTY
- Mail to:
- Email:
Brand : Home Touch
Model : PS-200
Category : Steam cleaner