
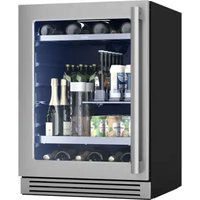
PRW24C02BPG - Refrigerator Zephyr - Free user manual and instructions
Find the device manual for free PRW24C02BPG Zephyr in PDF.


| Product type | Built-in refrigerator |
| Brand | Zephyr |
| Model | PRW24C02BPG |
| Dimensions (W x H x D) | 60,9 x 85,1 x 55,9 cm |
| Net weight | 45 kg |
| Total volume | 192 litres |
| Energy class | F (formerly A+) |
| Annual consumption | 221 kWh/year |
| Noise level | 38 dB(A) |
| Type of cooling | Ventilated cooling (No Frost) |
| Recommended ambient temperature | 10°C to 43°C |
| Shelves | 3 adjustable glass shelves |
| Vegetable drawer | 1 humidity-controlled drawer |
| Door bins | 3 adjustable door bins |
| Interior lighting | LED |
| Defrost type | Automatic (No Frost) |
| Refrigerant | R600a |
| Holiday function | Yes |
| Open door alarm | Yes |
| Electronic thermostat | Yes, with digital display |
| Reversible doors | Yes, possible |
| Care and cleaning | Clean surfaces with a soft cloth and soapy water. Do not use abrasive products. |
| Safety | Child lock available |
| Spare parts and repairability | Repairability index: 7.2/10. Parts available on request. |
| Warranty | 2 years parts and labor |
Frequently Asked Questions - PRW24C02BPG Zephyr
User questions about PRW24C02BPG Zephyr
0 question about this device. Answer the ones you know or ask your own.
Ask a new question about this device
Download the instructions for your Refrigerator in PDF format for free! Find your manual PRW24C02BPG - Zephyr and take your electronic device back in hand. On this page are published all the documents necessary for the use of your device. PRW24C02BPG by Zephyr.
USER MANUAL PRW24C02BPG Zephyr
Presrv Dual Zone Panel Ready Wine Cooler
EN Use, Care, and Installation Guide
natural_image
Technical line drawing of a multi-level rack cabinet with ventilation grilles and mounting feet (no text or symbols)

Page Safety Information 4-11
Types of Safety Warnings....4
General Safety 5-7
Save These Instructions 8
Disposal of Old Appliance....8
Before Using Your Appliance 9
Installation of Your Appliance 9-10
Attention....10
Electrical Connection 11
Introduction 12
List of Materials.... 13
Product Specifications 14-17
Product Summary ....14
Internal Storage....14
Parts Identification ....15
Dimensions 16-17
Installation Instructions....18-23
Installation Clearance Requirements....18
Installing the Overlay Panel....19
Installing the Handle 20
Reversing the Door Swing of Your Appliance 21
Installing the Wooden Shelves 22
Removing the Wooden Shelves 22
Carbon Filter 23
Operating Your Appliance 24-26
Using the Control Panel 24
Internal Light 25
Door Open Alarm.... 25
Sabbath Mode....25
Demonstration Mode 26
Temperature Alarm 26
Defrosting....26
Care and Maintenance.... 27-28
Normal Sounds 27
Cleaning the Unit 27
Power Failure 28
Moving Your Wine Cooler 28
Energy Saving Tips 28
Troubleshooting.... 29-30
Notes....31-32
Limited Warranty 33
Product Registration....34
Your safety and the safety of others are very important.
We have provided many important safety messages in this manual for your appliance. Always read and obey all safety messages.

natural_image
Warning symbol: black triangle with exclamation mark (no text or numbers)This is the Safety Alert Symbol. This symbol alerts you to potential hazards that can cause severe bodily injury or death. All safety messages will follow the Safety Alert Symbol and either the words "DANGER" "WARNING" or "CAUTION"

DANGER

Danger means that failure to heed this safety statement may result in severe injury or death.

WARNING

Warning means that failure to heed this safety statement may result in extensive product damage, serious personal injury, or death.

CAUTION

Caution means that failure to heed this safety statement may result in minor or moderate personal injury, property or equipment damage.
For your safety, read all instructions carefully before operating the appliance.
General Safety

DANGER

When using an electrical appliance, basic precautions should always be followed to reduce the risk of fire, electric shock, and injury to persons.

WARNING

To reduce the risk of fire, electric shock or personal injury, unplug or disconnect the appliance from the power supply before servicing.

CAUTION

Flammable refrigerant used! When handling, moving and use of the refrigerator, make sure to avoid either damaging the refrigerant tubing, or increasing the risk of a leak.
▶ Use this appliance only as described in this manual. Other uses not recommended may cause fire, electric shock or personal injury.
This appliance is not intended for use by young children or infirm persons unless they have been adequately supervised by a responsible person to ensure that they can use the appliance safely.
▶ Young children should be supervised to ensure that they never play with the appliance.
▶ To protect against the risk of electric shock, NEVER IMMERSE the unit, cord, or plug in water or spray any other liquid.
▶ Unplug the appliance from the plug socket when not in use, when moving from one location to another and before cleaning.
For your safety, read all instructions carefully before operating the appliance.
▶ To disconnect the appliance, grip the plug and pull it from the wall outlet. Never pull by the cord.
▶ Never operate the appliance in the presence of explosive and/or flammable fumes.
▶ Never place the appliance or any of its parts near an open flame, cooking or other heating appliance.
▶ Never operate the appliance with a damaged cord or plug, if the product malfunctions, or if it is dropped or damaged in any manner.
The use of attachments not recommended by the manufacturer may be hazardous.
▶ Never operate if the housing is removed or damaged.
▶ A loose fit between the AC outlet (receptacle) and plug may cause overheating and a distortion of the plug. Contact a qualified electrician to replace loose or worn outlet.

WARNING

Prop. 65 Warning for California Residents: This product may contain chemicals known to the State of California to cause cancer, birth defects, or other reproductive harm.
▶ Locate the unit away from direct sunlight and sources of heat (stove, heater, radiator, etc.).
This appliance is CFC and HFC free and contains small quantities of Isobutane (R600a), an environmentally friendly coolant.
▶ You must ensure that the cooling circuit is undamaged when installing the appliance. However, if it becomes damaged, avoid proximity to open fires and heat sources of all kinds. The room in which the appliance is located should be ventilated properly and according to state and local codes.
▶ Never use an appliance with a damaged circuit.
▶ Ensure that the ventilation openings to and from a built-in appliance are never blocked or covered.
No liability will be accepted for any damage caused by misuse of the appliance, or as a result of repairs carried out by unqualified person. In this case neither the warranty nor any other liability claims will apply.
For your safety, read all instructions carefully before operating the appliance.

WARNING

Never operate any other electrical appliance inside this appliance.
▶ Never attempt to repair or replace any part of your appliance unless it is specifically recommended in this manual. All other servicing should be referred to a qualified technician.
▶ Replace all access panels before operating.
▶ Use two or more people to move and install the appliance. Failure to do so can result in back or other injury.
▶ Never clean appliance parts with flammable liquids. These fumes can create a fire hazard or explosion. Never store or use gasoline or other flammable vapors and liquids in the vicinity of this or any other appliance. The fumes can create a fire hazard or explosion.
▶ Never connect or disconnect the electric plug with wet hands.
It is recommended that a separate circuit, serving only your appliance be provided. Use receptacles that cannot be turned off by a switch or pull chain.

WARNING

To reduce the risk of fire, electric shock or personal injury, unplug or disconnect the appliance from the power supply before servicing.
For your safety, read all instructions carefully before operating the appliance.
Save These Instructions
If you are experiencing problems, check the Troubleshooting Guide at the back of this manual. It lists causes of minor operating problems that you can correct yourself.
Disposal of Old Appliance
Dispose of your appliance packaging properly. Refrigeration equipment must be properly disposed of in a way which protects the environment. This applies to your old appliance and to your new unit once it has reached the end of its service life.

WARNING

Please ensure that old, worn appliances are rendered unusable before disposal by removing the plug, cutting the power cable, and removing or destroying any snap fastenings or bolts. You will thus prevent children from locking themselves in the appliance during play (risk of suffocation) or endangering their lives in any other way.
The appliance must not be disposed with normal household waste collection.
The coolant circuit, particularly the heat exchange at the back/bottom of the unit, must not be damaged.
The symbol on the product or its packaging indicates that this product is not to be handled as normal household waste but is to be taken to a recycling collection point for electrical and electronic goods. By correctly disposing of this product you are contributing to the protection of the environment. Improper disposal endangers health and the environment. Further information about the recycling of the product may be obtained from your town hall or local waste collection department.
For your safety, read all instructions carefully before operating the appliance.
Before Using Your Appliance
▶ Remove all exterior and interior packing.
Before connecting the appliance to the power source, let it stand upright for approximately 2 hours. This will reduce the possibility of a malfunction in the cooling system caused by handling during transportation.
▶ Clean the interior surface with warm water using a soft cloth.
The door on this appliance can be opened from either the left or the right side. The unit is delivered with the door opening on the left side. Should you wish to open the door from the right, follow the instructions, "Reversing the Door Swing of your Appliance," listed below.
Installation of Your Appliance

WARNING

Do not store or install the appliance outdoors.
The appliances are designed for either built-in, or free-standing installation.
Place your appliance on a floor that is strong enough to support it when it is fully loaded. To level your appliance, adjust the 4 legs until level.
Locate the appliance away from direct sunlight and sources of heat (stove, heater, radiator, etc.). Direct sunlight may affect the acrylic coating and heat sources may increase electrical consumption. Extreme cold ambient temperatures may also cause the unit not to perform properly.
▶ Never place the unit in damp areas.
▶ Plug the appliance into an exclusive, easily accessible electrical socket.
▶ Any questions concerning power and/or electrical connection should be directed towards a qualified electrician or an authorized products service center.
The air vent at the front of the appliance must never be covered or blocked in any way.
For your safety, read all instructions carefully before operating the appliance.
The appliance must be installed to all electrical connections in accordance with state and local codes.
▶ Use two or more people to move and install the wine cooler. Failure to do so can result in back or other injury.
The cooler may experience decreased cooling efficiency if air flow is restricted due to a fully loaded cabinet.
▶ Install the wine cooler in a well-ventilated area where the ambient temperature is above 50^ F and below 90^ F.
Attention
▶ Never overload the cabinet.
▶ Never open the door unless necessary.
▶ Never cover shelves with aluminum foil or any other shelf material which may prevent air circulation.
Should the appliance be left empty for long periods, it is suggested that the appliance be unplugged, and, after careful cleaning, leave the door ajar to allow air to circulate inside the cabinet in order to avoid possible condensation, mold or odors from forming.
For your safety, read all instructions carefully before operating the appliance.
Electrical Connection
Check that the voltage marked on the product corresponds with your supply voltage.

WARNING

Improper use of the grounded plug can result in the risk of electrical shock. If the power cord is damaged, have it replaced by a qualified electrician or an authorized service center.
This appliance should be properly grounded for your safety. The power cord of this appliance is equipped with a three-pin plug which mates with standard three-pin wall outlets to minimize the possibility of electrical shock.
Never under any circumstances cut or remove the third ground prong from the power cord supplied. For personal safety, this appliance must be properly grounded.
Have the wall outlet and circuit checked by a qualified electrician to make sure the outlet is properly grounded. When a standard two-pin wall outlet is encountered, it is your responsibility and obligation to have it replaced with a properly grounded three-pin wall outlet.
To prevent accidental injury, the cord should be secured behind the appliance and not left exposed or dangling.
The appliance should always be plugged into its own individual electrical outlet which has a voltage rating that matches the rating label on the appliance. This provides the best performance and also prevent overloading wiring circuits that could cause a fire hazard from overheating. Never unplug the appliance by pulling the power cord. Always grip the plug firmly and pull straight out from the receptacle. Repair or replace immediately all power cords that have become frayed or otherwise damaged. Never use a cord that shows cracks or abrasion damage along its length or at either end. When moving the appliance, be careful not to damage the power cord.
Never use your appliance with an extension cord unless this cord has been checked and tested by a qualified technician or service person. The extension cord must be a UL/CUL Listed, 3-wire grounding extension cord that has a grounding plug and outlet and that the electrical rating of the cord is 115 volts and at least 10 amperes.
Thank you for purchasing your Zephyr wine cooler. Zephyr is dedicated to developing products that will enhance your lifestyle with superior quality and distinctive features. Please visit www.zephyronline.com for more information on your product and other Zephyr products.
This manual contains important information regarding the proper installation, use, and maintenance of your wine cooler. Following this manual will ensure that your product will work at its peak performance and efficiency.
For Your Records
Please write down the model number and serial number below for future reference. Both numbers are located on the rating label on the back of your unit and are needed to obtain warranty service. You may also want to staple your receipt to this manual as it is the proof of your purchase and may also be needed for service under warranty.
Model Number:
Serial Number:
Date of Purchase:
To better serve you, please do the following before contacting customer service:
If you received a damaged product, immediately contact the retailer or dealer that sold you the product.
Read and follow this instruction manual carefully to help you install, use and maintain your wine cooler.
Read the troubleshooting section of this manual as it will help you diagnose and solve common issues.
Visit us on the web at http://www.zephyronline.com to download product guides, additional troubleshooting resources and up-to-date information.
If you need warranty service, our friendly customer service representatives are available on our website at http://zephyronline.com/contact or by telephone at 888-880-8368.
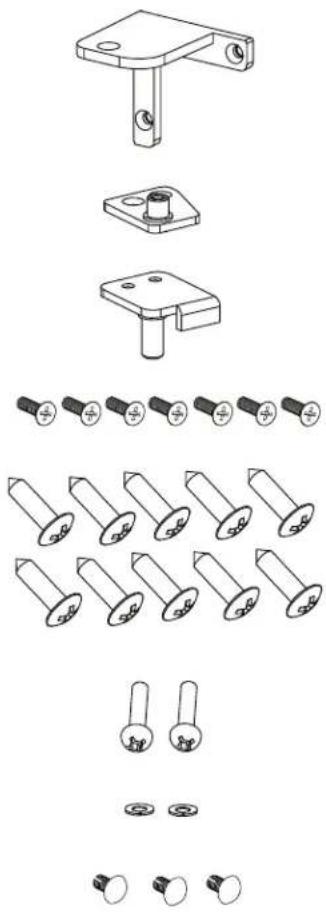
Quantity Part
natural_image
Exploded view diagram of mechanical components including bracket, mounting plate, and multiple screw holes (no text or labels)Self-tapping screws (ST4*30)
Door handle screws (M4*40)
Flat washers (Φ4.3*Φ8*0.5, M4)
Black decorative nails
Product Summary
This appliance requires a standard 115/120 Volt AC\~60Hz electrical ground outlet.
| DESCRIPTION OF PRODUCT Presrv Dual Zone Panel Ready Wine Cooler | |
| MODEL PRW24C02BPG | |
| VOLTAGE/FREQUENCY AC 115/60Hz | |
| AMPERAGE 1.5A | |
| COLOR Black Cabinet with Black Panel Ready Door | |
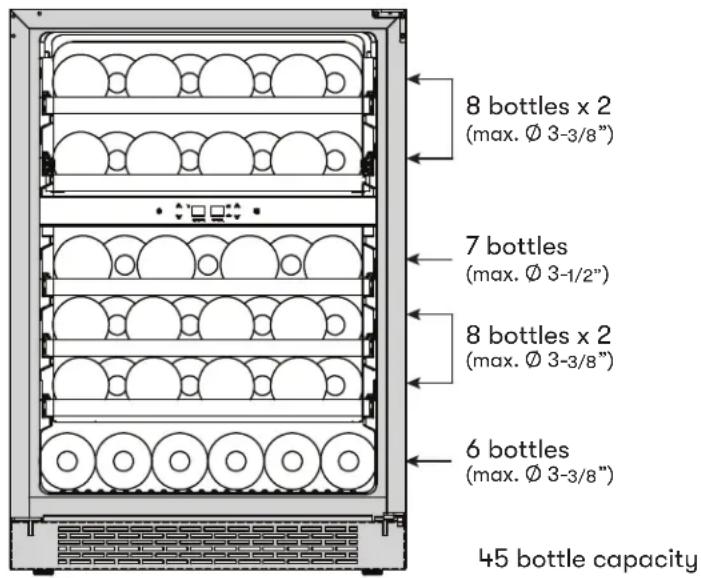
| STORAGE CAPACITY* (45) 750ml bottles | |
| REFRIGERANT R600a | |
| TEMPERATURE RANGE 40°F - 65°F | |
| DIMENSIONS (HxWxD) 33-7/8” X 23-7/8” X 23-3/4” | |
| GROSS WEIGHT (lb) 139lb | |
| OPTIONAL PRO HANDLE ACCESSORY PRHAN-C001 | |
| OPTIONAL CONTEMPORARY HANDLE ACCESSORY, STAINLESS STEEL | PRHAN-C101 |
| OPTIONAL CONTEMPORARY HANDLE ACCESSORY, BRUSHED GOLD | PRHAN-C102 |
| OPTIONAL CONTEMPORARY HANDLE ACCESSORY, MATTE BLACK | PRHAN-C104 |
| REPLACEMENT CARBON FILTER Z0F-C004 | |
*Storage capacity is based on standard 12 oz. cans and 750 ml. Bordeaux-style wine bottles.
NOTE: Depth provided includes a 3/4" overlay panel.
Internal Storage
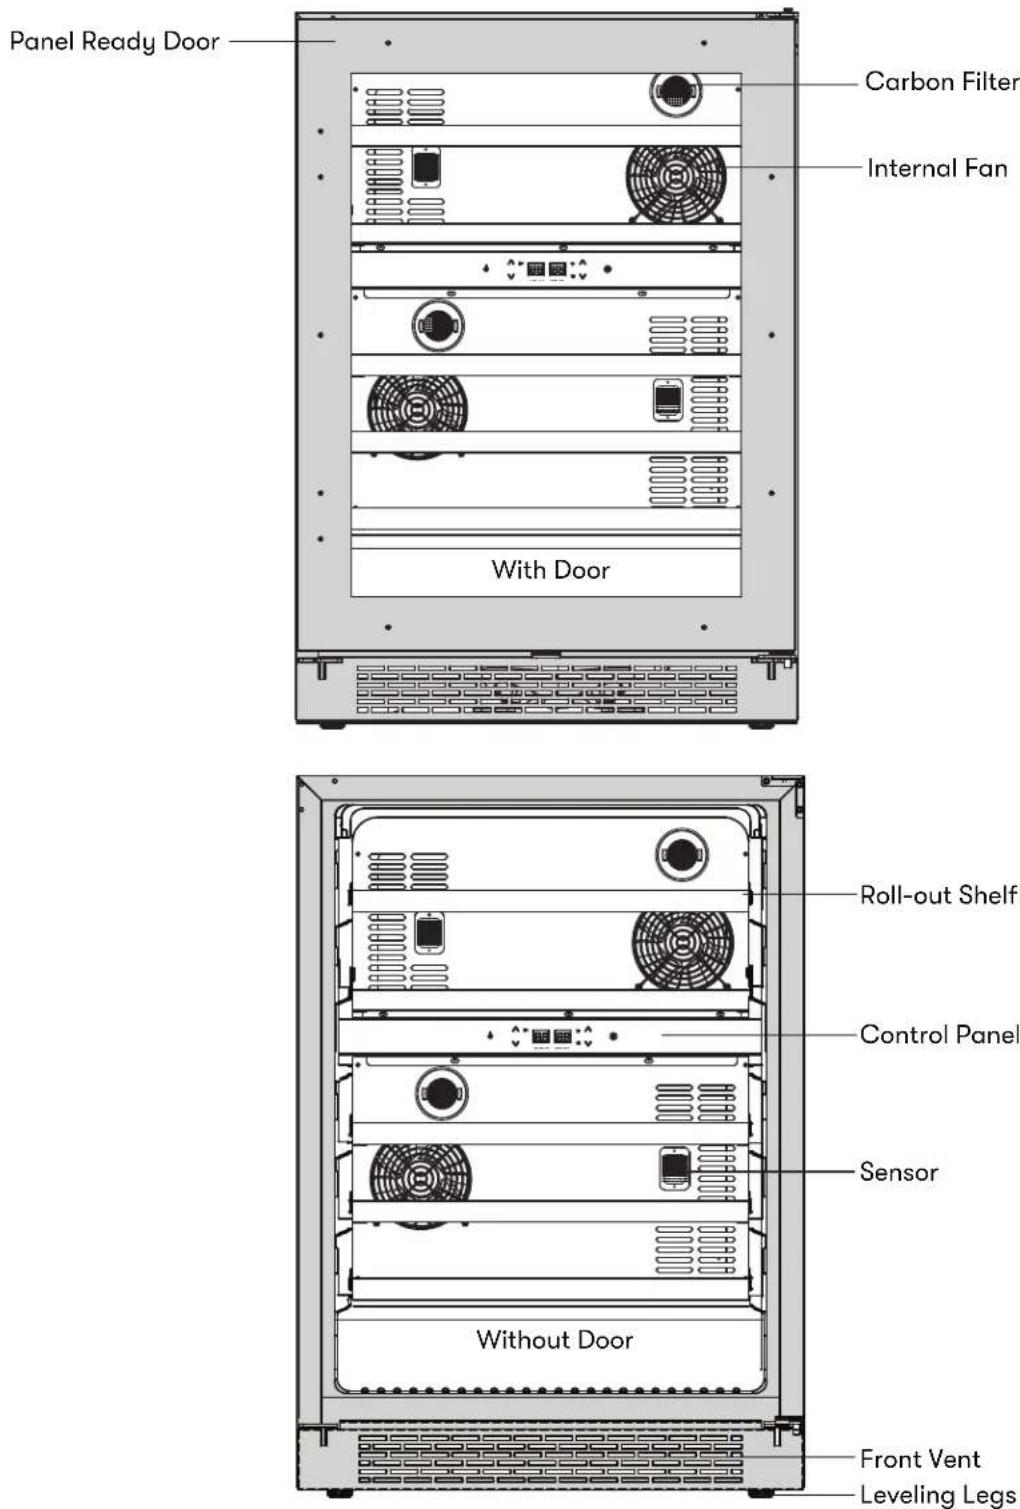
Parts Identification
Dimensions
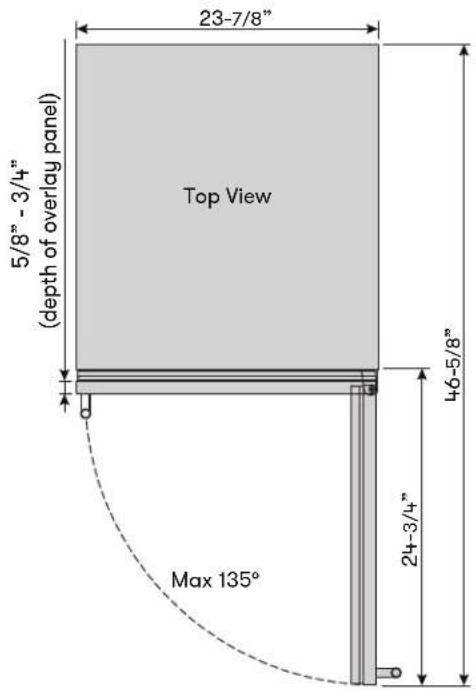

NOTE: Cabinet depth provided includes a 3/4" overlay panel.
NOTE: A screw is present on the top hinge of the unit, adding an additional 1/8" to the height of the cooler. If installing cooler flush with cabinet fronts, additional clearance may be needed.
Dimensions

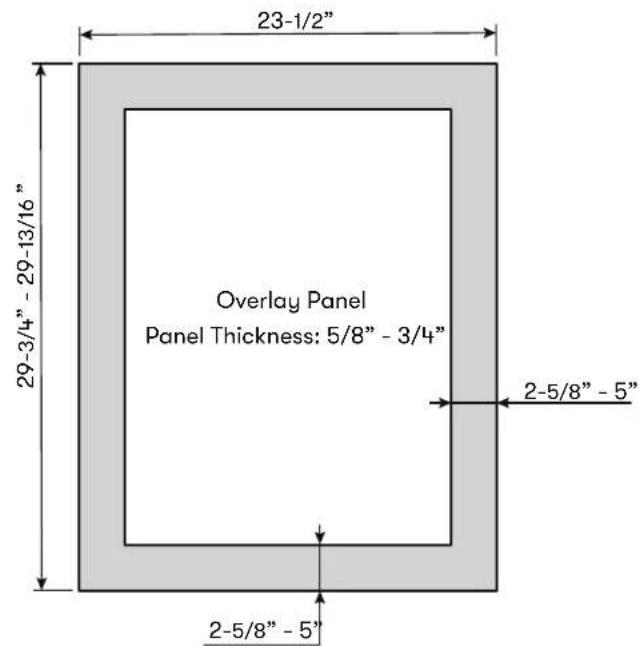
NOTE: Compatible with framed overlay panels only.
Installation Clearance Requirements
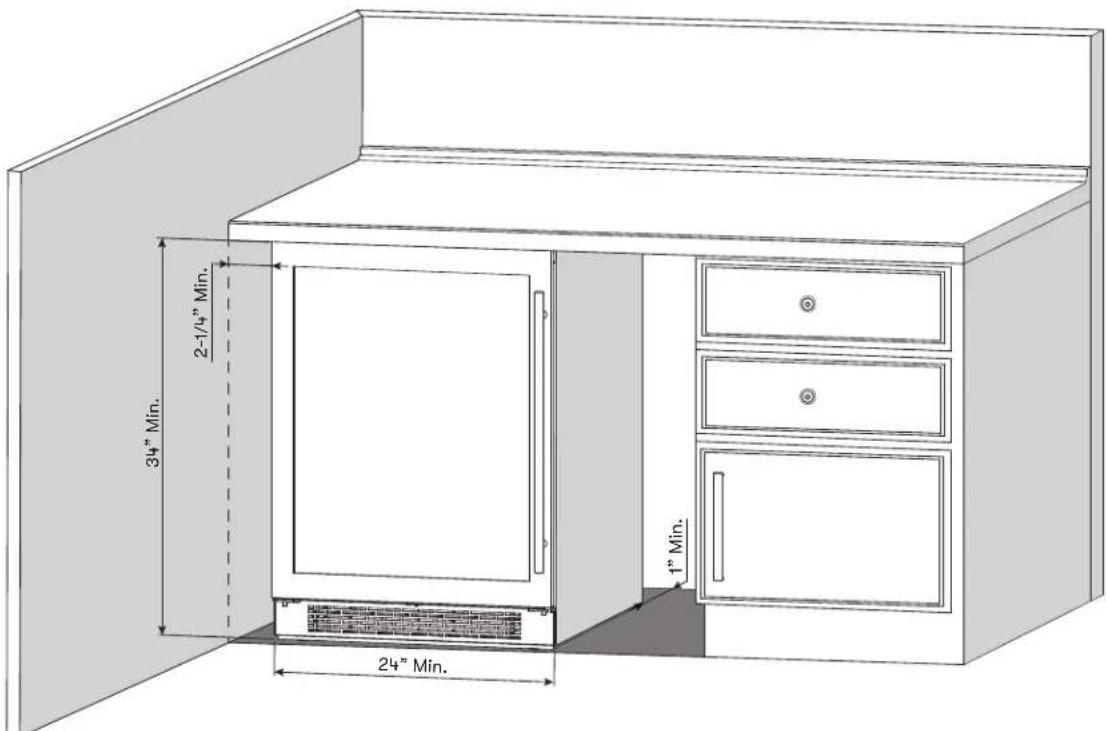
When installing the wine cooler under a counter, follow the recommended spacing dimensions shown.
If the cooler is flush-mounted with the front of the cabinets, an additional 1/8" cabinet height clearance will be required.
For proper clearance of the electrical plug, allow at least 1" of clearance at the back as shown in the diagram.
An installation next to a wall will require a minimum 2-1/4" door clearance to accommodate the Zephyr handle. If a custom handle is used, the dimensions will need to be measured accordingly based on the handle dimensions.
The cabinet should allow at least 24" for the width and 34" for the height to accommodate the wine cooler.
The power cable is located on the back right of the unit and has a length of 72" to accommodate multiple outlet locations.
▶ Once you are ready to install the unit, you must adjust the feet to level the wine cooler.
The installation should allow the unit to be pulled forward for servicing, if necessary.
Installing the Overlay Panel
To install the overlay panel onto the door, please follow the instructions below. Refer to the dimensions page to ensure proper measurements prior to installation.
natural_image
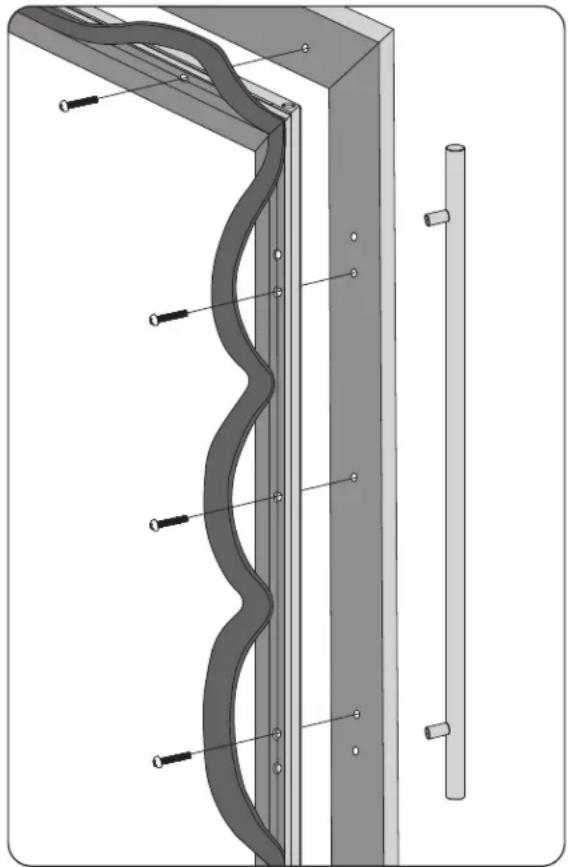
Technical diagram of a wall-mounted cable or duct assembly with mounting holes and a vertical rod (no text or symbols)- Open the door.
- Temporarily remove the door gasket to see the 10 holes for the overlay panel. There are 2 holes on the top and bottom sides of the door with either 3 or 5 holes on the left and right side depending on where the handle is located. The handle side will have 5 holes.
- Open the hardware package containing 10 self-tapping screws (ST4*30 size) for the overlay panel.
- Clamp the overlay panel with the door firmly with bar clamps and screw the self-tapping screws into the overlay panel. Perform this step per screw until the overlay panel is completely secured.
- Reattach the door gasket and close the door.
NOTE: If handles will be installed, thread 2 pre-installed screws onto the overlay panel and refer to Installing the Handle instructions. If they will not be installed, remove the screws from the door.
Installing the Handle
If optional contemporary or pro handles are desired, refer below for the part numbers.
- Confirm if the overlay panel has already been installed onto the unit. If not, refer to Overlay Panel Installation to mount the overlay panel onto the unit.
- Push aside the door gasket. Under the gasket you will see two designated holes for handle installation. Mark handle hole locations on the overlay panel.
- Remove overlay panel from door. Using 3/16" drill bit, create holes for handle screws.
- Re-install overlay panel on the door.
- Install the handle tightly as shown with two 1-1/2" machine screws.
NOTE: If using a custom handle, install the handle in the position of your choosing with counter sunk screw holes prior to installing the overlay panel to door.

Zephyr Presrv Contemporary Handles
Part #: PRHAN-C101
Color: Stainless Steel
Part #: PRHAN-C102
Color: Brushed Gold
Part #: PRHAN-C104
Color: Matte Black

natural_image
Simple line drawing of a horizontal beam with two vertical supports at both ends (no text or symbols)Zephyr Presrv Pro Handle
Part #: PRHAN-C001 Color: Stainless Steel

natural_image
Simple horizontal line with two right-angle extensions, no text or symbols presentReversing the Door Swing of Your Appliance
Should you desire to reverse the opening direction of the door, please follow the instructions below. Safely reversing the door swing of your appliance should require at least two people.
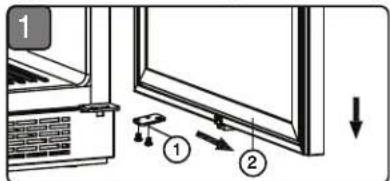
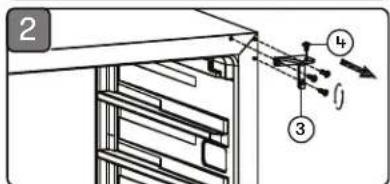
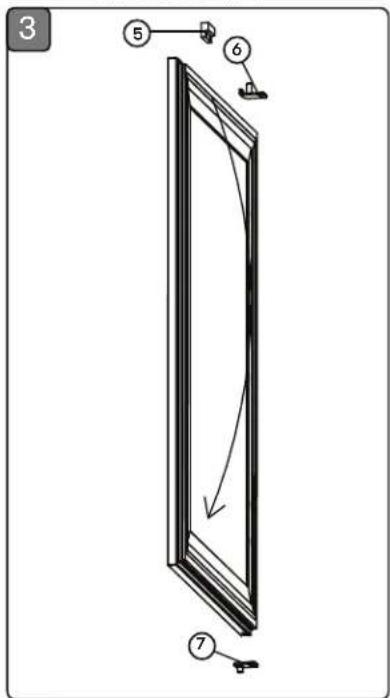
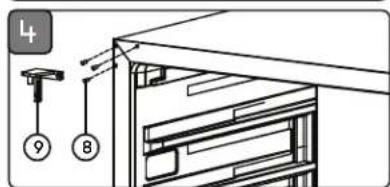
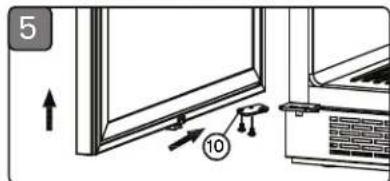
-
Remove the 2 screws from the lower door axis (1) and remove a top screw on top of the hinge (4). Then remove the door (2) and remove the axis plate (1) from the door.
-
Remove the 3 hinge screws from the top right hinge (3) and remove the top right hinge.
-
Unscrew 2 screws and remove the door magnet (5) and unscrew 2 screws and remove the door stopper (6). Remove 2 screws from upper door axis (7) mounted on top of the door and remove it. Then, install the door magnet on the opposite side of the door frame. Take out the new upper door axis and door stopper from the hardware package and install them with 2 screws. Rotate the door 180 degrees.
-
Remove the 3 black decorative covers (8) from the top left of the cabinet. Install the black decorative covers to the top right of the cabinet and install the new top hinge (9) from the hardware package that includes the installation manual at the top left of the cabinet with 3 screws.
-
Install the lower door axis (10) and install the door once correctly aligned. Secure the door with the top screw on top of the hinge (4).
▶ To prevent damaging the door or door gasket, make sure the door is open at least 90-degrees when pulling shelves out of the rail compartment.
The door opens to a maximum of 135 degrees with a door stop on the bottom hinge preventing the door from opening further. If the unit is flush-mounted with adjacent cabinetry, the door opens to 120 degrees.
▶ Use caution when opening the door so adjacent cabinetry will not be damaged.
Installing the Wooden Shelves
- Open the door completely.
- Line up the shelf notches with the rail posts on both the right and left sides.
- Push the shelf down and then push it all the way inwards until the shelf fully rests inside of the unit and you are able to close the door.
- The shelf should glide smoothly back and forth. If it does not, you may need to remove it and start over.
TIP: To prevent damaging the door gasket, make sure to open the door fully before pulling the shelves out of their track.
Removing the Wooden Shelves
- Open the door completely.
- Remove all of the contents loaded on the shelf, if applicable.
- Line up the shelf notches with the rail posts as indicated below. This will require you to hold on to both rails as you move the shelf to line up the posts with the notches on both sides of the shelf.
- Evenly lift the shelf up and then pull the shelf out.

Carbon Filter
A built-in carbon filter protects your wine by acting as a natural barrier against harmful odors. The carbon filter should be replaced every 3-6 months depending on the unit's exposure level to odor. If the unit is placed in a kitchen, regular replacement every three months is ideal.
Remove the carbon filter by turning counterclockwise to unlock from rear panel.
Carbon Filter Replacement Part #: ZOF-C004

natural_image
Simple line drawing of a circular object with grid pattern and two handles, no text or symbols present.If the unit is unplugged, power lost, or turned off, you must wait 3 to 5 minutes before restarting the unit. If you attempt to restart before this time delay, the appliance may not start and will not keep the last set temperature.
Using the Control Panel

This wine cooler has a temperature range from 40°F-65°F.
Power Button

Press and hold this button for three seconds to power your unit on or off. While the unit is on, the R "Compressor Running" light may illuminate to indicate the internal compressor is active.
Increase Temperature

Press this button to increase the temperature by one (1) degree increments. 65^ F is the highest available temperature on this unit.

Decrease Temperature

Press this button to decrease the temperature by one (1) degree increments. 40^ F is the lowest available temperature on this unit.

Interior Light
Press this button to cycle through the different internal light settings. There are three light settings: Cloud White, Deep Blue and Amber.
°F/°C Selector
Hold the Increase and Decrease Temperature buttons at the same time to switch the display temperature.
NOTE: The wine cooler is equipped with a temperature memory function. If power is suddenly lost, the previous set temperature will be saved, and the cooler will return to this setting once power is restored.
Internal Light
This refrigerator is equipped with side internal lights that can be set to Cloud White, Deep Blue or Amber. Because the unit comes with a glass door, the inside will be seen whether the door is open or closed.
You can choose to display each color of light in two different modes: Display mode and Automatic Mode.*
Display Mode
The internal lights will stay constantly illuminated whether the door is open or closed. Display mode is a custom/user-defined function, not a regular day-to-day function.
Automatic Mode
The internal lights will illuminate each time the door is opened and fade off once the door is closed. This feature is triggered by a sensor located on the front vent, this sensor allows the refrigerator to recognize when the door is open or closed.
*The default mode is Automatic Mode. To change between modes, press and hold the Interior Lights button for 3 seconds.
Door Open Alarm
After 3 minutes of the door being open an alarm will sound and the display will flash with 00.
Sabbath Mode
Sabbath mode disables system responses to user-initiated activities and all external functions, including lighting, display and audible alarms. The unit will still maintain internal temperatures and set points.
To enable or disable Sabbath mode, Press the Power Button and simultaneously press the Increase Temperature Button twice. The interior light and control display will go dark until the user disables Sabbath mode.
NOTE: Although the display will not be visible, the temperature settings will remain active and preserve the internal temperature. Sabbath mode will remain active until it is disabled by the user.
Demonstration Mode
In this mode, the compressor and fans never turn on but all other functions remain enabled. When in Demonstration Mode, the "R" indicator light will slowly blink indicating it is in Demonstration Mode.
To enable or disable Demonstration mode, hold Power Button and tap Decrease Temperature Button twice.
Temperature Alarm
If the interior temperature is higher than 73^ F ( 23^ C), “HI” is shown on the temperature control panel and the temperature alarm will sound continuously after one hour. This indicates that the inner temperature is too high. If the inner temperature is lower than 32^ F ( 0^ C), “LO” is shown on the temperature display panel and the temperature alarm will sound continuously after one hour. If one of these situations occur, please reference the troubleshooting section for support.
Defrosting
The wine cooler is designed with an automatic defrost system. However, on colder settings, some frost may build up. Additionally, the more humid the ambient conditions, the more frost may build up. Keep the door closed as much as possible and avoid opening the door unnecessarily to minimize frost build-up.
If frost is preventing the door from closing properly, you may need to power the unit off until the frost melts (possibly up to 24 hours). Use a soft absorbent towel to dry the unit.

WARNING

Never attempt to remove frost with a sharp object.
Normal Sounds
Your new wine cooler may make sounds that are not familiar to you. Most of the new sounds are normal. Hard surfaces like the floor or walls can make the sounds seem louder than they actually are. The following describes the kinds of sounds that might be new to you and what may be making them.
▶ Rattling noises may come from the flow of the refrigerant or the water line.
Items stored on top of the wine cooler can also make noises.
The high efficiency compressor may make a pulsating or high-pitched sound.
▶ Water running from the evaporator to the water bin may make a splashing sound.
As each cycle ends, you may hear a gurgling sound due to the refrigerant flowing in your wine cooler.
▶ You may hear air being forced over the condenser by the condenser fan.
Cleaning the Unit
Periodic cleaning and proper maintenance will ensure efficiency, top performance, and long life.
Interior Cleaning
- Disconnect power to the unit.
- Open the door and remove the contents and shelves.
- With a clean cloth, wipe down the interior of the unit.
- Reinsert the shelves and wine.
- Reconnect power to the unit.
Exterior Cleaning
The door and cabinet may be cleaned with a mild detergent and lukewarm water solution such as two (2) tablespoons of baking soda to one (1) quart of water. Do not use solvent based or abrasive cleaners. Use a soft sponge and rinse with clean water. Wipe with a soft clean towel to prevent water spotting. If the door panel is stainless steel, it can discolor when exposed to chlorine gas and moisture. Clean stainless steel with a cloth dampened with a mild detergent and warm water solution. Never use an abrasive or caustic cleaning agent.
Power Failure
Most power failures are corrected within a few hours and should not affect the temperature of your appliance if you minimize the number of times the door is opened. If the power is going to be off for a longer period of time, you need to take the proper steps to protect your contents.
Moving Your Wine Cooler
Remove all items.
▶ Securely tape down all loose items (shelves) inside your appliance.
▶ Turn the adjustable leg all the way up (clockwise) to the base to avoid damage.
▶ Tape the door shut.
Be sure the appliance stays secure in the upright position during transportation. Also protect outside of appliance with a blanket, or similar item.
Energy Saving Tips
The appliance should be located in the coolest area of the room, away from heat producing appliances, and out of the direct sunlight.
▶ Ensure that the unit is adequately ventilated. Never cover air vents.
▶ Only open the door for as long as necessary.
| Possible Problem Possible Cause Solutions | ||
| The appliance does not operate. | Not plugged in. | Ensure the appliance is plugged in and the power outlet has power. |
| The appliance is turned off. Turn on the | appliance. | |
| The circuit breaker tripped or has a blown fuse. | Replace the broken fuse or reset the breaker. | |
| Sabbath mode may be enabled. | See the Operating Your Appliance section and verify if Sabbath mode is disabled. | |
| The appliance is not cold enough. | Temperature control setting is too high. | Adjust the set temperature. |
| External environment may require a higher setting. | Keep the appliance away from sunshine or other heat sources. | |
| The door is opened too frequently or for long periods of time. | Close the door tightly and do not open the door too frequently or for a long period of time. | |
| The door gasket is not sealed properly. | Ensure the door gasket is not loose. | |
| Demonstration mode may be enabled. | See the Operating Your Appliance section and verify if Demonstration mode is disabled. | |
| The cooler does not have sufficient ventilation. | Read and follow the “Installation Clearance Requirements” in the Installation Instructions section. | |
| The cooler has restricted air flow due to too much storage. | Open space in the cabinet to allow air flow. | |
| The appliance turns on and off frequently. | The room temperature is hotter than normal. | Run the refrigerator at the appropriate ambient temperature. |
| The door gasket is not sealed properly. | Ensure the door gasket is not loose. | |
| The door is opened too frequently or for long periods of time. | Close the door tightly and do not open the door too frequently or for a long period of time. | |
| The cooler does not have sufficient ventilation. | Read and follow the “Installation Clearance Requirements” in the Installation Instructions section. | |
| The door is not closed completely | Make sure the door is completely closed. | |
| The body of the appliance is electrified. | The unit is not properly grounded. | Contact your local electrician to test your electrical grounding system. |
| Frost is forming in the appliance. | The environment is too humid. | The unit uses an ‘auto-defrost’ system, under certain conditions, manual defrosting may be required. If frost builds up, you can try running the refrigerator on a warmer temperature setting, minimizing the number of times you open the door or unplugging the unit to allow the frost to melt. |
| The ambient temperature is too low. | ||
| The door is being opened too frequently. | ||
| The appliance makes too much noise. | The rattling noise may come from the flow of the refrigerant, which is normal. As each cycle ends, you may hear gurgling sounds caused by the flow of refrigerant in the appliance. | It is normal that as each cooling cycle ends, you may hearing ratting or gurgling sounds caused by the flow of refrigerant in the appliance. The high efficiency compressor may make a pulsating or high pitched sound. |
| Contraction and expansion of the inside walls may cause popping and cracking noises. | Some popping or cracking noises are normal. They are caused by expansion and contraction of the inside walls due to temperature changes. | |
| The unit is not level or is touching another appliance. | Check to make sure the cooler is level and that it is non in contact with another appliance or furniture. | |
| The door will not close properly. | The appliance is not level. | Make sure the appliance is on a level surface. |
| The door gasket is not installed correctly. | Make sure the door gasket is properly installed. | |
| The gasket is dirty. Clean the door gasket. | The shelves correctly. | |
Zephyr Ventilation, LLC (referred to herein as “we” or “us”) warrants to the original consumer purchaser (referred to herein as “you” or “your”) of Zephyr products (the “Products”) that such Products will be free from defects in materials or workmanship as follows:
Five Year Limited Warranty for Compressor: For five years from the date of your original purchase of the Products, we will provide, free of charge, compressor parts to replace those that failed due to manufacturing defects subject to the exclusions and limitations below. We may choose, in our sole discretion, to repair or replace parts before we elect to replace the Products.
Two Year Limited Warranty for Parts: For two years from the date of your original purchase of the Products, we will provide, free of charge, Products or parts (including LED light bulbs, if applicable) to replace those that failed due to manufacturing defects subject to the exclusions and limitations below. We may choose, in our sole discretion, to repair or replace parts before we elect to replace the Products.
One Year Limited Warranty for Labor: For one year from the date of your original purchase of the Products, we will provide, free of charge, the labor cost associated with repairing the Products or parts to replace those that failed due to manufacturing defects subject to the exclusions and limitations below. After the first year from the date of your original purchase, you are responsible for all labor costs associated with this warranty.
To Obtain Service Under Limited Warranty: To qualify for warranty service, you must: (a) notify us at the address or telephone number stated below within 60 days of the discovery of the defect; (b) give the model number and serial number; and (c) describe the nature of any defect in the Product or part. At the time of the request for warranty service, you must present evidence of your proof of purchase and proof of the original purchase date. If we determine that the warranty exclusions listed above apply or if you fail to provide the necessary documentation to obtain service, you will be responsible for all shipping, travel, labor and other costs related to the services. This warranty is not extended or restarted upon warranty repair or replacements.
Warranty Exclusions: This warranty covers only repair or replacement, at our option, of defective Products or parts and does not cover any other costs related to the Products including but not limited to: (a) normal maintenance and service required for the Products and consumable parts such as filters, light bulbs, fuses; (b) any Products or parts which have been subject to freight damage, misuse, negligence, accident, faulty installation or installation contrary to recommended installation instructions, improper maintenance or repair (other than by us); (c) commercial or government use of the Products or use otherwise inconsistent with its intended purpose; (d) natural wear of the finish of the Products or wear caused by improper maintenance, use of corrosive and abrasive cleaning products, pads, and oven cleaner products; (e) chips, dents or cracks caused by abuse or misuse of the Products; (f) service trips to your home to teach you how to use the Products; (g) damage to the Products caused by accident, fire, floods, acts of God; or (h) Custom installations or alterations that impact serviceability of the Products. (I) Damage to personal property or food spoilage from use of this product. If you are outside our service area, additional charges may apply for shipping costs for warranty repair at our designated service locations and for the travel cost to have a service technician come to your home to repair, remove or reinstall the Products. After the first year from the date of your original purchase, you are also responsible for all labor costs associated with this warranty. All Products must be installed by a qualified professional installer to be eligible for warranty repairs or service.
Limitations of Warranty: OUR OBLIGATION TO REPAIR OR REPLACE, AT OUR OPTION, SHALL BE YOUR SOLE AND EXCLUSIVE REMEDY UNDER THIS WARRANTY. WE SHALL NOT BE LIABLE FOR INCIDENTAL, CONSEQUENTIAL OR SPECIAL DAMAGES ARISING OUT OF OR IN CONNECTION WITH THE USE OR PERFORMANCE OF THE PRODUCTS. THE EXPRESS WARRANTIES IN THE PRECEDING SECTION ARE EXCLUSIVE AND IN LIEU OF ALL OTHER EXPRESS WARRANTIES. WE HEREBY DISCLAIM AND EXCLUDE ALL OTHER EXPRESS WARRANTIES FOR THE PRODUCTS, AND DISCLAIM AND EXCLUDE ALL WARRANTIES IMPLIED BY LAW, INCLUDING THOSE OF MERCHANTABILITY AND FITNESS FOR A PARTICULAR PURPOSE. Some states or provinces do not allow limitations on the duration of an implied warranty or the exclusion or limitation of incidental or consequential damages, so the above limitations or exclusions may not apply to you. To the extent that applicable law prohibits the exclusion of implied warranties, the duration of any applicable implied warranty is limited to the same two-year and one-year periods described above if permitted by applicable law. Any oral or written description of the Products is for the sole purpose of identifying the Products and shall not be construed as an express warranty. Prior to using, implementing or permitting use of the Products, you shall determine the suitability of the Products for the intended use, and you shall assume all risk and liability whatsoever in connection with such determination. We reserve the right to use functionally equivalent refurbished or reconditioned parts or Products as warranty replacements or as part of warranty service. This warranty is not transferable from the original purchaser and only applies to the consumer residence where the Product was originally installed located in the United States and Canada. This warranty is not extended to resellers.
Please check our website for any additional Product information, www.zephyronline.com.
MAR20.0201
Congratulations on the purchase of your Zephyr product! Please take a moment to register your new Zephyr product at www.zephyronline.com/registration
IT'S IMPORTANT
Prompt registration helps in more ways than one.
- Ensures warranty coverage should you need service.
- Ownership verification for insurance purposes.
- Notification of product changes or recalls.

Zephyr Ventilation | 2277 Harbor Bay Pkwy. | Alameda, CA 94502 | 1.888.880.8368
PRW24C02BPG
EN Use, Care, and Installation Guide
natural_image
Technical line drawing of a multi-level rack cabinet with ventilation grilles and cooling fins (no text or symbols)

natural_image
Warning symbol: black triangle with exclamation mark (no text or numbers)natural_image
Exploded view diagram of mechanical parts including bracket, mounting plate, and multiple screw holes (no text or labels)natural_image
Technical diagram of a wall-mounted panel assembly with curved internal structure and mounting holes (no text or symbols)natural_image
Simple horizontal line with two vertical bars at the bottom (no text or symbols)Zephyr Presrv pro handle
natural_image
Simple horizontal line with two side rectangles at top and bottom (no text or symbols)Filtre à charbon
natural_image
Simple line drawing of a circular object with grid pattern and two handles, no text or symbols present.Most power failures are corrected within a few hours and should not affect the temperature of your appliance if you minimize the number of times the door is opened. If the power is going to be off for a longer period of time, you need to take the proper steps to protect your contents.
- Page Safety Information 4-11
- Product Specifications 14-17
- Installation Instructions....18-23
- Operating Your Appliance 24-26
- Care and Maintenance.... 27-28
- Troubleshooting.... 29-30
- Your safety and the safety of others are very important.
- DANGER
- WARNING
- CAUTION
- General Safety
- For your safety, read all instructions carefully before operating the appliance.
- Save These Instructions
- Disposal of Old Appliance
- Before Using Your Appliance
- Installation of Your Appliance
- Attention
- Electrical Connection
- For Your Records
- Model Number:
- Serial Number:
- Date of Purchase:
- Product Summary
- Internal Storage
- Dimensions
- Installation Clearance Requirements
- Installing the Overlay Panel
- Installing the Handle
- Zephyr Presrv Contemporary Handles
- Zephyr Presrv Pro Handle
- Reversing the Door Swing of Your Appliance
- Installing the Wooden Shelves
- Removing the Wooden Shelves
- Carbon Filter
- Using the Control Panel
- Power Button
- Increase Temperature
- Decrease Temperature
- Interior Light
- °F/°C Selector
- Internal Light
- Display Mode
- Automatic Mode
- Door Open Alarm
- Sabbath Mode
- Demonstration Mode
- Temperature Alarm
- Defrosting
- Normal Sounds
- Cleaning the Unit
- Interior Cleaning
- Exterior Cleaning
- Power Failure
- Moving Your Wine Cooler
- Energy Saving Tips
- IT'S IMPORTANT
- PRW24C02BPG
- Filtre à charbon
Brand : Zephyr
Model : PRW24C02BPG
Category : Refrigerator