
EDV705HQWA - Tumble dryer ELECTROLUX - Free user manual and instructions
Find the device manual for free EDV705HQWA ELECTROLUX in PDF.


| Product Type | Tumble Dryer |
| Brand | Electrolux |
| Model | EDV705HQWA |
| Dimensions (H x W x D) | 850 x 600 x 610 mm |
| Power Supply | 220-240 V / 50 Hz (220-230 V / 60 Hz for Philippines) |
| Total Power (Heater/Motor) | 1500/150 W |
| Minimum Fuse Protection | 10 A |
| Capacity | 7.0 kg |
| Drying Programs | Cottons, Mixed, Synthetics, Fast 40, Delicates, Bedding, Refresh, Time Drying |
| Dryness Levels | Extra Dry, Cupboard Dry, Iron Dry |
| Temperature Options | Boost, Low, Airing (no heat) |
| Delay Start | 30 min to 20 hours (1 hour increments) |
| Anti-Crease Function | Yes (up to 2 hours extra) |
| Control Lock | Yes |
| Lint Filter | Front, clean after each load |
| Installation Options | Floor, workbench, inverted mounting (using included kit) |
| Venting Options | Front or rear (using kit, max 2 m length, 100 mm diameter) |
| Reversing Drum Action | Yes (clockwise and anticlockwise) |
| Safety Features | Door safety switch, overheating protection, child lock |
| Warranty | Manufacturer’s warranty (adherence to manual required) |
Frequently Asked Questions - EDV705HQWA ELECTROLUX
User questions about EDV705HQWA ELECTROLUX
0 question about this device. Answer the ones you know or ask your own.
Ask a new question about this device
Download the instructions for your Tumble dryer in PDF format for free! Find your manual EDV705HQWA - ELECTROLUX and take your electronic device back in hand. On this page are published all the documents necessary for the use of your device. EDV705HQWA by ELECTROLUX.
USER MANUAL EDV705HQWA ELECTROLUX
| REVISION: DATE: DETAIL: | REQUESTED BY: REMARK: | ||
| 001 06 Oct 2018 | New Release K. Manassapong 32 Pages | (ENGLISH-BAHASA) | |
COLOUR
Gray Scale1


Electrolux
| BRAND Electrolux | User Manual for modelEDV705HQWAEDV805JQWAA12554104 | TITLE |
| BY Worawoot K. | ||
| DATE - | ||
| SCALE 100% | ARTWORK NO.: G0020097 001 | |
This drawing contains confidential information and is the property of Aktiebolaget Electrolux, Stockholm, Sweden. Without its permission, it may not be copied, shown, or handed to a third party, or otherwise used. It is to be returned promptly upon request to Aktiebolaget Electrolux.
EN - Tumble Dryer
Photograph the camera icon located on your product's serial tag, including the 4 dots (●).


Send it in via Line, Facebook Messenger, or go online.

@eluxreg

eluxreg

eluxreg.com

Enjoy many privileges.*
*Terms and conditions apply.
WE'RE THINKING OF YOU
Thank you for purchasing an Electrolux appliance. You've chosen a product that brings with it decades of professional experience and innovation. Ingenious and stylish, it has been designed with you in mind. So whenever you use it, you can be safe in the knowledge that you'll get great results every time. Welcome to Electrolux.
Important Information that may impact your Manufacturer's Warranty
Adherence to the directions for use in this manual is extremely important for health and safety. Failure to strictly adhere to the requirements in this manual may result in personal injury, property damage and affect your ability to make a claim under the Electrolux manufacturer's warranty provided with your product. Products must be used, installed and operated in accordance with this manual. You may not be able to claim on the Electrolux manufacturer's warranty in the event that your product fault is due to failure to adhere to this manual.
Visit our website to:

Get usage advice, brochures, trouble shooter, service information, buy accessories & spare parts, online product registration : www.electrolux.com
CUSTOMER CARE AND SERVICE
We recommend the use of original spare parts. When contacting Service, ensure that you have the following data available. The information can be found on the rating plate. Model, PNC, Serial Number.
⚠ Warning / Caution-Safety information. i General information and tips Environmental information.
Subject to change without notice.
CONTENTS
- IMPORTANT SAFETY INSTRUCTIONS
1.1 Dryer Safety 3 1.2 Fire Hazards 3 1.3 Cleaning The Lint Filter 4 1.4 Drying Guide 4
- INSTALLATION INSTRUCTIONS 5
- USE
3.1 The Control Panel 7
3.2 Operating Sequence 10
- HINTS.... 11
- TROUBLESHOOTING
5.1 Troubleshooting 13
5.2 Customer center 14
- TECHNICAL DATA 15

IMPORTANT SAFETY INSTRUCTIONS 1.
1.1 Dryer Safety
Failure to follow these safety instructions could damage the dryer or your clothes.
You may then not be covered by warranty for this damage.
Only plug this appliance directly into an AC power supply, which is properly earthed and has the correct voltage.

See the serial number sticker located on the bottom of the door opening for voltage information.
CAUTION: If this appliance is supplied from a cord extension set or electrical portable outlet device, the cord extension set or electrical portable outlet device must be positioned so that it is not subject to splashing or ingress of moisture. For safety reasons, we strongly advise against the use of double adaptors, extension cords, or power boards.

This appliance is not intended for use by persons (including children) with reduced physical, sensory, or mental capabilities, or lack of experience and knowledge, unless they have been given supervision or instruction concerning use of the appliance by a person responsible for their safety.
Children should be supervised to ensure that they do not play with the appliance.

IMPORTANT:
- If the electrical cord of this appliance is damaged, it must be replaced by the manufacturer, an authorized service agent, or a similarly qualified person in order to avoid a hazard. These dryers are intended for drying clothes, towels, and linen at home. Do not use them for any other purpose.
- Lint must not be allowed to accumulate around the tumble dryer.
- Do not dry unwashed items in the tumble dryer.

WARNING:
Never stop a tumble dryer before the end of the drying cycle unless all items are quickly removed and spread out so that the heat is dissipated.
1.2 Fire Hazards
Some fabrics are not suitable for tumble drying. The following MUST NOT be placed in your dryer due to the risk of fire or explosion:
- Items that have been spotted or soaked with vegetable oil, cooking oil, suntan oil, linseed oil, salad oil, lubrication oil, or grease. Oil-affected items can ignite spontaneously, especially when exposed to heat sources such as in a tumble dryer. The items become warm, causing an oxidation reaction in the oil. Oxidation creates heat. If heat cannot escape, the items can become hot enough to ignite. Piling, stacking, or storing oil-affected items can prevent heat from escaping and create a fire hazard. If it is unavoidable that fabrics containing vegetable or cooking oil, or contaminated by hair care products, be placed in a tumble dryer, they should first be washed in hot water with extra detergent - this will reduce, but not eliminate, the hazard.
The final part of the tumble dryer cycle occurs without heat (cooling cycle) to ensure that the items are left at a temperature that ensures they will not be damaged.
- Items that have previously been cleaned in, washed in, or spotted with petrol/gasoline, industrial chemicals used only for cleaning, dry-cleaning solvents, or other flammable or explosive substances are highly flammable. Highly flammable or explosive substances commonly found around the house include acetone (nail polish remover), denatured alcohol, petrol/gasoline, kerosene, some spot removers, turpentine, waxes, and wax removers. These should not be put in the dryer. Items containing foam rubber (also known as latex foam) or similarly textured rubber-like materials can produce fire by spontaneous combustion when heated.
- Rubber-backed articles, clothes fitted with foam rubber pads, pillows, rubber boots, and rubber-coated sports shoes.
For your safety, and to reduce the risk of fire or explosion, DO NOT store or use petrol or other inflammable vapors and liquids near your dryer.
1.3 Cleaning the Lint Filter 1.4 Drying Guide
LINT BUILD-UP IS A FIRE HAZARD
A clean lint filter reduces drying times, saves energy, and avoids overheating. Overheating may also damage your clothes.
What happens if I forget to clean the lint filter?

Number of usages with an unclean lint filter (based on laboratory tests using a load of new towels)

The lint filter is located at the front of your dryer at the bottom of the door opening.
You must clean this lint filter after every load.

To remove the lint filter, open the door and press the two pads together. Pull the lint filter out of the pocket.
Open apart the lint filter and wipe or peel off the lint.
Ensure the lint filter "clicks" when replacing. It can be inserted into the pocket only one way.
• Never operate your dryer without the lint filter. - Do not allow lint to build up around your dryer. - A torn or damaged lint filter must be replaced immediately. • Overloading can increase lint build-up because the airflow is reduced.
To avoid potential fire hazards, we recommend that you pay a qualified service technician to periodically clean your dryer. You must do this also when you change your mounting from upright to inverted, or vice versa.
Your load, when dry, must not exceed the rated capacity.
• 7.0 kg for the EDV705HQWA, 8.0 kg for the EDV805JQWA dryer (See page 12 for a table of average weights of laundry items).
Always check your labels for the drying symbol which this international Care Labelling Code now uses.

• Permanent press and synthetics - take out as soon as the dryer stops to reduce wrinkles.
• Woollen articles - not recommended. Pull them to their original shape, then dry them flat.
- Woven and loop knit materials - may shrink, by varying amount, depending on their quality. Do not use the "Boost" setting for these fabrics. Always stretch them out immediately after drying.
- Fibre or leather materials - always check the manufacturer's instructions.
- Baby clothes and night gowns - acrylic clothing or sleepwear use only on the "Low Heat" setting.
- Rubber and plastics - Do not dry any items made from or containing rubber or plastics, such as aprons, bibs, babies' water proof napkins, curtains, tablecloths, shower caps, clothes fitted with foam rubber pads, pillows, galoshes, or rubber coated tennis shoes.
- Fibreglass - not recommended, glass particles left in the dryer could be picked up by your clothes the next time you use the dryer and irritate your skin.
Fabric softeners or similar products should not be used in a tumble dryer to eliminate the effects of static electricity unless this practice is specifically recommended by the manufacturer of the fabric softener or product.
Note: We strongly advise against the use of fabric conditioners of the sheet type that are added to the clothes in the drum. These products may lead to rapid blockage of the lint filter and inefficient operation of your dryer.
INSTALLATION INSTRUCTIONS
You can choose to put your dryer:
- on the floor. • on a work bench. • on a wall upside down, using the included mounting kit.

Inverted Place Dryer Program Inverted Mode
You can setting inverted mode follow instruction on page 6.
Normal Place Dryer
The appliance must not be installed behind a lockable door, a sliding door or a door with a hinge on the opposite side to that of the tumble dryer in such away that a full opening of the tumble dryer door is restricted.

The exhaust grille has a range of positions, which allows you to select the optimum exhaust air angle. Simply hold the grille and rotate it until it hits the built-in stop.

There are 2 VENTING OPTIONS
- Front • Rear - using an included kit
Important: Use only kits approved by Electrolux with your dryer.
The exhaust duct must not exceed 2 metres in length at 100mm diameter.
If connecting the dryer to a common ducting system, safety advice should be requested from the manufacturer.
If you choose to use the included kit, the exhaust grille at the front of the dryer will need to be replaced with the outlet cover from the back of the dryer. Gently prise open the grille, using a thin bladed tool. Next, remove the cover from the back and clip it into the grille space at the front. The exhaust grille is not required when using a vent kit.

Do not install your dryer in a cupboard or small unventilated room.
You can position the vent kit at the back of the dryer to remove air upwards or sideways.


Inlet and outlet points need clear airflow to prevent overheating, so ensure there is adequate ventilation (i.e., open window or external door).
If a venting kit is used and the exhaust is discharged out of the room, there must be adequate ventilation to avoid the back flow of gases into the room from appliances burning other fuels, including open fires, when operating the tumble dryer. This is not applicable where a venting hose is directed to an open window. The exhaust air must not be discharged into a flue which is used for exhausting fumes from appliances burning gas or other fuels.
Inverted Mounting Mode
To set the appliance to Inverted Mounting Mode, press and hold Program & Time buttons for 3 seconds. Wait for the play tone and press KeyAccept to confirm, and the inverted mode will operate on display.
![graph TD A["Program"] --> B["Dryness"] B --> C["Temp"] C --> D["Time"] style A fill:#f9f,stroke:#333 style B fill:#ccf,stroke:#333 style C fill:#cfc,stroke:#333 style D fill:#fcc,stroke:#333 note right of B "Hold touch pad Program and Time 3 seconds." note right of C "Extra Anticrease"](/content/2026/05/948635/images/dffed7e174096203c92defa450600067807b5673e40f563b1462ceb7240bf86a.jpg)

(Note: Set Machine upside down)
Program control for inverted mounting mode
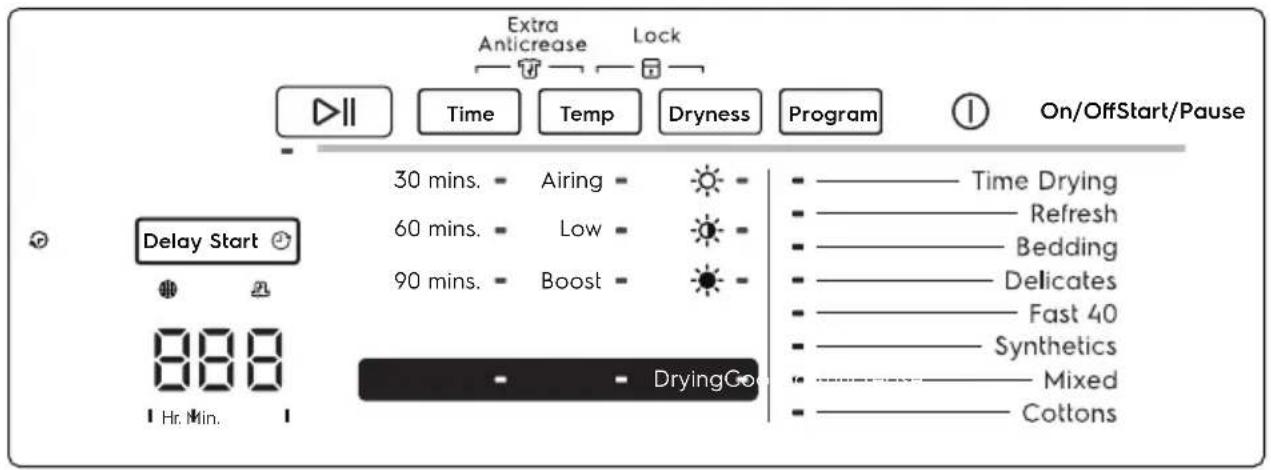
USE 3.

1 ON/OFF BUTTON
This button is used to switch the appliance ON or OFF.
2 PROGRAM SELECTOR BUTTON
Press or touch the Program Selector button to choose the dry program. The table "Your Program Guide" shown on page 10 will help you in selecting the right program. Once you select a dry program, the light will stay at that program position for the whole dry cycle.
3 SETTING DRYNESS MODE
Press this touchpad to set the dryness level. The display will show the selected option.
- Extra dry
- Cupboard dry
- Iron dry
- Dryness level settings are based on the Dry program selected.
i NOTE:
- Dryness level is not allowed on the "TIME DRYING" program.
- Dryness level can change following the main program.
Dryness Option Guidelines:
| Level of dryness Type of fabric | |
| Extra Dry [4DZZ]Ideal for towels or similar | Cotton and linen (bathrobes, bath towels) |
Cupboard Dry  Suitable for items to put away without ironing Suitable for items to put away without ironing | Cotton and linen (bathrobes, bath towels) |
| Synthetics and mixed fabrics (jumpers ,blouses, underwear, household linen) | |
Iron Dry  Suitable for ironing Suitable for ironing | Cotton and linen (sheets, tablecloths, shirts, etc.) |
4 START / PAUSE BUTTON
▷||
Start/Pause
The user needs to press or touch the [Start / Pause] button once to pause the appliance. The displayed hours and minutes will blink. This button allows you to start or pause the dryer to check the contents or perhaps add more clothes.
NOTE:
- This mode has a standby mode for saving energy when the user does not operate any program within 5 minutes.
- The dryer will not start unless the door is closed.
5 DISPLAY
The display shows the following information.

After selecting a program, the duration is displayed in hours and minutes (for example, 3:10 which means 3 hours and 10 minutes). The duration is calculated automatically based on the maximum recommended load for each type of fabric.
6 PROGRESS INDICATORS
6.1 DRY CYCLE IN PROGRESS

After the program has started, the dry time remaining is updated every minute.
6.2 COOLING CYCLE IN PROGRESS

After the drying process finishes, the cooling process will operate and switch off the heater. The cooling indicator blinks until the cooling process finishes. This process releases heat from the clothes and provides crease protection.
After this process finishes, the machine will show "END" and the lint filter indicator.

The user can remove the clothes after this process.
6.3 ANTI-CREASE CYCLE IN PROGRESS

- This process will operate after the end of the cycle to protect clothes from wrinkles.
- After the cooling process finishes and the display shows "END", the "Anticrease" indicator will show and blink until the end of the cycle. The machine will rotate the drum clockwise and counterclockwise for about 1 hour.
i NOTE:
- The user can remove clothes at any time during this process by opening the door, and the machine will stop the "Anticrease" process.
6.4 EXTRA ANTI-CREASE CYCLE IN PROGRESS

This dryer can add extra time for anticrease by pressing and holding "TEMP" and "TIME" for 2 seconds. The display will show "TV" indicator and add 2 hours of time.
i NOTE:
- Extra Anticrease should be set on the initial main program.
7 LOCK (☐)
This option is used to protect against changing the program while the machine is still operating, but the ON/OFF button can still be used.
To Activate "LOCK"
Press and hold "Dryness" and "Temp" for 2 seconds. The display will show "LOC".

Display
To Deactivate "LOCK"
Press and hold "Dryness" and "Temp" for 2 seconds. The display will show "unL".

Display
NOTE:
- It is recommended to activate the Lock after operating the program.
8 DELAY START
- This dryer can set a delay start time of 30, 60, 90 minutes, and from 2 hours to 20 hours in 1-hour increments.
- To set this option, choose the drying time and press "Delay start". The display will show the time and a lock icon.
- The user can select the time and press the Start/Pause button.
NOTE:
- It is recommended to select the program before setting the delay start option.
CHANGE AND CANCEL DELAY START
- After the user sets the delay start, the machine will wait to operate.
Change time
- Press Start/Pause and then press Delay start. The time will reset to 0h, and the user can select the time again. When finished, press Start/Pause to start the delay again.
Cancel time
- Press Start/Pause and press Delay start, time will reset to 0h and press Start/Pause for normal operate program
9 TIME DRYING
This mode gives you the option of selecting different Time for drying. Time button is pressed during setup, the display will only light up part of the segmented display to indicate which mode is being selected
- 90 mins.
- 60 mins.
- 30 mins.

After the program has started, the time remaining is
updated every minute
10 TEMP option
Press the "Temp" button to select either Boost or Low from the option program.
| Option | Definition |
| Boost | For drying most fabrics. |
| Low | For drying delicates and synthetics at lower heat for maximum care of the fabrics. The Low Heat setting will cause the heater to cycle on for shorter time than the Boost setting. |
| Airing | This setting does not heat. ONLY circulate the air in the dryer to shake out dust and refresh clothes. |
i "Airing" is NOT available in Drying program.
3.2 Operating Sequence
Step 1
Load your dryer loosely until it is no more than TWO THIRDS FULL. Clothes must tumble freely in a dryer. Don't crem them in. Wet clothed fluff up when dry.

Overloading will :
Reduce efficiency
Increase drying time
Increase the risk of creasing.

Do not load clothes or other articles which are dripping wet or have sand and grit on them into your dryer.
Step 2
Switch on and Close the door
The dryer will not operate unless the door fully pressed in.

Step 3
Press then release the On/Off button on the control panel.
You are now ready to select your drying Program.

i See program table guides for load size info.
* Do not select the "Extra Dry" option for delicates fabric such polyester as shrinking may occur.
*To obtain the best drying results with small loads it is recommended to use "Time drying" program.
Program Table Guides
| Program Textile Type Info | Load Size Info (Max.)* | |
| Cotton | Ideal for towels or similar such as cotton and linen. | Full [IMAGE] |
| Mixed | Select this cycle to dry everyday fabrics including cottons, linens and sheets. | Half [IMAGE] |
| Synthetics | Suitable for synthetics such as polyester. | 3.5 kg [IMAGE] |
| Fast 40 | Select this cycle to dry everyday fabrics, cotton or blended fabrics that need to be dried quickly. | 2 kg [IMAGE] |
| Delicate | For drying delicate clothing and Synthetics. | 3.5 kg [IMAGE] |
| Bedding | For Bedding clothing | Half |
| Refresh | Refreshing items that have been in storage for long time (a short cycle with warm temp). | 3-5 pcs (dry items) |
| 90 min. | For drying most fabrics, cotton. | 4 kg [IMAGE] |
| 3 kg60 min. | ||
| 1.5 kg 80 min. | ||
* Depend on model of Dryer
Programs Cottons, Mixed, Synthetics, Fast 40, Delicates, Bedding, and Refresh do not allow selecting drying time.
The Time Drying program does not allow selecting Dryness and Temp.
When a new program is selected while the dryer is already running, the drying process will continue using the settings from the new program.
For best results, we recommend sorting your laundry according to fabric type and spin drying at the highest speed available in your washing machine.

WARNING: Never stop a tumble dryer before the end of the drying cycle unless all items are quickly removed and spread out so that the heat is dissipated.
Reversing Action
The drum is designed to rotate in both directions, clockwise and anti-clockwise. This reduces tangling and gives more even drying in a shorter time.
Step 4
Turn off the machine by pressing the "ON/OFF" button. When you have finished using the dryer, turn off the power, then switch off at the power point. It is recommended to power off the appliance when not in use.
Step 5
Clean Lint Filter

After every load, clean the lint filter to reduce drying time and avoid overheating.
Checking the Load
To check the dryness or add clothes during the cycle, simply open the door. The dryer will beep several times indicating the door is open. If further drying is required, close the door and then press the Start/Pause button to continue.
For the best drying performance, only add or remove clothes at the beginning of the drying cycle.
Last Memory Setting
Next time you turn your dryer on it will be ready to go as it remembers the last program, temperature, and option setting used. You can change the setting if you wish.
Hints 4.
- Never tumble dry the following: delicate items such as net curtains, woollen, silk, fabric with metal trim, nylon tights, bulky materials such as anoraks, blankets, eiderdown, sleeping bags, feather quilts, and any item containing rubber foam or materials similar to foam rubber.
- Do not place in your dryer undergarments such as bras and corsets that contain metal reinforcements. Your dryer may be damaged if metal parts were to come loose from the garment. Place such items in a bag designed for this purpose.
Check and empty pockets. Clips, pens, nails, and pins can damage both the dryer and your clothes. Other items such as matches or cigarette lighters will cause a fire.
- Close all press studs, hooks, eyes, and zips that may catch on something else. Tie all belts and apron strings to prevent tangling.
- Drying time will depend on fabric type and construction, load size, and wetness. Save time and money and always spin the load as dry as possible in your washing machine. • Always clean the lint filter - this will reduce drying time and save you money. • The laundry must be thoroughly spun before tumble drying.
- Easy-care items, e.g., shirts, should be briefly pre-spun before drying (depending on their crease resistance, approximately 30 seconds).
- To avoid static charge when drying is completed, use either a fabric softener when you are washing the laundry or a fabric conditioner specifically for tumble dryers.
- Remove the laundry when the dryer has finished drying.
- Do not over-dry laundry; this avoids creasing and saves energy. • Clothes or towels containing sand or grit should be washed first.
- Due to variations in dryer load, fabric texture, and thickness, it is possible that not all items will be dried evenly. If you experience uneven dryness on the Cupboard program, please use either Extra Dry or Timer Program, but be mindful of the type of fabric being dried to avoid overdrying certain types of fabric. Always follow drying instructions attached to the items intended to be dried in a clothes dryer.
- Drying time will also be affected by voltage fluctuations, room temperature and humidity. Clothes will dry more slowly on a cool or humid day.
- For best results, sort the load according to fabric. Such as heavy items which may take longer to dry, eg. towels, flannelette sheets, etc. than ones which dry quickly, eg. poly/cotton shirts and sheets.
- Avoid drying dark clothes with light coloured items such as towels as lint will show on the dark clothes.
- Note: Some fabrics will collect lint from other clothes and items. Separate the lint "givers" and the lint "collectors" to minimise this problem.
- Clothes that give lint include towels, nappies, chenille. Clothes that collect lint include corduroy, synthetics and permanent press garments.
- If individual items are still damp after drying, set a 30 minutes post drying time. This will be necessary particularly for multilayered items (eg. collars, pockets, etc).
- To help you, here is a list of the average weights of some common laundry items.
| Sheet | 700 - 1000g |
| Tablecloth | 400 - 500g |
| Kitchen towel | 70 - 120g |
| Table napkin | 50 - 100g |
| Towelling hand towel | 150 - 250g |
| Bathrobe | 1000 - 1500g |
| Men's shirt | 200 - 300g |
| Pillowcase | 100 - 200g |
| Men's pyjamas | 400 - 500g |
| Ladies nightdress | 200 - 250g |
| Bath towel | 300 - 400g |
TROUBLESHOOTING 5.
5.1 Troubleshooting
Check the points listed here before you call for help, and make sure that you have followed the Important Safety Instructions on pages 3 and 4.
| Problem | Possible causes |
| The dryer will not start: | Plug is not firmly in socket, or power not turned on.You have blown a fuse.Check the power point with another appliance.You have not closed the dryer door or pushed in the door safety switch button. |
| Your clothes are still wet: | The selected drying time was insufficient. Select a longer time setting.Longer time may be needed when the room temperature is 10 °C or less.Check that the lint filter is not blocked.Check to see that you have read all the instructions carefully.Contact the Service Center if you are still having problems. Write down the model and serial numbers and the date of purchase before you ring. The Service Center will need this information. |
Possible Failures
Certain problems are due to lack of simple maintenance or oversights, which can be solved easily without calling out an engineer. Before contacting your local Service Centre, please check possible cause of malfunction and solution listed below.
Once the problem has been eliminated, press the Start/Pause button to restart the program. If after all checks, the problem persists, contact your local Service Centre.

WARNING! Deactivate the appliance before you do the checks.
Alarm Code:
| E40 | The appliance door is open or not closed correctly. Please check the door! |
| E40 | The main supply is unstable. Wait until the main supply is stable. |
| E91 | No communication between electronic elements of the appliance. Switch off and switch on again. |
Important
To operate efficiently the clothes dryer must have an unrestricted air supply and exhaust ventilation.
Service calls resulting from installation where ventilation is restricted are not covered by warranty.
THE COST OF THIS TYPE OF CALL WILL BE CHARGED TO THE CUSTOMER
Should you require further instructions in the use and care of your clothes dryer please contact the CUSTOMER CENTER on the phone number listed below:
5.2 Customer Center
Thailand
Electrolux Customer Care
Tel : (+66 2) 725 9000
Electrolux Thailand Co., Ltd.
Electrolux Building
14th Floor 1910 New Petchburi Road,
Bangkapi, Huay Kwang, Bangkok 10310
Email: customercare@electrolux.co.th
Indonesia
Tel: (+62 21) 522 7180
Plaza Kuningan - Menara Utara 2nd Fl. Suite 201
JI. HR. Rasuna Said
Kav. C11-14, Jakarta 12940
Office Tel: (+62 21) 522 7099
Office Fax: (+62 21) 522 7099
Email: customercare@electrolux.co.id
Vietnam
Domestic Toll Free: 1800-58-88-99
76 Le Lai Street, Ben Thanh Ward, District 1,
Ho Chi Minh City.
Office Tel: (+84 8) 3910 5465
Office Fax: (+84 8) 3910 5470
Email: vncare@electrolux.com
Malaysia
Domestic Toll Free: 1300-88-11-22
Electrolux Home Appliances Sdn. Bhd.
7th Floor, Tower 2, Jaya33,
No. 3, Jalan Semangat, Seksyen 13,
46100 Petaling Jaya, Selangor
Office Tel: (+60 3) 7843 5999
Office Fax: (+60 3) 7955 5511
Email: Malaysia.customercare@electrolux.com
Philippines
Domestic Toll Free: 1-800-10-845-care 2273
Customer Care Hotline: (+63 2) 845 care 2273
Electrolux Phils Inc.
25th Floor, Equitable Bank Tower 8751
Paseo De Roxas, Makati City,
1226 Philippines
Office Tel : (+63 2) 845 4510
Office TeleFax : (+63 2) 845 4543
Office Fax : (+63 2) 845 4548
Email: wecare@electrolux.com
Singapore
Tel : (+65) 6507 8699
Electrolux S.E.A. Pte Ltd.
11 Lorong 3 Toa Payoh
Jackson Square, Block B, #01-13/14/15
Singapore 319579
Office Tel : (+65) 6507 8900
Office Fax : (+65) 6356 5489
Email: customer-care.sin@electrolux.com.sg
6. TECHNICAL DATA

| Dimensions (H/W/D) | 850x600x610 mm |
| Power supply (Voltage / Frequency) | 220-240 V / 50 Hz(220-230/60Hz for Philippines) |
| Total power (Heater/Motor) | 1500/150 W |
| Minimum fuse protection 10 A |
WE'RE THINKING OF YOU
• 7.0 kg for the EDV705HQWA dryer • 8.0 kg for the EDV805JQWA dryer
3. USAGE
3.1 Control Panel
![graph TD A["Cottons"] --> B["Drying"] C["Mixed"] --> B D["Synthetics"] --> B E["Fast 40"] --> B F["Delicates"] --> B G["Bedding"] --> B H["Refresh"] --> B I["Time Drying"] --> B J["On/Off"] --> K["Program"] K --> L["Dryness"] L --> M["Temp"] M --> N["Time"] N --> O["Start/Pause"] P["Progress"] --> Q…](/content/2026/05/948635/images/ed57985db2883e0a350319eab56a6ad43930fa12f5c9fc8a791fc759f491219a.jpg)
1 ON/OFF BUTTON
- Extra Dry
- Cupboard Dry
- Iron Dry

- 90 mins.
- 60 mins.
- 30 mins.

Step 3

Program Table Guide
14th Floor 1910 New Petchburi Road,
Bangkapi, Huay Kwang, Bangkok 10310
Email: customercare@electrolux.co.th
Indonesia
Tel: (+62 21) 522 7180
Plaza Kuningan - Menara Utara 2nd Fl. Suite 201
JI. HR. Rasuna Said
Kav. C11-14, Jakarta 12940
Office Tel: (+62 21) 522 7099
Office Fax: (+62 21) 522 7099
Email: customercare@electrolux.co.id
Vietnam
Domestic Toll Free: 1800-58-88-99
76 Le Lai Street, Ben Thanh Ward, District 1, Ho Chi Minh City.
Office Tel: (+84 8) 3910 5465
Office Fax: (+84 8) 3910 5470
Email: vncare@electrolux.com
Malaysia
Domestic Toll Free: 1-300-88-11-22
Electrolux Home Appliances Sdn. Bhd.
7th Floor, Tower 2, Jaya33
No. 3 Jalan Semangat, Seksyen 13,
46100 Petaling Jaya, Selangor
Office Tel: (+60 3) 7843 5999
Office Fax: (+60 3) 7955 5511
Email: Malaysia.customer.care@electrolux.com
Philippines
Domestic Toll Free: 1-800-10-845-care 2273
Customer Care Hotline: (+63 2) 845 care 2273
Electrolux Phils Inc.
25th Floor Equitable Bank Tower 8751
Paseo De Roxas, Makati City
1226 Philippines
Office Tel: +(63 2) 845 4510
Office TeleFax: +(63 2) 845 4543
Office Fax: +(63 2) 845 4548
Email: wecare@electrolux.com
Singapore
Tel: (+65) 6507 8699
Electrolux S.E.A Pte Ltd
No.11 Lorong 3 Toa Payoh
Jackson Square Block B, #01-13/14/15
Singapore 319579
Office Tel: (+65) 6507 8900
Office Fax: (+65) 6356 5489
Email: customer-care.sin@electrolux.com.sg
TECHNICAL DATA 6.

| Dimensi (Tinggi / Lebar / Panjang) | 850x600x610 mm |
| Catu daya (Tegangan / Frekuensi) 220-240 V~ / 50 Hz | |
| Total daya yang diserap (Heater / Motor) | 1500/150 W |
| Perlindungan sekring minimal | 10 A |
NOTE

Electrolux
Product
Model
Purchaser's Name
Full Postal Address
Retailer (Shop)
Address
Please keep this book and your Proof of Date of Purchase to show the technician if you need service during the warranty period.
Date of Purchase
Serial Number

- ELECTROLUX
- WE'RE THINKING OF YOU
- IMPORTANT INFORMATION THAT MAY IMPACT YOUR MANUFACTURER'S WARRANTY
- VISIT OUR WEBSITE TO
- CUSTOMER CARE AND SERVICE
- CONTENTS
- IMPORTANT SAFETY INSTRUCTIONS
- DRYER SAFETY
- IMPORTANT
- WARNING
- FIRE HAZARDS
- CLEANING THE LINT FILTER 1.4 DRYING GUIDE
- LINT BUILD-UP IS A FIRE HAZARD
- INSTALLATION INSTRUCTIONS
- INVERTED MOUNTING MODE
- PROGRAM CONTROL FOR INVERTED MOUNTING MODE
- USE
- ON/OFF BUTTON
- PROGRAM SELECTOR BUTTON
- SETTING DRYNESS MODE
- I NOTE
- START / PAUSE BUTTON
- ▷
- START/PAUSE
- NOTE
- DISPLAY
- PROGRESS INDICATORS
- DRY CYCLE IN PROGRESS
- COOLING CYCLE IN PROGRESS
- ANTI-CREASE CYCLE IN PROGRESS
- EXTRA ANTI-CREASE CYCLE IN PROGRESS
- LOCK (☐)
- TO ACTIVATE "LOCK
- TO DEACTIVATE "LOCK
- DELAY START
- CHANGE AND CANCEL DELAY START
- CHANGE TIME
- CANCEL TIME
- TIME DRYING
- TEMP OPTION
- OPERATING SEQUENCE
- STEP
- OVERLOADING WILL
- SWITCH ON AND CLOSE THE DOOR
- REVERSING ACTION
- CLEAN LINT FILTER
- CHECKING THE LOAD
- LAST MEMORY SETTING
- HINTS
- TROUBLESHOOTING
- POSSIBLE FAILURES
- CUSTOMER CENTER
- THAILAND
- INDONESIA
- VIETNAM
- MALAYSIA
- PHILIPPINES
- SINGAPORE
- TECHNICAL DATA
- USAGE
- CONTROL PANEL
Brand : ELECTROLUX
Model : EDV705HQWA
Category : Tumble dryer