
DAC060EB1WDB - Air conditioner DANBY - Free user manual and instructions
Find the device manual for free DAC060EB1WDB DANBY in PDF.


| Brand | Danby |
| Model | DAC060EB1WDB |
| Product Type | Window Air Conditioner |
| Cooling Capacity | 6,000 BTU/h (estimated) |
| Power Supply | 115 V ~ 60 Hz, 5.5 A (per nameplate) |
| Dimensions (approx.) | 47 x 38 x 32 cm |
| Weight (approx.) | 22.5 kg |
| Operating Modes | Cool, Dry, Fan, Auto |
| Fan Speeds | Low, Medium, High, Auto |
| Temperature Range | 1 °C increment (Celsius/Fahrenheit switchable) |
| Timer | Programmable On/Off up to 24 h |
| Sleep Function | Increases set temperature by 1 °C/2 °F every 30 min for 1 h, then maintains 6 h |
| Energy Saver Function | Fan runs 3 min after compressor stops, then cycles 2 min every 10 min |
| Follow Me Function | Temperature sensor in remote, sends signal every 3 min, range 8 m |
| Refrigerant | R32 (flammable) |
| Filter Maintenance | Clean every 2 weeks with warm soapy water |
| Exterior Cleaning | Soft or damp cloth; do not use harsh chemicals |
| Grounding | Required (3-prong plug) |
| Warranty | 1 year parts (plastics: 30 days); in-shop service |
| Customer Service | 1-800-263-2629 (Canada/United States) |
Frequently Asked Questions - DAC060EB1WDB DANBY
User questions about DAC060EB1WDB DANBY
0 question about this device. Answer the ones you know or ask your own.
Ask a new question about this device
Download the instructions for your Air conditioner in PDF format for free! Find your manual DAC060EB1WDB - DANBY and take your electronic device back in hand. On this page are published all the documents necessary for the use of your device. DAC060EB1WDB by DANBY.
USER MANUAL DAC060EB1WDB DANBY
Owner's Manual....1 - 17
AIR CONDITIONER
Welcome to the Danby family. We are proud of our quality products and we believe in dependable service. We suggest that you read this owner's manual before plugging in your new appliance as it contains important operation information, safety information, troubleshooting and maintenance tips to ensure the reliability and longevity of your appliance.
Visit www.Danby.com to access self service tools, FAQs and much more. For additional assistance call 1-800-263-2629.
Note the information below; you will need this information to obtain service under warranty.
You must provide the original purchase receipt to validate your warranty and receive service.
Model Number: ____
Serial Number: ____
Date of Purchase: ____
Need Help?
Before you call for service, here are a few things you can do to help us serve you better.
Read this owner's manual:
It contains instructions to help you use and maintain your appliance properly.
If you receive a damaged appliance:
Immediately contact the retailer or builder that sold you the appliance.
Save time and money:
Check the troubleshooting section at the end of this manual before calling. This section will help you solve common problems that may occur.

1-800-26- Danby
(1-800-263-2629)
SAFETY REQUIREMENTS
DANGER: Risk of fire or explosion. Flammable refrigerant used. Do not damage the refrigerant circuit.
- Ensure that servicing is done by factory authorized service personnel, to minimize product damage or safety issues.
- Consult repair manual or owner's guide before attempting to service this product. All safety precautions must be followed.
- Dispose of properly in accordance with federal or local regulations. • Follow handling instructions carefully.
- Keep ventilation openings, in the appliance clear of obstruction.
- Do not use mechanical devices or other means to accelerate the defrosting process. • Children should be supervised to ensure that they do not play with the appliance.
- Do not store or install the appliance near continuously operating ignition sources such as open flames or a gas stove.
- Do not operate near water or in a wet room.
- Do not pierce or burn.
- Be aware that refrigerants may not contain an odor.
- The appliance must be stored so as to prevent mechanical damage from occurring.
All wiring must comply with local and national codes and must be installed by a qualified electrician. Check the available power supply and resolve any wiring problems before installing and operating this appliance.
The rating plate located on the right side of the appliance just above the power cord contains electrical and other technical data.
This appliance is not intended for use by persons (including children) whose physical, sensory or mental capabilities may be different or reduced, or who lack experience or knowledge, unless such persons receive supervision or training to operate the appliance by a person responsible for their safety.
GROUNDING INSTRUCTIONS
This appliance must be grounded. Grounding reduces the risk of electrical shock by providing an escape wire for the electrical current.
This appliance has a cord that has a grounding wire with a 3-prong plug. The power cord must be plugged into an outlet that is properly grounded. If the outlet is a 2-prong wall outlet, it must be replaced with a properly grounded 3-prong wall outlet. The serial rating plate indicates the voltage and frequency the appliance is designed for.
WARNING - Improper use of the grounding plug can result in a risk of electric shock.
Consult a qualified electrician or service agent if the grounding instructions are not completely understood, or if doubt exists as to whether the appliance is properly grounded.
Do not connect your appliance to extension cords or together with another appliance in the same wall outlet. Do not splice the power cord.
Do not under any circumstances cut or remove the third ground prong from the power cord. Do not use extension cords or ungrounded (two prongs) adapters.
If the power supply cord is damaged, it must be replaced by the manufacturer, its service agent or similar qualified person in order to avoid hazard.

CAUTION: RISK OF FIRE
Flammable refrigerant used. When maintaining or disposing of the air conditioner, the refrigerant must not be allowed to vent into the open air.

Important Safety Information READ AND FOLLOW ALL SAFETY INSTRUCTIONS
Any person involved with working on the refrigerant circuit should hold a current, valid certificate from an industry accredited assessment authority which authorizes their competence to handle refrigerants safely in accordance with an industry recognized assessment specification.
Servicing shall only be performed as recommended by the manufacturer. Maintenance and repair requiring the assistance of other skilled personnel shall be carried out under the supervision of the person competent in the use of flammable refrigerants.
When maintaining or disposing of the appliance the refrigerant must be recovered properly and should not be allowed to discharge to the air directly.
Information on servicing
- Checks to the area: Prior to beginning work on systems containing flammable refrigerants, safety checks are necessary to ensure that the risk of ignition is minimized. For repair to the refrigerating system, the following precautions shall be complied with prior to conducting work on the system.
- Work procedure: Work shall be undertaken under a controlled procedure so as to minimize the risk of a flammable gas or vapour being present while the work is being performed.
- General work area: All maintenance staff and others working in the local area shall be instructed on the nature of work being carried out. Work in confined spaces shall be avoided. The area around the work space shall be sectioned off. Ensure that the conditions within the work area have been made safe by removing all flammable material.
- Checking for the presence of refrigerant: The area shall be checked with an appropriate refrigerant detector prior to and during work to ensure the technician is aware of potentially flammable atmospheres. Ensure that the leak detection equipment being used is suitable for use with flammable refrigerants, i.e. non-sparking, adequately sealed and intrinsically safe.
- Presence of fire extinguisher: If any hot work is to be conducted on the refrigeration equipment or any associated parts, appropriate fire extinguishing equipment shall be available to hand. Have a dry powder or CO2 fire extinguisher adjacent to the work area.
- No ignition sources: No person carrying out work in relation to a refrigeration system which involves exposing any pipe work that contains or has contained flammable refrigerant shall use any sources of ignition in such a manner that it may lead to risk of fire or explosion. All possible ignition sources including cigarette smoking, should be kept sufficiently far away from the site of installation, repairing, removing and disposal during which flammable refrigerant can possibly be released to the surrounding space. Prior to work taking place, the area around the equipment is to be surveyed to make sure there are no flammable hazards or ignition risks. No smoking signs shall be displayed.
- Ventilated area: Ensure that the area is in the open or that it is adequately ventilated before breaking into the system or conducting any hot work. A degree of ventilation shall continue during the period that the work is carried out. The ventilation should safely disperse any released refrigerant and preferably expel it externally into the atmosphere.
- Checks to the refrigeration equipment: Where electrical components are being changed, they shall be fit for the purpose and to the correct specification. At all times the manufacturer's maintenance and service guidelines shall be followed. If in doubt consult the manufacturer's technical department for assistance.
Important Safety Information READ AND FOLLOW ALL SAFETY INSTRUCTIONS
The following checks shall be applied to installations using flammable refrigerants:
- The charge size is in accordance with the room size within which the refrigerant containing parts are installed.
- The ventilation machinery and outlets are operating adequately and are not obstructed.
- If an indirect refrigerating circuit is being used, the secondary circuit shall be checked for the presence of refrigerant.
- Marking to the equipment continues to be visible and legible. Markings and signs that become illegible must be corrected.
- Refrigeration pipe or components are installed in a position where they are unlikely to be exposed to any substance which may corrode refrigerant containing components, unless the components are constructed of materials which are inherently resistant to being corroded or are suitable protected against being corroded.
- Checks to electrical devices: Repair and maintenance to electrical components shall include initial safety checks and component inspection procedures. If a fault exists that could compromise safety, then no electrical supply shall be connected to the circuit until it is satisfactorily dealt with. If the fault cannot be corrected immediately but it is necessary to continue operation, an adequate temporary solution shall be used. This shall be reported to the owner of the equipment so all parties are advised.
Initial safety checks shall include:
- That capacitors are discharged. This shall be done in a safe manner to avoid possibility of sparking.
- That no live electrical components and wiring are exposed while charging, recovering or purging the system. • That there is continuity of earth bonding.
Repairs to sealed components
- During repairs to sealed components, all electrical supplies shall be disconnected from the equipment being worked upon prior to any removal of sealed covers, etc. If it is absolutely necessary to have an electrical supply to equipment during servicing then a permanently operating form of leak detection shall be located at the most critical point to warn of a potentially hazardous situation.
- To ensure that by working on electrical components the casing is not altered in such a way that the level of protection is affected, particular attention shall be paid to the following:
- Damage to cables, excessive number of connections, terminals not made to original specification, damage to seals, incorrect fitting of glands, etc.
- Ensure the apparatus is mounted securely.
- Ensure that seals or sealing materials have not degraded such that they no longer serve the purpose of preventing the ingress of flammable atmospheres. Replacement parts shall be in accordance with the manufacturer's specifications.
Note: The use of silicon sealant may inhibit the effectiveness of some types of leak detection equipment. Intrinsically safe components do not have to be isolated prior to working on them.
Repair to intrinsically safe components
Do not apply any permanent inductive or capacitance loads to the circuit without ensuring that this will not exceed the permissible voltage and current permitted for the equipment in use. Intrinsically safe components are the only types that can be worked on while live in the presence of a flammable atmosphere. The test apparatus shall be at the correct rating. Replace components only with parts specified by the manufacturer. Other parts may result in the ignition of refrigerant in the atmosphere from a leak.

Important Safety Information READ AND FOLLOW ALL SAFETY INSTRUCTIONS
Cabling
Check that cabling will not be subject to wear, corrosion, excessive pressure, vibration, sharp edges or any other adverse environmental effects. The check shall also take into account the effects of aging or continual vibration from sources such as compressors or fans.
Detection of flammable refrigerants
Under no circumstances shall potential sources of ignition be used in the searching for or detection of refrigerant leaks. A halide torch or any other detector using a naked flame shall not be used.
Leak detection methods
The following leak detection methods are deemed acceptable for systems containing flammable refrigerants:
- Electronic leak detectors shall be used to detect flammable refrigerants but the sensitivity may not be adequate or may need recalibration. Detection equipment shall be calibrated in a refrigerant-free area. Ensure that the detector is not a potential source of ignition and is suitable for the refrigerant used.
- Leak detection equipment shall be set at a percentage of the LFL of the refrigerant and shall be calibrated to the refrigerant employed and the appropriate percentage of gas (25% maximum) is confirmed.
- Leak detection fluids are suitable for use with most refrigerants but the use of detergents containing chlorine shall be avoided as the chlorine may react with the refrigerant and corrode the copper or pipe-work.
- If a leak is suspected, all naked flames shall be removed or extinguished.
- If a leakage of refrigerant is found which requires brazing, all of the refrigerant shall be recovered from the system or isolated by means of shut off valves in a part of the system remote from the leak. Oxygen free nitrogen (OFN) shall then be purged through the system both before and during the brazing process.
Removal and evacuation
When breaking into the refrigerant circuit to make repairs or for any other purpose conventional procedures shall be used. However, it is important that the best practice is followed since flammability is a consideration. The following procedures shall be adhered to:
- Remove refrigerant.
- Purge the circuit with inert gas.
- Evacuate.
- Purge again with inert gas.
- Open the circuit by cutting or brazing.
- The refrigerant charge shall be recovered into the correct recovery cylinders. The system shall be flushed with OFN to render the unit safe. This process may need to be repeated several times. Compressed air or oxygen shall not be used for this task.
- Flushing shall be achieved by breaking the vacuum in the system with OFN and continuing to fill until the working pressure is achieved, then venting to atmosphere and finally pulling down to a vacuum. This process shall be repeated until no refrigerant is within the system. When the final OFN charge is used, the system shall be vented down to atmospheric pressure to enable work to take place. This operation is absolutely vital if brazing operations on the pipe-work are to take place.
- Ensure that the outlet for the vacuum pump is not close to any ignition sources and there is ventilation available.
Charging procedures
In addition to conventional charging procedures, the following requirements shall be followed:
- Ensure that contamination of different refrigerants does not occur when using charging equipment. Hoses or lines shall be as short as possible to minimize the amount of refrigerant contained in them. Cylinders shall be kept upright.
- Ensure that the refrigeration system is earthed prior to charging the system with refrigerant.
- Label the system when charging is complete, if not already labeled.
- Extreme care shall be taken not to overfill the refrigeration system.
- Prior to recharging the system it shall be pressure tested with OFN. The system shall be leak tested on completion of charging but prior to commissioning. A follow up leak test shall be carried out prior to leaving the site.

Important Safety Information READ AND FOLLOW ALL SAFETY INSTRUCTIONS
Decommissioning
Before carrying out this procedure, it is essential that the technician is completely familiar with the equipment in all its detail. It is recommended good practice that all refrigerants are recovered safely. Prior to the task being carried out, an oil and refrigerant sample shall be taken in case analysis is required prior to re-use of reclaimed refrigerant. It is essential that electrical power is available before the task is commenced.
A. Become familiar with the equipment and its operation. B. Isolate system electrically. C. Before attempting the procedure ensure that: - Mechanical handling equipment is available if required for handling refrigerant cylinders. - All personal protective equipment is available and being used correctly. - The recovery process is supervised at all times by a competent person. - Recovery equipment and cylinders conform to the appropriate standards. D. Pump down refrigerant system, if possible. E. If a vacuum is not possible, make a manifold so that refrigerant can be removed from various parts of the system. F. Make sure that cylinder is situated on the scales before recovery takes place. G. Start the recovery machine and operate in accordance with the manufacturer's instructions. H. Do not overfill cylinders. No more than 80% volume liquid charge. I. Do not exceed the maximum working pressure of the cylinder, even temporarily. J. When the cylinders have been filled correctly and the process is completed, make sure that the cylinders and the equipment are removed from the site promptly and all isolation valves on the equipment are closed off. K. Recovered refrigerant shall not be charged into another refrigeration system unless it has been cleaned and checked.
Labeling
Equipment shall be labeled stating that it has been decommissioned and emptied of refrigerant. The label shall be dated and signed. Ensure that there are labels on the equipment stating the equipment contains flammable refrigerant.
Recovery
When removing refrigerant from a system, either for servicing or decommissioning, it is recommended good practice that all refrigerants are removed safely.
When transferring refrigerant into cylinders, ensure that only appropriate refrigerant recovery cylinders are employed. Ensure that the correct number of cylinders for holding the total system charge are available. All cylinders to be used are designed for the recovered refrigerant and labeled for that refrigerant, i.e., special cylinders for the recovery of refrigerant. Cylinders shall be complete with pressure relief valve and associated shut-off valves in good working order. Empty recovery cylinders are evacuated and, if possible, cooled before recovery occurs.
The recovery equipment shall be in good working order with a set of instructions concerning the equipment that is at hand and shall be suitable for the recovery of flammable refrigerants. In addition, a set of calibrated weighing scales shall be available and in good working order. Hoses shall be complete with leak-free disconnect couplings and in good condition. Before using the recovery machine, check that it is in satisfactory working order, has been properly maintained and that any associated electrical components are sealed to prevent ignition in the event of a refrigerant leak. Consult the manufacturer if in doubt.
The recovered refrigerant shall be returned to the refrigerant supplier in the correct recovery cylinder and the relevant waste transfer note shall be arranged. Do not mix refrigerants in recovery units and especially not in cylinders. If compressors or compressor oils are to be removed, ensure that they have been evacuated to an acceptable level to make certain that flammable refrigerant does not remain within the lubricant. The evacuation process shall be carried out prior to returning the compressor to the suppliers. Only electric heating to the compressor body shall be employed to accelerate this process. When oil is drained from a system, it shall be carried out safely.
INSTALLATION INSTRUCTIONS
LOCATION
This air conditioner is designed for easy installation in single or double hung windows. Since window designs vary, it may be necessary to make some modifications for safe installation.
This air conditioner is not designed for vertical, slider type windows or "through the wall" installation.
Ensure that the window and frame are structurally sound and free from dry or rotted wood.
Install the air conditioner in a window on a side of the building which favors more shade than sunlight. If the appliance must be in direct sunlight, it is advisable to provide a shade awning over the appliance to ensure efficient functioning.
Do not install the appliance where leakage of combustible gas is suspected.
This appliance is designed to evaporate condensation under normal conditions. Under extremely hot or humid conditions, excess condensation may overflow to the outside. The appliance should be installed where condensation cannot drip on pedestrians or neighboring properties.
Provide sufficient clearance around the appliance to allow ample air circulation. The rear of the appliance should be outdoors, it should not be in a garage or another room. Keep the appliance away from obstacles and at least 76 cm (30 inches) above the ground. Ensure that curtains and other obstructions do not block air flow to the appliance.

INSTALLATION INSTRUCTIONS
REQUIRED TOOLS
- Screwdrivers: Phillips and flat head. • Power Drill: 3.2mm (1/8in.) diameter drill bit
- Pencil • Measuring Tape
- Scissors
- Carpenter's Level
ACCESSORIES
The following accessories are included with the appliance and should be used during the installation.
- 13 mm (1/2 inch) screws (x7)
- 9.5 mm (3/8 inch) screws (x4) (Factory installed on some models.)
- Safety Lock
- Adhesive foam seal
- Regular foam seal
- "L" shaped mounting bracket (Factory installed on some models.)
- Bracket for wood windows (x2)
- Bracket for vinyl windows (x2)
- Weather stripping (x5)
- Foam insert (x2)
- Side curtains (x2)

ASSEMBLY
Note: Images in this manual are for instructional purposes only. The actual shape of the appliance may vary slightly.
Install the "L" Shaped Bracket
Attach the "L" shaped bracket to the top of the cabinet as shown below using the provided 9.5 mm (3/8 inch) screws (x4).
Note: The "L" shaped bracket may come factory installed on some models.

Install the Side Curtains
Attach the side curtains to the cabinet by sliding the curtain frame into the side channel of the cabinet as shown below.
The curtains are labeled "left" and "right" on the frames. This refers to the left and right sides of the appliance when facing the front of the appliance.

INSTALLATION INSTRUCTIONS
INSTALLATION
Cut the regular foam seal to fit the area of the window sill that the air conditioner will rest on.
Place the air conditioner into the window with the "L" shaped mounting bracket positioned in front of the upper sash. The bottom of the cabinet should be positioned on the recessed portion of the window frame. Pull the upper window sash down until it rests just behind the front flange of the "L" shaped mounting bracket.
Expand the side curtains on each side and secure the top of the frames to the window sash using one 13 mm (1/2 inch) screw on each side of the "L" shaped mounting bracket.
Attach the clamps on the lower part of each curtain to the window sill using one 13 mm (1/2 inch) screw on each side of the cabinet.

Place the adhesive foam seal into the opening between the inside and outside windows and attach the safety lock to the outside window frame using two 13 mm (1/2 inch) screws.

Check the Tilt Angle
The air conditioner should be tilted downward towards the outside approximately 3° to 4°. This tilt will encourage any condensed water to drain to the outside. If any condensed water leaks to the inside of the house, check the tilt angle and adjust as necessary.
Measure the tilt angle from the front of the cabinet's edge. The difference in height between the front and the back of the appliance, labeled "A" on the image below, should be approximately 19 mm - 2.5 cm (3/4 inch - 1 inch).

Install the Foam Inserts
The foam inserts can block any cracks or spaces in the side curtains and help maintain the energy efficiency of the appliance.
After the appliance is installed in the window, measure the width of the side curtains from the side of the appliance to the edge of the curtain.
If necessary, cut the foam insert to the correct size and then slide the foam insert into the slots in the side curtain. The supplied weather stripping can be used to block any other cracks or spaces as required.

OPERATING INSTRUCTIONS
FEATURES
- Cabinet
- Exterior Air Inlet
- Interior Air Outlet
- Interior Air Inlet
- Control Panel
- Air Filter (not pictured)

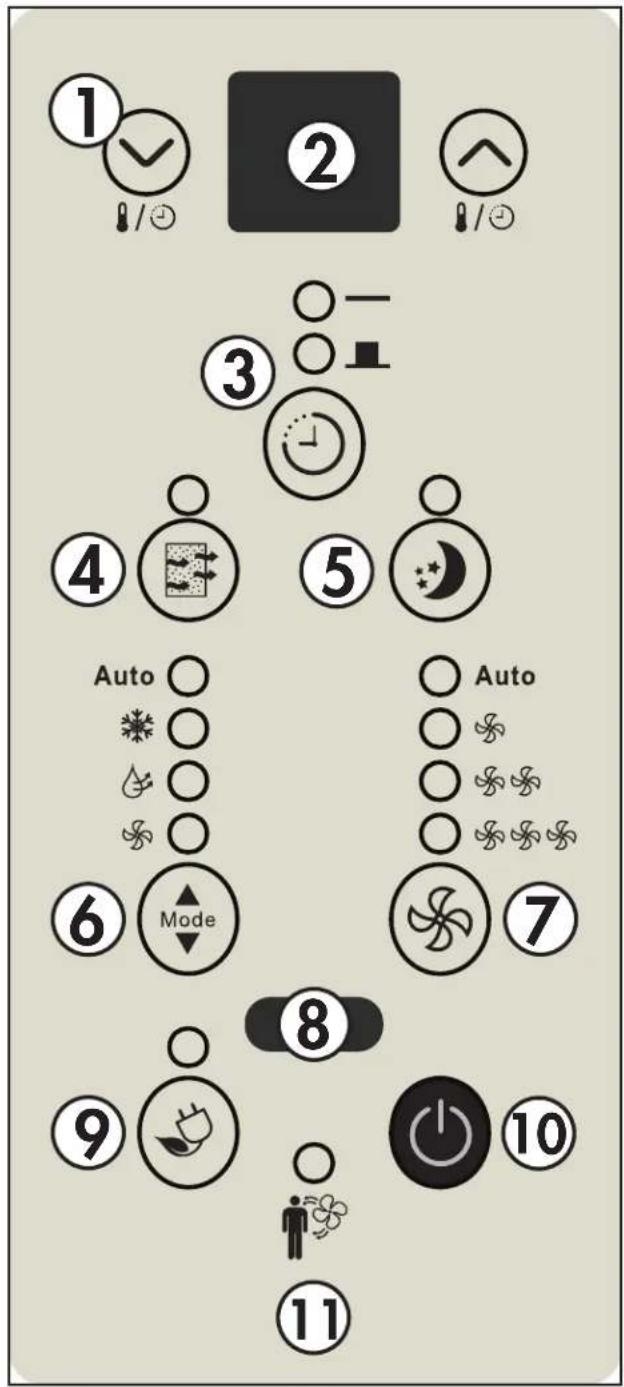
CONTROL PANEL
- Up and Down Arrows: Used to adjust the set temperature in 1° increments and the timer function in 30 minute increments up to 10 hours and then in 1 hour increments up to 24 hours.
- Display Panel: Displays the set temperature, the ambient temperature and the timer settings. To change the temperature scale being displayed, press the up and down buttons at the same time.
- Timer Button: Used to set the auto on and auto off timer.
- Filter Button: The indicator light will illuminate as a reminder to check the filter. Once the filter has been cleaned, use this button to resume operation.
- Sleep Button: Used to set the Sleep function.
- Mode Button: Used to choose the operating mode.
- Fan Button: Used to set the fan speed. The fan can be set to Low, Medium, High and Auto.
- Remote Control Receiver: Ensure this receiver is not obscured by curtains or other items as it could impact remote control functioning.
- Energy Saver Button: Used to set the energy saver function.
- Power Button: Used to turn the appliance on or off.
- Follow Me Indicator Light: Illuminates when the Follow Me function is active. Follow Me can only be set from the remote control.
- Mode Button: Used to choose the operating mode.
- Energy Saver Button: Used to set the energy saver function.
- Follow Me Button: Used to set the Follow Me function.
- Sleep Button: Used to set the Sleep function.
- LED Button: Press to turn the LED backlight on or off.
- Clock Button: Press and hold the button for 3 seconds to set the clock. Press the Up and Down Arrows to adjust the time in 10-minute intervals.
Note: The clock feature is only available on the remote; the appliance does not have a clock. The remote clock is a 24-hour clock only.
- Cancel Button: Cancels current Timer settings.
- Timer Button: Used to set the auto on and auto off timer.
- Fan Button: Used to set the fan speed. The fan can be set to Low, Medium, High, and Auto.
- Up and Down Arrows: Used to adjust the set temperature in 1° increments and the timer function in 30-minute increments up to 10 hours, then in 1-hour increments up to 24 hours.
- Default Button: Press to restore the remote control default settings.
- Lock Button: Press this button to lock the remote control and prevent the settings from being inadvertently changed.

OPERATING INSTRUCTIONS
REMOTE CONTROL BATTERIES
The remote control requires two AAA alkaline batteries (included). Batteries should be replaced when:
a) No sound is heard when attempting to program the appliance. b) The appliance does not respond to a command issued by the remote control.
Battery replacement:
- Slide the rear cover on the remote in the direction of the arrow.
- Insert two AAA batteries following the same orientation depicted inside the battery chamber (+/-).
- Reinstall the rear cover.
- If the remote control will not be used for extended periods of time, the batteries should be removed.
Notes:
- Protect the remote control from high temperatures, and keep it away from radiation exposure.
- Keep the control panel receiver out of direct sunlight.
- Do not mix old and new batteries.
- Do not mix alkaline, standard (carbon-zinc), or rechargeable (ni-cad, ni-mh, etc) batteries.
- The remote operates within a range of 8 meters (26 ft.) from the receiver located inside the main appliance. Any obstruction between the receiver and remote may cause signal interference, limiting the ability to program the main unit.
This Class B digital apparatus complies with the Canadian ICES-003 standard. CAN ICES-3 (B)
This equipment has been tested and found to comply with the limits for a Class B digital device, pursuant to Part 15 of the FCC Rules. These limits are designed to provide reasonable protection against interference in a residential installation.
This equipment generates, uses and can radiate radio frequency energy and, if not installed and used in accordance with the instructions, may cause interference to radio communications. However, there is no guarantee that interference will not occur in a particular installation.
If this equipment does cause interference to radio or television reception, which can be determined by turning the equipment off and on, the user is encouraged to try to correct the interference by one or more of the following measures:
- Reorient or relocate the receiving antenna.
- Increase the separation between the equipment and receiver.
- Connect the equipment into an outlet on a circuit different from that to which the receiver is connected.
- Consult the dealer or an experienced radio/TV technician for help.
Changes or modifications not approved by the party responsible for FCC compliance could void the user's authority to operate the equipment. This appliance complies with Part 15 of the FCC Rules.
Operation is subject to the following two conditions:
- This device may not cause interference.
- This device must accept any interference received, including interference that may cause undesired operation.
OPERATING INSTRUCTIONS
FUNCTION INSTRUCTION
Operating Modes
There are four operating modes to choose from. Press the Mode Button repeatedly to choose the desired mode. The adjacent indicator light will illuminate to show which mode has been selected.
- Cool Mode
Choose Cool Mode to set the cooling function. Use the Up and Down Arrows to choose the desired temperature. When Cool Mode is selected, the fan speed can be adjusted by pressing the fan button.
- Dry Mode
Choose Dry Mode to remove excess moisture from the air during periods of high humidity. All water pulled from the air will condense inside the appliance and drain out the back. The fan speed will be automatically set and cannot be modified in Dry Mode.
- Fan Mode
Choose Fan Mode to run the internal fan without engaging the cooling function. Press the fan button repeatedly to choose the fan speed: Low, Med, High, or Auto.
- Auto Mode
Auto Mode is a pre-set factory program that automatically defines the mode (Cool or Dry) and fan speed based on the set temperature, the ambient temperature, and the ambient humidity.
Timer Function
The Timer Function can be used to turn the appliance on or off after a set period of time.
Auto On Function
- Press the Timer Button once and the Auto On indicator light will illuminate.
- Use the Up and Down Arrows to select the desired amount of time before the appliance should turn on. The Up and Down Arrows will add or subtract time in 30-minute increments up to 10 hours, and then in 1-hour increments up to 24 hours.
- Use the Mode Button to select the desired mode.
- Use the Fan Button to select the desired fan speed.
- The time selected will appear on the display panel and will count down until the appliance turns on.
Auto Off Function
- Press the Timer Button twice and the Auto Off indicator light will illuminate.
- Use the Up and Down Arrows to select the desired amount of time before the appliance should turn off. The Up and Down Arrows will add or subtract time in 30-minute increments up to 10 hours, and then in 1-hour increments up to 24 hours.
- The time selected will appear on the display panel and will count down until the appliance turns off.
Using Auto On and Auto Off Simultaneously
If there is a need for the appliance to turn on, run for a set period of time and then turn off, the Auto On and Auto Off functions can be used at the same time by first setting one and then the other. Both indicator lights will illuminate and the display will count down to the appliance either turning off or on, whichever function was set first.
Note: The timer will not cycle the appliance on and off indefinitely. The Auto On and Auto Off timers will function one time and then the appliance will return to regular functioning.
Turning the appliance off, pressing the default button on the remote or unplugging the appliance will clear all memory settings, including the timer.
OPERATING INSTRUCTIONS
Follow Me Function
There is a temperature sensor built into the remote control that will continuously collect the current room temperature. Keep the remote control with you and the appliance will automatically adjust the set temperature based on the current temperature where you are located to reach the most comfortable condition and temperature.
Press the Follow Me button to activate the Follow Me function. The remote will display the current temperature at its location. The remote will send a signal to the air conditioner every 3 minutes, so long as you remain within range of the appliance.
The Follow Me light on the control panel of the appliance will illuminate for 5 seconds every three minutes to indicate that it has received a signal from the remote. If the appliance does not receive a signal from the remote during any 7 minute interval, it will beep to indicate that the Follow Me mode has ended.
The maximum distance for the Follow Me feature is 8 meters (26 feet). This feature is available in Cool and Auto modes.
Sleep Function
The Sleep Function can be used to conserve energy during sleeping hours.
When selected, the set temperature will increase by 1°C/2°F every half hour for one full hour. The appliance will hold the new set temperature for 6 hours before automatically returning to normal operation.
The Sleep Function can be canceled at any time by pressing the Sleep Button.
Energy Saver Function
The Energy Saver Function will automatically cycle the fan on and off when the compressor is not in use to minimize how often the compressor needs to turn on. This function is available in Cool, Dry, Auto Cool and Auto Fan modes.
The fan will continue to run for 3 minutes after the compressor turns off. The fan will then cycle on for 2 minutes in 10 minute intervals until the ambient temperature is above the set temperature, at which point the compressor will turn on and cooling will resume.
CARE & MAINTENANCE
AIR FILTER
The air filter should be cleaned approximately every 2 weeks. The air filter may require more frequent cleaning if there is significant dander or fur in the air.
Approximately every two weeks, the filter indicator light on the control panel will illuminate as a reminder to clean the filter. Follow the steps below to clean the filter and return the appliance to normal functioning.
- The air filter is located behind the front intake grill. To remove the air filter, grasp the filter tab on the right side of the grill and slide it out to the right. If the front intake grill has two indents, pull the grill forward to remove the air filter.
- Use a vacuum cleaner with a soft brush attachment to remove any large debris or dust build up from the air filter.
- Wash the filter in lukewarm, soapy water, below 40°C (104°F), or use a neutral cleaning agent.
- Rinse the filter with clean water and dry thoroughly before reinstalling in the appliance.
- Press the filter button on the control panel to resume normal functioning.
Note: Do not operate the appliance without the air filter installed.
ERROR CODES
If the display panel shows any of the below error codes, unplug the appliance, let it stand for 5-10 minutes and then plug it back in. If the error persists, call for service.
AS - Room temperature sensor error
HI - Temperature sensor error
LO - Temperature sensor error
. - Evaporator temperature sensor error
CLEANING
To avoid possible electric shock, ensure that the appliance is unplugged before performing any cleaning or maintenance.
The outside of the appliance can be wiped clean with a soft cloth or with a lukewarm, damp cloth if necessary.
Do not use gasoline, benzene, thinner or any other chemicals to clean this appliance as these substances can cause damage to the finish and deformation of plastic parts.
Never pour water directly onto the appliance as this will cause deterioration of electrical components and wiring insulation.
END OF SEASON CARE
Before removing the appliance from service for the year, operate the appliance on high fan mode for half a day to ensure the inside of the appliance is dry. This will help avoid the growth of mold or mildew inside the appliance. Ensure the filter is clean and dry. Store the appliance covered in a dry location.
Note: When installing or removing the appliance from the window, ensure that caution is taken to prevent it from falling backward. It is recommended that installation or removal is completed with assistance to prevent injury to persons or damage to property or the appliance.
DISPOSAL
Check for local regulatory compliance regarding approved and safe disposal of this appliance.
TROUBLESHOOTING
Danby Consumer Care: 1-800-263-2629 or consumerservice@danby.com
Hours of operation:
Monday to Thursday 8:30 am - 6:00 pm Eastern Standard Time
Friday 8:30 am - 4:00 pm Eastern Standard Time
Information in this manual is subject to change without notice.
PROBLEM POSSIBLE CAUSE
| Appliance will not operate | Plug is not fully inserted into the wall outletBlown fuse or circuit breaker |
| Insufficient cooling | Air filter is dirtyBlocked air flowAppliance size is too small for application |
| Noise Inadequate support | in window installation |
| Odors Formation of mold | or mildew on internal wet surfacesPlace an algaecide tablet in base pan; push the tablet through the grill on either side of the appliance |
| Water dripping inside | Appliance is not properly angled to allow water to drain to the outside |
| Water dripping outside | On very hot or humid days dripping water from the back of the appliance is normal |
| Frost build up When outdoor | door temperatures are below 18.3°C (65°F) frost may form when the appliance is in cooling modeSwitch the appliance to fan only mode until the frost melts |
LIMITED "CARRY IN" WARRANTY
This quality product is warranted to be free from manufacturer's defects in material and workmanship, provided that the unit is used under the normal operating conditions intended by the manufacturer.
This warranty is available only to the person to whom the unit was originally sold by Danby Products Limited (Canada) or Danby Products Inc. (U.S.A.) (hereafter "Danby") or by an authorized distributor of Danby, and is non-transferable.
TERMS OF WARRANTY
Plastic parts are warranted for thirty (30) days from the date of purchase, with no extensions provided.
First 12 months
During the first twelve (12) months, any functional parts of this product found to be defective, will be repaired or replaced, at warrantor's option, at no charge to the original purchaser.
To obtain service
Contact the dealer where the unit was purchased, or contact the nearest authorized Danby service depot, where service must be performed by a qualified service technician. If service is performed on the unit by anyone other than an authorized service depot, all obligations of Danby under this warranty shall be void.
It is the responsibility of the purchaser to transport the appliance to the nearest authorized service depot.
Transportation charges to and from the service location are not covered by this warranty and are the responsibility of the purchaser.
Nothing in this warranty shall imply that Danby will be responsible or liable for any spoilage or damage to food or other contents of this appliance, whether due to any defect of the appliance, or its use, whether proper or improper.
EXCLUSIONS
Except as provided herein by Danby, there are no other warranties, conditions, representations, or guarantees, express or implied, made or intended by Danby or its authorized distributors, and all other warranties, conditions, representations, or guarantees, including any warranties, conditions, representations, or guarantees under any Sale of Goods Act or similar legislation or statute, are hereby expressly excluded. Except as provided herein, Danby shall not be responsible for any damages to persons or property, including the unit itself, however caused, or any consequential damages arising from the malfunction of the unit, and by the purchase of the unit, the purchaser hereby agrees to indemnify and hold harmless Danby from any claim for damages to persons or property caused by the unit.
GENERAL PROVISIONS
No warranty or insurance herein contained or set out shall apply when damage or repair is caused by any of the following:
1) Power failure. 2) Damage in transit or when moving the appliance. 3) Improper power supply such as low voltage, defective house wiring, or inadequate fuses. 4) Accident, alteration, abuse, or misuse of the appliance such as inadequate air circulation in the room or abnormal operating conditions (i.e., extremely high or low room temperature). 5) Use for commercial or industrial purposes (i.e., if the appliance is not installed in a domestic residence). 6) Fire, water damage, theft, war, riot, hostility, acts of God such as hurricanes, floods, etc. 7) Service calls resulting in customer education. 8) Improper installation (i.e., building-in of a free-standing appliance or using an appliance outdoors that is not approved for outdoor application, including but not limited to: garages, patios, porches, or anywhere that is not properly insulated or climate controlled).
Proof of purchase date will be required for warranty claims; retain bills of sale. In the event that warranty service is required, present the proof of purchase to our authorized service depot.
Warranty Service
Carry In
Danby Products Limited
PO Box 1778, Guelph, Ontario, Canada N1H 6Z9
Telephone: (519) 837-0920 FAX: (519) 837-0449
1-800-263-2629
04/17
Danby Products Inc
PO Box 669, Findlay, Ohio, U.S.A. 45840
Telephone: (419) 425-8627 FAX: (419) 425-8629
Welcome
1-800-26-Danby
(1-800-263-2629)
SAFETY REQUIREMENTS
CAUTION: FIRE RISK
ASSEMBLY
INSTALLATION INSTRUCTIONS
INSTALLATION
Install foam inserts
OPERATING INSTRUCTIONS
FEATURES

OPERATING INSTRUCTIONS
REMOTE CONTROL BATTERIES
Danby Products Limited
PO Box 1778, Guelph, Ontario, Canada N1H 6Z9
ASSEMBLY

PROBLEM POSSIBLE CAUSE
Danby Products Limited
PO Box 1778, Guelph, Ontario, Canada N1H 6Z9
Telephone: (519) 837-0920 FAX: (519) 837-0449
1-800-263-2629
04/17
Danby Products Inc.
PO Box 669, Findlay, Ohio, U.S.A. 45840
Telephone: (419) 425-8627 FAX: (419) 425-8629
NOTES / REMARKS / NOTAS:
NOTES / REMARKS / NOTAS:
NOTES / REMARQUES / NOTAS :
MODEL • MODÈLE • MODELO
DAC060EB1WDB


- AIR CONDITIONER
- NEED HELP
- READ THIS OWNER'S MANUAL
- IF YOU RECEIVE A DAMAGED APPLIANCE
- SAVE TIME AND MONEY
- SAFETY REQUIREMENTS
- GROUNDING INSTRUCTIONS
- CAUTION: RISK OF FIRE
- IMPORTANT SAFETY INFORMATION READ AND FOLLOW ALL SAFETY INSTRUCTIONS
- INFORMATION ON SERVICING
- REPAIRS TO SEALED COMPONENTS
- REPAIR TO INTRINSICALLY SAFE COMPONENTS
- CABLING
- DETECTION OF FLAMMABLE REFRIGERANTS
- LEAK DETECTION METHODS
- REMOVAL AND EVACUATION
- CHARGING PROCEDURES
- DECOMMISSIONING
- LABELING
- RECOVERY
- INSTALLATION INSTRUCTIONS
- LOCATION
- REQUIRED TOOLS
- ACCESSORIES
- ASSEMBLY
- INSTALL THE "L" SHAPED BRACKET
- INSTALL THE SIDE CURTAINS
- INSTALLATION
- CHECK THE TILT ANGLE
- INSTALL THE FOAM INSERTS
- OPERATING INSTRUCTIONS
- FEATURES
- CONTROL PANEL
- REMOTE CONTROL BATTERIES
- BATTERY REPLACEMENT
- NOTES
- FUNCTION INSTRUCTION
- OPERATING MODES
- COOL MODE
- DRY MODE
- FAN MODE
- AUTO MODE
- TIMER FUNCTION
- AUTO ON FUNCTION
- AUTO OFF FUNCTION
- USING AUTO ON AND AUTO OFF SIMULTANEOUSLY
- FOLLOW ME FUNCTION
- SLEEP FUNCTION
- ENERGY SAVER FUNCTION
- CARE & MAINTENANCE
- AIR FILTER
- ERROR CODES
- CLEANING
- END OF SEASON CARE
- DISPOSAL
- TROUBLESHOOTING
- HOURS OF OPERATION
- LIMITED "CARRY IN" WARRANTY
- TERMS OF WARRANTY
- EXCLUSIONS
- GENERAL PROVISIONS
- WELCOME
- CAUTION: FIRE RISK
- INSTALL FOAM INSERTS
- MODEL • MODÈLE • MODELO
- DAC060EB1WDB
Brand : DANBY
Model : DAC060EB1WDB
Category : Air conditioner