FFMO1611LS - Microwaves FRIGIDAIRE - Free user manual and instructions
Find the device manual for free FFMO1611LS FRIGIDAIRE in PDF.


| Product Type | Microwave Oven |
| Model Number | FFMO1611LS |
| Brand | Frigidaire |
| Power Supply | 120V, 60Hz AC |
| Power Levels | 10 levels (100% to 10%) |
| Cook Time Range | Up to 99 minutes 99 seconds |
| Timer | Yes, up to 99 minutes 99 seconds |
| Clock Display | 12-hour system |
| Child Safety Lock | Yes, touch and hold Stop/Cancel for 3 seconds |
| Sensor Cook | Potato, Meat, Frozen Veggies, Fresh Veggies, Fish/Seafood, Frozen Pizza, Frozen Entree, Reheat |
| Defrost by Weight | Yes, 0.3 to 6.3 lbs |
| Defrost by Time | Yes, up to 99 minutes 99 seconds |
| Popcorn Feature | 3 bag sizes: 1.75 oz, 3.0 oz, 3.5 oz |
| Favorite Memory | Stores up to 3 custom programs |
| One-Touch Cooking | Ready Set for 1, 2, or 3 minutes at 100% power |
| +30 Seconds | Adds 30 seconds at 100% power |
| Multiple Cooking Stages | Up to 2 stages |
| Turntable | Glass tray included |
| Interior Light | Yes |
| Door Interlock System | Safety interlocks |
| Grounding | 3-prong plug, grounded outlet required |
| Installation | Countertop or built-in with trim kit (keep 2 ft away from gas/electric range) |
| Cleaning | Mild detergent, soft cloth; turntable dishwasher safe |
| Warranty | 1 year limited |
| Customer Service | 1-866-312-2117 |
Frequently Asked Questions - FFMO1611LS FRIGIDAIRE
User questions about FFMO1611LS FRIGIDAIRE
0 question about this device. Answer the ones you know or ask your own.
Ask a new question about this device
Download the instructions for your Microwaves in PDF format for free! Find your manual FFMO1611LS - FRIGIDAIRE and take your electronic device back in hand. On this page are published all the documents necessary for the use of your device. FFMO1611LS by FRIGIDAIRE.
USER MANUAL FFMO1611LS FRIGIDAIRE
natural_image
Line drawing of a microwave oven with control panel and display (no text or symbols)Welcome & Congratulations.....2
Important Safety Instructions...3
Features & Specifications......7
Before Operating......8
Manual Operation......9
Sensor Operations......12
Cooking Charts......14
Care & Cleaning......18
Before You Call....19
Warranty....20


Questions or for Service Call:
1-866-312-2117
Product Registration
Be sure to register your product. The self-addressed PRODUCT REGISTRATION CARD should be filled in completely, signed and returned to Electrolux Home Products.
This Use & Care Manual contains general operating instructions for your appliance and feature information for several models. Your microwave may not have all the described features. The graphics shown are representative. The graphics on your microwave may not look exactly like those shown.
Congratulations on your purchase of a new microwave! At Electrolux Home Products, we are very proud of our product and are completely committed to providing you with the best service possible. Your satisfaction is our number one priority.
We know you'll enjoy your new microwave and Thank You for choosing our product. We hope you consider us for future purchases.
PLEASE CAREFULLY READ AND SAVE THESE INSTRUCTIONS
This Use & Care Manual provides specific operating instructions for your model. Use your microwave only as instructed in this manual. These instructions are not meant to cover every possible condition and situation that may occur. Common sense and caution must be practiced when installing, operating and maintaining any appliance.
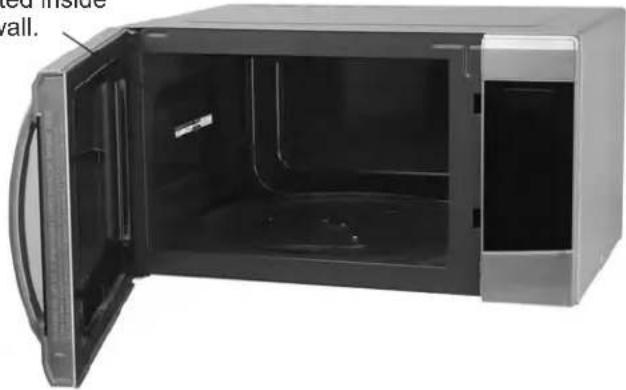
Be sure to record your model and serial number. The serial plate is located inside the cavity on the left side wall. Please refer to page 7 for exact location.
Please record your model and serial number and date of purchase in the spaces provided below for future reference in case your microwave should ever require servicing:
Model Number: ____
Serial Number: ____
Purchase Date: ____
IMPORTANT SAFETY INSTRUCTIONS

What You Need to Know About Safety Instructions
Warning and Important Safety Instructions appearing in the Use & Care Guide are not meant to cover all possible conditions and situations that may occur. Common sense, caution, and care must be exercised when installing, maintaining or operating a microwave.
Always contact your dealer, distributor, service agent or manufacturer about problems or conditions you do not understand.
Recognize Safety Symbols, Words, Labels

DANGER
DANGER - Immediate hazards which WILL result in severe personal injury or death.

WARNING
WARNING - Hazards or unsafe practices which COULD result in severe personal injury or death.

CAUTION
CAUTION - Hazards or unsafe practices which COULD result in minor personal injury.

CAUTION
To avoid personal injury or property damage, observe the following:
- Do not deep fat fry in oven. Fat could overheat and be hazardous to handle.
- Do not cook or reheat eggs in shell or with an unbroken yolk using microwave energy. Pressure may build up and erupt. Pierce yolk with fork or knife before cooking.
- Pierce skin of potatoes, tomatoes, and similar foods before cooking with microwave energy. When skin is pierced, steam escapes evenly.
- Do not operate oven without load or food in oven cavity.
- Use only popcorn in packages designed and labeled for microwave use. Popping time varies depending on oven wattage. Do not continue to heat after popping has stopped. Popcorn will scorch or burn. Do not leave oven unattended.
- Do not use regular cooking thermometers in oven. Most cooking thermometers contain mercury and may cause an electrical arc, malfunction, or damage to oven.
- Do not use metal utensils in oven.
- Never use paper, plastic, or other combustible materials that are not intended for cooking.
- When cooking with paper, plastic, or other combustible materials, follow manufacturer's recommendations on product use.
- Do not use paper towels which contain nylon or other synthetic fibers. Heated synthetics could melt and cause paper to ignite.
- Do not heat sealed containers or plastic bags in oven. Food or liquid could expand quickly and cause container or bag to break. Pierce or open container or bag before cooking.
- To avoid pacemaker malfunction, consult physician or pacemaker manufacturer about effects of microwave energy on pacemaker.
SAVE THESE INSTRUCTIONS

WARNING
Improper use of the grounding can result in electric shock. To avoid risk of electrical shock or death, this oven must be grounded and plug must not be altered.
GROUNDING INSTRUCTIONS
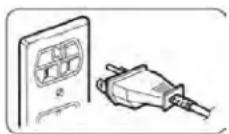
Oven MUST be grounded.
In the event of an electrical short circuit, grounding reduces risk of electric shock by providing an escape wire or the electric current if an electric short occurs. This oven is equippe with a cord having a grounding wire with a grounding plug. The plug mus be plugged into an outlet that is properly installed and grounded. See Installation Instructions.
Consult a qualified electrician or servicer if grounding instructions are not completely understood, or if doubt exists as to whether the oven is properly grounded. Do not use an extension cord. If the product power cord is too short, have a qualified electrician install a three-slot receptacle. This oven should be plugged into a separate 60 hertz circuit with the electrical ratting as shown in specifications table. When the oven is on a circuit with other equipment, an increase in cooking times may be required and fuses can be blown. Microwave operates on standard household current, 120V.

WARNING
a. A short power-supply cord is provided to reduce the risks resulting from becoming entangled in or tripping over a longer cord.
b. Longer cord sets or extension cords may be used if care is exercised in their use.
c. If a long cord or extension cord is used:
-
The marked electrical rating of the cord set or extension cord set should be at least as great as the electrical rating of the appliance.
-
The extension cord must be a grounding-type 3-wire cord.
-
The longer cord should be arranged so that it will not drape over the countertop or tabletop where it can be tripped over, snagged, or pulled on by children or tripped over unintentionally.
If you use an extension cord, the interior light may flicker and the blower sound may vary when the microwave oven is on. Cooking times may be longer, too.
Federal Communications Commission Radio Frequency Interference Statement (U.S.A. Only)
This equipment generates and uses ISM frequency energy and if not installed and used properly, that is in strict accordance with the manufacturer's instructions, may cause interference to radio and television reception. It has been type tested and found to comply with limits for ISM Equipment, pursuant to part 18 of FCC Rules, which are designed to provide reasonable protection against such interference in a residential installation.
However, there is no guarantee that interference will not occur in a particular installation. If this equipment does cause interference to radio or television reception, which can be determined by turning the equipment off and on, the user is encouraged to try to correct the interference by one or more of the following:
- Reorient the receiving antenna of the radio or television.
- Relocate the microwave oven with respect to the receiver.
- Move the microwave oven away from the receiver.
- Plug the microwave oven into a different outlet so that the microwave oven and the receiver are on different branch circuits.
The manufacturer is not responsible for any radio or television interference caused by unauthorized modification to this microwave oven. It is the responsibility of the user to correct such interference.
SAVE THESE INSTRUCTIONS
IMPORTANT SAFETY INSTRUCTIONS

PRECAUTIONS TO AVOID POSSIBLE EXPOSURE TO EXCESSIVE MICROWAVE ENERGY
Adhere to the following precautions:
- DO NOT attempt to operate this oven with the door open since open door operation can result in harmful exposure to microwave energy. It is important not to defeat or tamper with the safety interlock switches.
- DO NOT place any object between the oven front face and the door or allow soil or cleaner residue to accumulate on sealing surfaces.
- DO NOT use any cleaning materials on the oven door gasket. Doing so could cause damage.
- DO NOT operate the oven if it is damaged. It is particularly important that the oven door close properly and that there is no damage to:
- door (bent),
- hinges and latches (broken or loosened),
- door seals and sealing surfaces.
- Oven should not be adjusted or repaired by anyone except properly qualified service personnel.
Radio Interference
- Operation of the microwave oven may cause interference to your radio, TV or similar equipment.
- When there is interference, it may be reduced or eliminated by taking the following measures:
1) Clean door and sealing surface of the oven
2) Reorient the receiving antenna of radio or television.
3) Relocate the microwave oven with respect to the receiver.
4) Move the microwave oven away from the receiver.
5) Plug the microwave oven into a different outlet so that microwave oven and receiver are on different branch circuits.
WARNING
Liquids such as water, coffee, or tea are able to be overheated beyond the boiling point without appearing to be boiling due to surface tension of the liquid. Visible bubbling or boiling when the container is removed from the microwave oven is not always present. THIS COULD RESULT IN VERY HOT LIQUIDS SUDDENLY BOILING OVER WHEN THE CONTAINER IS DISTURBED OR A UTENSIL IS INSERTED INTO THE LIQUID.
To reduce the risk of injury to persons:
- Do not overheat the liquid.
- Stir the liquid both before and halfway through heating it.
- Do not use straight-sided containers with narrow necks.
- After heating, allow the container to stand in the microwave oven for a short time before removing the container.
- Use extreme care when inserting a spoon or other utensils into the container.
SAVE THESE INSTRUCTIONS

WARNING
When using electrical appliances, basic safety precautions should be followed to reduce the risk of burns, electric shocks, fire or injury to persons or exposure to excessive microwave energy.
- READ ALL instructions before using oven.
- READ AND FOLLOW the specific "PRECAUTIONS TO AVOID POSSIBLE EXPOSURE TO EXCESSIVE MICROWAVE ENERGY" on page 5.
- This appliance must be grounded. Connect only to properly grounded outlet. See GROUNDING INSTRUCTIONS found on Page 4
- Install or locate this oven ONLY in accordance with the installation instructions in this Use & Care Manual.
- Some products such as whole eggs and sealed containers -for example, closed jars -are able to explode and SHOULD NOT be HEATED in this oven.
- Use this oven ONLY for its intended use as described in this Use & Care Manual. Do not use corrosive chemicals or vapors in this oven. This type of oven is specifically designed to heat, cook, or dry food. It is not designed for industrial or laboratory use.
- As with any appliance, CLOSE SUPERVISION necessary when used by CHILDREN or INFIRM PERSONS
- DO NOT operate this oven if it has a damaged cord or power plug, if it is not working properly, or if it has been damaged or dropped.
- This oven, including power cord, must be serviced ONLY by qualified service personnel. Special tools are required to service oven. Contact nearest authorized service facility for examination, repair, or adjustment.
- DO NOT cover or block any vents or openings on the oven.
-
DO NOT store this oven outdoors. DO NOT use this appliance near water -for example, near a kitchen sink, in a wet basement, near a swimming pool or similar locations.
-
DO NOT immerse cord or plug in water.
- Keep cord AWAY from HEATED surfaces.
- DO NOT let cord hang over edge of table or counter.
-
Review the door cleaning instructions in the Care & Cleaning section.
-
To avoid the risk of fire in the oven cavity, injury to persons, or exposure to excessive microwave energy.
a. DO NOT overcook food. Carefully attend oven when paper, plastic or other combustible materials are placed inside the oven to facilitate cooking.
b. Remove wire twist-ties from paper or plastic bags before placing bag in oven.
c. If materials inside the oven ignite, keep oven door CLOSED, turn oven off and disconnect the power cord, or shut off power at the fuse or circuit breaker panel.
d. DO NOT use this oven cavity for storage. DO NOT leave paper products, cooking utensils or food in the cavity when not in use.
-
Liquids such as water, coffee, or tea are able overheated beyond the boiling point without appearing to be boiling due to surface tension of the liquid. Visible bubbling or boiling when the container is removed from the microwave oven is not always present. THIS COULD RESULT IN VERY HOT LIQUIDS SUDDENLY BOILING OVER WHEN A SPOON THE CONTAINER IS DISTRURBED OR A UTENSIL IS INSERTED INTO THE LIQUID.
-
DO NOT heat baby bottles in oven.
-
Baby food jars shall be open when heated and contents stirred or shaken before consumption, in order to avoid burns.
-
DO NOT use this oven for commercial purposes. It is made for household use only.
-
May be built into a cabinet structure, but not for use adjacent to (within 2 feet of) any gas or electric range, cooktop, or oven. Please install the trim kit according to the Trim Kit Installation Instruction.
SAVE THESE INSTRUCTIONS
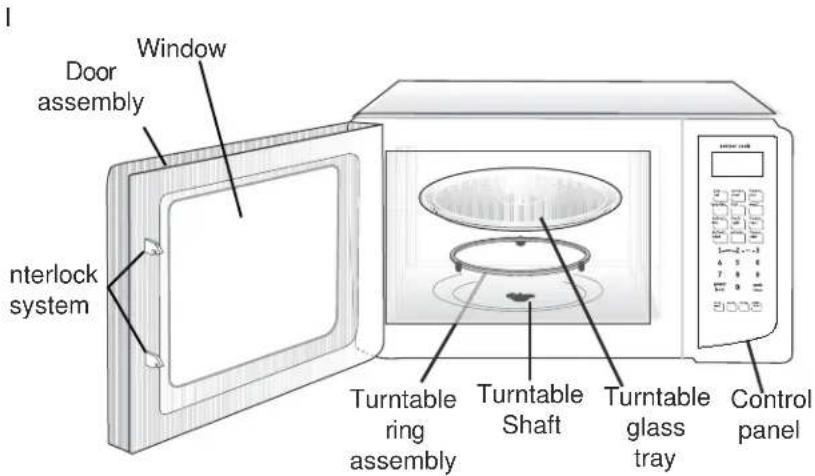
Features & Specifications

The rating label is located inside the cavity on left side wall.
natural_image
Interior view of a microwave oven with open door and lid (no text or symbols visible)Microwave features
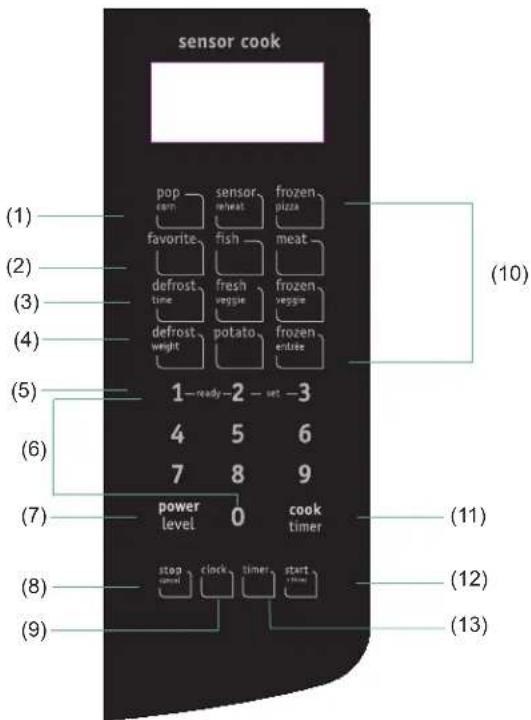
Control panel
(1) Popcorn
(2) Favorite
(3) Time defrost
(4) Weight Defrost
(5) Ready set button
(6) Number Keys
(7) Power level (10 power level available)
(8) Stop/Cancel:
clears all previous settings pressed before cooking starts.
During cooking: press once to stop oven; twice to stop and clear all entries.
(9) Clock
(10) Auto menu
(11) Cook time r
(12) Start/+30Sec.
(13) Timer
Before Operating
Learn more about your microwave oven
- To avoid risk of personal injury or property damage, do not operate the microwave oven empty.
- To avoid risk of personal injury or property damage, do not use stoneware, aluminum foil, metal utensils, or metal trimmed utensils in the microwave oven.
Setting the clock
Example: setting clock display for 9:00:
- Touch clock pad once for 12 hour clock system.
- Enter time using number pads.
- Touch clock pad again.
Microwave utensil guide
Use Do not use
Oven proof glass (specifically treated for high intensity heat): Utility dishes, loaf dishes, pie plates, cake plates, liquid measuring cups, casseroles and bowls without metallic trim.
• China: Bowls, cups, serving plates and platters without metallic trim.
Plastic:
Plastic wrap (as a cover) - lay the plastic wrap loosely over the dish and press it to the sides. Vent plastic wrap by turning back one edge slightly to allow excess steam to escape. The dish should be deep enough so that the plastic wrap will not touch the food. Use plastic dishes, cups, semi-rigid freezer containers and plastic bags for short cooking times. Use these with care because the plastic may soften from the heat of the food.
- Paper:
Paper towels, waxed paper, paper napkins and paper plates with no metallic trim or design. Look for the manufacturer's label for any special instructions for use in the microwave oven.
Metal utensils:
Metal shields the food from microwave energy and produces uneven cooking. Also, avoid metal skewers, thermometers or foil trays. Metal utensils can cause arcing, which can damage your microwave oven.
• Metal decoration:
Bowls, cups, serving plates and platters without metallic trim.
Aluminum foil:
Avoid large sheets of aluminum foil because they hinder cooking and may cause harmful arcing. Use small pieces of foil to shield poultry legs and wings. Keep ALL aluminum foil at least 1 inch from the side walls of the oven cavity and door of the microwave.
Wood:
Wooden bowls and boards will dry out and may split or crack when you use them in the microwave oven. Baskets made of wood will react in the same way.
Tightly covered utensils:
e sure to leave openings for steam to escape from covered cookware. Pierce plastic pouches of vegetables or other food items before cooking. Tightly closed pouches may explode.
- Brown paper:
Avoid using brown paper bags. They absorb heat and can burn.
Flawed or chipped cooking utensils:
Any utensil that is cracked, flawed or chipped may break in the oven.
Metal twist ties:
Remove metal twist ties from plastic or paper bags. They become hot and could cause a fire.
Manual Operation
Setting the timer
Example: setting timer for 5 minutes
- Touch Timer pad once.
- Enter desired time using number pads. (timer may be set up to 99 minutes and 99 seconds).
- Touch START/+30sec pad.

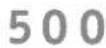

When finished, you will hear a series of beeps.
Safety Lock
You may lock the control panel to prevent the microwave from being accidentally started or used by children.
The safety lock feature is very useful when cleaning the control panel. The lock will prevent accidental programming when wiping the control panel.
Example: to set the safety lock ON:
Touch and hold the Stop/Cancel pad for more than 3 seconds. The lock icon will appear in the display window with 1 beep.

hold for 3 seconds
Example: to change the safety lock from ON to OFF
Touch and hold the Stop/Cancel pad for more than 3 seconds. The lock icon will disappear in the display window with 1 beep.

hold for 3 seconds
Using Ready Set
$$ \mathbf {1} - \text { ready } - \mathbf {2} - \text { set } - \mathbf {3} $$
Microwave heating or cooking may be quickly set at 100% power level for 1, 2, 3 or minutes. Use the number key or 1, 2, 3 to choose the desired minutes of cook time (this option will only work using the 1, 2 or 3 numeric pads.)
Example: to quickly heat for 2 minutes at 100% power:
Touch number pad for desired minute(s). The microwave will start at once.
2
Heating with high power level
Example: to heat for 5 minutes and 30 seconds at 100% power:
- Press "COOK TIMER" once."00:00" displays.
cook timer
- Use the number pads to enter desired heating time (cook time may be set up to 99 minutes and 99 seconds).
530
- Press "START/+30SEC." to start cooking.

When finished, you will hear a series of beeps.
Heating with lower power levels
Using the highest power level to heat foods does not always give the best results when some types of food need slower cooking, such as roasts, baked goods or custards. Your oven has nine other power levels you may choose.
Example: to heat for 4 minutes and 30 seconds at 70% power:
- Press "COOK TIMER" once."00:00" displays.
cook timer
- Use the number pads to enter desired heating time (cook time may be set up to 99 minutes and 99 seconds).
430
- Press Power Level pad once for power level 10(100% power).
power level
- Use the number keys to change the power level to 7. PL7 appears in the display (70 % power).
7
- Press START/+30sec pad.

When finished, you will hear a series of beeps.
Heating with multiple cooking stages Adding cook time (+30sec)
For best results, some microwave recipes call for different power levels or different lengths of time for cooking. Your microwave may be set to change from one stage to another automatically (2 stages maximum).
Example: to cook food at 80% power for 3 minutes and then 50% power for 6 minutes 30 seconds:
- Press "COOK TIMER" once."00:00" displays.
- Use the number pads to enter heating time for the 1st stage (cook time may be set up to 99 minutes and 99 seconds).
- Press Power Level pad once for power level 10(100% power).
- Use the number pads to enter power level for the 1st stage. PL8 appears in the display (80% power).
- Press "COOK TIMER" pad.
- Use the number pads to enter heating time for the 2nd stage (cook time may be set up to 99 minutes and 99 seconds).
- Press Power Level for the 2nd stage.
- Use the number pads to enter power level for the 2nd stage. PL5 appears in the display (50% power).
- START/+30sec pad.Press
When finished, you will hear a series of beeps.
NOTE:
- The "Auto Menu" can't be set as one of multiple cooking.
- If the 1st stage is the set defrost feature, the 2nd stage can't be set to Defrost again. If one of the stages is weight defrost, that will be the 1st stage when cooking starts.
cook timer
300
power level 8
cook timer
630
power level
5
start +30 sec
Pressing the START/+30sec pad once starts 30 seconds of cooking at a 100% power level.
Pressing the START/+30sec pad during cooking adds 30 seconds (for each press) to the cook time..
Example: to add 1 minute of cook time at the power level of 100%:
- Press START/+30sec pad 2 times.
NOTE: The “+30sec” function is not available when using the “weight defrost” or any of the “convenience operation” features.
Setting Defrost by Weight
Example: to defrost 0.5 lbs. of food using the automatic defrost cycle (cook time determined automatically)
- Press Defrost Weight pad
- Use the number pads to enter weight of food to defrost in pounds. You may enter weight from 0.3 to 6.3 pounds.
- Press START/+30sec pad.


When defrosting has finished, you will hear a series of beeps.
NOTE: The weight amount must be a valid entry for this feature to start. A valid weight entry is 0.3 to 6.3 pounds A decimal point is assumed before the last digit you enter. For example, enter 0.5 for 0.5 pounds and enter 5 for 5.0 pounds.
Setting Defrost by Time
Example: to defrost food with the automatic defrost cycle for 5 minutes:
- Press Defrost Time pad
- Use the number pads to enter desired defrost time (defrost time may be set up to 99 minutes and 99 seconds).
- Press START/+30sec pad.


When defrost has finished, you will hear a series of beeps.
Manual Operation

Popcorn

CAUTION
- DO NOT leave microwave oven unattended while popping corn.
The popcorn feature lets you pop 3 different commercially packaged microwave popcorn sized bags. Use the table below to determine the setting to use:
| Amount Press popcorn pad | |
| 3.0 oz. (default) | 1 |
| 1.75 oz. | 2 |
| 3.5 oz. | 3 |
Example: to pop a 3.5 oz. bag of popcorn automatically:
- Press POPCORN pad 3 times (refer to table above).

- Press START/+30 sec pad

When finished, you will hear a series of beeps.
MEMORY
(1) Press "FAVORITE" to choose memory 1-3 procedure. 1,2,3 will display.

(2) If the procedure has been set, press "START/+30SEC." to use it. If not, continue to set the procedure. Only one or two stages can be set.
(3) After finishing the setting, press "FAVORITE" to save the procedure and turn back to the waiting states. If press "START/+30SEC.", it can save and operate the setting.
Example: save one program as memory 2. To cook the food with 80% microwave power for 3 minutes and 20 seconds. Operate the following steps
a. In waiting states, press "FAVORITE" twice, "2" displays.
b. Press "COOK TIMER" then input number keys "3", "2", "0" to choose the cooking time.
c. Press "POWER LEVEL" once, then press number button "8", "PL8" displays.
d. Press "FAVORITE" to save the current setting. If press "START/+30SEC.", the cooking program can be operated and save it as memory 2.
e. To run the saved program, in waiting states, press
"FAVORITE" twice, "2" displays
and press "START/+30SEC." to run the saved cooking program.
Note: Auto menu cannot be set as memory cooking.
Sensor Cook Operating Tips
The Sensor Cook categories are designed to detect the increasing humidity released by the food during the cooking process. The microwave oven sensor will automatically adjust the cooking time to the type and amount of food. The food categories that are controlled with the humidity sensor are::
- Potato
- Meat
- Frozen Veggies
- Fish/Seafood
- Fresh Veggies
- Frozen Pizza
- Frozen Entree
For best results, do not use one of the Sensor Cook categories twice in succession on the same food portion. This may result in severely overcooked or burnt food. If the food appears to be undercooked, use one of the Easy Set pads or cook time pads to add more time.
Additional sensor cook suggestions are:
- Never start with less than 4 oz. of food.
- Use proper containers and covers for best sensor cooking results.
- Always use microwave-safe containers and cover them with loose fitting lids or vented plastic wrap. Never use tight sealing plastic containers. They will prevent steam from escaping and this will mislead the sensor, usually causing the food to overcook.
Be sure the outside of the cooking containers and the cavity of the microwave oven are dry before placing food in the oven. Excessive moisture turning into steam that does not result from the food cooking can mislead the sensor.
Baked Potato
The potato feature cooks 8-32 oz. of potatoes automatically (starting from room temperature).
- Press the Potato pad.
- Press START/+30sec pad.
When finished, you will hear a series of beeps. If additional time is needed, continue cooking manually.
Notes:
- Before cooking, pierce potato skins with fork 5-6 times.
- Place potatoes around the edge of a paper towel-lined turntable.
- Do not cover potatoes.
- Let potatoes stand for about 5 minutes after the microwave has finished to complete the cooking process.
Frozen Veggies
The frozen veggies sensor feature cooks from 6 to 16 oz. Of frozen vegetables (when starting at minus 18^ Q(-0.4^) ).
- Press the Frozen Veggie pad.
- Press START/+30sec pad.
When finished, you will hear a series of beeps. If additional time is needed, continue cooking manually.
Fresh Vegetables
The Fresh Veggie sensor feature cooks from 4 to 16 oz. Of fresh vegetables (when starting at room temperature).
- Press the Fresh Veggie pad.
- Press START/+30sec pad.
When finished, you will hear a series of beeps. If additional time is needed, continue cooking manually.
Frozen Entree
The frozen entree sensor setting is designed for single frozen en tress or frozen convenience foods such as frozen dinners from 8 to 32 oz. In size (starting with frozen pizza temperature at minus 18°C (-0.4°F)).
- Press the Frozen Entree pad.
- Press START/+30sec pad.
When finished, you will hear a series of beeps. If additional time is needed, continue cooking manually.
Notes:
- ALWAYS be sure to follow the directions that are specific for the microwave oven that is printed on the packaging for the food being prepared. Many times there are special instructions to follow in order to achieve best results.
- Be sure to allow for moisture to escape from the packaging. All frozen entree instructions specify that you poke holes in the film covering with a fork before cooking.
- Be careful when removing the film covers after cooking frozen convenience foods. Remove facing away from you to avoid steam burns.
- If the food is not done when the cook time is done, finish cooking manually.
Sensor Operations

Meat (frozen)
The meat sensor setting cooks from 8 to 24 Oz. of frozen ground meat automatically (starting with meat temperature at 5°C (41°F)).
- Press the Meat pad.
- Press START/+30sec pad.
When finished, you will hear a series of beeps. If additional time is needed, continue cooking manually.
Notes:
- Break meat apart in glass bowl or container.
• Cover meat with lid or vented plastic wrap. - Juices should be clear when finished cooking, then drain.
- Once cooking has begun and the meat begins to thaw, press STOP pad once to pause; open oven door and mix. Press START/+30sec pad to resume cooking.
Fish / Seafood (frozen)
The fish/seafood sensor setting cooks from 4 to 16 Oz. of frozen fish or seafood automatically (starting with a temperature at 5°C (41°F)).
- Press the Fish pad.
- Press START/+30sec pad.
When finished, you will hear a series of beeps. If additional time is needed, continue cooking manually.
Notes:
- Arrange fish in a single layer.
- Cover with lid or vented plastic wrap. Be sure to leave enough space in the venting or lid for steam to escape.
- About mid-way through the displayed cook time, press STOP to pause the cooing and turn over the fish; after turning, press START/+30sec to continue cooking with the remaining cook time displayed.
Frozen Pizza
The frozen pizza sensor feature cooks from 6-12 Oz.of pizza automatically (when starting at minus 18^ Q(-0.4°F)).
- Press the Frozne Pizza pad.
- Press START/+30sec pad.
When finished, you will hear 5 beeps. If additional time is needed, continue cooking manually.
NOTE: Be sure to separate the slices before cooking.
Sensor Reheat
The sensor reheat feature is designed to detect the increasing humidity released by the food during the cooking process. The microwave oven sensor will automatically adjust the cooking time to the type and amount of food.
The food types to avoid using with the reheat feature are:
• Uncooked or raw foods.
- Bread and other dry types of food such as crackers, biscuits, or cakes.
- Beverages or frozen foods.
- Frozen pizza.
Notes concerning sensor reheat:
- For casseroles, add 2-3 tablespoons of liquid, cover with lid or vented plastic wrap. Stir when instructed from display.
- For canned foods, empty contents of can into a casserole dish or serving bowl. Cover dish with lid or vented plastic wrap. Let stand a few minutes before serving.
- For plates of food, arrange food on plate and add any butter or gravies, etc. Cover with loose-fitting lid or vented plastic wrap. After reheating, let stand a few minutes be
Example: to reheat (sensor) automatically:
- Press Sensor Reheat pad once. Sensor detects vapor emitting from food to determine remaining cooking time and then press START/+30se. starts.
Cooking meat in your microwave
Be sure to place prepared meats on a microwave-safe roasting rack in a microwave-safe dish. Start cooking the meat fat side down and if necessary, use narrow strips of aluminum foil to shield any bone tips or thin meat areas. After cooking, check the temperature in several places before letting the meat stand the recommended time. Please note that the temperatures in the following charts are temperature at removal time; the temperature will rise during the standing period.
| Meat Power level Cook | time Directions | ||
| Roast beef boneless(up to 4 lbs.) | High (10) for first 5 minutes, then medium (5) | 12-17 min./lb. For 160^ F (Medium) | Place roast beef fat-side down on roasting rack.Cover with wax paper. Turn over half way through cooking. Let stand * 10-15 minutes. |
| 14-19 min./lb. For 170^ F (Well Done) | |||
| Roast pork boneless or bone-in(up to 4 lbs.) | High (10) for first 5 minutes, then medium (5) | 15-20 min/lb. For 170^ F (Well Done) | Place roast pork fat-side down on roasting rack.Cover with wax paper. Turn over half way through cooking. Let stand * 10-15 minutes. |
* Expect a 10° F rise in the temperature during the standing period.
| Meat Doneness Remove from oven After standing (10-15 min.) | |||
| • Beef | MediumWell Done | 150°F160°F | 150°F160°F |
| • Pork | MediumWell Done | 150°F160°F | 150°F160°F |
| • Poultry | Dark meatLight meat | 170°F160°F | 170°F160°F |
Cooking poultry in your microwave
Be sure to place poultry on a microwave-safe roasting rack in a microwave-safe dish. Cover poultry with wax paper to prevent splattering. Use narrow strips of aluminum foil to shield any bone tips or thin meat areas, or areas that start to overcook. After cooking, check the temperature in several places before letting the meat stand the recommended time.
| Poultry Cook time / power level Directions | |
| Whole chicken(up to 4 lbs.) | Cook time: 7-10 min. / lb. 180^ F dark meat 170^ F light meatPower level: medium high (7) |
| Chicken pieces(up to 4 lbs.) | Cook time: 7-10 min. / lb. 180^ F dark meat 170^ F light meatPower level: medium high (7) |
Cooking eggs in your microwave
- Never cook eggs in the shell and never warm hard-cooked eggs in the shell; they can explode.
• Always pierce whole eggs to keep them from bursting.
- Cook eggs just until set; they will become tough if overcooked.
Suggested power levels for cooking
The 10 power levels available with this microwave will help you to adjust to the power output best suited for the food type you are preparing. As with any food preparation in the microwave, it is best to follow the microwave instructions that are printed on food packaging.
The table below provides suggested power levels for various types of food that you can be prepare in the microwave.
| Power level | Microwave output | Use to prepare when: |
| 10 High | 100% | Boiling waterCooking ground beefMaking candyCooking fresh fruits & vegetablesCooking fish & poultryPreheating browning dishReheating beveragesCooking bacon slices |
| 9 90% | Reheating meat slices quicklySaute onions, celery & green peppers | |
| 8 80% | All reheatingCooking scrambled eggs | |
| 7 70% | Cooking breads & cereal productsCooking cheese dishes & vealCakes, muffins, brownies & cupcakes | |
| 6 60% | Cooking pasta | |
| 5 50% | Cooking meats & whole poultryCooking custardCooking spare ribs, rib roast & sirloin roast | |
| 4 40% | Cooking less tender cuts of meatReheating frozen packages foods | |
| 3 30% | Thawing meat, poultry & seafoodCooking small quantities of foodFinish cooking casseroles, stew & some sauces. | |
| 2 20% | Softening butter & cream cheeseHeating small amounts of food | |
| 1 10% | Softening ice creamRaise yeast dough |
Suggestions for getting the best results
To help you achieve the best possible results from your microwave oven, read the following suggestions below;
• Storage temperature
Foods taken from the freezer or refrigerator take longer to cook than the same foods would at room temperature.
- Size
Small pieces of food cook faster than large ones. Pieces similar in size and shape will cook more evenly when cooked together. For more even results, reduce the power levels when cooking large pieces of food.
• Natural moisture
Very moist foods cook more evenly because microwave energy heats water molecules very efficiently.
- Stirring
Stir foods such as casseroles and vegetable from the outside to the center to distribute the heat more evenly. This will allow the food to cook faster. Constant stirring is not necessary.
- Turn over items
Turn over foods such as pork chops, roasts or whole cauliflower halfway through the cook time. This will help to expose all sides equally to microwave energy.
- Food placement
Place delicate areas of food items, such as asparagus tips, toward the center of the turntable tray.
- Food arrangement
Arrange unevenly shaped foods, such as chicken pieces or salmon, with the thicker or meatier parts toward the outside of the turntable tray.
- Let the food stand
After removing the food from the microwave, cover the food with foil or a casserole lid and let it stand to finish cooking. This will help the food finish in the center and avoids overcooking the out edges. The length of stand time depends on the density and surface area of the food items.
• Wrapping in paper towels or waxed paper
Sandwiches and many other food types containing pre-baked bread should be wrapped prior to placing in the microwave to help prevent the food items fro drying out while heating.
One Touch Cooking Suggestions
| Convenience category Amount Suggestions | ||
| Popcorn Cook a single “microwave-only” | 3.5 oz, 1.75 oz, 3.5 oz. | bag of popcorn at a time. Use caution when removing and opening the hot popcorn bag from the oven. Let microwave oven cool down at least 5 minutes before using again. |
Cooking vegetables in your microwave
- Vegetables should be washed just before cooking. Rarely is extra water needed. If dense vegetables such as potatoes, carrots and greens are being cooked, add about 14 cup of water.
- Small vegetables (sliced carrots, peas, lima beans, etc.) will cook faster than larger vegetables.
- Whole vegetables, such as potatoes, acorn squash or corn on the cob, should be arranged in a circle on the turntable before cooking. The will cook more evenly if turned over halfway through cooking.
-
Always place vegetables like asparagus and broccoli with the stem ends pointing towards the edge of the dish and the tips toward the center.
-
When cooking cut vegetables, always cover the dish with a lid or vented microwavable plastic wrap.
- Whole, unpeeled vegetables such as potatoes, squash, eggplant, etc., should have their skin pricked in several locations before cooking to prevent them from bursting.
- For more even cooking, stir or rearrange whole vegetables halfway through the cook time.
- Most of the time, the denser the food the longer the required standing time. For example, a baked potato should stand for 5 minutes before serving, while a dish of peas may be served immediately.
Cooking seafood in your microwave
Place fish on a microwave-safe roasting rack in a microwave-safe dish. Be sure to always cook fish until it flakes easily with a fork. Use a tight cover to steam fish; a lighter cover of wax paper or paper towel provides less steaming. And be sure not to overcook fish; check it for doneness at a minimum cooking time before cooking longer.
| Seafood Cook | time/power level Directions | |
| Fish steaksUp to 1 12 lbs. | Cook time: 7-11 min./lb.Power level: med-high (7) | Arrange fish on roasting rack with meaty portions towards the outside of rack.Cover with wax paper. Turn over and rearrange halfway through cook time.Cook until fish flakes easily with fork. Let stand 3-5 mins. |
| Fish filletsUp to 1 12 lbs. | Cook time: 4-8 min./lb.Power level: med-high (7) | Arrange fillets in a baking dish, turning any thin pieces under. Cover with wax paper. If over 12 inch thick, turn over and rearrange halfway through cook time. Cook until fish flakes easily with fork. Let stand 2-3 mins. |
| ShrimpUp to 1 12 lbs. | Cook time: 4-6 12 min./lb.Power level: med-high (7) | Arrange shrimp in a baking dish without overlapping or layering. Cover with wax paper. Cook until firm and opaque, stirring 2 or 3 times. Let stand 5 mins. |
Defrosting tips
- When using the defrost weight feature, the weight entered should always be (valid entries are from
- Use both defrost weight and defrost time features for raw food items only. Defrosting gives best results when food to be thawed is a minimum of 0°F (taken directly from a true freezer). If the food has been stored in a refrigerator-freezer that does not maintain a temperature of 5°F or below, always program a lower food weight or lower cook time to prevent cooking the food.
-
If the frozen food is stored outside the freezer for up to 20 minutes, enter a reduced cook time or weight.
-
The shape of the package will alter the defrosting time. Shallow rectangular food packets defrost more quickly than a deep frozen block of food.
- Separate pieces as they begin to defrost. Separated frozen pieces of food defrost better.
- Shield warm areas of food with small pieces of foil if they start to become warm.
- You may use small pieces of aluminum foil to shield food items like chicken wings, leg tips and fish tails, but do not allow the foil to touch the oven cavity walls when defrosting.
Defrosting suggestions for meats
For best results, please read these suggestions when defrosting meats.
| Meat Normal amount Suggestions | ||
| Roast beef or pork | 2.5 to 6 lbs.(40 to 96 oz.) | Start with the food placed fat side down. After each stage, turn the food over and shield any warm portions with narrow strips of aluminum foil. Let stand, covered for 15-30 minutes. |
| Steaks, chops or fish | 0.5 to 3 lbs.(8 to 48 oz.) | After each stage, rearrange the food. If there are any warm or thawed portions of food, shield them with narrow flat pieces of aluminum foil. Remove any pieces of food that are nearly defrosted. Let stand, covered for about 5 to 10 minutes. |
| Ground meat | 0.5 to 3 lbs.(8 to 48 oz.) | After each stage, remove any pieces of food that are nearly defrosted. Let stand, covered with foil for 5 to 10 minutes. |
| Whole chicken | (40 to 96 oz.)2.5 to 6 lbs. | Remove giblets before freezing poultry. Start defrosting with the breast side down. After the 1st stage, turn the chicken over and shield any warm portions with narrow strips of aluminum foil. After the 2nd stage, again shield any warm portions with narrow strips of aluminum foil. Let stand, covered, for 30 to 60 minutes in the refrigerator. |
| Chicken pieces | 0.5 to 3 lbs.(8 to 48 oz.) | After each stage, rearrange or remove any pieces of food that are nearly defrosted. Let stand for 10-20 minutes. |
Cleaning suggestions
For best performance and for safety reasons, keep the oven clean inside and outside. Take special care to keep the inner door panel and oven from frame free of food and grease build-up.
Never use rough scouring powder or pads on the microwave. Wipe the microwave oven inside and out with a soft cloth and warm (not hot) mild detergent solution. Then rinse and wipe completely dry.
Wipe spatters immediately with a wet paper towel, especially after cooking greasy foods like chicken or bacon.
Clean your microwave oven weekly or more often, if
- Wash the oven door window with very mild soap and water. Be sure to use a soft clean cloth to avoid scratching.
- If steam accumulates inside or outside the oven door, wipe with a soft cloth. Steam can accumulate when operating the oven in high humidity and in no way indicates microwave leakage.
- Never operate the oven without food in the oven cavity; this can damage the magnetron tube or glass tray. You may wish to leave a cup of water standing inside the oven when it is not in use to prevent damage if the oven is accidentally turned on.
Follow these instructions to clean and care for your microwave oven:
- Keep the inside (cavity) of the oven clean. Food particles and spilled liquids can stick to the oven walls, causing the oven to wok less efficiently.
- Wipe up spills immediately. Use a damp, clean cloth and mild soap. DO NOT use harsh detergents or abrasive cleaners.
- To help loosen baked-on food particles or liquids, heat 2 cups of water (add the juice of 1 lemon if you desire to keep the oven fresh smelling) in a 4 cup measuring glass at High power for 5 minutes or until boiling. Let stand in oven cavity for 1 or 2 minutes.
- Remove the glass turntable tray from the oven when cleaning the oven cavity or tray. To prevent the glass turntable from breaking, handle with care and do not put it in water immediately after cooking. Wash the turntable tray in warm sudsy water or in the dishwasher.
- Clean the outside surface of the microwave with soap and a clean damp cloth. Dry with a clean soft cloth. To prevent damage to the operating parts of the oven, do not let water seep into any vents or openings.
Troubleshooting guide
If you have a problem you cannot solve, please do not hesitate to call our service line:
Questions or for Service Call:
1-866-312-2117
Before you call a repair person for your microwave, check the list below for possible easy solutions to some common problems.
Neither the microwave's display or oven operates -
- Properly insert the plug into a grounded power outlet.
- If the outlet is controlled by a wall switch, make sure the wall switch is turned on.
- Remove the plug from the outlet, wait 10 seconds, then plug the microwave in again.
- Reset the household circuit breaker or replace any blown fuses.
- Plug a different appliance into the power outlet. If the other appliance will not operate, have a qualified electrician repair the outlet.
- Plug the microwave into a different power outlet.
The oven display works, but the oven will not operate -
- Make sure the oven door is closed securely and completely.
- Check to see if packing material or other materials are suck to the door seal.
- Check for damage to the oven door.
- Press the STOP pad twice and attempt to re-enter cooking instructions.
- Plug a different appliance into the power outlet. If the other appliance will not operate, have a qualified electrician repair the outlet.
- Plug the microwave into a different power outlet.
The power goes off before the cook time has elapsed -
- If there has been a power interruption, remove the plug from the outlet; wait 10 seconds, then plug the microwave in again. If there was a power outage, the time indicator in the display will show 00:00.
- Reset the clock and any cooking instructions
- Reset the household circuit breaker or replace any blown fuses.
- Press the STOP pad twice and attempt to re-enter cooking instructions.
- Plug a different appliance into the power outlet. If the other appliance will not operate, have a qualified electrician repair the outlet.
- Plug the microwave into a different power outlet.
Food is cooking too slowly -
- Make sure the oven is on a separate 20 amp circuit line. Operating another appliance on the same circuit can cause a voltage drop. If necessary, move the microwave to its own circuit.
You see sparks or arcing -
- Remove any metallic utensils, cookware or metal ties from the oven cavity. If using aluminum foil, use only narrow strips and allow at least one inch between the foil and the interior oven walls.
The turntable makes noises or sticks -
- Clean the turntable, roller ring and oven cavity bottom.
- Make sure the turntable and roller ring are positioned correctly.
Using your microwave causes TV or radio interference -
- This is similar to the interference caused by other small appliances, such as hair dryers. Move your microwave further away from other appliances, like your TV or
Please note: If the oven is set to cook for more than 30 minutes at 100% power level, it will automatically adjust itself to a 80% power level after 30 minutes to avoid overcooking
Compact Appliance Warranty Information
Your appliance is covered by a one year limited warranty. For one year from your original date of purchase, Electrolux will pay costs, except as set forth below, associated with replacing any parts of this appliance that prove to be defective in materials or workmanship when such appliance is installed, used, and maintained in accordance with the provided instructions.
Exclusions This warranty does not cover the following:
- Products with original serial numbers that have been removed, altered or cannot be readily determined.
- Product that has been transferred from its original owner to another party or removed outside the USA or Canada.
- Rust on the interior or exterior of the unit.
- Products purchased "as-is" are not covered by this warranty.
- Food loss due to any refrigerator or freezer failures.
- Products used in a commercial setting.
- Service calls which do not involve malfunction or defects in materials or workmanship, or for appliances not in ordinary household use or used other than in accordance with the provided instructions.
- Service calls to correct the installation of your appliance or to instruct you how to use your appliance.
- Expenses for making the appliance accessible for servicing, such as removal of trim, cupboards, shelves, etc., which are not a part of the appliance when it is shipped from the factory.
- Service calls to repair or replace appliance light bulbs, air filters, water filters, other consumables, or knobs, handles, or other cosmetic parts.
- Surcharges including, but not limited to, any after hour, weekend, or holiday service calls, tolls, ferry trip charges, or mileage expense for service calls to remote areas, including the state of Alaska.
- Damages to the finish of appliance or home incurred during installation, including but not limited to floors, cabinets, walls, etc.
- Damages caused by: services performed by unauthorized service companies; use of parts other than genuine Electrolux parts or parts obtained from persons other than authorized service companies; or external causes such as abuse, misuse, inadequate power supply, accidents, fires, or acts of God.
- Labor costs after ninety (90) days from your original date of purchase incurred for product repair or replacement as provided herein for carry-in appliances.
DISCLAIMER OF IMPLIED WARRANTIES; LIMITATION OF REMEDI ES
CUSTOMER'S SOLE AND EXCLUSIVE REMEDY UNDER THIS LIMITED WARRANTY SHALL BE PRODUCT REPAIR OR REPLACEMENT PROVIDED HEREIN. CLAIMS BASED ON IMPLIED WARRANTIES, INCLUDING WARRANTIES OF MERCHANTABILITY OR FITNESS A PARTICULAR PURPOSE, ARE LIMITED TO ONE YEAR OR THE SHORTEST PERIOD ALLOWED BY LAW, BUT NOT LESS THAN ON YEAR. ELECTROLUX SHALL NOT BE LIABLE FOR CONSEQUENTIAL OR INCIDENTAL DAMAGES SUCH AS PROPERTY DAMAGE AND INCIDENTAL EXPENSES RESULTING FROM ANY BREACH OF THIS WRITTEN LIMITED WARRANTY OR ANY IMPLIED WARRANTY SOME STATES AND PROVINCES DO NOT ALLOW THE EXCLUSION OR LIMITATION OF INCIDENTAL OR CONSEQUENTIAL DAMAGE OR LIMITATIONS ON THE DURATION OF IMPLIED WARRANTIES, SO THESE LIMITATIONS OR EXCLUSIONS MAY NOT APPLY TO YOU. THIS WRITTEN WARRANTY GIVES YOU SPECIFIC LEGAL RIGHTS. YOU MAY ALSO HAVE OTHER RIGHTS THAT VARY FROM STATE TO STATE.
If You Need Service
Keep your receipt, delivery slip, or some other appropriate payment record to establish the warranty period should service be required. If service is performed, it is in your best interest to obtain and keep all receipts. Service under this warranty must be obtained by contacting Electrolux at the addresses or phone numbers below.
This warranty only applies in the USA and Canada. In the USA, your appliance is warranted by Electrolux Major Appliances North America, a division of Electrolux Home Products, Inc. In Canada, your appliance is warranted by Electrolux Canada Corp. Electrolux authorizes no person to change or add to any obligations under this warranty. Obligations for service and parts under this warranty must be performed by Electrolux or an authorized service company. Product features or specifications as described
- Product Registration
- PLEASE CAREFULLY READ AND SAVE THESE INSTRUCTIONS
- IMPORTANT SAFETY INSTRUCTIONS
- What You Need to Know About Safety Instructions
- Recognize Safety Symbols, Words, Labels
- DANGER
- WARNING
- CAUTION
- SAVE THESE INSTRUCTIONS
- GROUNDING INSTRUCTIONS
- Oven MUST be grounded.
- Federal Communications Commission Radio Frequency Interference Statement (U.S.A. Only)
- PRECAUTIONS TO AVOID POSSIBLE EXPOSURE TO EXCESSIVE MICROWAVE ENERGY
- Adhere to the following precautions:
- Radio Interference
- Features & Specifications
- Control panel
- Before Operating
- Learn more about your microwave oven
- Setting the clock
- Microwave utensil guide
- Plastic:
- - Paper:
- Metal utensils:
- • Metal decoration:
- Aluminum foil:
- Wood:
- Tightly covered utensils:
- - Brown paper:
- Flawed or chipped cooking utensils:
- Metal twist ties:
- Manual Operation
- Setting the timer
- Safety Lock
- Example: to set the safety lock ON:
- Example: to change the safety lock from ON to OFF
- Using Ready Set
- Example: to quickly heat for 2 minutes at 100% power:
- Heating with high power level
- Heating with lower power levels
- Example: to heat for 4 minutes and 30 seconds at 70% power:
- Heating with multiple cooking stages Adding cook time (+30sec)
- NOTE:
- Setting Defrost by Weight
- Setting Defrost by Time
- Popcorn
- Example: to pop a 3.5 oz. bag of popcorn automatically:
- MEMORY
- Sensor Cook Operating Tips
- Baked Potato
- Notes:
- Frozen Veggies
- Fresh Vegetables
- Frozen Entree
- Sensor Operations
- Meat (frozen)
- Fish / Seafood (frozen)
- Frozen Pizza
- Sensor Reheat
- Notes concerning sensor reheat:
- Example: to reheat (sensor) automatically:
- Cooking meat in your microwave
- Cooking poultry in your microwave
- Cooking eggs in your microwave
- Suggested power levels for cooking
- Suggestions for getting the best results
- • Storage temperature
- - Size
- • Natural moisture
- - Stirring
- - Turn over items
- - Food placement
- - Food arrangement
- - Let the food stand
- • Wrapping in paper towels or waxed paper
- One Touch Cooking Suggestions
- Cooking vegetables in your microwave
- Cooking seafood in your microwave
- Defrosting tips
- Defrosting suggestions for meats
- Cleaning suggestions
- Follow these instructions to clean and care for your microwave oven:
- Troubleshooting guide
- Questions or for Service Call:
- 1-866-312-2117
- Neither the microwave's display or oven operates -
- The oven display works, but the oven will not operate -
- The power goes off before the cook time has elapsed -
- Food is cooking too slowly -
- You see sparks or arcing -
- The turntable makes noises or sticks -
- Using your microwave causes TV or radio interference -
- Compact Appliance Warranty Information
- Exclusions This warranty does not cover the following:
- DISCLAIMER OF IMPLIED WARRANTIES; LIMITATION OF REMEDI ES
- If You Need Service
Brand : FRIGIDAIRE
Model : FFMO1611LS
Category : Microwaves