
HBM17158SS - Freezer HISENSE - Free user manual and instructions
Find the device manual for free HBM17158SS HISENSE in PDF.


| Brand | Hisense |
| Model | HBM17158SS |
| Product Type | Freezer (bottom freezer in a refrigerator-freezer combo) |
| Power Supply | 115 V, 60 Hz, single phase, dedicated circuit |
| Refrigerant | R600a (isobutane), flammable |
| Freezer Temperature Range | 5°F to -11°F (-15°C to -24°C) |
| Refrigerator Temperature Range | 36°F to 46°F (2°C to 8°C) |
| Super Freeze Function | Yes, lowers temperature quickly for fast freezing, auto-off after 52 hours |
| Holiday Mode | Yes, sets fridge to 59°F (15°C) when away, no food storage |
| Display Controls | Touch button control panel with Fahrenheit or Celsius display |
| Freezer Drawers | 2 removable drawers (upper and lower) |
| Door Reversible | Yes, can be reversed from right to left side |
| Handles | 2 handles included (long for fridge, short for freezer), must be installed |
| Interior Lighting | LED light, replaceable by competent person |
| Shelves | Adjustable glass shelves in refrigerator compartment |
| Crisper Drawer | Yes, with divider, for fruits and vegetables |
| Door Bins | Full-width and half-width bins, adjustable |
| Leveling Legs | Adjustable feet for leveling; tilt top back 10-15mm for self-closing doors |
| Clearance Requirements | Back: 3 inches (75mm), Top: 3 7/8 inches (100mm), Sides: 3 7/8 inches (100mm), Door opening angle: 140° |
| Ambient Temperature Range | 55°F to 110°F (12.8°C to 43.3°C) |
| Defrosting | Automatic defrost, manual defrost assistance if frost buildup |
| Cleaning Frequency | Every 2 months for interior; mild detergent and water |
| Warranty / Support | Contact 1-877-465-3566 for service |
Frequently Asked Questions - HBM17158SS HISENSE
User questions about HBM17158SS HISENSE
0 question about this device. Answer the ones you know or ask your own.
Ask a new question about this device
Download the instructions for your Freezer in PDF format for free! Find your manual HBM17158SS - HISENSE and take your electronic device back in hand. On this page are published all the documents necessary for the use of your device. HBM17158SS by HISENSE.
USER MANUAL HBM17158SS HISENSE
For questions about features, operation/performance, parts or service, call: 1-877-465-3566
Thank you for choosing Hisense. We are sure you will find your new refrigerator a pleasure to use. However, before you use the appliance, we recommend that you read through these instructions carefully, which provides details about installing and using the product. Please keep a copy for future reference.
Contents
Important ...safety ...instructions....2
Refrigerator ...Overview....5
Installing your new appliance....6
Display controls....11
Using your refrigerator....13
Cleaning and care....14
Helpful hints and tips....15
Troubleshooting....16
Disposal of the appliance....18
Copyright....19
Important Safety Instructions
Read and follow all safety messages. Save these instructions.

This ...safety ...alert ...symbol help ...you ...understand situations ...and ...hazards ...that ...ma cause injury or death.

WARNING
The WARNING alert means a potentially hazardous ...situation. ...Serious ...injury death may occur if not avoided.

DANGER
The ...DANGER ...alert ...means ...an imminently hazardous situation. Serious injury or death may occur if not avoided.

CAUTION
The CAUTION alert means a potentially hazardous situation. Moderate or minor injury may occur if not avoided.

WARNING
- Please ensure that everyone using this appliance ...is ...familiar ...with ...its ...opera and safety features. This appliance is not intended ...for ...use ...by ...persons ...(incl children) with reduced physical, sensory or mental ...capabilities, ...unless ...supervised
are properly instructed.
- This appliance is intended to be used in residential households and similar applications.
- Keep explosive and flammable substances away from unit. Do not store similar material in the refrigerator.
- ...Disconnect ...power ...before ...servicing ...or installing an Ice Maker.
- Use nonflammable cleaner.
- Use 2 or more people to remove old unit and install this unit.
- Connect to potable water supply only.
- Do not use mechanical devices or other means to accelerate the defrosting process, ...other ...than ...those ...recommended by the manufacturer.
- Do not damage the refrigerant circuit.
- Do not use electrical appliances inside the food storage compartments of the appliance, ...unless ...they ...are ...of ...the ...type recommended by the manufacturer.
- ...The ...instructions include the ...following wording ...regarding ...the ...use ...of ...extension cards: ...
- Do not use an extension cord or ingrounded (two prong) adapters.
- If the supply cord is damaged, it must be replaced by the manufacturer, its service
agent or similarly qualified persons in order to avoid a hazard.
- Keep ventilation openings, in the appliance enclosure or in the built-in structure, clear of obstruction.

DANGER
To avoid the risks that are always present when using an electric appliance, we recommend that you pay attention to the instructions about electricity below.
-
The appliance requires single phase 115V/60Hz power supply. It has a power cord that has a 3-prong grounding plug that minimizes the possibility of electrical shock. This appliance must be grounded. Do not remove grounding prong or modify the power plug.
-
The unit should be plugged into a dedicated electrical outlet that meets all current standards and requirements. Do not plug anything else into the same outlet and ensure the appliance is the only thing plugged into the entire circuit. It should have its own dedicated breaker. Otherwise, this may overload the circuit and cause a fire.
-
Do not modify the power plug. The power plug must be accessible when the appliance is installed.
-
The appliance should not be turned off with a switch or other device.
-
Make sure that the plug is not squashed or damaged. Otherwise, it may cause short circuit, electric shock or overheat and even cause a fire.
-
Do not insert the power plug if the socket is loose, there is a risk of electric shock or fire.
-
Switch off the appliance and disconnect it from the main power before you clean or move it.
-
Never unplug the appliance by pulling on the electrical cord. Always grip the plug
firmly and pull straight out from the socket to prevent damaging the power cord.
-
Do not operate the appliance without the cover over interior lighting.
-
Any electrical component must be replaced or repaired by a qualified electrician or authorized service engineer. Only genuine replacement parts should be used.
-
To avoid eye injury, do not look direct into the LED light located in the refrigerator compartment. If it is not functioning correctly, consult a qualified, registered electrician or replace it in accordance with the “cleaning and care” chapter.
-
The refrigerant isobutene (R600a) is contained within the refrigerant circuit of the appliance. During transportation and installation of the appliance, ensure that none of the components of the refrigerant circuit becomes damaged. The refrigerant (R600a) is flammable.
-
Risk of child entrapment. Before you throw away your old appliance:
• Take off the doors
- Leave the shelves in place so that children may not easily climb inside.

CAUTION
-
Don't store products which contain flammable propellants (e.g. spray cans) or explosive substances in the appliances.
-
Avoid open flames (candles, lamps etc.) and sources of ignition.
-
Thoroughly ventilate the room in which the appliance is situated.
-
Unpack and check through the appliance. Should any damage be evident, don't plug in the appliance but contact the shop immediately from which you purchased it. Keep all packing materials in this case.
-
We recommend that you wait for 4 hours before connecting the appliance to allow the refrigerant to flow back into the compressor.
General safety and daily use
It is important to use your appliance safely. We recommend that you follow the guidelines below.
- We recommend that you keep this user's manual with the appliance for future reference.
- This appliance is intended to be used in households and similar applications such as:
-Staff kitchen-areas in shops, offices and other working environments;
-Clients in hotels, motels and other residential types of environment;
-Bed and breakfast type of environments;
-Catering and similar non-retail applications. - Lack of experience and knowledge, unless they have supervision or been given instruction concerning use of the appliance. Children should be supervised to ensure that they do not play with the appliance.
- Store any food in accordance with the storage instructions from the manufacturer.
- Don't try to repair the appliance yourself. It is dangerous to alter the specifications
or modify this product in any way. Any damage to the power cord may cause a short circuit, fire or electric shock.
- Don't place too much food directly against the air outlet on the rear wall of both the refrigerator and freezer compartment, as it affects sufficient air circulation.
- Don't place hot items near the plastic components of this appliance.
- Frozen food must not be refrozen once it has been thawed out.
- Don't store bottled or canned drinks (especially carbonated drinks) in the freezer compartment. Bottles and cans may explode.
- Use caution consuming popsicles or ice cubes straight from the freezer as this can cause freezer burn to the mouth and lips.
Safety for children and infirm persons
- Keep all packaging away from children to avoid risk of suffocation.
- Protect children from being scalded by touching the compressor at the rear bottom of appliance
- Don't place items on top of the appliance as this could cause injury should they fall off.
- Never allow children to play with the appliance by hanging or standing over or on the doors, racks, shelves and drawers etc.
Refrigerator Overview
① Display panel
② Air Duct
3 Glass shelf
4 Crisper cover
⑤ Crisper Bin (with divider)
6 Upper freezer drawer
7 Lower freezer drawer
8 Leveling Leg
9 Door Bin Cover
10 Half Width Door Bin
11 Door Gasket
12 Full Width Door Bin
13 Lower Door Bin
14 Wheel
15 Fridge door
16 Handle
17 Freezer door

Package Content:
16 handles (x2)
- long handle for fridge door, with screws (x2) assembled
- short handle for freeze door, with screws (x2) assembled
Spare parts, used when reversing the door
- Upper left hinge (x1)
19.Middle left hinge (x1)
20.Left hinge cover (x1)
Assembly tool:
-Allen Wrench 3mm (x1)
-Allen Wrench 4mm (x1)

Note!
- Due to unceasing modification of our products, your refrigerator may be slightly different from this instruction manual, but its functions and using methods remain the same.
- To get the best energy efficiency of this product, please place all shelves, drawers and baskets on their original position as the illustration above.
Installing Your New Appliance
Before using the appliance for the first time, you should be informed of the following tips.

Warning!
For proper installation, this refrigerator must be placed on a level surface of hard material that is the same height as the rest of the flooring. This surface should be strong enough to support a fully loaded refrigerator.
The rollers, which are not castors, should be only used for forward or backward movement. Moving the refrigerator sideways may damage your floor and the rollers.

Ventilation of appliance
In order to improve efficiency of the cooling system and save energy, it is necessary to maintain good ventilation around the appliance for the dissipation of heat. For this reason, sufficient clear space should be available around the refrigerator.
Suggestion: It is advisable for there to be at least 3 inches (75mm) of clearance from the back of the fridge to the wall, at least 3 7/8 inches (100mm) of clearance from its top, at least 3 7/8 inches (100mm) from its side to the wall and a clear space in front to allow the doors to open 140°. As shown in following diagrams.


Note:
- This appliance performs well with ambient temperature between 55^ (12.8^) to 110^ (43.3^) . The appliance may not work properly if left at a temperature above or below the indicated range.
- Stand your appliance in a dry place to avoid high moisture.
- Keep the appliance out of direct sunlight, rain or frost. Stand the appliance away from heat sources such as stoves, fires or heaters.
Leveling of appliance
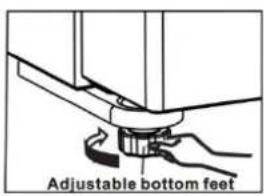
- For sufficient leveling and air circulating in the lower rear section of the appliance,
the bottom feet may need to be adjusted. You can adjust them manually by hand or by using a suitable tool.
- To allow the doors to self-close, tilt the top backwards by 3/8\~5/8 inches (10-15mm).


Installing the handles
Before you use the appliance, you have to install the handles provided in the fridge chamber.
The longer one is fridge door handle, the shorter one is freezer door handle.
Please follow procedures below to install and reverse the handle.
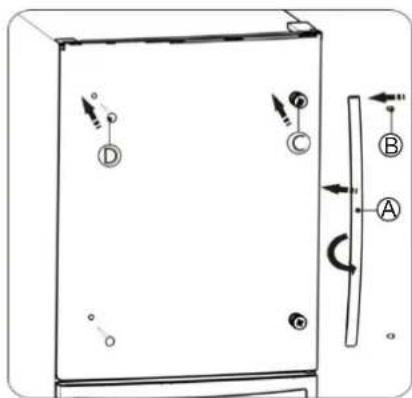
- Place the handle (A) on the door by fitting the handle footprints over the handle
supports (C), then fasten the screws (B) with 3mm Allen wrench (provided in plastic).

- When you reverse the fridge door, please move the handle (A), the screws (B) and the handle supports (C) to the right side. Move the screw hole covers (D) to the left side.
Reversing the fridge door
The side at which the door opens can be changed, from the right side (as supplied) to the left side, if the installation site requires.
Warning!
When reversing the door, the appliance must not be connected to the
mains. Ensure that the plug is removed from the mains socket..
Tools you will need(Not provided):
| Philips Screwdriver & Slotted Screwdriver | Socket Wrench(8mm) |
Note:
When required, tilt the refrigerator back in order to gain access to the base, you should rest the appliance on soft foam packaging or similar material to avoid damaging the backboard of the refrigerator. To reverse the door, the following steps are generally recommended.
- Stand the refrigerator upright. Open the upper door to take out all door racks (to avoid racks damaged) and then close the door.

natural_image
Line drawing of an open refrigerator with doors open, showing internal compartments and door handle (no text or symbols)- With the door closed, remove the upper hinge cover (A) (you can pry it up with slotted screwdriver) on the top right side of appliance and remove 3 special flange screws (B) with Socket Wrench. Keep the upper hinge cover for future reference.

- Remove the upper hinge (Please hold upper door by hand when installing). Keep it for future reference.

natural_image
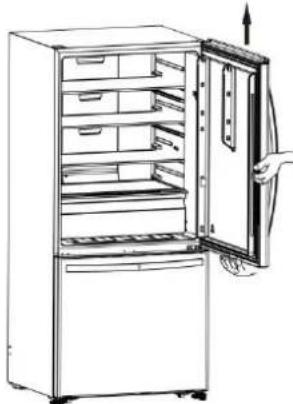
Diagram showing a mechanical component with an upward arrow and dot pattern, no text or symbols present- Use your both hands to open the door more than 90^ . Lift it up and take it off.
natural_image
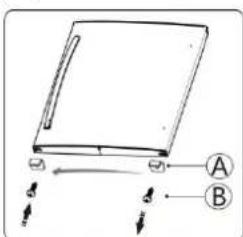
Line drawing of an open refrigerator with doors open, showing internal compartments and a hand holding the door (no text or symbols)- Loosen screw (B) on the bottom of the fridge door and take down stop block (A), then install stop block (A) to the left side with screw (B).
- Open the freezer door, then loosen 2
screws (B) with 4mm Allen Wrench (provided in plastic) and remove middle hinge (A). Keep the middle hinge (A) for future reference.
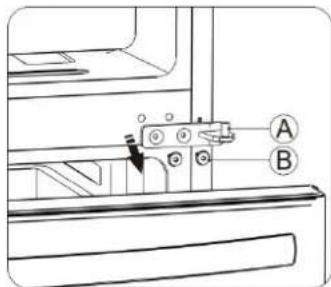
- Change screw hole covers and screws on middle cover plate from left to right.

natural_image
Line drawing of a refrigerator interior showing door, drawer, and shelf (no text or symbols)- Remove screw hole cover (left) from the top left side of appliance and install it onto the top right side of refrigerator body.
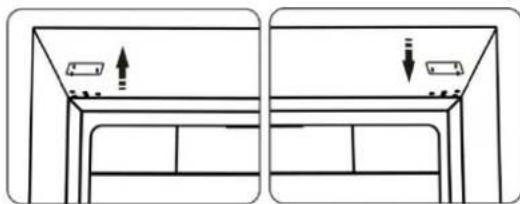
natural_image
Diagram showing two views of a cabinet or enclosure with arrows indicating direction (no text or symbols)- Put out the left middle hinge (A) (provided in plastic). Then screw it with 2 screws (B) from right side.
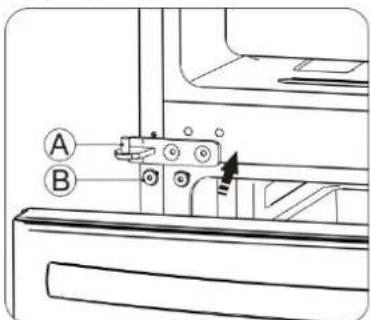
- Close the freezer door. Refer to step 4, put the fridge door back on the other side, then close the fridge door and move it to an appropriate position.

natural_image
Line drawing of an open refrigerator with a hand pointing to the door (no text or symbols)- Put out the left upper hinge from plastic bag provided. Then put it on the top left side refer to step 3.

natural_image
Simple line drawing of a mechanical component with an arrow indicating direction (no text or symbols)- Put out the upper hinge cover (A) from plastic bag provided, install them refer to step 2.

Freezer Door Removal
In case your home access door is too narrow for the refrigerator to pass through, remove the refrigerator doors and drawers as follows.
- Pull out the freezer door and the upper freezer drawer to the final position.

natural_image
Technical line drawing of a refrigerator interior showing front, side, and top views (no text or labels)- Take out the upper freezer drawer (A) by lifting it up from the rail system (B).
- Then push the rail system (B) back.

- Remove the lower freezer drawer by lifting it up.

natural_image
Diagram of a mechanical assembly with directional arrows indicating motion or force (no text or symbols)- Remove the 2 screws attached to the supporting frame.

natural_image
Technical line drawing of a door mechanism with no visible text or symbols- Pull out the freezer door and lift it up in the direction of the arrow.

natural_image
Diagram of a refrigerator with open door and side arm, showing airflow direction (no text or symbols)Re-assembling the freezer door
To reattach the drawer after you moved the appliance to its final location, assemble the parts in reverse order.
Display Controls
Please use the instructions and images below as a reference when using your appliance. Your exact model may be slightly different than the image below.
Fahrenheit Display Controller

Celsius Display Controller

Controlling the temperature
We recommend that when you start your refrigerator for the first time, the temperature for the refrigerator is set to 39 °F (4°C) and the freezer to -2 °F (-19°C). If you want to change the temperature, follow the instructions below.

Caution
When you set a temperature, you set an average temperature for the whole refrigerator cabinet. Temperatures inside each compartment may vary from the temperatures displayed on the panel, depending on how much food you store and where you place it. High or low room temperature may also affect the actual temperature inside the appliance.
1. Fridge

Press the middle part of the button to set fridge temperature
between 36°F and 46°F as needed, and control panel will display corresponding figures according to the following sequence.

If you have the Celsius Display Controller, press the button to set fridge temperature between 2 °C and 8 °C as needed, and control panel will display corresponding figures according to the following sequence.

2. Freezer
Freezer Press the middle part of the Freezer button to set freezer temperature between 5°F and -11°F as needed, and control panel will display corresponding figures according to the following sequence.

If you have the Celsius Display Controller, press the button to set freezer temperature between -15°C and -24°C as needed, and control panel will display corresponding figures according to the following sequence.

chemical
Temperature range labels for carbon chain with corresponding degrees Celsius3. Super freeze

Super Freeze will quickly lower the temperature within the
freezer so food will freeze faster. This can lock in the vitamins and nutrients of fresh food and keep food fresh longer.
- Press the middle part of button for 3 seconds to activate the super freeze function. The light ⚙ will be illuminated.
- Super freeze automatically switches off after 52 hours.
- When super freeze function is on, you can switch off super freeze function by pressing the middle part of button and the freezer temperature setting will revert back to the previous setting.
4. Holiday Mode
If you are going to be away for a long period of time, you can activate this function by pressing the middle part of button for 3 seconds until the light 📂 illuminated
Important! Do not store any food in the fridge during this time. This feature is not designed to allow food storage when activated.
- When the holiday function is activated, the temperature of the refrigerator is automatically switched to 59^(15^) to minimize the energy consumption.
- When the holiday function is on, you can switch it off by pressing the middle part of button. The fridge temperature setting will revert back to the previous setting.
Using your Refrigerator
This section tells you how to use most of the useful features. We recommend that you read through them carefully before using the appliance.
1. Using your refrigerator compartment
The refrigerator compartment is suitable for storage of vegetables and fruit. Food inside should be packed to store in order to avoid losing moisture or flavor permeating into other foods.

CAUTION
Never close the refrigerator door while the shelves, crisper and/or telescopic slides are extended. It may damage both them and the refrigerator.
Glass shelves and Door racks
The refrigerator compartment is provided with several glass shelves and several different door racks, which are suitable for the storage of eggs, canned liquid, bottled drinks and packed food. They can be placed at different heights according to your need. However, do not place too many heavy things in racks. Before you lift up the door bin vertically, please take the food out.

natural_image
Illustration of two hands holding a rectangular object with upward arrows indicating motion or force (no text or symbols)
Drawer
This is suitable for storage of fruits and vegetables. And it can be taken out to be cleaned.
To take it out, open the door to the final location first. Then pull out the drawer and tilt up the front of the crisper after moving slightly in the direction.
2. Using the freezer compartment
The freezer compartment is provided with an upper drawer and a lower drawer. To remove all of them, refer to page 9 for disassembly instruction.
Cleaning and Care
For hygienic reasons the appliance (including exterior and interior accessories) should be cleaned at least every two months.

CAUTION
The appliance must not be connected to the wall outlet during cleaning. Danger of electrical shock! Before cleaning, switch the appliance off and remove the plug from the wall outlet socket.
Exterior cleaning
To maintain good appearance of your appliance, you should clean it regularly.
- Spray water onto a cleaning cloth instead of spraying directly on the surface of the appliance. This helps ensure an even distribution of moisture to the surface.
- Clean the doors, handles and cabinet surfaces with a mild detergent and then wipe dry with a soft cloth.

CAUTION
- Don't use sharp objects to clean with, as they are likely to scratch the surface.
- Don't use Thinner, Car detergent, bleach, ethereal oil, abrasive cleansers or organic solvent such as Benzene for cleaning. They may damage the surface of the appliance and may cause fire.
Interior cleaning
You should clean the appliance interior regularly. It will be easier to clean when food stocks are low. Wipe the inside of the fridge freezer with a weak solution of backing soda and water, and then rinse with warm water using a wrung-out sponge or cloth. Wipe completely dry before replacing the shelves and baskets. Thoroughly dry all surfaces and removable parts before putting them back into place. Although this appliance automatically defrosts, a layer of frost may occur on the freezer compartment's interior walls if the freezer door is opened frequently or kept open too long. If the frost is too thick, choose a time when the freezer is nearly empty and proceed as follows:
- Remove existing food and accessories baskets, unplug the appliance from the main power and leave the doors open. Ventilate the room thoroughly to accelerate the process.
- When defrosting is completed, clean your freezer as described above.

WARNING
Do not use sharp objects to remove frost from the freezer compartment. Only after the interior is completely dry should the appliance be switched back on and plugged back into the main socket.
Door gasket cleaning
Take care to keep door gasket clean. Sticky food and drinks can cause gasket to stick to the cabinet and tear when you open the door. Wash gasket with a mild detergent and warm water. Rinse and dry it thoroughly after cleaning.

CAUTION
Only after the door seals are completely dry should the appliance be powered on
Replacing the LED light
Warning: The LED light must be replaced by a competent person. If the LED light is damaged, follow the steps below:
- Unplug your appliance.
- Remove light cover by rising up and pulling out the LED light.
- Hold the LED light with one hand and pull it with the other hand while pressing the connector latch.
- Replace LED light and snap it correctly in place and recover the light cover.
Helpful Hints and Tips
Energy Saving Tips
We recommend that you follow the tips below to save energy.
- Try to avoid keeping the door open for long periods in order to conserve energy.
Ensure the appliance is away from any sources of heat (direct sunlight, electric oven or cooker etc.)
- Don't set the temperature colder than necessary.
- Don't store warm food or evaporating liquid in the appliance.
- Place the appliance in a well ventilated, humidity free, room. Please refer to "Installing your New Appliance" chapter.
- If the diagram shows the correct combination for the drawers, crisper and shelves, do not adjust the combination as this is designed to be the most energy efficient configuration.
Hints for fresh food refrigeration
- Do not place hot food directly into the refrigerator or freezer, the internal temperature will increase resulting in the compressor having to work harder and will consume more energy.
- Do cover or wrap the food, particularly if it has a strong flavor.
- Place food properly so that air can circulate freely around it.
Hints for refrigeration
- For Meat: (all types) wrap in cling wrap and place on the glass shelf above the vegetable drawer. Always follow food storage times and use by dates suggested by manufacturers.
• Cooked food, cold dishes, etc.:
They should be covered and placed on any shelf.
- Fruit and vegetables:
They should be stored in the special
drawer provided.
- Butter and cheese:
Should be wrapped in airtight foil or plastic film wrap. - Milk bottles:
Should have a lid and be stored in the door racks.
Hints for freezing
- When first starting-up or after a period out of use, let the appliance run at least 2 hours on the higher settings before putting food in the compartment.
- Prepare food in small portions to enable it to be rapidly and completely frozen and to make it possible to subsequently thaw only the quantity required.
- Wrap up the food in aluminum foil or cling wraps which are airtight.
- Do not allow fresh, unfrozen food to touch the food which is already frozen to avoid temperature rise of the latter.
- Iced products, (ice cubes, popsicles): if consumed immediately after removal from the freezer compartment, will probably cause frost burns to the skin.
- It is recommended to label and date each frozen package in order to keep track of the storage time.
Hints for the storage of frozen food
- Ensure that frozen food has been stored correctly by the food retailer
- Once defrosted, food will deteriorate rapidly and should not be re-frozen. Do not exceed the storage period indicated by the food manufacturer.
Switching off your appliance
If the appliance needs to be switched off for an extended period, the following steps should be taken prevent mold on the appliance.
- Remove all food.
-
Remove the power plug from the main socket.
-
Clean and dry the interior thoroughly.
- Ensure that all the doors are wedged open slightly to allow air to circulate
Troubleshooting
If you experience a problem with your appliance or are concerned that the appliance is not functioning correctly, you can carry out some easy checks before calling for service, please see below.

WARNING
- Don't try to repair the appliance yourself. If the problem persists after you have made the checks mentioned below, contact a qualified electrician, authorized service engineer or the shop where you purchased the product.
- A child entrapment warning statement is included in either the operating instructions or in a use and care manual provided with each refrigerator.
| Problem Possible Cause & Solution | |
| Appliance is not working correctly | Check whether the power cord is plugged into the power outlet properly. |
| Check the fuse or circuit of your power supply, replace if necessary. | |
| The ambient temperature is too low. Try setting the chamber temperature to a colder level to solve this problem. | |
| It is normal that the freezer is not operating during the defrost cycle, or for a short time after the appliance is switched on to protect the compressor. | |
| Odours from the compartments | The interior may need to be cleaned |
| Some food, containers or wrapping cause odours. | |
| Noise from the appliance | The sounds below are quite normal:Compressor running noises.Air movement noise from the small fan motor in the freezer compartment or other compartments.Gurgling sound similar to water boiling.Popping noise during automatic defrosting.Clicking noise before the compressor starts.Clicking noise when you get the water.The motor running noises when you get ice. |
| Other unusual noises are due to the reasons below and may need you to check and take action:The cabinet is not level.The back of appliance is touching the wall. | |
| Bottles or containers have fallen or are rolling. | |
| The motor runs continuously | It is normal to frequently hear the sound of the motor, it will need to run more when in following circumstances:•Temperature setting is set colder than necessary•Large quantity of warm food has recently been stored within the appliance.•The temperature outside the appliance is high.•Doors are kept open too long or too often.•After installing the appliance or it has been switched off for a long time. |
| A layer of frost occurs in the compartment | Check that the air outlets are not blocked by food and ensure food is placed within the appliance to allow sufficient ventilation. Ensure that door is fully closed. To remove the frost, please refer to the “Cleaning and Care” chapter. |
| Temperature inside is too warm | You may have left the doors open too long or too frequently; or the doors are kept open by some obstacle; or the appliance is located with insufficient clearance at the sides, back and top |
| Temperature inside is too cold | Increase the temperature by following the “Display Controls” chapter. |
| Doors can’t be closed easily | Check whether the top of the refrigerator is tilted back by 10-15mm to allow the doors to self-close, or if something inside is preventing the doors from closing. |
| The light is not working | •The LED light may be damaged. Refer to replace LED lights in“ Cleaning and Care” chapter.•The control system has disabled the lights due to the door being kept open too long. Close and reopen the door to reactivate the lights. |
| Hear water bubbling in the refrigerator | This is normal. The bubbling comes from the refrigerant coolant liquid circulating through the refrigerator. |
Disposal of the appliance

DANGER
It is prohibited to dispose of this appliance as household waste.
Packaging materials
Packaging materials with the recycle symbol are recyclable. Dispose of the packaging into a suitable waste collection container to recycle it.
Before disposal of the appliance
- Pull out the main plug from the main socket.
- Cut off the power cord and discard with the main plug.

WARNING
Potential Suffocation Hazard! Potential death or brain damage could occur. Remove doors to prevent potential suffocation.
- To prevent potential suffocation hazard, remove your old refrigerators doors completely immediately. Leave shelves installed to help block children from climbing on or getting inside.
- When disposing of the appliance do so only at an authorized waste disposal center. Do not expose to flame.
Refrigerators contain refrigerant and gases in the insulation. Refrigerant and gases must be disposed of professionally as they may cause eye injuries or ignition. Ensure that tubing of the refrigerant circuit is not damaged prior to proper disposal
| Correct Disposal of this product | |
 | This symbol on the product or in its packing indicates that this product may not be treated as household waste. Instead, it should be taken to the appropriate waste collection point for the recycling of electrical and electronic equipment. By ensuring this product is disposed of correctly, you will have prevent potential negative consequences for the environment and human health, which could otherwise be caused by the inappropriate waste handling of this product. For more detailed information about the recycling of this product, please contact your local council, your household waste disposal service, or the shop where you purchased the product. |
" Copyright Statement © 2018 Hisense Company Ltd. All Rights Reserved. All material in this User Manual is the property of Hisense Company Ltd. and its subsidiaries, and is protected under US, CANADA, MEXICO and International copyright and/or other intellectual property laws. Reproduction or transmission of the materials, in whole or in part, in any manner, electronic, print, or otherwise, without the prior written consent of Hisense Company Ltd. is a violation of Hisense Company Ltd. rights under the aforementioned laws. No part of this publication may be stored, reproduced, transmitted or distributed, in whole or in part, in any manner, electronic or otherwise, whether or not for a charge or other or no consideration, without the prior written permission of Hisense Company Ltd. Requests for permission to store, reproduce, transmit or distribute materials may be made to one of the following addresses: USA: Hisense USA Corporation 7310 McGinnis Ferry Road Suwanee, GA 30024 CANADA: Hisense Canada Co., Ltd 2283 Argentina Road, Unit 16 Mississauga, ON, Canada L5N 5Z2 MEXICO: Hisense Mexico S. de R.L. de C.V. Blvd. Miguel de Cervantes Saavedra No 301 Torre Norte Piso 2, Col. Ampliación Granada Miguel Hidalgo, Ciudad de México, C.P. 11520 Hisense, and any and all other Hisense product names, logo's, slogans or marks are registered trademarks of Hisense Company Ltd. and its subsidiaries. All other trademarks are the property of their respective holders. ©2018. All rights reserved. Hisense and the Hisense logo are registered trademarks of Hisense. Other brand and product names are registered trademarks of their respective owners.
Hisense
natural_image
Two refrigerators with no visible text or symbols, one marked with a checkmark and the other without a checkmark, shown in side-by-side illustrations (no text or labels)natural_image
Line drawing of an open refrigerator with doors open, showing internal compartments and door mechanism (no text or symbols)natural_image
Diagram showing a mechanical component with an upward arrow and dot pattern, no text or symbols presentnatural_image
Line drawing of an open refrigerator with doors open, showing internal shelves and a hand holding the lid (no text or symbols)natural_image
Line drawing of a refrigerator interior showing door, drawer, and front panel (no text or symbols)natural_image
Diagram showing two views of a cabinet or enclosure with arrows indicating direction (no text or symbols)natural_image
Line drawing of an open refrigerator with a hand pointing to the door (no text or symbols)natural_image
Technical line drawing of a mechanical component with mounting holes and a downward arrow indicating force or direction (no text or symbols)natural_image
Technical line drawing of a refrigerator interior showing front, side, and top views (no text or labels)natural_image
Diagram of a mechanical device with directional arrows indicating motion or movement (no text or symbols)natural_image
Line drawing of a refrigerator with handle and side panel, no text or symbols presentnatural_image
Diagram of a door mechanism with arrows indicating clockwise motion (no text or symbols)Pantalla Celsius

natural_image
Illustration showing two steps of installing a flexible panel, one being open and the other holding a tray (no text or symbols present)Cajón
- Contents
- Important Safety Instructions
- WARNING
- DANGER
- CAUTION
- General safety and daily use
- Safety for children and infirm persons
- Refrigerator Overview
- Package Content:
- Note!
- Installing Your New Appliance
- Warning!
- Ventilation of appliance
- Note:
- Leveling of appliance
- Installing the handles
- Reversing the fridge door
- Freezer Door Removal
- Re-assembling the freezer door
- Display Controls
- Controlling the temperature
- Fridge
- Freezer
- Super freeze
- Holiday Mode
- Using your Refrigerator
- Using your refrigerator compartment
- Glass shelves and Door racks
- Drawer
- Using the freezer compartment
- Cleaning and Care
- Exterior cleaning
- Interior cleaning
- Door gasket cleaning
- Replacing the LED light
- Helpful Hints and Tips
- Energy Saving Tips
- Hints for fresh food refrigeration
- Hints for refrigeration
- Hints for freezing
- Hints for the storage of frozen food
- Switching off your appliance
- Troubleshooting
- Disposal of the appliance
- Packaging materials
- Before disposal of the appliance
- Hisense
- Cajón
Brand : HISENSE
Model : HBM17158SS
Category : Freezer