111.77086 - Air Conditioning KENMORE - Free user manual and instructions
Find the device manual for free 111.77086 KENMORE in PDF.


| Product Type | Window Air Conditioner |
| Model Number | 111.77086 |
| Brand | Kenmore |
| Cooling Capacity | 8,000 BTU |
| Room Coverage | Up to 350 sq ft |
| Energy Efficiency Ratio (EER) | 12.1 |
| Dimensions (W x H x D) | 19.5 x 14.5 x 22.5 inches |
| Weight | 55 lbs |
| Power Supply | 115 V / 60 Hz / 7.5 A |
| Plug Type | 3-prong grounded plug |
| Cooling Modes | Cool, Fan, Energy Saver |
| Fan Speeds | 3 (Low, Medium, High) |
| Thermostat Control | Digital with remote control |
| Timer | 24-hour programmable timer |
| Air Filter | Washable mesh filter |
| Installation Kit | Included (window bracket, side panels) |
| Maintenance | Clean filter every 2 weeks; wipe exterior with damp cloth |
| Safety Features | Overload protection, tip-over switch |
| Spare Parts Availability | Remote control, filters, fan motor available through Kenmore service |
| Repair Service | Contact Kenmore customer service or authorized repair centers |
Frequently Asked Questions - 111.77086 KENMORE
User questions about 111.77086 KENMORE
0 question about this device. Answer the ones you know or ask your own.
Ask a new question about this device
Download the instructions for your Air Conditioning in PDF format for free! Find your manual 111.77086 - KENMORE and take your electronic device back in hand. On this page are published all the documents necessary for the use of your device. 111.77086 by KENMORE.
USER MANUAL 111.77086 KENMORE
Safety Instructions 3
Features and Components 5 - 6
Installation 7-8
Control Setting 9 - 10
Drainage Instructions 11
Maintenance 12 - 13
Troubleshooting 14
Warranty 15
Service .... Back Cover
Read this Use & Care Guide carefully before product use. Keep the Use & Care Guide for later review.
IMPORTANT SAFETY INSTRUCTIONS
WARNING! When using electrical appliances, basic safety precautions should be followed, including the following:
- This air conditioner must be connected to proper electrical outlet with the correct electrical supply.
-
Proper grounding must be ensured to reduce the risk of shock and fire. DO NOT CUT OR REMOVE THE GROUNDING PRONG. If you do not have a three-prong electric receptacle outlet in the wall, have a certified electrician install the proper receptacle. The wall receptacle MUST be properly grounded.
-
Do not operate air conditioner if power cord is frayed or otherwise damaged. Avoid using it if there are any cracks or abrasion damage along the length, plug connector or if the unit malfunctions or is damaged in any manner. Contact an authorized service technician for examination and repairs.
-
DO NOT USE AN ADAPTER OR AN EXTENSION CORD.
-
Do not block airflow around the air conditioner. The exhaust hose should be free of any obstructions.
-
Always unplug the air conditioner before servicing it or moving it.
-
Do not install or use the air conditioner in any area where the atmosphere contains combustible gases or where the atmosphere is oily or sulfurous. Avoid any chemical coming in contact with your air conditioner.
-
Do not place any object on the top of the unit.
-
Never operate the air conditioner without filters in place.
-
Do not use the air conditioner in a bathroom or other highly humid environment.
-
Always unplug air conditioner when not in use.
-
Do not operate air conditioner with any safety devices removed.
-
Do not run power cord under carpeting. Do not cover cord with throw rugs, runners, or the like. Arrange cord away from traffic area where it will not be tripped over.
-
Do not block air openings or place air conditioner on a soft surface such as a bed or sofa.
-
Do not place the air conditioner on a small, unlevel, uneven or any other surface which might allow the unit to tip or fall.
-
For proper operation, air conditioner should be placed on a smooth, noncombustible surface. Always place this air conditioner on a level surface at least 20" (50 cm) away from any wall or object.
-
This appliance is not intended for use by persons (including children) with reduced physical, sensory or mental capabilities, or lack of experience and knowledge, unless they have been given supervision or instruction concerning use of the appliance by a person responsible for their safety.
-
Always insert the filters securely. Clean the filters every two weeks.
-
Operating with clogged filters may cause failures.
IMPORTANT SAFETY INSTRUCTIONS
- When moving the unit, make sure that it is in an upright position.
- Keep the unit away from gasoline, flammable gas, stoves and other heat sources.
- Don't disassemble, overhaul or modify the air conditioner, otherwise it will cause a malfunction or possibly bring harm to persons and properties. To avoid hazard, if a unit failure occurs, have the unit repaired before attempting to use it.
- Do not install and use the air conditioning in the bathroom or other humid environments.
- Do not pull the plug to turn off the unit operation.
- Do not place cups or other objects on the body to prevent water or other liquids from spilling into the air conditioner.
- Do not use insecticide sprays or other flammable substances near the air conditioning.
- Do not wipe or wash the air conditioner with chemical solvents such as gasoline and alcohol. When you need to clean the air conditioner, you must disconnect the power supply, and clean it with a half-wet soft cloth. If the unit is very dirty, scrub with a mild detergent.
- The appliance can be used by children aged from 8 years and above if they have been given supervision or instruction concerning use of the appliance in a safe way and understand the hazards involved.
- This appliance is intended for indoor residential use only, not for industrial or other commercial applications.
- This appliance is intended for private household use only!
SAVE THESE INSTRUCTIONS
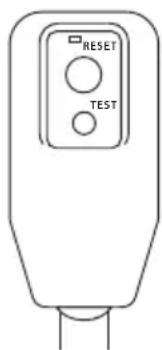
Power Plug
The power plug contains a device that senses damage to the power cord.
To test the power cord:
- Plug in the air conditioner. The plug has a Test and a Reset button.
- Press the TEST button and notice a click as the RESET button pops out.
- Press the RESET button. You will also hear a click as the RESET button engages.
- The power cord will now supply electricity to the unit.
- Always make sure the RESET button in pushed in for correct operation. The power cord must be replaced if it fails to reset after this test.
FEATURES AND COMPONENTS
This air conditioner features cooling, dehumidification, fan-only, and continuous water drainage functions.
The air louvers in top of the unit have an automatic air swing function that is activated from the remote control
The remote control can be placed on the back of the body for convenient out of the way storage.
Handles on both sides make unit easier to carry.
The plug storage plate enables the plug to be inserted into the back of the unit during storage.
Operation of the unit provides continuous air filtration.
The Timer function provides for automatic shutoff and delayed starting.
The unit is equipped with a variety of protection functions, such as automatic defrosting and a water pan overflow signal.
The unit features thermostatic operation. The thermostat senses the temperature of the air surrounding the unit. When the air reaches the set cooling temperature, the compressor shuts off and the fan continues to run at low speed. When the surrounding air temperature increases by approximately 2^0F , the compressor restarts to cool the air to the set temperature.
The dehumidification mode combines compressor operation and low fan speed to reduce humidity in damp rooms. Keep room doors and windows closed for effective dehumidification. The fan speed cannot be varied when the unit is set to dehumidify. The display screen will show dh; it will not show the relative humidity percentage of the air.
FEATURES AND COMPONENTS
Front Back
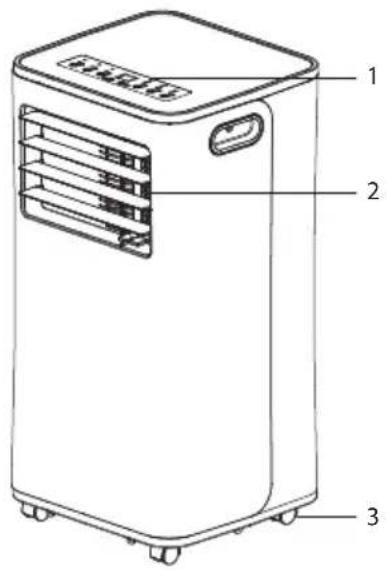
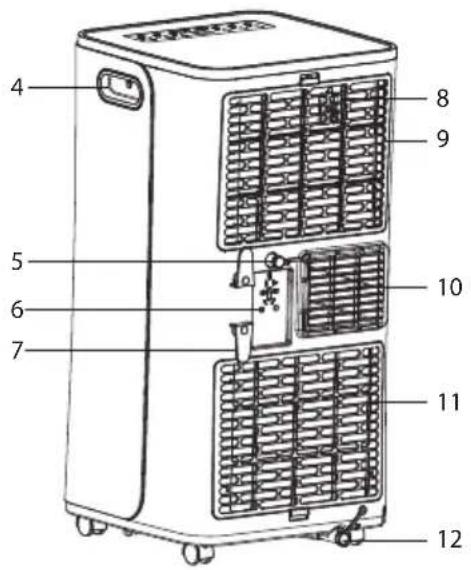
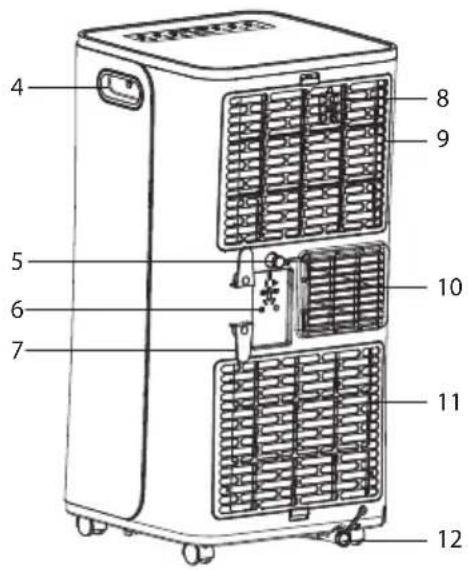
- Control Panel
- Air Louvers
- Casters
- Handle
- Upper Drainage Tube Port
- Plug Storage Plate
- Cord Wrap Hook
- Remote Control Storage
- Upper Filter Grille
- Air Exhaust Vent
- Lower (Air Intake) Filter Grille
- Lower Drainage Port
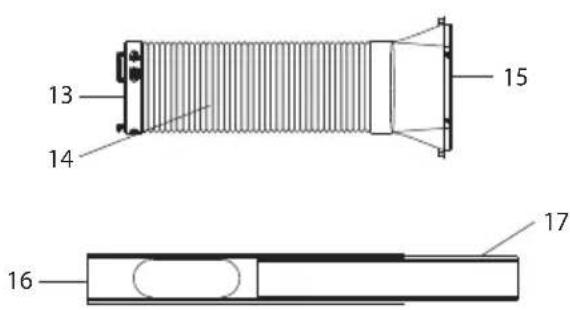
- Air Exhaust Hose Inlet Coupler
- Air Exhaust Hose
- Air Exhaust Hose Flared Outlet Coupler
- Window Slider Kit Piece 1
- Window Slider Kit Piece 2
Not Shown
· 3 L Brackets
· 2 Straight Brackets
· 2 Foam Strips (Adhesive)
· 1 Foam Strip (Non-adhesive)
· Drainage Tube
Air Exhaust Assembly
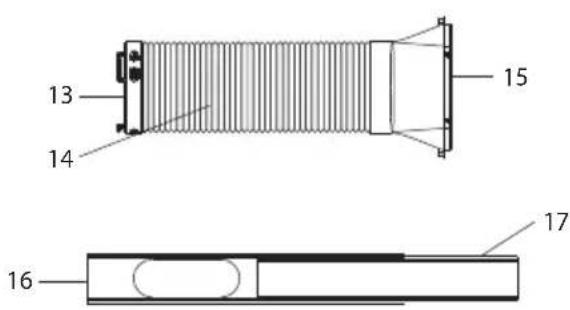
INSTALLATION AND ADJUSTMENT
Air Exhaust Hose Installation
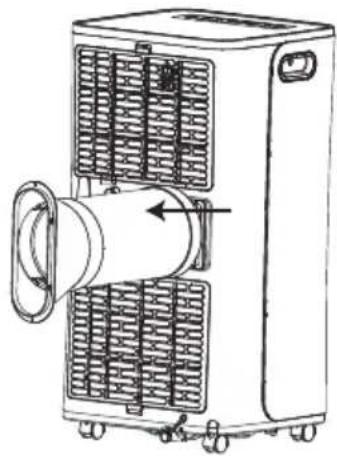
The couplers for the inlet and outlet ends of the air exhaust hose are shipped preattached to the hose. Ensure that they are securely screwed into place on the hose before hose installation.
- Slide the hose inlet end coupler to the left into the hose attachment frame of the air exhaust vent. See Fig. 1.
- Position the flared opening of the hose outlet over the elliptical opening in slider piece 1.
- Push the tabs at the top of the flared outlet into the slots on slider piece 1. Slide the hose outlet to the side so that the tabs engage in the slots.
-
Use a screw to secure the flared outlet to slider piece 1 on the side of the elliptical opening that will be nearest to the window frame.
-
Insert slider piece 2 into piece 1 and push until tight against the flared outlet ridge protruding through the elliptical opening. You may need to trim material off of the inner end of piece 2 to fit the width of the window opening.
Fig.1
natural_image
Technical line drawing of a mechanical device with cooling fans and a central pipe (no text or symbols)NOTE: If the window is narrower than 20.5", use only slider piece 1. Shorten the piece by cutting material from the end that is furthest from the hole. Do not cut from the end that is nearest to the hole.
Position Unit Near Window
IMPORTANT! Before using the air conditioner, keep it upright for at least two hours.
The four casters on the air conditioner base allow it to be easily pushed in an upright position across a level floor. There are handles on each side of the unit to allow it to be lifted straight up if necessary.
CAUTION! To avoid injury, use proper lifting technique when lifting the unit by its handles. Do not bend over from waist with legs straight. Bend knees down to lift with back straight.
natural_image
Diagram showing two different indoor air conditioning units connected by tubing, with arrows indicating airflow direction (no text or symbols present)INSTALLATION
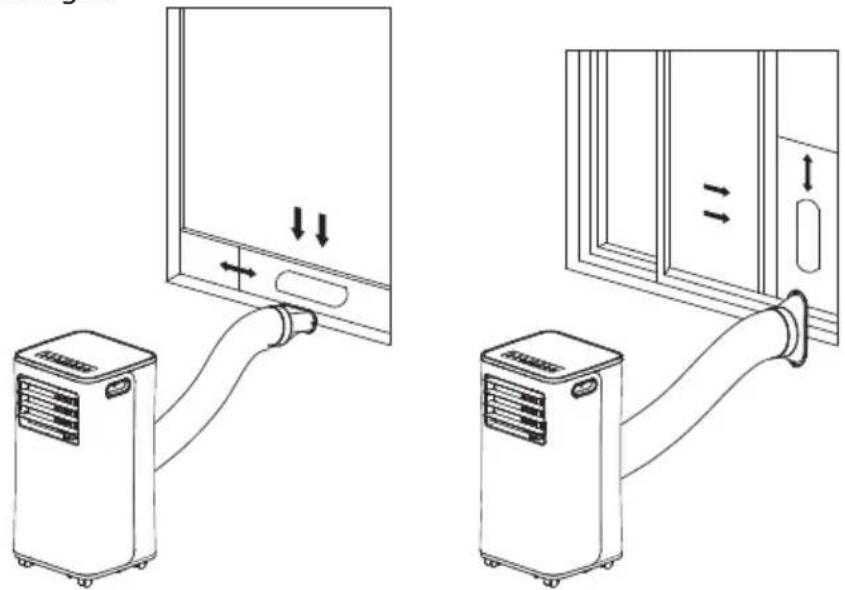
Install the Window Slider Kit
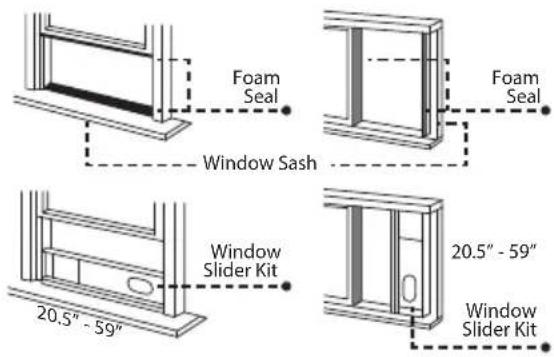
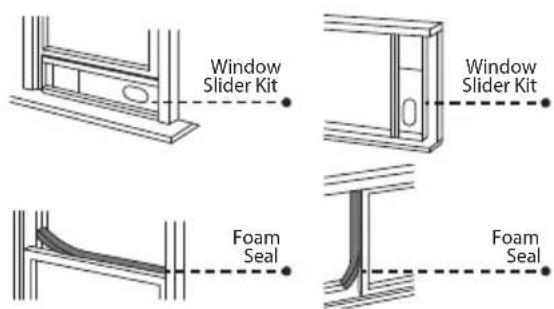
- Cut a length of foam seal (adhesive type) to the proper window opening width and attach it to the window sash.
- Extend the air exhaust hose to necessary length. Place the window slider kit (with flared outlet attached) onto the window sash.
- Cut a length of foam seal (adhesive type) to the proper width and attach it to the bottom (horizontally hung) or side (vertically hung) of the window.
- Close the window securely onto the window slider kit.
- Cut the foam seal (non-adhesive type) to an appropriate length and seal the open gap at the top of the window frame.
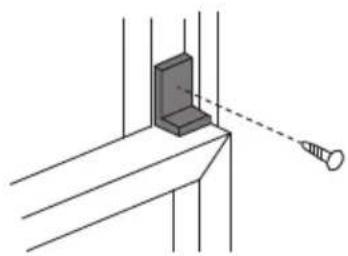
NOTE: You may use one of the supplied L brackets to secure the window closed (see figure to the right). Also, you may use the two supplied straight brackets to secure the top side of the slider kit to the window, and the other two L brackets to secure the bottom side of the slider kit to the window frame.
natural_image
Diagram of a mechanical assembly with a bracket and screw, no text or symbols presentNOTE: The length of the exhaust hose can be extended to 59 inches, but it is best to keep the length to a minimum. Make sure that the hose does not have any sharp bends. Do not use extension tubes or replace the supplied exhaust hose with a different hose, or a malfunction may result. There must be no obstructions within the hose, or the unit may overheat.
CONTROL SETTINGS
LED Control Panel
flowchart
graph TD
    A["Timer"] --> B["Clock Icon"]
    C["Low"] --> D["Star Icon"]
    E["High"] --> F["Light Bulb Icon"]
    G["⑧"] --> H["Arrow Up"]
    G --> I["Arrow Down"]
    J["Sleep"] --> K["Light Star Icon"]
    L["Fan"] --> M["Circle Icon"]
    N["Dehum"] --> O["Circle Icon"]
    P["Cool"] --> Q["Circle Icon"]
    R["Water Full"] --> S["Circle Icon"]
    T["Power"] --> U["Circle Icon"]
    V["①"] --> W["Circle Icon"]
    X["②"] --> Y["Circle Icon"]
    Z["③"] --> AA["Arrow Up"]
    AB["④ 5 6 7"] --> AC["Arrow Down"]
-
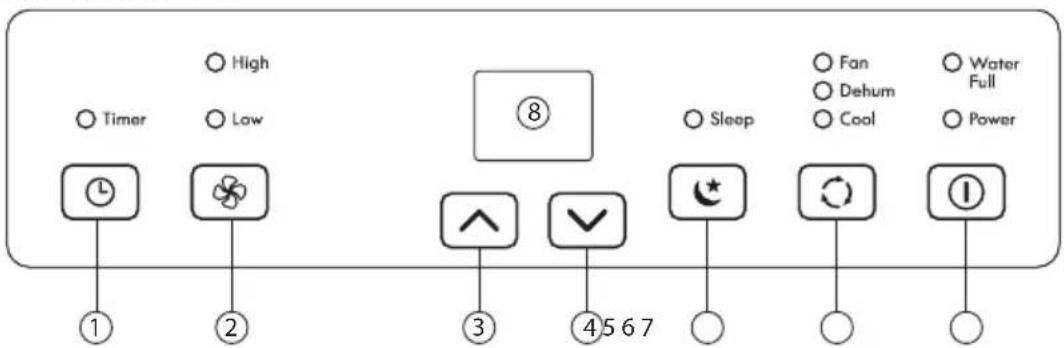
Timer Key
-
Fan Speed Selection Key
-
Up Key
-
Down Key
-
Sleep Mode Key
-
Mode Selection Key
-
Power Key
-
Display Screen
Plug the power cord of the unit into a 3-prong wall receptacle. You will hear a beep and the display screen will illuminate, showing digits for the surrounding air temperature. Press the Power Key. The air louvers on the front of the unit will open and the unit will begin operating in Cool mode. Press Up or Down key to adjust Cool temperature setting. Press Mode key to toggle from Cool to Dehum (dehumidification) to Fan (fan-only) operation mode.
1 Timer Key – The Timer can be set from 1 to 24 hours in one-hour increments.
Shutoff Time – With power on, press the Timer key. Digits will start to flash in the display and the Hr indicator will light. While display is flashing, press the up and down keys to select the desired number of run time hours. After a few seconds the temperature digits will display and the Hr indicator will remain lit. The unit will run for the set time and then shut off.
Delayed Start Time – With the power off, press the Timer key. Digits will start to flash in the display and the Hr indicator will light. While the display is flashing, press the up and down keys to select the desired number of hours before startup. After a few seconds the temperature digits will display and the Hr indicator will remain lit. The unit will begin to run after the set number of hours has passed.
To cancel Timer settings press the Timer key twice in quick succession. The Hr indicator will turn off.
2 Fan Speed Selection Key – In Cool and Fan mode, press the Fan key to select high (F2) or low (F1) fan speed. In Dehum mode, the fan defaults to the lowest speed (F1).
3, 4 Up and Down Keys – Press the up or down key to adjust the desired cooling temperature. While pressing Timer key, press up or down key to select the desired shutoff or delayed start time span. Simultaneously press both keys to switch between Celsius (°C) and Fahrenheit (°F).
5 Sleep Mode – In Cool mode press Sleep key to turn on Sleep mode. After one hour the temperature setting will increase by one degree, and by one more degree after another hour, to accord with how your body naturally cools while asleep. Fan speed is low for quiet operation. Press Sleep key again to turn Sleep mode off. The temperature will return to original setting.
CONTROL SETTINGS
6 Mode Selection Button – Press Mode key to switch between modes. With each press, the mode indicator will light up in sequence from Cool ---> Dehum ---> Fan 7 Power Key – Press the key to turn unit operation on or off. With key off the display shows surrounding air temperature.
Remote Control
Point the remote control at the unit control panel when pressing remote control keys. You will hear the unit beep to confirm remote control key activation.
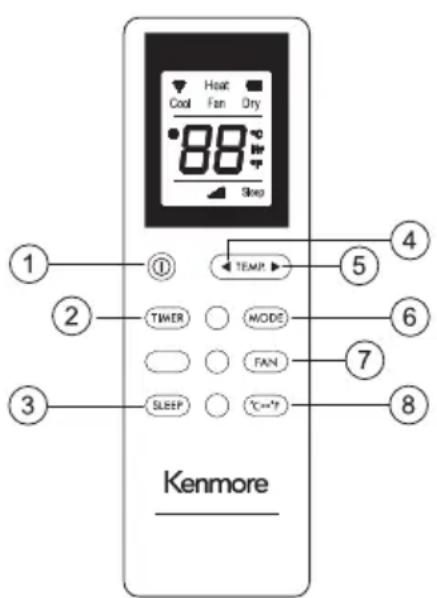
1 Power – Press Ⓘ key to turn unit operation on and off.
2 Timer – Press TIMER key to set the timer.
3 Sleep – Press SLEEP key to turn on sleep mode.
4 Down – Press ◀ key to reduce temperature and adjust timer setting.
5 Up – Press ▶ key to increase the temperature and adjust timer setting.
6 Mode – Press MODE key to switch between cooling, dehumidifying and fan-only mode.
7 Fan – Press FAN key to select high or low wind speed.
8 Temperature unit converter - ^ F ^ C
Protective Functions
Frost Protection – In Cool and Dry modes, if the temperature of the compressor becomes too low, the unit will automatically enter protection status. Once coil rises to a sufficient temperature, the unit will automatically revert to normal operation.
Overflow Protection – When water in the water pan exceeds the maximum level, the unit will beep, stop running, and the display screen will show FL. The water in the pan must be drained empty before the unit will resume operation. See the Drainage Instructions in the next section of this Use & Care Guide.
Automatic Defrosting – The air conditioner has automatic defrosting. During defrosting, the compressor will stop working for about 3-5 minutes, during which time the fan continues to run.
Automatic Thermal Protection – The air conditioner has automatic thermal protection to protect against overheating. When thermal protection is activated, the compressor and motor will stop. Once cooled to a safe operation temperature, the unit can be restarted.
DRAINAGE INSTRUCTIONS
Manual drainage
- When the unit stops after the water pan is full, press the power key to turn off power to the unit, and then unplug the power plug. Note: Move the unit carefully so as not to spill the water in the water pan at the base.
- Place a water container below the bottom drainage port of the unit.
- Unscrew the drain cap and remove the water plug. Water will automatically flow into the water container.
Notes
· During drainage, tilt the unit slightly backwards.
- If you see that your water container will not hold all the water, before it is full insert the water plug back into the drain port to prevent water from spilling onto the floor.
- You may use the drainage tube in the bottom drainage port if it is helpful to do so. See instructions for tube insertion in Continuous drainage below.
4. When the all the water is drained from the unit, insert the water plug and retighten the drain cap.
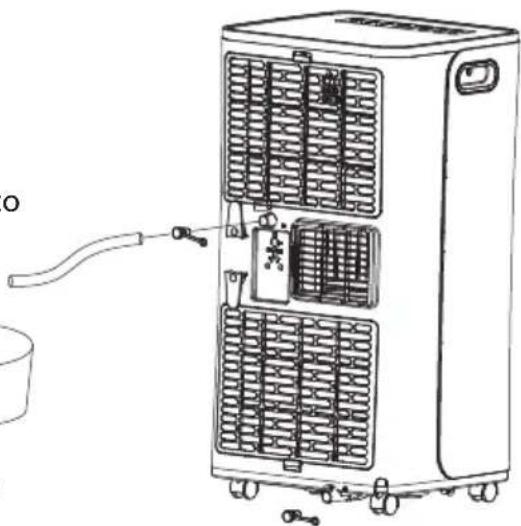
Continuous drainage
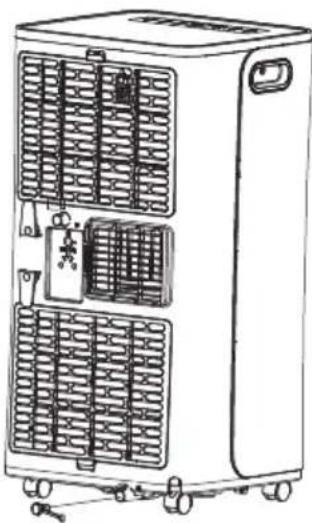
- Unscrew the drain cap and remove the water plug from the drainage tube port in the middle back of the unit.
- Push one end of the drainage tube into the drainage port.
- Set the other end of the drainage tube into a water container or floor drain. Allow water pan to drain.
Note: If your water container becomes full, a water backup may occur that will fill the unit water pan and result in unit shutdown. Remove the adapter end and place into another empty container or floor drain. Allow water pan to drain.
- When the all the water is drained from the unit, insert the water plug and retighten the drain cap.
natural_image
Line drawing of a portable air conditioner unit with cooling fans and control panel (no text or symbols)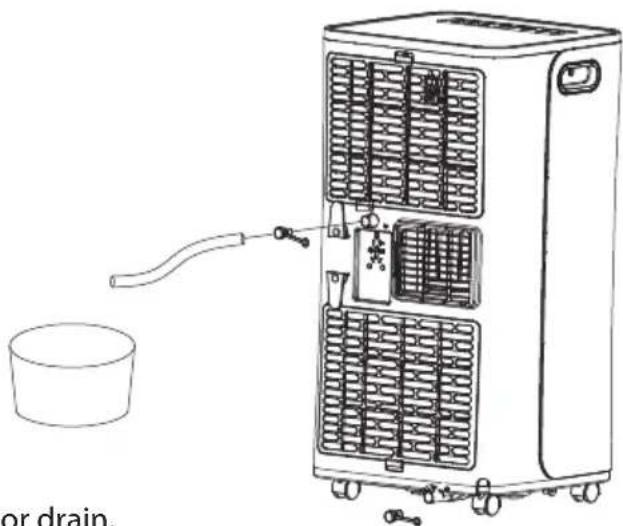
natural_image
Line drawing of a portable air purifier with a cylindrical container nearby (no text or symbols)MAINTENANCE
Cleaning
Before cleaning and maintenance, press the power key is pressed to off and unplug the power cord from the electrical outlet.
Clean the exterior surface
Clean with surface of machine with a wet soft cloth. Don't use chemicals such as alcohol, gasoline, etc.; otherwise, the surface of the air conditioning will be damaged or even the whole machine will be damaged.
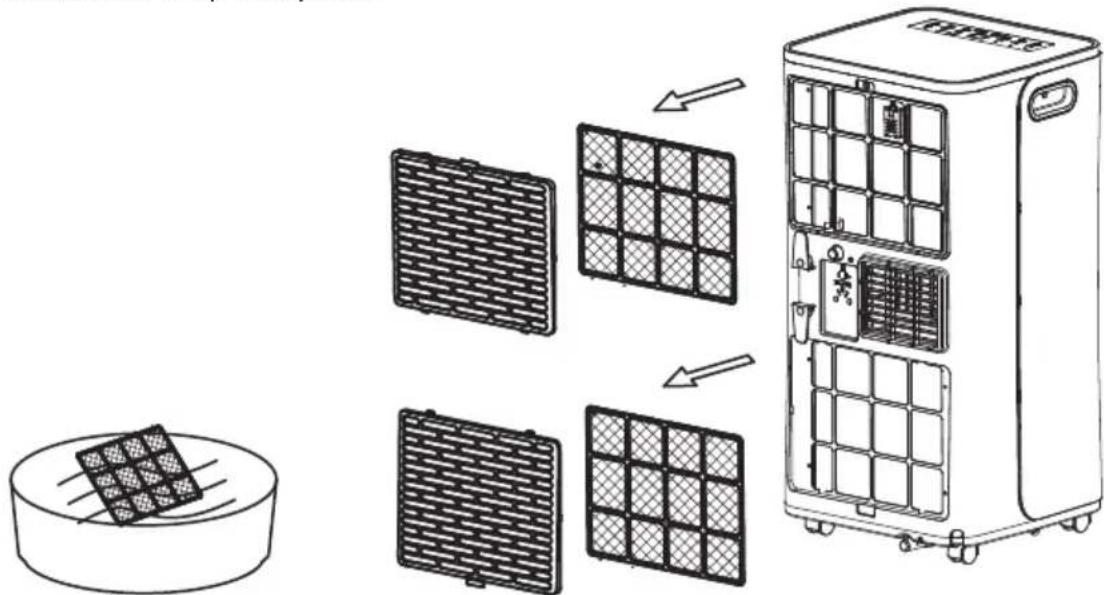
Clean the filter screens
If the filter screens become clogged with dust the effectiveness of the air conditioner is reduced. Be sure to clean the filter screens once every two weeks. To purchase new filter screens call 1-844-553-6667
To clean upper filter screen
- Remove Remote Control from storage slot in upper filter grille.
- Insert fingertips beneath PULL tab at top of screen grille and pull outward to remove.
- Remove upper filter screen. Place the screen into warm water (about 104^ F/ 40^ C) with mild detergent and allow it to air dry after rinsing clean.
- Once screen is completely dry, insert back into place in unit.
- To reinstall grille, insert tabs at bottom of grille into slots in unit frame. Push grille forward to snap into place.
To clean the lower filter screen
- Insert fingertips beneath PULL tab at bottom of screen grille and pull outward to remove.
- Remove lower filter screen. Place the screen into warm water (about 104^ F/ 40^ C) with mild detergent and allow it to air dry after rinsing clean.
- Once screen is completely dry, insert back into place in unit.
- To reinstall grille, insert tabs at top of grille into slots in unit frame. Push grille forward to snap into place.
MAINTENANCE
Postseason Storage
- If unit is hooked up for continuous drainage, unscrew the middle drain cap, unplug the water plug, and discharge the water into other water containers or floor drain. If unit is not connected for continuous drainage, empty the pan according to the manual drainage instructions.
- Turn on the air conditioner, adjust it to low-low fan speed, and run unit until for a period of time so as to dry out moisture from inside the unit to prevent formation of mildew during storage.
- Turn off the air conditioner, unplug the power plug from wall receptacle and insert the power plug prongs into the plug storage plate on the back of the unit. Reinstall the water plug and the drainage cap.
- Remove the air exhaust hose and store in a secure place.
- Cover the air conditioner with a plastic bag. Store the unit in a dry place, keep it out of the reach of children, and take dust control measures.
TROUBLESHOOTING
If problems not listed in the table occur or recommended solutions do not work, contact a qualified service dealer for repair. Do not disassemble the air conditioner. Unqualified repair will void the warranty, and may cause injury to users or damage to property.
| Problems Reasons Solutions | ||
| The air conditioner does not work. | There is no electricity. | Turn unit on after connecting it to a socket with electricity. |
| The overflow indicator displays FL. | Discharge the water inside. | |
| The ambient temperature is too low or too high | Run the unit within the ambient temperature range of 44-95 °F (7-35°C). | |
| In cooling mode, the room temperature is lower than the set temperature | Change the set temperature. | |
| In dehumidification mode, the ambient temperature is low. | Place the unit in a room with an ambient temperature of greater than 62 °F (17 °C). | |
| The cooling effect is not good | There is direct sunlight. | Pull the room curtain closed. |
| Doors or windows are open; there are a lot of people in the room; or in cooling mode, there are other sources of heat. | Close doors and windows, and add new air conditioner. | |
| The filter screen is dirty. | Clean or replace the filter screen. | |
| The air inlet or outlet is blocked. | Clear obstructions. | |
| Loud Noise | The air conditioner is not placed on a flat surface. | Put the air conditioner on a flat and hard place (to reduce noise). |
| Compressor does not work. | Overheat protection is active. | Wait for 3 minutes until unit cools, then restart. |
| The remote control does not work. | The distance between the unit and the remote control is too far. | Move the remote control closer to the air conditioner, and make sure that the remote control directly faces in the direction of the remote control receiver on the unit. |
| The remote control is not aligned with the direction of the remote control receiver. | ||
| Batteries are dead. | Replace batteries. | |
| Displays E1 | The coil temperature sensor is malfunctioning. | Call for service. |
| Displays E2 | The room temperature sensor is malfunctioning. | Call for service. |
WARRANTY
KENMORE LIMITED WARRANTY
FOR ONE YEAR from the date of sale this appliance is warranted against defects in material or workmanship when It is correctly installed, operated and maintained according to all supplied instructions.
WITH PROOF OF SALE a defective appliance will receive free repair or replacement at option of seller.
For warranty coverage details to obtain free repair or replacement, visit the web page: www.kenmore.com/warranty
This warranty applies for only 90 DAYS from the date of sale if this appliance is ever used for other than private household purposes.
This warranty covers ONLY defects in material and workmanship, and will NOT pay for:
- Expendable items that can wear out from normal use, including but not limited to filters, belts, bags or screw-in base light bulbs.
- A service technician to clean or maintain this appliance, or to instruct the user in correct appliance installation, operation and maintenance.
- Service calls to correct appliance installation not performed by Sears authorized service agents, or to repair problems with house fuses, circuit breakers, house wiring, and plumbing or gas supply systems resulting from such installation.
- Damage to or failure of this appliance resulting from installation not performed by Sears authorized service agents, including installation that was not in accord with electrical, gas or plumbing codes.
- Damage to or failure of this appliance, including discoloration or surface rust, if it is not correctly operated and maintained according to all supplied instructions.
- Damage to or failure of this appliance, including discoloration or surface rust, resulting from accident, alteration, abuse, misuse or use for other than its intended purpose.
- Damage to or failure of this appliance, including discoloration or surface rust, caused by the use of detergents, cleaners, chemicals or utensils other than those recommended in all instructions supplied with the product.
- Damage to or failure of parts or systems resulting from unauthorized modifications made to this appliance.
- Service to an appliance if the model and serial plate is missing, altered, or cannot easily be determined to have the appropriate certification logo.
Disclaimer of implied warranties: limitation of remedies
Customer's sole and exclusive remedy under this limited warranty shall be product repair or replacement as provided herein. Implied warranties, including warranties of merchantability or fitness for a particular purpose, are limited to one year or the shortest period allowed by law. Seller shall not be liable for incidental or consequential damages. Some states and provinces do not allow the exclusion or limitation of incidental or consequential damages, or limitation on the duration of implied warranties of merchantability or fitness, so these exclusions or limitations may not apply to you.
This warranty applies only while this appliance is used in the United States.
This warranty gives you specific legal rights, and you may also have other rights which vary from state to state.
Sears Brands Management Corporation, Hoffman Estates, IL 60179
TABLA DE CONTENIDO
Air Exhaust Assembly
No mostrada
natural_image
Line drawing of a portable air conditioner unit with cooling fans and ventilation slots (no text or symbols)natural_image
Diagram showing two household air conditioner units connected by tubing, with arrows indicating airflow direction (no text or symbols)INSTALACION
natural_image
Diagram of a mechanical assembly with a bracket and screw, no text or symbols presentnatural_image
Line drawing of a portable air conditioner unit with cooling fans and control panel (no text or symbols)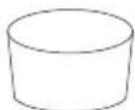
natural_image
Line drawing of a multi-level industrial air conditioner unit with cooling fins and a water tap (no text or symbols)MANTENIMIENTO
Limpieza
MANTENIMIENTO
Sears Brands Management Corporation, Hoffman Estates, IL 60179
Kenmore®
Customer Care Hotline
To schedule in-home repair service or order replacement parts
- IMPORTANT SAFETY INSTRUCTIONS
- SAVE THESE INSTRUCTIONS
- Power Plug
- FEATURES AND COMPONENTS
- Not Shown
- INSTALLATION AND ADJUSTMENT
- Air Exhaust Hose Installation
- Position Unit Near Window
- INSTALLATION
- CONTROL SETTINGS
- Remote Control
- Protective Functions
- DRAINAGE INSTRUCTIONS
- Manual drainage
- Notes
- Continuous drainage
- MAINTENANCE
- Cleaning
- Clean the exterior surface
- Clean the filter screens
- To clean upper filter screen
- To clean the lower filter screen
- Postseason Storage
- TROUBLESHOOTING
- WARRANTY
- KENMORE LIMITED WARRANTY
- This warranty covers ONLY defects in material and workmanship, and will NOT pay for:
- Disclaimer of implied warranties: limitation of remedies
- TABLA DE CONTENIDO
- No mostrada
- INSTALACION
- MANTENIMIENTO
- Limpieza
- Kenmore®
- Customer Care Hotline
Brand : KENMORE
Model : 111.77086
Category : Air Conditioning