
HMDR1000WE - Freezer Magic Chef - Free user manual and instructions
Find the device manual for free HMDR1000WE Magic Chef in PDF.


| Product Type | Chest Freezer |
| Model | HMDR1000WE |
| Brand | Magic Chef |
| Total Capacity | 10.0 cu ft |
| Dimensions (W x D x H) | 32.1 x 27.6 x 35.2 inches |
| Weight | 105 lbs |
| Power Supply | 115 V, 60 Hz |
| Amperage | 1.5 A |
| Energy Consumption | 365 kWh/year |
| Temperature Range | -10°F to 10°F |
| Defrost Type | Manual Defrost |
| Refrigerant | R-600a |
| Adjustable Thermostat | Yes |
| Removable Basket | Yes |
| Interior Light | No |
| Lock and Key | No |
| Castors / Wheels | No |
| Energy Star Certified | Yes |
| Noise Level | ~40 dB |
| Warranty | 1 Year Parts and Labor |
| Maintenance | Clean condenser coils annually; defrost when frost exceeds 1/4 inch |
| Safety Features | Power-on indicator, temperature control knob, proper ventilation required |
Frequently Asked Questions - HMDR1000WE Magic Chef
User questions about HMDR1000WE Magic Chef
0 question about this device. Answer the ones you know or ask your own.
Ask a new question about this device
Download the instructions for your Freezer in PDF format for free! Find your manual HMDR1000WE - Magic Chef and take your electronic device back in hand. On this page are published all the documents necessary for the use of your device. HMDR1000WE by Magic Chef.
USER MANUAL HMDR1000WE Magic Chef
10.1 Cu. Ft.
Top Mount Refrigerator
User's Manual

natural_image
Front view line drawing of a double refrigerator with a handle and side legs (no text or symbols)Specifications are subject to change without prior notice for purpose of product improvement.

Product Registration
Thank you for purchasing a Magic Chef® product. The first step to protect your new product is to complete the product registration on our website: www.mcappliance.com/register. The benefits of registering your product include the following:
- Registering your product will allow us to contact you regarding a safety notification or product update.
- Registering your product will allow for more efficient warranty service processing when warranty service is required.
- Registering your product could act as your proof of purchase in the event of insurance loss.
Once again, thank you for purchasing a Magic Chef® product.
TABLE OF CONTENTS
NAMES OF THE PARTS 3
IMPORTANT SAFETY INSTRUCTIONS 4 - 5
INSTALLATION INSTRUCTIONS
FREEZING FRESH FOODS 8
CHANGING THE REVERSIBLE DOOR 9-11
CARE AND MAINTENANCE
CLEANING YOUR REFRIGERATOR....12
VACATION TIME 12
MOVING YOUR REFRIGERATOR 12
ENERGY SAVING TIPS 12
TROUBLE SHOOTING GUIDE.... 13 - 14
LIMITED WARRANTY.... 15
MODEL NO. HMDR1000WE / HMDR1000BE / HMDR1000SE / HMDR1000ST

- Freezer Section
- Freezer Shelf
- Freezer Temperature Control
- Refrigerator Temperature Control
- Refrigerator Shelves
- Vegetable Crispers (2) With Glass Cover
- Leveling Leg
- Freezer Door
- Freezer Door Bins
- Refrigerator Door
- Refrigerator Door Bins
WARNING: Never touch the interior of the Freezer Chamber or frozen foods in the compartment with wet hands as this could result in frost bite.
IMPORTANT SAFETY INSTRUCTIONS
| WARNING | To reduce the risk of fire, electrical shock, or injury when using your refrigerator, follow these basic precautions: |
| Read all instructions before using the refrigerator.DANGER or WARNING: Risk of child entrapment.To avoid the possibility of child entrapment, please take the following precautions before throwing out the refrigerator.Remove all doors from the unit.Leave the shelves in place so that children may not easily climb inside.Never allow children to operate, play with, or crawl inside the refrigerator.Never clean refrigerator parts with flammable fluids. The fumes can create a fire hazard or explosion.Do not store or use gasoline or any other flammable vapors and liquids in the vicinity of this or any other refrigerator. The fumes can create a fire hazard or an explosion.-Save these instructions- | |

WARNING
To reduce the risk of fire, electrical shock, or injury follow these basic precautions when using your refrigerator.
1) WARNING—Keep ventilation openings, in the appliance enclosure or in the built-in structure, clear of obstruction.
2) WARNING—Do not use mechanical devices or other means to accelerate the defrosting process, other than those recommended by the manufacturer.
3) WARNING—Do not damage the refrigerant tubing to increase the risk of a leak when handle, move and use of refrigerator.
4) WARNING—Do not use electrical appliances inside the food storage compartments of the appliance, unless they are of the type recommended by the manufacturer.
5) WARNING—DANGER: Never allow children to play with, operate, or crawl inside the refrigerator. Risk of child entrapment. Before you throw away your old refrigerator or freezer:
• Take off the doors
- Leave the shelves in place so that children may not easily climb inside.
6) The appliance has to be unplugged before carrying out user maintenance on the appliance.
7) This appliance can be used by children age 8 years and above and persons with reduced physical sensory or mental capabilities or lack of experience and knowledge if they have been given supervision or instruction concerning use of the appliance in a safe way and understand the hazards involved. Children should not play with the appliance. Cleaning and maintenance should not be made by children without supervision.
8) If the component part is damaged, it must be replaced by the manufacturer, its service agent or similar qualified persons in order to avoid a hazard.
9) Please abandon the refrigerator according to local regulations as the unit contains flammable blowing gas and refrigerant.
10) Follow local regulations regarding disposal of the appliance due to flammable refrigerant and blowing gas. All refrigeration products contain refrigerants, which under the guidelines of federal law must be removed before disposal. It is the consumer's responsibility to comply with federal and local regulations when disposing of this product.
11) This appliance is intended to be used in household and similar environments such as
- staff kitchen areas in shops, offices and other working environments;
- farm houses and by clients in hotels, motels and other residential type environments;
• bed and breakfast type environments;
• catering and similar non-retail applications.
12) Do not store or use gasoline or any inflammable liquors and liquids inside or in the vicinity of refrigerator.
13) Do not use an extension cord with this appliance. If the power cord is too short, have a qualified electrician install an outlet near the appliance. Use of an extension can negatively affect the unit's performance.

Caution: risk of fire

IT IS HAZARDOUS FOR ANYONE OTHER THAN AUTHORIZED SERVICE PERSONNEL TO CARRY OUT SERVICES OR REPAIRS INVOLVING THE REMOVAL OF COVERS.

TO AVOID THE RISK OF AN ELECTRICAL SHOCK DO NOT ATTEMPT REPAIRS YOURSELF.
INSTALLATION INSTRUCTIONS
Before Using Your Refrigerator
- Remove the exterior and interior packing.
- Before connecting the refrigerator to the power source, let it stand upright for approximately 4 hours. This will reduce the possibility of a malfunction in the cooling system from improper handling during transportation.
- Clean the interior surface with lukewarm water using a soft cloth. (Cleaning instruction on page 12)
Installing Your Refrigerator
• This appliance is designed to be free standing only, and should not be recessed or built-in.
- Place your refrigerator on a floor that is strong enough to support the refrigerator when it is fully loaded.
- Allow 5 inches of space between the back and sides of the refrigerator, which allows the proper air ventilation. Adjust the feet to keep the refrigerator level.
- Locate the refrigerator away from direct sunlight and sources of heat (stove, heater, radiator, etc.). Direct sunlight may affect the acrylic coating and heat sources may increase electrical consumption. Ambient temperature below 50°F (10°C) or above 85°F (29.4°C) will hinder the performance of this appliance. This unit is not designed for use in a garage or any other outside installation.
- Avoid locating the refrigerator in moist areas.
- Plug the refrigerator into dedicated, properly installed-grounded wall outlet. Do not under any circumstances cut or remove the third (ground) prong from the power cord. Any questions concerning power and/or grounding should be directed toward a certified electrician or an authorized service center. This unit is not designed to be installed in an RV or used with an inverter.
- After plugging the appliance into a wall outlet, turn the unit on and allow the unit to cool down for 2\~3 hours under before placing food in the refrigerator or freezer compartment.
Electrical Connection
WARNING
Improper use of the grounded plug can result in the risk of electrical shock. If the power cord is damaged, have it replaced by an authorized service center.
This refrigerator should be properly grounded for your safety. The power cord of this refrigerator is equipped with a three-prong plug which mates with standard three prong wall outlets to minimize the possibility of electrical shock.
Do not, under any circumstances, cut or remove the third ground prong from the power cord supplied.
This refrigerator requires a standard 115 Volt A.C. \~/60Hz electrical outlet with three-prong ground.
This refrigerator is not designed to be used with an inverter.
The cord should be secured behind the refrigerator and not left exposed or dangling to prevent accidental injury.
Never unplug the refrigerator by pulling the power cord. Always grip the plug firmly and pull straight out from the receptacle.
Do not use an extension cord with this appliance. If the power cord is too short, have a qualified electrician or service technician install an outlet near the appliance. Use of an extension cord can negatively affect the performance of the unit.
If any problems with the appliance persist, please contact our Customer Service Dept. to consult with a representative at 888 775-0202 or visit our website to request warranty service at www.mcappliance.com.
Do not attempt to repair or replace any part of your refrigerator unless it specifically recommended in this manual. All other servicing should be referred to a qualified technician, so as to minimize the risk of possible ignition due to incorrect parts or improper service.
Temperature Control Panels
• Refrigerator Temperature Control
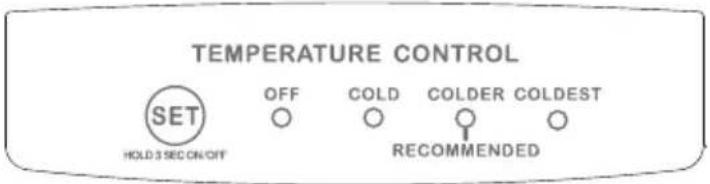
SET(HOLD 3 SEC ON/OFF): This will turn off all cooling functions but not the power to the unit.
- Freezer Control

Setting the Temperature Control
- Your refrigerator has one control for regulating the temperature. The temperature control is located on the top of the refrigerator compartment. As well as a control knob in the freezer to balance the cold air distribution between the two compartments.
- The temperature control in the refrigerator compartment will control the actual cooling cycle whereas the control knob in the freezer compartment will adjust the distribution of the cold air between the freezer and the refrigerator compartments.
- The first time you turn the unit on, adjust the temperature control knob to "COLDEST" in the freezer compartment and "COLDEST" in the refrigerator compartment and run for at least 4 hours before placing foods inside. Then return selector to "Recommended" or COLDER position in the freezer compartment and "Recommended" or COLDER in the refrigerator compartment.
- Adjust the temperature control to the setting that best suits your needs. The setting of "Recommended" in the refrigerator compartment and "COLDER" in the freezer compartment will distribute the cold air equally between both compartments which should be appropriate for home or office refrigerator use.
- If you at any time want to distribute a larger amount of cold air to the freezer for example is a large amount of food has been added to the freezer, simply move the controller to the "COLDEST" position until the desired temperature has been attained then return the controller to the "Recommended" position.
- If you at any time want to distribute a larger amount of cold air to the refrigerator section, for example to quickly cool down if a large amount of fresh food has been added, simply move the controller in the freezer to the "COLD" position until the desired temperature has been attained and then return the controller to the "Recommended" position.
NOTE:
If the unit is unplugged, has lost power, or is turned off, you must wait 3 to 5 minutes before restarting the unit. If you attempt to restart before this time delay, the refrigerator-freezer will not start.
NOTE:
We do not recommend the installation of the refrigerator where the temperature will drop below 50^ F ( 13^ C) or rise above 110^ F ( 43^ C). The compressor will not be able to maintain proper temperatures inside the refrigerator.
NOTE:
For installations where the temperatures will drop below 50^ F set the freezer temperature control to the “coldest” setting. This will improve the operations of the refrigerator under these conditions.
Freezing Fresh Foods
- Proper use of the appliance, adequately packed food, correct temperature and taking into account hygienic precautions will substantially influence the quality of freezing the food or storing of the frozen foods.
• This compartment is designed for the long-term storage of frozen food.
• The storage life of frozen foods varies and the recommended storage time should not be exceeded. - Pre-packed commercially frozen food should be stored in accordance with the frozen foods manufacturer's instructions for a three star frozen food storage compartment or home freezer.
- Place frozen food into the freezer as quickly as possible after purchase. If there are instructions on the packet, carefully follow these instructions regarding storage times.
• Carefully select food you intend to freeze, it should be of adequate quality and suitable for freezing.
• Use correct packaging and wrap it tight. - The packaging should be airtight and shouldn't leak since this could cause substantial vitamin loss and dehydration of foods.
- Foils and bags should be soft enough to tightly wrap around the foods.
- When preparing foods to be frozen, consider sanitary precautions.
• Mark packages with following data: kind and amount of foods and the date of loading.
• It is extremely important that the food is frozen as quickly as possible. - If the loading amount is too large, the quality of freezing is reduced which affects the quality of frozen foods.
CHANGING THE REVERSIBLE DOOR
Tool required: Philips screwdriver, Flat bladed screwdriver, Hexagonal spanner.
• Ensure the unit is unplugged and empty.
- To take the door off, it is necessary to tilt the unit backwards. You should rest the unit on something solid so that it will not slip during the door reversing process.
• All parts removed must be saved to do the reinstallation of the door.
- Do not lay the unit flat as this may damage the coolant system.
It's better that 2 people handle the unit during assembly.
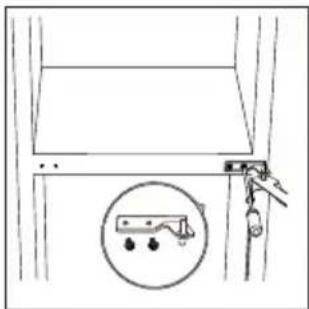
- Unscrew top hinge cover and then unscrew the top hinge. Then lift upper door and place it on a soft pad to avoid scratch and damage.
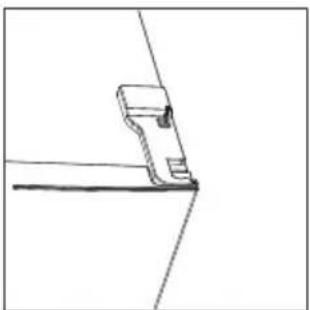
natural_image
Simple line drawing of a mechanical clip or bracket with no text or symbols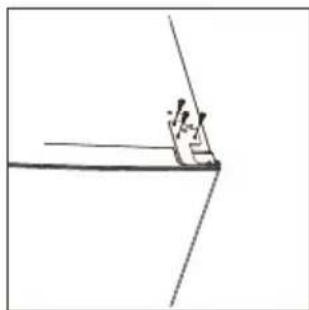
natural_image
Simple line drawing of a person sitting on a pole with a small object nearby (no text or symbols)- Remove the pin with a screwdriver and flip the hinge bracket. Then refit the pin to hinge bracket.
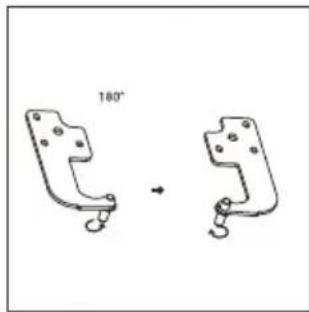
- Remove the top left screw cover.
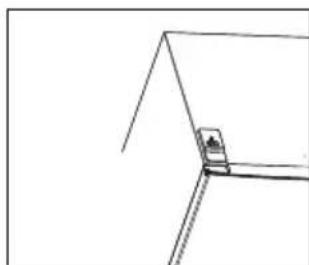
natural_image
Simple line drawing of a corner structure with a small object on one end (no text or symbols)- Unscrew middle hinge.

natural_image
Simple line drawing of a door with a hanging handle and a circular inset showing a small object (no text or symbols)- Move shaft sleeve and pin hole plug from left side to right side.

natural_image
Simple line drawing of a rectangular frame with a curved top edge and dashed arc indicating a radius (no text or symbols)- Move the middle hinge hole covers from left side to right side.

natural_image
Pure diagram of a mechanical or structural assembly with no text, numbers, or symbols- Unscrew bottom hinge. Then remove the adjustable feet from both side.
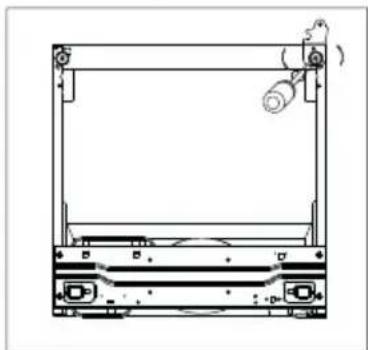
natural_image
Technical line drawing of a mechanical device with no visible text or symbols
natural_image
Line drawing of a laboratory apparatus with heating elements and a hanging clamp (no text or symbols)- Move the bottom hinge hole covers from left side to right side.

natural_image
Pure diagram of a symmetrical mechanical or structural component with no text, numbers, or symbols- Disassemble right hinge, find out right bottom hinge from spare parts bags and fix it.

natural_image
Diagram showing a device before and after transformation, with no visible text or symbols- Refit the bracket fitting the bottom hinge pin. Replace both adjustable feet. Transfer the lower door to the property position.

natural_image
Technical line drawing of a mechanical assembly with no visible text or symbols
natural_image
Technical line drawing of a mechanical component with no visible text or symbols- Make the middle hinge reverse the direction 180 then transfer it to the left property position. Make the middle hinge pin in the upper hole of the lower door, then tight the bolts.

natural_image
Technical line drawing of a mechanical clamp or bracket assembly (no text or symbols)- Place the upper door back on. Ensure the door is aligned horizontally and vertically so that the seal are closed on all sides before finally tightening the top hinge. Then inert the top hinge and screw it to the top of unit and then fix hinge cover (in accessory bag) by screw.

natural_image
Simple line drawing of a car on a slope with no text or symbols
natural_image
Line drawing of a corner bracket with a clip and metal rail (no text or symbols)- Place the top left cover to right side and fix it by screw.
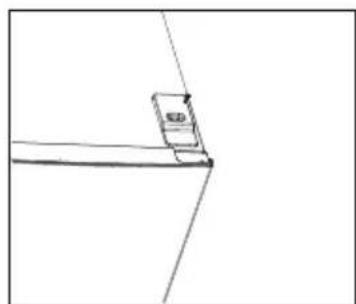
natural_image
Simple line drawing of a corner bracket with a small rectangular object on top (no text or symbols)CARE AND MAINTENANCE
Cleaning Your Refrigerator
- Upon installation of your new appliance, it is recommended that it be cleaned thoroughly.
- Turn off the refrigerator first and then unplug the unit from the wall outlet.
- Remove all food content.
- Wash the inside with a damp warm cloth soaked in lukewarm water and baking soda solution. The solution should be about 2 tablespoons of baking soda to a quart of water.
- Be sure to keep the door gasket (seal) clean to keep the unit running efficiently.
• The outside of the refrigerator should be cleaned with mild detergent and warm water.
• Dry the interior and exterior with a soft cloth.
Vacation Time
• Turn off the refrigerator first and then unplug the unit from the wall outlet.
- Remove all the food.
• Clean the refrigerator.
- Leave the door open slightly to avoid possible formation of condensation, mold, or odor.
- Use extreme caution in the case of children. The unit should not be accessible to child's play.
- Short vacations: Leave the refrigerator operating during vacations of less than three weeks.
- Long vacations: If the appliance will not be used for several months, remove all food and unplug the power cord. Clean and dry the interior thoroughly. To prevent odor and mold growth, leave the door open slightly: blocking it open if necessary or have the door removed.
Moving Your Refrigerator
• Turn off the refrigerator first and then unplug the unit from the wall outlet.
- Remove all the food.
- Securely tape down all loose items inside your refrigerator.
- Tape the doors shut.
- Be sure the refrigerator stays in the upright position during transportation.
Energy Saving Tips
- The refrigerator should be located in the coolest area of the room, away from heat producing appliances or heating ducts, and out of the direct sunlight.
- Let hot foods cool to room temperature before placing in the refrigerator. Overloading the refrigerator forces the compressor to run longer. Foods that freeze too slowly may lose quality, or spoil.
- Be sure to wrap foods properly, and wipe containers dry before placing them in the refrigerator. This cuts down on frost build-up inside the refrigerator.
- Organize and label food to reduce door openings and extended searches. Remove as many items as needed at one time, and close the door as soon as possible.
TROUBLE SHOOTING GUIDE
You can solve many common refrigerator problems easily, saving you the cost of a possible service call. Try the suggestions below to see if you can solve the problem before calling for service.
| PROBLEM | POSSIBLE CAUSE |
| Refrigerator does not operate. | Not plugged in.The circuit breaker tripped or a blown fuse. |
| Compressor turns on and off frequently. | The room temperature is hotter than normal.A large amount of food has been added to the refrigerator.The door is opened too often.The door is not closed completely.The temperature control is not set correctly.The door gasket does not seal properly.The refrigerator does not have the correct clearances.The refrigerator has recently been disconnected for a period of time. 4 hours are required for the refrigerator to cool down completely. |
| Temperature inside the refrigerator is too warm. | Temperature control is set too warm. Turn the control to a cooler setting and allow several hours for the temperature to stabilize.Door is kept open too long or is opened too frequently. Warm air enters the refrigerator every time the door is opened. Open the door less often.The door is not closed completely.The door gasket does not seal properly.A large amount of warm or hot food might have been stored recently. Wait until the refrigerator has had a chance to reach its selected temperature.The refrigerator has recently been disconnected for a period of time. 4 hours are required for the refrigerator to cool down completely. |
| Temperature inside the refrigerator is too cold. | Temperature control is set too cold. Turn the control to a warmer setting and allow several hours for the temperature to stabilize. |
| Temperature of external refrigerator surface is warm. | The exterior refrigerator walls can be as much as 30^ warmer than room temperature. This is normal while the compressor works to transfer heat from inside the refrigerator cabinet. |
| Popping or cracking sound when compressor comes on. | Metal parts undergo expansion and contraction, as in hot water pipes. This is normal. Sound will level off or disappear as refrigerator continues to run. |
| Bubbling or gurgling sound, like water boiling. | Refrigerant (used to cool refrigerator) is circulating throughout the system. This is normal. |
| Vibrations. | Check to assure that the refrigerator is on a level surface.Floor is uneven or weak. Refrigerator rocks on the floor when it is moved slightly. Be sure floor can adequately support refrigerator. Level therefrigerator by putting wood or metal shims under part of the refrigerator.The refrigerator is touching the wall. Re-level the refrigerator and move it from the wall.See "Installation Instructions". |
| Moisture forms on inside refrigerator walls. | Weather is hot and humid, which increases internal rate of frost build-up. This is normal.Door is slightly open.Door is kept open too long, or is opened too frequently. Open the door less often.The door is not sealed properly. |
| Moisture forms on outside of refrigerator. | Door is slightly open, causing cold air from inside the refrigerator to meet warm moist air from outside. |
| The door will not close properly. | The refrigerator is not on a level surface.The gasket is dirty. |

Limited Warranty
MC Appliance Corporation warrants each new Compact Refrigerator to be free from defects in material and workmanship, and agrees to remedy any such defect or to furnish a new part(s), at the company's option, for any part(s) of the unit that has failed during the warranty period. Parts and labor expenses are covered on this unit for a period of one year from the date of purchase. A copy of the dated sales receipt or invoice is required to receive warranty service, replacement or refund.
In addition, MC Appliance Corporation warrants the compressor (parts only) to be free from defects in material and workmanship for a period of five years. The consumer is responsible for all labor and transportation expenses related to the diagnosis and replacement of the compressor after the initial one-year warranty expires. In the event the unit requires replacement or refund under the terms of this warranty, the consumer is responsible for all transportation expenses to return the unit to our factory prior to receiving a replacement unit or refund. A copy of the dated sales receipt/invoice is required to receive warranty service, replacement or refund.
This warranty covers appliances in use within the contiguous United States, Alaska, Hawaii and Puerto Rico. This warranty does not cover the following:
• Damages due to shipping damage or improper installation.
• Damages due to misuse or abuse.
• Content losses due to failure of the unit.
• Inside components such as door panels, door shelves, racks, light bulbs, etc.
• Repairs performed by unauthorized service agents.
• Service calls that do not involve defects in material and workmanship such as instructions on proper use of the product or improper installation.
• Replacement or resetting of house fuses or circuit breakers.
• Failure of this product if used for other purposes than its intended purpose.
• Disposal costs for any failed unit not returned to our factory.
• Any delivery/installation costs incurred as the result of a unit that fails to perform as specified.
- Expenses for travel and transportation for product service if your appliance is located in a remote area where service by an authorized service technician is not available.
- The removal and reinstallation of your appliance if it is installed in an inaccessible location or is not installed in accordance with published installation instructions.
• Refunds for non repairable products are limited to the price paid for the unit per the sales receipt.
• This warranty is non transferable. This warranty applies only to the original purchaser and does not extend to any subsequent owner(s).
Limitations of Remedies and Exclusions:
Product repair in accordance with the terms herein, is your sole and exclusive remedy under this limited warranty. Any and all implied warranties including merchantability and fitness for a particular purpose are hereby limited to one year or the shortest period allowed by law. MC Appliance Corporation is not liable for incidental or consequential damages and no representative or person is authorized to assume for us any other liability in connection with the sale of this product. Under no circumstances is the consumer permitted to return this unit to the factory without the prior written consent of MC Appliance Corporation.
Some states prohibit the exclusion or limitation of incidental or consequential damages, or limitations on implied warranties. This warranty gives you specific legal rights, and you may also have other rights which vary from state to state.
| Model | Parts & Labor | Compressor (Parts Only) | Type of Service |
| HMDR1000WE | One Year | Five Years | In Home |
| HMDR1000BE | One Year | Five Years | In Home |
| HMDR1000SE | One Year | Five Years | In Home |
| HMDR1000ST | One Year | Five Years | In Home |
For Service or Assistance please call 888-775-0202 or visit us on the web at www.mcappliance.com to request warranty service or order parts.

CNA International, Inc. d/b/a MC Appliance Corporation. All rights reserved. Magic Chef® logo is a registered trademark of CNA International, Inc.

Refrigerador de 10.1 pies cúbicos
Manual del usuario
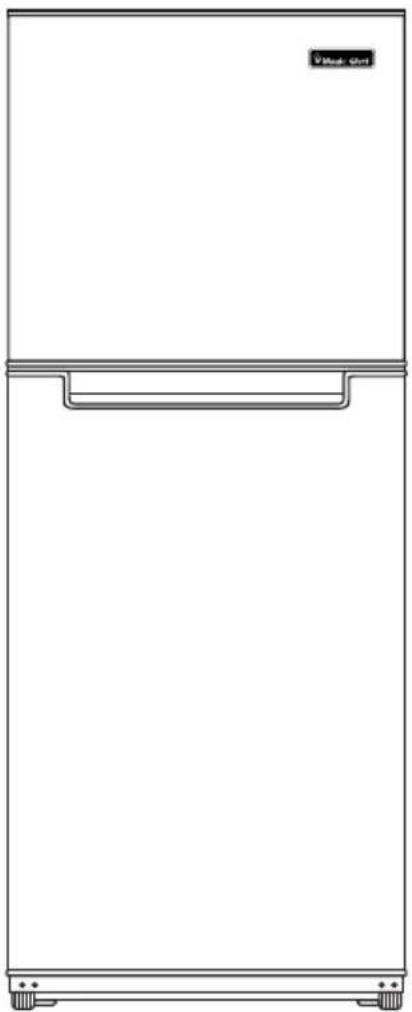
natural_image
Front view line drawing of a double refrigerator with a handle and side legs (no text or symbols)natural_image
Pure technical line drawing of a mechanical component or bracket (no text or symbols)
natural_image
Simple line drawing of a person standing on a pole with a diagonal line (no text or symbols)natural_image
Pure architectural line drawing of a corner detail with no text or symbols- Desenrosca la bisagra intermedia.
natural_image
Simple line drawing of a door with a hanging handle and a circular inset showing a small device (no text or symbols)natural_image
Simple line drawing of a rectangular frame with a curved top edge and dashed arc indicating angle (no text or symbols)natural_image
Pure diagram of a mechanical or electrical component with no text, numbers, or symbolsnatural_image
Technical line drawing of a mechanical device with mounting holes and a spring-loaded component (no text or symbols)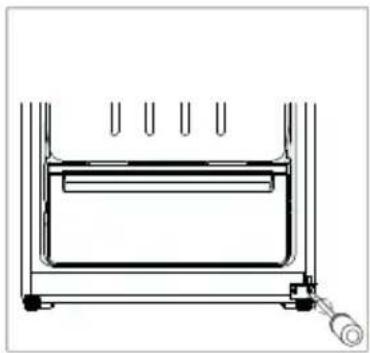
natural_image
Simple line drawing of a heating or cooling system with a cooling chamber and cooling unit (no text or symbols)natural_image
Pure mechanical diagram showing a bracket with mounting holes and a curved beam (no text or symbols)natural_image
Diagram showing a device being processed from a left-side to the right-side view (no text or symbols present)natural_image
Technical line drawing of a mechanical frame with no visible text or symbols
natural_image
Technical line drawing of a mechanical device with no visible text or symbolsnatural_image
Technical line drawing of a mechanical clamp or bracket assembly (no text or symbols)natural_image
Simple line drawing of a person sitting at the edge of a ladder, no text or symbols present
natural_image
Pure technical line drawing of a corner bracket with no text or symbolsnatural_image
Simple line drawing of a right-angle corner with a small rectangular object on the left side (no text or symbols)GUIDE Y LA CONSERVACION
PARA LIMPIAR SU REFRIGERADOR
- Cu. Ft.
- Top Mount Refrigerator
- Product Registration
- TABLE OF CONTENTS
- IMPORTANT SAFETY INSTRUCTIONS
- WARNING
- To reduce the risk of fire, electrical shock, or injury follow these basic precautions when using your refrigerator.
- INSTALLATION INSTRUCTIONS
- Before Using Your Refrigerator
- Installing Your Refrigerator
- Electrical Connection
- Temperature Control Panels
- Setting the Temperature Control
- NOTE:
- Freezing Fresh Foods
- CHANGING THE REVERSIBLE DOOR
- CARE AND MAINTENANCE
- Cleaning Your Refrigerator
- Vacation Time
- Moving Your Refrigerator
- Energy Saving Tips
- TROUBLE SHOOTING GUIDE
- Limited Warranty
- Limitations of Remedies and Exclusions:
- Refrigerador de 10.1 pies cúbicos
- GUIDE Y LA CONSERVACION
- PARA LIMPIAR SU REFRIGERADOR
Brand : Magic Chef
Model : HMDR1000WE
Category : Freezer