
MCO1610WF - Microwaves Magic Chef - Free user manual and instructions
Find the device manual for free MCO1610WF Magic Chef in PDF.


| Product Type | Microwave |
| Brand | Magic Chef |
| Model | MCO1610WF |
| Capacity (volume) | 1.6 cu ft (approx. 45 L) |
| Microwave Power | 1000 W |
| Grill Power | Not applicable |
| Dimensions (W x D x H) | 51.8 x 43.2 x 30.5 cm |
| Weight | 13.6 kg |
| Voltage | 120 V, 60 Hz |
| Operating Frequency | 2450 MHz |
| Main Functions | Quick cooking, defrost, timer, child lock |
| Control Type | Digital with rotary knobs |
| Finish | White |
| Door | Push-button opening |
| Included Accessories | Glass turntable |
| Care and Cleaning | Clean with a damp cloth; avoid abrasives |
| Safety | Child lock, automatic stop when door is opened |
| Repairability | Spare parts available; contact customer service |
| Certifications | CE, FCC |
| Intended Use | Household use only |
Frequently Asked Questions - MCO1610WF Magic Chef
User questions about MCO1610WF Magic Chef
0 question about this device. Answer the ones you know or ask your own.
Ask a new question about this device
Download the instructions for your Microwaves in PDF format for free! Find your manual MCO1610WF - Magic Chef and take your electronic device back in hand. On this page are published all the documents necessary for the use of your device. MCO1610WF by Magic Chef.
USER MANUAL MCO1610WF Magic Chef
Over-the-Range Microwave Oven
User's Manual
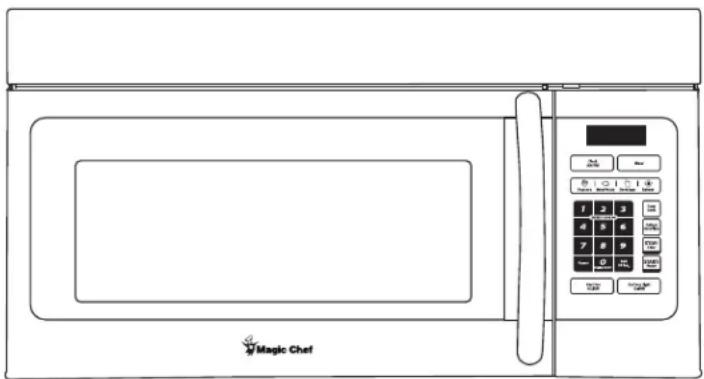
natural_image
Line drawing of a Magic Chef microwave oven with control panel and door (no text or symbols on main body)
Product Registration
Thank you for purchasing a Magic Chef product. The first step to protect your new product is to complete the product registration on our website: www.mcappliance.com/register. The benefits of registering your product include the following:
- Registering your product will allow us to contact you regarding a safety notification or product update.
- Registering your product will allow for more efficient warranty service processing when warranty service is required.
- Registering your product could act as your proof of purchase in the event of insurance loss.
Once again, thank you for purchasing a Magic Chef product.
TABLE OF CONTENTS
Important Safety Instructions....3
Precautions to Avoid Possible Exposure to Excessive Microwave Energy 4
INSTALLATION INSTRUCTIONS....5
Unpacking ....5
Location Requirements....5
Electrical Requirements....5
Grounding Instructions....5
PARTS AND FEATURES 6
Multi-section Cooking ....7
Defrost Cooking....7
Popcorn Menu 8
Beverage Menu 8
Baked Potato Menu 8
Reheat Menu 8
Hood Function 8
Oven Lamp 8
Timer Function 8
Lock Function for Children....8
Inquiring Function 8
Speedy Cooking 8
Display On/Off Function....8
MICROWAVE OVEN CARE....9
Cleaning the exhaust filters 9
Surface light replacement....9
Charcoal filter replacement....10
Oven light replacement....10
General Cleaning 11
TROUBLESHOOTING....11
ASSISTANCE OR SERVICE....12
WARRANTY 13
SPECIFICATIONS
| Model: | MCO1610WF/ MCO1610BF |
| Rated Voltage: | 120V~60Hz |
| Rated Input Power(Microwave): | 1550 Watt |
| Rated Output Power(Microwave): | 1000 Watt |
| Oven Capacity: | 1.6Cu.ft |
| Turntable Diameter: | 12.4 inches |
| External Dimensions(LxWxH): | 29.9X15.0X16.4 inches |
| Net Weight: | Approx.51.6Lbs |
Your safety and the safety of others are very important.
We have provided many important safety messages in this manual and on your appliance. Always read and obey all safety messages.

This is the safety alert symbol.
This symbol alerts you to potential hazards that can kill or hurt you and others.
All safety messages will follow the safety alert symbol and either the word "DANGER" or "WARNING."
These words mean:
DANGER
You can be killed or seriously injured if you don't immediately follow instructions.
WARNING
You can be killed or seriously injured if you don't follow instructions.
All safety messages will tell you what the potential hazard is, tell you how to reduce the chance of injury, and tell you what can happen if the instructions are not followed.
IMPORTANT SAFETY INSTRUCTIONS
When using electrical appliances basic safety precautions should be followed, including the following:
WARNING: To reduce the risk of burns, electric shock, fire, injury to persons, or exposure to excessive microwave energy:
- Read all instructions before using the microwave oven.
- Read and follow the specific "PRECAUTIONS TO AVOID POSSIBLE EXPOSURE TO EXCESSIVE MICROWAVE ENERGY" found in this section.
■ The microwave oven must be grounded. Connect only to properly grounded outlet. See “GROUNDING INSTRUCTIONS” found in this section and in the provided Installation Instructions.
■ Install or locate the microwave oven only in accordance with the provided Installation Instructions.
■ Some products such as whole eggs in the shell and sealed containers – for example, closed glass jars – are able to explode and should not be heated in the microwave oven.
■ Use the microwave oven only for its intended use as described in this manual. Do not use corrosive chemicals or vapors in the microwave oven. This type of oven is specifically designed to heat, cook, or dry food. It is not designed for industrial or laboratory use.
■ As with any appliance, close supervision is necessary when used by children.
■ Do not operate the microwave oven if it has a damaged cord or plug, if it is not working properly, or if it has been damaged or dropped.
■ The microwave oven should be serviced only by qualified service personnel. Call an authorized service company for examination, repair, or adjustment.
■ See door surface cleaning instructions in the "Microwave Oven Care" section.
■ To reduce the risk of fire in the oven cavity:
- Do not overcook food. Carefully attend the microwave oven when paper, plastic, or other combustible materials are placed inside the oven to facilitate cooking.
- Remove wire twist-ties from paper or plastic bags before placing bags in oven.
- If materials inside the oven ignite, keep oven door closed, turn oven off, and disconnect the power cord, or shut off power at the fuse or circuit breaker panel.
- Do not use the cavity for storage purposes. Do not leave paper products, cooking utensils, or food in the cavity when not in use.
■ Liquids, such as water, coffee, or tea are able to be overheated beyond the boiling point without appearing to be boiling. Visible bubbling or boiling when the container is removed from the microwave oven is not always present. THIS COULD RESULT IN VERY HOT LIQUIDS SUDDENLY BOILING OVER WHEN THE CONTAINER IS DISTURBED OR A SPOON OR OTHER UTENSIL IS INSERTED INTO THE LIQUID.
To reduce the risk of injury to persons:
- Do not overheat the liquid.
- Stir the liquid both before and halfway through heating it.
- Do not use straight-sided containers with narrow necks.
- After heating, allow the container to stand in the microwave oven for a short time before removing the container.
- Use extreme care when inserting a spoon or other utensil into the container.
■ Oversized foods or oversized metal utensils should not be inserted in the microwave oven as they may create a fire or risk of electric shock.
■ Do not clean with metal scouring pads. Pieces can burn off the pad and touch electrical parts involving a risk of electric shock.
SAVE THESE INSTRUCTIONS
IMPORTANT SAFETY INSTRUCTIONS
■ Do not operate any heating or cooking appliance beneath the microwave oven.
■ Do not mount microwave oven over or near any portion of a heating or cooking appliance.
- Do not use paper products when appliance is operated in convection, combination, grill or "PAN BROWN" mode (on models with such features).
- Do not store any materials, other than manufacturer's recommended accessories, in this microwave oven when not in use.
■ Do not store anything directly on top of the microwave oven when the microwave oven is in operation.
■ Do not cover or block any openings on the microwave oven.
■ Do not store this microwave oven outdoors. Do not use the microwave oven near water - for example, near a kitchen sink, in a wet basement, or near a swimming pool, or similar locations.
■ Do not immerse cord or plug in water.
- Keep cord away from heated surfaces.
■ Do not let cord hang over edge of table or counter.
■ Do not mount over a sink.
■ Do not cover racks or any other part of the microwave oven with metal foil. This will cause overheating of the microwave oven.
SAVE THESE INSTRUCTIONS
PRECAUTIONS TO AVOID POSSIBLE EXPOSURE TO EXCESSIVE MICROWAVE ENERGY
(a) Do not attempt to operate this oven with the door open since open-door operation can result in harmful exposure to microwave energy. It is important not to defeat or tamper with the safety interlocks.
(b) Do not place any object between the oven front face and the door or allow soil or cleaner residue to accumulate on sealing surfaces.
(c) Do not operate the oven if it is damaged. It is particularly important that the oven door close properly and that there is no damage to the:
(1) Door (bent),
(2) Hinges and latches (broken or loosened),
(3) Door seals and sealing surfaces.
(d) The oven should not be adjusted or repaired by anyone except properly qualified service personnel.
This device complies with Part 18 of the FCC Rules.
INSTALLATION INSTRUCTIONS
Unpacking
- Empty the microwave oven of any packing materials.
- Clean the inside with a soft, damp cloth.
- Check for damage, such as:
■ a door that is not lined up correctly
■ damage around the door, or
■ dents on the interior or exterior of the microwave oven.
If there is any damage, do not operate the microwave oven until a designated service technician has checked it and made any needed repairs.
Location Requirements
WARNING
Excessive Weight Hazard
Use two or more people to move and install microwave oven.
Failure to do so can result in back or other injury.
IMPORTANT: The control side of the microwave oven is the heavy side. Handle the microwave oven gently. The weight of the microwave oven is over 35 lbs (15.9 kg).
■ Place the microwave oven on a cart, counter, table or shelf that is strong enough to hold the microwave oven and the food and utensils you place inside it.
■ The microwave oven should be at a temperature above 50^ F ( 10^ C) for proper operation.
■ Do not block the exhaust vents or air intake openings. Allow a few inches of space at the back and side of the microwave oven where the exhaust vents are located. Blocking the exhaust vents could cause damage to the microwave oven, as well as poor cooking results.
■ Make sure the microwave oven legs are in place to ensure proper airflow. If vents are blocked, a sensitive thermal device may automatically turn the microwave oven off. The microwave oven should work properly once it has cooled.
Electrical Requirements
WARNING
Electrical Shock Hazard
Plug into a grounded 3 prong outlet.
Do not remove ground prong.
Do not use an adapter.
Do not use an extension cord.
Failure to follow these instructions can result in death, fire, or electrical shock.
Observe all governing codes and ordinances.
Required:
■ A 120 Volt, 60 Hz, AC only, 20-amp electrical supply with a fuse or circuit breaker.
Recommended:
■ A time-delay fuse or time-delay circuit breaker.
■ A separate circuit serving only this microwave oven.
GROUNDING INSTRUCTIONS
■ For all cord connected appliances:
The microwave oven must be grounded. In the event of an electrical short circuit, grounding reduces the risk of electric shock by providing an escape wire for the electric current. The microwave oven is equipped with a cord having a grounding wire with a grounding plug. The plug must be plugged into an outlet that is properly installed and grounded.
WARNING: Improper use of the grounding plug can result in a risk of electric shock. Consult a qualified electrician or serviceman if the grounding instructions are not completely understood, or if doubt exists as to whether the microwave oven is properly grounded.
Do not use an extension cord. If the power supply cord is too short, have a qualified electrician or serviceman install an outlet near the microwave oven.
SAVE THESE INSTRUCTIONS
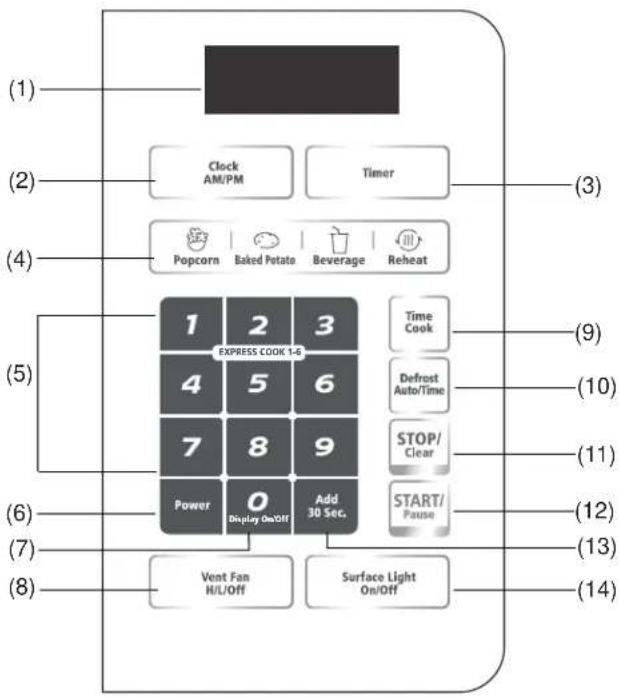
PARTS AND FEATURES MICROWAVE OVEN CONTROL
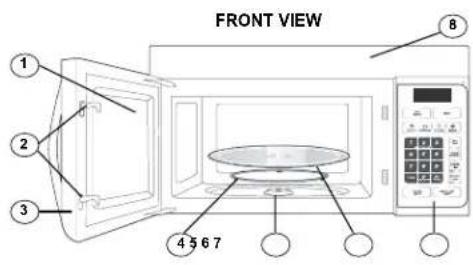
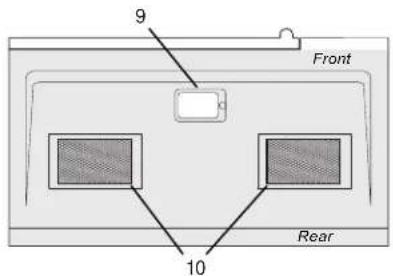
Bottom View
1 Window
2 Interlock system
3 Door assembly
4 Tumtable ring assembly
5 Tumtable Shaft
6 Tumtable glass tray
7 Control panel
8 Front vent grill
9 Surface lights
10 Ventilation filters
flowchart
graph TD
    A["Clock AM/PM"] --> B["Timer"]
    C["Popcorn"] --> D["Baked Potato"]
    D --> E["Beverage"]
    E --> F["Reheat"]
    G["1 EXPRESS COOK 1-6"] --> H["2"]
    H --> I["3"]
    J["4"] --> K["5"]
    K --> L["6"]
    M["7"] --> N["8"]
    N --> O["9"]
    P["Power"] --> Q["0"]
    Q --> R["Add 30 Sec."]
    S["Vent Fan H/L/Off"] --> T["Surface Light On/Off"]
    U["Time Cook"] --> V["Defrost Auto/Time"]
    W["STOP/Clear"] --> X["START/Pause"]
    Y["(1)"] --> Z["(2)"]
    Z --> AA["(3)"]
    AB["(4)"] --> AC["(5)"]
    AD["(6)"] --> AE["(6)"]
    AE --> AF["(7)"]
    AG["(7)"] --> AH["(8)"]
    AH --> AI["(13)"]
    AJ["(14)"] --> AK["(14)"]
(1) Display Screen
(2) Clock AM/PM: to set the current time;
(3) Timer
(4) Auto Menu
(5) Number Keys
(6) Power
(7) Display On/Off
(8) Vent Fan H/L/Off
(9) Time Cook
(10) Defrost Auto/Time
(11) Stop/Clear: clears all previous settings before cooking starts. During cooking: press once to stop oven; twice to stop and clear all entries.
(12) Start/Pause: 1. Cooking/defrosting would be paused if microwave oven's door is opened during cooking/ defrosting, and the display shows the remaining cooking time. Close the door and press "START/ PAUSE" to continue cooking/ defrosting.
2. Press "START/ PAUSE" during cooking/ defrosting to pause cooking/ defrosting; press again to continue cooking/ defrosting.
(13) Add 30Sec.
(14) Surface Light On/Off
OPERATION INSTRUCTIONS
Clock Setting
1). Press "CLOCK AM/PM", the unit enters the clock setting states. AM indicator will light. "0:00" flash to remind you to input the time.
2). Press "CLOCK AM/PM" again to select AM or PM. The responding AM or PM indicator lights.
3). Press the number keys and enter the correct time. For example, time is 10:12 now, please press "1,0,1,2" in turn.
4). Press "CLOCK AM/PM" key finish setting the clock.
Note:
a. This is a 12 hour clock from 1:00 to 12:59. If the time set is not appropriate, press "CLOCK AM/PM" will be no used.
b. Buzzer sounds twice and turn back to waiting states.
Microwave Cooking
1) Press "TIME COOK" to select microwave cooking. "0:00" flash to remind you to input the cooking time.
2) Press the number keys to adjust the cooking time you need. For example, to cook the time for 10 minutes. Please press "1,0,0,0" in turn. The maximum cooking time is 99 minutes 99 seconds.
3) At the same time, you can choose the power by pressing "POWER".
4) Press the number keys to select the power level.
5) Press "START/PAUSE" to start cooking. Time counts down.
Note:
1) If the power level you choose is 100% power, steps "3" and "4" can be skipped and go directly to the step "5".
2) After cooking finishing, buzzer sounds five times.
Ten power levels are available:
| LEVEL | POWER DISPLAY | |
| 10 | 100% | PL10 |
| 9 | 90% | PL9 |
| 8 | 80% | PL8 |
| 7 | 70% | PL7 |
| 6 | 60% | PL6 |
| 5 | 50% | PL5 |
| 4 | 40% | PL4 |
| 3 | 30% | PL3 |
| 2 | 20% | PL2 |
| 1 | 10% | PL1 |
Multi stage Cooking
At most two stages can be input.
For example: to cook the food with 100% microwave power for 10 minutes and then cook with 80% microwave power for 15 minutes. Do as following:
1) Press "TIME COOK" to choose microwave cooking;
2) Press "1", "0", "0", "0" to input the cooking time;
3) Press "POWER" to select the microwave power;
4) Press "10" to choose 100% microwave power;
5) Press "TIME COOK" to choose microwave cooking;
6) Press "1", "5", "0", "0" to input cooking time;
7) Press "POWER" to select the microwave power;
8) Press "8" to choose 80% microwave power;
9) Press "START/PAUSE" to start cooking.
Note:
a.Microwave cooking can be set as two stages only. Defrost program and auto menu cannot be set here.
b. When the first stage finish, buzzer sounds once and the second stage begins cooking.
c. During cooking, each added press on "ADD 30 SEC.", 30 seconds can be added too. The time can be up to 99 minutes and 99 seconds.
Defrost Cooking
A. Defrost by Weight
1) Press "DEFROST AUTO/TIME" once to choose defrost by weight function. 0.0 will flash and "lb" indicator flash;
2) Press number keys from 0 to 9 to input the derfost weight. For example: the food weight is 1.2 Lbs, then "1","2" will be input. The maximum cooking weight is 6.0 Lbs. If the weight input is more than 6.0 Lbs, the unit will turn back to waiting state.
3) Press "START/PAUSE" to start defrosting. "lb" indicator will be off.
B. Defrost by Time
1) Press "DEFROST AUTO/TIME" twice to choose defrost by time function.0:00 flash and defrost indicator will light;
2) Press number keys from 0 to 9 to input the derfost time. The maximum time can be input is 99 minutes and 99 seconds.
3) Press "START/PAUSE" to start defrosting.
Note: If half the defrost time passes, the buzzer will sound once to remind you to turn the food over. In both weight/time defrost, the defrost icon is blinking on screen during the operation to indicate that defrost is being done.
Popcom Menu
a) Press "POPCORN" repeatedly until the number you wish appears in the display.
"1" SET: approximate 1.75 ounces
"2" SET: approximate 3.0 ounces
"3" SET: approximate 3.5 ounces
For example, press "POPCORN" three times , "3.5" appears in the LED.
b) Press "START/PAUSE" to cook.
Beverage Menu
a) Press "BEVERAGE" repeatedly until the number you wish appears in the display.
"1" SET: approximate 8.8 ounces
"2" SET: approximate 17.6 ounces
"3" SET: approximate 26.4 ounces
For example, press "BEVERAGE" once, "1" appears in the LED.
b) Press "START/PAUSE" to cook.
Baked Potato Menu
1) Press "BAKED POTATO" repeatedly until the number you wish appears in the display.
"1"SET: for approximately 7.1 ounces
"2"SET: for approximately 14.2 ounces
"3"SET: for approximately 21.3 ounces
For example, press "BAKED POTATO" once, "1" appears in the LED.
2) Press "START/PAUSE" to cook.
Reheat Menu
1) Press "REHEAT" repeatedly until the number you wish appears in the display.
"1" SET: approximate 7.1 ounces
"2" SET: approximate 14.2 ounces
"3" SET: approximate 21.3 ounces
For example, press "REHEAT" once, "1" appears in th LED.
2) Press "START/PAUSE" to cook.
Hood Function
1) When the exhaust fan is under off states, press "VENT FAN/H/L/OFF" once to choose the fan with high speed;
2) Press "VENT FAN/H/L/OFF" twice to choose the fan with low speed;
3) Press "VENT FAN/H/L/OFF" three times to choose the fan to be off.
4) Except lock states, the fan can be adjusted anytime.
Oven Lamp
1) Press "SURFACE LIGHT ON/OFF" once to turn on the lamp;
2) Press "SURFACE LIGHT ON/OFF" twice to turn off the lamp.
Timer Function
1) Press "TIMER", timer indicator will light;
2) Press number keys to input the timer time you need.
The maximum cooking time is 99 minutes and 99 seconds.
3) Press "TIMER", time counts down. When time counting down is over, buzzer sounds to indicate off.
4) Press "TIMER", the timer function or the buzzer sound will stop.
Note:
During timer states, hood and oven lamp can be activated. Others function will be no used.
Lock Function for Children
Lock: In waiting state, press "STOP/CLEAR" for 3 seconds, there will be two beeps denoting the entering into the children-lock state.
Lock quitting: In locked state, press "STOP/CLEAR" for 3 seconds, there will be two beeps denoting that lock is released.
Inquiring Function
1) Under microwave cooking state, press "POWER" to check the power level.
2) During cooking states, press "CLOCK AM/PM" to check the clock.
Speedy Cooking
1) Press number keys from 1 to 6 to start cooking with full microwave power for 1-6 minutes.
2) In the waiting state, press "ADD 30 SEC." to start cooking 100% micropower for 30 seconds.
3) During cooking, 30 seconds can be added each time the "ADD 30 SEC" is pressed. The maximum cooking time is 99 minutes and 99 seconds.
Note: During speedy cooking, microwave power can be checked and selected.
Press "POWER", the current power displays, then press number keys to choose the power you need.
Display On/Off Function
1) In wating states, press "0 DISPLAY On/Off" for 3 seconds, buzzer sounds twice, and the display would be off.
2) Under the mode of display off, press any key, buzzer sound once, the microwave oven is back to waiting mode, and the display shows "0:00"
MICROWAVE OVEN CARE
Disconnect the power cord before cleaning or leave the door open to deactivate the oven during cleaning.
Cleaning the exhaust filters Surface light replacement
The oven ventilation exhaust filters should be removed and cleaned often; generally at least once every month.
CAUTION
To avoid risk of personal injury or property damage, do not operate oven hood without filters properly in place.
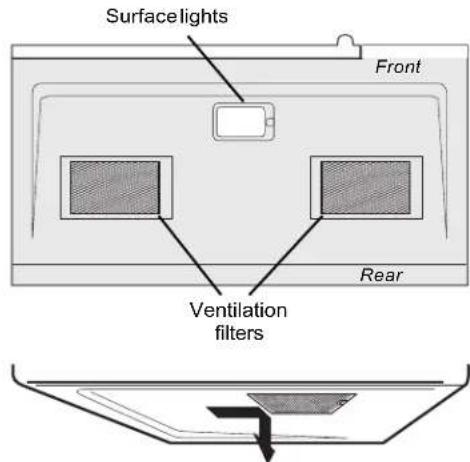
- To remove the exhaust ventilation filters, slide the filter to the rear. Then pull filter downward and push to the other side. The filter will drop out. Repeat for the 2nd filter.
natural_image
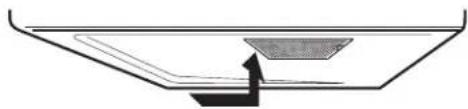
Simple line drawing of a container with a lid and an arrow pointing to it (no text or symbols)- To reinstall the exhaust ventilation filter, slide it into the side slot, then push up and toward oven to lock. Reinstall the 2nd filter using the same procedure.
CAUTION
To avoid risk of personal injury or property damage, wear gloves when replacing the light bulbs.
- Unplug the microwave oven or turn off power at the main circuit breaker.
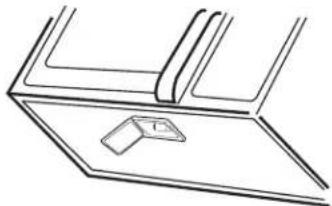
- Remove the bulb cover mounting screw at light position under the microwave.
natural_image
Pure technical line drawing of a mechanical component or bracket (no text or symbols)-
Replace bulb with 30 watt appliance bulb.
-
Re-install bulb cover and mounting screw.
-
Plug the microwave back into the power supply or turn the power back on at the main circuit breaker.
MICROWAVE OVEN CARE
Disconnect the power cord before cleaning or leave the door open to deactivate the oven during cleaning.
Charcoal filter replacement Oven light replacement
Charcoal Filter installed in your microwave oven, is used for nonvented, recirculated installation. The filter should be changed every 6 to 12 months depending on use.
- Disconnect power to the microwave oven at the circuit breaker panel or by unplugging.
- Remove the vent grill mounting screws.
- Pull the vent grill away from the unit.
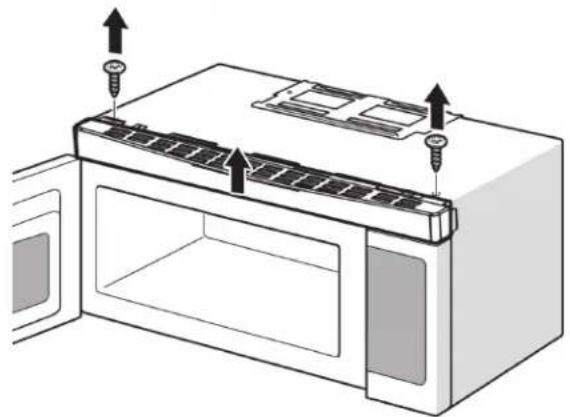
natural_image
Diagram of a microwave oven with labeled parts and directional arrows indicating assembly (no text or symbols present)- Remove the charcoal filter by pushing it inwards, then turn and pull it away from the unit.
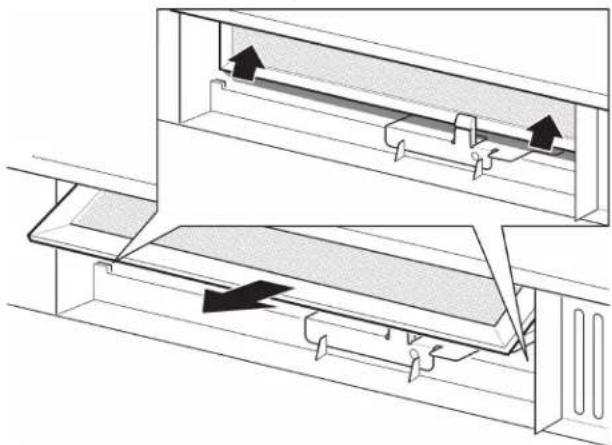
natural_image
Technical diagram of a mechanical assembly with two views showing internal components and directional arrows (no text or labels)Remove the vestigstructions 1-4 above and charcoal filter, if used.
- Open light cover located behind filter mounting by carefully pulling up on the front edge.
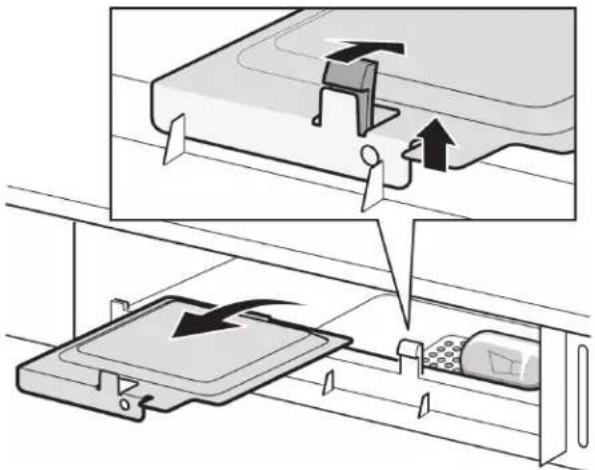
- Remove old light bulb and replace only with equivalent 30 watt bulb available from parts distributor. Bulbs are also available at most hardware stores or lighting centers.
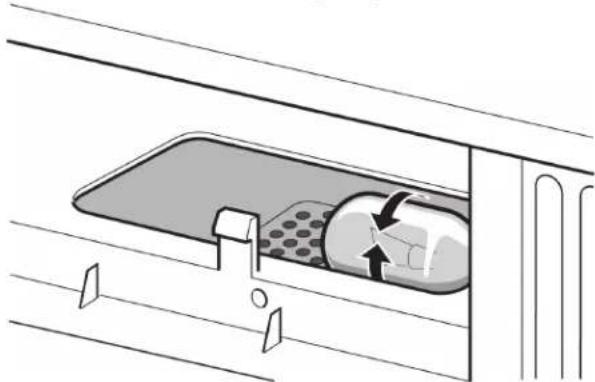
natural_image
Diagram of a storage or cleaning device with a tray, lid, and gear mechanism (no text or symbols)Note: DO NOT USE BULB LARGER THAN 30 WATTS.
- Replace the microwave oven light cover by carefully pushing into place. Replace the charcoal filter. Push the vent grill back into place (engaging both the bottom and top tabs) and replace the vent grill mouting screws.
MICROWAVE OVEN CARE
General Cleaning
IMPORTANT: Before cleaning, make sure all controls are off and the microwave oven is cool. Always follow label instructions on cleaning products.
Soap, water and a soft cloth or sponge are suggested unless otherwise noted.
To avoid damage to the microwave oven cavity, do not use soap-filled scouring pads, abrasive cleaners, steel-wool pads, gritty washcloths or some recycled paper towels.
To avoid damage to stainless steel models, rub in direction of grain.
The area where the microwave oven door and frame touch when closed should be kept clean.
Average soil
■ Mild, nonabrasive soaps and detergents:
Rinse with clean water and dry with soft, lint-free cloth.
Heavy soil
■ Mild, nonabrasive soaps and detergents:
Heat 1 cup (250 mL) of water for 2 to 5 minutes in microwave oven. Steam will soften soil. Rinse with clean water and dry with soft, lint-free cloth.
Odors
■ Lemon juice or vinegar:
Heat 1 cup (250 mL) of water with 1 tbs (15 mL) of either lemon juice or vinegar for 2 to 5 minutes in microwave oven.
Microwave Inlet Cover
To avoid arcing and microwave oven damage, the microwave inlet cover (see "Parts and Features") should be kept clean.
■ Wipe with wet cloth.
MICROWAVE OVEN DOOR AND EXTERIOR
The area where the microwave oven door and frame touch when closed should be kept clean.
■ Mild, nonabrasive soaps and detergents:
Rinse with clean water and dry with soft, lint-free cloth.
■ Glass cleaner and paper towels or nonabrasive plastic scrubbing pad:
Apply glass cleaner to towel, not directly to surface.
Stainless Steel (on some models)
To avoid damage to microwave oven door and exterior, do not use soap-filled scouring pads, abrasive cleaners, steel-wool pads, gritty washcloths or some paper towels. Rub in direction of grain.
■ Stainless Steel Cleaner and Polish (not included):
■ Liquid detergent or all-purpose cleaner:
Rinse with clean water and dry with soft, lint-free cloth.
■ Vinegar for hard water spots
CONTROL PANEL
■ Sponge or soft cloth and water:
Dampen sponge with water and wipe panel. Dry with soft cloth.
■ To avoid damage to the control panel, do not use chemical or abrasive cleansers.
TURNTABLE
Replace turntable immediately after cleaning. Do not operate the microwave oven without the turntable in place.
■ Mild cleanser and scouring pad
■ Dishwasher
TROUBLESHOOTING
Try the solutions suggested here first in order to avoid the cost of an unnecessary service call.
Nothing will operate
■ Has a household fuse blown, or has a circuit breaker tripped?
Replace the fuse or reset the circuit breaker. If the problem continues, call an electrician.
Microwave oven will not operate
■ Is the magnetron working properly?
Try to heat 1 cup (250 mL) of cold water for 2 minutes at 100% cooking power. If water does not heat, try the steps below. If microwave oven still does not operate, call for service.
■ Is the door completely closed?
Firmly close door.
■ Is a packaging spacer (on some models) attached to the inside of the door?
Remove packaging spacer, then firmly close door.
Is the electronic microwave oven control set correctly? See "Microwave Oven Control" section.
■ Does the display show a message about opening the door?
The door has been closed for an extended period of time (about 5 minutes) after adding food and before starting the microwave oven. Open and close the door, then start the cycle. See "Start" section.
■ Is the Control Lock set?
See "Control Lock" section.
Microwave oven makes humming noise
■ This is normal and occurs when the power supply switches the magnetron on and off.
Microwave oven door looks wavy
■ This is normal and will not affect performance.
Turntable will not operate
■ Is the turntable properly in place?
Make sure turntable is correct side up and is sitting securely on the turntable support. See “Turntable” section.
■Is the turntable support operating properly?
Remove turntable. Remove and clean turntable hub, support and rollers. Replace hub, support and turntable. Place 1 cup (250 mL) of water on the turntable, then restart microwave oven. If it still is not working, call for service. See “Assistance or Service” section. Do not operate the microwave oven without turntable and turntable support working properly.
Turntable alternates rotation directions
■ This is normal and depends on motor rotation at beginning of cycle.
Display shows messages
■ Is the display showing "0:00?" There has been a power failure or the Clock time has not been set. See "Clock" section to reset Clock.
Display shows time countdown, but the microwave oven is not operating
■ Is the Kitchen Timer in use? See "Kitchen Timer" section.
Cooking times seem too long
■ Is the cooking power set properly?
See “Microwave Cooking Power” section.
■ Are large amounts of food being heated?
Larger amounts of food need longer cooking times.
- Is the incoming voltage less than that specified in "Microwave Oven Safety?"
Have a qualified electrician check the electrical system in the home.
Interference with radio, TV, cordless phone, etc.
■ Is the microwave oven plugged into the same outlet?
Try a different outlet for the electronic device.
■Is the radio or TV receiver near the microwave oven?
Move the receiver away from the microwave oven, or adjust the radio or TV antenna.
■ Are the microwave oven door and sealing surfaces clean? Make sure these areas are clean.
■ Is the cordless phone frequency 2.4 GHz?
Some 2.4 GHz-based cordless phones and home wireless networks may experience static or noise while the microwave oven is on. Use a corded phone or a different frequency cordless phone, or avoid using these items during microwave oven operation.
ASSISTANCE OR SERVICE
Before calling for assistance or service, please check "Troubleshooting." It may save you the cost of a service call. If you still need help, follow the instructions below.
When calling, please know the purchase date and the complete model and serial number of your appliance. This information will help us to better respond to your request.
If you need replacement parts
If you need to order replacement parts, we recommend that you use only factory specified parts. Factory specified parts will fit right and work right because they are made with the same precision used to build every new MAGIC CHEF® appliance.
To locate factory specified parts please visit our website at www.mcappliance.com, or call toll free: 1-888-775-0202.
In the U.S.A.
Call the MC Appliance Customer Service Center toll free: 1-888-775-0202.
Our consultants provide assistance with:
■ Features and specifications on our full line of appliances.
■ Installation information.
■ Use and maintenance procedures.
■ Accessory and repair parts sales.
■ Specialized customer assistance (Spanish speaking).
Limited Warranty
MC Appliance Corporation warrants each new Counvertop Microwave Oven to be free from defects in material and workmanship, and agrees to remedy any such defect or to furnish a new part(s), at the company's option, for any part(s) of the unit that have failed during the warranty period. Parts and labor expenses are covered on this unit for a period of one year from the date of purchase. A copy of the dated sales receipt or invoice is required to receive warranty service by an authorized service agent.
In addition, MC Appliance Corporation warrants the magnetron (parts only) to be free from defects in material and workmanship for a period of eight years. The consumer is responsible for all labor and transportation expenses related to the diagnosis and replacement of the magnetron after the initial one-year warranty expires. In the event the unit requires replacement or refund under the terms of this warranty, the consumer is responsible for all transportation expenses to return the unit to our factory prior to receiving a replacement unit or refund. A copy of the dated sales receipt/invoice is required to receive warranty service, replacement or refund.
This warranty covers appliances in use within the continental United States, Alaska, Hawaii and Puerto Rico. This warranty does not cover the following:
- Damages due to shipping damage or improper installation.
• Damages due to misuse or abuse.
- Content losses due to failure of the unit.
- Inside components such as turntable, roller guide, light bulbs, etc.
• Repairs performed by unauthorized service agents.
- Service calls that do not involve defects in material and workmanship such as instructions on proper use of the product or improper installation.
- Replacement or resetting of house fuses or circuit breakers.
- Failure of this product if used for other purposes than its intended purpose.
- Disposal costs for any failed unit not returned to our factory.
- Any delivery/installation costs incurred as the result of a unit that fails to perform as specified.
- Expenses for travel and transportation for product service if your appliance is located in a remote area where service by an authorized service technician is not available.
- The removal and reinstallation of your appliance if it is installed in an inaccessible location or is not installed in accordance with published installation instructions.
• Refunds for non repairable products are limited to the price paid for the unit per the sales receipt.
Limitations of Remedies and Exclusions:
Product repair in accordance with the terms herein, is your sole and exclusive remedy under this limited warranty. Any and all implied warranties including merchantability and fitness for a particular purpose are hereby limited to one year or the shortest period allowed by law. MC Appliance Corporation is not liable for incidental or consequential damages and no representative or person is authorized to assume for us any other liability in connection with the sale of this product. Under no circumstances is the consumer permitted to return this unit to the factory without the prior written consent of MC Appliance Corporation.
Some states prohibit the exclusion or limitation of incidental or consequential damages, or limitations on implied warranties. This warranty gives you specific legal rights, and you may also have other rights which vary from state to state.
| Model | Parts & Labor | Magnetron (Parts Only) | Type of Service | ||
| M | O161 | M O161 | One Year | Eight Years | Carry In |
For Service or Assistance please call 888-775-0202 or visit us on the web at www.mcappliance.com to request warranty service or order parts.
CNA International, Inc. d/b/a MC Appliance Corporation. All rights reserved. Magic Chef® logo is a registered trademark of CNA International, Inc.
www.mcappliance.com Printed in China
1.6 Cu. Ft.
natural_image
Line drawing of a Magic Chef microwave oven with control panel and door (no text or symbols on the device itself)
SERVICE OU ASSISTANCE....12
GARANTIE....13
SPÉCIFICATIONS
natural_image
Simple line drawing of a container with a handle and arrow indicating direction (no text or symbols)natural_image
Simple line drawing of a container with a lid and an arrow pointing to it (no text or symbols)natural_image
Pure technical line drawing of a mechanical component or bracket (no text or symbols)natural_image
Diagram of a microwave oven with mounting screws and ventilation slots (no text or labels)natural_image
Technical diagram of a mechanical assembly with two views showing internal components and directional arrows (no text or labels)natural_image
Diagram of a kitchen drawer with a bed and a bag, showing internal components and directional arrows (no text or symbols)Remarque : NE PAS UTILISER D'AMPOULES PLUS PUISSANTES QUE 30 WATTS.
SERVICE OU ASSISTANCE
- Over-the-Range Microwave Oven
- Product Registration
- TABLE OF CONTENTS
- INSTALLATION INSTRUCTIONS....5
- PARTS AND FEATURES 6
- MICROWAVE OVEN CARE....9
- TROUBLESHOOTING....11
- SPECIFICATIONS
- Your safety and the safety of others are very important.
- DANGER
- WARNING
- IMPORTANT SAFETY INSTRUCTIONS
- SAVE THESE INSTRUCTIONS
- PRECAUTIONS TO AVOID POSSIBLE EXPOSURE TO EXCESSIVE MICROWAVE ENERGY
- INSTALLATION INSTRUCTIONS
- Unpacking
- Location Requirements
- Excessive Weight Hazard
- Electrical Requirements
- Electrical Shock Hazard
- Required:
- Recommended:
- GROUNDING INSTRUCTIONS
- PARTS AND FEATURES MICROWAVE OVEN CONTROL
- OPERATION INSTRUCTIONS
- Clock Setting
- Note:
- Microwave Cooking
- Multi stage Cooking
- At most two stages can be input.
- Defrost Cooking
- Defrost by Weight
- Defrost by Time
- Popcom Menu
- Beverage Menu
- Baked Potato Menu
- Reheat Menu
- Hood Function
- Oven Lamp
- Timer Function
- Lock Function for Children
- Inquiring Function
- Speedy Cooking
- Display On/Off Function
- MICROWAVE OVEN CARE
- Cleaning the exhaust filters Surface light replacement
- CAUTION
- Charcoal filter replacement Oven light replacement
- General Cleaning
- Average soil
- Heavy soil
- Odors
- Microwave Inlet Cover
- MICROWAVE OVEN DOOR AND EXTERIOR
- Stainless Steel (on some models)
- CONTROL PANEL
- TURNTABLE
- TROUBLESHOOTING
- Nothing will operate
- Microwave oven will not operate
- Microwave oven makes humming noise
- Microwave oven door looks wavy
- Turntable will not operate
- Turntable alternates rotation directions
- Display shows messages
- Display shows time countdown, but the microwave oven is not operating
- Cooking times seem too long
- Interference with radio, TV, cordless phone, etc.
- ASSISTANCE OR SERVICE
- If you need replacement parts
- In the U.S.A.
- Our consultants provide assistance with:
- Limited Warranty
- Limitations of Remedies and Exclusions:
- Cu. Ft.
- SPÉCIFICATIONS
- Remarque : NE PAS UTILISER D'AMPOULES PLUS PUISSANTES QUE 30 WATTS.
- SERVICE OU ASSISTANCE
Brand : Magic Chef
Model : MCO1610WF
Category : Microwaves