
DF1233 - Deep fryer Salton - Free user manual and instructions
Find the device manual for free DF1233 Salton in PDF.


| Product Type | Deep Fryer |
| Brand | Salton |
| Model | DF1233 |
| Capacity | 2.5 liters (approximately) |
| Power | 1500 watts |
| Voltage | 120 V |
| Frequency | 60 Hz |
| Temperature Range | 150°C to 190°C (300°F to 375°F) |
| Control Type | Adjustable thermostat |
| Indicator Lights | Power and ready lights |
| Material | Stainless steel body with plastic handles |
| Frying Basket | Removable, wire mesh with handle |
| Oil Capacity | Up to 2 liters |
| Viewing Window | Yes, for monitoring cooking |
| Safety Features | Automatic shut-off, cool-touch handles, thermal fuse |
| Filter | Permanent mesh filter |
| Cleaning | Non-stick interior, dishwasher-safe basket (except electrical parts) |
| Cord Storage | Yes, cord wrap underneath |
| Dimensions (W x D x H) | 30 x 25 x 20 cm (approximately) |
| Weight | 2.5 kg (approximately) |
| Warranty | 1 year limited |
| Included Accessories | Frying basket, lid, instruction manual |
Frequently Asked Questions - DF1233 Salton
User questions about DF1233 Salton
0 question about this device. Answer the ones you know or ask your own.
Ask a new question about this device
Download the instructions for your Deep fryer in PDF format for free! Find your manual DF1233 - Salton and take your electronic device back in hand. On this page are published all the documents necessary for the use of your device. DF1233 by Salton.
USER MANUAL DF1233 Salton
natural_image
Abstract gray background with a partial circular shape in the left corner (no text or symbols)salton®
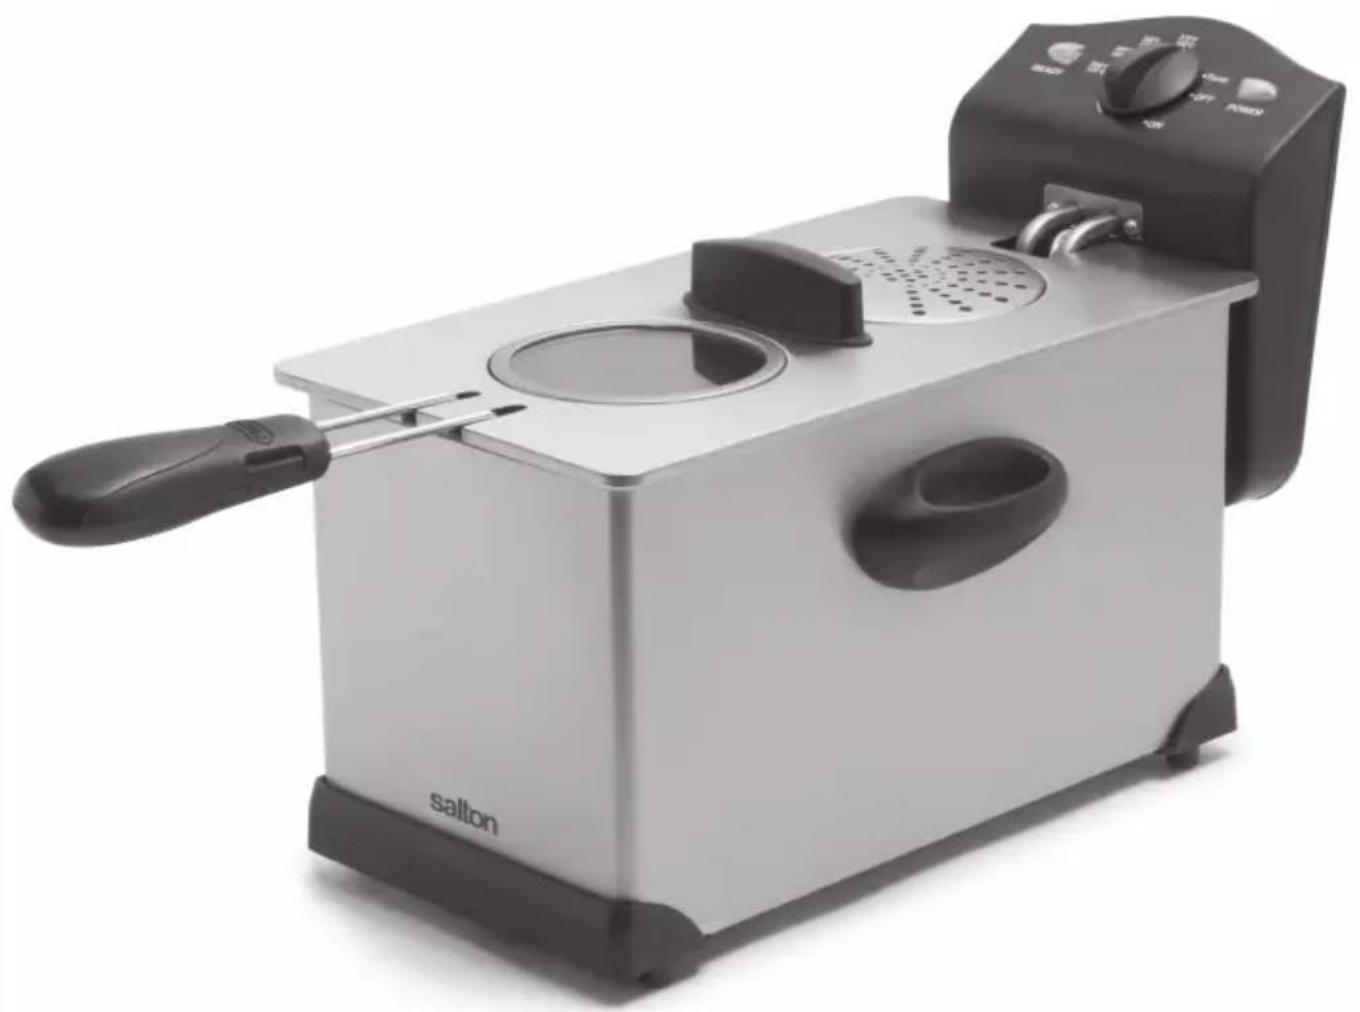
'easy clean' deep fryer
natural_image
Exterior view of a stainless steel French-style food grater with control panel and side handle (no text or symbols on main body)Instruction Booklet
Model DF1233
IMPORTANT SAFEGUARDS
When using electrical appliances, basic safety precautions should always be followed including the following:
- Read all instructions.
- DO NOT touch hot surfaces. Use handles or knobs. DO NOT touch areas around opening and vents that may become hot.
- To protect against electrical hazards, do not immerse cord, plugs, or the appliance in water or other liquid.
- Do not allow children to operate this appliance. Close supervision is necessary when any appliance is used by or near children. Children should not play with this appliance.
- This appliance is not intended for use by persons (including children) with reduced physical, sensory or mental capabilities or lack of experience and knowledge, unless they have been given supervision or instruction concerning the use of the appliance by a person responsible for their safety.
- Unplug from outlet when not in use and before cleaning. Allow to cool before putting on or taking off parts, and before cleaning the appliance.
- DO NOT operate any appliance with a damaged cord or plug or after the appliance malfunctions, or has been damaged in any manner. Return appliance to Salton for examination, repair or adjustment. See Warranty section.
- The use of accessories or attachments not recommended by Salton may cause hazards.
- DO NOT use outdoors.
- DO NOT let cord hang over edge of table or counter, or touch hot surfaces.
- DO NOT place on or near a hot gas or electric burner, or in a heated oven.
- Extreme caution must be used when moving an appliance containing hot liquids or hot oil. Hot oil is very dangerous and can cause serious burns.
- Always attach plug to appliance first, then plug cord into the wall outlet. To disconnect, turn any control to 'OFF', then remove plug from wall outlet.
- This appliance is for Household Use Only. DO NOT use appliance for other than intended use.
- NEVER leave the appliance unattended while in use.
- This product is for oil deep frying food only. It should not be used for any other task such as heating wax or cooking soups or casseroles.
- To avoid personal injury, always position your fryer well back from the edge of the counter or table. Always use your fryer on a dry flat, stable, heat resistant surface.
- This appliance is not intended to be operated by means of an external timer or a separate remove-control system.
SAVE THESE INSTRUCTIONS
HOUSEHOLD USE ONLY
The Safety Release power cord attaches to the appliance with a magnetic connector. This magnetic connector will detach from the appliance if the cord is pulled on accidentally. DO NOT allow the cord to hang over the edge of the counter. DO NOT use this appliance with an extension cord.
The magnetic end fits into the socket of the fryer in only one direction. Always attach the magnetic end of the cord directly to the fryer socket prior to plugging into a wall outlet. When disconnecting, always remove the plug from the wall outlet first.
Should the magnetic plug become detached from the appliance during use, it is important to:
- Unplug the power cord from the wall outlet
- Turn off the appliance at the temperature knob or control panel
- Reattach the power cord to the appliance
- Reconnect to the wall outlet
- Turn the appliance back on
If the magnetic power cord becomes damaged in any way, contact Salton at the address listed at the end of this booklet for a replacement. DO NOT attempt to permanently attach the power cord to this appliance. DO NOT use any other power cord on this appliance.
POLARIZED PLUG
This appliance has a polarized plug (one blade is wider than the other). To reduce the risk of electric shock, this plug will fit in a polarized outlet only one way. If the plug does not fit fully in the outlet, reverse the plug. If it still does not fit, contact a qualified electrician. Do not modify the plug in any way.
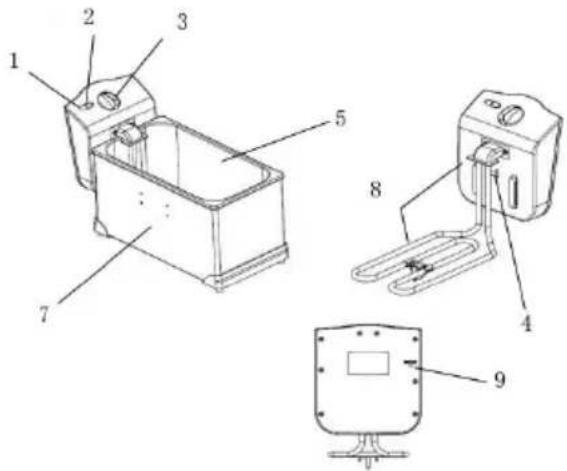
DESCRIPTION OF PARTS
- Power Indicator (red)
- Ready Indicator Light (green)
- Temperature Control Dial
- Safety Button
- Fry Bowl
- Frying Basket
- Base
- Control Panel / Element
- Restart Button
- Frying Basket Support Bracket

BEFORE FIRST USE AND ASSEMBLY
- Remove all packaging.
- To remove any residue left over from the manufacturing process, wash the Fry Bowl, Frying Basket/Handle Assembly and the Cover in warm soapy water or in the dishwasher. Ensure that the Cover is completely dry before using the fryer.
- Wipe the Control Panel/Element with paper towels or a dry cloth. NEVER IMMERSE ANY PORTION OF THE CONTROL PANEL / ELEMENT IN WATER OR ANY OTHER LIQUID.
Fryer Assembly
When all of the parts are dry, reassemble the Fryer.
- Place the Fry Bowl into the Base. The Fry Bowl should slide into the Base without any resistance.
- Place the Control Panel / Element Assembly into the Fry Bowl by sliding the tabs on the Control Panel into the slots on the Base.
- Place the Frying Basket/Handle Assembly into the Fry Bowl.
- Place the Cover on the Fryer by lining up the end that has the 2 slots over the Frying Basket Handle.
NOTE: The Fryer will only heat when the control panel is correctly assembled and the Safety Button is pushed in.
Basket Assembly
Ensure that the handle of the Frying Basket has been correctly attached.
- Press of ends of the wire handle together at the free end of the handle. Insert the ends into the two small wire hoops inside the basket.
- Once the Handle is inserted into the hoops, rotate the Handle so that it locks into position over the wire tab at the top of the Frying Basket.
HOW TO USE
- Ensure that the Temperature Control Dial is in the OFF position.
- Place the assembled Fryer on a flat heatproof surface, close to a 120 volt wall outlet and leaving 2" (5cm) of free space on all sides.
- Remove the Cover.
- Smear the inner face of the Viewing Window with a small amount of vegetable oil to prevent condensation from forming and to enable the cooking process to be checked.
- Remove the Frying Basket.
- Pour 2.2 – 3 litres of oil into fryer. Peanut, soya or other high quality vegetable oil is recommended. Ensure that the oil level is maintained between the MIN and MAX markings on the inside of the Fryer. NOTE: Do not use the Fryer without oil. The Fryer will be damaged and the warranty will be voided, if heated dry.
- Connect the magnetic end of the cord into the Deep Fryer socket (see the instructions on page 3 "Safety Release Power Cord", paragraph 2) then plug into the wall outlet. The red 'Power' indicator light will come on.
- Turn the Temperature Control Dial to the desired temperature. The green 'Ready' Light will illuminate. The green light will go out when the Fryer reaches the set temperature and will cycle on and off throughout the cooking process.
- Prepare the food to be cooked. Cut food into uniform size pieces so they will cook evenly. Pat food dry before cooking. Place in the Frying Basket. NOTE: Do not exceed 2/3 of the Frying Basket capacity. If using frozen food, do not use more than 12 the Frying Basket capacity.
- When the green 'Ready' light goes out, remove the Cover.
- Lower the Frying Basket into the oil.
- Replace the Cover.
- Refer to the Frying Table for temperatures and cooking time. Please note that these cooking times are only a guide and the exact cooking time will depend on the size of pieces being cooked and the temperature of the food.
- Check food from time to time by looking through the Viewing Window.
- Once cooking is complete, turn the Temperature Control Dial to Off and unplug from the wall outlet.
- Remove the Cover, raise the Frying Basket and place the Basket Support Bracket on the edge of the Non-stick Bowl. Allow oil to drain off for a few minutes. Do not allow food to remain in the Basket over hot steam for an extended period of time. Food will lose its crispness.
- Remove food from Basket and place on absorbent paper.
SAFETY RESET SWITCH
- Should you accidentally switch ON your Deep Fryer without oil or without the minimum amount of oil, the Deep Fryer will automatically cut-out to prevent overheating.
- If this should happen turn the Temperature Control Dial to OFF and unplug the Fryer. Wait until the Fryer cools completely then locate the Restart Button at the back of the Control Panel.
- Using a thin implement, press the Restart Button. Your Deep Fryer is now ready to use.
| FOOD | TEMPERATURE F° / C° | APPROXIMATE FRYING TIME (MINUTES) |
| Cheese, breaded | 340 / 170 | 1 - 2 |
| Donuts | 340 / 170 | Until golden brown |
| Mushrooms | 300 / 150 | 4 - 6 |
| Chicken, breaded | 340 / 170 | 12 - 14 |
| Chicken strips | 340 / 170 | 3 - 4 |
| Shrimps | 260 / 125 | 3 - 4 |
| Fish cakes or balls | 340 / 170 | 5 – 7 |
| Fish fillets | 300 / 150 | 5 – 7 |
| Fish fillet in batter | 340 / 170 | 5 – 7 |
| Frozen fish | 340 / 170 | 10 - 11 |
| Onion rings | 375 / 190 | 2 – 4 |
| French fries, thin | 375 / 190 | 5 - 7 |
| French fries, thick | 375 / 190 | 10 - 11 |
As a general rule, food that has been pre-cooked in some way may need a higher temperature and less cooking time than food that is raw.
HELPFUL HINTS
- Use only good quality oil when frying. Do not deep fry food in butter or margarine. Butter and margarine have a low smoking temperature.
- Oil can be reused 8 – 12 times if cleaned after each use. (See the Care & Cleaning section)
- The Lid is fitted with a Filter to reduce frying odour.
• DO NOT heat the Fryer without oil.
- When removing the Cover make sure you stand back to avoid steam that is being released from under the Cover.
- Once you add food to the Fryer, the water on the food will cause the oil to boil. Watch the oil to ensure it doesn't overflow. It is threatens to overflow, raise the basket immediately.
- When frying several kinds of food, fry the food whose cooking temperature is lower first, then fry the food whose cooking temperature is higher.
- When frying for several cycles, the time between the end of the first frying cycle and the beginning of the second frying cycle should be 3 – 5 minutes. The green indicator light will turn off when the preset temperature has been reached.
CARE AND CLEANING
- Unplug cord from wall outlet. Allow oil to cool. NOTE: Oil retains its temperature for a long time after use, approximately 2 hours. Do not attempt to empty the Fryer until the oil has cooled completely. Do not move or carry the Fryer while it is still hot.
- Once oil has cooled, remove the Cover, Frying Basket and Non-Stick Bowl. Pour the oil, into a container that has a wide mouth and deep enough so that oil does not splash up over the sides.
- Wash Cover, Non-Stick Bowl and Frying Basket/Handle in hot soapy water or in the dishwasher. Rinse and then dry thoroughly.
- Filter oil through either absorbent paper or a large coffee filter into another container or back into the cleaned Non-Stick Bowl. Oil should retain its properties for another 8 - 12 uses.
NOTE: If oil has been used for cooking seafood, it should be discarded. - When all the parts are completely dry, place the Non-Stick Bowl, Frying Basket / Handle and Cover on the Fryer. Store in a cool dry place.
NOTE:
- DO NOT IMMERSE FRYER, CORD OR PLUG IN WATER OR ANY OTHER LIQUID.
- DO NOT USE STEEL WOOL OR ABRASIVE CLEANERS ON ANY PART OF YOUR APPLIANCE.
TROUBLESHOOTING GUIDE
| PROBLEM POSSIBLE CAUSE SOLUTION | ||
| No power • Control panel not fitted on frying basket properly• Reset button has tripped. | • Check the control panel ensuring that the safety button is pushed in.• Check if the restart button on the rear of the control panel requires resetting | |
| Release of unpleasant odours | • The oil has deteriorated• The oil is unsuitable for deep frying | • Change the oil after every 8 - 12 cycles.• Use a good quality vegetable oil. |
| Release of steam from under edge of the cover | • The cover is not closed properly. | • Make sure that the cover is fully closed. |
| Oil overflows | • The oil level is above the MAX level marked inside the Frying Bowl.• Too much food added to the basket.• The food is too wet. | • Reduce the oil level.• Do not fill the basket over 2/3 full, only 1⁄2 full if using frozen food.• Dry the food before frying. |
| Food is not crispy on the outside | • The frying temperature is too low.• Too much food was added to the basket. | • Adjust the temperature.• Do not fill the basket over 2/3 full, only 1⁄2 full if using frozen food |
RECIPES
Deep Fried Fish
3/4 cup (180 ml) corn starch
14 cup (60 ml) flour
1 tsp. (5 ml) baking powder
12 tsp. (3 ml) salt
14 tsp. (1.5 ml) pepper
1/3 cup (125 ml) beer
1 egg, slightly beaten
2 lbs. (900 g) white fish
Add all dry ingredients to a bowl and mix. Add beer and egg, stir until smooth. Cut fish into 7.5cm (3") lengths.
Set the temperature according to the Temperature Chart and follow the directions in the How to Use section.
Cook until batter is golden brown. Drain then place on paper towels.
Chicken Fingers
1 lb. (450 g) boneless chicken breasts
2 cups (500 ml) milk
2 eggs
1-1/2 cups (375 ml) all purpose flour
2/3 cup (170 ml) parmesan cheese
1 tsp. (5 ml) chili spice
2 tsp. (10 ml) oregano
2 tsp. (10 ml) basil
2 tsp. (10 ml) garlic powder
Cut chicken into strips. Combine milk and egg. Place chicken strips in mixture and soak for 30 minutes. Combine flour and remaining ingredients in a plastic bag. Remove chicken strips from mixture and let excess moisture drip off. Add a few chicken strips at a time to the plastic bag and shake. Place chicken strips on a platter and chill in the refrigerator for several hours.
Set the temperature according to the Temperature Chart and follow the directions in the How to Use section.
Place chicken strips a few at a time into the hot oil. Fry until golden brown and crispy. Drain then place on paper towels.
Fried Cheese
^1/_2 lb. (225 g) Gruyère or Mozzarella Cheese
12 cup (125 ml) all purpose flour
2
eggs,
beaten
1 cup seasoned breadcrumbs
Cut cheese into 12 " (2.5 cm) cubes. Dust with flour then dip in beaten egg and then into breadcrumbs. Press breadcrumbs onto the cheese then dip again into egg and breadcrumbs. Place in the refrigerator until ready to cook.
Cheese must be kept cold or it will melt too quickly.
Set the temperature according to the Temperature Chart and follow the directions in the How to Use section.
Cook for 1 – 2 minutes, turning once until golden brown. Drain then place on paper towels.
'Restaurant Style' French Fries
Peel or scrub potatoes. Cut into strips of equal size and thickness, approximately 12 " (1.5 cm). Place in a bowl of cold water until ready to use. When ready to cook, drain thoroughly and dry on paper towels.
Set the temperature according to the Temperature Chart and follow the directions in the How to Use section.
Cook for 6 – 7 minutes. Raise Basket and wait until the 'ready' light goes out. Lower basket into oil for a second time and fry for another 4 – 6 minutes or until potatoes are golden brown. Drain then place on paper towels.
Donuts
3 tbsp. (45 ml) vegetable shortening
2/3 cup (170 ml) sugar
1 egg,
beaten
2/3 cup (170 ml) milk
1 tsp. (5 ml) cinnamon
^3/_4 tsp. (4 ml) salt
3 cups (750 ml) flour
5 tsp. (25 ml) baking powder
powdered sugar
Cream shortening and sugar. Add the beaten egg then stir in milk. Add the cinnamon, salt, flour and baking powder. Make the dough stiff enough to be rolled out on a floured surface to about 14 " (6 mm). Cut out with doughnut cutter.
Set the temperature according to the Temperature Chart and follow the directions in the How to Use section.
Fry until golden brown. Drain and place on paper towels. Sprinkle with powdered sugar.
A short supply cord is provided to reduce the hazards of becoming entangled in or tripping over a long cord. Extension cords may be used if care is exercised in their use. If an extension cord is used, the marked electrical rating of the detachable power-supply cord or extension cord should be at least as great as the electrical rating of the appliance. If the appliance is of the grounded type, the extension cord should be a grounded 3-wire cord. The extension cord should be arranged so that it will not drape over the counter top or table top, where it can be pulled on by children or tripped over.
LIMITED WARRANTY
**The original sales receipt is the only acceptable proof of purchase**
Salton Canada warrants that this appliance shall be free from defects in material and workmanship for a period of two (2) years from the date of original purchase. Salton Canada, at its sole discretion during this warranty period, will repair or replace a defective product or issue a refund. Any refund to the purchaser will be at a pro-rated value based on the remaining period of the warranty. All liability is limited to the amount of the purchase price. This warranty covers normal domestic usage and does not cover damage which occurs in shipment or failure which results from alteration, accident, misuse, abuse, glass breakage, neglect, improper maintenance, use contrary to the operating instructions or commercial use. This warranty is not available to retailers or other commercial purchasers or owners.
This warranty does not include the cost of shipping, which is to be borne by the customer.
TO OBTAIN PROMPT WARRANTY SERVICE:
Contact one of our many Service Centers found on our website
www.salton.com/customer-care
or
Securely package and return the appliance to us. Please enclose:
• Original proof of purchase
- The completed form below with a \$12.50 Return Shipping & Handling fee – either a cheque, money order or credit card (A personal cheque will delay return shipping by 2-3 weeks)
For added protection, we suggest that you use an insured delivery service with tracking information when returning your product. Salton Canada will not be held responsible for in-transit damage or for packages that are not received.
This warranty does not include the cost of shipping, which is to be borne by the customer.
Name
Address.
City
Prov/State
Postal/Zip
Daytime
Phone
No.
Product defect:
Type of payment
Cheque/Money Order
Visa □
MasterCard □
Name on card
Expiry Date CSV No
Card No.
To contact our Customer Service Department:
SALTON CANADA Telephone: 514-685-3660 (Ext. 226)
81A Brunswick,
E-mail: service@salton.com
Dollard-des-Ormeaux, Quebec H9B 2J5
Fax: 514-685-8300
Canada
www.salton.com

- salton®
- Instruction Booklet
- IMPORTANT SAFEGUARDS
- SAVE THESE INSTRUCTIONS
- POLARIZED PLUG
- DESCRIPTION OF PARTS
- BEFORE FIRST USE AND ASSEMBLY
- Fryer Assembly
- Basket Assembly
- HOW TO USE
- SAFETY RESET SWITCH
- HELPFUL HINTS
- CARE AND CLEANING
- NOTE:
- TROUBLESHOOTING GUIDE
- RECIPES
- Deep Fried Fish
- Chicken Fingers
- Fried Cheese
- 'Restaurant Style' French Fries
- Donuts
- LIMITED WARRANTY
- TO OBTAIN PROMPT WARRANTY SERVICE:
- or
Brand : Salton
Model : DF1233
Category : Deep fryer