HTX-6 - Receiver Wet Sounds - Free user manual and instructions
Find the device manual for free HTX-6 Wet Sounds in PDF.


| Product Type | Marine Full Range Class D Amplifier |
| Brand | Wet Sounds |
| Model | HTX-6 |
| Number of Channels | 6 |
| Amplifier Class | Class D |
| Output Power (RMS) @ 4Ω Stereo | 6 x 100 Watts |
| Output Power (RMS) @ 2Ω Stereo | 6 x 150 Watts |
| Output Power (RMS) @ 4Ω Bridged | 3 x 300 Watts |
| Frequency Response (-3dB) | 7 Hz - 33 kHz |
| Crossover Type | High-Pass / Low-Pass, 12 dB/octave |
| Crossover Range | 50 Hz - 250 Hz |
| Input Sensitivity | 0.2V - 6.1V |
| Signal-to-Noise Ratio (1W / Rated Power) | >62 dB / >85 dB (A-weighted) |
| Separation | >52 dB |
| Power Supply | 12V DC (Marine electrical system) |
| Fuse Rating | 40A x 2 (internal) |
| Recommended Power Wire Gauge | 4 AWG |
| Speaker Wire Gauge Supported | 12 AWG - 16 AWG |
| Input Connectors | RCA (3 pairs) |
| Output Connectors | Removable screw terminal blocks (3 pairs) |
| Protection Features | Thermal, Short Circuit, Over/Under Voltage, DC Offset |
| LED Indicator | Dual-color (Blue = normal, Red = protection with fault code) |
| Cooling | Convection, ensure adequate airflow |
| Mounting | Solid surface, dry location, avoid excessive vibration |
| Operating Environment | Marine (humid), but avoid direct water contact |
| Warranty | 1 year limited (original purchaser, US authorized retailers) |
| What's in the Box | Amplifier, installation manual, (speaker terminal blocks pre-installed) |
Frequently Asked Questions - HTX-6 Wet Sounds
User questions about HTX-6 Wet Sounds
0 question about this device. Answer the ones you know or ask your own.
Ask a new question about this device
Download the instructions for your Receiver in PDF format for free! Find your manual HTX-6 - Wet Sounds and take your electronic device back in hand. On this page are published all the documents necessary for the use of your device. HTX-6 by Wet Sounds.
USER MANUAL HTX-6 Wet Sounds
natural_image
Abstract metallic brushstroke design on black background (no text or symbols)wet sounds
wetsounds.com
CONGRATULATIONS!
Thank you for purchasing the Wet Sounds Hydro-Tech™ X (HTX) series amplifier. Wet Sounds represents the ultimate in High Performance Marine Audio. Wet Sounds HTX Series Marine Amplifiers are designed to be a complete solution for every type of extreme marine application. HTX amplifiers use superior performance circuitry by utilizing Class D Power Supplies. These amplifiers have extreme power output packed inside a small chassis, thermal overload protection, flexible crossovers, extended inputs. HTX amplifiers are a well balanced match for all of the Wet Sounds™ products.
WARNING
We build all Wet Sounds products to play at high volumes for extended periods of time. Your ears however are not designed for high volume listening. This product can easily generate high volumes that can permanently damage your hearing. We urge you to limit your exposure to very high volume sound. You may also find your state has laws governing the volume of an audio system. Please be aware of all local and state laws in your area. A Properly tuned and operated audio system will deliver years of enjoyment when used properly.
WARNING
Please check the installation location before you begin. Do not cut any of the boats structure. Pay close attention to what items are behind the panels and carpet. Often the manufacturer will hide wires, mechanical or other electronic devices in the exact locations you wish to install in.
natural_image
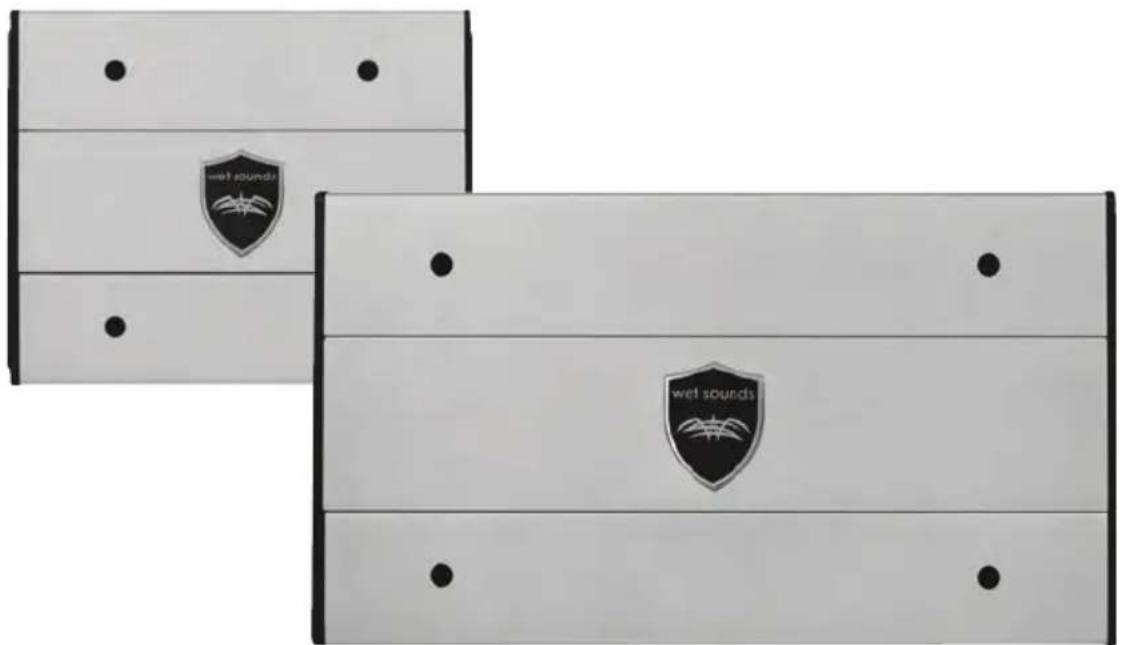
Two white rectangular panels with black dots and a shield logo, no visible text or symbols on the panels themselves.WET SOUNDS HTX SERIES SUBWOOFER AMPLIFIERS
INSTALLATION INSTRUCTIONS
Wet Sounds Marine Amplifiers are designed for easy installation in your boat. To ensure proper installation of your new purchase please follow all the suggestions listed below. If you do not have experience with marine electrical and mechanical systems contact a professional installer. Paying a qualified installer is almost always cheaper than paying a dealership to repair your boat.
LOCATING THE AMPLIFIER
The amplifier must be securely mounted to a solid surface. Please select a dry location to mount your amplifier. All Wet Sounds products are designed to operate in humid environments however direct contact with water can damage the electronics. Do not mount the amplifier to any area that may have excessive vibration (like a subwoofer enclosure). Position the amplifier in an area that receives sufficient airflow for proper heat dissipation.
Your amplifier does NOT make power; it converts power, or current, from your boats electrical system and converts it into high power musical energy. If the amp can't get all the power it needs it will not produce its full output. Your Wet Sounds amplifier will produce full output longer than other amplifies on the market today. Should your voltage or current drop too low the amplifier will drop below the rated output. Make sure your boats charging system is in good working order. Any high performance audio amplifier will increase the demand on your alternator and battery. If you are unsure have you charging system checked system testing by a professional technician.

RUNNING THE WIRING CABLES
**Always keep the signal cable and the power cables separated to prevent the possibility of inducing noise into the system**
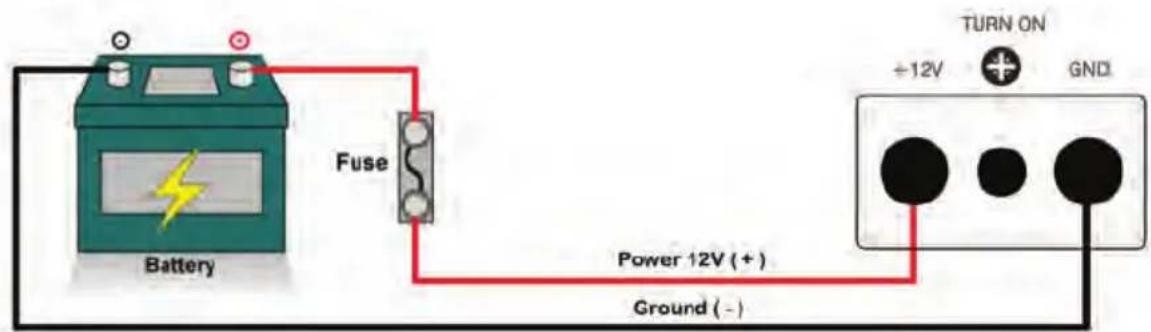
Carefully run the power and the signal cables through the boat. Always keep all the wire tight and tied down to prevent the power wire from shorting and reduce the risk of fire. A 4 AWG or larger wire should be used for power and ground connections. We recommend a fuse to be installed on the power wire within 18 inches of the battery for safety.
AMPLIFIER CONNECTIONS
**Make sure that the +12 volt cable is NOT connected to the battery while making any of the connections until all the connections and the fuse are installed** Power Connections
The HTX Series is designed for 4 AWG Power wire (+12 V) and Ground wire (GND). You will need to prepare the wire by remove 5/8" on the protective shielding on the power and ground wire. Then take a Phillips head screwdriver and back out the screws on the terminal block. Insert the +12 volt wire into the +12V side of the terminal block and then tighten the screw back into the terminal block. You will do the same for the Ground wire. See below
REMOTE CONNECTION
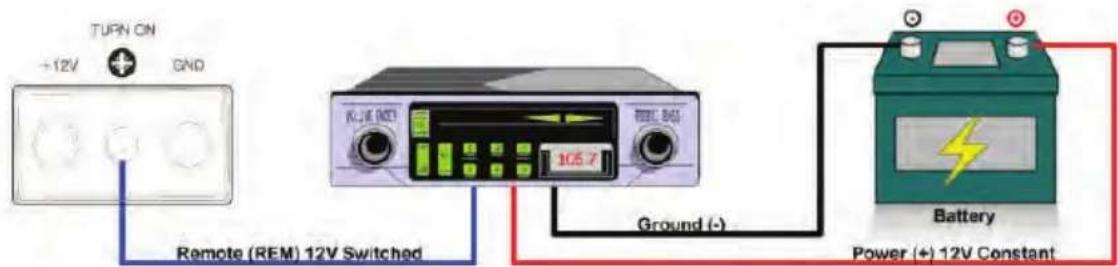
This amplifier is designed to accept a 12 AWG – 16 AWG wire input on the terminal block for speaker outputs 1 and 2. (Diagram A). The Remote Turn-on is how the amplifier knows when to turn on and off. This is typically connected to the remote output wire on an aftermarket radio. When connecting this amplifier to a factory radio, you will need to find a +12 volt accessory wire that switches on and off with the key.
AMPLIFIER SIGNAL INPUTS
Connect the RCA outputs from the source unit into the inputs of the amplifier. The HTX Series has 1 pair of inputs for each pair of channels (6 channel shown below, other models will vary).
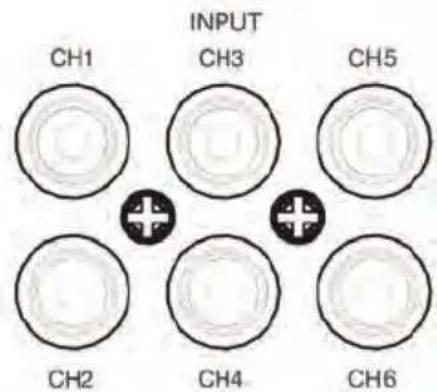
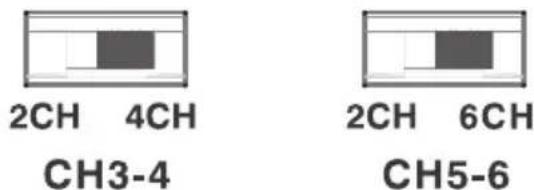
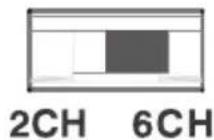
There are 2 different input selection switches. The first is to designate 2 or 4 channel input. You can select 2 channel input when only using 1 set of RCA inputs to allow all 4 channels to have output (CH 1,2,3, & 4). The next is to turn on or off the inputs for channels 5 & 6.(See below) Ch 5 & 6 can be carried over from inputs 1 & 2 when in 2CH mode, or a separate set of RCA cables can be used in 6CH mode.
**note if you only use the amplifier in 2 channel input mode you will not have fading capabilities between front and rear outputs.**
INPUT MODE
SPEAKER TERMINAL INPUTS
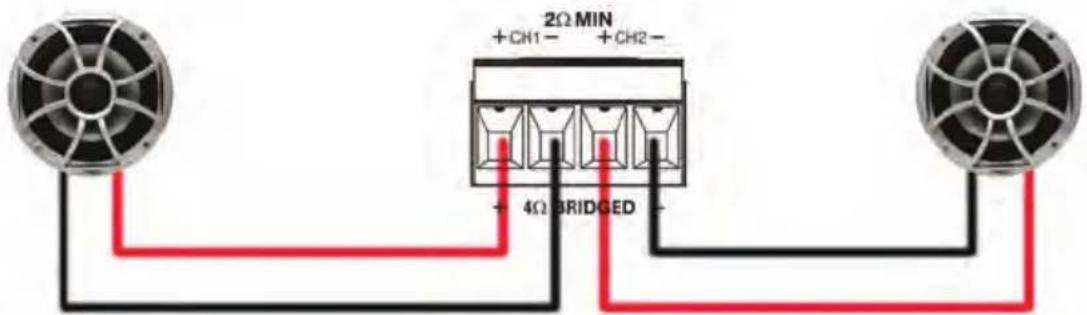
The HTX Series utilizes removable speaker terminal blocks for easier installations and stronger power connections. The terminal blocks are designed to accept 12 AWG- 16 AWG speaker wire. When preparing the wire you will need to strip 5/8" of the cables protective shielding. Then take a small Phillips or flat head screwdriver and back out the screw on the terminal block. Insert the speaker wire into the terminal block and then tighten the screw back into the terminal block. (DO NOT OVERTIGHTEN) (See below)
POWER INDICATOR
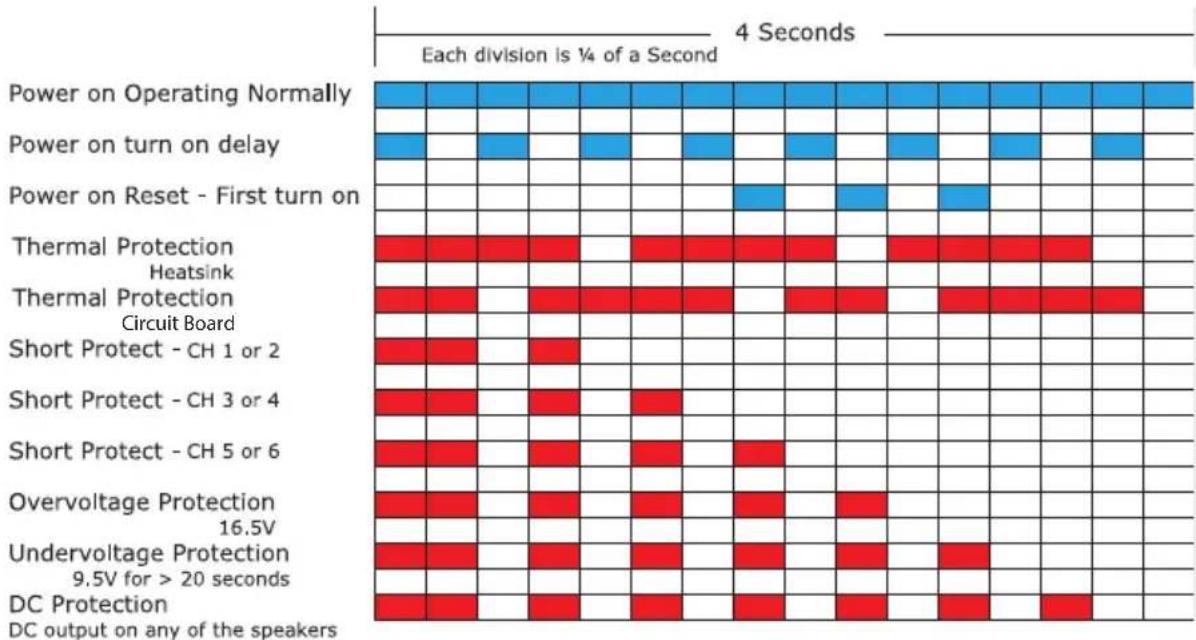
The amplifier is equipped with a dual illumination LED on the top of the amplifier that the Wet Sounds logo badge is mounted on. This amplifier is equipped with an advanced diagnostic system controlled by a microprocessor. In the event that the unit goes into protection for any reason it will flash a diagnostic code. The different sequences indicate the "Code" for faster trouble shooting. When the amplifier first turns on the LED will flash blue. Once the amplifier is ready for use the LED light will change to solid blue. If the amplifier is in protection mode (over voltage, under voltage, DC offset, thermal heating or speaker short) the LED light will flash a red diagnostic sequence. See troubleshooting section for further detail.


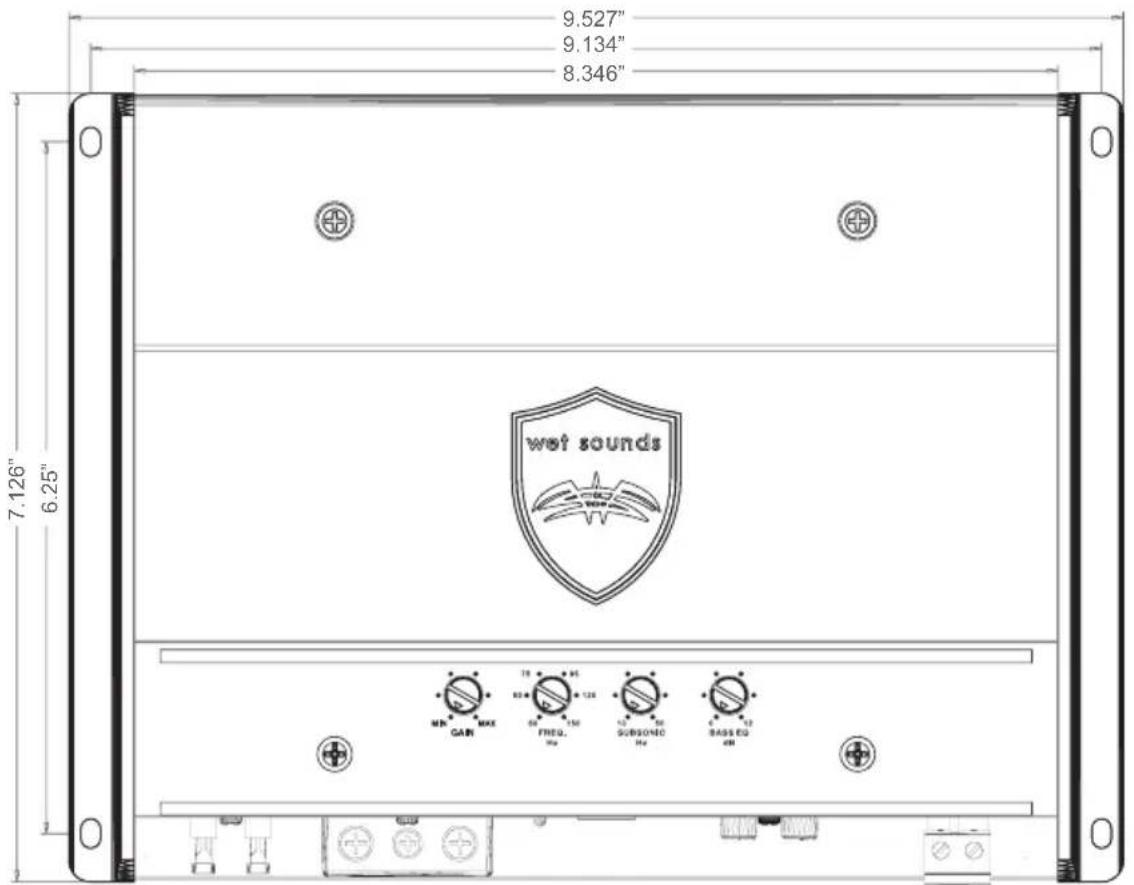
AMP DIAGRAM WITH LEGEND
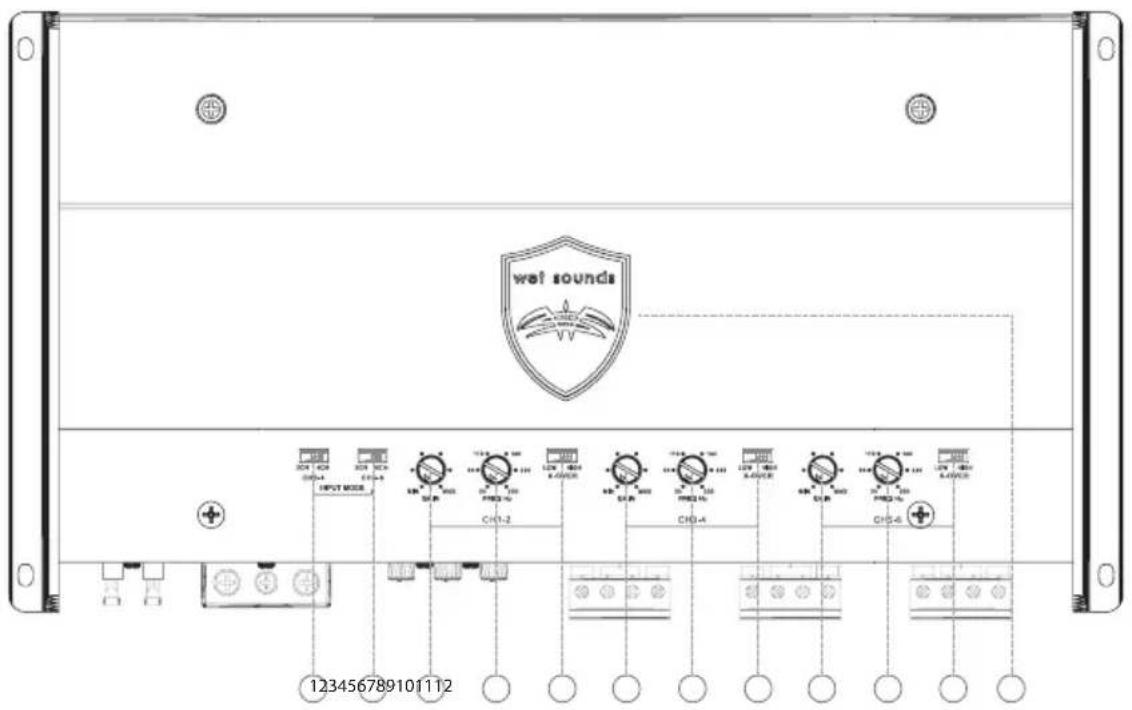
- Channel 3-4 Input Switch – Adjusting this switch to 2 channel input and connecting only the CH 1/2 inputs allows the amplifier to have 4 channel output.
- Channel 5-6 Input Switch – Adjusting this switch turns on/off the RCA inputs for channels 5 & 6.
- Gain Control 1-2 - This is the input sensitivity gain control for channels 1 & 2.
- Variable Crossover 1-2 – Built in 12db crossover with frequencies between 50Hz – 250Hz.
- Crossover Switch 1-2 - The HPF attenuates low frequencies and is used with mid-range speakers and tweeters. LPF attenuates high frequencies and is used for subwoofers. This controls channels 1 & 2
- Gain Control 3-4 – This is the input sensitivity gain control for channels 3 & 4.
- Variable Crossover 3-4 – Built in 12db crossover with frequencies between 50Hz – 250Hz.
- Crossover Switch 3-4 - The HPF attenuates low frequencies and is used with mid-range speakers and tweeters. LPF attenuates high frequencies and is used for subwoofers. This controls channels 3 & 4.
- Gain Control 5-6 – This is the input sensitivity gain control for channels 5 & 6.
- Variable Crossover 5-6 – Built in 12db crossover with frequencies between 50Hz – 250Hz.
- Crossover Switch 5-6 - The HPF attenuates low frequencies and is used with mid-range speakers and tweeters. LPF attenuates high frequencies and is used for subwoofers. This controls channels 5 & 6.
- Power LED Indicator and Logo
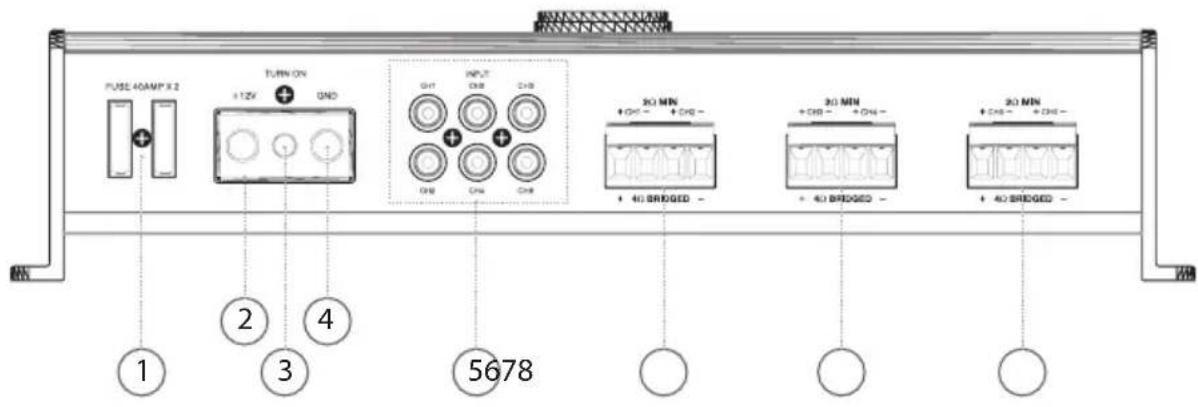
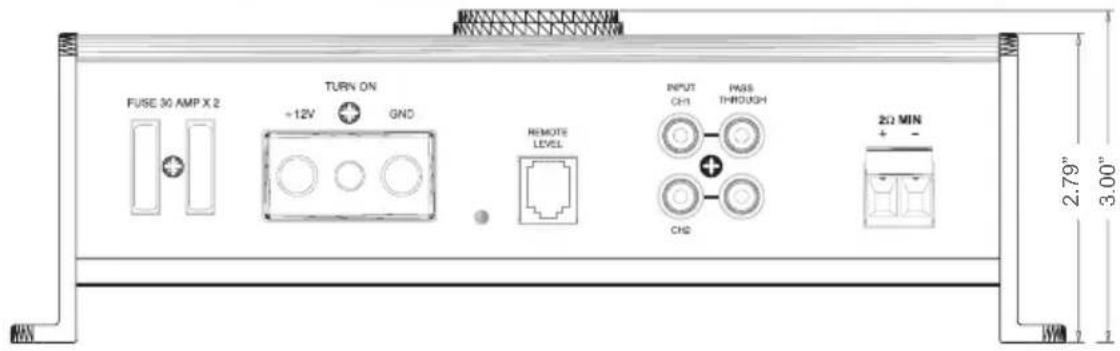
AMP DIAGRAM WITH LEGEND
-
Fuses – The fuses protect the amplifier against internal electrical damage and are meant to protect the amplifier only. All other power connections should be fused at the source
-
(+) 12 Volt Power – Connect this terminal through a FUSE or CIRCUIT BREAKER to the positive terminal of the vehicle battery or the positive terminal of an isolated audio system battery.
-
Remote Turn On – This terminal turns on the amplifier when (+) 12 volt is applied to it. Connect it to the Remote Turn on lead of the head unit or signal source.
-
Ground – Connect this terminal directly to the battery, using the shortest wire necessary to make this connection. Always use wire of the same gauge or larger than the (+) 12 volt power wire.
-
RCA Inputs - RCA Input Jacks—Accepts line level outputs from source units or signal processors at voltages between 250mV and 6 volts.
-
Speaker Terminal Output Block 1-2 – This is the speaker connecting block for channels 1 & 2.
-
Speaker Terminal Output Block 3-4 – This is the speaker connecting block for channels 3 & 4.
-
Speaker Terminal Output Block 5-6 – This is the speaker connecting block for channels 5 & 6.
SETTING UP THE AMPLIFIER

Input Selection
Because of the wide range of head unit/radio output configurations all Wet Sounds amplifiers have an adjustable input sensitivity or "GAIN". The gain is NOT a volume or a power limiting control similar to a throttle. It makes the amplifier more sensitive to input from the stereo. When the gain is turned up the amplifier will reach full output at lower volume levels on the head unit/radio. Also when the gain is set too high the amplifier becomes much more sensitive to noise from your boats electrical system.
Adjusting the Gain
You will need a small flat head screwdriver and select the style/genre of music you primarily enjoy listening to.
Here are 3 easy steps to follow.
- Turn the gain all the way counter clockwise to the "min" point on the amp.
- Increase the head unit/radio volume to 34 of the maximum volume output while paying your favorite style/genre of music.
- Gently turn the gain clockwise to increase the amplifiers output until the desired level of output is achieved.
**You will repeat these steps for both the front and rear channels independently**

You should not hear any distortion in your speakers at this level, if you do, slowly turn down the gain until distortion is no longer present. If you need further assistance please contact Wet Sounds Technical Services Department.
Crossover Controls
This amplifier is designed to play frequencies between 50 Hz and 250 Hz. The amplifier is equipped 2 different optional settings. High-Pass (HI) or Low-Pass (LO) (See below)
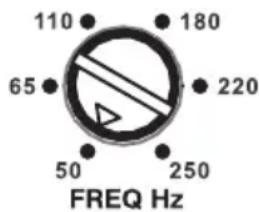
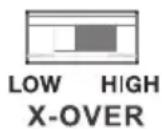
"High-Pass"
designed to play only the frequencies above where the crossover is set at. "Low Pass"
designed to play only the frequencies below where the crossover is set at.
TROUBLESHOOTING

If you are experiencing problems with your amplifier after installation follow these procedures to try and remedy the problem.
- Check your fuse and replace if necessary.
- Confirm your Ground wire has a good connection.
- Make sure your remote wire and power wire has +12 Volts.
- Make sure your battery has 12 volts.
- Confirm that the amplifier LED color is blue. If the light flashing is red than the amplifier is in protection mode. If the light is red check the following items below:
A. See what sequence is flashing by referencing the chart below
B. Confirm that a/the speaker is not blown.
C. Confirm that there are no loose wires that could be grounding out the amplifier.
D. Check that the amplifier has sufficient air circulation where it is located. Insufficient air flow and overdriving the audio system could result in the amplifier going into protection to preserve the amplifier.
Wet Sounds HTX Fault Codes
heatmap
| Protection Type | Each division is ¼ of a Second (Blue) | Each division is ¼ of a Second (Red) | |---|---|---| | Power on Operating Normally | 100 | 0 | | Power on turn on delay | 50 | 0 | | Power on Reset - First turn on | 50 | 0 | | Thermal Protection Heatsink | 100 | 0 | | Thermal Protection Circuit Board | 100 | 0 | | Short Protect - CH 1 or 2 | 50 | 0 | | Short Protect - CH 3 or 4 | 50 | 0 | | Short Protect - CH 5 or 6 | 50 | 0 | | Overvoltage Protection 16.5V | 50 | 0 | | Undervoltage Protection 9.5V for >20 seconds | 50 | 0 | | DC Protection DC output on any of the speakers | 50 | 0 |For HTX 4, 6 amplifiers, a short will only shut down the channels which are in fault. The other channels will continue to play. After a fault connection is cleared, the error code will continue to flash, while the logo is still illuminated blue. Please contact Tech Support for additional assistance, questions, etc.
BRIDGED AUDIO RCA CONFIGURATION
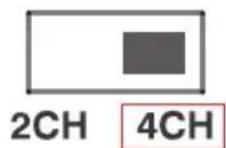
When connecting two speakers in bridged mode on channels 1-4 on the HTX-4 or HTX-6, the left and right RCA's must be split to retain stereo separation. This means you will have left audio out of the left speaker and right audio out of the right speaker. You must also switch to 4CH on the input mode section of the control panel on top of the amplifier (See the switch image below for an example). If you choose not to configure using this method and just use 2CH mode, then both speakers will play in mono and not stereo.
HTX-6 Control Panel
CH3-4
CH5-6
INPUT MODE
HTX-4 Connection Panel
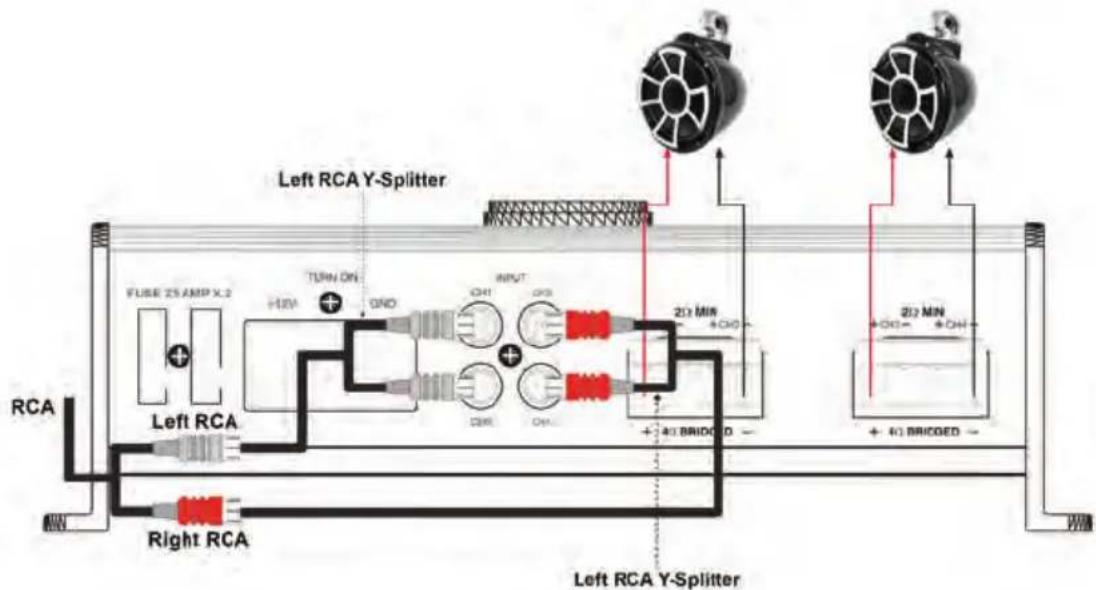

Two dual male RCA Y-Splitters are required for this configuration.
Please contact Wet Sounds Technical Support at 877.938.7757 if you need any assistance or how to bridge your HTX Series Amplifier.
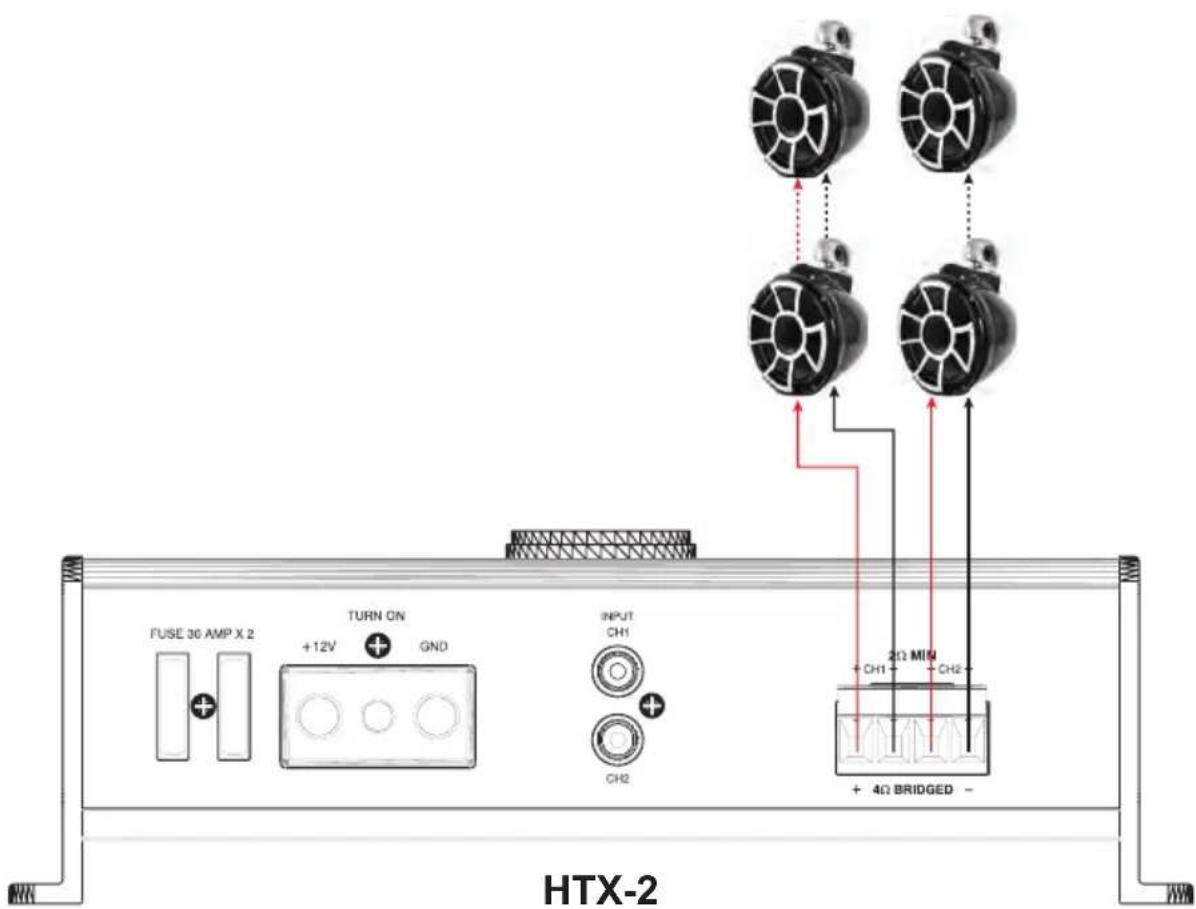
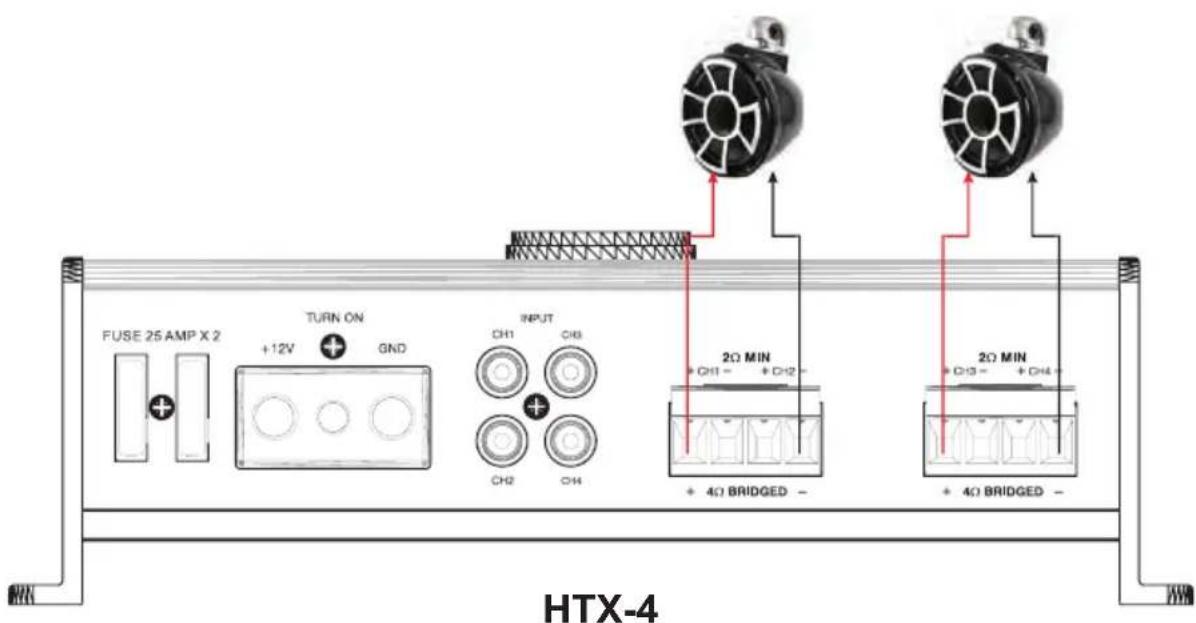
SAMPLE SYSTEM SETTINGS
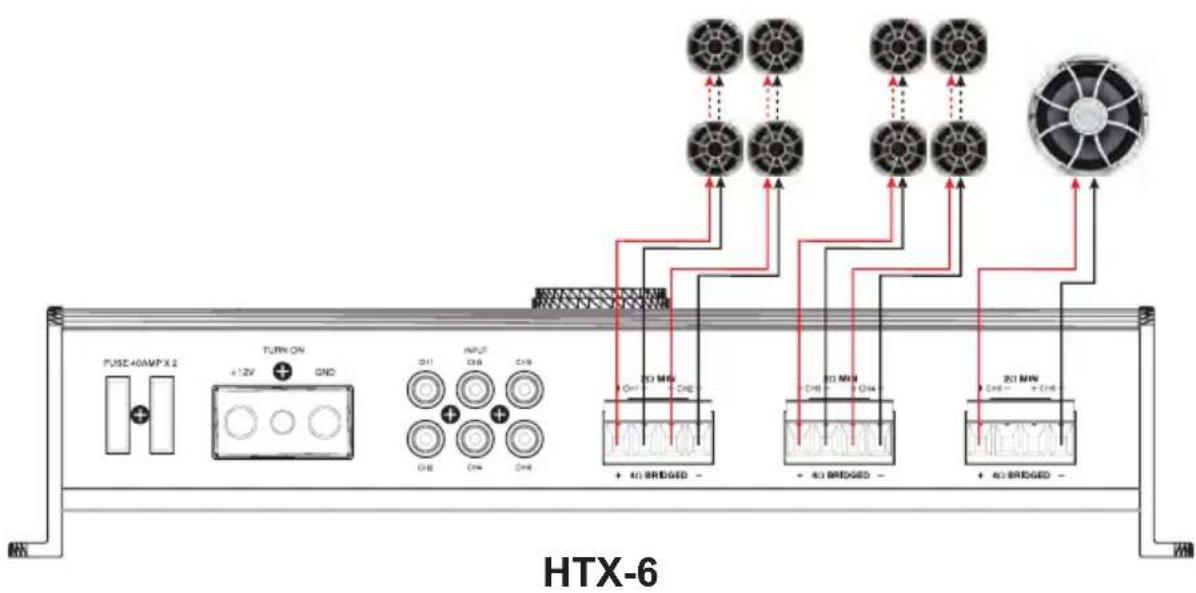
flowchart
graph LR
    A["FUSE 40AMP X 2"] --> B["+1.2V"]
    B --> C["+ GND"]
    C --> D["CH1 CH2 CH3"]
    D --> E["CH8 CH9 CH10"]
    E --> F["+ 40 MNG"]
    F --> G["CH1 CH2 CH3"]
    G --> H["+ 40 MNG"]
    H --> I["CH8 CH9 CH10"]
    I --> J["+ 40 MNG"]
    J --> K["CH1 CH2 CH3"]
    K --> L["+ 40 MNG"]
    L --> M["CH8 CH9 CH10"]
    M --> N["+ 40 MNG"]
    N --> O["CH1 CH2 CH3"]
    O --> P["+ 40 MNG"]
    P --> Q["CH8 CH9 CH10"]
    Q --> R["+ 40 MNG"]
    R --> S["CH1 CH2 CH3"]
    S --> T["+ 40 MNG"]
    T --> U["CH8 CH9 CH10"]
    U --> V["+ 40 MNG"]
    V --> W["CH1 CH2 CH3"]
    W --> X["+ 40 MNG"]
    X --> Y["CH8 CH9 CH10"]
    Y --> Z["+ 40 MNG"]
    Z --> AA["CH1 CH2 CH3"]
    AA --> AB["+ 40 MNG"]
    AB --> AC["CH8 CH9 CH10"]
    AC --> AD["+ 40 MNG"]
    AD --> AE["CH1 CH2 CH3"]
    AE --> AF["+ 40 MNG"]
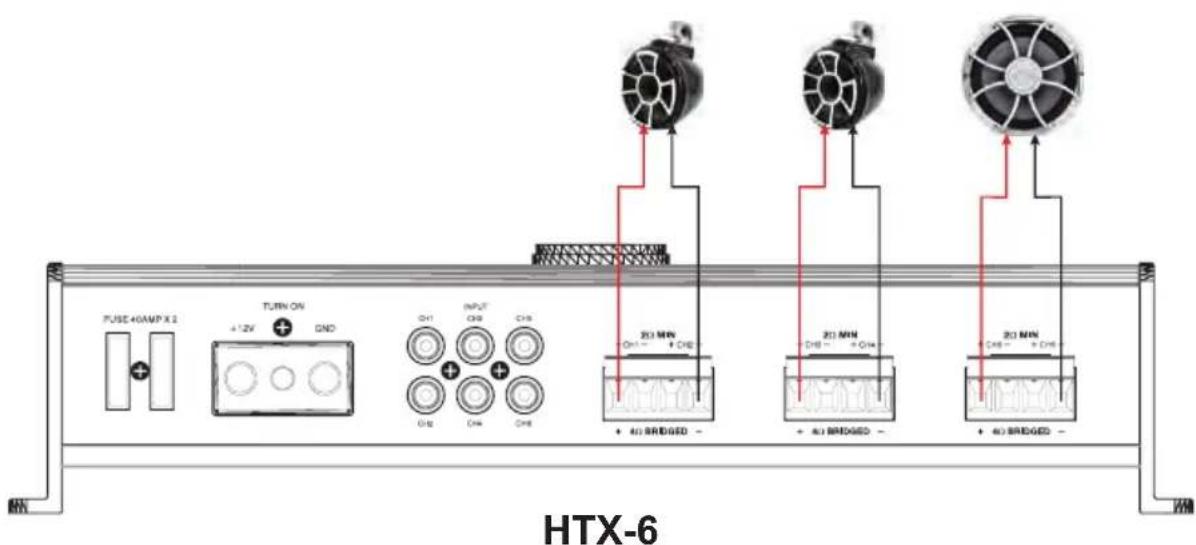
HTX-1 SPECS
Output Power (RMS) @ 1% 100Hz 14.4V CEA 2006
Mono @ 4 Ohms 330W X 1 @ <1.0%THD
Mono @ 2 Ohms 650W X 1 @ <1.0%THD
Frequency Response -3dB
Crossover Range Low Pass
Crossover Range Subsonic Filter
Bass Boost
Remote Attenuation
S/N Ratio (Awtg)
Input Sensitivity
10 Hz - 150 Hz
50Hz - 150Hz 12dB/Octav
10Hz - 50Hz 12dB/Octave
0 - 12dB @ 45Hz
+0.7 - -29dB
1Watt 4ohm 125Watts 4ohm
59dB >92dB
0.2V-6.0V
HTX-2 SPECS
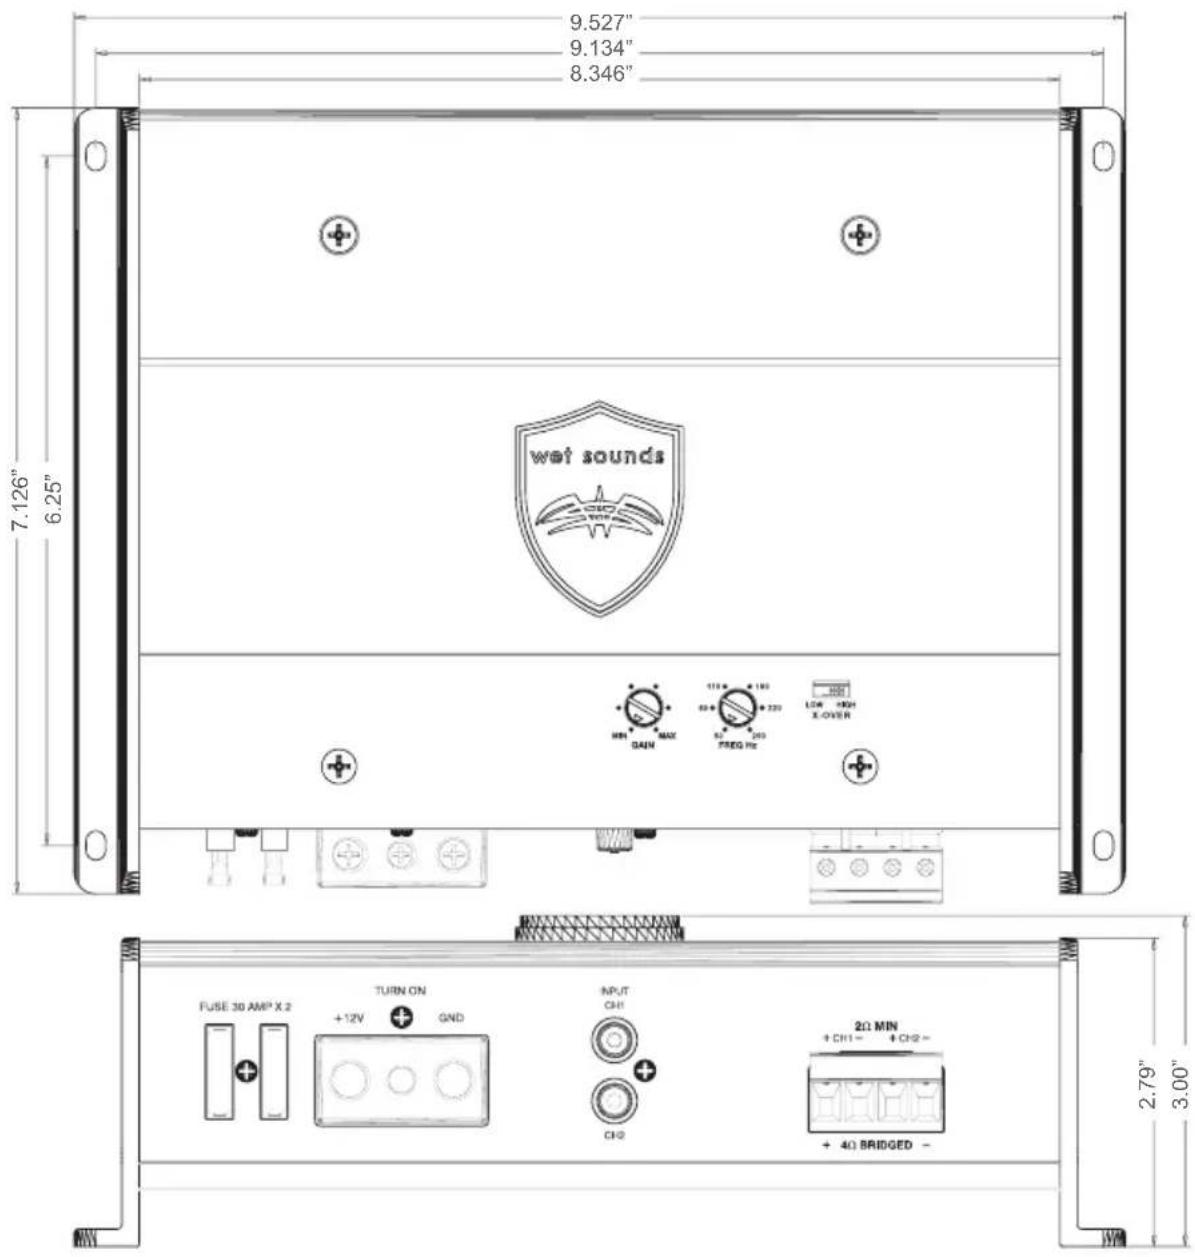
Output Power (RMS) @ 1% 100Hz 14.4V CEA 2006
STEREO @ 4 Ohms 150W X 2 @ <1.0% THD
STEREO @ 2 Ohms 300W X 2 @ <1.0% THD
MONO @4 Ohms 600W X 1 @ <1.0% THD
Frequency Response 20Hz-20KHz
Crossover Range Low Pass 50Hz-250Hz 12dB/Octav
Crossover Range Subsonic Filter 50Hz-250Hz 12dB/Octave
1Watt 4ohm 150Watts 4ohm
S/N Ratio (Awtg) > 60dB90dB>
Input Sensitivity 0.2V-6.0V
HTX-4 SPECS
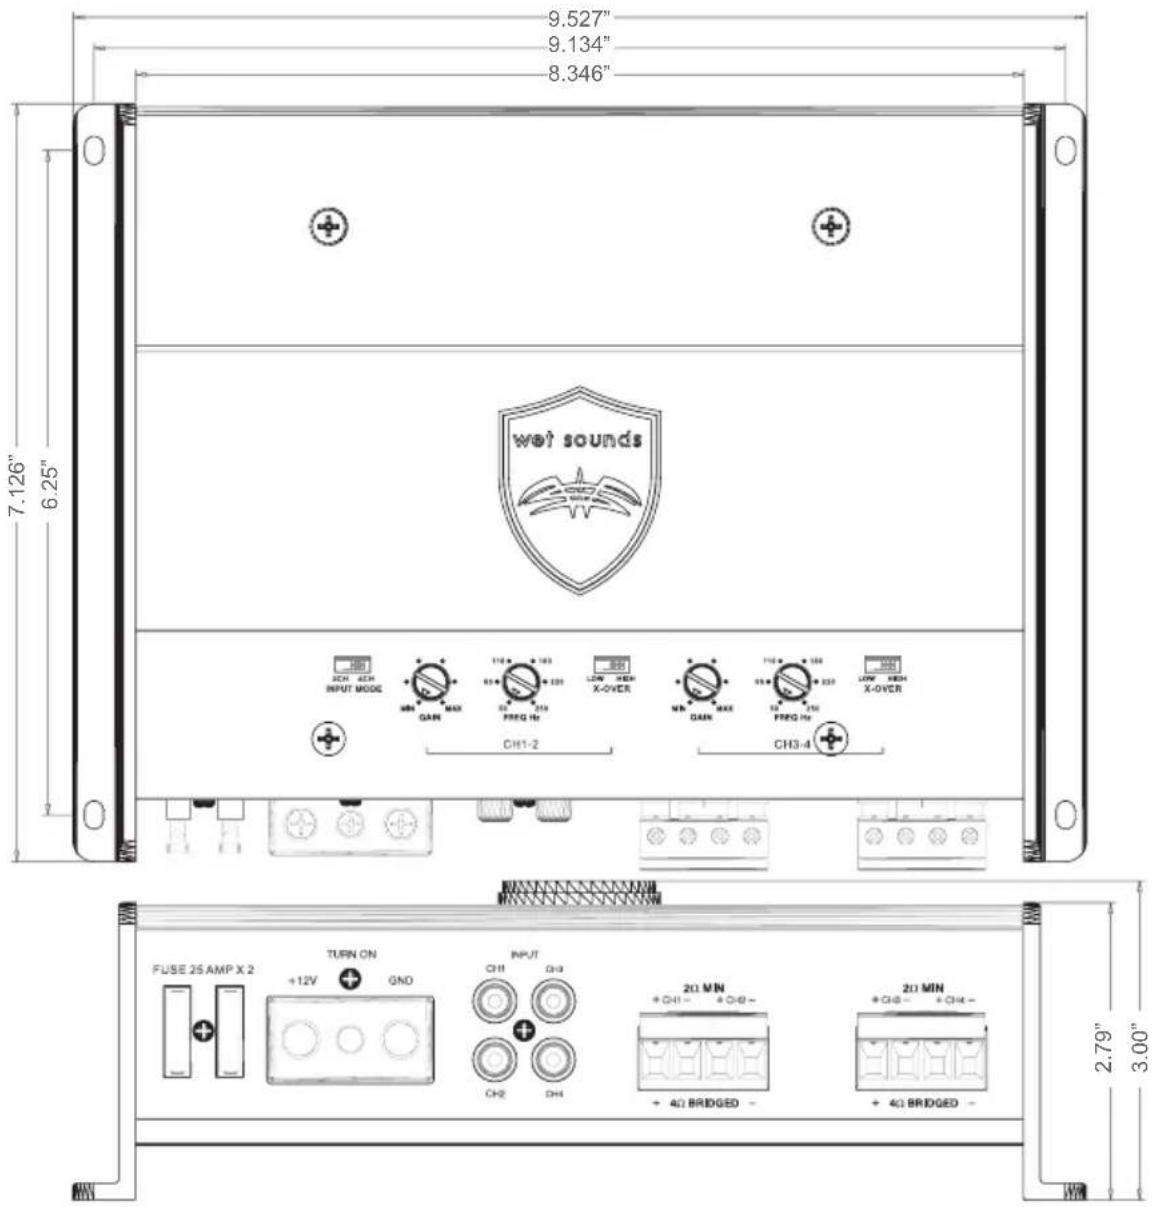
HTX-4 Full Range Class D Amplifier
Output Power (RMS) @ 1% 1000Hz 14.4V CEA 2006
Stereo @ 4Ohms 4x100 Watts
Stereo @ 2 Ohms 4x150 Watts
Mono @ 4 Ohms 2x300 Watts
Frequency Response -3dB 7 Hz - 33 kHz
Crossover Range Low Pass 50Hz-250Hz 12dB/Octave
Crossover Range High Pass 50Hz-250Hz 12dB/Octave
1Watt 4ohm 75Watts 4ohm
S/N Ratio (Awtg) >62dB >85dB
Separation >52dB
Input Sensitivity 0.2V - 6.1V
HTX-6 SPECS
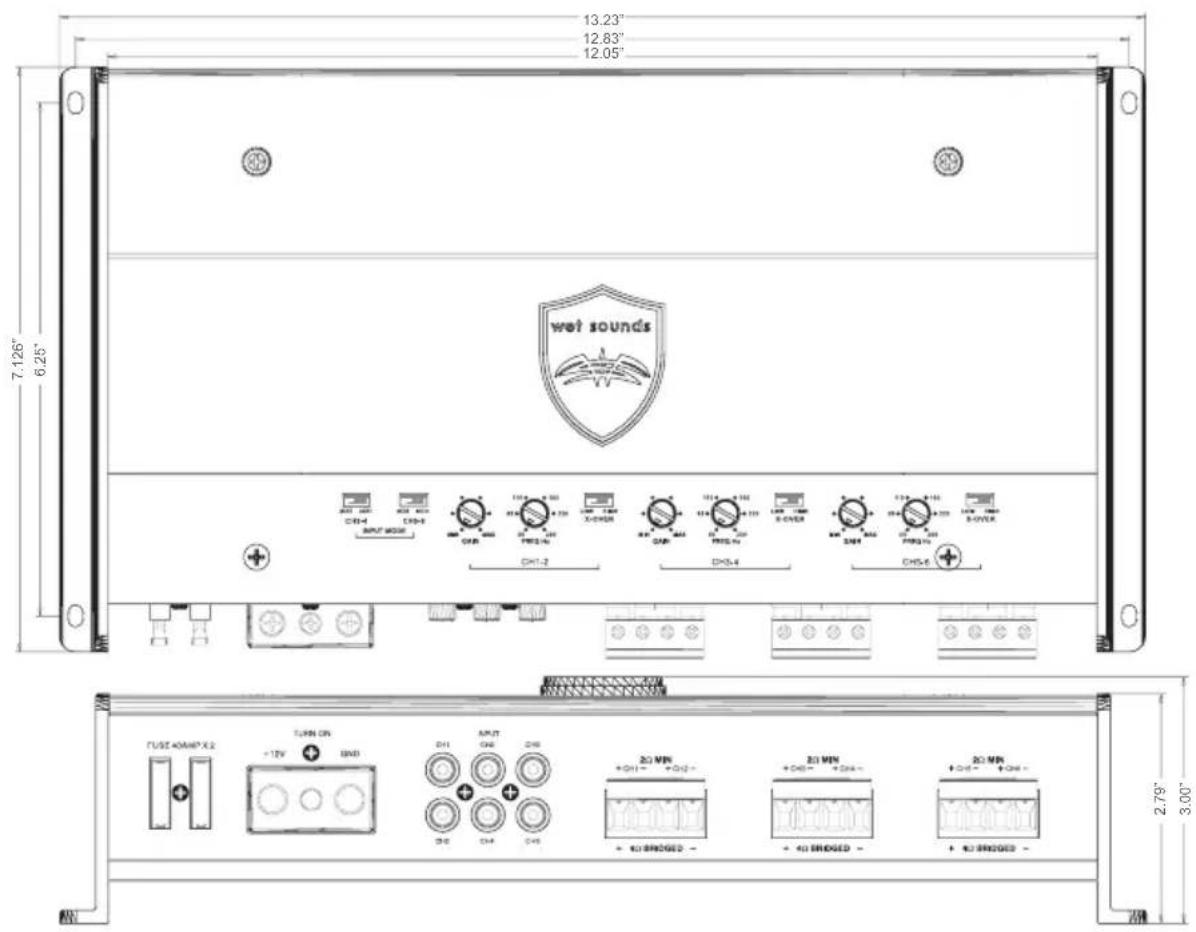
HTX-6 Full Range Class D Amplifier
Output Power (RMS) @ 1% 1000Hz 14.4V CEA 2006
Stereo @ 4Ohms 6x100 Watts
Stereo @ 2 Ohms 6x150 Watts
Mono @ 4 Ohms 3x300 Watts
Frequency Response -3dB 7 Hz - 33 kHz
Crossover Range Low Pass 50Hz-250Hz 12dB/Octave
Crossover Range High Pass 50Hz-250Hz 12dB/Octave
1Watt 4ohm 75Watts 4ohm
S/N Ratio (Awtg) >62dB >85dB
Separation >52dB
Input Sensitivity 0.2V - 6.1V
LIMITED WARRANTY
Length and limits of Warranty
Wet Sounds warrants this product to be free of defects in material or workmanship for (1) year from the date of purchase. Wet Sounds warranty applies exclusively to the original purchaser, not transferable and the amplifier must be purchased from an Authorized Wet Sounds Retailer within the United States. All products purchased outside of the United States are covered by the Authorized Distributor or OEM supplier. Any and all warranties not to exclude merchantability or fitness are limited in the duration to 1 year. This warranty gives you specific legal rights, and those rights may vary from state to state.
Items not covered
- Serial numbers that are defaced, altered or removed.
- Any product purchased outside the United States.
- Any cost related to removal, installation, shipping of the product.
- Damage caused by abuse or accident, theft, water, shipping or neglect.
- Service performed by anyone other than Wet Sounds or a Authorized Wet Sounds Service Center.
- Subsequent damage to any other components.
- Misrepresentations by the seller.
- Failure to follow installation instructions.
- Cosmetic damage.
Obtaining Service
Should service be necessary Wet Sounds (at its discretion), replace or repair the defective equipment with new or refurbished product. To receive service the original invoice of purchase with the customer name, product purchased, retailer name and address with date of purchase, must be provided to obtain warranty service. Contact Wet Sounds directly at 1-877-938-7757 contact customer service to obtain RA # (Return Authorization). You are responsible for the shipping of the product to Wet Sounds.

WET SOUNDS INC.
www.wetsounds.com
877-938-7757
10621 S Sam Houston PKWY W • Suite 100
Houston, Texas 77071
USA

PROUDLY DESIGNED
USA
- CONGRATULATIONS!
- WARNING
- INSTALLATION INSTRUCTIONS
- LOCATING THE AMPLIFIER
- RUNNING THE WIRING CABLES
- AMPLIFIER CONNECTIONS
- REMOTE CONNECTION
- AMPLIFIER SIGNAL INPUTS
- SPEAKER TERMINAL INPUTS
- POWER INDICATOR
- AMP DIAGRAM WITH LEGEND
- SETTING UP THE AMPLIFIER
- Input Selection
- Adjusting the Gain
- Here are 3 easy steps to follow.
- Crossover Controls
- "High-Pass"
- TROUBLESHOOTING
- If you are experiencing problems with your amplifier after installation follow these procedures to try and remedy the problem.
- Wet Sounds HTX Fault Codes
- BRIDGED AUDIO RCA CONFIGURATION
- SAMPLE SYSTEM SETTINGS
- HTX-1 SPECS
- HTX-2 SPECS
- HTX-4 SPECS
- HTX-4 Full Range Class D Amplifier
- HTX-6 SPECS
- LIMITED WARRANTY
- Length and limits of Warranty
- Items not covered
- Obtaining Service
Brand : Wet Sounds
Model : HTX-6
Category : Receiver