ICF-CD610 - Alarm clock radio SONY - Free user manual and instructions
Find the device manual for free ICF-CD610 SONY in PDF.

User questions about ICF-CD610 SONY
0 question about this device. Answer the ones you know or ask your own.
Ask a new question about this device
Download the instructions for your Alarm clock radio in PDF format for free! Find your manual ICF-CD610 - SONY and take your electronic device back in hand. On this page are published all the documents necessary for the use of your device. ICF-CD610 by SONY.
USER MANUAL ICF-CD610 SONY
Operating Instructions
Mode d'emploi
Bedienungsanleitung
Gebruiksaanwijzing
ICF-CD610
ICF-CD810
ICF-CD810L
Sony Corporation © 1995 Printed in Malaysia
English
WARNING
To prevent fire or shock hazard, do not expose the unit to rain or moisture.
To avoid electrical shock, do not open the cabinet. Refer servicing to qualified personnel only.
For the Customers in Europe and Saudi Arabia
CLASS 1 LASER PRODUCT
LUOKAN 1 LASERLAITE
KLASS 1 LASERAPPARAT
This Compact Disc player is classified as a CLASS 1
LASER product.
The CLASS 1 LASER
PRODUCT label is located on
the bottom exterior.
NOTICE FOR CUSTOMERS IN THE UNITED KINGDOM
A moulded plug complying with BS 1363 is fitted to this equipment for your safety and convenience.
Should the fuse in the plug supplied need to be replaced, a 5 AMP fuse approved by ASTA or BSI to BS 1362, (i.e. marked with ◆ or ♥ mark) must be used.
If the plug supplied with this equipment has a detachable fuse cover, be sure to attach the fuse cover after you change the fuse. Never use the plug without the fuse cover. If you should lose the fuse cover, please contact your nearest Sony service station.
IMPORTANT
If the plug supplied is not suitable for the socket outlets in your home, it should be cut off and an appropriate plug fitted in accordance with the following instructions.
The wires in this mains lead are coloured in accordance with the following code:
Blue : Neutral
Brown:Live
As the colours of the wires in the mains lead of this apparatus may not correspond with the coloured markings identifying the terminals in your plug proceed as follows:
The wire which is coloured blue must be connected to the terminal which is marked with the letter N or coloured black. The wire which is coloured brown must be connected to the terminal which is marked with the letter L or coloured red. Do not connect either wire to the earth terminal in the plug which is marked by the letter E or by the safety earth symbol 12 or coloured green or green-and-yellow.
WARNING
To prevent shock hazard, do not insert the plug cut off from the mains lead into a socket outlet. This plug cannot be used and should be destroyed.
For the Customers in Canada
CAUTION
TO PREVENT ELECTRIC SHOCK, MATCH WIDE BLADE OF PLUG TO WIDE SLOT, FULLY INSERT.
English
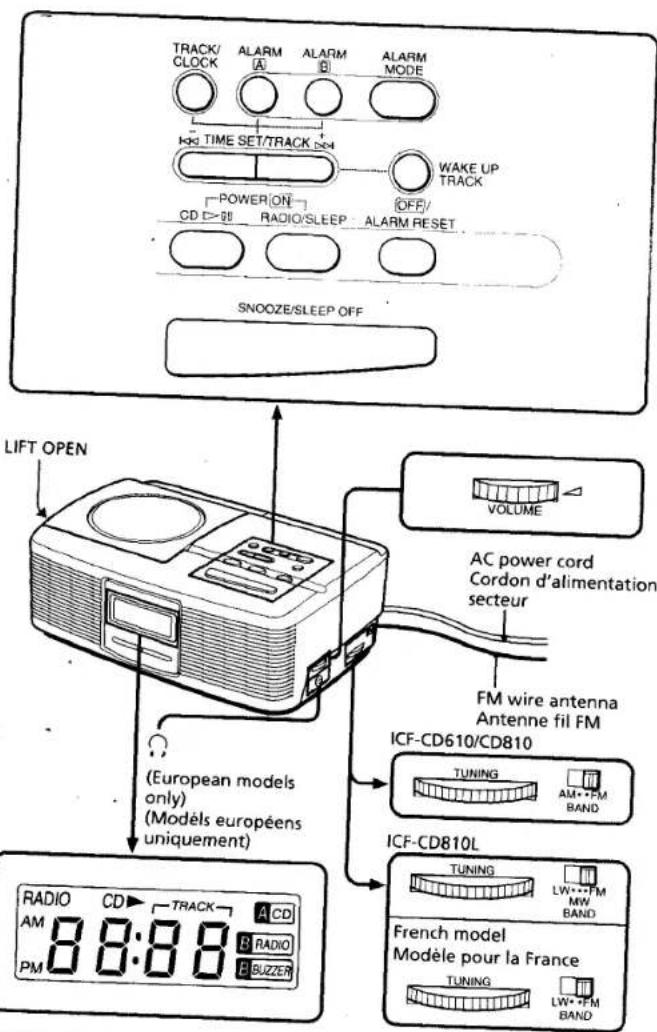
Before You Begin
Thank you for choosing the Sony CD clock radio! The CD clock radio will give you many hours of reliable service and listening pleasure. Before operating the CD clock radio, please read these instructions thoroughly and retain them for future reference.
Features
- You can wake up to CD, radio and buzzer with the snooze function.
- You can wake up to any track on CD.
- Dual alarm
- Three-inch disc can be played without an adaptor.
- Self power back-up: Even if the power supply is interrupted, the time setting and the memory will be backed up for 1 minute without batteries.
Precautions
- Operate the unit on the power sources specified in "Specifications".
- The nameplate indicating voltage, etc. is located at the bottom.
- Disconnect the cord by grasping the plug. Never pull it by the cord.
- Do not leave the unit in a location near a heat source such as a radiator or airduct, or in a place subject to direct sunlight, excessive dust, mechanical vibration, or shock.
- The unit is not disconnected from the AC power source (mains) as long as it is connected to the wall outlet, even if the unit itself has been turned off.
- Allow adequate air circulation to prevent internal heat build-up. Do not place the unit on a surface (a rug, a blanket, etc.) or near materials (a curtain) which might block the ventilation holes.
- Should any liquid or solid object fall into the unit, unplug the unit and have it checked by a qualified personnel before operating it further.
- When the casing becomes soiled, clean it with a soft cloth dampened with a mild detergent solution. Never use abrasive cleansers or chemical solvents, as they may mark the casing.
- Do not connect the antenna lead to the external antenna.
If you have any question, please consult your nearest Sony dealer.
Playing a Disc
An 8 cm (3-inch) CD can be played without an adaptor.
- Lift LIFT OPEN to open the CD compartment lid and place a disc.
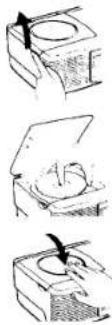
Lift
Label surface up
Close the lid.
-
Press CD ▷ and the display lights "01". The current number (01 to 99) appears in the display window. After 10 seconds, the indication becomes the current time, but the "CD ▶" indication remains.
-
Adjust VOLUME.

Do not stick paper or
Specifications
CD player section
System: Compact disc digital audio system
Laser diode properties: Material: GaAlAs
Wavelength: 780 nm
Emission duration: Continuous
Laser output: Less than 44.6 uW*
*This output is the value measured at a
distance of about 200 mm from the objective
lens surface on the optical pick-up block with
7 mm aperture.
Frequency response: 20-20,000 Hz · is dB
Wow and flutter: Below measurable limit
Radio section
Frequency range:
| Band | ICF-CD610/CD810 | ICF-CD810L | |
| North America | FM | 87.5-108.0 MHz | — |
| AM | 530-1,605 kHz | — | |
| Italy | FM | 87.5-108.0 MHz | — |
| AM | 526.5-1,606.5 kHz | — | |
| France | FM | — | 87.5-108.0 MHz |
| LW | — | 153-255 kHz | |
| Other countries | FM | 87.5-108.0 MHz | 87.5-108.0 MHz |
| AM(MW) | 530-1,605 kHz | 530-1,605 kHz | |
| LW | — | 153-255 kHz |
Intermediate frequency:
FM: 10.7 MHz
AM: 455 kHz
General
Time display:
North America, UK: 12-hour system
Other countries: 24-hour system
Speaker: Fullrange: 7.7 cm (3 ^1 /+ inches) 4 ohms
tput: ♩ jack (stereo minijack) (European
models only)
Power outputs: 1.2 W + 1.2 W (at 10% harmonic
distortion)
Power requirements: North American model:
120 V AC, 60 Hz
Other models: 220-230 V AC, 50 Hz
Dimensions: Approx. 286×200×104 mm (w/h/d)
(Approx. 11^3/s × 7^7/s × 4^1/s inches) incl.
projecting parts and controls
Mass: Approx. 1.7 kg (3 lb 12 oz)
Design and specifications are subject to change
without notice
Locating a Particular Portion
Locating a particular selection (AMS*)
To locate the beginning of the current selection.
press
To locate the next selection, press ▶▶▶
Locating a particular point in a selection
(SEARCH)
To go back at high speed, keep ◀◀ pressed.
To go ahead at high speed, keep ▶▶I pressed.
* AMS is the abbreviation of Automatic Music Sensor.
- If you press repeatedly, the player locates the previous selections. If you press repeatedly, the player locates the next selection and stops at the last selection.
• To stop play, press OFF/ALARM RESET. - To pause, press CD ▷ and the "CD ▶" indication flashes. To resume play, press CD ▷ again.
- To change the clock mode to track mode, press TRACK/CLOCK.
Press TRACK/CLOCK again, and the current time appears.
• To eject a disc, lift LIFT OPEN. - For private listening, connect the stereo headphones to the jack. (European models only)
• To handle compact discs
This way
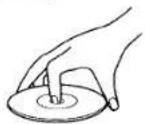
Handle the disc by its edge.
Not this way
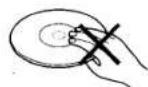
Do not touch the surface.

Do not stick paper or tape nor write anything on the surface.
Notes
- Do not open the CD compartment lid while playing, otherwise, the disc will be damaged. Be sure to stop the disc first.
- When you press CD ▷, if there is no disc in the CD compartment, the "00" indication flashes for 10 seconds and the unit will be turned off.
- If the A CD alarm is activated while listening to the CD, the track changes to that preset by pressing WAKE UP TRACK.
Operating the Radio
- Press RADIO/SLEEP to turn on the radio. The "RADIO" indication will appear and the "On" indication will appear in the display. After 10 seconds, the indication becomes the current time but the "RADIO" indication remains.
2. Adjust VOLUME
3. Select the BAND.
- Tune in a station using the TUNING dial.
• To turn off the radio, press OFF/ALARM RESET
• To improve radio reception
FM: Extend the FM wire antenna to improve FM reception.
AM (MW)/LW: Rotate the unit horizontally for optimum reception. A ferrite bar antenna is built into the unit.
Setting the Clock
Set the time when the CD or radio is turned off.
- Plug in the unit.
The display will flash "AM 12:00" or "0:00".
- While holding down TRACK/CLOCK, press either TIME SET/TRACK + or - until the correct time appears in the display.
When you release TRACK/CLOCK, the clock begins to operate and ":" flashes.
• The clock system varies depending on the model you own.
12-hour system: "AM 12:00" = midnight
24-hour system: "0:00" = midnight
- To set the current time rapidly, keep pressing the + or - button while holding down TRACK/CLOCK.
- To set the current time from zero seconds, at step 2, release TRACK/CLOCK with the time signal.
Setting the Alarm
You can set the CD, radio and buzzer alarms at the preset time. Before setting the alarm, be sure to set the clock. (See "Setting the Clock".)
Setting the Alarm Time
To set the A CD alarm
-
While holding down ALARM A. press either TIME SET/TRACK + or - until the desired time appears in the display window. The "A CD" indication flashes and "' lights.
-
Release ALARM A. The alarm time is set and the indication becomes the current time.
-
While holding down WAKE UP TRACK, set the desired track by pressing I◀◀ or ▶▶▶ beside TIME SET/TRACK.
-
Release WAKE UP TRACK. The track is preset and the indication becomes the current time.
Note
When the CD player is preset to start with track 5, it will always start with track 5 even though you change the CD, unless you change WAKE UP TRACK.
To set the B RADIO / B BUZZER alarm
-
While holding down ALARM B, press either TIME SET/TRACK + or - until the desired time appears in the display window. The "B RADIO" and "B BUZZER" indication flash and "; lights.
-
Release ALARM B. The alarm time is set and the indication becomes the current time.
Setting the Alarm Mode
Before setting the alarm mode, be sure to set the alarm time. (See "Setting the Alarm Time".)
- Press ALARM MODE until the alarm you want appears in the display window.
Each time you press ALARM MODE, the alarm indication changes as follows.
No alarm

- To stop the alarm, press OFF/ALARM RESET. The alarm will sound at the same time the next day.
• To cancel the alarm, while holding down ALARM MODE, press OFF/ALARM RESET
• To check the alarm time you set, press ALARM A or ALARM B.
Notes
• The alarm does not function, unless you set the clock and A CD / B RADIO / B BUZZER alarm.
- If you set the CD alarm and radio or buzzer alarm at the same time, the CD alarm sounds
- When you set the CD alarm, if there is no disc in the CD player, the buzzer will sound at the time you set.
• The selected alarm is activated at the time you set, and automatically turns off after 60 minutes.
- When the CD alarm comes on, the "A CD" indication flashes.
If you want to stop flashing, press CD ▷II. The CD player will stop playing at the last track.
- When the radio alarm is activated, the "B RADIO" indication flashes. If you want to keep on listening to radio and stop flashing, press RADIO/SLEEP. The "B RADIO" indication remains:
• The buzzer sound level is fixed, and independent of VOLUME.
To Doze for a Few More Minutes
- Press SNOOZE/SLEEP OFF. The CD, radio or buzzer will shut off but will be activated automatically after about 8 minutes. You can repeat this process as many times as necessary.
- While SNOOZE/SLEEP OFF function is operating, the alarm indication flashes
To Use Both Sleep Timer and Alarm
You can fall asleep to the radio and you will be awakened by the CD, radio or buzzer alarm at the preset time.
- Set the alarm. (See "Setting the Alarm".)
- Set the sleep timer. (See "Setting the Sleep Timer".)
Français
AVERTISSEMENT
You can enjoy falling asleep to the radio using the built-in sleep timer that turns off the radio automatically after a preset duration.
- Press RADIO/SLEEP repeatedly
The radio turns on and the "On" indication will appear initially in the display. The radio will turn off automatically after the selected preset duration has elapsed.
Each time you press RADIO/SLEEP, the duration changes as follows.
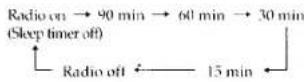
• To turn off the radio before the preset duration has elapsed, press SNOOZE/SLEEP OFF.
Troubleshooting Guide
Should any problem occur with the unit, make the following checks to determine whether or not servicing is required. If the problem persists, consult the nearest Sony dealer.
The clock does not show the correct time.
• There was an electrical power interruption lasting for more than 1 minute.
The CD player does not operate.
• Did you-place a disc correctly?
The disc should be placed with the labelled surface up.
• Did you close the compartment lid completely?
• Dusty or defective disc—Clean the disc with an optional cleaning cloth. Wipe the disc from the center out.
Skipping of sound in CD operation
• Dusty or defective disc—Clean the disc.
- Dirty lens—Clean the lens with a commercially available blower.
• Strong vibration
The CD, radio or buzzer alarm does not activate at the preset time.
• Did you set the current time correctly?
• Did you set the alarm time correctly?
• Did you place a disc?
• Did you close the CD compartment lid completely?
- Did you adjust the volume? If the volume is turned down completely, the CD or radio alarm is not heard.
Laserdiode: Material: GaAlAs
Wellenlänge: 780 nm