
SL-XP255C - CD Player TECHNICS - Free user manual and instructions
Find the device manual for free SL-XP255C TECHNICS in PDF.


User questions about SL-XP255C TECHNICS
0 question about this device. Answer the ones you know or ask your own.
Ask a new question about this device
Download the instructions for your CD Player in PDF format for free! Find your manual SL-XP255C - TECHNICS and take your electronic device back in hand. On this page are published all the documents necessary for the use of your device. SL-XP255C by TECHNICS.
USER MANUAL SL-XP255C TECHNICS
●Handle the AC adaptor carefully. Improper handling is irreversible.
- Do not touch it
- Do not touch it with wet blanks. - Do not explore invasive insects on top of it
• Do not place heavy 00, • Do not firmly hand it
• Do not forcibly belong it.
- Be sure to connect only the AC adaptor provided with the unit
- Disconnect the AC adaptor from the power outlet
If the unit is not going to be used for a long time.
If who don't not going to be better for doing time?
-
Unit
(No text)
No altering or remodeling
This can cause malfunctioning.
Wednesday
No dropping or strong impacts
This may damage the unit.
Locations to be avoided
Avoid using the unit in line following locations close
Avoid using the unit in this following locations since
they can cause malfunctioning: 1. Ruivome sind other molshu
- Ballboards and other moisture-plone places
-
Water/sewer and other dusty pieces
-
Warehouses and other duty places
-
Vocabuts places reception allowances, etc
-
Very hot places near heating appliances, etc.
Do not leave the unit exposed to direct
sunlight for long periods of time
This may deform or discolor: low cabinet and may
This may default or disector the cabinet and may also cause malfunctioning.
also c
Rechargeable batteries
Hechargeable batteries
10.4.1. 2013 (2020) Brazil are subdued
- Only the SH-CBED batteries can be recharged.
- If the power delivered by the Batteries Iats for a
very short time after recharging, it means that the
Benches' service line is over. Do not use them any
more. Please replace the batteries.
● Recharging already charged batteries will shorten
their service line:
- When recharging surged for the big time of what they have not been used for a long period
which they have not been used for a long period at time. The play time may be shorter than usual
of date, the play time may be shorter than casual in a case like this, negatively appears and die
In a case like this, repeatedly exchange and discharge the batteries. This will penetrate them to the
change the battery. This will restore them to all
regular changed state.
● Lie not show any metal objects to touch the terminal role of electromorphic bellows, since this may
Rats of recoungestive behaviors since and may
cause short-circulating which is dangerous.
。
Dry cell batteries/rechargeable
To prevent damage to the batteries and electrolyte
leakage, heed the following points.
- Align the ① and ○ polarities properly when in
serving the batteries into the unit,
- Do not mix different types or makes of batteries or
old and new batteries.
- Remove the batteries if you do not plan to use the
unit for an extended period of time.
- Do not throw batteries into a fire, and do no
short-circuit, disassemble or subject them to ex
cessive heat.
- Do not attempt to recharge dry cell batteries.
- Do not pool off the plastic covering on the ro
cheresable batteries. Short-circuiting may occur
which is dangerous.
“
Corrving dry cell batteries or
Carrying dry cell batteries of
rechargeable batteries around
(No text)
When putting dry cell or rechargeable batteries in a
pocket or bag, ensure that no other metal objects
such as a necklace, are placed in the pocket or bag
with them-
Contact with metal may cause short-circuiting
which in turn, may cause a fire.
Be absolutely sure to carry the rechargeable battery
les in the battery carrying case.
When driving a car
For safety reasons, do not operate the unit while driving.
Precautions for Listening with
the Headphones
(2) 本说明仅供参考。
- Do not play your headset at a high volume. Hear-
- DO NOT PLAY YOUR HEADSET AT A HIGH VOLUME YEAR ing experts advine against continuous extended
ing experts advise against combines exchised play
- If you experience a doctor in your ears, refuse
- If you experience a liking in your cars, recovered website or disagree with us.
- Do not use while operating a motorized vehicle. It
- DO NOT USE WHILE OPERATING a motorized vehicle. It was created to a trafficking hazard and is illegal in many
may create a traffic hazard and is illegal at many
- You should use primary sources or temporarily
- Toa should be extreme (anion) in man, klimy discontive titin is potentially hazardous plus
decommende also in potentially hazardous samples:
- Even if you have lost in an pair, all have deprived
- Even if your financial is an open-all type designed to let you have outside cash, which just be
Is let you hear outside sounds, don't turn up the
volume so high that you isn't near whirs around
you.
The Ground Truth image displays a single, solid horizontal line. According to Rule 2 (UNDERSCORE & LINE RULES), this is a stylistic or background line, not a placeholder underscore. Therefore, the OCR result must ignore it. The provided OCR content is "____", which consists of four underscores. This is an incorrect interpretation of the line as a placeholder, violating the rule that stylistic lines must be ignored. The OCR has hallucinated underscores where none should exist based on the GT's visual context. Hence, the OCR result is inconsistent with the Ground Truth.
When purchasing rechargeable
which purchasing 30% of the
Batteries
As a safety precaution, the portable CD players
made by Technics have a construction designed to
make it impossible to recharge ordinary batteries.
To use rechargeable batteries, to absolutely sure
to purchase the rechargeable Ni-Cd batteries de-
signed especially for this unit.
Special rechargeable Ni-Cd batteries:
SH-CDB8D (set of 2)
For details, check with your dealer.
For example, when this year is
Optical room, possible battery; Chemistry dry oil; heater/wire/harce-
Shiellbacteries
2019
(0) 》()
②L____D
⊖ ⊕ ⊖ ⊕
(1) (2) (3)
For Continental Europe and United
Kingdom:
(1) =
Notice about the rechargeable battery
The battery is designated recyclable.
Please follow your local recycling rule.
Please remaw your local recycling regulations.
- 2013.
The Ground Truth image displays a single, solid horizontal line. According to Rule 2 (UNDERSCORE & LINE RULES), if the GT contains lines used for stylistic emphasis or as background elements (like ruled paper), the OCR result must ignore them. The line in the GT is clearly a stylistic/background line, not a placeholder for text. Therefore, the OCR should not have output any underscores. Outputting `____` constitutes an error under Rule 2, as it hallucinates placeholder symbols where none are semantically intended. Hence, the OCR result is inconsistent with the Ground Truth.
m - 1 0 ;
Maintenance
Maintenance
The Ground Truth image displays a single, solid horizontal line. According to Rule 2 (UNDERSCORE & LINE RULES), if the GT contains lines used for stylistic emphasis or as background elements (like ruled paper), the OCR result must ignore them. The line in the GT is clearly a stylistic or background line, not a placeholder for text. Therefore, the OCR should not have output any underscores. Outputting `____` constitutes an error under Rule 2, as it hallucinates placeholder symbols where none are semantically intended. No punctuation mismatch or formatting transformation applies here because the content is purely symbolic and not textual.
Maintaining the unit
Wise the unit with a soft cloth. Remove stubbour
Wipe the dirt wall a soft cloth. Remove stubborn dirt using a cloth which has been sliced in water or
dilt using a cloth which has been dipped in water of
soapy watch and wrang gel, and then wipe dry.
- If you intend to use a chemical cleaning clean and its dimfions first
Read its directions first.
- Do not use alcohol or paint thinners.
Maintaining this loss
Maintaining the lens
Open the lid and clean the lens as shown in the
figure.
Use a cotton swab to gently wipe off any finger
prints.
Recommended product: Lens cleaner kit
(SZZP1038C)
Air Bidower for
camera lerts
Lens
1
1
1

Convering Compact Dises

Specifications



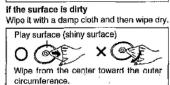
If moisture has formed on a disc When moisture has formed because the disc was brought suddenly into a warm room from a cold environment, wipe it off using a soft dry cloth.
When storing discs Avoid locations which are - Exposed to direct sunlight. - Susceptible to high levels of humidity or dust.
- Directly exposed to heat from a heating appliance. - On top of a car dashboard or near the rear
window
Handling precautions - On the label side (the side with writing) Do not write anything using a pencil, ball-point pen, etc. Do not stick paper or labels. - On the disc (shiny) side Handle this side carefully to keep it free from fingerprints or scratches. Do not use record cleaners, solvents, etc.


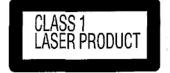

7
Troubleshooting Guide
Before requesting service for this unit, check the chart below for a possible cause of the problem you are experiencing. Some simple checks or a minor adjustment on your part may eliminate the problem and restore proper operation. If you are in doubt about some of the check points, or if the remedies indicated in the chart do not solve the problem, refer to the directory of Authorized Service Centers (enclosed with this unit) to locate a convenient service center, or consult your dealer for instructions.
| Problem | Checkpoint | Remedy |
| Disc ifd does not close. | Is the disc secured properly? | Secure the disc properly. |
| No play even when disc is inserted. | Is unit in HOLD mode? | Release HOLD mode. |
| Is disc secured? | Secure disc until it clicks into position. | |
| Any condensation inside unit? | Stand for about an hour and then operate. | |
| Disc cannot be removed. | Is disc secured? | Press PUSH to release disc. |
| Disturbed TV picture or interference in radio reception. | Is unit being used near TV or tuner? | •Place unit as far away as possible from TV or tuner.•If the TV or tuner has a simple indicator antenna, replace it with an antenna specially designed for the TV or tuner. |
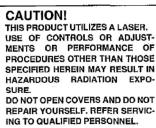
DANSK
BEMÆRK! I DETTE APPARAT ANVENDES EN LASER. BRUG AF BETJENINGSKNAPPER ELLER REGULERINGER ELLER FREMGANGSMÅDER UDOVER DE I DENNE BETJENINGSVEJLEDNING ANGIVNE, KAN MEDFøre FARE FOR BESTRÅLING. ÅBN IKKE KABINETTET OG FORS∅G IKKE AT UDFøre REPARATIONER SELV. REPARATIONER MÅ KUN FORETAGES AF KVALIFICEREDE TEKNIKERE.
SUOMI
VAROITUS! LAITTEEN KÄYTTÄMINEN MUULLA KUIN TÄSSÄ KÄYTTÖOHJEESSA MAINITULLA TAVÄLLA SAATTAA ALTISTAA KÄYTTÄJÄN TURVALLISUUSLUOKAN 1 YLITTÄVÄLLE NÄKYMÄTTÖMÄLLE LASERSÄTEILYLLE.
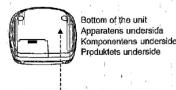
Marking sign is located on bottom of the unit.
NORSK
ADVARSEL! DETTE PRODUKTET ANVENDER EN LASER. BETJENING AV KONTROLLER, JUSTERINGER ELLER ANDRE INNGREP ENN DE SOM ER BESKREVENT I DENNE BRUKSANVIENING, KAN FORE TIL FARLIG BESTRALING. DEKSLER MÅ IKKE ÅPNES, OG FORSOK ALDRI Å REPARERE APPARATET PÅ EGENHÅND. ALT SERVICE OG REPARASJONSARBEID MÅ UTFÖRES AV KVALIFISERT PERSONELL.
For areas except Continental Europe, United
Kingdom, Australia and New Zealand only:
CAUTION:
CAUTION. The AC voltage is different according
The AC voltage is different according to the area.
Be sure to set the proper voltage in
your area before use.
(For details, please refer to the
attached sheet.)
(1) (2) (3)
WARNING:
TO REDUCE THE RISK OF FIRE OR ELECTRIC SHOCK, DO NOT EXPOSE THIS APPLIANCE TO RAIN OR MOIS-TURE.
ADVARSEL: FOR AT REDUCERE RISIKOEN FOR BRAND OG ELEKTRISKE ST∅D MÅ DETTE APPARAT IKKE UDSÆTTES FOR REGN ELLER FUGT.
VAROITUS: TULIPALO- JA SÄHKÖISKUVAARAN VÄLTTÄMISEKSI ÄLÄ SAATA TÄTÄ LAITETTA ALTTIJKSI SATEELLE TAI KOSTEUDELLE.
Dear Customer
Thank you for purchasing this product. For optimum performance and safety, please read these operating instructions carefully.


Supplied Accessories
Check the packing carton for these accessories.
Check the passing command for inside each AC adaptor: 1 pc
For United Kingdom (BEFA404B W)
For United Kingdom (H-FAX4048-W)
For Continental Europe
(RFEA401E-1S)
For Australia and N. Z. (RFEA404A-W)
For others (RFEA402Z-W)
Car adaptor 1 pc
(Sh-CDC2EY)
Car stereo cassette adaptor . . . . 1 pc
(ULGDM0AF)K4
(SH-CDM9AEYK1)
Technics
Portable CD Player
SL-XP255C
433 Operating Instructions
Note
The "EB" indication shown on the packing case indicates United Kingdom. Before connecting, operating or adjusting this product, please read these instructions completely.
EG EB GC GN
Location of Controls

① Skip/search buttons (◀◀/SKIP/-SEARCH ▶▶) ② Memory/recall button (MEMORY/RECALL) ③ Display ④ Repeat button (REPEAT) ⑤ Push button (PUSH) ⑥ Open button (OPEN) ⑦ Play/pause button (▶▶) ⑧ Headphones volume control (VOLUME) ⑨ Stop/operation off button (MI/OPR OFF) ⑩ XBS switch(XBS) ⑪ Headphones jack(□) ⑫ Play mode selector (MODE) ⑬ Hold switch (HOLD) ⑭ Out jack (OUT) ⑮ DC in jack (DC IN 4.5 V ◇◇◇) ⑯ Hole for car insulator mounting
Matsushita Electric Industrial Co., Ltd. Central P.O. Box 288, Osaka 530-91, Japan
Printed in Japan
RQT2989-B F0395F0
Juman Supply Preparations
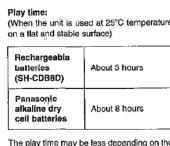
Refer to the specifications (page 7) for the duration of the play time provided when rechargeable or dry cell batteries are used.
Using the rechargeable batteries (not included)
Obtain the optional rechargeable batteries (SH-CDB6D).
o sure that the reche
Recharging proceduro
1 Place the rechargeable batteries inside the unit. (No batteries other than SH-CD88D can be recharged.)

If the battery compartment lid becomes disengaged, position it horizontally and press it back into position.

2 Connect the AC adaptor.

Note
The configuration of the AC adaptor differs according to the area. - It takes about 3 hours to fully recharge the batteries.
3 Upon completion of the recharging, disconnect the AC adaptor from the DC IN jack and power outlet.
Removing the batteries Push the batteries upward in the direction of the arrow to remove them.
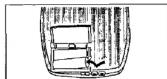
- The batteries can be used for about 10 months (300 times) if they are used every day. They will need to be replaced if the duration of their operation drops drastically. - You can operate the unit with the AC adaptor while recharging the batteries, but it will lengthen the recharging time.
- Recharging should be performed at 0°C\~40°C. - While recharging, the AC adaptor and rechargeable batteries may get warm. This is normal.
Using the dry cell batteries (not included)
Disconnect the AC adaptor and then install two LR6 (UM-3) type alkaline batteries. The batteries are inserted and removed in the same way as for the rechargeable batteries.
Using the AC adaptor
Connect the AC adaptor supplied. Refer to the section on "Using the rechargeable batteries" for details on the connections.
Note
The unit is in the standby condition when the AC adaptor is connected. The primary circuit is always "live" as long as the AC adaptor is connected to an electrical outlet.
Using the car adaptor
For details, refer to the attached sheet, "Installation Instructions". The batteries can be recharged inside the car using the car adaptor.
Battery indicator
749:58 Battery Indicator
This starts flashing when the batteries have run down, and after a short while the power is automatically cut off. (The amount of time during which play continues after the indicator has started flashing differs slightly depending on the type of batteries used.)
| Type of battery | Action |
| Recharge-able batteries | Recharge the batteries again. |
| Dry cell batteries | Replace with new batteries. |
(The battery indicator may not flash if rechargeable batteries, other than those designated by our company, are used.)
Sequential Play Basic Play
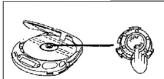
- Press OPEN to open the lid, and Insert the disc.

Removing the disc
After the disc has stopped rotating, press PUSH and release the disc. (Do not open the lid during play.)
Skip and search functions
- During program play the tracks are skipped in the forward or backward direction in the programmed sequence.
- During program play, random play or 1-track repeat play, only the track being played is searched.
- During random play, it is not possible to skip to the track which has already been played!
。
-
-
-
-
-
-
-
-
-
-
-
-
-
-
-
-
-
-
-
-
-
-
-
-
-
-
-
-
-
-
-
-
-
-
-
-
-
-
-
-
-
-
-
-
-
-
-
-
-
-
-
-
-
-
-
-
-
-
-
-
-
-
-
-
-
-
-
-
-
-
-
-
-
-
-
-
-
-
-
-
-
-
-
-
-
-
-
-
- 90.
-
-
-
-
-
-
-
-
-
-
-
-
-
-
-
-
-
-
-
-
-
-
-
-
-
-
-
-
-
-
-
-
-
-
-
-
-
-
-
-
-
-
-
-
-
-
-
-
-
-
-
-
-
-
-
-
-
-
-
-
-
-
-
-
-
-
-
-
-
-
-
-
-
-
-
-
-
-
-
-
-
-
-
-
-
-
-
| Operation | Button | Display |
| Pauses: press during play:press again to resume play | ▶H | 1 125 |
| To stop play: press during play! [Stop mode] | ■ | Total number of tracks 1 455g Total playing time |
| To turn off the unit press during stop mode! Off mode | ■ | |
| Skip forward/backward (skip function): press during play Rapid forwards/backward (search function): keep depressed during play | ▶H: Forward direction ◀: Backward direction | — |
| For your reference: "no d lS" display This appears for about 30 seconds when a disc has not been inserted or when a disc has not been inserted properly and then ▶H is pressed. | Backlight The backlight comes on to illuminate the display panel when the unit is used with the AC adaptor or a car adaptor. Automatic Shut-OFF function When the unit is left for about 10 minutes in the stop or pause mode, this function automatically shuts off the power in order to prevent the rechargeable batteries, etc. from discharging needlesally. | |
Accidental Operation Prevention Function

This function prevents the unit from operating even if a control button is pressed in error. (The disc lid can still be opened and closed.) Use the function to prevent the following situations;
Example 1: While the unit is not in use, the power is inadvertently turned on and the batteries run down.
Example 2: Play is interrupted while the unit is in use.
The Ground Truth image displays a single, solid horizontal line. According to Rule 2 (UNDERSCORE & LINE RULES), if the GT contains lines used for stylistic emphasis or as background elements (like ruled paper), the OCR result must ignore them. The provided OCR content is "\_\_\_\_", which consists of four underscores. This is incorrect because underscores are not equivalent to a solid line and are not permitted under the “Stylistic/Background Lines (Ignore)” rule. The OCR has hallucinated underscores where none should exist in the GT, violating the “Stylistic/Background Lines (Ignore)” rule. Therefore, the OCR result is inconsistent with the Ground Truth.
- 12 (a) 12 (b) 12 (c) 12 (d) 12 (e) 12 (f) 12 (g) 12 (h) 12 (i) 12 (j) 12 (k) 12 (l) 12 (m) 12 (n) 12 (o)
To use the accidental operation prevention function
“ h_0 / d ” indicator If the unit is in the hold mode, the “ h_0 / d ” indicator appears when any of the unit's function buttons (except OPEN) is pressed, When the unit is turned off.
The "h0 I d" indicator appears only when ▶II is pressed.
Before operating the buttons Be absolutely sure to move HOLD to release the unit from the hold mode.
Other Play Methods

Skip play
Preparation
Set the unit to the stop mode. (See page 3.)
1 Set MODE to NORMAL
2 Press -SKIP/-SEARCH to select
the desired track number.
3 Press ▶ II
The tracks are played in sequence starting with the selected track until the last track, after which play is automatically stopped.
Resume play
Set MODE to RESUME
Resume
5 0:01
Play can be resumed from the start of the track which was playing when the stop mode was last selected or when the power was last turned off.
This is useful when playing discs inside a car.
To cancel the resume mode
Sor MODE IS NORMAL.
For your reference:
If MODE is set to RESUME while the unit is turned off, the all repeat function is automatically activated when play is started.
Notes
- If play is stopped near the end of a track, it may be resumed from the next track.
- When a track is being played, if the unit is turned off and another disc is inserted, the position of the last track played is still in the memory, and play will start at the same position among the tracks on the newly inserted disc.
“ ” “ ” “ ”
To change the tone quality [Available only when listening through the stereo earphones (not included).] Set XRS to ON.
ON: For extra bass sound OFF: To cancel the XBS mode
Program play
Up to 24 tracks can be programmed.
- 2014年1月1日
Preparation:
Set the unit (to the stop mood. (see page 3.)
1 Set MODE to NORMAL.
2 Press -SKIP/-SEARCH to select
the desired track number.
For example: To select track 2 press ▶▶1.3 times
二
| 3
(No text)
Track number
3 Press MEMORY/RECALL to
store the number in the memory.
7 61
3--01
-
Track Number
Program order
4 Repeat steps 2 and 3 to program all the desired tracks
5.
6 Hess
To program the same track re-
peatedly
Press MEMORY/RECALL repeatedly and
(2) m = 311 ;
when "F" appears
No more tracks can be programmed.
To check what has been pro-
grammed
Press MEMORY/RECALL during play
(The display shows the programmed track
Numbers in the sequence you have entered?
The present all the new members
To cancel all the programming Press ■/OPR OFF
(1) 本说明仅供参考。
Random play
Random play
1 Set MODE to RANDOM.
2 Press ▶ II.
www.csc1
5 0:01 | Random
- Medical
To cancel the random mode
OR MODE IS NORMAL
For your reference:
The first track to be played can be changed by pressing ▶▶ in the stop mode. (All the tracks are played regardless of the track first played.)
Note
Program play is not possible in, the RANDOM mode.
1
Repeat function
To expect one week
Press REPEAT once in the stop mode or during play.
1
3 4:1 (L) — Lights
To respect all the tracks
To repeat all the tracks Press REPEAT twice in the stop mode on during play.(In the program play mode, only all the programmed tracks will be repeated.)
5 2:14
Press REPEAT once in the all repeat mode,
Using the Unit with
Optional Accessories
Using the unit with an audio
system
The Ground Truth image displays a single, solid horizontal line. According to Rule 2 (UNDERSCORE & LINE RULES), this is a stylistic or background line, not a placeholder underscore. Therefore, the OCR result must ignore it and output nothing or only meaningful text. The provided OCR content is "____", which consists of four underscores. This is an incorrect interpretation of the line as a placeholder, violating the rule that stylistic lines must be ignored. The OCR has hallucinated underscores where none should exist based on the GT's visual context. Hence, the OCR result is inconsistent with the Ground Truth.
Using the stereo connection cable (not included), you can hear CDs on your audio system.
- Connect the cable to the amplifier after turning off its power.
- Do not connect the cable to the .PHONO
jacks on the amplifier.
- Obtain the optional connecting cable if the amplifier comes with mini phone isake
-Adjust the volume level on the amplifier.
-
-
-
-
-
-
-
-
-
-
-
-
-
-
-
-
-
-
-
-
-
-
-
-
-
-
-
-
-
-
-
-
-
-
-
-
-
-
-
-
-
-
-
-
-
-
-
-
-
-
-
-
-
-
-
-
-
-
-
-
-
-
-
-
-
-
-
-
-
-
-
-
-
-
-
-
-
-
-
- 81.
-
-
-
-
-
-
-
-
-
-
-
-
-
-
-
-
-
-
-
-
-
-
-
-
-
-
-
-
-
-
-
-
-
-
-
-
-
-
-
-
-
-
-
-
-
-
-
-
-
-
-
-
-
-
-
-
-
-
-
-
-
-
-
-
-
-
-
-
-
-
-
-
-
-
-
-
-
-

Using the unit with a car audio system
For connection to the car audio system, refer to the attached sheet, "Installation Instructions."
Items to be purchased for securing the unit in a car: Car Mount Kit (SH-CPE7)
Car mounting arm, car insulator Car Mount Kit makes it easy to secure the product inside your car.
Note
It may not be possible to use the unit with some types of car audio systems owing to restrictions imposed by the construction of the car stereo cassette adaptor. For further details, refer to the instructions of the part concerned.
15
Preparations for the cassette adaptor
The cassette adaptor is set to the metal position.
Set the mode selector to the appropriate position for your car audio system, as shown in the diagram on the right.
■ To change the tape position
When the system has an auto tape selector:
Make sure that this cassette adaptor's mode selector is at the "METAL/CrO₂" position.
When the system has a manual tape selector:
Set the mode selectors of both the car audio system and this cassette adaptor to the "METAL/CrO₂" position.
When the system does not have a tape selector function:
Set this cassette adaptor's mode selector to the "NORMAL" position.
■ When the sound volume is extremely low
Set the cassette adaptor's head position selector to 1, 2 or 3, whichever yields the highest volume level.
Deviation between the head positions of the cassette adaptor and car stereo can be adjusted. A ballpoint pen comes in handy for this.
(Refer to "To connect the cassette adaptor".)
2


Before installing this product, please read these instructions completely.
Before installing this cassette adaptor in the car, check whether it can be fitted into your car audio unit.
The cassette adaptor cannot be used with some car audio systems.
EB EG GC GN
RQT2562-1B

Accessories Supplied For Installation
A Car stereo cassette adaptor
(SH-CDM9D)....1 pc.
B Car adaptor (SH-CDC2) ..... 1 pc.
■ For securing the portable CD player in a car
Optional Car Mount Kit (SH-CDF7) (The car mounting arm © and car insulator ® make it easy to secure the product inside your car.)
Note:
If you have a portable CD player with an anti-shock memory function, please obtain the Optional Car Mount Kit (SH-CDF20).
Connection with a Car Audio System
■ To check the insertion direction of the cassette adaptor
Depending on the position of the head section in the car audio system, the way in which the cassette adaptor is installed will differ. Refer to the illustrations and find out which installation method applies. Inserting the side with the cord into the system may cut the cord or damage the car audio system.
A For a car audio system with the head at the right side
It can be used as it is. See page 5.
B For a car audio system with the head at the left side
Change the direction in which the cord is led out. See page 4.
c For a car audio system in which the head is in the center at the rear
Change the direction in which the cord is led out. See page 4.
A


B


C

With some car audio systems it is necessary to change the direction in which the cord is led out.
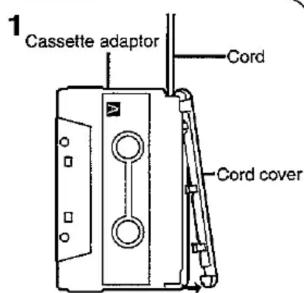
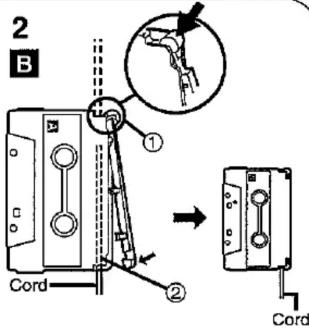
■ Changing the cord position
1 Remove the cord cover of the cassette adaptor.
2 Pull out the cord, align it with the head section of the car audio system, and change the position from which it extends.
B For a car audio system with the head at the left side
① Fit this end back into position first.
② Fit the cord into the groove.
c For a car audio system in which the head is in the center at the rear

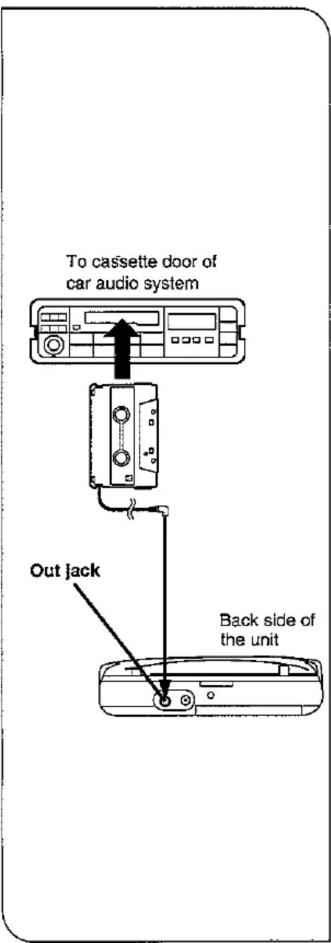
To connect the cassette adaptor
Connect the provided cassette adaptor to the Out jack on the CD player, and insert it into the cassette door of your car audio system.
Compact discs can then be enjoyed through your car audio system.
■ For an auto-reverse car audio system
Switch the car audio system's playback direction to the side for which sound can be heard, or the side for which the sound is louder.
■ To remove the cassette adaptor The cassette adaptor can be removed by pressing the car audio system's eject button.
Note:
Depending on the type of vehicle, static may be heard if the unit is connected via line cord to the car audio system's CD IN jack or AUX IN jack. If this occurs, it is recommended that you use the provided cassette adaptor.
■ When the sound volume is extremely low
Set the cassette adaptor's head position selector to 1, 2 or 3, whichever yields the highest volume level.
(Refer to "Preparations for the cassette adaptor".)
5
To connect the car adaptor A
The provided car adaptor must be connected.
- This car adaptor can be used in an automobile which has a 12 V or 24 V battery. You can use it in a truck or other large vehicle. (This is a special-purpose negative ground car adaptor.)
- Do not connect the adaptor immediately after using the cigarette lighter.
- Leave a little slack in the car adaptor's cord, making sure that it does not run underneath the unit.
■ To replace the fuse ☐
1 Remove the plug cap by rotating it in the direction shown by the arrow, and take out the old fuse.
2 Insert the new fuse (250 V, 500 mA type) into the fuse receptacle and reinstall the plug cap.
If the fuse blows frequently, there may be something wrong with the adaptor. Consult your dealer.
■ To recharge the batteries with the car adaptor
With the rechargeable batteries SH-CDB8D (RP-BP60) inserted in the player (Refer to the operating instructions), connect the provided car adaptor.


6
Please understand that we cannot take responsibility for the unit falling or any other damage that may occur as a result of faulty installation.
Precautions
Car adaptor
●The provided car adaptor is made specifically for use with DC 4.5 V Technics portable CD players. Do not use it with other devices.
- Do not use the adaptor for a long period with the batteries left in the unit because this may shorten the life of the batteries.
●Pay attention to the car battery capacity when using this adaptor for a long period.
- Do not expose this adaptor to strong sunlight or very high temperatures.
- Be sure to remove this adaptor from the cigarette lighter socket when not using this adaptor or before leaving the automobile.
- The power source polarities of this unit are - - , check the DC IN jack.
■ Cassette adaptor
- Bunch the excess cord together or place it so that it will not interfere with operation.
- Do not touch the head or roller.

●After use, remove the cassette adaptor and replace it in its accessory case so that no dust will adhere to the head section.
●After installing the cassette adaptor in the car audio system, do not allow its cord to make contact with the control section.
- The sound quality deteriorates when the head section of the car audio system becomes dirty. It is, therefore, a good idea to clean it periodically.
- If the rollers or car audio capstan are dirty, it may no longer be possible to install the cassette adaptor in the car audio system. Clean the rollers and capstan using a cotton swab.
- Do not leave this adaptor in a vehicle which is exposed to direct sunlight.
- Do not bring any magnetized objects near this adaptor's head section.
- Because of the nature of its construction, the sound of something rotating can be heard in this adaptor. This is normal and not indicative of a malfunction.
- During the winter months when the temperature inside the vehicle falls to an extremely low level, there may be times when the unit cannot be used because the cord is too stiff to allow the adaptor to be installed in its proper position.
Specifications
■ Cassette adaptor
Frequency
response .....30-20,000 Hz
(This is the rating for the head section of the product.)
Suitable output
impedance .....2.2 kΩ
Dimensions
(W×H×D) .....102.4×12.1×
63.8 mm
Weight .....47 g
Cable length ..... Approx. 1.5 m
Car adaptor
Input .....DC 12/24 V
Output .....DC 4.5 V (0.8 A)
Dimensions
(W×H×D) .....104×32×23 mm
Cable length .....Approx. 1.8 m
Note:
Specifications are subject to change
without notice.
Weight and dimensions are
approximate.
- -
- also c
- Rechargeable batteries
- 。
- “
- When driving a car
- Precautions for Listening with
- Convering Compact Dises
- Specifications
- Troubleshooting Guide
- DANSK
- SUOMI
- NORSK
- WARNING:
- Dear Customer
- Supplied Accessories
- Technics
- Note
- Location of Controls
- Juman Supply Preparations
- Using the car adaptor
- Battery indicator
- Sequential Play Basic Play
- Removing the disc
- Skip and search functions
- Accidental Operation Prevention Function
- The Ground Truth image displays a single, solid horizontal line. According to Rule 2 (UNDERSCORE & LINE RULES), if the GT contains lines used for stylistic emphasis or as background elements (like ruled paper), the OCR result must ignore them. The provided OCR content is "\_\_\_\_", which consists of four underscores. This is incorrect because underscores are not equivalent to a solid line and are not permitted under the “Stylistic/Background Lines (Ignore)” rule. The OCR has hallucinated underscores where none should exist in the GT, violating the “Stylistic/Background Lines (Ignore)” rule. Therefore, the OCR result is inconsistent with the Ground Truth.
- Other Play Methods
- Skip play
- Resume play
- Notes
- Program play
- Repeat function
- Using the Unit with
- Optional Accessories
- Preparations for the cassette adaptor
- ■ To change the tape position
- Accessories Supplied For Installation
- Connection with a Car Audio System
- To connect the cassette adaptor
- Note:
- To connect the car adaptor A
- Precautions
- Car adaptor
- ■ Cassette adaptor
Brand : TECHNICS
Model : SL-XP255C
Category : CD Player