
CVL-2008 - Microphone Cyber Acoustics - Free user manual and instructions
Find the device manual for free CVL-2008 Cyber Acoustics in PDF.


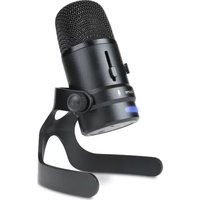
| Product Type | Professional USB Recording Microphone |
| Brand | Cyber Acoustics |
| Model | CVL-2008 (Denali) |
| Polar Patterns | Cardioid, Bidirectional, Omnidirectional, Stereo |
| Microphone Capsule | Three condenser elements |
| Frequency Response | 20 Hz – 20 kHz (typical for condenser microphones) |
| Connectivity | USB (micro USB to USB-A) with included cable |
| Headphone Output | 3.5 mm (1/8") stereo jack for zero-latency monitoring |
| Controls | Headphone volume slider, microphone volume slider (with mute at lowest position), stereo recording button, polar pattern selector knob |
| Power Requirement | USB bus-powered (5V DC) |
| Power LED | Illuminates when USB power is detected |
| Compatibility | Windows 7/8/10/11 and Mac OS X 10.4.11 or higher |
| Stand Type | Adjustable desktop stand (included); also has 3/8" mounting hole for professional mic stands |
| Box Contents | Microphone, desk stand, pop filter, USB cable, user guide |
| Construction Material | Die-cast anodized aluminum body and stand |
| Special Features | Pro-glide controls, stereo recording override, mute function, real-time monitoring |
| Certifications | FCC Part 15 Class B, Canada ICES-003 |
| Weight (approx.) | 1.5 lbs (680 g) – based on typical condenser mics |
| Dimensions (stand height) | Approximately 10.2 x 12.4 x 5.5 inches (260 x 315 x 140 mm) – estimated |
Frequently Asked Questions - CVL-2008 Cyber Acoustics
User questions about CVL-2008 Cyber Acoustics
0 question about this device. Answer the ones you know or ask your own.
Ask a new question about this device
Download the instructions for your Microphone in PDF format for free! Find your manual CVL-2008 - Cyber Acoustics and take your electronic device back in hand. On this page are published all the documents necessary for the use of your device. CVL-2008 by Cyber Acoustics.
USER MANUAL CVL-2008 Cyber Acoustics
Minimum System Requirements
Works with USB compliant computers
- Microsoft Windows OS 7, 8, 10 or higher
- Apple Macintosh OSX 10.4.11 or higher
For additional information and support contact: cyberacoustics.com
FCC Compliance Part 15
This equipment has been tested and found to comply with the limits for Class B digital device, pursuant to Part 15 of the FCC Rules. These limits are designed to provide reasonable protection against harmful interference in a residential installation. This equipment generates, uses and can radiate radio frequency energy and, if not installed and used in accordance with the instruction, may cause harmful interference to radio communications. However, there is no guarantee that interference will not occur in a particular installation. If this equipment does cause harmful interference to radio or television reception, which can be determined by turning the equipment off and on, the user is encouraged to try to correct the interference by one or more of the following measure:
- Reorient of relocate the receiving antenna
- Increase the separation between the equipment and receiver
- Connect the equipment into an circuit different from that to which the receiver is connected
- Consult the dealer or an experienced radio/TV technician for help
Changes or modifications not expressly approved by the party responsible for compliance could void the user's authority to operate the equipment.
Canada ICES-003
This Class B digital apparatus complies with Canadian ICES-003.

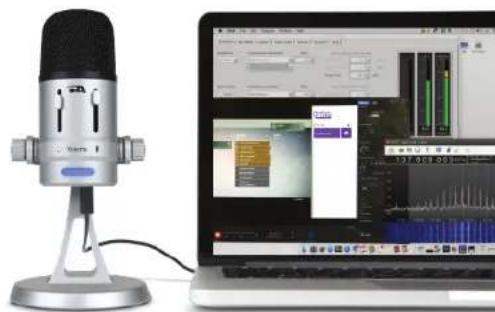
User Guide
DENALI
Professional USB Recording Mic
Welcome
The Denali microphone is designed for interviews, live blogging events, webinars, podcast recordings, voice-overs, conference calls, and music recordings. Crafted from industrial-grade components, including die-cast anodized aluminum body and stand, with pro-glide controls, this professional level instrument will provide years of service. Compatible with Mac, PC, and other USB ready systems.
Box Contents
- Recording microphone
- Desk stand
- Pop filter
- USB connection cable
- User's guide
Getting started with USB professional recording mic
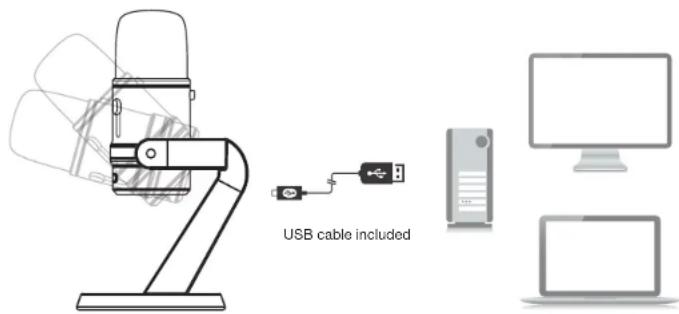
Unpack your microphone and adjust the angle to a desired position and tighten the two (2) screws on either side of the base to hold this position.
Connect the microphone to your computer with the provided USB cable (avoid connecting through USB hubs or other USB multipliers for best performance).
Controls and features
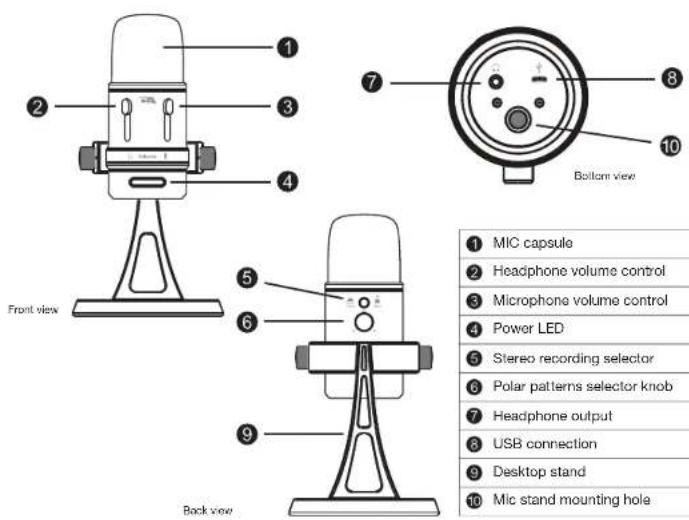
1) Mic capsule – Three microphone elements with different recording characteristics for different sound environments.
2) Headphone volume control – Control headphone volume by sliding up or down.
3) Microphone volume control - Slide up and down to adjust the microphone gain. When it switches to the lowest position, the mic will mute.
4) Power LED - Lights up when mic is plugged into USB port and is getting power.
5) Stereo recording selector - Press stereo button to override polar pattern knob selection and engage stereo recording. Pattern is left to right in front, and reverses behind the mic. Press button again to disengage and return to the polar pattern knob control.
6) Polar patterns selector knob - Rotate selector knob to chose between omni-directional, uni-directional (cardiod), or bi-directional (front to back).
7) Headphone output - The microphone includes a 3.5mm headphone output jack for monitoring and playback. Plug in your own headphones to monitor your microphone recording in real-time, without latency delays. And you can also enjoy the audio playback on your computer through the same headphone output jack.
8) USB connection – Connect the microphone with your computer using the provided USB cable. Plug the micro USB into the micro USB port on the bottom of the mic, and other end into a standard USB port on your PC / Mac. To perform at its best, avoid connecting through USB hubs or other USB multipliers.
9) Desktop mic stand - You can adjust the mic tilt angle to your desired recording position.
10) Mic stand mounting hole - You can remove the desktop stand and use professional mic stands, tripods or other mounting options by connecting with a 3/8" threaded adapter in the mounting hole on the bottom of the mic.
![Microphone Properties General Listen Levels Advanced You can listen to a portable music player or other device through this microphone jack. If you connect a microphone, you may hear feedback. Listen to this device Playback through this device: Speakers [ DENALI ] Power Management Continue running w…](/content/2026/05/946826/images/dea292a082296ec93f33064dab6b0f750706dbb27b38c18df0844b7f8801c989.jpg)
Configuring for Windows
Windows 7, 8, 10 or higher
1) Plug the microphone into a USB port on your computer using the provided USB cable
2) Open up Control Panel
3) In the upper right hand corner of the window, change the "View by" to small icons
4) Select "Sound"
5) From the Sound window, chose the "Recordings" tab
6) Select "DENALI", then select "Set Default"
7) If there is green check mark at the base of the DENALI icon continue. If not,
repeat the steps again
8) Select the "Configure" box
9) Select "Set up Microphone" and follow the steps
10) You can adjust the computer microphone volume by clicking on the properties box
11) Exit the control panel when the setup is completed
Configuring for Mac
OSX (10.4 or higher)
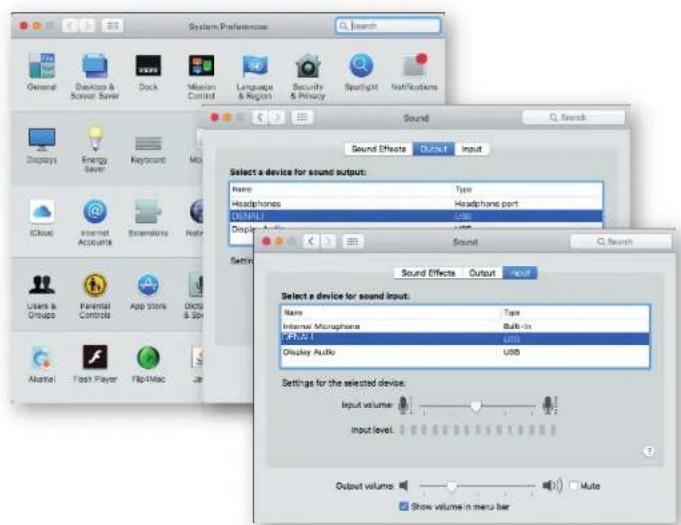
1) Plug the microphone into a USB port on your computer using provided USB cable
2) Open the "Finder"
3) Select "Applications"
4) Select "System Preferences"
5) Select the "Sound" Icon
6) Select the "Input" tab and select "DENALI"
(Make sure the mute button is not selected)
7) Select the "Output" tab and select "DENALI"
(Make sure the mute button is not selected)
8) Close window, set up is complete
Choosing the right recording pattern

Capture left and right stereo audio from the front of the mic.
Excellent in recreating the live scene for your audiences with life-like spatial relationships between multiple people, instruments and sounds in the recording studio.

Capture primary audio from the front and back of the mic.
Perfect for interviews with two people, while minimizing sound pick up from the sides.

Capture audio equally around the mic.
Great for placement in the middle of a room or studio to capture all sounds. Ideal for conference calls.
CardioidOmnidirectionalBidirectionalStereo

Captures primary audio from the front of the mic.
Excellent for single podcasters, voiceovers, gaming, and instrument recordings, while minimizing unnecessary sound pickup from behind.

- MINIMUM SYSTEM REQUIREMENTS
- FCC COMPLIANCE PART 15
- CANADA ICES-003
- USER GUIDE
- DENALI
- WELCOME
- BOX CONTENTS
- GETTING STARTED WITH USB PROFESSIONAL RECORDING MIC
- CONTROLS AND FEATURES
- CONFIGURING FOR WINDOWS
- WINDOWS 7, 8, 10 OR HIGHER
- CONFIGURING FOR MAC
- OSX (10.4 OR HIGHER)
- CHOOSING THE RIGHT RECORDING PATTERN
- CARDIOIDOMNIDIRECTIONALBIDIRECTIONALSTEREO
Brand : Cyber Acoustics
Model : CVL-2008
Category : Microphone