C-HDM-176 - Uncategorized Havis - Free user manual and instructions
Find the device manual for free C-HDM-176 Havis in PDF.


| Product Type | Heavy Duty Passenger Side Mount |
| Brand | Havis |
| Model | C-HDM-176 |
| Category | Vehicle Mount System |
| Compatible Vehicles | 2010 Ford Focus (example), designed for various vehicles |
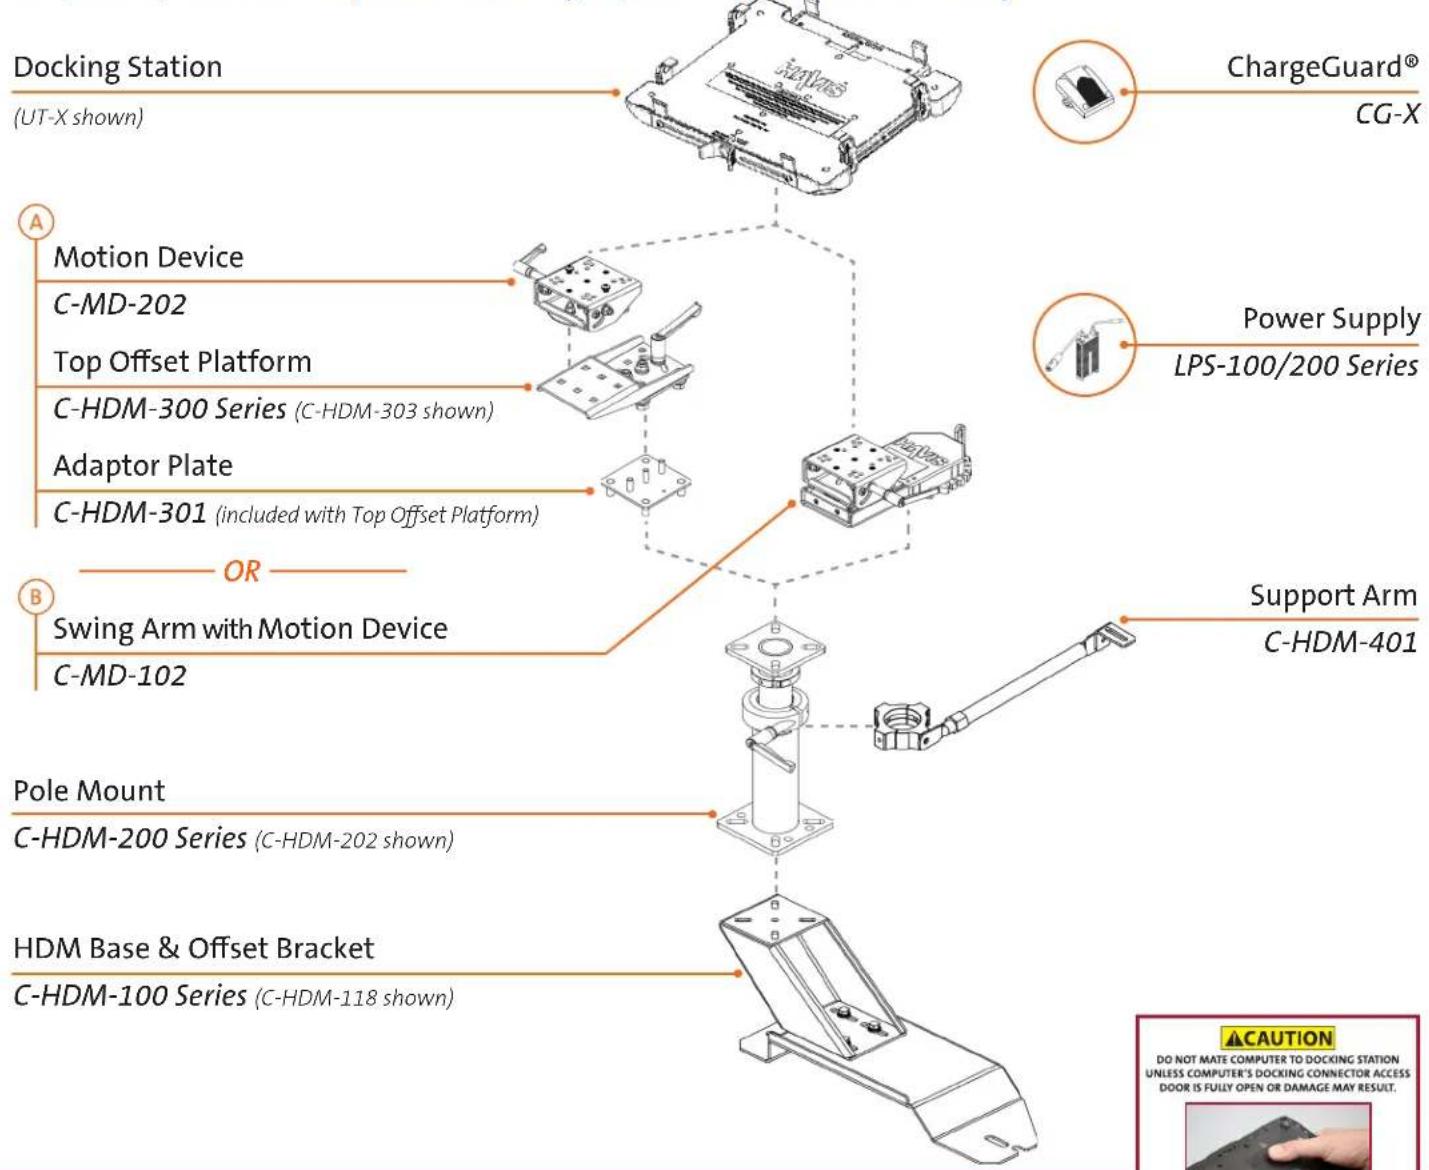
| Main Components | HDM Base, Offset Bracket, Pole, Adaptor Plate, Swing Arm, Top Offset, Motion Device, Docking Station, Power Supply |
| Mounting Location | Passenger side floor, between seat bracket and floor |
| Material | Heavy-duty metal with plastic washers |
| Height Adjustability | Yes, via shaft collar on inner pole |
| Rotation Capabilities | 90° (3-bolt pattern) or 180° (2-bolt pattern) via Motion Device |
| Docking Station Compatibility | Havis Docking Stations; Universal Laptop Mounts (UT-X Series, C-3090 Series) |
| Power Supply | Included, mounts to designated location on Docking Station |
| Optional Support | Two-piece support collar with side support arm and L bracket |
| Optional Offset Plate | C-HMD-409 Offset Plate for center adjustment |
| Required Tools | Large Metric Socket Set (1/2" drive), Small Metric and US Standard Socket Set (1/4" drive), 7/8" Wrench, 1/2" Wrench, 7/16" Wrench, US Standard Allen Wrench Set, Phillips head Screwdriver |
| Installation Instructions | General installation steps provided for 2010 Ford Focus as reference |
| Safety Warnings | Read all instructions, check for obstructions (wire, brake lines, fuel tank), use provided hardware only |
| Optional Accessory | ChargeGuard® Power Management System (requires connection to fused 12V battery) |
| Docking Procedure | Open docking connector door, seat computer, turn latch to DOCK, lock with key |
| Maintenance | No specific maintenance instructions; ensure all hardware is tight periodically |
| Repair and Spare Parts | Contact Havis or visit www.Havis.com for accessories and parts |
Frequently Asked Questions - C-HDM-176 Havis
User questions about C-HDM-176 Havis
0 question about this device. Answer the ones you know or ask your own.
Ask a new question about this device
Download the instructions for your Uncategorized in PDF format for free! Find your manual C-HDM-176 - Havis and take your electronic device back in hand. On this page are published all the documents necessary for the use of your device. C-HDM-176 by Havis.
USER MANUAL C-HDM-176 Havis
Havis Heavy Duty Passenger Side Mounts
General Installation Instructions
Required tools to complete installation.
• Large Metric Socket Set (1/2" drive)
- Small Metric and US Standard Socket Set (1/4" drive)
- 7/8" Wrench
• 1/2" Wrench
- 7/16" Wrench
• US Standard Allen Wrench Set
• Phillips head Screwdriver
natural_image
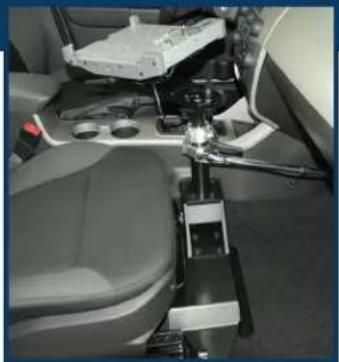
Interior view of a vehicle's seat and dashboard assembly (no visible text or symbols)Complete assembly in vehicle (2010 Ford Focus)

natural_image
Abstract geometric design with two overlapping orange and blue diagonal bars (no text or symbols)Required parts to complete assembly Optional parts for assembly
For installation of Havis products, ALWAYS...
- Read all instructions before installing any Havis, Inc. Products.
- Check for obstructions (wire, brake lines, fuel tank, etc.)
- Use hardware provided with install kit
natural_image
Close-up of hands installing a black electronic component with a red arrow indicating the pin (no text or symbols visible)Havis Heavy Duty Passenger Side Mounts General Installation Instructions
2010 Ford Focus used for instructions
1
natural_image
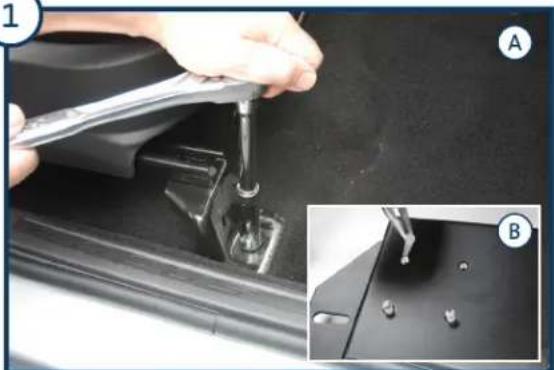
Close-up of a hand using a tool to adjust or install a mechanical component, with inset showing close-up details (no visible text or symbols)A) Remove the plastic caps that cover the seat bolts. Remove the OEM seat bolts, seat nuts and seat studs, making sure to keep the seat bolts for HDM Base installation (Step 3).
B) Remove all rubber thread protectors from the mounting holes on the HDM Base.
3
natural_image
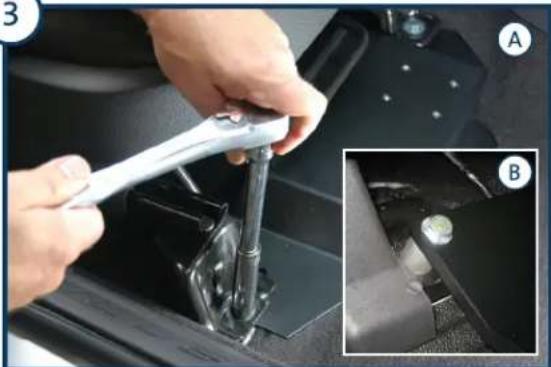
Close-up of hands using a wrench to adjust the internal components of a car intake manifold (no visible text or symbols)Align the HDM Base mounting holes to seat bolt locations and loosely attach the seat bolts. Use caution to avoid stripping the threads. Fully tighten the bolts once HDM Base is properly in place.
NOTE: Some HDM Bases mount under the vehicle seat bracket and reuse OEM seat bolts (A), while other HDM Bases mount over the top of vehicle seat bracket and use provided spacers and bolts (B).
5
natural_image
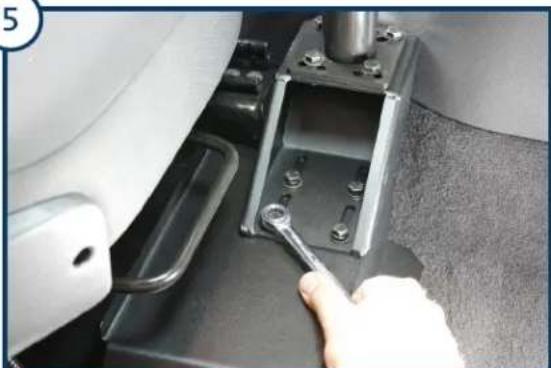
Close-up of a hand using a wrench to adjust a mechanical component (no visible text or symbols)Attach the assembled Offset Bracket and Pole to the HDM Base inside the vehicle, using supplied 5/16" x 3/4" hex bolts, lock washers, and flat washers. Make sure to adjust Offset Bracket to desired position before all hardware is fully tightened.
NOTE: If your application needs to be closer to center of vehicle, see optional C-HMD-409 Offset Plate.
2
natural_image
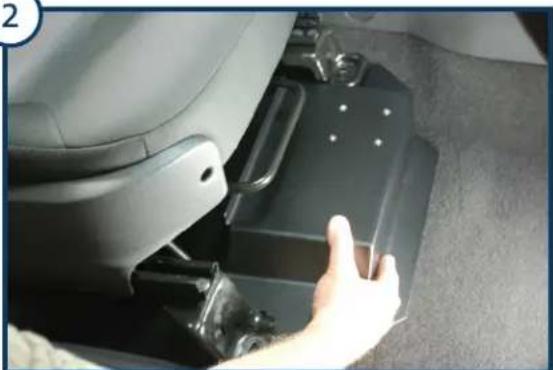
Close-up of a car seatbelt with a hand adjusting the compartment (no visible text or symbols)Lift the seat to place the HDM Base between the seat brackets and the floor.
NOTE: Loosening rear seat bolts may be required for ease of installation.
4
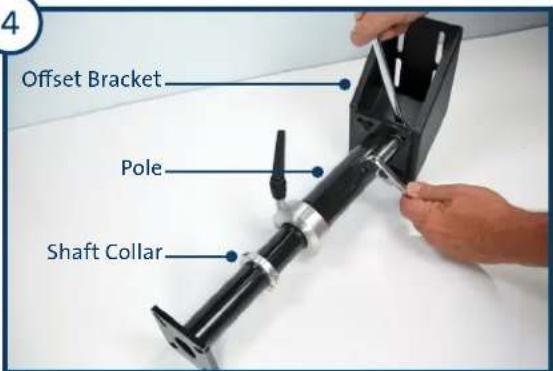
On the workbench, assemble the Offset Bracket and Pole using supplied 5/16" x 1" hex bolts, lock washers, and nuts (x4). Make sure all hardware is fully tightened. Attach the shaft collar anywhere on the inner pole, making sure to leave the shaft collar loose in order to adjust Pole height once installed in vehicle (Step 12).
6
natural_image
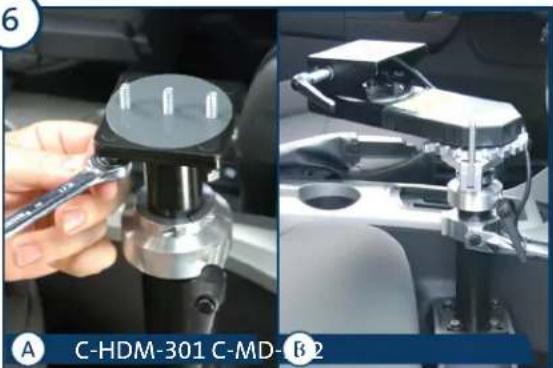
Two-panel image showing a hand holding a tool next to a mechanical device, and a close-up of a mechanical assembly with no visible text or symbols.A) Align the Adaptor Plate mounting studs to the top of the inner pole, then attach using the supplied 5/16" lock washers, flat washers, and nuts. Place the large plastic washer on top of Adaptor Plate.
B) Align Swing Arm with Motion Device mounting holes to the top of the inner pole, then attach using 1/4" lock washers, flat washers, and bolts.
NOTE: Make sure all hardware is fully tightened.
Havis Heavy Duty Passenger Side Mounts General Installation Instructions
2010 Ford Focus used for instructions
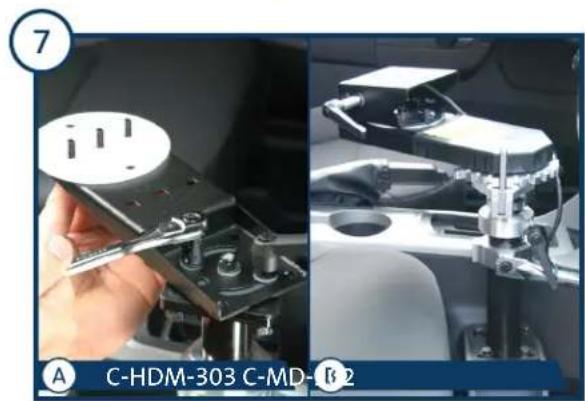
A) Install the Top Offset with the supplied hardware and handle. Tighten the hardware to allow minimal motion. Place the large plastic washer on the Top Offset. B) No adjustment required, please proceed to Step 8.
natural_image
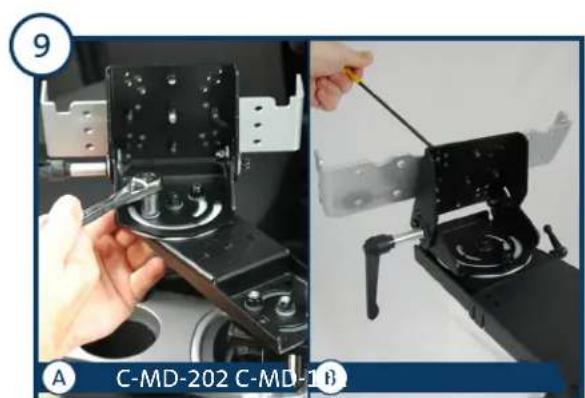
Two-panel image showing a hand operating a mechanical clamp device, with no visible text or symbols.A) Connect the Motion Device assembly to the Top Offset. Tighten the hardware to allow minimal motion. NOTE: Motion Device has two (2) sets of holes. 3-bolt pattern allows for 90 rotation. 2-bolt pattern allows for 180 rotation. B) Motion Device is already connected, please proceed to step 10.
natural_image
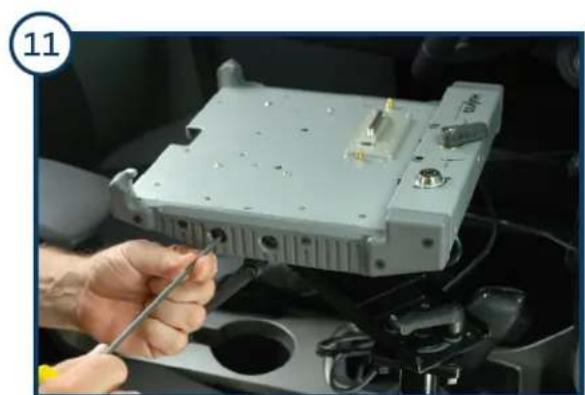
Close-up of a hand using a tool to adjust or install an electronic device component (no visible text or symbols)Attach the Docking Station to the mounting bracket.
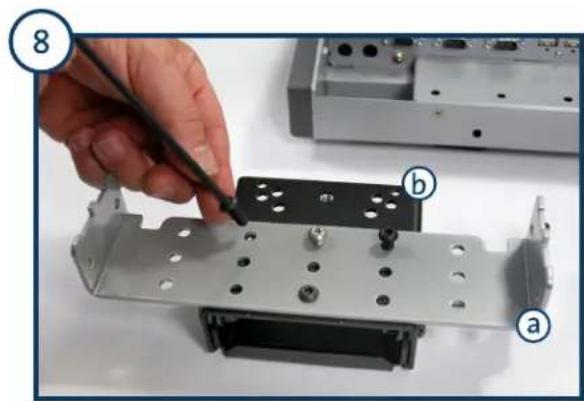
natural_image
Close-up of a hand using a tool to adjust or install a metal bracket component, labeled with parts a and b (no text or symbols on the object itself)Remove mounting bracket (a) from the bottom of the Docking Station and attach to the Motion Device (b). NOTE: If attaching a Universal Laptop Mount (UT-X Series or C-3090 Series), mount directly to the Motion Device.
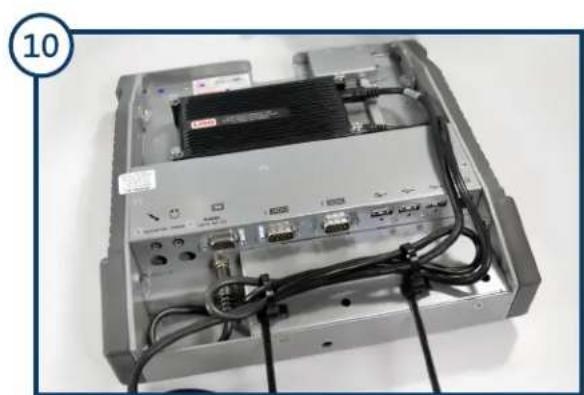
natural_image
Interior view of an electronic device showing a drive bay with cables and connectors (no visible text or symbols)Attach the Power Supply to the designated mounting location on the Docking Station.
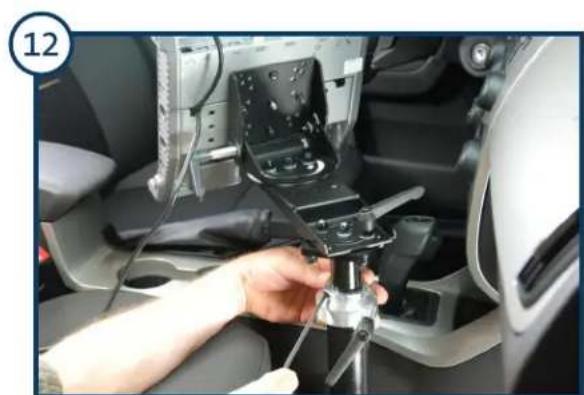
natural_image
Close-up of a hand adjusting a mechanical component inside a car (no visible text or symbols)Adjust the shaft collar to desired height and fully tighten.
Havis Heavy Duty Passenger Side Mounts General Installation Instructions
2010 Ford Focus used for instructions
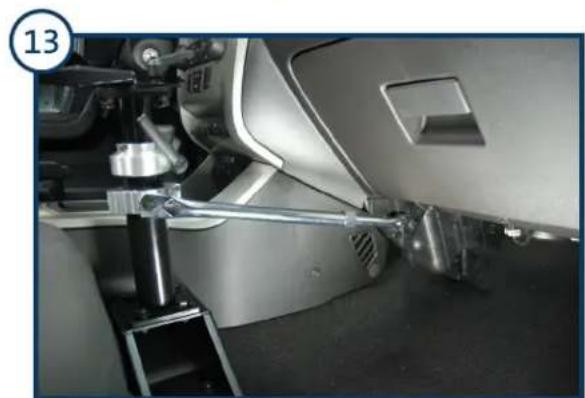
natural_image
Close-up of a mechanical assembly with metallic components and a numbered label (13) in the corner, no readable text or symbols on the main subject.To attach the optional two-piece support collar to the Pole, attach the side support arm to the two-piece support collar. Attach the side support arm to the underside of the dash with the supplied L bracket. Make sure all hardware is fully tightened.
natural_image
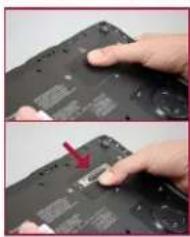
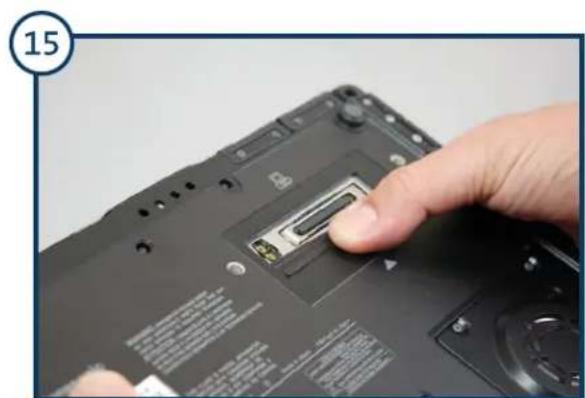
Close-up of a hand pressing a small electronic device on a black remote control panel (no visible text or symbols)Congratulations, the installation is complete. To properly dock your computer into the Havis Docking Station, you must first open the docking connector door on the bottom of your computer or damages may occur.
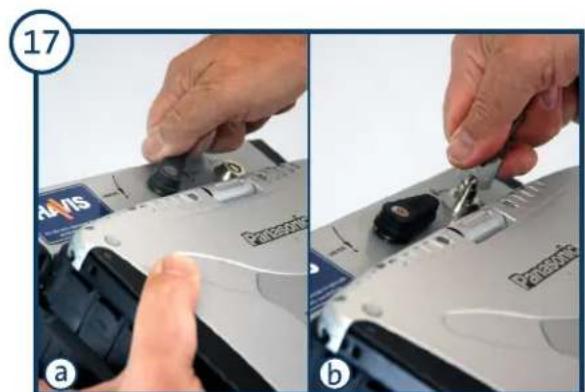
a) With the computer seated, turn the docking latch to the DOCK position. b) Secure by locking the barrel lock with the supplied key.
natural_image
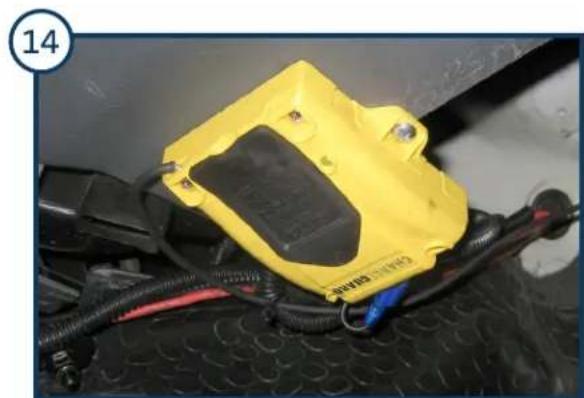
Close-up of a yellow automotive electrical contactor with black wiring and red connectors, mounted on a perforated metal surface (no visible text or symbols)If you are installing the optional ChargeGuard® Power Management System, run power wires to the ChargeGuard and connect to the fused, 12 volt battery. (Additional instructions inside the ChargeGuard box.)
natural_image
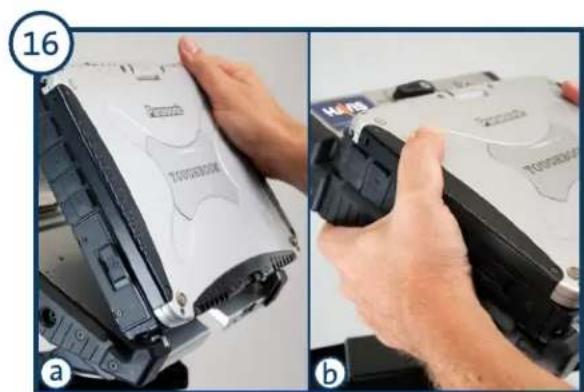
Two-step photo showing hands installing or adjusting a device component, labeled (a) and (b), with no visible text or symbols.a) Load the front of the computer into the front hooks of the Docking Station. b) Gently lower the back of the laptop down into the docking connector.
natural_image
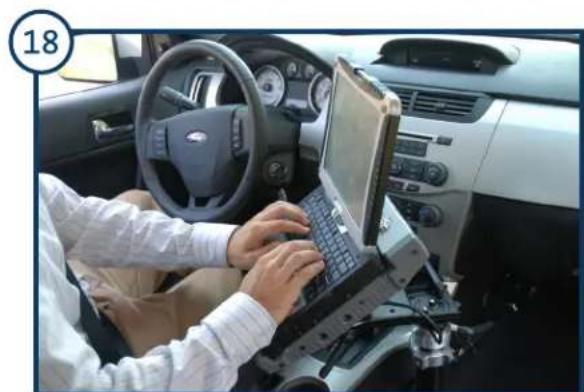
Interior view of a car with hands using a laptop on the steering wheel (no visible text or symbols)You have successfully and safely docked your computer. Please visit www.Havis.com for more mounting and computing accessories.
Brand : Havis
Model : C-HDM-176
Category : Uncategorized