RF720BG - Thermostat British Gas - Free user manual and instructions
Find the device manual for free RF720BG British Gas in PDF.


User questions about RF720BG British Gas
0 question about this device. Answer the ones you know or ask your own.
Ask a new question about this device
Download the instructions for your Thermostat in PDF format for free! Find your manual RF720BG - British Gas and take your electronic device back in hand. On this page are published all the documents necessary for the use of your device. RF720BG by British Gas.
USER MANUAL RF720BG British Gas
Whatisaprogrammableroomthermostat? ...anexplanationforhouseholders
Aprogrammapleroomthermostatisbothaprogrammerandroomthermostat.Aprogrammallowayoutset'On and Off time periodostuityyourownlifestyle.Aromothermostworksbyssening theattemperature,switchingattheheatingwhentheair temperaturefallsbelowthermostatsetting,andswitchingitoff oncethisettemperaturehasbeenreached.
So, a programmablerom thermos tablets you choose what times you want the heating table and what temperature should reach while it can allow your select different temperatures in your home at different times of the day (and days of the week) to meet your particular needs.
Tumingprogrammablercomthermostattoohighersettingwillnot maketheromineatupanyfaster.Howquicklythercomheatsup dependencethedesignoftheheatingsystem,forexample,thesize of boilerandradiators.
Neitherdoesthesettingaffectnowquicklytheroomcoolsdown. Turningaprogrammablercomthermostatoolowersettingwillresult intheromboesingcontrolledtotallowertemperature,andsavesenergy.
The way to set and use your programmable northern thermostatists find the lowest temperature settings that you are comfortable with the different times you have chosen and then leave southern doctors job. The best stay to do this to sell low temperatures first, say 18 and then turn them up by ordered green each day until you are comfortable with the temperatures. You won't travel to adjust the thermostat further. Any adjustments above these settings will waste energy and cost you more money.
If you/heating system is a boiler with radiators, there will usually be only one program mobilization of the same state control the whole house. But you can have different temperatures in individual room by installing thermostical radiator valves (TRVs) and involve air radiators. If you don't have TRVs, you should choose temperature reduction reasonable for the whole house. If you do have TRVs, you can choose slightly higher setting to make sure that the other indoor room is comfortable, then prevent any overheating room another room by adjusting the TRVs.
The time on the programmer must be correct. Some types have to be adjusted in spring and autumn that changes between Greenwich Mean Time and British Summer Time.
Youmaybeletotemporal iyadjusttheheatingprogramme,for example, 'Override', 'Advance' or 'Boost'. Theseareexplainedinthe manufacturer'sinstructions.
Programmableroonthermostatsneed afreeflowsafairtosensethetemperature, sotheymustnothecoveredbycurtains orblockedbyfurniture.Nearbyelectric fires,televisions,wallorcabielamps maypreventethermostatfrom workingproperly.

YourSmartLinkedThermostat
TheSmartLinkedThermostatisaprogrammablethermostat 7Dayproduct.Full7-dayfunctionalityallowsyoutoseta differentprogramforeverydayoftheweek.Eachprogramtype allowsyoutoset6timeandtemperatureevents.
ClockSetting
YourSmartLinkedThermostatisfiedwithareal-timeclock, whichispre-setatthefactory.Youwillnothavetoaltertheime settings.
Aspecialfeatureofthisreal-timeclockistoautomaticallyupdate thetimeduringthesummer/wintertimechangeremovingthe needtomanuallyaltertheclock.
GeneralOperation
WiththeuntinAutomode(thesmallarrowtobottomofscreen willpointtoAuto)thetemperaturecanbechangedforashort timebyusingthe+or-butions.Changingthetemperaturein thiswaywillkeeptheSmart,linkedThermostatsettoyournew temperatureuntilthenextemperature-programmedevent(atwhichtime itwillreverttoprogrammedtemperature).Thetemperature you aresettingwillflashonthescreen.Oncotemperatureisct.the unitwillrevertoshowingthecurrenttemperature. The indicatorwillshowonthescreeniftheheatingisturnedon.
ControlsandDisplayLayout
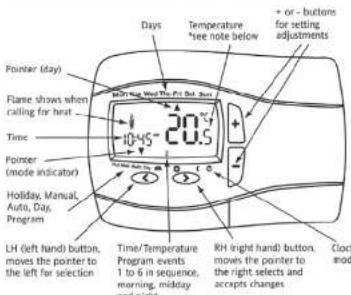
text_image
Points (day) Flame shows when calling for heat Time Pointer (mode indicator) Holiday, Manual, Auto, Day, Program LH (left hand) button, moves the pointer to the left for selection Time/Temperature Program events 1 to 6 in sequence, morning, midday and night Days Temperature *see note below + or - buttons for setting adjustments 20.75 10-45-20.5 Time/Temp at Time/Temp at RH (right hand) button, moves the pointer to the right selects and accepts changes Clock mode* Temperature displayed is actual room temperature unless adjusting the + or - button when it displays the set temperature. Once adjustment is complete and after 5 seconds this will return to actual room temperature.
BasicSettings
TheSmartLinkedThermostatisaprogrammablethermostat7 Dayproduct.Full7-dayfunctionalityallowsyoutosetadifferent programforeverydayoftheweek.Eachprogramtypeallowsyou toset6timeandtemperatureevents.
Pre-setProgram
Your Digital comes with the following default settings pre-programmed for your convenience:
Pre-setProgram1(9til5)
Monday-Friday
| Event | 1 | 2 | 3 | 4 | 5 | 6 |
| Time | 6:30 | 8:30 | 12:00 | 14:00 | 16:30 | 22:30 |
| Temperature | 20.0 | 16.0 | 16.0 | 16.0 | 21.0 | 7.0 |
Saturday-Sunday
| Event | 1 | 2 | 3 | 4 | 5 | 6 |
| Time | 7:00 | 9:00 | 12:00 | 14:00 | 16:00 | 23:00 |
| Temperature | 20.0 | 18.0 | 21.0 | 18.0 | 21.0 | 7.0 |
Weekday
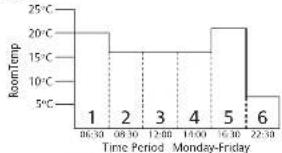
bar
| Time Period | RoomTemp (°C) | |---|---| | 06:30 | 20 | | 08:30 | 15 | | 12:00 | 15 | | 14:00 | 20 | | 16:30 | 5 | | 22:30 | 5 |Asyoucanse,at06:30.theheatingwillcomcontoraisethe temperatureto20°C. At08.30, thetemperaturere1pointisdropped from 20°Cdownto10°C.itsstaysat16°Cthrouhouttheday, until 16:30whenthetemperatureincreasesto21°C. Thetemperature thendropsdowntoanight-setbacktemperatureof7°Cuntil05.30 whenthecyclerepeatsforthenextday (MondaytoFriday)or changestowEEKendsettingseebelow.
Weekend
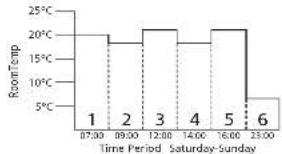
bar
| Time Period | RoomTemp (°C) | |---|---| | 07:00 | 18 | | 09:00 | 18 | | 12:00 | 21 | | 14:00 | 21 | | 16:00 | 21 | | 23:00 | 5 |Asyoucanse,at07:00.theheatingwilcomontoraiset the temperature20°C,A09:00,thetemateresetpointis droppedfrom 20°Cdownto18°C,Jstaysat18°Cuntill 2:00when the heatingcomesontoraisethetemperature20°C.The temperaturesayasat21°Cuntill 4:00whenthetropsdownto18°C. At 16:30theheatingcomesontoraisethetemperature21°C whereisdaysuntil 23:00whenthetetrendropsdown tonight-setbacktemperatureof7°Cuntill 07:00whenthetecycle repeatsforthenexendt.(SaturdayandSu nday)orchangesto weekdaysettingsseabove.
Toadjustthetimesandtemperaturesfor7-Day operation:
- With the product operating as normal in the Automode press once. The display is flashing and shows.
2.Pressthe since,the displaywillbeasshown. The timewillbeflashing,usethe +or-buttonstoadjustthe 1sttimeasrequired.
- Oncetimehasbeenset press andusethe +or-buttonstoadjust requiredtemperature. Repeatheabovesteps 2-3untilthe6periods havebeenseltforMonday
4.OnceMondayhasbeenset, press once. Repeatsteps2-3untilall 7daysoftheweekhave beenset.
- Oncethefinaltemperature has been set press the toconfirmsettings. To exit press or until your return to automod with the bottom arrow pointing at Auto.
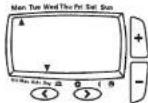
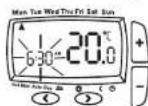
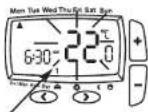
(* small 1 in lower half of screen shows which time period is being set e.g. 1-1st period, 2 - 2nd period etc)
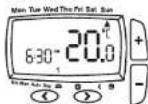
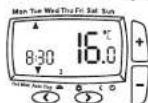
Congratulations!
Theunitisnowsetcorrectlytofollowyourequiredtimings.
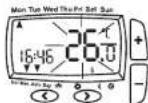
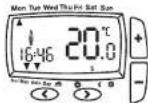
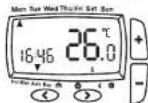
Tochangetemperatureforashortperiod(Override):
-
Press+or-buttonsto adjustsettemperature.Set temperatureshownflashing
-
After 5 secondswill start controllingatselectedset point but displays actual room temperature, 2 chrevons indicates overridemode.
3.Toexitoverridepress onceorwaituntilnextchange inthepre-setprogram.
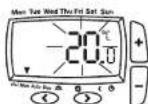
Tosetaconstantroomtemperature(Manualmode):
-
Press once, the display show temperature flashing (example 20 °C)
-
Press+or-buttonsto adjust the temperature as required. The temperature will stop flashing after 5 seconds and start controlling at this temperature
3.Toexitmanualmodepress once,loreturntoauto.
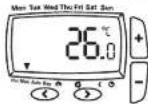
Tosetholidaymode:
-
Press twice the display showstimeflashing. Timeperiodsbetween1to 23(lhr)hoursand1to 199(d)dayscanbeset.
-
Press+or-buttonsto adjust the countdowntime asrequired.Press ② once, thedisplaywillshow temperatureflashing
-
Press+or-buttonsto adjusttemperatureandpress
tostartholidaycount downtime.Alternativelyafter 10secondsthetemperature willstopflashingandholiday countdowntimewillstart. Displayshowscoundown timeandambientroom temperature.
-
To exit the holiday mode pressthe (or) once, to return to auto.
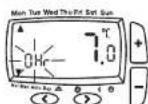
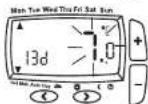
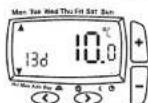
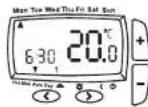
ToswitchOFFthethermostat:
Pressthe+and-simultaneouslyforSsecondsuntiltheOFFis displayed.
ThethermostatheatingsystemwillnowbeOFFunless the temperatureinthecontrolledspacefallsbelow?C,chef rost protectionsetpoint.Plesenotethisdoesnotaffectthe operationofthedomustichotwaterwhereprovided. ToswitchONthermostatpressthe-and-simultaneouslyfor5 secondsuntiltheOFFdisappears.
User Options
If you wish to change any User Options (shown in table 1) be accessed from Auto or Man by pressing < and > simulta for 3 seconds. Once you have accessed the User Options Me 4) press > to scroll through selectable options. The settings each option can be changed by pressing + or - as required, to accept the change and move to the next option. To exit and > simultaneously for 3 seconds. Alternatively, not pressing buttons for 2 mins will cause the Digistatto return to Auto. shows option 01 24 (24 hour clock).
Only selected options that have been accepted by pressing > be changed.
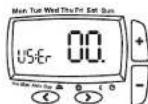
(Fig 4)
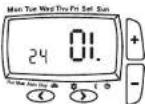
(Fig 5)
User
| options | What is it Min Max Default | |||
| 01 | Change 12h or 24h clock 12 | 24 | 24 | |
| 02 | Change to another pre-set programme 131 | |||
| 03 | Change the number of programme events per day | 2 or 6 4 | ||
| 04 | Switch on/off automatic summer/winter time change | On | Off | |
| 05 | Adjust date and time | Factory Set | ||
| 06 | Change temperature offset °C | -5.0°C | +5.0°C | 0 |
| 07 | Restore pre-set programme | On | Off | Off |
| 08 | Access protection lock | On | Off | Off |
| 09 | Create Radio Link Automatically | Off | On | Off |
| 10 | Create Radio Link manually | 0 | 4094 | actual |
| 11 | Relay On/Off (in the receiver) | Off | On | Off |
(Table 1)
(Option 01)
How to change from 24hr to 12hr clock.
Enter user options, select option 01 and use + and - keys to desired option, 12 = 12hr and 24 = 24hr. Press > to accept (Option 02)
How to change to another predefined program 1, 2 or 3. Enter user options, select option 02 and use - and - keys to select desired program 1, 2 or 3. 1 = program 1, 2 = program 3 and 3 = program 3. Press > to accept desired change. Preset programs 2 and 3 are shown below:
Pre-set Program 2 (Home for lunch)
Monday-Friday
| Event | 123456 | |||||
| Time | 6:30 | 8:30 | 12:00 | 14:00 | 16:30 | 22:30 |
| Temperature | 21.0 | 16.0 | 21.0 | 16.0 | 21.0 | 10.0 |
Saturday-Sunday
| Event | 123456 | |||||
| Time | 7:00 | 9:00 | 12:00 | 14:00 | 16:30 | 23:00 |
| Temperature | 21.0 | 18.0 | 21.0 | 18.0 | 21.0 | 10.0 |
Weekday
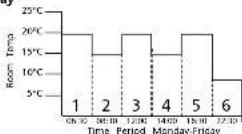
Weekdays
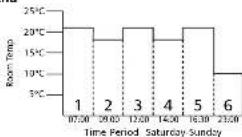
As you can see, at 06:30, the heating will come on to raise temperature to 21°C.
At 08:30, the temperature set point is dropped to 16°C, it stays 16°C until 12:00 when the heating comes on to raise the temperature to 21°C. The temperature stays at 21°C until 14:00 when it drops to 16°C. At 16:30 the heating comes on to raise temperature to 21°C where it stays until 22:30 when the temperature drops down to a setback temperature of 10°C until 06:30 when the cycle repeats the next day.
Weekends
As you can see, at 7:00, the heating will come on to raise the temperature to 21°C.
At 9:00, the temperature set point is dropped to 18°C, it stays in a 45°C until 2:00 when the heating comes on to raise the temperature to 21°C. The temperature stays at 21°C until 14:00. Proven it drops down to 18°C. At 16:30 the heating comes on press of the temperature to 21°C, where it stays until 23:00 when the temperature drops down to a setback temperature of 10°C until 07:00 when the cycle repeats the next day.
wWeekend
Pre-set Program 3 (Home Worker)
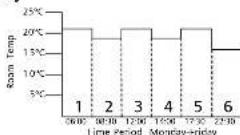
Monday-Friday
| Event | 123456 | |||||
| Time | 6:00 | 8:30 | 12:00 | 14:00 | 17:30 | 22:30 |
| Temperature | 21.0 | 19.0 | 21.0 | 19.0 | 21.0 | 16.0 |
Saturday-Sunday
| Event | 123456 | |||||
| Time | 7:00 | 9:00 | 12:00 | 14:00 | 16:30 | 23:00 |
| Temperature | 21.0 | 18.0 | 21.0 | 18.0 | 21.0 | 16.0 |
Weekday
Weekdays
As you can see, at 06:00, the heating will come on to raise temperature to 21°C.
select 8.30, the temperature set point is dropped to 19°C, it stays 2456 until 12:00 when the heating comes on to raise the
45°C until 12:30 when the heating comes on to raise the temperature to 21°C. The temperature stays at 21°C until 14:00 when it drops to 19°C. At 17:30 the heating comes on to raise temperature to 21°C where it stays until 22:30 when the temperature drops down to a setback temperature of 16°C until 06:00 when the cycle repeats the next day.
Weekend
Weekends
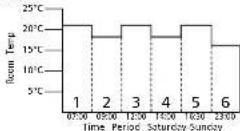
As you can see, at 7:00, the heating will come on to raise the temperature to 21°C.
At 9:00, the temperature set point is dropped to 18°C, it stays at 18°C until 12:00 when the heating comes on to raise the temperature to 21°C. The temperature stays at 21°C until 14:00 when it drops down to 18°C. At 16:30 the heating comes on raise the temperature to 21°C where it stays until 23:00 when the temperature drops down to a setback temperature of 16°C until 07:00 when the cycle repeats the next day.
(Option 03)
How to change the number of program events per day. Enter user options, select option D3 and use + and - keys to select desired option. 2 = 2 time / temp events per day, 4 = time / temp events per day and 6 = 6 time / temp events / day. Press > to accept desired change.
(Option 04)
How to switch on/off the automatic summer /winter time change.
Write a year the actual time is automatically changed to keep in line with the summer / winter time change. Default setting On. If you wish to disable / enable this feature enter user options, select option 04 and press - or + key to display Off On as desired. Press > to accept desired change.
Date and time setting.
Digistat comes with a pre-set clock, which also automatically adjusts for summer/winter time changes. It is activated automatically on 1st installation. There should be no need to change these settings, however, should you wish to, it can be done in Option 05.
(Option 05)
How to adjust date and time.
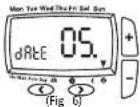
Enter user options, select option DS (fig 6), press+ key To change the year press > once (fig 7) To change the month press > again (fig 8) To change the day press > again (fig 9) To change the time press > again (fig 10) Once you have selected your required display, to adjust press or - and > to accept change.
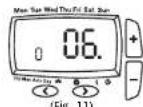
To select option 06 press > until option 06 display is shown
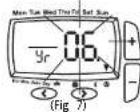
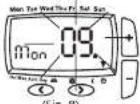
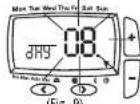
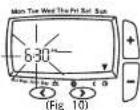
(Option 06)
How to change temperature offset.
The temperature displayed on the thermostat may not match of other temperature measuring devices in the controlled space because of its location. The displayed temperature may be off bring it in line with other devices. To adjust the temperature, the user options, select option 06. The temperature may be 0 by +/- 5 degrees by pressing the - and - keys. Press > to a desired change.
(Option 07)
How to restore the built in time temperature programs. Enter user options, select option 07 and use + and - keys to desired option. Off = current programs retained. On = restore factory program settings. Press > to select the desired change, option 07 display automatically reverts back to off. Pleasenote enabling this function will lose any user changestothepreset
programs.
(Option 08)
How to lock the key pad - Access Protection Lock.
The access protection lock allows you to lock the Digistat so cannot have any adjustments.
The default is OFF mode allowing you to adjust the Digistat. To Lock the Digistat settings enter the User Options Menu O 00 and select On and press > to accept.
Once the User Options Menu is exited all buttons will be lo To switch off the Protection Lock enter the User Menu and to OFF. Press > to accept
Once the User Menu is exited all buttons will be free to adju
(Option 09)
Establish radio link address automatically
With this option, a radio link between transmitter and receiver be created
-
Activate "learning mode" on the receiver (see receiver instructions)
-
Activate "learning mode" on this transmitter as follows:
Activate USER-SETTINGS, and then
a) press button > until option 9 is displayed.
b) press button Enn I be displayed
press button >LErn is blinking. ON is visible. Learn-Mode is active.
When the connection has been created successfully, the indicat lamp on the receiver extinguishes (after -1 minutes)
c) press button > on the transmitter to terminate Learn Mode press buttons < and > simultaneously for 3 seconds in order activate AUTO
Note: Activating learning mode will create a new address, all receivers linked to this transmitter need to be re-learnt. The transmitter exits the learning mode after 10 minutes.
(Option 10)
Establish radio link address manually
Choose a unique number as address that is not repeated throughout the whole building. Make a note of this number 1. Activate "learning mode" on the receiver (see receiver instructions).
- Activate "learning mode" on this transmitter as follows:
Activate USER-SETTINGS and then
a press button > until option 10 is displayed.
b) press button + xxxx - actual address will be displayed press button + / - to change digit of address (max address = 4 press button > for the next digits; on last digit press button > the address is blinking. ON is visible: LearnMode is now active
When the connection has been created successfully, the indicator lamp on the receiver extinguishes (after -1 minutes)
c) press button > on the transmitter to terminate Learn Mode press buttons < and > simultaneously in order to activate AOTO
(Option 11)
Manually switching ON/OFF the receiver
This function can be used to make some voltage measuring on receiver. The output
remains active for 10 minutes.
To access this function, the USER-SETTINGS need to be activated then.
Press button > Until option 11 is displayed
Press button + Receiver channel will switch ON Press button - Receiver channel will switch OFF
This function will be terminated after 10 minutes after last key pre
How do I know when to change the batteries.
When the batteries start to run low a battery icon will flash in the display, to indicate "low battery" during this time the Digistatwill function normally (see fig 1).
lease replace batteries with 2 x 1.5V IEC LRS (AA) Alkaline batterie When the battery icon alone is shown in the display, the batteries are completely exhausted and the Digistotwill cease to function (see fig 2). Re-activate by replacing the batteries.
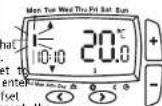
(Fig 1)
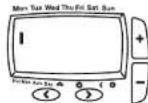
(Fig 2)
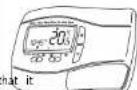
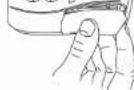
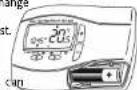
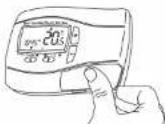
How to replace the batteries see fig 3.
Remove the battery cover using a coin. Replace the spent batteries with 2 x 1.5V IEC LRG (AA) Alkaline batteries ensuring correct orientation. Replace the battery cover pressing fully home.

Battery Handling

Batteries, rechargeable or not, should not be disposed of into ordinary household waste. Instead, they must be recycled properly to protect the environment and cut down the waste of precious resources.
Your local waste management authority can supply details concerning the proper disposal of batteries.
In compliance with the EU Directive 2006/66/EC, the button cell battery located on the printed circuit board inside this product, can be removed at the end of the product life, by professional personnel only.