E15T4 - Screen eMachines - Free user manual and instructions
Find the device manual for free E15T4 eMachines in PDF.


| Product Type | LCD Monitor |
| Brand | eMachines |
| Model | E15T4 |
| Screen Size | 15.6 inches (diagonal) |
| Native Resolution | 1366 x 768 pixels |
| Aspect Ratio | 16:9 |
| Backlight Type | LED |
| Brightness | 200 cd/m² (typical) |
| Contrast Ratio | 600:1 (typical) |
| Response Time | 5 ms |
| Ports | VGA, DVI-D |
| Power Consumption | 20W (typical), Standby <0.5W |
| Voltage | 100-240V AC, 50/60Hz |
| Dimensions (with stand) | 14.3 x 10.7 x 6.2 inches |
| Weight (with stand) | 4.2 lbs |
| Stand Adjustments | Tilt only (-5° to 15°) |
| VESA Mount | 75 x 75 mm |
| Cleaning Instructions | Use a soft, dry microfiber cloth. Do not use liquid cleaners. |
| Safety Precautions | Do not open the housing. Keep away from water and heat sources. |
| Spare Parts Availability | Power adapter, VGA cable, stand (order from eMachines support) |
| Warranty | 1 year limited warranty |
Frequently Asked Questions - E15T4 eMachines
User questions about E15T4 eMachines
0 question about this device. Answer the ones you know or ask your own.
Ask a new question about this device
Download the instructions for your Screen in PDF format for free! Find your manual E15T4 - eMachines and take your electronic device back in hand. On this page are published all the documents necessary for the use of your device. E15T4 by eMachines.
USER MANUAL E15T4 eMachines
natural_image
Computer monitor displaying a colorful abstract logo with a smiling woman's face, no visible text or symbols on the screen or background.Flat Panel Monitor User Guide
Contents
Using Your eMachines Flat Panel Monitor 1
Connecting the monitor 2
Attaching the optional stand 4
Adjusting the height-adjustable stand 7
Starting the monitor 8
Adjusting monitor settings 9
Monitor buttons 9
On-screen display options 10
Windows controls 13
Video modes 17
Power management 18
ENERGY STAR 18
Energy declaration 18
Maintenance 19
Troubleshooting 19
No power 19
No picture 20
Display colors are wrong 20
Picture has shadows or "ghosts" 21
Color is not uniform 21
Image is not sized or centered correctly 21
The monitor has pixels that are always dark or too bright 21
Specifications 22
15-inch monitor 22
17-inch monitor 23
Safety, Regulatory, and Legal Information 25
Using Your eMachines Flat Panel Monitor
■Connecting the monitor
■Attaching and adjusting the optional stand
■Starting the monitor
■Changing monitor settings
■Maintaining and troubleshooting
■Specifications
Connecting the monitor

To connect the monitor:
1 Place the monitor base on a tabletop, then slide the monitor neck down onto the base until it clicks into place.

natural_image
Close-up of a mechanical device with a downward arrow indicating compression or disassembly (no text or symbols visible)2 Position your computer and the monitor so you can reach the back of each.
3 Connect the power cord to the power connector under the back of the display.

natural_image
Close-up of a mechanical component with an arrow pointing to a cylindrical feature (no text or symbols visible)4 Connect the blue VGA video cable to the blue video connector under the back of the display.

natural_image
Close-up of a black VGA connector with an arrow pointing to it, no visible text or symbols on the device itself.5 Make sure that your computer is turned off, then connect the other end of the video cable to the VGA port on the back of your computer.
6 Plug the power cord into a correctly grounded electrical outlet.

Attaching the optional stand
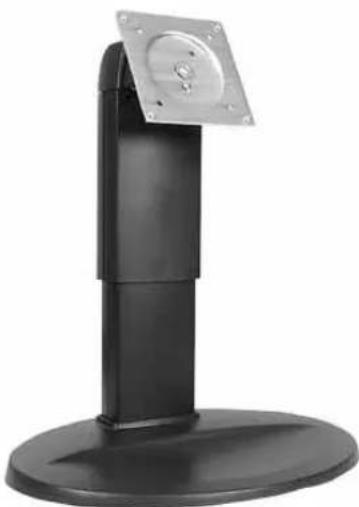
You can buy a fully adjustable stand from www.gateway.com. The stand can be adjusted for height, tilt, pan angle, and screen rotation.
natural_image
Black cylindrical stand with a metallic mounting bracket and circular base (no text or symbols visible)To attach the height-adjustable stand:
1 Make sure the monitor is turned off.
2 Place the monitor face-down on a soft, non-marring surface. A non-slip mat on a tabletop is ideal. Allow the monitor base to hang down over the edge of the table.
3 Press the two release buttons on the back of the monitor's original neck, then slide the monitor base out of the neck.

4 Remove the screw from the neck hinge, then remove the neck from the LCD panel. Do not discard the screw.

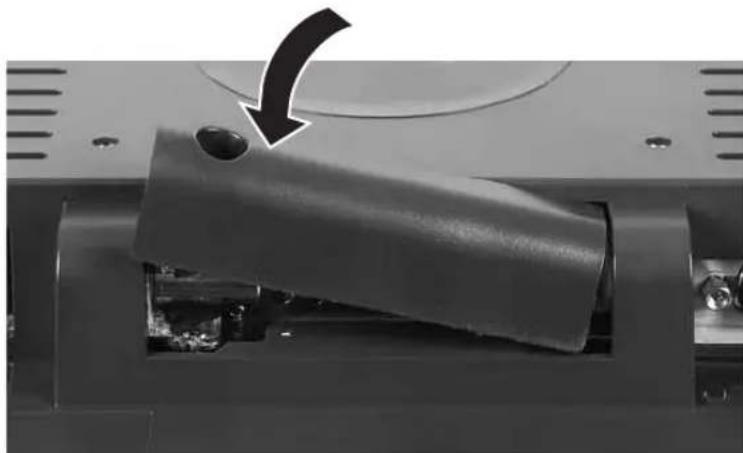
5 Place the hinge cover over the hinge.
natural_image
Close-up of a mechanical component with a curved arrow pointing to a cylindrical part, showing internal structure (no text or symbols visible)6 Attach the hinge cover using the screw you removed from the original neck hinge.
7 Remove the four small screws from the back of the LCD panel. Do not discard the four screws.

8 Attach the adjustable stand's mounting flange to the LCD panel using the four screws you removed.

natural_image
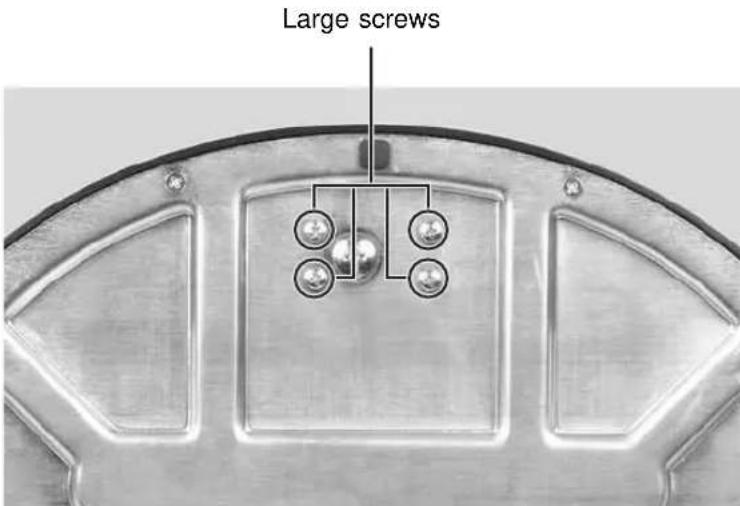
Close-up of a black industrial fan or compressor component with a metallic mounting base and a white arrow pointing to a component (no text or symbols visible)9 Use the four large screws provided with the adjustable stand to attach the base to the adjustable stand. Insert the screws through the bottom of the base and into the stand's neck.
Adjusting the height-adjustable stand

Starting the monitor

To start the monitor:
1 Press the power button on the front of monitor. The power LED on the power button turns on.

2 Turn on your computer.
After your computer is running, the power LED on the monitor's power button should be blue. Allow about 10 seconds for the display image to appear. If the power LED is not blue or you do not see a display image, check the connections. For more troubleshooting information, see "Troubleshooting" on page 19.
3 Adjust the tilt of the monitor for the best viewing angle.
4 After you see the Windows desktop, press the Auto button on the right side of the monitor to automatically adjust your display image to the ideal settings.
5 Use the on-screen display (OSD) to adjust other monitor settings. For more information, see "Adjusting monitor settings" on page 9.
Important

When adjusting the monitor settings, always press the Auto button before entering the OSD. This will automatically adjust the display image to the ideal settings for the current screen resolution.
For most applications, the best screen resolution for the 15-inch model is 1024 × 768 , and the best for the 17-inch model is 1280 × 1024 .

Adjusting monitor settings
Use the monitor controls (located on the monitor itself) and computer controls (accessible through Windows) to adjust the display image. For more information about computer controls, see “Windows controls” on page 13.
Monitor buttons
This monitor features an on-screen display (OSD) that lets you adjust contrast, brightness, and other settings for the monitor. The monitor saves changes you make to the settings, even if you turn off the monitor.
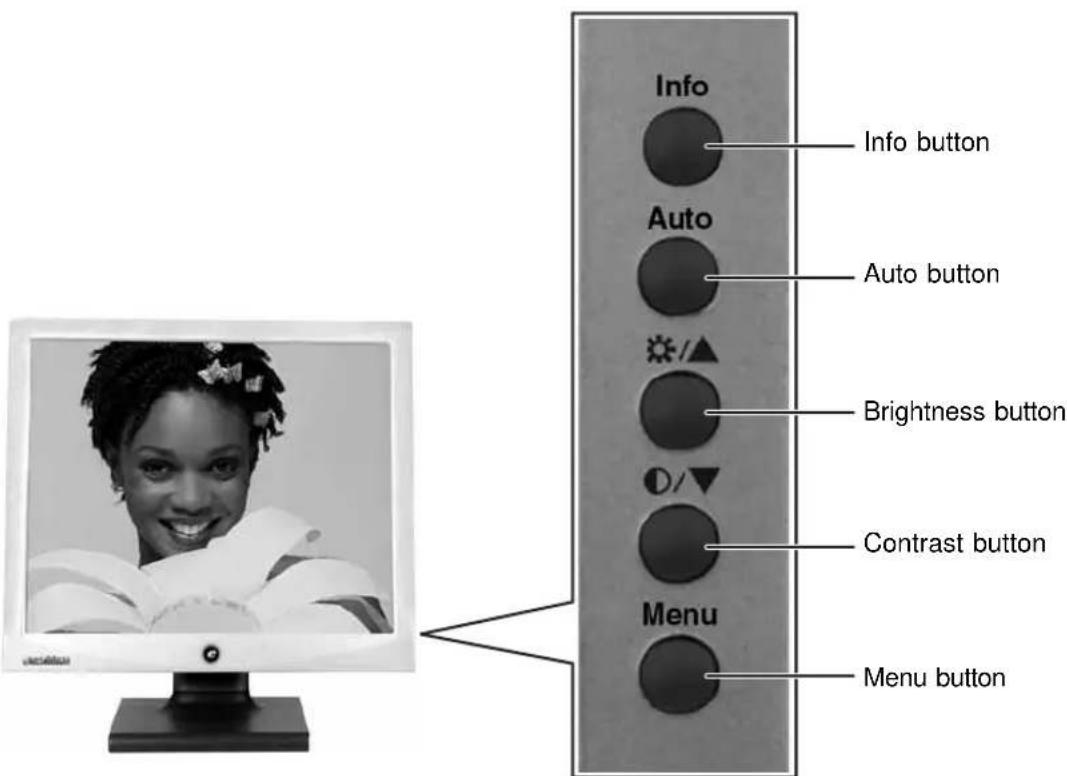
Info
OSD active: Press to move to the previous menu.
OSD inactive: Press to display the current resolution and refresh rate of your monitor.
■Auto
OSD active: Press to open a menu or setting.
OSD inactive: Automatically optimizes the monitor's image position, clock, and phase.
OSD active: Press to move up through menu selections and adjust OSD options.
OSD inactive: Press to adjust the brightness.
■/ (contrast)
OSD active: Press to move down through menu selections and adjust OSD options.
OSD inactive: Press to adjust the contrast.
■Menu
Press to view the OSD. Press again to exit or move to a previous menu.
On-screen display options
Adjusting OSD settings
To adjust the OSD settings:
1 Press the Menu button. The OSD menu opens.
2 Use the △ and ▽ buttons to highlight a setting, then press the Auto button to open the selected menu or setting.
3 Use the and buttons to adjust the setting to the desired level or change the option.
4 Press the Input button to return to a previous menu.
5 When you have finished making all adjustments, press the Menu button at the Main Menu to exit.
Tips & Tricks

While the OSD is active, on-screen labels appear next to the buttons to help you identify them.

OSD menus
OSD Menu Description
Main menu

Auto—Automatically adjusts your monitor to its optimum settings.
Picture—Opens the Picture menu, where you can adjust brightness, contrast, and gamma.
Geometry—Opens the Geometry menu, where you can adjust image size and minimize distortions.
Advanced—Opens the Advanced menu, where you can adjust color balance, change the OSD language, and display information about current monitor settings.
Reset—Resets the monitor to its factory settings.
Picture menu

Brightness—Adjusts the amount of light in the darkest portion of the picture. Use the lowest brightness setting you are comfortable with to maximize the life of the monitor backlights.
You may need to readjust brightness after the monitor has warmed up.
Contrast—Adjusts the level of white between the lightest and darkest portions of an image.
Gamma—Customizes the gamma level. High gamma levels increase white levels and low gamma levels increase contrast.
OSD Menu Description
Geometry menu

H-Position—Moves the display image left and right.
V-Position—Moves the display image up and down.
You can also press the Auto button to configure the vertical and horizontal position automatically.
Clock—Minimizes any vertical bars or stripes visible on the screen background. The horizontal screen size will also change.
Phase—Minimizes any horizontal distortion and clears or sharpens the displayed characters.
Advanced menu

Color—Customizes the color levels.
Language—Changes the language of the OSD.
LED Brightness—Changes the brightness of the Standby and Power LED to Day Mode or Nite Mode.
Information—Displays current screen resolution.
Windows controls
Color depth, screen resolution, and screen fonts are three of the most basic monitor settings you may need to change.
Adjusting the color depth
Color depth is the number of colors your video card uses. Most images look best displayed with the maximum number of colors available.
Windows lets you choose from several color depth settings for the monitor. We recommend that you use the 32-bit True Color setting or the highest setting available at all times.
If the color in your images seems "false" or "jumpy," especially after you have played a game or run a video-intensive program, check the color depth setting and return it to 32-bit True Color, if necessary.
To change the color depth:
1 Click Start, then click Control Panel. The Control Panel window opens. If your Control Panel is in Category View, click Appearance and Themes.
2 Click/Double-click the Display icon. The Display Properties dialog box opens.
3 Click the Settings tab.

4 Click the arrow button to open the Color quality list, then click the color depth you want.
5 Click OK, then click Yes to save your changes.

Help and Support

For more information about adjusting monitor settings, click Start, then click Help and Support. Type the keyword changing display settings in the Search box, then click the arrow.
Adjusting the screen resolution
You can change the screen resolution to a size you prefer. For example, you can increase the resolution to fit more icons on your desktop, or you can decrease the resolution to make reading and identifying objects on the monitor easier. The higher the resolution, the smaller individual components of the screen (such as icons and menu bars) appear.

To change the screen resolution:
1 Click Start, then click Control Panel. The Control Panel window opens. If your Control Panel is in Category View, click Appearance and Themes.
2 Click/Double-click the Display icon. The Display Properties dialog box opens.
3 Click the Settings tab.

4 Drag the Screen resolution slider to the size you prefer.
5 Click OK, then click Yes to save your changes.

Help and Support

For more information about adjusting monitor settings, click Start, then click Help and Support. Type the keyword changing screen resolution in the Search box, then click the arrow.
Clarifying screen fonts
You can change the display fonts to ClearType for smoother screen fonts.
To change the display fonts to ClearType:
1 Click Start, then click Control Panel. The Control Panel window opens. If your Control Panel is in Category View, click Appearance and Themes.
2 Click/Double-click the Display icon. The Display Properties dialog box opens.
3 Click the Appearance tab.

4 Click the Effects button. The Effects dialog box opens.
5 Click to select the Use the following method to smooth the edges of screen type check box.
6 Click the arrow to open the list, then click ClearType.
7 Click OK.

Video modes
Your monitor supports several video modes. If you do not use the best mode for the monitor, the display image may look slightly "fuzzy."
15-inch monitor
| Mode Mode name and resolution | Horizontal frequency (kHz) | Vertical frequency (Hz) |
| 1 VGA 720 × 400 31.469 70.087 | ||
| 2 VGA 640 × 480 31.469 59.941 | ||
| 3 VESA 640 × 480 37.861 72.810 | ||
| 4 VESA 640 × 480 37.500 75.000 | ||
| 5 VESA 800 × 600 35.156 56.250 | ||
| 6 VESA 800 × 600 37.879 60.317 | ||
| 7 VESA 800 × 600 48.077 72.188 | ||
| 8 VESA 800 × 600 46.875 75.000 | ||
| 9 VESA 1024 × 768 48.363 60.004 | ||
| 10 VESA 1024 × 768 56.476 70.069 | ||
| 11 VESA 1024 × 768 60.023 75.029 |
17-inch monitor
| Mode Mode name and resolution | Horizontal frequency (kHz) | Vertical frequency (Hz) |
| 1 VGA 720 × 400 31.469 70.087 | ||
| 2 VGA 640 × 480 31.469 59.941 | ||
| 3 VESA 640 × 480 37.861 72.810 | ||
| 4 VESA 640 × 480 37.500 75.000 | ||
| 5 VESA 800 × 600 35.156 56.250 | ||
| 6 VESA 800 × 600 37.879 60.317 | ||
| 7 VESA 800 × 600 48.077 72.188 | ||
| 8 VESA 800 × 600 46.875 75.000 | ||
| 9 VESA 1024 × 768 48.363 60.004 | ||
| 10 VESA 1024 × 768 56.476 70.069 | ||
| 11 VESA 1024 × 768 60.023 75.029 | ||
| 12 VESA 1280 × 1024 63.980 60.020 | ||
| 13 VESA 1280 × 1024 79.976 75.025 |
Power management
ENERGY STAR
As an ENERGY STAR® Partner, eMachines has determined that this product meets the ENERGY STAR guidelines for energy efficiency.
This monitor complies with the EPA's International ENERGY STAR Program, which is a program designed to encourage manufacturers of computer equipment to build circuitry into their products to reduce energy consumption during time of non-use.
Energy declaration
When connected to a computer that supports the VESA Display Power Management Signaling (DPMS) Protocol, the monitor can conserve significant energy by reducing power consumption during periods of non-use. When your computer goes into the energy saving mode, the monitor will then enter the Active Off mode (sleep). In the Active Off mode the Power LED will still show orange.
Use these conventions and the power can be reduced to the following levels:
| VESA State LED Indicator Power Consumption | |
| On Blue 15-inch: 35 W | 17-inch: 40 W |
| Active Off Orange ≤2 W | |
To “wake” the monitor when it is in Active Off mode, move the mouse or press any keyboard key.
Access the power management options in the Control Panel to change the period of time after which the monitor enters these low power states.
Maintenance
To keep the monitor in optimal working order:
■Do not block the ventilation holes.
■Do not expose the monitor to rain or use near water.
- Keep the monitor away from radiators or heat vents.
■Keep the monitor out of direct sunlight.
To clean the monitor, use a soft cloth slightly moistened with water only. Wipe the cabinet, screen, and controls.
Caution

Do not use any type of abrasive pad or glass cleaner. You will permanently scratch the screen.
Troubleshooting
If you have problems with the monitor, the information in this troubleshooting section may help you solve them.
Important

Make sure that the monitor has warmed up for approximately 30 minutes before making any judgments about the picture quality.
No power
Make sure that the power cord is connected correctly to both the back of the monitor and the wall outlet. For more information about connecting the power cord, see "Connecting the monitor" on page 2.
No picture
■ Press the Input button to make sure that you have selected the correct video source.
■ Make sure that the power cord is connected correctly to both the back of the monitor and the wall outlet. For more information about connecting the power cord, see "Connecting the monitor" on page 2.
■ Make sure that the video cable is connected securely to the back of the monitor and computer. For more information about connecting the video cable, see “Connecting the monitor” on page 2.
■Make sure that the monitor is turned on.
■If the power LED is orange:
■Make sure that your computer is turned on.
■Move the mouse or press any key on the keyboard to bring the monitor out of sleep mode.
■Restart your computer with the monitor turned on.
■Make sure that the video cable is not damaged.
■Check the end of the video cable for any pins that might be bent or pushed in.
■Turn off the monitor and unplug the video cable from the back of your computer. Turn the monitor back on and wait for ten seconds. If the monitor is functioning correctly, a “No Signal” message appears. For more information about connecting the video cable, see “Connecting the monitor” on page 2.
Display colors are wrong
■ Press the Auto button to automatically adjust the display image to the ideal settings.
■Restart your computer with the monitor turned on.
■ Make sure that the video cable is connected securely to the back of the monitor and your computer. For more information about connecting the power cord, see “Connecting the monitor” on page 2.
■Make sure that the video cable is not damaged.
■Check the end of the video cable for any pins that might be bent or pushed in.
Picture has shadows or “ghosts”
■ Press the Auto button to automatically adjust the display image to the ideal settings.
■Remove any extension cables or switchboxes.
■ Make sure that the video cable is connected securely to the back of the monitor and your computer. For more information about connecting the power cord, see "Connecting the monitor" on page 2.
■Make sure that the video cable is not damaged.
■Check the end of the video cable for any pins that might be bent or pushed in.
Color is not uniform
■ Press the Auto button to automatically adjust the display image to the ideal settings.
■ Make sure that the monitor warms up for at least 30 minutes before making a final judgment about color uniformity or brightness.
Image is not sized or centered correctly
■ Press the Auto button to automatically adjust the display image to the ideal settings.
■ Use the position controls to adjust the image. For instructions on how to adjust the display image position, see “Adjusting monitor settings” on page 9.
The monitor has pixels that are always dark or too bright
This condition is normal and inherent in the TFT technology used in active-matrix LCD screens. eMachines' inspection standards keep these to a minimum. If you feel these pixels are unacceptably numerous or dense on your display, contact eMachines Customer Care to identify whether a repair or replacement is justified based on the number of pixels affected.
Specifications
Specifications are subject to change without notice or obligation. Many products for eMachines and its subsidiaries are custom engineered by our suppliers to eMachines' specifications and may vary from similarly marketed products.
15-inch monitor
| Panel size | 15 inches (diagonal) |
| Panel type | 15-inch viewable TFT with anti-glare coating |
| Pixel resolution | 1024 × 768 (native) |
| Pixel pitch | 0.0117 × 0.0117 inches (0.297 mm × 0.297 mm) |
| Aspect ratio | 5:4 |
| Brightness and contrast ratio | 250 cd/m2, 400:1 |
| Viewing angles | 130° horizontal, 100° vertical |
| Response time | 16 ms |
| Lamp type/life | 50,000 hours |
| Colors | 16.2 million |
| OSD languages | English, German, French, Spanish, Italian, Japanese |
| Connections and inputs | Analog (VGA): 15-pin mini d-sub VGADigital (DVI-D): 24-pin DVD-DAc Power input |
| Cables | 15-pin mini d-sub analog VGA (included)24-pin DVI-D (not included) |
| Power consumption | Normal operation: 35 WOff (power-save): 2 W |
| Power input | 100-240 VAC, 50/60 Hz |
| Power management | Energy Star® |
| Certifications | UL, cUL, FCC Class B, NOM,CE, TUV/GS.VCCI and TCO'99 where applicable. |
| Wall mount bracket | VESA 4 × 3.937 inches (4 × 100 mm) |
| Dimensions | 13.71 × 13.60 × 5.67 inches(34.82 × 34.54 × 14.40 cm) with stand |
17-inch monitor
| Panel size | 17 inches (diagonal) |
| Panel type | 17-inch viewable TFT with anti-glare coating |
| Pixel resolution | 1280 × 1024 (native) |
| Pixel pitch | 0.0104 × 0.0104 inches (0.264 mm × 0.264 mm) |
| Aspect ratio | 5:4 |
| Brightness and contrast ratio | 250 cd/m2, 450:1 |
| Viewing angles | 140° horizontal, 130° vertical |
| Response time | 16 ms |
| Lamp type/life | 50,000 hours |
| Colors | 16.2 million |
| OSD languages | English, German, French, Spanish, Italian, Japanese |
| Connections and inputs | Analog (VGA): 15-pin mini d-sub VGADigital (DVI-D): 24-pin DVD-DAc Power input |
| Cables | 15-pin mini d-sub analog VGA (included)24-pin DVI-D (not included) |
| Power consumption | Normal operation: 40 WOff (power-save): 2 W |
| Power input | 100-240 VAC, 50/60 Hz |
| Power management | Energy Star® |
| Certifications | UL, cUL, FCC Class B, NOM,CE, TUV/GS.VCCI and TCO'99 where applicable. |
| Wall mount bracket | VESA 4 × 3.937 inches (4 × 100 mm) |
| Dimensions | 14.97 × 15.26 × 6.55 inches(38.02 × 38.76 × 16.64 cm) with stand |
Chapter 1
Safety, Regulatory, and Legal Information
■Safety information
■Regulatory statements
■Notices
Important safety information
Your eMachines product is designed and tested to meet the latest standards for safety of information technology equipment. However, to ensure safe use of this product, it is important that the safety instructions marked on the product and in the documentation are followed.
Warning

Always follow these instructions to help guard against personal injury and damage to your eMachines product.
Setting up your system
- Read and follow all instructions marked on the product and in the documentation before you operate your system. Retain all safety and operating instructions for future use.
- Do not use this product near water or a heat source such as a radiator.
- Set up the system on a stable work surface.
- The product should only be operated from the type of power source indicated on the rating label.
- If your product has a voltage selector switch, make sure that the switch is in the proper position for your area. The voltage selector switch is set at the factory to the correct voltage.
- Openings in the monitor case are provided for ventilation. Do not block or cover these openings. Make sure you provide adequate space, at least 6 inches (15 cm), around the system for ventilation when you set up your work area. Never insert objects of any kind into the monitor ventilation openings.
- Some products are equipped with a three-wire power cord to make sure that the product is properly grounded when in use. The plug on this cord will only fit into a grounding-type outlet. This is a safety feature. If you are unable to insert the plug into an outlet, contact an electrician to install the appropriate outlet.
- If you use an extension cord with this system, make sure that the total ampere rating on the products plugged into the extension cord does not exceed the extension cord ampere rating.
- If your system is fitted with a TV Tuner, cable, or satellite receiver card, make sure that the antenna or cable system is electrically grounded to provide some protection against voltage surges and buildup of static charges.
Care during use
- Do not walk on the power cord or allow anything to rest on it.
- Do not spill anything on the system. The best way to avoid spills is to avoid eating and drinking near your system.
- Do not expose the monitor to rain or use near water. If the monitor does get exposed to moisture, unplug it and allow it to dry for 24 hours. Call eMachines Customer Care for advice on whether the monitor is safe to turn back on.
- When the monitor is turned off, a small amount of electrical current still flows through the monitor. To avoid electrical shock, always unplug all power cables and modem cables from the wall outlets before cleaning the system.
■ Unplug the system from the wall outlet and refer servicing to qualified personnel if:
■ The power cord or plug is damaged.
- Liquid has been spilled into the system.
■ The system does not operate properly when the operating instructions are followed.
■ The system was dropped or the cabinet is damaged.
■ The system performance changes.
Warning

To prevent electric shock, never remove the cover. No user serviceable parts inside. Refer servicing to qualified service personnel.
Replacement parts and accessories
Use only replacement parts and accessories recommended by eMachines.
Warning

Do not use eMachines products in areas classified as hazardous locations. Such areas include patient care areas of medical and dental facilities, oxygen-laden environments, or industrial facilities.
Environmental information
The product you have purchased contains extracted natural resources that have been used in the manufacturing process. This product may contain substances known to be hazardous to the environment or to human health.
To prevent releases of harmful substances into the environment and to maximize the use of our natural resources, eMachines provides the following information on how you can responsibly recycle or reuse most of the materials in your “end of life” product.
Waste Electrical and Electronic Equipment (commonly known as WEEE) should never be disposed of in the municipal waste stream (residential garbage collection). The “Crossed-Out Waste Bin” label affixed to this product is your reminder to dispose of your “end of life” product properly.

Substances such as glass, plastics, and certain chemical compounds are highly recoverable, recyclable, and reusable. You can do your part for the environment by following these simple steps:
- When your electrical or electronic equipment is no longer useful to you, “take it back” to your local or regional waste collection administration for recycling.
In some cases, your “end of life” product may be “traded in” for credit towards the purchase of new eMachines equipment. Call eMachines to see if this program is available in your area. - If you need further assistance in recycling, reusing, or trading in your “end of life” product, you may contact us at the Customer Care number listed in your product’s user guide and we will be glad to help you with your effort.
Finally, we suggest that you practice other environmentally friendly actions by understanding and using the energy-saving features of this product (where applicable), recycling the inner and outer packaging (including shipping containers) this product was delivered in, and by disposing of or recycling used batteries properly.
With your help, we can reduce the amount of natural resources needed to produce electrical and electronic equipment, minimize the use of landfills for the disposal of “end of life” products, and generally improve our quality of life by ensuring that potentially hazardous substances are not released into the environment and are disposed of properly.
Regulatory compliance statements
United States of America
Federal Communications Commission (FCC) Unintentional emitter per FCC Part 15
This device has been tested and found to comply with the limits for a Class B digital device, pursuant to Part 15 of the FCC rules. These limits are designed to provide reasonable protection against harmful interference in a residential installation. This equipment generates, uses, and can radiate radio frequency energy and, if not installed and used in accordance with the instructions, may cause harmful interference to radio or television reception. However, there is no guarantee that interference will not occur in a particular installation. If this equipment does cause interference to radio and television reception, which can be determined by turning the equipment off and on, the user is encouraged to try to correct the interference by one or more of the following measures:
■ Reorient or relocate the receiving antenna
■ Increase the separation between the equipment and receiver
- Connect the equipment to an outlet on a different circuit from that to which the receiver is connected
- Consult the dealer or an experienced radio/TV technician for help.
Compliance Accessories: The accessories associated with this equipment are: shielded video cable. These accessories are required to be used in order to ensure compliance with FCC rules.
FCC declaration of conformity
Responsible party:
eMachines, Inc.
7565 Irvine Center Drive
Irvine, CA 92618 USA
This device complies with Part 15 of the FCC Rules. Operation of this device is subject to the following two conditions: (1) this device may not cause harmful interference, and (2) this device must accept any interference received, including interference that may cause undesired operation.
Caution

Changes or modifications not expressly approved by eMachines could void the FCC compliance and negate your authority to operate the product.
California Proposition 65 Warning
Warning

This product contains chemicals, including lead, known to the State of California to cause cancer, birth defects or reproductive harm.
Mercury Warning
Warning

Hg lamp(s) inside this product contain mercury and must be recycled or disposed of according to local, state, or federal laws.
Canada
Industry Canada (IC) Unintentional emitter per ICES-003
This digital apparatus does not exceed the Class B limits for radio noise emissions from digital apparatus as set out in the radio interference regulations of Industry Canada.
As an ENERGY STAR ^® Partner, eMachines has determined that this product meets the ENERGY STAR guidelines for energy efficiency when used with a computer equipped with a Display Power Management System.
Notices
© 2005 eMachines, Inc.
All rights reserved.
eMachines, Inc.
7565 Irvine Center Drive
Irvine, CA 92618 USA
All Rights Reserved
This publication is protected by copyright and all rights are reserved. No part of it may be reproduced or transmitted by any means or in any form, without prior consent in writing from eMachines.
The information in this manual has been carefully checked and is believed to be accurate. However, changes are made periodically. These changes are incorporated in newer publication editions. eMachines may improve and/or change products described in this publication at any time. Due to continuing system improvements, eMachines is not responsible for inaccurate information which may appear in this manual. For the latest product updates, consult the eMachines Web site at www.emachines.com. In no event will eMachines be liable for direct, indirect, special, exemplary, incidental, or consequential damages resulting from any defect or omission in this manual, even if advised of the possibility of such damages.
In the interest of continued product development, eMachines reserves the right to make improvements in this manual and the products it describes at any time, without notices or obligation.
Trademark Acknowledgments
Gateway and eMachines are trademarks or registered trademarks of Gateway, Inc. in the United States and other countries. All other brands and product names are trademarks or registered trademarks of their respective companies.

MAN MON EM 15/17/19T4 USR GDE R1 3/05

- Contents
- Using Your eMachines Flat Panel Monitor 1
- Safety, Regulatory, and Legal Information 25
- Using Your eMachines Flat Panel Monitor
- Connecting the monitor
- To connect the monitor:
- Attaching the optional stand
- To attach the height-adjustable stand:
- Adjusting the height-adjustable stand
- Starting the monitor
- To start the monitor:
- Important
- Adjusting monitor settings
- Monitor buttons
- Info
- ■Auto
- On-screen display options
- Adjusting OSD settings
- To adjust the OSD settings:
- Tips & Tricks
- OSD menus
- OSD Menu Description
- Windows controls
- Adjusting the color depth
- To change the color depth:
- Help and Support
- Adjusting the screen resolution
- To change the screen resolution:
- Clarifying screen fonts
- To change the display fonts to ClearType:
- Video modes
- Power management
- ENERGY STAR
- Energy declaration
- Maintenance
- Troubleshooting
- No power
- No picture
- Display colors are wrong
- Picture has shadows or “ghosts”
- Color is not uniform
- Image is not sized or centered correctly
- The monitor has pixels that are always dark or too bright
- Specifications
- Chapter 1
- Important safety information
- Warning
- Setting up your system
- Care during use
- Replacement parts and accessories
- Environmental information
- Regulatory compliance statements
- United States of America
- Federal Communications Commission (FCC) Unintentional emitter per FCC Part 15
- FCC declaration of conformity
- Caution
- California Proposition 65 Warning
- Mercury Warning
- Canada
- Industry Canada (IC) Unintentional emitter per ICES-003
- Notices
- Trademark Acknowledgments
Brand : eMachines
Model : E15T4
Category : Screen