E15T3 - Screen eMachines - Free user manual and instructions
Find the device manual for free E15T3 eMachines in PDF.


| Product Type | Computer Monitor |
| Brand | eMachines |
| Model | E15T3 |
| Diagonal Size | 15.6 inches |
| Aspect Ratio | 16:9 |
| Resolution | 1366 x 768 (HD) |
| Display Technology | TN (Twisted Nematic) with LED backlight |
| Brightness | 200 cd/m² |
| Contrast Ratio | 600:1 (static) |
| Response Time | 5 ms |
| Viewing Angles | 90° horizontal / 65° vertical |
| Input Connectors | VGA, DVI-D |
| Power Consumption | 15 W (typical), <0.5 W (standby) |
| Voltage | 100-240 V AC, 50/60 Hz |
| Dimensions (W x H x D) | 14.2 x 10.5 x 2.0 inches (without stand) |
| Weight | 5.5 lbs (with stand) |
| VESA Mount | 100 x 100 mm |
| Built-in Speakers | No |
| Tilt Adjustment | Yes (-5° to +20°) |
| Security Lock | Kensington lock slot |
| Energy Star Certified | Yes |
| Maintenance | Clean with a soft, dry cloth. Do not use liquids or cleaners. |
| Safety | Do not open the monitor. High voltage inside. Risk of electric shock. |
| Spare Parts & Repairability | Power adapter and cables available. Repairs should be done by a qualified technician. |
Frequently Asked Questions - E15T3 eMachines
User questions about E15T3 eMachines
0 question about this device. Answer the ones you know or ask your own.
Ask a new question about this device
Download the instructions for your Screen in PDF format for free! Find your manual E15T3 - eMachines and take your electronic device back in hand. On this page are published all the documents necessary for the use of your device. E15T3 by eMachines.
USER MANUAL E15T3 eMachines
- Caution and Warning....2
- FCC Requirements....3
- Product Safety Precautions....4
- Introduction 5
- Hardware Installation 6
5-1. Unpacking....6
5-2. Installation....6
5-3. Video Input Pin Assignment....8 - Display Timing....9
6-1. Applicable Video Timing....9 - Display Controls 11
7-1. Display Controls.... 11
7-2. Screen Adjustment Operation Procedure 12 - Screen Adjustment....13
8-1. Main Menu 13
8-2. OSD Adjusting and Controls....14
8-3. How to use AUTO TUNE Adjustment 17 - Troubleshooting Tips 18
- Specification 19
- Appendix....20
1. Caution and Warning

CAUTION !!
RISK OF ELECTRIC SHOCK
DO NOT OPEN

CAUTION: To reduce the risk of electric shock, do not remove cover (or back). No user serviceable parts inside. Refer servicing to qualified personnel
WARNING:
TO PREVENT FIRE OR SHOCK HAZARD, DO NOT EXPOSE THIS MONITOR TO RAIN OR MOISTURE.
HIGH VOLTAGE EXISTS ON THE BACK LIGHT POWER LEAD OF THIS MONITOR. BEFORE SERVICING, DETERMINE THE PRESENCE OF HIGH VOLTAGE BY CONNECTING THE H.V. METER BETWEEN THE BACK LIGHT POWER LEAD AND CHASSIS ONLY.
2. FCC Requirements
This device complies with part 15 of the FCC Rules. Operation is subject to the following two conditions: (1) This device may not cause harmful interference, and (2) this device must accept any interference received, including interference that may cause undesired operation."
The equipment has been tested and found to comply with the limits for a Class B digital device, pursuant to part 15 of FCC rules. These limits are designed to provide reasonable protection against harmful interference in a residential installation. This equipment generates, uses and can radiate radio frequency energy and, if not installed and used in strict accordance with the instructions, may cause harmful interference to radio communications. However, there is no guarantee that interference will not occur in a particular installation. If this equipment does cause harmful interference to radio or television reception, which can be determined by turning the equipment off and on, the user is encouraged to try to correct the interference by one or more of the following measure:
- Reorient or relocate the receiving antenna.
- Increase the separation between the equipment and the receiver.
- Connect the equipment into an outlet on a circuit different from that to which the receiver is connected.
- Consult the dealer or an experienced radio/TV technician for help.
Shielded interconnected cables and shield power cords must be employed with this equipment to insure compliance with the pertinent RFD emission limits governing this device.
Changes or modifications no expressly approved by the manufacturer could void the user authority to operate the equipment.
Notice of Compliance with Canadian Interference-causing Equipment Regulations This Class B digital apparatus meets all requirements of the Canadian Interference-Causing Equipment Regulations.
• Follow all warnings and instructions marked on the product.
- Do not use this product near water.
- This display should be installed on a solid horizontal base.
When cleaning, use only a neutral detergent cleaner with a soft damp cloth. Do not spray with liquid or aerosol cleaners.
Do not expose this display to direct sunlight or heat. Hot air may cause damage to the cabinet and other parts.
Adequate ventilation must be maintained to ensure reliable and continued operation and to protect the display from overheating. Do not block ventilation slots and openings with objects or install the display in a place where ventilation may be hindered.
This display should be operated from the type of power source indicated on the AC/DC adapter. Do not install this display near a motor or transformer where strong magnetism is generated. Images on the display will become distorted and the color irregular.
Do not allow metal pieces or objects of any kind fall into the display from ventilation holes.
Do not attempt to service this unit yourself. Removal of the display cover may expose you to dangerous voltage or other risks. Refer all servicing to qualified service personnel.
Unplug this product from the wall outlet and refer servicing to qualified service personnel in the event that:
- Liquid is spilled into the product or the product is exposed to rain or water.
• The product does not operate normally when the operating instructions are followed. - The product has been dropped or the cabinet has been damaged.
• The product exhibits a distinct change in performance, indicating a need for service.
• Power cord or plug is damaged or frayed.
4. Introduction
Thank you for purchasing an eMachines LCD monitor. We're sure that you'll be pleased with the outstanding quality, reliability and performance of your new LCD monitor. The following are some of the major advantages of your new eMachines LCD monitor.:
- An LCD monitor has low radiation and less flicker than compared to traditional CRT monitor.
- Your LCD monitor weights only 7.55 lbs (3.42 Kgs), and its compact size requires only minimal desktop space. This means that your LCD monitor is easy to transport and can be used on the most cluttered of desktops. Note: always protect the LCD glass screen when transporting. Please save the original packaging for transporting longer distances or for shipping.
- Your LCD monitor operates on low power consumption level ... this translates into savings on power bills and of the Earth's resources.
- The special design of the LCD cabinet is both ergonomic and attractive ... it fits in with any decor.
- Using an LCD monitor is the same as the CRT monitor. There is no need to change the hardware of your computer, just plug it in and go. Please see section 5. Hardware Installation on page 6 for full details.
5. Hardware Installation
This chapter will guide you thru the correct installation procedures of your LCD monitor.
5-1. Unpacking
After you unpack your LCD Monitor, please make sure that the following items are included in the carton and in good condition. If you find that any of these items are damaged or missing, please contact your dealer immediately.
- One LCD Monitor mounted on its stand with video cable
• AC/DC adapter with 12V DC output - AC power cord
• The User's Manual - Warranty Card
5-2. Installation
This analog LCD display does not require any special drivers. Necessary drivers are supplied by the video card manufacturer and may be found on the diskettes supplied with the video card that came with your computer. Windows XP / ME / 2000 drivers for both the display and the video card are supplied on the Windows XP / ME / 2000 CD or diskettes. Unfortunately, Microsoft does not provide a complete listing of the display manufacturers in the operating system. You may use the standard XGA (1024X768@60) as the display type when asked by the operating system. The video card must also be set up correctly in Windows XP / ME / 2000 and make sure the video output of the VGA card is on the list in Section 6.1 or check your Video Card manual or Windows XP / ME / 2000. Please see the Windows read me file for further information on Video Card settings. You are now ready to connect your new LCD Monitor to your computer.
5. Hardware Installation
Follow these simple steps to setup your LCD monitor
- Turn power off to both Computer and Display before making any connection.
- Disconnect any existing monitor you may have from your Computer. Please refer to your existing monitor's User's Guide.
- Install the Display on a solid horizontal surface such as a table or a desk.
- Connect the power cable and the AC/DC adapter and then connect the AC Adapter to the DC jack that is located at the end of the signal cable.
IBM PC's & Compatibles
5a. Connect one end of the signal cable to the matching 15-pin connector on the rear of the computer.
Apple / Macintosh Computers
5b. Connect a MAC adapter (not supplied) to the video connector on the rear of the Apple / Macintosh computer. Then plug the other end of the signal cable into the MAC adapter. (Contact your local Apple dealer for information on purchasing the correct conversion connector.)
6. Tighten the screws of the Display cable until the connectors are fastened securely.
7. Switch on power to the computer, then to the Display.

Figure 5.1 LCD Monitor Hardware Setup
5. Hardware Installation
5-3. Video Input Pin Assignment
This section describes the pin assignment of the LCD's video connector. It is called a 15-Pin Mini D-sub Connector.
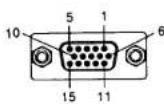
| Pin No. | Signal Connector |
| 1 | Red Video Signal |
| 2 | Green Video Signal |
| 3 | Blue Video Signal |
| 4 | N.C. |
| 5 | Ground |
| 6 | Ground for red video signal |
| 7 | Ground for green video signal |
| 8 | Ground for blue video signal |
| 9 | +5V |
| 10 | Ground |
| 11 | N.C. |
| 12 | DDC data |
| 13 | Horizontal sync signal |
| 14 | Vertical sync signal |
| 15 | DDC clock |
6. Display Timing
6-1. Applicable Video Timing
The following table lists the display quality modes that the LCD monitor provides. If the other video modes are input, the monitor may not work or will display unsatisfactory picture quality.
| VESA MODES | ||||
| Mode | Resolution | Horizontal Nominal Frequency +/- 1 kHz | Vertical Nominal Frequency +/- 1 Hz | |
| DOS | 720*400@70Hz | 31.469 | 70.087 | |
| VGA | 640*480@60Hz | 31.469 | 59.940 | |
| 640*480@72Hz | 37.861 | 72.809 | ||
| 640*480@75Hz | 37.500 | 75.000 | ||
| SVGA | 800*600@56Hz | 35.156 | 56.250 | |
| 800*600@60Hz | 37.879 | 60.017 | ||
| 800*600@72Hz | 48.077 | 72.188 | ||
| 800*600@75Hz | 46.875 | 75.000 | ||
| XGA | 1024*768@60Hz | 48.363 | 60.004 | |
| 1024*768@70Hz | 56.476 | 70.069 | ||
| 1024*768@75Hz | 60.023 | 75.029 | ||
Table 6.1 Applicable Video Timing
6. Display Timing
| IBM MODES | ||||
| Mode | Resolution | Horizontal Nominal Frequency +/- 1 kHz | Vertical Nominal Frequency +/- 1 Hz | |
| EGA | 640*350@70Hz | 31.469 | 70.086 | |
| DOS | 720*400@70Hz | 31.469 | 70.087 | |
| VGA | 640*480@60Hz | 31.469 | 59.940 | |
| XGA | 1024*768@72Hz | 57.515 | 71.9 | |
| MAC MODES | ||||
| VGA | 640*480@60Hz | 35.000 | 66.667 | |
| SVGA | 832*624@75Hz | 49.725 | 74.551 | |
| XGA 1 | 1024*768@75Hz | 60.241 | 74.927 | |
Table 6.2 Applicable Video Timing
7. Display Controls
7-1. Display Controls

1) MENU

Press to enter to the OSD adjustment menu. It is also used to go back to the previous menu for sub-menu, changed data will not be saved to memory.
2) SELECT

Press to confirm the current selection. It is also used to go back to the previous menu for sub-menu, changed data will be saved to memory.
3) ADJUST ▲ : (UP)
Press to scroll up in a sub-menu or to increase value of the selected item. If pressed when menu is not active, CONTRAST is adjusted.
4) ADJUST ▼ : (DOWN)
Press to scroll down in a sub-menu or to decrease value of the selected item. If pressed when menu is not active, CONTRAST is adjusted.
5) POWER & LED :
Pushing the power switch will turn the monitor on. Pushing it again to turn the monitor off. The LED will light with a solid blue color in normal on state with the power on, and will flash blue in power saving mode.
7. Display Controls
7-2. Screen Adjustment Operation Procedure
This LCD monitor features an On-Screen Display (OSD) menu. The icons are designed to make your monitor display settings easier to perform. When highlighted, the icons illustrate the control function to assist you in identifying which control needs adjustment.
Before activating the OSD menu, the select button can be used to automatically adjust the display to the proper size and horizontal and vertical position. Press and hold the select
button ← for 2 seconds to activate the automatic adjustment feature.
The OSD menu activates automatically when you press the menu button select on the rear of the monitor. The OSD remains centered on the screen while you make your adjustments. Use either the ▲ or ▼ button to move the highlight to your selection. MENU submenu or control with a status bar will appear. The status bar indicates in which direction, from the factory preset, which adjustments are being made. Use the ▲ or ▼ button to adjust the control.
The contrast and brightness menu can also be adjusted by simply pressing either the ▲ or ▼ buttons.
When you have finished making adjustments, press the MENU button to save the setting and exit back to main menu.
8. Screen Adjustment
8-1. Main Menu
The OSD Main Menu (Figure 8-1) is displayed on screen when MENU key is pressed. The OSD menu is a combination of graphic and text display. The column inside the OSD menu will show information of input image. Second column beneath OSD menu shows the item selected.
The UP and DOWN keys are used to scroll through items within the menu. The selected item is highlighted as the scrolling advances. The SELECT key is used to activate the highlighted item during this state.
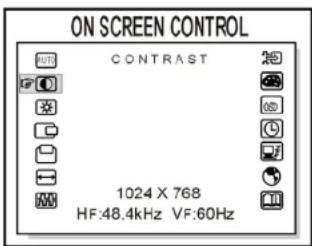
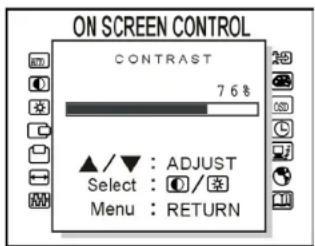
Figure 8-1 On Screen Control Menu
8. Screen Adjustment
8-2. OSD Adjusting and Controls
AUTO-TUNE AUTO
This control will automatically make adjustments to the horizontal and vertical size, horizontal and vertical position and phase.
CONTRAST
This control allows you to make adjustments to the contrast of the display screen.
BRIGHTNESS
Selecting this control allows you to make adjustments to the luminosity level of the display screen.
H-POSITION (HORIZONTAL POSITION)
Select this control and then use the ▲ and ▼ buttons to center the image horizontally on the screen.
V-POSITION (VERTICAL POSITION)
Select this control and then use the ▲ and ▼ buttons to center the image vertically or the screen.
H-SIZE (HORIZONTAL SIZE)
Select this control and then use the ▲ and ▼ buttons to expand or decrease the image width to horizontally fill the display screen.
PHASE
Select this control and then use the ▲ and ▼ buttons to adjust the screen image until it looks focused, crisp and sharp.
AUTO-LEVEL
This control will automatically make adjustment to the input levels of video signal (ex. 0.714Vp-p, 1.0Vp-p).
8. Screen Adjustment
COLOR CONTROL

Select this control, and then use the ▲ and ▼ buttons to scroll to the desired color temperature. Use the select button to select the 9300K, 6500K, 5500K or USER for custom setting.
R-GAIN (RED)
Select "USER" then use the select button to scroll up and down the RGB menu to R (Red). Use the ▲ and ▼ buttons to adjust the red level of the display.
G-GAIN (GREEN)
Select "USER" then use the select button to scroll up and down the RGB menu to G (Green). Use the ▲ and ▼ buttons to adjust the Green level of the display.
B-GAIN (BLUE) B
Select "USER" then use the select button to scroll up and down the RGB menu to B (Blue). Use the ▲ and ▼ buttons to adjust the Blue level of the display.
OSD POSITION OSD
Select this control and then use the select button to select the direction to move the OSD menu. Use the ▲ and▼ buttons to move the OSD menu.
OSD TIME-OUT
Select this control and then use the select button to select the duration time for the OSD menu. Use the ▲ and ▼ buttons to select the time. (5, 15, 30, 60 SEC)
POWER SAVE DELAY
This feature directs the monitor to stay in the "on" mode even after the computer goes into "sleep" mode. The user is able to select time of 5 seconds, 1 minute, 60 minutes, or OFF for the display to appear on the monitor screen.
8. Screen Adjustment
LANGUAGE
Select this control and then use the ▲ and ▼ buttons to choose from English (ENGLISH), Spanish (ESPAÑOL), Italian (ITALIANO), French (FRANÇAIS). German (DEUTSCH) Japanese (「本語」)
INFORMATION
Select this control and it will allow you to confirm the current display mode.
*Note:
You can get the best quality of the image under full-screen image with a running computer.
The function of AUTO-TUNE may not work properly if background color is dark or if the input image does not fill the screen. (ex: DOS text mode)
We strongly recommend that you just run the AUTO-LEVEL & AUTO-TUNE function to get the best image quality when you unpack the monitor or when you install different VGA card or PC.
8. Screen Adjustment
8-3. How to use AUTO TUNE Adjustment
This function can tune the parameters of PHASE, H-SIZE, H-POSITION and V-POSITION.
Suggesting Adjustment Steps :
Step 1: Enter the Windows XP / ME / 2000 Shut-down frame. (Note : The Wallpaper color CAN NOT be black.)
Step 2: Enter OSD Main Menu and Choose the "AUTO" in the "AUTO TUNE" option, then press SELECT key. The Picture will auto-adjust by itself. After 4 seconds, you can exit OSD and SHUT DOWN frame.
Step 3: If you are not still satisfied with the picture quality, you could choose CONTRAST item in OSD Main Menu and adjust it.
Note:
-
If you don't like the effect of AUTO TUNE adjustment, you can adjust PHASE, H-SIZE, H-POSITION and V-POSITION settings yourself by using the OSD.
-
AUTO TUNE adjustment can be used in Windows XP / ME / 2000 except black background frame, but the best effect is in the SHUT DOWN frame.
-
It is recommended to run "EDIT" program first, if performing an AUTO TUNE adjustment in DOS mode.
9. Troubleshooting Tips
In the event that you experience trouble with your Display, check the following items before contacting the dealer from whom the Display was purchased. The most common problems usually involve an incorrect connection from the Video Card to the Display. We recommend that you also consult your Video Card User's manual during the Troubleshooting Procedure. Do not exceed the maximum refresh rate recommended for the display.
| Problem | Troubleshooting Tip |
| No image on display screen 1. | Check that power cord of the Computer has been connected securely into wall outlet or grounded extension cable or strip.2. Check that power switch of the Display has been pressed and LED on the front of Display is lit.3. Check that the Video (Signal) Cable from the Display has been securely and correctly connected.4. With computer power off, check that the Video Card is firmly seated in card slot of Computer motherboard.5. Check that the video input from the Video Card falls within the timing range (listed in the table in section 6) of the Display. |
| Abnormal image. 1. Check that the video input from the Video Card falls within the timing range (listed in the table in section 6) of the Display.2. Check that Video (Signal) Cable from the Display has been securely and correctly connected to the Video Connector at the rear side of the Computer. | |
| Colors of image on screen are abnormal | Check that Video (Signal) Cable from the Display has been securely and correctly connected to the 15-pin Video Connector at the rear side of the computer. |
| Disturbances on Screen | OSD adjustment is incorrect. Please consult section 8 for OSD screen adjustment procedures. |
10. Specification
| LCD panel type | 15" TFT |
| Resolution | XGA 1024 x 768 Max. |
| Pixel dimension | 0.297mm(H) x 0.297 mm (V) |
| LCD display color | 16.7 Million Colors max. |
| OSD control | Auto-Tune, Contrast, Brightness, H/V Position, H-Size Phase, Auto-Level, Color Control, OSD Position, OSD Time-Out, Power Save Delay, Language, Information. |
| Manual control | Menu, Select, Adjust (▲,▼), Power. |
| Tilt | +20°, -5° |
| Active display area | 304.1 mm(H) x 228.1 mm(V) |
| AC/DC adapter | Input : AC 100 ~ 240V, 50 ~ 60HzOutput : +12 V DC. |
| Input signal | Video : Analog 0.7 Vp-p. 75 ohmsSync. : TTL Level, Positive/Negative, Separate Sync. |
| Input connector | 15 Pin D-Sub. |
| Power management | YES |
| Regulation | Safety : UL, CSA, CE, TÜV/GS, VCCI |
| EMI : FCC-B, MPRII | |
| Dimensions | 347 mm (W) x 365.4mm (H) x 159.5 mm (D). |
| Weight | 7.55 lbs (3.42 Kgs) (unpacked) |
| Accessory | VGA cable, AC / DC adapter, power cord. |
| Temperature | Operation : 0 ~ 40°C |
| Storage : -20 ~ 60°C | |
| Plug & Play | DDC 2B |
※ Specifications subject to change without notice
11. Appendix
Safety Guidelines
WARNING: This device must be operated with the original power supply, part number: HJC, HASU05F.
CAUTION: The socket-outlet should be installed near the equipment and should be easily accessible.
CAUTION : Use a power cable that is properly grounded. Always use the appropriate AC cord that is certified for the individual country. Some examples are listed below:
| USA | ...... | UL | Switzerland | ...... | SEV |
| Canada | ...... | CSA | Britain | ...... | BASE/BS |
| Germany | ...... | VDE | Japan | ...... | Electric Appliance Control Act |
IMPORTANT NOTICE CONCERNING POWER CORD SELECTION
The power cord set for this unit has been enclosed and been selected according to the country of destination and must be used to prevent electric shock. Use the following guidelines if it is necessary to replace the original cord set, or if the cord set is not enclosed. The female receptacle of the cord set must meet IEC-60320 requirements and may look like (Figure A1 below):

Figure A2

For the United States and Canada
In the United States and Canada the male plug is a NEMA5-15 style (Figure A2), UL Listed, and CSA Labeled. For units that are mounted on a desk or table, type SVT or SJT cord sets may be used. For units that sit on the floor, only SJT type cord sets may be used. The cord set must be selected according to the current rating for your unit. Please consult the table below for the selection criteria for power cords used in the United States and Canada.
| Code Type | Size of Conductors in Cord | Maximum Current Rating of Unit |
| SJT | 18 AWG | 10 Amps |
| 16 AWG | 12 Amps | |
| 14 AWG | 12 Amps | |
| SVT | 18 AWG | 10 Amps |
| 17 AWG | 12 Amps |
11. Appendix
For European Countries
In Europe you must use a cord set which is appropriate for the receptacles in your country. The cord set is HAR-Certified, and a special mark that will appear on the outer sheath, or on the insulation of one of the inner conductors.
AC PLUG CORD PRECAUTIONS FOR THE UNITED KINGDOM
FOR YOUR SAFETY PLEASE READ THE FOLLOWING TEXT CAREFULLY.
IF THE FITTED MOULDED PLUG IS UNSUITABLE FOR THE SOCKET OUTLET THEN THE PLUG SHOULD BE CUT OFF AND DISPOSED OF SAFELY.
THERE IS A DANGER OF SEVERE ELECTRICAL SHOCK IF THE CUT OFF PLUG IS INSERTED INTO AN APPROPRIATE SOCKET.
If a new plug is to be fitted, please observe the wiring code as shown below. If in any doubt, please consult a qualified electrician.
WARNING: THIS APPLIANCE MUST BE EARTHED.
IMPORTANT: The wires in this mains lead are coloured in accordance with the following code:
Green-and-Yellow : Earth
Blue : Neutral
Brown : Live
If the coloured wires of the main lead of this appliance do not correspond with the coloured markings identifying the terminals in your plug, proceed as follows:
The wire which is coloured GREEN-AND-YELLOW must be connected to the terminal in the plug which is marked by the letter E or by the Earth symbol or coloured GREEN or GREEN-AND-YELLOW.
The wire which is coloured BLUE must be connected to the terminal in the plug which is marked with the letter N or coloured BLACK. The wire which is coloured BROWN must be connected to the terminal in the plug which is marked with the letter L or coloured RED.
If you have any questions concerning which proper power cord to use, please consult with the dealer from whom you have purchased the product.
11. Appendix
◆ Compliance Information for U.S.A.
The equipment has been tested and found to comply with the limits for a Class B digital device, pursuant to part 15 of the FCC Rules. These limits are designed to provide reasonable protection against harmful interference in a residential installation. This equipment generates, uses, and can radiate radio frequency energy, and if not installed and used in accordance with the instructions, may cause harmful interference to radio communications. However, there is no guarantee that interference will not occur in a Particular installation. If this equipment does cause harmful interference to radio or television reception, which can be determined by turning the equipment off and on, the user is encouraged to try to correct the interference by one or more of the following measures:
• Reorient or relocate the receiving antenna.
- Increase the separation between the equipment and receiver.
- Connect the equipment into an outlet on a circuit different from that to which the receiver is connected.
- Consult the dealer or an experienced radio/TV technician for help.
FCC Warning
To assure continued FCC compliance, the user must use a grounded power supply cord and the provided shielded video interface cable with bonded ferrite cores. If a BNC cable is going to be used, use only a shielded BNC (5) cable. Also, any unauthorized changes or modifications not expressly approved by the party responsible for compliance could void the user's authority to operate this device.
◆ CE Conformity for Europe

The device complies with the requirements of the ECC directive 89/336/EEC as amended by 92/31/EEC and 93/68/EEC Art.5 with regard to "Electromagnetic compatibility", and 73/23/EEC as amended by 93/68/EEC Art.13 with regard to "Safety".
- CAUTION AND WARNING
- WARNING
- FCC REQUIREMENTS
- INTRODUCTION
- HARDWARE INSTALLATION
- 5-1. UNPACKING
- 5-2. INSTALLATION
- 5-3. VIDEO INPUT PIN ASSIGNMENT
- DISPLAY TIMING
- 6-1. APPLICABLE VIDEO TIMING
- DISPLAY CONTROLS
- MENU
- SELECT
- ADJUST ▲ : (UP)
- ADJUST ▼ : (DOWN)
- POWER & LED
- 7-2. SCREEN ADJUSTMENT OPERATION PROCEDURE
- SCREEN ADJUSTMENT
- 8-1. MAIN MENU
- 8-2. OSD ADJUSTING AND CONTROLS
- AUTO-TUNE AUTO
- CONTRAST
- BRIGHTNESS
- H-POSITION (HORIZONTAL POSITION)
- V-POSITION (VERTICAL POSITION)
- H-SIZE (HORIZONTAL SIZE)
- PHASE
- AUTO-LEVEL
- COLOR CONTROL
- R-GAIN (RED)
- G-GAIN (GREEN)
- B-GAIN (BLUE) B
- OSD POSITION OSD
- OSD TIME-OUT
- POWER SAVE DELAY
- LANGUAGE
- INFORMATION
- 8-3. HOW TO USE AUTO TUNE ADJUSTMENT
- NOTE
- TROUBLESHOOTING TIPS
- SPECIFICATION
- APPENDIX
- SAFETY GUIDELINES
- IMPORTANT NOTICE CONCERNING POWER CORD SELECTION
- FOR THE UNITED STATES AND CANADA
- FOR EUROPEAN COUNTRIES
- AC PLUG CORD PRECAUTIONS FOR THE UNITED KINGDOM
- WARNING: THIS APPLIANCE MUST BE EARTHED
- ◆ COMPLIANCE INFORMATION FOR U.S.A
- FCC WARNING
- ◆ CE CONFORMITY FOR EUROPE
Brand : eMachines
Model : E15T3
Category : Screen