
EX6220 - Video projector EPSON - Free user manual and instructions
Find the device manual for free EX6220 EPSON in PDF.


| Product Type | Video projector |
| Brand | Epson |
| Model | EX6220 |
| Display Technology | 3LCD |
| Native Resolution | 800 x 600 (SVGA) |
| White Light Output | 3000 ANSI lumens |
| Color Light Output | 3000 lumens |
| Contrast Ratio | 15000:1 |
| Lamp Type | UHE |
| Lamp Life (Normal/Eco) | 5000 h / 6000 h |
| Projection Lens | Manual zoom / focus |
| Screen Size (diagonal) | 30" - 300" |
| Throw Ratio | 1.44 - 1.72:1 |
| Keystone Correction | Vertical: ±30° |
| Built-in Speaker | 2 W (mono) |
| Network Connectivity | Wireless LAN (optional), Wired LAN (100BASE-TX) |
| EasyMP Network Projection | Supported (Windows/Mac) |
| Input Ports | VGA, HDMI, USB Type A (for USB display), Audio 3.5mm |
| Power Consumption | 315 W (Normal), 0.2 W (Standby) |
| Dimensions (W x D x H) | 12.1" x 8.9" x 3.3" |
| Weight | 2.5 kg (5.5 lbs) |
| Product Color | White |
Frequently Asked Questions - EX6220 EPSON
User questions about EX6220 EPSON
0 question about this device. Answer the ones you know or ask your own.
Ask a new question about this device
Download the instructions for your Video projector in PDF format for free! Find your manual EX6220 - EPSON and take your electronic device back in hand. On this page are published all the documents necessary for the use of your device. EX6220 by EPSON.
USER MANUAL EX6220 EPSON
EasyMPNetworkProjection OperationGuide
Contents
Introduction to EasyMP Network Projection....7
EasyMP Network Projection Features....7
Display Options 7
Multi-Screen Display Function 8
Movie Sending Mode 8
Presentation Mode 9
Distribution Function....9
Connection Modes 10
Quick Connection Mode 10
Advanced Connection Mode 10
Setting Up EasyMP Network Projection for the First Time 12
Installing the Software 12
EasyMPNetworkProjectionSystemRequirements....12
Installing EasyMP Network Projection (Windows) 14
Installing EasyMP Network Projection (Mac OS X).... 14
Setting Up the Projector 15
ConnectionMethodsforVariousNetworkEnvironments....15
SettingUpaProjectortoConnectinQuickConnectionMode....17
SettingUpaProjectortoConnectinAdvancedConnectionMode(Wireless)....18
SettingUpaProjectortoConnectinAdvancedConnectionMode(Wired)....20
Connecting to the Projector and Projecting Images 22
Connection Methods 22
ConnectingtheProjectorandaComputerDirectlyUsingWirelessCommunication....22
ConnectingtheProjectorandaComputeroveraNetworkSystem(Wireless)....26
ConnectingtheProjectorandaComputeroveraNetworkSystem(Wired)....28
Changing the Projector Search Method 31
Search Methods 31
Searching for Network Projectors Automatically 32
SearchingforNetworkProjectorsbySpecifyinganSSID,IPAddress,orProjectorName......33
Searching for Network Projectors Using a Profile 34
Profile.... 35
Performing a Profile Search 35
Making a Profile 36
Managing a Profile 39
Controlling the Projected Display 42
Hiding Computer Operations 42
Switching the Input Source 43
Finishing Projecting Images 44
Using Additional Functions.... 45
Changing the Computer Projection Source 45
Projecting Only a PowerPoint Slide Show 45
Projecting Movies.... 46
Supported Movie Files 47
Using Movie Sending Mode 47
Projecting Images Using the Multi-Screen Display Function 50
Multi-Screen Display Examples 51
Setting Up Multi-Screen Display 53
Enabling the Virtual Display Driver (Windows).... 54
ArrangingtheMulti-ScreenDisplay(Windows)....55
ArrangingtheMulti-ScreenDisplay(MacOSX)....60
ProjectingImagestotheArrangedMulti-ScreenDisplay....64
Projecting One Computer Screen from Multiple Projectors 66
Solving Problems 68
Solving Network Connection Problems 68
SolutionsWhenYouCannotConnectUsingQuickConnectionMode....68
SolutionsWhenYouCannotConnectUsingAdvancedConnectionMode(Wireless)....69
SolutionsWhenYouCannotConnectUsingAdvancedConnectionMode(Wired)....71
Solving Problems During Projection 73
SolutionsWhentheComputerScreenisNotDisplayedProperly....73
Solutions When the Screen is Not Projected Properly 74
Solutions When There is No Audio 74
Error Messages List 75
ErrorMessagewhenStartingupEasyMPNetworkProjection....75
ErrorMessagewhenSearchingforandSelectingProjectors....76
Error Messages when Projecting.... 78
Event ID List....78
Screen Summary 81
Select Connection Mode Screen 81
Search and Connect Screen 82
Profiles 86
Save in the profile....86
Edit profile.... 87
Set options 89
Set options - General settings 89
Set options - Adjust performance 92
Set options - Audio Output.... 93
Toolbar 95
Select target projector 97
Projector control 98
Movie Sending Mode....99
Add-Remove Virtual Display 101
Appendix 102
Updating and Uninstalling the Software 102
Getting the Latest Version of the Application.... 102
UninstallingEasyMPNetworkProjection(WindowsXP/WindowsVista/Windows7)....102
UninstallingEasyMPNetworkProjection(Windows8)....103
UninstallingEasyMPNetworkProjection(MacOSX)....103
Supported Resolutions and Colors.... 104
Supported Resolutions 104
Display Color 104
Limitations.... 105
Connection Limitations 105
LimitationswhenProjectingfromWindowsPhotoGalleryorWindowsLivePhotoGallery......105
Limitations in Windows Aero.... 106
LimitationswhenProjectingfromWindowsMediaCenter....107
Notices 107
Copyright Notice.... 107
About Notations....107
General Notice.... 108
Copyright Attribution 109
IntroductiontoEasyMPNetworkProjection
SeethefollowingsectionstolearnmoreaboutEasyMPNetworkProjectionsoftware.
EasyMPNetworkProjectionFeatures
DisplayOptions
ConnectionModes
EasyMPNetworkProjectionFeatures
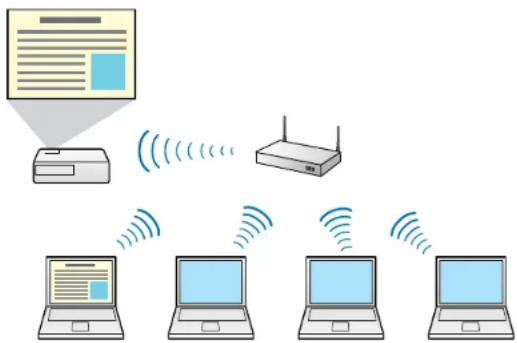
YoucanuseEasyMPNetworkProjectionsoftwaretoprojectimagesfromyourcomputertotheprojectoroveranetwork.Sharingtheprojectoroveranetworkallowsyoutoprojectimagesfromdifferentcomputerswithouthavingtochangecableconnections,aswellasprojectimagesfromaremotelocation.
flowchart
graph TD
    A["Printer"] -->|Signal| B["Router"]
    B -->|Signal| C["Laptop"]
    C -->|Signal| D["Laptop"]
    D -->|Signal| E["Laptop"]
    style A fill:#f9f,stroke:#333
    style B fill:#ccf,stroke:#333
    style C fill:#cfc,stroke:#333
    style D fill:#fcc,stroke:#333
    style E fill:#cff,stroke:#333
Parenttopic: Introduction to Easy MP Network Projection
DisplayOptions
Youcanuseavarietyofdisplayoptionsforprojectingimages.
Multi-ScreenDisplayFunction
MovieSendingMode
PresentationMode
DistributionFunction
Parenttopic: Introduction to Easy MP Network Projection
Multi-ScreenDisplayFunction
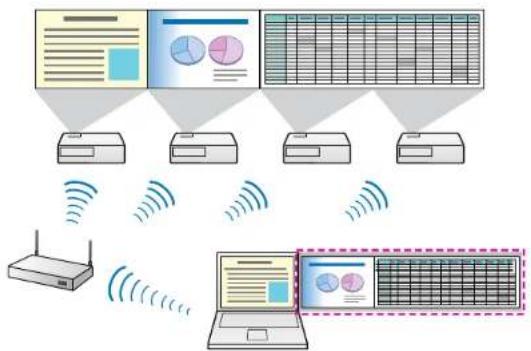
Youcanprojectdifferentimagesfromuptofourprojectorsthatareconnectedtoonecomputer.This allowsyoutoprojectcomplexdata,suchasabusinessreport,inanextra-widelandscapeformat.
flowchart
graph TD
    A["Data Panel"] --> B["Server 1"]
    C["Data Panel"] --> D["Server 2"]
    E["Data Panel"] --> F["Server 3"]
    G["Server"] --> H["Laptop"]
    I["Router"] --> J["Laptop"]
    K["Router"] --> L["Laptop"]
    style A fill:#f9f,stroke:#333
    style C fill:#f9f,stroke:#333
    style E fill:#f9f,stroke:#333
    style G fill:#f9f,stroke:#333
    style I fill:#f9f,stroke:#333
    style K fill:#f9f,stroke:#333
    style L fill:#f9f,stroke:#333
Parenttopic:DisplayOptions
Relatedtopics
ProjectingImagesUsingtheMulti-ScreenDisplayFunction
MovieSendingMode
Youcanplaymoviessmoothlybysendingmoviefilesdirectlytotheprojector.
Note: This function is only available for supported models.
Parenttopic:DisplayOptions
Relatedtopics
ProjectingMovies
PresentationMode
YoucanprojectaPowerPoints slideshow from your computer without displaying any other distracting computer content. While using Presentation Mode, ablackscreen is projected when the PowerPoint slideshow is not playing.
Parenttopic:DisplayOptions
Relatedtasks
ProjectingOnlyaPowerPointSlideShow
DistributionFunction
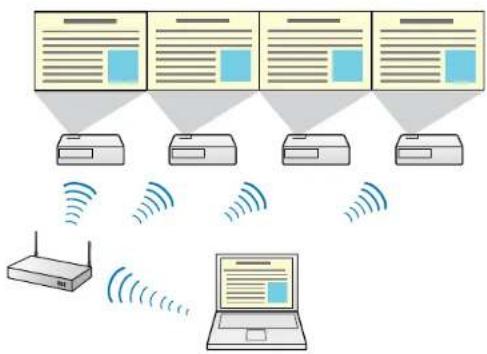
Youcanprojectthesamecomputerimagesimultaneouslyfromuptofourprojectorsconnectedtothe samenetwork.
flowchart
graph TD
    A["Device 1"] -->|Wireless Link| B["Router"]
    C["Device 2"] -->|Wireless Link| D["Router"]
    E["Device 3"] -->|Wireless Link| F["Router"]
    G["Device 4"] -->|Wireless Link| H["Laptop"]
    style A fill:#f9f,stroke:#333
    style C fill:#f9f,stroke:#333
    style E fill:#f9f,stroke:#333
    style G fill:#ccf,stroke:#333
    style B fill:#cff,stroke:#333
    style D fill:#cff,stroke:#333
    style F fill:#cff,stroke:#333
    style H fill:#ffc,stroke:#333
Note: You cannot connect multiplenetworked computerstooneprojectoratthesametime.
Parenttopic:DisplayOptions
Relatedtasks
ProjectingOneComputerScreenfromMultipleProjectors
ConnectionModes
Youcanusethefollowingmethodstoconnectacomputertoaprojectoroveranetworkbyusing EasyMPNetworkProjection.
QuickConnectionMode
AdvancedConnectionMode
Parenttopic: Introduction to Easy MP Network Projection
QuickConnectionMode
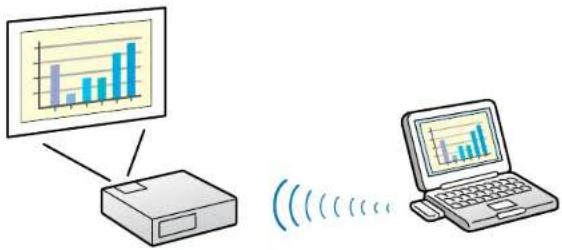
Youcanconnecttheprojectorandthecomputerdirectlyusingwirelesscommunication. Thisallowsyou toprojectthecomputerscreenwithoutmakinganycomplicatednetworksettings.
QuickConnectionModeisonlyavailablewhenyouinstallthewirelessLANunitontheprojector.
Parenttopic:ConnectionModes
Relatedtasks
SettingUpaProjectortoConnectinQuickConnectionMode
ConnectingtheProjectorandaComputerDirectlyUsingWirelessCommunication
AdvancedConnectionMode
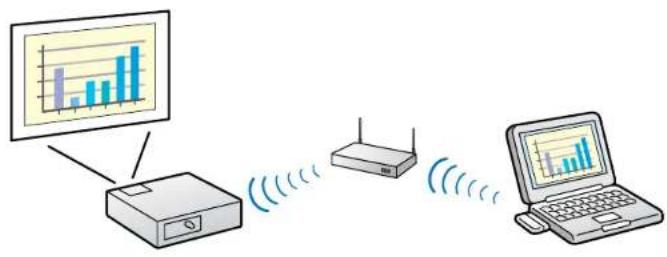
Youcanconnecttheprojectorandthecomputerusinganexistingnetworksystem. TouseAdvanced ConnectionMode, youneedtoconnecttheprojectortoanaccesspointortoanetworkhub.
Parenttopic:ConnectionModes
Relatedtasks
SettingUpaProjectortoConnectinAdvancedConnectionMode(Wireless) SettingUpaProjectortoConnectinAdvancedConnectionMode(Wired) ConnectingtheProjectorandaComputeroveraNetworkSystem(Wireless) ConnectingtheProjectorandaComputeroveraNetworkSystem(Wired)
SettingUpEasyMPNetworkProjectionfortheFirstTime
Followtheseinstructionsbeforeconnectingacomputertotheprojectoroveranetwork.
InstallingtheSoftware
SettingUptheProjector
InstallingtheSoftware
InstallEasyMPNetworkProjectionfromtheEPSONProjectorSoftwareCD-ROMsuppliedwithyourprojector.
Note:
- If the languages selected for the installation differs from the language of the operating system being used, the screens may not be displayed correctly.
- YoucandownloadthelatestversionofEasyMPNetworkProjectionfromtheEPSONWebsite.
- IfapreviousversionofEasyMPNetworkProjectionisalreadyinstalledonyourcomputer, uninstallit firstandtheninstallEasyMPNetworkProjection.
EasyMPNetworkProjectionSystemRequirements
InstallingEasyMPNetworkProjection(Windows)
InstallingEasyMPNetworkProjection(MacOSX)
Parenttopic: SettingUpEasyMPNetworkProjectionfortheFirstTime
Relatedtasks
GettingtheLatestVersionoftheApplication
EasyMPNetworkProjectionSystemRequirements
YourcomputermustmeetthefollowingsystemrequirementsstousetheEasyMPNetworkProjection software.
| RequirementWindows | Mac | |
| OperatingsystemWindows | XPMacOSXProfessional(32-bit)•10.4.x(32-bit)HomeEdition(32-bit)•10.5.1orlater(32-bit)TabletPCEdition(32-bit)•10.6.x(32-and64-bit) | •10.7.x(32-and64-bit)•10.8.x(64-bit)(MacOSX10.4.11,10.5.8,10.6.8,10.7.3,or10.8.0recommended) |
| WindowsVistaUltimate(32-bit)Enterprise(32-bit)Business(32-bit)HomePremium(32-bit)HomeBasic(32-bit) | ||
| Windows7Ultimate(32-and64-bit)Enterprise(32-and64-bit)Professional(32-and64-bit)HomePremium(32-and64-bit)HomeBasic(32-bit)Starter(32-bit) | ||
| Windows8Windows8(32-and64-bit)Windows8Pro(32-and64-bit)Windows8Enterprise(32-and64-bit) | ||
| CPUUMobilePentiumIII1 | 2GHzorfasterPowerPCG3900MHzorfaster(PentiumM1.6GHzorfaster(CoreDuo1.83Ghzorfasterrecommended)recommended) | |
| Memory256MBormore | (512MBormorerecommended) | |
| Harddiskspace20MBormore | more | |
| DisplayResolutionbetween1024×768(XGA)and1920×1200(WUXGA)16-bitcolororgreater(approximately32,000displaycolors) | ||
Note:
•OperationisnotguaranteedforWindowsXPwithoutanyservicepacksinstalled,orWindowsXPServicePack1.
- OperationisnotguaranteedforMacOSX10.5.0becausetheFirewallsettingsarenotsetcorrectly whentheversionisupdated.
Parenttopic:InstallingtheSoftware
InstallingEasyMPNetworkProjection(Windows)
InstallEasyMPNetworkProjectiononyourcomputer.
Note: Youneed administrator authority to install EasyMPNetworkProjection.
- Turnonyourcomputer.
- Makesureallrunningapplicationsareclosed.
- Insert the EPSON Projector Software CD-ROM into the computer.
Theinstallerstartsautomatically. - If the installer does not start automatically, open the CD-ROM drive from My Computer (or Computer), and then double-click InstallNavi.exe or EMP_NSCInst.exe.
- Followtheon-screen instruction to install.
Parenttopic:InstallingtheSoftware
InstallingEasyMPNetworkProjection(MacOSX)
InstallEasyMPNetworkProjectiononyourcomputer.
- Turnonyourcomputer.
- Makesureallrunningapplicationsareclosed.
- Insert the EPSON Projector Software CD-ROM into the computer.
- Double-click the EMP_NP Installer. mpkgiconin the EPSON window.
Installationstarts.
- Followtheon-screen instruction to install.
Parenttopic:InstallingtheSoftware
SettingUptheProjector
Followtheseinstructionstoselectaconnectionmethodbetweenacomputerandtheprojector,andthen setuptheprojector.
ConnectionMethodsforVariousNetworkEnvironments
SettingUpaProjectortoConnectinQuickConnectionMode
SettingUpaProjectortoConnectinAdvancedConnectionMode(Wireless)
SettingUpaProjectortoConnectinAdvancedConnectionMode(Wired)
Parenttopic: SettingUpEasyMPNetworkProjectionfortheFirstTime
ConnectionMethodsforVariousNetworkEnvironments
You can choose a connection modetousity our network environment.
Checkhowtheprojectorisconnectedtothenetworksystem(wirelessorwired)andthecommunication pathfromthecomputertotheprojector.
Depending on your projector, some connection methods may not be available. See the User's Guide supplied with the projector formoredetails.
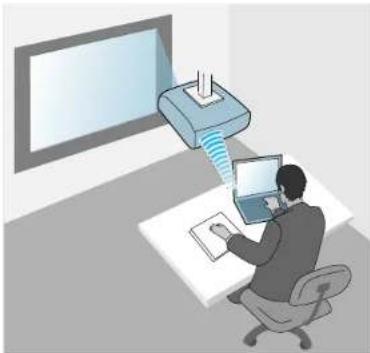
• Toconnect the project to the computer directly using wireless communication:
UseQuickConnectionMode.
natural_image
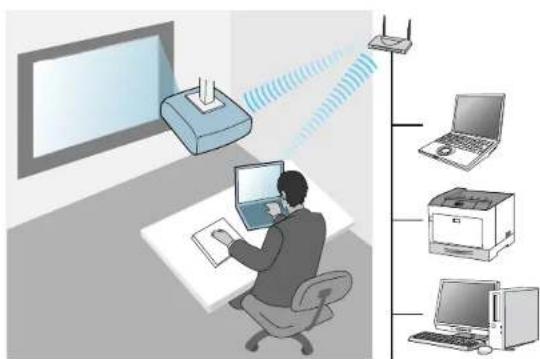
Illustration of a person using a laptop at a desk with a monitor overhead (no text or symbols)- Toconnecttheprojectortothecomputerusingawirelessnetworksystem: UseAdvancedConnectionMode.
natural_image
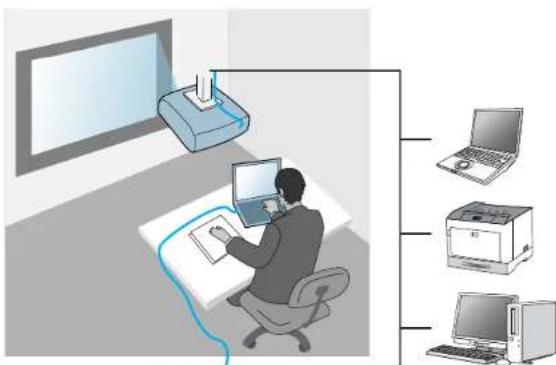
Illustration of a person working at a desk with laptops and a printer, connected to a server tower (no text or symbols present)• Toconnecttheprojectortothecomputerusingawirednetworksystem: UseAdvancedConnectionMode.
Parenttopic:SettingUptheProjector
Relatedtasks
SettingUpaProjectortoConnectinQuickConnectionMode
SettingUpaProjectortoConnectinAdvancedConnectionMode(Wireless)
SettingUpaProjectortoConnectinAdvancedConnectionMode(Wired)
SettingUpaProjectortoConnectinQuickConnectionMode
Toconnectacomputerdirectlytotheprojectorusingwirelesscommunication,youneedtoselect networksettingsonthecomputerandtheprojector.
-
Select the necessary setting to connect your computer to wireless LAN. Seethedocumentation supplied with your computer formored details.
-
Install the wireless LAN unit in the projector, if necessary. See the User's Guide supplied with the projector formoredetails.
-
Turnon the projector.
-
Press the Menu button on the remote control or the control panel, select the Network menu, and select NetworkConfiguration.
-
SelectWirelessLAN.
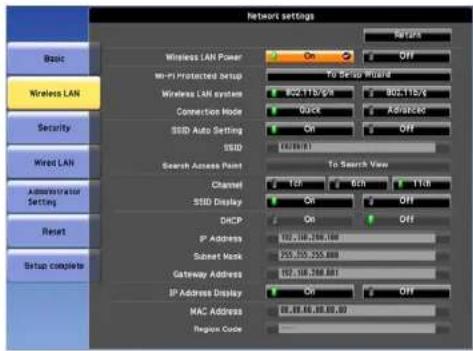
Ascreenlikeoneofthefollowingisdisplayed.
![Basic Wireless LAN Security Wired LAN Mail Others Reset Complete Wireless LAN Power Off Connection Mode Quick Channel 1ch Wireless LAN Sys. 802.11b/g SSID Auto Setting Off SSID IP Settings SSID Display Off IP Address Display Off Return [Esc] / [ ] : Return [ ] : Select](/content/2026/05/945870/images/58e528e47955ee50b50a80744ae58d199e405b6cec67a5f4fc6460e75aabd390.jpg)
- SelectOnforWirelessLANPower.
- SelectQuickforConnectionMode.
- Select other options as necessary for your network. See the User's Guide supplied with the projector formoredetails.
- SelectsecuritysettingstheSecuritymenuasnecessaryforyournetwork.Checkwithyour networkadministratorformoreinformationonmakingthecorrectsettings.
- When you have finished making settings, select Setup Complete or Complete and follow the on-screen instruction to save your settings and exit themenus.
Parenttopic:SettingUptheProjector
Relatedtasks
ConnectingtheProjectorandaComputerDirectlyUsingWirelessCommunication
SettingUpaProjectortoConnectinAdvancedConnectionMode(Wireless)
ToconnectacomputertotheprojectoroverawirelessLAN,youneedtoselectnetworksettingsonthe computerandtheprojector.
-
Contact your network administrator and writedown the settings for the access point, such as the SSID and security settings.
-
Connect the computer to the network.
Note: Tosetupanetworkconnection, if necessary, seethedocumentations supplied with your computerornetworkadapter.
- Install the wireless LAN unit in the projector, if necessary. See the User's Guide supplied with the projector formoredetails.
- Turnon the projector.
- Press the Menu button on the remote control or the control panel, select the Network menu, and select NetworkConfiguration.
6.SelectWirelessLAN.
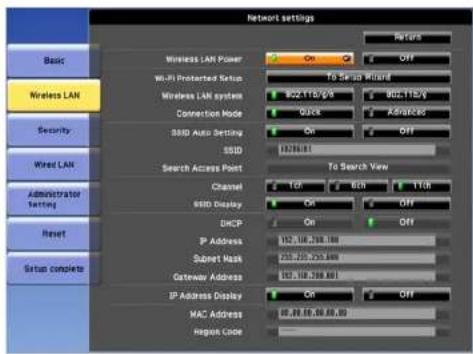
Ascreenlikeoneofthefollowingisdisplayed.
![Basic Wireless LAN Security Wired LAN Mail Others Reset Complete Wireless LAN Power Off Connection Mode Quick Channel 1ch Wireless LAN Sys. 802.11b/g SSID Auto Setting Off SSID IP Settings SSID Display Off IP Address Display Off Return [Esc] / [●]: Return [◆]: Select](/content/2026/05/945870/images/618530223d59cfd10fe2e27d2d2258da68a6a4c65cef9a9aa9828f525098f34e.jpg)
- SelectOnforWirelessLANPower.
- SelectAdvancedforConnectionMode.
- Select other options as necessary for your network. See the User's Guide supplied with the projector formoredetails.
-
Select security settings on the Security menu as necessary for your network. Check with your network administrator form more information on making the correct settings.
-
When you have finished making settings, select Setup Complete or Complete and follow the on-screen instruction to save your settings and exit themenus.
Parenttopic:SettingUptheProjector
Relatedtasks
ConnectingtheProjectorandaComputeroveraNetworkSystem(Wireless)
SettingUpaProjectortoConnectinAdvancedConnectionMode(Wired)
ToconnectacomputertotheprojectorusingawiredLAN,youneedtoselectnetworksettingsonthe computerandtheprojector.
- Contact your network administrator and check that DHCP is available under the current network environment.
Note: If DHCP is not available, write down the following values that are available for your projector.
- IPAddress
-
SubnetMask
•GatewayAddress -
Connect the computer to the network.
Note: Tosetupanetworkconnection, if necessary, seethedocumentations supplied with your computerornetworkadapter.
- ConnectaLANcabletotheprojector.
- Turnon the projector.
- Press the Menu button on the remote control or the control panel, select the Network menu, and selectNetworkConfiguration.
6.SelectWiredLAN.
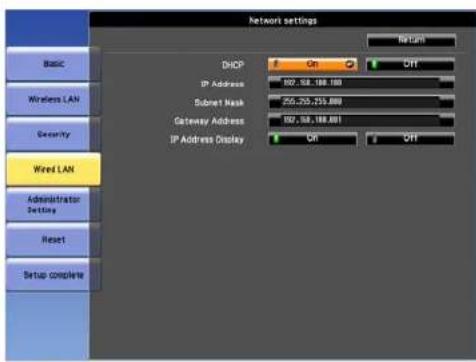
Ascreenlikeoneofthefollowingisdisplayed.
![Basic Wireless LAN Security Wired LAN Mail Others Reset Complete IP Settings IP Address Display Off Return [Esc] / [ ] : Return [ ] : Select](/content/2026/05/945870/images/c872b46fc989a2fd86c67357460f4d68362e563442b2178d7f8b5db641a72cfc.jpg)
- SelectIPsettingsasnecessary.
•DHCPisavailable:TurnontheDHCPsetting.
- DHCP is not available: Turn off DHCP and enter the projector's IP Address, Subnet Mask, and GatewayAddressvaluesasnecessary.
- When you have finished making settings, select Setup Complete or Complete and follow the on-screen instruction to save your settings and exit themenus.
Parenttopic:SettingUptheProjector
Relatedtasks
ConnectingtheProjectorandaComputeroveraNetworkSystem(Wired)
ConnectingtotheProjectorandProjectingImages
Followtheseinstructionstoconnectthecomputerandtheprojectoroveranetwork,andtoproject imagesfromyourcomputer'sscreenusingtheprojector.
MakesureyouhavealreadysetupEasyMPNetworkProjectionandselectedaconnectionmodeforthe projector.
ConnectionMethods
ChangingtheProjectorSearchMethod
ControllingtheProjectedDisplay
FinishingProjectingImages
Relatedtopics
InstallingtheSoftware
SettingUptheProjector
ConnectionMethods
Youcanselectasuitablemethodtoconnectthecomputerandtheprojectoroveranetworkdepending onyournetworkenvironment.
ConnectingtheProjectorandaComputerDirectlyUsingWirelessCommunication
ConnectingtheProjectorandaComputeroveraNetworkSystem(Wireless)
ConnectingtheProjectorandaComputeroveraNetworkSystem(Wired)
Parenttopic: ConnectingtotheProjectorandProjectingImages
ConnectingtheProjectorandaComputerDirectlyUsingWirelessCommunication
When your projector is setup as indicated below, you can connect the projector and a computer directly using wireless communication to project the computer's screen.
• Thewireless LANunitis installed in the projector.
• The projector's connection methodissettoQuick.
Note:
- When you connect the projector and a computer directly using wireless communication, the connection between the computer and an access point is disconnected.
- Makesureyouturnonyourcomputer'swirelesscommunicationfunction.
- PresstheLANbuttonontheremotecontrol.
The LAN stand by screen is projected.
![[LAN] Projector Name : EB***** SSID : IP Address ↓ : IP Address (1) : Keyword :](/content/2026/05/945870/images/4a7d795f4671298080cae715156684a18459f9786c6b4a3e717a60be5b702e57.jpg)
2.StartEasyMPNetworkProjection.
- Windows XP, Windows Vista, and Windows 7: Click Start, select Programs (or All Programs), EPSON Projector, EasyMP Network Projection, and then click EasyMP Network Projection Ver.X.XX.
-
Windows 8: Navigate to the Start screen and select EasyMP Network Projection Ver.X.XX.
• Mac OS X: Double-click EasyMP Network Projection from the Applications folder. -
Select Quick Connection Mode, and then click OK.
![EasyMP Network Projection Ver. X.XX Select Connection Mode. ● Quick Connection Mode ○ Advanced Connection Mode □ Set the selected Connection Mode as the default mode for future connections. [Do not display this window again.] OK Cancel](/content/2026/05/945870/images/cca48fca02cea13f86f12b81fc8486ef09a78aae46216153f0872f076a4c2eb7.jpg)
Theprojectorsearchresultsaredisplayed.
- If the projector you want to connect to is not displayed in these results, search for using one of the following methods.
•AutomaticSearch: Searchesfortheprojectorautomatically.
- ManualSearch: SearchesfortheprojectorbasedontheSSIDselectedfromalist.
•Profile: Searchesfortheprojectorbasedonapreviouslysavedprofile.
- Select the projectory you want to connect to, and then click Connect.
WhenProjectorKeywordissettoOnfromtheprojector,thekeywordentryscreenisdisplayed.
6.Entertheprojectorkeywordandpassphrase.
- WindowsXPandMacOSX:EnterthekeyworddisplayedontheLANstandbyscreen, and then clickOK.
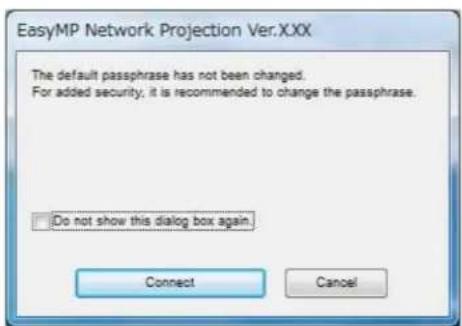
- Windows Vista, Windows7, and Windows8: Enter the keyword displayed on the LAN stand by screen, and then click OK. When the following dialog box is displayed, enter the pass phrases set on the projector, and then click Connect.
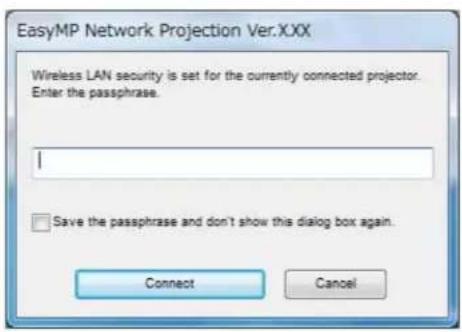
Note: If you select Save the passphrase and don't show this dialog box again, the projector's SSIDandpassphrasearesavedonthecomputerandthisdialogboxisnotdisplayedthenext timeyouconnect.Youdonothavetoenterthepassphraseagain.
If the projector's passphrase has not been changed from the default, the following dialog box is displayed. Changethe passphrase from the projector's Network menu.
Whenaconnectionisestablished, thecomputerscreenisprojected. The following EasyMPNetwork Projectiontoolbarisdisplayed on the computerscreen.

Note: When a connection is established, the input source for the projector automatically switches to the LANsourceifnothersignalisbeinginput.IftheinputsourcedoesnotautomaticallyswitchtotheLAN source,presstheLANbutton.
Parenttopic:ConnectionMethods
Relatedtasks
SettingUpaProjectortoConnectinQuickConnectionMode
SearchingforNetworkProjectorsAutomatically
SearchingforNetworkProjectorsbySpecifyinganSSID,IPAddress,orProjectorName
PerformingaProfileSearch
ConnectingtheProjectorandaComputeroveraNetworkSystem(Wireless)
When your projector is setup as indicated below, you can connect the project to an existing network system and project the computer's screen over then network.
• ThewirelessLANunitisinstalledintheprojector.
• The projector's connection methodissetto Advanced.
Note: Makesureyouconnectacomputertothenetwork.
- PresstheLANbuttonontheremotecontrol.
The LAN stand by screen is projected.
![[LAN] Projector Name : EB***** SSID : IP Address ↓ : IP Address («¶») : Keyword :](/content/2026/05/945870/images/d58be76ec5fe4144a0131e0b38a04914f85e1a0f4737cf2672ec9da10111bdc1.jpg)
2.StartEasyMPNetworkProjection.
- Windows XP, Windows Vista, and Windows 7: Click Start, select Programs (or All Programs), EPSON Projector, EasyMP Network Projection, and then click EasyMP Network Projection Ver.X.XX.
-
Windows 8: Navigate to the Start screen and select EasyMP Network Projection Ver.X.XX.
• Mac OS X: Double-click EasyMP Network Projection from the Applications folder. -
SelectAdvancedConnectionMode, and then click OK.
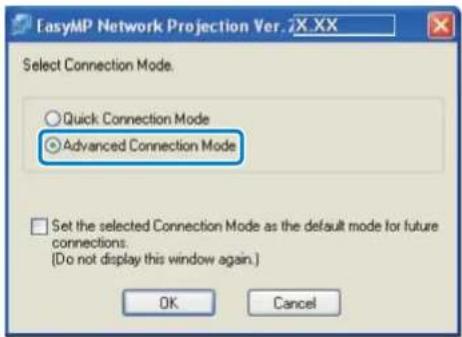
Theprojectorsearchresultsaredisplayed.
- If the projector you want to connect this not displayed in these search results, search for it using one of the following methods.
•AutomaticSearch: Searchesfortheprojectorautomatically.
- ManualSearch: SearchesfortheprojectorbasedonaspecifiedIPaddressorprojectorname.
•Profile: Searchesfortheprojectorbasedonapreviouslysavedprofile.
- Select the projectory you want to connect to, and then click Connect.
WhenProjectorKeywordissettoOnfromtheprojector,thekeywordentryscreenisdisplayed.
6.EnterthekeyworddisplayedontheLANstandbyscreen,andthenclickOK.
Whentheconnectioniscomplete, thecomputerscreenisprojected. The following EasyMPNetwork Projectiontoolbarisdisplayed on the computerscreen.

Note: When a connection is established, the input source for the projector automatically switches to the LANsourceifnothersignalisbeinginput.IftheinputsourcedoesnotautomaticallyswitchtotheLAN source,presstheLANbutton.
Parenttopic:ConnectionMethods
Relatedtasks
SettingUpaProjectortoConnectinAdvancedConnectionMode(Wireless)
SearchingforNetworkProjectorsAutomatically
SearchingforNetworkProjectorsbySpecifyinganSSID,IPAddress,orProjectorName
PerformingaProfileSearch
ConnectingtheProjectorandaComputeroveraNetworkSystem(Wired)
When your projector is setup as indicated below, you can connect the project to an existing network system and project the computer's screen over then network.
•ALANcableisconnectedtotheprojector.
• The projector's connection methodissetto Advanced.
Note: Makesureyouconnectacomputertothenetwork.
- PresstheLANbuttonontheremotecontrol.
TheLANstandbyscreenisprojected.
![[LAN] Projector Name : EB***** SSID : IP Address ↓ : IP Address (1) Keyword :](/content/2026/05/945870/images/f1dc2f5c47150a04c46ca6c1296721ecf774f3ae0f7a359227a551146c8eb202.jpg)
2.StartEasyMPNetworkProjection.
- Windows XP, Windows Vista, and Windows 7: Click Start, select Programs (or All Programs), EPSON Projector, EasyMP Network Projection, and then click EasyMP Network Projection Ver.X.XX.
- Windows 8: Navigate to the Start screen and select EasyMP Network Projection Ver.X.XX.
• Mac OS X: Double-click EasyMP Network Projection from the Applications folder.
3. Select Advanced Connection Mode, and then click OK.
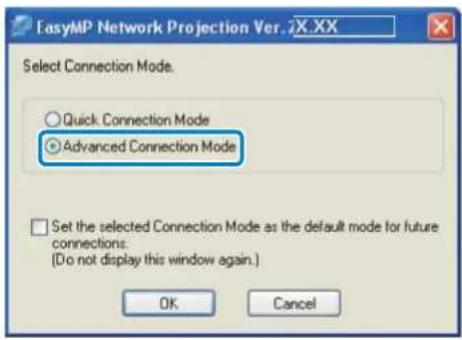
Theprojectorsearchresultsaredisplayed.
- If the projector you want to connect to is not displayed in these results, search for it using one of the following methods.
•AutomaticSearch: Searchesfortheprojectorautomatically.
- ManualSearch: SearchesfortheprojectorbasedonaspecifiedIPaddressorprojectorname.
•Profile: Searchesfortheprojectorbasedonapreviouslysavedprofile.
- Select the projectory you want to connect to, and then click Connect.
WhenProjectorKeywordissettoOnfromtheprojector,thekeywordentryscreenisdisplayed.
6.EnterthekeyworddisplayedontheLANstandbyscreen,andthenclickOK.
Whentheconnectioniscomplete, thecomputerscreenisprojected. The following EasyMPNetwork Projectiontoolbarisdisplayed on the computerscreen.

Note: When a connection is established, the input source for the projector automatically switches to the LANsourceifnothersignalisbeinginput.IftheinputsourcedoesnotautomaticallyswitchtotheLAN source,presstheLANbutton.
Parenttopic:ConnectionMethods
Relatedtasks
SettingUpaProjectortoConnectinAdvancedConnectionMode(Wired)
SearchingforNetworkProjectorsAutomatically
SearchingforNetworkProjectorsbySpecifyinganSSID,IPAddress,orProjectorName
PerformingaProfileSearch
ChangingtheProjectorSearchMethod
Youcanselectasuitablemethodtosearchforaprojectordependingonthestatusorlocationoftheprojectoryuwanttoconnectto.
SearchMethods
SearchingforNetworkProjectorsAutomatically
SearchingforNetworkProjectorsbySpecifyinganSSID,IPAddress,orProjectorName
SearchingforNetworkProjectorsUsingaProfile
Parenttopic: ConnectingtotheProjectorandProjectingImages
SearchMethods
Youcanuseoneofthefollowingmethodstosearchfortheprojectoryouwanttoconnectto.Choosethe bestmethoddependingonyourenvironment.
•SearchingforNetworkProjectorsAutomatically
Youcanautomaticallysearchforavailableprojectorsonthenetwork.Searchresultsdifferdepending ontheconnectionmodeyouuse.
- QuickConnectionMode: Display the SSID for available projectors.
- AdvancedConnectionMode: Displaysavailableprojectorsonthenetwork.Searchesareonly performedonthesamesubnet.Projectorsondifferentsubnetsarenotdisplayedinthesearch results.
- SearchingforNetworkProjectorsbySpecifyinganSSID,IPAddress,orProjectorName
If the projector you want to connect to is not found automatically, you can search for the target projector by using the SSID, IP address, or a projector name. By using Advanced Connection Mode, you can search for projectors at remote locations on different subnet.
- SearchingforNetworkProjectorsUsingaProfile
Youcansavenetworkprojectorinformationasaprofile,andthenspecifytheprofiletosearchforthe sameprojectorinsteadofprovidingprojectordetailseachtimeyousearch.Forexample,bycreatinga groupofprofilesforeachplacewhereaprojectorissetupandmanagingthemwithfolders,thetarget projectorcanbefoundquickly.
Parenttopic: Changing the Projector Search Method
SearchingforNetworkProjectorsAutomatically
Youcanautomaticallysearchforavailableprojectorsonthenetwork,andthenprojectimagesbysimply selectingtheprojector.
ClicktheAutomaticsearchbuttontostartasearch. Thesearchtakesabout30seconds.
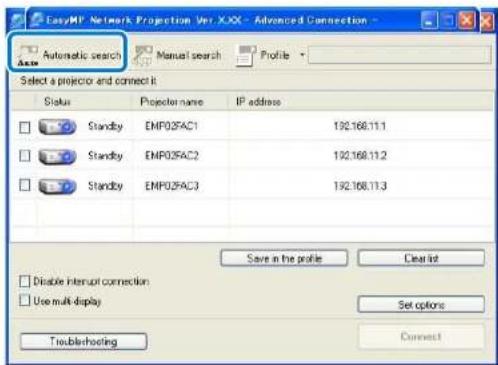
Thesearchresultsaredisplayed.
If you cannot find any projectors, try one of the other search methods.
Parenttopic: Changing the Projector Search Method
Relatedconcepts
SearchMethods
Relatedtasks
SearchingforNetworkProjectorsbySpecifyinganSSID,IPAddress,orProjectorName
PerformingaProfileSearch
SearchingforNetworkProjectorsbySpecifyinganSSID,IPAddress,orProjectorName
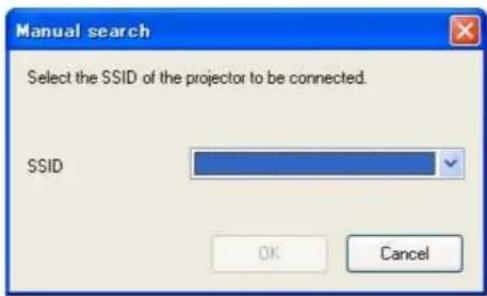
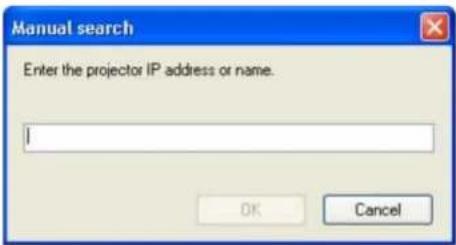
If theprojectoryouwanttoconnecttoisnotfoundautomatically,youcansearchforthetargetprojector byspecifyingtherelevantdetails.InQuickConnectionMode,youcansearchfortheprojectorbyusing anSSID.InAdvancedConnectionMode,youcansearchforaprojectorbyusinganIPaddressora projectorname.
- Click Manualsearch on the following screen.
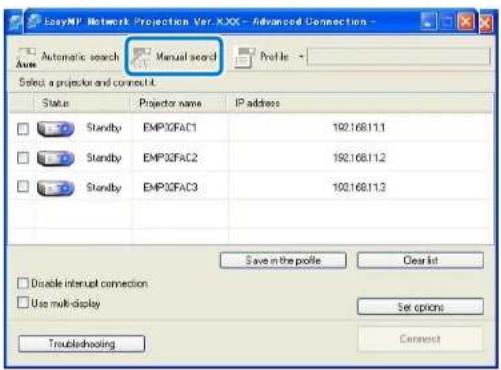
- Specifyoneofthefollowingitems, andthenclickOK.
- Quick Connection Mode: Select the SSID for the projector you want to connect to from the list.
- AdvancedConnectionMode: EntertheIPaddressortheprojectornamefortheprojectoryou wanttoconnectto.
Thesearchresultsaredisplayed.
Parenttopic: ChangingtheProjectorSearchMethod
SearchingforNetworkProjectorsUsingaProfile
Youcansavenetworkprojectorinformationasaprofile,andthenspecifytheprofiletosearchforthe sameprojectorinsteadofspecifyingtherelevantdetailseachtime.
Profile
PerformingaProfileSearch
MakingaProfile
ManagingaProfile
Parenttopic: Changing the Projector Search Method
Profile
Youcansaveinformationforanetworkprojectorasaprofile.Aprofileisafilecontainingallofthe projector'sinformation,suchastheprojectorname,IPaddress,andSSID.Byusingaprofile,youcan easilysearchforsavedprojectorsinsteadofprovidingprojectordetails.
Parenttopic: SearchingforNetworkProjectorsUsingaProfile
PerformingaProfileSearch
Youcanspecifytheprofiletosearchforthesavedprojectorinsteadofprovidingprojectordetailseach timeyousearch.
- ClickProfileonthefollowingscreen.
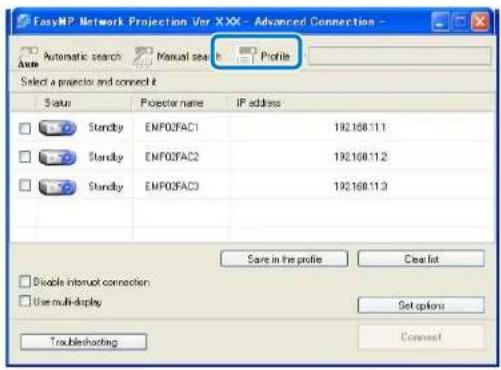
Note: Ifnoprofilesarecreated, you cannot select Profile.
- Select the projectory you want to connect to from the list.
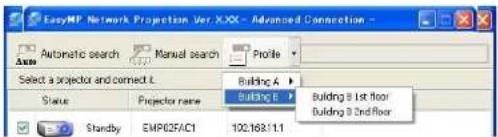
Thesearchresultsaredisplayed.
Parenttopic: SearchingforNetworkProjectorsUsingaProfile
MakingaProfile
Aftersearchingforaprojector,youcansavetheprojectordetailsasaprofileusingamemorablename thatyoucansearchforeasilylater.
- While the projector is displayed on the following screen, click Save in the profile.
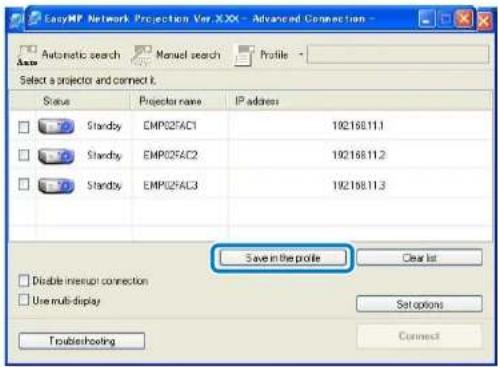
- EnteraProfilename, andthenclickAdd.
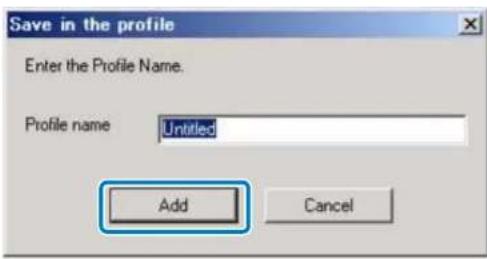
- Perform the following operations as necessary.
• Anoverwriteconfirmationscreenisdisplayed: If you are prompted to confirm whether or not you want to overwrite, select Saveastosaveaprofile with a different name.
- Afolderselectionscreenisdisplayed: If you have created a folder for profiles, one of the following screens is displayed. After entering the Profile name and selecting the Save in destination, click Add.
Windows:
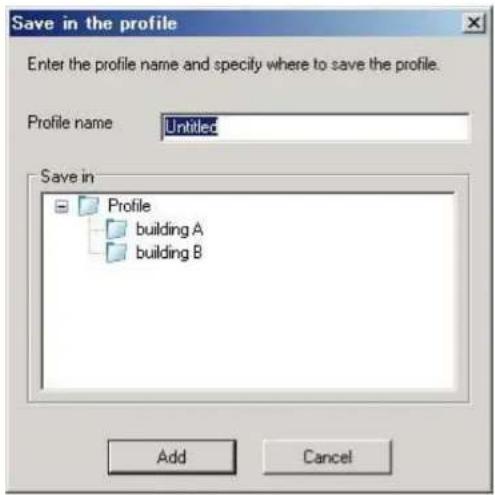
MacOSX:
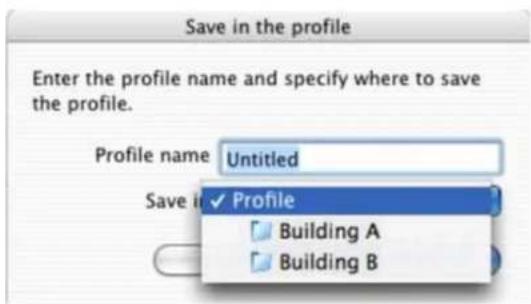
Theprojectorinformationissavedintheprofile.
Parenttopic: SearchingforNetworkProjectorsUsingaProfile
ManagingaProfile
Youcanchangethenameandtheorganizationofyourprofiles.
- ClickSetoptionsonthefollowingscreen.
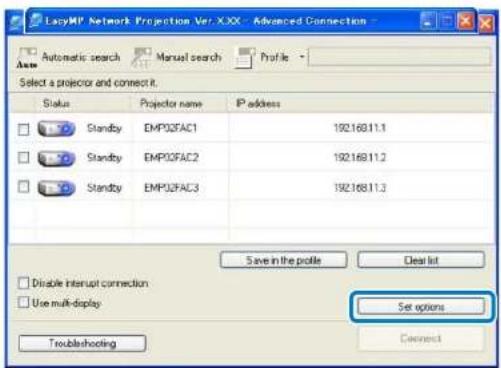
TheSetoptionsscreenisdisplayed.
2.ClickEditprofile.
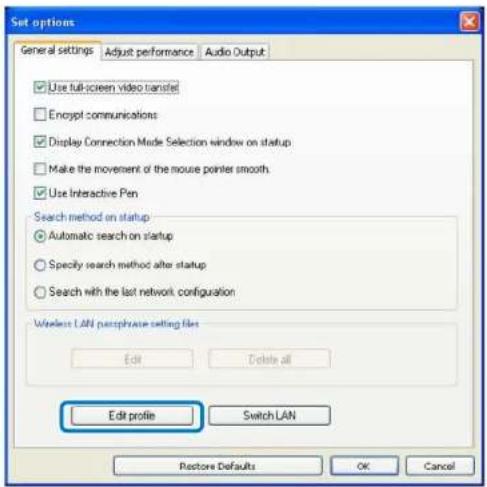
TheEditprofilescreenisdisplayed.
- Edit the profiles as necessary.
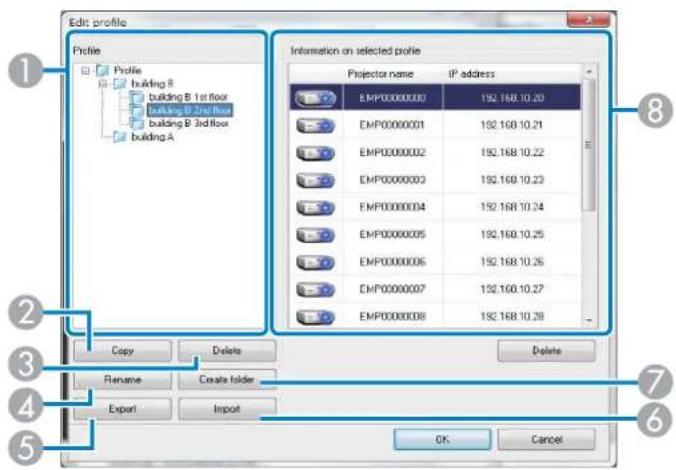
| 1Displaystheprofiles.Youcandraganddropprofilesandfolderstochangethefolder structure. |
| 2Duplicatestheprofile.Thecopiedprofileissavedinthesamefolderastheoriginalwiththe samename. |
| 3Deletestheprofileandthefolder. |
| 4DisplaystheRenamedialogboxtorenamethefolderortheprofile.Youcanenterupto32 charactersintheRenamedialogbox. |
| 5Exportstheprofile.Exportedprofilescanbeusedasbackupfiles.Youcanthenimportthem onanothercomputer. |
| 6Loadsanexportedprofile. |
| 7Createsanewfolder. |
8Displaystheprojectorssavedintheprofile. Todeleteaspecificprojectorfromtheprofile, selecttheprojectorandthenpresstheDeletebutton. Whenallprojectorinformationhasbeen deleted, theprofileisalsodeleted.
4.ClickOK.
YoureditsaresavedandtheEditprofilescreencloses.
Parenttopic: SearchingforNetworkProjectorsUsingaProfile
ControllingtheProjectedDisplay
Followtheseinstructionstousethetoolbartocontrolthescreenbeingprojected.
HidingComputerOperations
SwitchingtheInputSource
Parenttopic: ConnectingtotheProjectorandProjectingImages
HidingComputerOperations
You can hide your computer operations from your audience while giving a presentation by stopping, pausing, or muting the projection.
- MakesurethetoolbardisplayissettoFull.

- If you are connected to multiple projectors, click the button on the toolbar and select the projector you want to control.
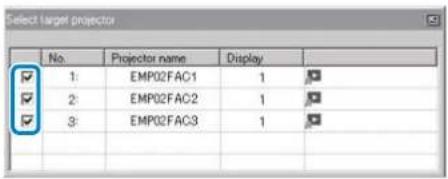
- Performoneofthefollowingoperations.
-Stop:Clickthebuttononthetoolbar. Theprojectedimagestops.Ablackscreenisprojectedwhilestopped.
- Pause: Click the button on the toolbar. The projected image pauses. The paused image is projected.
• A/VMute: Clickthebuttononthetoolbar, and then click the button on the tool bar that is displayed. The audio and video turn off. The logo set for the projector is projected while using A/V Mute, if available.
- Toreturntotheprojectedimage, performoneofthefollowingoperations.
- StoporPause: Clickthebuttononthetoolbar. - A/VMute: Clickthebuttonagain.
Parenttopic: Controlling the Projected Display
SwitchingtheInputSource
When an others signals being input to the projector while projecting over an network, you can change the inputs from the tool bar.
- MakesurethetoolbardisplayissettoFull.

- If you are connected to multiple projectors, click the button on the toolbar and select the projector you want to control.
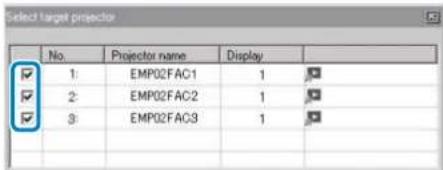
-
Clickthebuttononthetoolbar.
-
Performoneofthefollowingoperations.

Parenttopic: Controlling the Projected Display
FinishingProjectingImages
Youcanfinishprojectingimagesbyusingthetoolbar.
Clickthebuttonlodisconnect.ThecomputerandtheprojectoraredisconnectedandtheLANstandbyscreenisprojected.ThesearchandconnectscreenisdisplayedinEasyMPNetworkProjection software.
Parenttopic: ConnectingtotheProjectorandProjectingImages
UsingAdditionalFunctions
FollowtheseinstructionstouseadditionalEasyMPNetworkProjectionfunctionsthatmaybeuseful duringameetingorpresentation.
ChangingtheComputerProjectionSource
ProjectingOnlyaPowerPointSlideShow
ProjectingMovies
ProjectingImagesUsingtheMulti-ScreenDisplayFunction
ProjectingOneComputerScreenfromMultipleProjectors
ChangingtheComputerProjectionSource
You can chan gethe computer from which you are projecting which allows you to change presenters during meetings,forexample.
Note: If a connection is made while Disable interrupt connection is set on the search and connect screen, the connection is not switched to another computer.
1.StartEasyMPNetworkProjectiononthecomputeryouwanttoprojectfrom.
- Followstandardprocedure to connect the projector and a computer.
The computer that is currently connected, disconnected, and the projector connect to the computer that is currently trying to connect.
Parenttopic: Using Additional Functions
Relatedtasks
ConnectingtheProjectorandaComputerDirectlyUsingWirelessCommunication
ConnectingtheProjectorandaComputeroveraNetworkSystem(Wireless)
ConnectingtheProjectorandaComputeroveraNetworkSystem(Wired)
ProjectingOnlyaPowerPointSlideShow
ByusingPresentationMode,youcanprojectonlythePowerPointslideshowrunningonyourcomputer.Youcanstartpresentationwithoutdisplayinganyotherdistractingcomputercontent.WhileusingPresentationMode,ablackscreenisprojectedwhenthePowerPointslideshowisnotplaying.
Note: PresentationModealsoworksinKeynotewithMacOSX.
- MakesurethetoolbardisplayissettoFull.

- If you are connected to multiple projectors, click the button on the toolbar and select the projector you want to control.
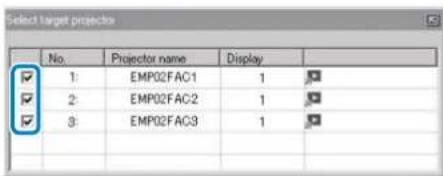
-
Clickthebuttononthetoolbar.
-
RunthePowerPointslideshowonyourcomputer. ThePowerPointslideshowisprojected.
-
TostopPresentationMode, clickthebuttonagain.
Parenttopic: Using Additional Functions
ProjectingMovies
YoucanprojectmoviessmoothlybyusingMovieSendingMode.
SupportedMovieFiles
UsingMovieSendingMode
Parenttopic: Using Additional Functions
SupportedMovieFiles
The following movie file types are supported.
Note: You cannot project files protected by digital rights management (DRM).
| FileTypeMovieCode(Extension) | CodecAudioCodecRecordingQuality | ||
| .mpgMPEG-2MF.pegYoucanplayMPEGcontents | EG-1Layer1/2Maximumframerate:withoutaudio.LinearPCMandMaxiAC-3arenotsupported.1280×720 | 30fpsmumresolution: | |
| .mp4MPEG-4AS | PMPEG-4H.264/MPEG-4AVCAAC-LC | ||
| .wmvWMV9WMA.asf |
Parenttopic: ProjectingMovies
UsingMovieSendingMode
YoucansendmoviefilesdirectlytotheprojectorbyusingMovieSendingMode.Thisallowssmoother playbackofmoviesthanbyprojectingthemfromanotherapplicationonyourcomputer.
Youcanalsoselectmultiplefilesandplaythemrepeatedlyfromfirsttolast.
Note:
• Some projectors may not support Movie Sending Mode.
- YoucanuseMovieSendingModetosendamovietoasingingleprojector. YoucannotsendamovietomultipleprojectorsatthesametimeusingMovieSendingMode.
- The image and sound mayskiporstop depending on the communication method and electromagnetic wave conditions.
- MakesurethetoolbardisplayissettoFull.


- Clickthebuttononthetoolber.
Theprojectorselectionscreenisdisplayed.
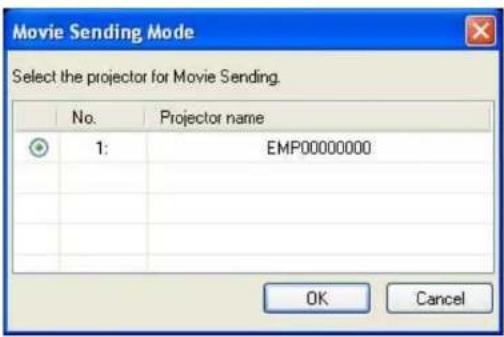
- Select the projector, and then click OK.
TheMovieSendingModescreenisdisplayed.
4.ClickSelectFile.
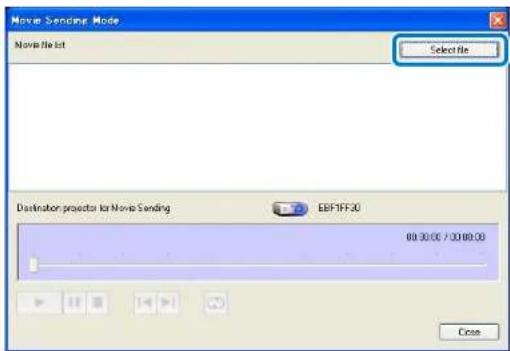
5. Select themoviefileyouwanttoplay, and then click Open.
![Open Look in Removable Disk (F:) Movie1 Movie2 Movie3 Movie4 My Recent Documents Desktop My Documents My Computer My Network File name: Movie1 Files of type: Movie file ["mpcg,"mpg,"sp4,"wavr,"adf] Open Cancel](/content/2026/05/945870/images/baecfa47d4abee34ddbea4edb464a2827eaa57b044c9ed4ab6590862a217980e.jpg)
TheMovieSendingModescreenisdisplayedagain. TheselectedfileisdisplayedintheMoviefile list.
If you click Select file again, the Movie file list currently displayed is cleared, and then only the files youselectlateraredisplayedinthelist.
- Controlmovie playback using the Movie Sending Modescreen.
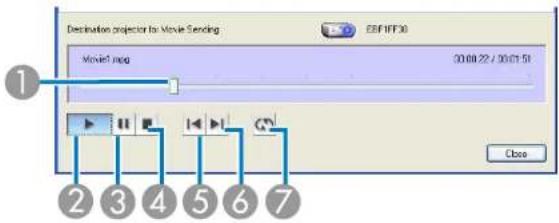
| 1Dis | playsthecurrentpointinthemoviefile.Youcandraganddroptheslidertothepointwhere youwanttostartplaying. |
| 2Pl | ysthefile. |
| 3Pa | uses playback. |
| 4St | ops playback. |
| 5Pl | ysthecurrentfilefromthebeginning. |
| 6Pl | ysthenextfilefromthebeginning. |
| 7Pl | aysrepeatedlyfromthefirstfileinthelist.Youcannotrepeatonespecificfilewhenthereare multiplefilesinthelist. |
7.ToexitMovieSendingMode,clickClose.
Parenttopic: ProjectingMovies
ProjectingImagesUsingtheMulti-ScreenDisplayFunction
By using themulti-screendisplayfunction, you can project different images fromuptofour projectors that are connected to one computer. This allows youtoproject complex data, such as business report, in an extra-widelandscape format.
Multi-ScreenDisplayExamples
SettingUpMulti-ScreenDisplay
Parenttopic: Using Additional Functions
Multi-ScreenDisplayExamples
Byusingthemulti-screendisplayfunction,youcanprojectimagesinthefollowingdisplayarrangements.
Note:
- ForWindows, you can set virtual display drivers and project each image from the projector. Virtual display drivers are not available for Windows Vista, Windows7, and Windows8.
- ForMacOSX,youmustconnectanexternalmonitortothecomputertousethemulti-screendisplay function.
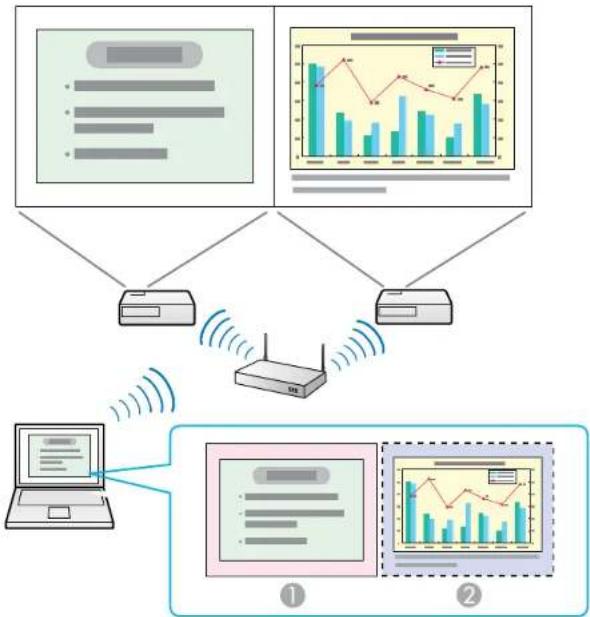
If you want to project twodifferentimages from your computer to two projectors, you can assign the additional display as shown below.
flowchart
graph TD
    A["Device 1"] --> D["Router"]
    B["Device 2"] --> D["Router"]
    D["Router"] --> E["Laptop"]
    style A fill:#f9f,stroke:#333
    style B fill:#bbf,stroke:#333
    style D fill:#dfd,stroke:#333
    style E fill:#dfd,stroke:#333
    subgraph Device 1
        F["Document ①"]
        G["Document ②"]
    end
    subgraph Device 2
        H["Document ②"]
        I["Document ②"]
    end
| 1Actualmonitorimage:PowerPointfile |
| 2Additionaldisplayimage:Excelfile |
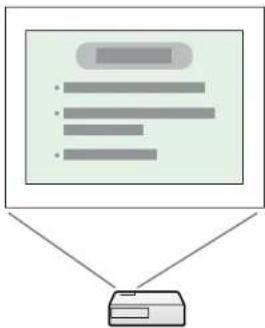
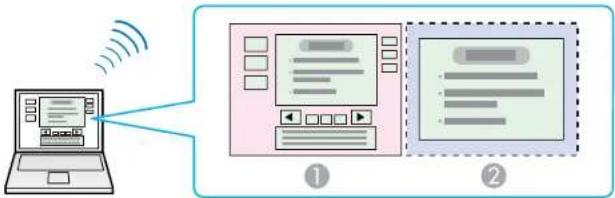
If you want to access twodifferentimages or viewson your computer but project only one image to the projector, you can assign the additional display as shown below.
flowchart
graph TD
    A["Input Step 1"] --> B["Output Box"]
    C["Input Step 2"] --> B
    D["Input Step 3"] --> B
    E["Input Step 4"] --> B
    F["Input Step 5"] --> B
flowchart
graph LR
    A["Laptop"] -->|Wireless Signal| B["Device ①"]
    B --> C["Device ②"]
| 1Actualmonitorimage:PowerPointfilepresentertools |
| 2Additionaldisplayimage:SlideshowusingaPowerPointfile |
Parenttopic: ProjectingImagesUsingtheMulti-ScreenDisplayFunction
SettingUpMulti-ScreenDisplay
Followtheseinstructionstosetupmulti-screendisplay.Ifyouconnectedanadditionalexternalmonitor toyourcomputer,youcanskipthestepsforenablingthevirtualdisplaydriver.
EnablingtheVirtualDisplayDriver(Windows)
ArrangingtheMulti-ScreenDisplay(Windows)
ArrangingtheMulti-ScreenDisplay(MacOSX)
ProjectingImagestotheArrangedMulti-ScreenDisplay
Parenttopic: ProjectingImagesUsingtheMulti-ScreenDisplayFunction
EnablingtheVirtualDisplayDriver(Windows)
Beforeusingthemulti-screendisplayfunction,youneedtoenablethevirtualdisplaydriverforWindows.
Note: If you have already enabled the virtual display while installing EasyMP Network Projection, you do notneedtoenableitagain.
- Click Start, select Programs (or All Programs), EPSON Projector, EasyMP Network Projection, and then click Add-Remove Virtual Display.
TheAdd-RemoveVirtualDisplayscreenisdisplayed.
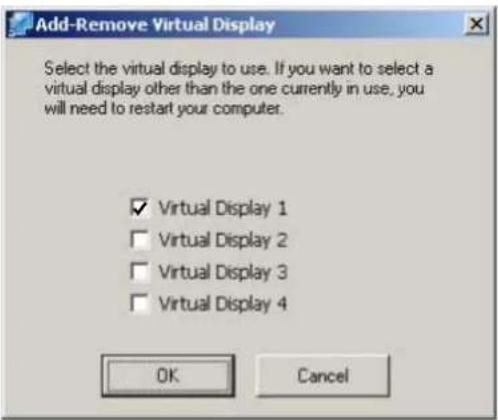
- Selectthevirtualdisplayyouwanttouse. Whensettingmultiplevirtualdisplays, selectasmany displaysasnecessary.Anyoneofthedisplayscanbeselected.
3.ClickOK.
The virtual display drivers are enabled and the display may flicker. When the procedure is complete, the Add-Remove Virtual Displays screen closes.
Note: If the virtual display driver has been enabled so that the mouse pointer can be moved outside the limitsofthescreen,theremaybeoccasionswhenyoulosetrackofthelocationofthepointer.Ifyouare notusingavirtualdisplay.clearthevirtualdisplaycheckboxontheAdd-RemoveVirtualDisplayscreen sothatthemousepointermovesbackinsidethescreen'sdisplayarea.Tosubsequentlyusemulti-screendisplayfunctionagain,placeacheckmarknexttotherequireddisplayontheAdd-Remove VirtualDisplayscreen.
Parenttopic:SettingUpMulti-ScreenDisplay
ArrangingtheMulti-ScreenDisplay(Windows)
You can arrange the position of each display. If you are using a virtual display, enable the virtual display before arranging them multi-display.
-
If you use an external display, connect it to the computer.
-
Check the following items when connecting over wireless LAN and modify these settings as necessary. If the following items are not set correctly, them multi-screen display function cannot be used.
- TheSSIDforthecomputerandeachprojectormustbethesame.(ForQuickConnectionMode)
- ThewirelessLANsystemforthecomputerandeachprojectormustbethesame.
-
Click Start, select Programs (or All Programs), EPSON Projector, EasyMP Network Projection, and then click EasyMP Network Projection V2.XX to start EasyMP Network Projection.
-
Select Quick Connection Mode or Advanced Connection Mode, and then click OK.
Note: When you connect to multiple projectors to project different images from each projector, select AdvancedConnectionMode.
5.SelectUsemulti-display.
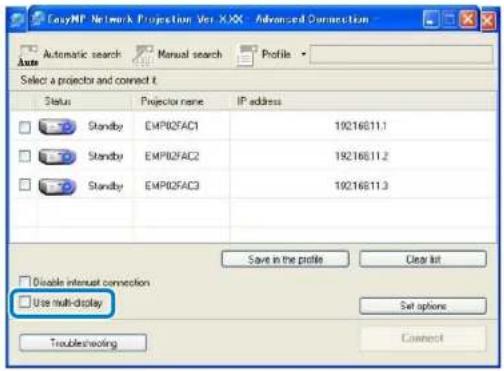
Display layout and Display properties options are added at the bottom of the screen.
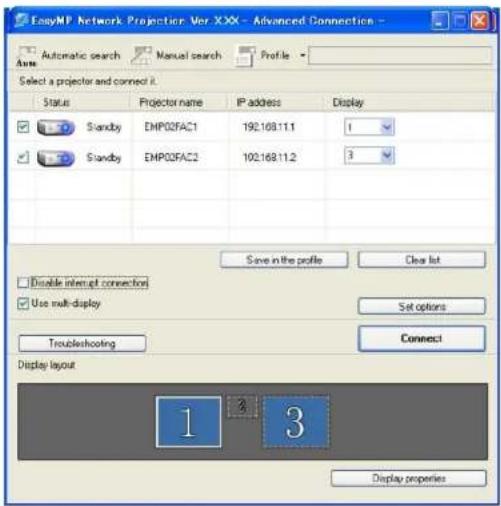
6.ClickDisplayproperties.
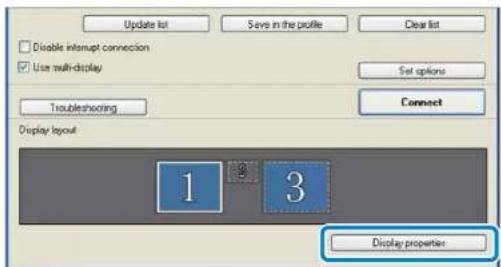
TheDisplayPropertiesscreenisdisplayed.
7.ClicktheSettingstab.
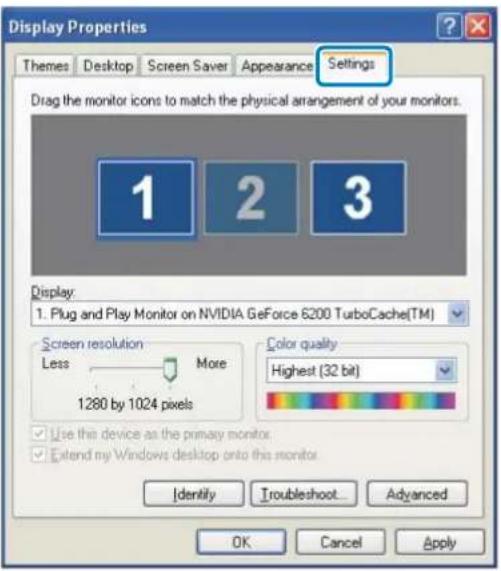
- Dragthedisplayedmonitoriconandplaceitwhereyouwanttheadditionalimagetoappear. In the following example, the actual monitor(1) is placed on the left, while the additional monitor(3) is placed on the right.
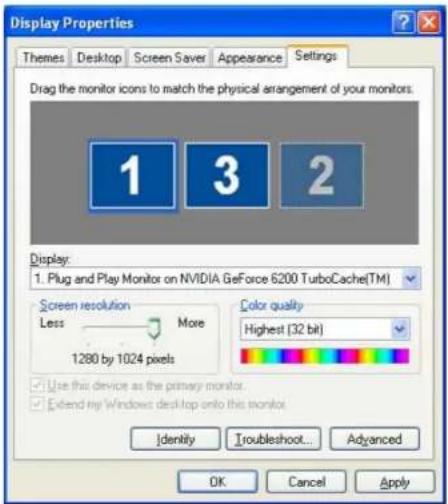
Note:
- When the PChasmultipledisplayoutputterminals, then numbers assigned to the virtual terminals are sequential to those of the physical terminals.
- When an external monitor is connected as a secondary monitor, the image forth that screen cannot be projected.
- Depending on the hardware, then number for these secondary monitor may not be "2". When placing them monitor icons, click the icon to check that the display monitor type is not these secondary monitor.
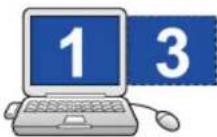
Whenthemonitoriconshavebeenarranged,displaysareconnectedasshowninthisimage.
9.ClickOKtoclosetheDisplayPropertiesscreen.
Parenttopic:SettingUpMulti-ScreenDisplay
ArrangingtheMulti-ScreenDisplay(MacOSX)
Youcanarrangethepositionofeachdisplay.
-
Connectanexternalmonitortothecomputer.
-
Check the following items when connecting over wireless LAN and modify these settings as necessary. If the following items are not set correctly, them multi-screen display function cannot be used.
•TheSSIDforthecomputerandeachprojectormustbethesame.(ForQuickConnectionMode)
- ThewirelessLANsystemforthecomputerandeachprojectormustbethesame.
-
Double-click EasyMP Network Projection from the Applications folder to start EasyMP Network Projection.
-
Select Quick Connection Mode or Advanced Connection Mode, and then click OK.
Note: InQuickConnectionMode, you cannot connect to multiple projectors and project different image to each projectors.
5.SelectUsemulti-display.
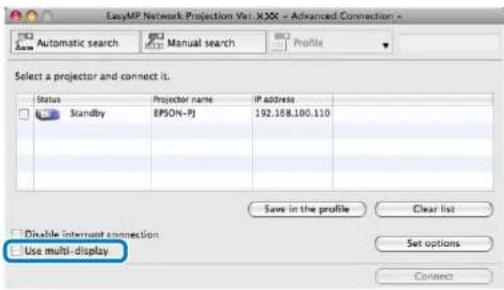
Display layout and Display preferences options are added at the bottom of the screen.
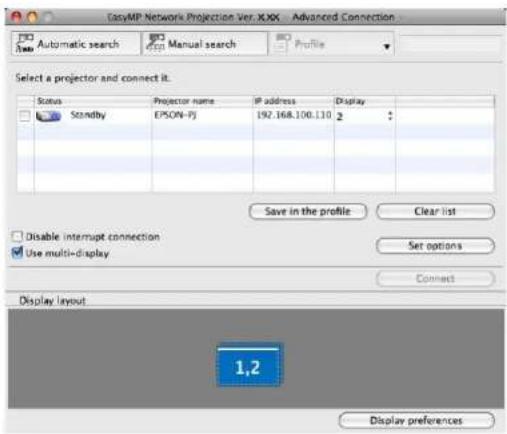
6.ClickDisplaypreferences.
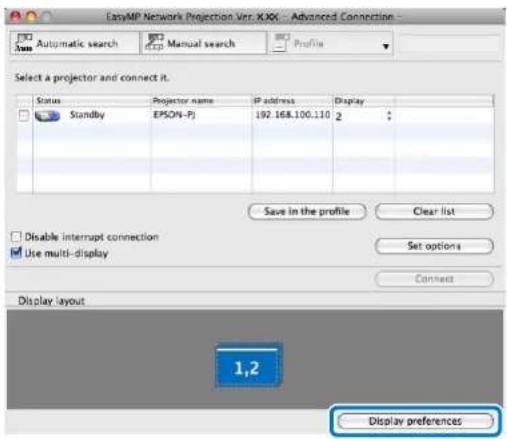
TheDisplaysettingscreenisdisplayed.
7.ClickArrangement.
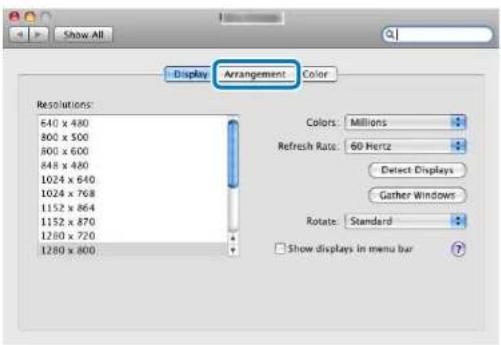
8.ClearMirrorDisplays.
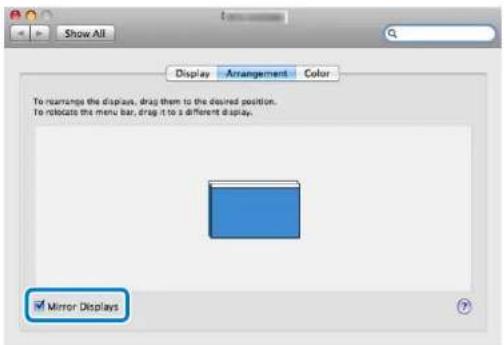
9. Dragthedisplayedmonitoriconandplaceitwhereyouwanttheadditionalimagetoappear.
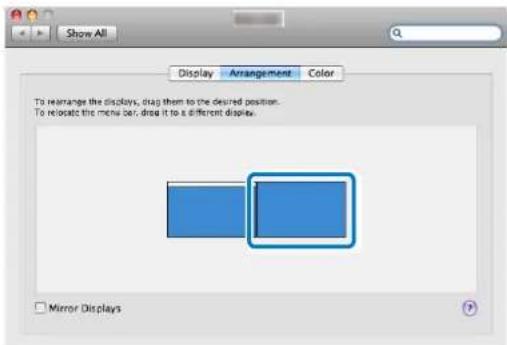
10.ClosetheDisplaysettingscreen.
Parenttopic:SettingUpMulti-ScreenDisplay
ProjectingImagestotheArrangedMulti-ScreenDisplay
Aftersettingupmulti-screendisplay,youcanassigntheimagesyouwanttoprojecttoeachscreen.
- Openthefileyouwanttoproject.
- Dragthewindowtothedesireddisplay, and assignwheretheimageistobeprojected.
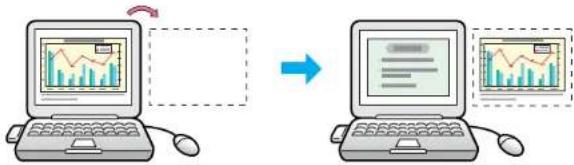
flowchart
graph LR
    A["Left Laptop"] -->|Arrow| B["Right Laptop"]
    style A fill:#f9f,stroke:#333
    style B fill:#bbf,stroke:#333
- Select the projector and the number you want to assign from Display to set which image you want to projectfromwhichprojector.
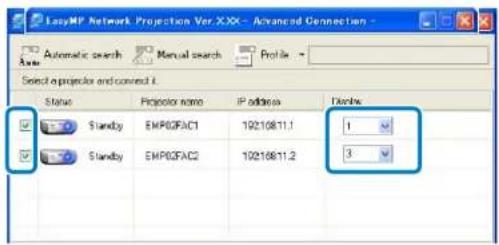
4.ClickConnect.
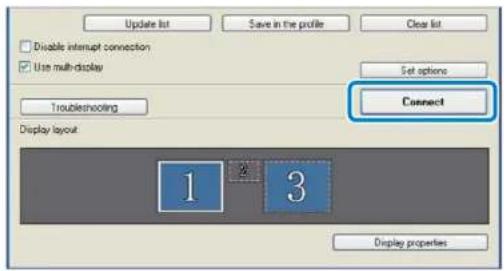
The image assigned to each projector is projected.
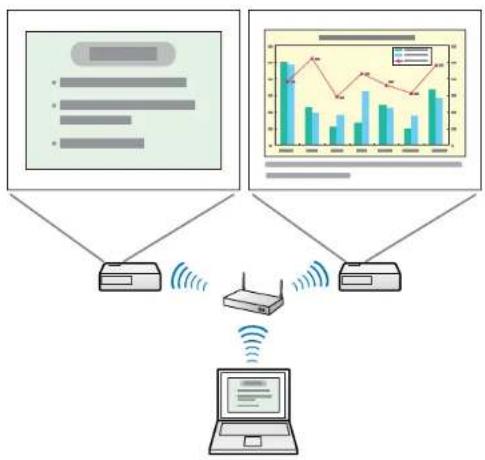
flowchart
graph TD
    A["Device 1"] --> B["Router"]
    C["Device 2"] --> D["Router"]
    B --> E["Laptop"]
    D --> E
    style A fill:#f9f,stroke:#333
    style C fill:#bbf,stroke:#333
    style B fill:#dfd,stroke:#333
    style D fill:#dfd,stroke:#333
    style E fill:#dfd,stroke:#333
Note: If you use a virtual display on Windows, you cannot view the image being sent to a virtual display on the computer. To adjust the image on the virtual display, check the projected image. To
performmouse-basedoperationsonthevirtualdisplay,movethemousepointerinthedirectionof thevirtualdisplaysothatthepointerappearsonthevirtualdisplay.
- To end projection formula-screen display, click Disconnectonthetoolbar.
Parenttopic:SettingUpMulti-ScreenDisplay
ProjectingOneComputerScreenfromMultipleProjectors
Youcanprojectonecomputerscreenfromuptofourprojectorssimultaneously.
When you connect to the projectors in Quick Connection Mode, you need to set the same SSID for all of the projectors you want to connect to.
-
StartEasyMPNetworkProjection.
-
Windows XP, Windows Vista, and Windows 7: Click Start, select Programs (or All Programs), EPSON Projector, EasyMP Network Projection, and then click EasyMP Network Projection V2.XX.
-
Windows 8: Navigate to the Start screen and select EasyMP Network Projection Ver.X.XX.
• Mac OS X: Double-click EasyMP Network Projection from the Applications folder. -
Select Quick Connection Mode or Advanced Connection Mode, and then click OK.
-
Select the projectors you want to connect to, and then click Connect.
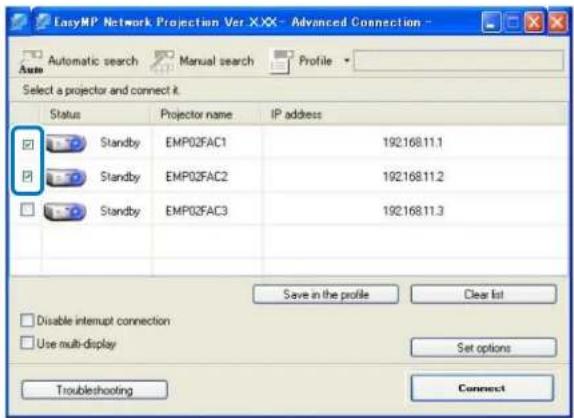
Thesameimageisprojectedfrommultipleprojectors.
Parenttopic: Using Additional Functions
SolvingProblems
SeethefollowingsectionstocheckforsolutionstoproblemsyoumayhaveusingEasyMPNetwork Projection.
SolvingNetworkConnectionProblems
SolvingProblemsDuringProjection
ErrorMessageList
EventIDList
SolvingNetworkConnectionProblems
Trythesesolutionsdependingonyournetworkenvironment.
SolutionsWhenYouCannotConnectUsingQuickConnectionMode
SolutionsWhenYouCannotConnectUsingAdvancedConnectionMode(Wireless)
SolutionsWhenYouCannotConnectUsingAdvancedConnectionMode(Wired)
Parenttopic: Solving Problems
SolutionsWhenYouCannotConnectUsingQuickConnectionMode
When you cannot connect the computer and the projector using QuickConnectionMode, try the followingsolutions.
- Checkthestatusoftheexternaldevicesusedforthenetworkconnectionorthesettingenvironmentof theprojector.
- ConnectthespecifiedwirelessLANunittotheprojectorsecurely.
- Checkforanyobstaclesbetweenthecomputerandprojector,andchangetheirpositiontoimprove communication.Sometimestheindoorenvironmentpreventstheprojectorfrombeingfoundina search.
- Settheradiostrengthforthenetworkdevicestothemaximum.
- Checktheprojector'snetworksettings.
- SettheConnectionModesettingtoQuick.
Go to Network > Network Configuration > Wireless LAN > Connection Mode.
- SetanSSIDthatisdifferentfromtheSSIDfortheaccesspoint.
Go to Network > Network Configuration > Wireless LAN > SSID.
- SetDHCPtoOff.
Go to Network > Network Configuration > Wireless LAN > DHCP or Network > Network Configuration > Wireless LAN > IP Settings > DHCP.
- SetWirelessLANPowertoOn.
Go to Network > Network Configuration > Wireless LAN > Wireless LAN Power.
- When you enable these security setting, set the same pass phrase to the computer and the projector.
- Closenetworksettingsontheprojector, and then return to the LAN stand by screen.
- Checkthecomputer'snetworksettings.
- If the wireless LAN adapter is not installed on your computer, install a wireless LAN card on your computer.
- EnablethewirelessLANsettingorAirPortonyourcomputer.
- Checkthesoftwaresettings.
- Ifanotheruserhasestablishedaconconnectionandtheprojectedimageremainsasitis,youcan connectbyinterruptingthecurrentconnection.
IfaProjectorKeywordissetfortheprojectorbutyoudonotknowthekeyword,restarttheprojector andcheckthekeyworddisplayedontheLANstandbyscreen.
- If you cannot selector change the connection mode, select Display Connection Mode Selection window on startup on the General settings tab from Set options. The select connection mode screen is displayed after restarting the software.
Parenttopic: Solving Network Connection Problems
Relatedreferences
Setoptions-Generalsettings
Relatedtasks
ChangingtheComputerProjectionSource
SolutionsWhenYouCannotConnectUsingAdvancedConnectionMode(Wireless)
When you cannot connect the computer and the projector using Advanced Connection Modeover a wireless network, try the following solutions.
- Checkthestatusoftheexternaldevicesusedforthenetworkconnectionortheprojector'ssetting environment.
- ConnectthespecifiedwirelessLANunittotheprojectorsecurely.
- Checkforanyobstaclesbetweentheaccesspointandthecomputerorprojector,andchangetheir positiontoimprovecommunication.Sometimes,indoorenvironmentspreventtheprojectorfrom beingfoundinasearch.
- Settheradiostrengthforthenetworkdevicestothemaximum.
- SetthelPaddress, the subnetmask, and the gateway address for the access point correctly.
- Checktheprojector'snetworksettings.
- SettheConnectionModesettingtoAdvanced.
Go to Network > Network Configuration > Wireless LAN > Connection Mode.
- Setthecomputer, theaccesspoint, and theprojectortothesameSSID.
Go to Network > Network Configuration > Wireless LAN > SSID.
- Set DHCP to Off. When DHCP is set to On, it may take some time to enter LAN standby status if an available DHCP serverisnotfound.
Go to Network > Network Configuration > Wireless LAN > DHCP or Network > Network Configuration > Wireless LAN > IP Settings > DHCP. - SettheIPaddress,thesubnetmask,andthegatewayaddressfortheprojectorcorrectly.
- SetWirelessLANPowertoOn.
Go to Network > Network Configuration > Wireless LAN > Wireless LAN Power.
- SetthewirelessLANsystemtomeetthestandardssupportedbytheaccesspoint.
Go to Network > Network Configuration > Wireless LAN > Wireless LAN system or Wireless LANSys.
- When you enable these security setting, set the same pass phrase to the access point, the computer, and the projector.
- Closenetworksettingsontheprojector, and then return to the LAN standbyscreen.
- Checkthecomputer'snetworksettings.
- If the wireless LAN adapter is not installed on your computer, install a wireless LAN card on your computer.
- EnablethewirelessLANsettingorAirPortonyourcomputer.
- Connecttotheaccesspointtowhichtheprojectorisconnected.
- Turnoffthefirewall.Orregisterthefirewallasanexception.Ifyoudonotwanttoturnitoffor registeritasanexception,makethenecessarysettingstoopentheports.Theportsusedbythis softwareare"3620","3621",and"3629".
- Checktheaccesspointsettings.
- Setconnectionpermissionattheaccesspointtoallowprojectorstoconnectifanyfunctionsthat blockconnections,suchasMACAddressrestrictionsandportrestrictions,arettotheaccess point.
- Checkthesoftwaresettings.
- Select the network adapter you are using from Switch LAN in Set options. If the computer has multipleLANenvironments, a connection cannot be established unless thenetworkadapter is selected correctly.
- If you cannot find the projector you want to connect using Automatic search, select Manual search to specify the IP address.
- Ifanotheruserhasestablishedaconconnectionandtheprojectedimageremainsasitis,youcan connectbyinterruptingthecurrentconnection.
IfaProjectorKeywordissetfortheprojectorbutyoudonotknowthekeyword,restarttheprojector andcheckthekeyworddisplayedontheLANstandbyscreen.
- If you cannot selector change the connection mode, select Display Connection Mode Selection window on startup on the General settings tab from Set options. The select connection mode screen is displayed after restarting the software.
Parenttopic: Solving Network Connection Problems
Relatedreferences
Setoptions-Generalsettings
Relatedtasks
SearchingforNetworkProjectorsbySpecifyinganSSID,IPAddress,orProjectorName
ChangingtheComputerProjectionSource
SolutionsWhenYouCannotConnectUsingAdvancedConnectionMode(Wired)
When you cannot connect the computer and the projector using Advanced Connection Modeovera wired network, try the following solutions.
- Checkthestatusoftheexternaldevicesusedforthenetworkconnectionortheprojector'ssetting environment.
- Connectthenetworkcablesecurely.
Note:
- Useacommerciallyavailable100BASE-TXor10BASE-TLANcable.
- Topreventmalfunctions, useacategory5orhighershieldedLANcable.
- Checktheprojector'snetworksettings.
- Set DHCP to Off. When DHCP is set to On, it may take some time to enter LAN standby status if an available DHCP server is not found.
Go to Network > Network Configuration > Wired LAN > DHCP or Network > Network Configuration > Wired LAN > IP Settings > DHCP.
- SetthelPaddress, thesubnetmask, and thegatewayaddress for the accesspoint correctly.
- Closenetworksettingsontheprojector, andreturntotheLANstandbyscreen.
- Checkthecomputer'snetworksettings.
- EnableLANsettingsyourcomputer.
Windows: Check Control Panel > System > Hardware > Device Manager.
- Turnoffthefirewall.Ifyoudonotwanttoturnitoff,registerthefirewallasanexception.Makethe necessarysettingstoopentheports.Theportsusedbythissoftwareare"3620", "3621", and "3629".
- Checktheaccesspointsettings.
- Setconnectionpermissionattheaccesspointtoallowprojectorstoconnectifanyfunctionsthat blockconnections,suchasMACAddressrestrictionsandportrestrictions,arettotheaccess point.
- Checkthesoftwaresettings.
- Select the network adapter you are using from Switch LAN in Set options. If the computer has multipleLANenvironments, a connection cannot be established unless then network adapter is selected correctly.
- If you cannot find the projector you want to connect using Automatic search, select Manual search to specify the IP address.
- Ifanotheruserhasestablishedaconconnectionandtheprojectedimageremainsasitis,youcan connectbyinterruptingthecurrentconnection.
IfaProjectorKeywordissetfortheprojectorbutyoudonotknowthekeyword,restarttheprojector andcheckthekeyworddisplayedontheLANstandbyscreen.
- If you cannot selector change the connection mode, select Display Connection Mode Selection window on startup on the General settings tab from Set options. The select connection mode screen is displayed after restarting the software.
Parenttopic: Solving Network Connection Problems
Relatedreferences
Setoptions-Generalsettings
Relatedtasks
SearchingforNetworkProjectorsbySpecifyinganSSID,IPAddress,orProjectorName
ChangingtheComputerProjectionSource
SolvingProblemsDuringProjection
Trythesesolutionsdependingonyoursituation.
SolutionsWhentheComputerScreenisNotDisplayedProperly
SolutionsWhentheScreenisNotProjectedProperly
SolutionsWhenThereisNoAudio
Parenttopic: Solving Problems
SolutionsWhentheComputerScreenisNotDisplayedProperly
If there are any problems with the computers screen, try the following solutions.
- Ifthemousepointerisnotdisplayedonthecomputerscreen, itmayhavebeenmovedontothevirtual display.ClearthevirtualdisplaycheckboxontheAdd-RemoveVirtualDisplayscreen. Themouse pointerreturnstothescreendisplayarea.
- When you cannot find some applications when after you start it, it may be running on the virtual display. Clear the virtual display checkbox on the Add-Remove Virtual Displays screen.
- IfyoustartEasyMPNetworkProjectionwhilePowerPointisrunning,aslideshowmightnotrun.Make surePowerPointisclosedandthenstartEasyMPNetworkProjectionandaslideshow.
- If the PowerPoint slideshow is not displayed where you want when using them multi-screendisplay function, use PowerPoint 2003 or latertomakesettings and set two words more virtual displays. Or, limit then number of display to one before displaying the PowerPoint Slide Show.
Parenttopic: Solving Problems During Projection
Relatedtasks
EnablingtheVirtualDisplayDriver(Windows)
SolutionsWhentheScreenisNotProjectedProperly
If the screen is not projected or there are problems with the project image and the following solutions.
- Whensendingmovies, useAdvancedConnectionModeorsettheWirelessLANsystemto802.11ato useQuickConnectionMode.Dependingontheelectromagneticwaveenvironment,theimageand soundformoviesmaystop.
- If you are using an Microsoft Office application, stop moving the mouse pointer. If you move the mouse pointer continuously, the screen may not be refreshed quickly.
-
Ifthemousepointerflickers, trythefollowingsolutions.
-
Select Make the movement of the mouse pointer smooth on the General settings tab from Set options.
- Clear Transfer layered window on the Adjust performance tab from Set options.
•TheMediaPlayermovieplaybackscreenmaynotbeprojecteddependingonthecomputer.
- Thescreensaverpreviewmaynotbeprojectedproperlydependingonthecomputer.
- If you are connected to multiple projectors, the screen transfers speed may decrease.
- When WEPencryptionisenabled, the screentransferspeedmaydecrease.
Parenttopic: Solving Problems During Projection
Relatedreferences
Setoptions-Generalsettings
Setoptions-Adjustperformance
SolutionsWhenThereisNoAudio
If there is no audiocoming from the projector, try the following solutions.
- Audiocanonlybetransferredtooneprojector. When multiple projectors are connected to one computer, disconnect other projectors and try again.
- Select Output audio from the projector on the Audio Output tab from Set options
Parenttopic: Solving Problems During Projection
Relatedreferences
Setoptions-AudioOutput
ErrorMessageList
When an error occurs, an error message is displayed on your computers screen. Check for your message and follow the instructions heretoclearthe error.
ErrorMessagewhenStartingupEasyMPNetworkProjection
ErrorMessagewhenSearchingforandSelectingProjectors
ErrorMessagewhenProjecting
Parenttopic: Solving Problems
ErrorMessagewhenStartingupEasyMPNetworkProjection
| ErrorMessageRemedy | |
| CannotstartthisapplicationwhileUSBDisplayisClose running.NetworkProjection. | USBDisplayandthenstartEasyMPDooneofthefollowingtocloseUSBDisplay:•Windows:DiscconnecttheUSBcablefromthe projector.•MacOSX:SelectDisconnectfromtheUSB DisplayiconmenuonthemenubarorDock, andthenremovetheUSBcable. |
| CannotstartthisapplicationwhileQuickWirelessClose Connectionisrunning.EasyMPNetworkProjection. | QuickWirelessConnectionandthenstartTocloseQuickWirelessConnection,perform ExternalDeviceRemovalfromtheicononthe taskbartoremovetheQuickWirelessConnection USBKeyfromthecomputer. |
| EasyMPNetworkProjectioninitializationfailed.Restar | EasyMPNetworkProjection.Ifthe messageisstilldisplayed,uninstallandthen reinstallEasyMPNetworkProjection. |
| NetworkadapterinformationcouldnotbeCheckthefollowingitems. obtained. | •Anetworkadapterisinstalledonthecomputer.•Thedriverforthenetworkadapterbeingusedis installedonthecomputer.•Thenetworkadapterisenabled.Afterchecking,restartthecomputerandthen restartEasyMPNetworkProjection.Ifyoustillcannotconnect,checkthenetwork settingsonthecomputerandthenetworksettings ontheprojector. |
| CannotbeusedwiththecurrentOSversion.ReinstallEasyReinstallEasyMPNetworkProjection. | asyMPNetworkProjection. |
Parenttopic: ErrorMessagesList
Relatedtasks
UninstallingEasyMPNetworkProjection(WindowsXP/WindowsVista/Windows7)
UninstallingEasyMPNetworkProjection(Windows8)
UninstallingEasyMPNetworkProjection(MacOSX)
InstallingEasyMPNetworkProjection(Windows)
InstallingEasyMPNetworkProjection(MacOSX)
ErrorMessagewhenSearchingforandSelectingProjectors
| ErrorMessageRemedy | |
| CannotconnecttotheprojectorusingthisversionInstallofEasyMPNetworkConnection.InstallthelatestProjectionofEasyMPNetworkProjection.CD-ROMsuppliedwiththeprojector.YouandownloadthelatestversionofEasyMPNetworkProjectionfromtheEpsonWebsite. | |
| Connectiontotheprojectorfailed.Tryconnectingagain. | Ifyoustillcannotconnectto theprojector,checkthenetworksettingsonthe computerandthenetworksettingsforthe projector. |
| Thekeyworddoesnotmatch.Re-entertheCheckthePro keyworddisplayedontheprojectorscreen.LANstandby | projectKeyworddisplayedontheyscreen,andentertheProjector Keyword. |
| Connectionfailedduetokeywordmismatch. | |
| Enterthekeyworddisplayedontheprojectorscreen. | |
| The selected projector is busy. Do you want to continuetheconnectionprocess?established.Theproj | If you click Yes, a connection to the projector isectorisdisconnectedfrom theothercomputer.IfyouclickNo,aconnectiontotheprojectorisnot established.Theconnectionbetween theprojector andtheothercomputerismaintained. |
| OneormoreconnectedprojectorsdonotsupportThere resolutionsgreaterthanSXGA.Reducethescreencon resolutionandreconnect.screenresolutiontoSXGA(1280×1024)orless. | sanuncompatibleprojectorinthe nctiondestination.Changethecomputer |
| Oneormoreprojectorsarenotresponding.Checkthenet | networksettingsonthecomputerand thenetworksettingsontheprojector. |
| ThewirelessLANisoff.TurnonthewirelessLAN,Turnon andthentrysearchingagain.trysearchingfortheprojector | yourcomputer'swirelessLAN,andthen oragain. |
Parenttopic:ErrorMessagesList
Relatedreferences
SupportedResolutions
Relatedtasks
UninstallingEasyMPNetworkProjection(WindowsXP/WindowsVista/Windows7)
UninstallingEasyMPNetworkProjection(Windows8)
UninstallingEasyMPNetworkProjection(MacOSX)
GettingtheLatestVersionoftheApplication
InstallingEasyMPNetworkProjection(Windows)
InstallingEasyMPNetworkProjection(MacOSX)
ErrorMessagewhenProjecting
| ErrorMessageRemedy | |
| XXXXXXwasdisconnected.Tryconnectingagain.Ifyo | ustillcannotconnectto theprojector,checkthenetworksettingsonthe computerandthenetworksettingsforthe projector. |
| Tooutputaudiofromtheprojector,restartRestartPower applicationssuchasPowerPointorWindowsAudioisth MediaPlayer. | PointerWindowsMediaPlayer.enoutputfromtheprojector. |
| YouneedtorestartyourcomputertoenableAudioTotra Output. Select Yes to restart now or select No to restartlater. | hsferaudiototheprojectorand playback,select Yes and restart the computer. |
Parenttopic: ErrorMessagesList
EventIDList
When a connection error occurs, an number indicating the type of error is displayed as follows.
EventID:04xx
Checkthenumbersandthenapplythefollowingcountermeasures.Ifyoucannotresolvetheproblem, contact your network administrator, or contact Epson as described in your projector User's Guide.
| EventCauseID | CauseRemedy | |
| 0432Failed | tostartupEasyMPNetworkProjection.Restarttheprojector. | |
| 0435 | ||
| 0434Net | workcommunicationisunstable.Checkthenetwork | kcommunicationstatus,and reconnectafterwaitingforawhile. |
| 0481 | ||
| 0482 | ||
| 0433Can | notplaytransferredimages.RestartEasyMPNetwork | workProjection. |
| 0484Com | mmunicationwasdisconnectedfromthe computer. | |
| 04FEEasy | MPNetworkProjectionendedCheckthestatusofnetworkcommunications.unexpectedly.Restarttheprojector. | |
| 04FFAsy | stemerroroccurredintheprojector.Restarttheprojector. | |
| 0891Can | notfindanaccesspointwiththesameSetthecomputer,theaccesspoint,andtheSSID.projectortothesameSSID. | |
| 0892The | WPA/WPA2authenticationtypedoesnotCheckthatthewirelessLANsecuritysettings match.arecorrect. | |
| 0893The | WEP/TKIP/AESencryptiontypedoesnot match. | |
| 0894Com | mmunicationwasdisconnectedbecauseContactyournetworkadministratorformore theprojectorconnectedtoanunauthorizedinformation accesspoint. | |
| 0898FailedtoacquireDHCP.ChecktheDHCPservertoseefitis operatingcorrectlyandchecktheLANcable toseefitisconnectedcorrectly.Ifyouare notusingDHCP,turnofftheDHCPsetting. | ||
| 0899Other | communicationerrors IfrestartingtheprojectorEasyMPNetwork Projectiondoesnotsolvetheproblem, contactEpsonasdescribedinyourprojector User'sGuide. | |
| 089A | The EAP authentication type is not the same. | Check that the wireless LAN security settings arecorrect.Also,checkifthecertificateis installedcorrectly. |
| 089BEAP | Serverauthenticationfailed. | |
| 089CEAP | clientauthenticationfailed. | |
| 089DKey | exchangefailed. | |
| 0B01The | built-instoragecouldnotbedetectedPerformDeletecorrectly.internalstorageisdeletedcorrectly.pluginthe | AllInternalData.Whenthepowercordfortheprojectorandturniton.Ifitisnotdeletedcorrectly,contactEpsonasdescribedinyourprojectorUser'sGuide.GotoExtended>WhiteboardSettings>InternalStorage. |
| 0BFFAn | errorhasoccurredintheWhiteboardRestarttheprofunction. | ector. |
Parenttopic: Solving Problems
ScreenSummary
SeethesesectionsformoreinformationabouttheEasyMPNetworkProjectionscreens.
SelectConnectionModeScreen
SearchandConnectScreen
Profiles
Setoptions
Toolbar
MovieSendingMode
Add-RemoveVirtualDisplay
SelectConnectionModeScreen
When you start Easy MP Network Projection, these selection connection modes screen is displayed.
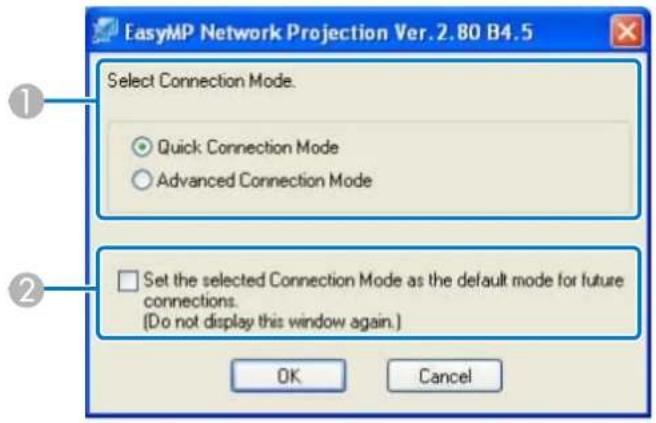
| 1Selecttheconnectionmode. |
| 2Selecttoalwaysconnectusingtheselectedconnectionmode. |
Parenttopic:ScreenSummary
SearchandConnectScreen
When you start Easy MP Network Projection and select a connection mode, one of the following screens is displayed depending on the connection mode you selected.
- WhenselectingQuickConnectionMode
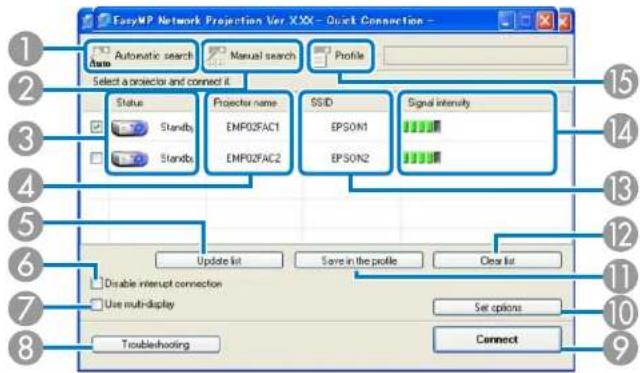
- WhenselectingAdvancedConnectionMode
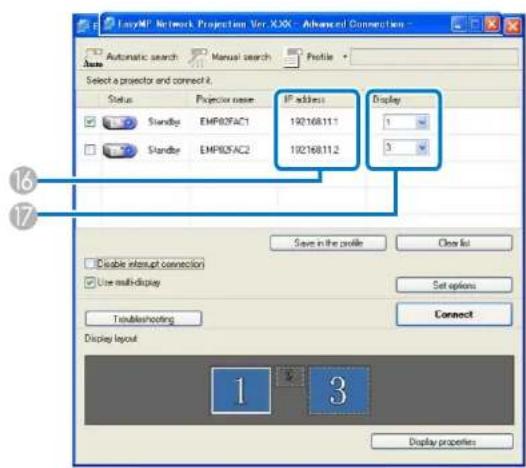
| 1InQuickConnectionMode,searchesAutoAutomaticsearch | fortheprojectorsbasedon theSSID.InAdvancedConnectionMode,searchesfortheavailable projectorsonthenetworksystemtowhichthecomputeris connected. |
| 2InQuickConnectionMode,searchesManualsearch | fortheprojectorbyusingtheSSID.InAdvancedConnectionMode,searchesfortheprojectorby usinganIPaddressoraprojectorname. |
| 3Status | Indicatesthestatusfordetected | day Projectorsasshownbelow. | |
 Standby Standby | Available. | ||
 Busy Busy | Available.WhenyouclickConnect,the computercurrentlyconnectedis disconnectedandyourcomputeris connected. | ||
 Busy(Disable interruptconnection) Busy(Disable interruptconnection) | Cannotbeselected.DisableInterrupt connectionissetonanothercomputerthat isalreadyconnected. | ||
 Currentlyinuseby anotherapplication Currentlyinuseby anotherapplication | Theprojector'sConfigurationmenuisopen. Youcanselectitafterclosingthe Configurationmenuandrunningthesearch again. | ||
 Searching Searching | DisplayedwhilerunningManualsearchor searchingwithaprofile. | ||
 Notfound. Notfound. | Displayedwhenaprojectorcannotbefound asaresultofManualsearchorsearchwitha profile. | ||
 Notacquired Notacquired | Available.Displayedwhenaprojectorwith securitysettingsenabledisfoundinQuick ConnectionMode. | ||
| 4Projectorname | Displaystheprojector'sname. | ||
| 5UpdateList(QuickUpdatesStatusand Signalintensity.ConnectionModeonly) | Signalintensity. | ||
| 6DisableinterruptSelecttopreventaninterruptconnectionbyothercomputerswhile connectionconnectedtotheselectedprojector. | |||
| 7Usermulti-displaySelectwhenusingthemulti-screendisplayfunction.Whenthisis selected,DisplaylayoutandDisplayproperties(Display preferences)aredisplayedatthebottomofthescreen. | |||
| 8TroubleshootingDisplaystheEasyMPNetworkProjectionTroubleshootingscreen. | |||
| 9ConnectConnectstotheprojectoryouselectedfromthesearchresultslist.Whenaconnectionismadewithaprojector,atoolbaris displayed. | |||
| 10SetoptionsDisplaystheSetoptionsscreentomakeoptionsettingssuchas theprocessingmethodwhenEasyMPNetworkProjectionstarts. | |||
| 11SaveintheprofileSavestheresultsofanetworkprojectorsearchasaprofile. | |||
| 12ClearlistDeletesallsearchresults. | |||
| 13SSID(QuickConnectionDisplaystheprojector'sSSID. Modeonly) | |||
| 14Signalintensity(QuickDisplaysthesignalintensitywhenaconnectionismadeinQuick ConnectionModeonly)ConnectionMode.AstheSignalintensityincreases,sodoesthe numberoflitindicators. | |||
| 15Searchesforaprojectoronthenetworkusingaprofilesaved usingSaveintheprofile. | |||
| Profile | |||
| 16IPaddress(AdvancedDisplaysthe connectionModeonly) | projector'sIPaddress. | ||
| 17 | DisplaySelect the display number (when Use multi-display is selected). | ||
Parenttopic:ScreenSummary
Relatedtasks
SearchingforNetworkProjectorsAutomatically
SearchingforNetworkProjectorsbySpecifyinganSSID,IPAddress,orProjectorName
MakingaProfile
PerformingaProfileSearch
Relatedtopics
ProjectingImagesUsingtheMulti-ScreenDisplayFunction
Setoptions
Profiles
Seethesesectionsformoreinformationaboutthescreensforsavingandmanagingprofiles.
Saveintheprofile
Editprofile
Parenttopic:ScreenSummary
Saveintheprofile
When you search for projectors and click Save in the profile on the search and connect screen, one of the followingscreensisdisplayed.
- Ifnofolderhasbeencreated.
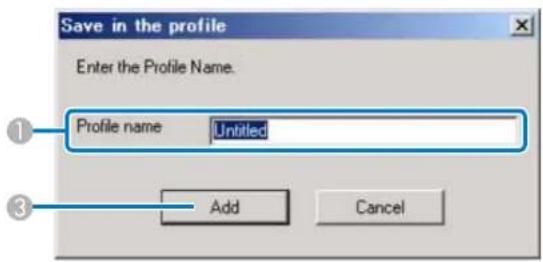
- If you have created a folder for profiles.
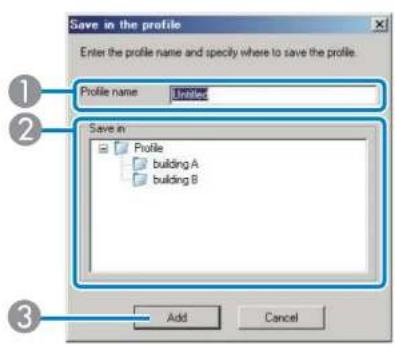
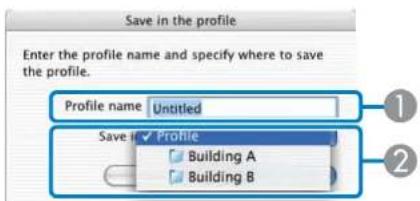
| 1ProfilenameEntertheprofilename. |
| 2SaveinSelectthefolderwhereyouwanttosavetheprofile. |
| 3AddRegisterstheprojectoninformationintheprofile. |
Parenttopic:Profiles
Relatedtasks
MakingaProfile
Editprofile
WhenyouclickEditprofileontheSetoptionsscreen,theEditprofilescreenisdisplayed.
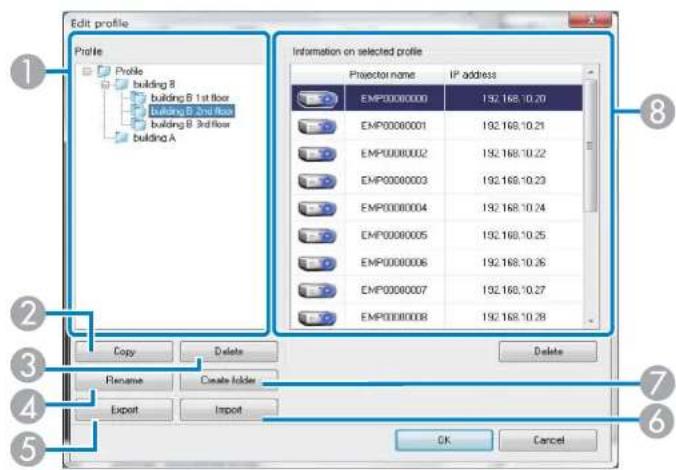
| 1Profile | Displaystheprofile. | Youcandraganddropprofilesandfolderstochange thefolderstructure. |
| 2Copy | Duplicatestheprofile. | Thecopiedprofileissavedinthesamefolderasthe originalwiththesamename. |
| 3Delete | Deletestheprofileandthefolder. | |
| 4Rename | DisplaystheRenamedialogboxtorenamethefolderortheprofile.You canenterupto32charactersintheRenamedialogbox. | |
| 5Export | Exportstheprofile. | Exportedprofilescanbeusedasbackupfiles.Youcan importthemonanothercomputer. |
| 6Import | Loadsanexportedprofile. | |
| 7Create | folderCreatesanewfolder. |
| 8ProjectornameDisplaysth | eprojectorinformationsavedintheprofile. |
| SSIDorIPaddress | |
| DeleteDeletesthese | ectedprojectorfromtheprofile.Whenallprojectorinformationisdeleted,theprofileisalsodeleted. |
Parenttopic:Profiles
Relatedtasks
MakingaProfile
Setoptions
When you click Set options on the Easy MP Network Projection search and connect screen, the Set option screen is displayed. You can make option settings such as the processing method when Easy MP Network Projection starts.
Note: You can also access Set options by clicking the button on the toolbar. When you access Set options from the toolbar, the General settingtabis not displayed.
Setoptions-Generalsettings
Setoptions-Adjustperformance
Setoptions-AudioOutput
Parenttopic:ScreenSummary
Setoptions-Generalsettings
When you click the General settings tab on the Set options screen, the following screen is displayed.
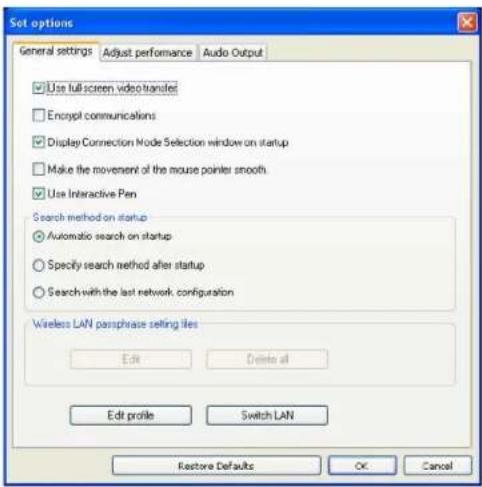
| Usefull-screenvideotransferWindowsXPonlyPlaysbackamoviefileatfullscreen.Iftheprojectordoesnot supportmoviesending,thisfunctioncannotbeset. |
| EncryptcommunicationsSelecttpencryptandtransmitdata.Evenifdataisintercepted,it cannotbedecrypted.WhenusingQuickConnectionMode,makesureyoualwaysselect thischeckbox. |
| DisplayConnectionModeSetwhetherornottheSelectConnectionModescreenisdisplayedSelectionwindowonstartupwhenEasyMPNetworkProjectionstarts.Clearthischeckboxonceyouhavesettledonaregularstartup method. |
| MakethemovementoftheWindowmousepointersmooth | sXP/WindowsVista/Windows7onlySelecttopreventhemousepointerfromflickeringwhenTransferlayeredwindowisselectedinAdjustperformance.(IfWindowsAeroisselectedasthethermeforWindowsVistaandWindows7,thissettingturnsoffWindowsAero.) |
| UseInteractivePenSelecttousethe | interactivefunctionoveranetwork(supportedmodelsonly).YoudonotneedtoconnectacomputertotheprojectorwithaUSBcable.YoucanonlyuseoneEasyInteractivePenatatime. |
| SearchmethodonstartupSelectfrom | fromthefollowingprojectorsearchmethodsexecutedwhenEasyMPNetworkProjectionisstarted.•Automaticsearchonstartup•Specifysearchmethodafterstartup•Searchwiththelastnetworkconfiguration |
| WirelessLANpassphraseNotaval settingfiles | ilableforWindowsXP.InQuickConnectionMode,SSIDsandpassphrasesarestoredonthecomputerwhenconnectingtoaprojectorwithsecuritysettingsenabled.Youcaneditanddeletethestoredinformation.Edit:Displaythewirelessnetworkmanagementscreenforthecomputer.DeletealltheSSIDsandpassphrasesstoredonthecomputer. |
| EditprofileTheEditprofilescreenis | displayed. |
| SwitchLANWindowsonly | Youcanusethisifyouneedtoswitchthenetworkadaptertobeusedforasearchwhenacomputerhasmultipleadapters.Bydefault,allofthenetworkadaptersareusedtoperformasearch. |
| Restore Defaults | You can reset all adjustment values forSet optionsto their defaultsettings.However,youcanretainsettingsforEditprofileandSwitchLANinGeneralsettings. |
Parenttopic:Setoptions
Relatedreferences
SelectConnectionModeScreen
Editprofile
Relatedtasks
SearchingforNetworkProjectorsAutomatically
SearchingforNetworkProjectorsbySpecifyinganSSID,IPAddress,orProjectorName
Setoptions-Adjustperformance
When you click the Adjust performance about the Setup options screen, the following screen is displayed.
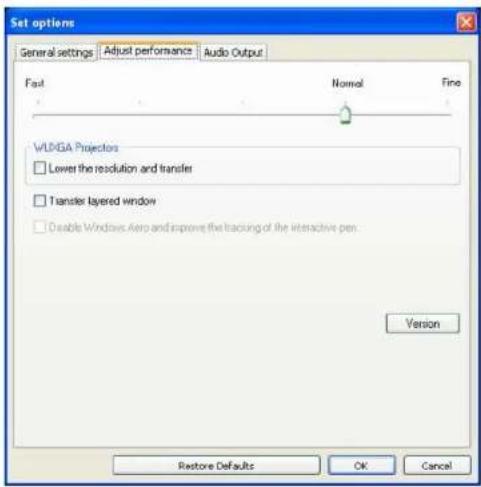
| Performance adjustment slider | You can set the performance to Fast, Normal, and Fine.SettoFastwhenmovieprojectionsareinterrupted. |
| LowertheresolutionandOnlyavaltransfer(1920×1200). | lableforprojectorswitharesolutionofWUXGASelecttoreducethesizeofthedatatobetransferredtotheprojectorbyloweringtheresolution.Usethisoptiononaslownetworkorwhenittakestoolongtodisplaytheimageorprojectionisinterrupted. |
| TransferlayeredwindowWindows | xPonlyWhenusingalayeredwindow,contentssuchasmessagesdisplayedonthecomputerarenotprojectedbytheprojector.Selectthistoprojectcontentssuchasmessagesthatusethelayeredwindow.Ifthemousepointerflickersonthescreen,selectMakethemovementofthemousepointersmoothinGeneralsettings. |
| DisableWindowsAeroandOnlyaimprovethetrackingoftheWindowsinteractivepen | availablewhenWindowsAeroisselectedasthethemeinvsVistaandWindows7.Selecttoimprovethetrackingdelayfortheinteractivepen.WindowsAeroisdisabledandinteractivepenoperationsbecomesmoother. |
| Restore Defaults | You can reset all adjustment values forSet optionsto their defaultsettings.However,youcanretainsettingsforEditprofileandSwitchLANinGeneralsettings. |
Parenttopic:Setoptions
Setoptions-AudioOutput
When you click the Audio Output tab on the Set options screen, the following screen is displayed.
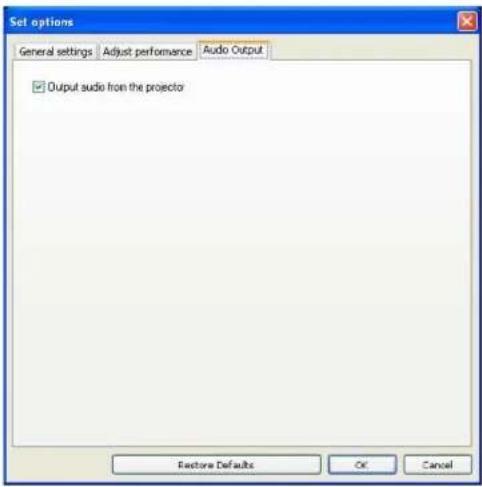
| OutputaudiofromtheSelecttooutputthecomputer'saudiofromtheprojector.Cleartoprojectoroutputaudiofromthecomputer.However,whenplayingmovieswithaudioinMovieSendingMode,audioisalwaysoutputfromtheprojectorregardlessofthissetting.Note:Audiocanonlybetransferredtooneprojector.Audiocannotbetransferredwhenconnectedtomultipleprojectors. | |
| Restore Defaults | You can reset all adjustment values forSet optionsto their defaultsettings.However,youcanretainsettingsforEditprofileandSwitchLANinGeneralsettings. |
Parenttopic:Setoptions
Toolbar
AfterEasyMPNetworkProjectionstartsandaconnectionismadewiththeprojector,thetoolbaris displayedonthecomputerscreen.Youcanusethistoolbartooperateandmakesettingsforthe projector,andtodisconnectthenetworkconnection.

| Selecttargetprojector | DisplaystheSelecttargetprojectorscreen.Clicktolimittheprojectorsoperatedfromthetoolbarwhenprojectingfrommultiple projectorsusingthedistributionfunctionormulti-screendisplayfunction.Thetextbelowtheiconindicatestheprojectorsthatcanbecontrolled.ALL indicatestatalloftheconnectedprojectorscanbecontrolled.Forexample,when "1,3"isdisplayed,projectorsNo.1andNo.3canbecontrolled. |
| Stop | Stopsprojectionwhileconnectedtotheprojector.Ablackscreenisprojected whilestopped. |
| Show | ReleasesStoporPause. |
| Pause | Pausesprojectedimageswhileconnectingtotheprojector. |
| PresentationMode | SwitchesPresentationModebetweenenabled/disabled. |
| Projectorcontrol | DisplaystheProjectorcontroltoolbar.Clicktoturnthevideoandaudioonoroff,orswitchtheinputsource. |
 ScreenPreview ScreenPreview | Displaysthemulti-screenpreviewscreen.Clicktodisplayapreviewwiththesettingsyouhavemade.CliceachdisplaytoenlargeeachScreenPreviewtofull-screen. |
 Setoptions Setoptions | DisplaystheSetoptionsscreen.Clicktoadjustthetransmissionperformeduringthetransferofcomputerimages. |
 MovieSendingMode MovieSendingMode | StartsMovieSendingMode.(Supportedmodelsonly) |
 Disconnect Disconnect | Disconnectstheconnectiontotheprojector. |
 Signalintensity(QuickConnectionModeonly) Signalintensity(QuickConnectionModeonly) | DisplaysthesignalintensitywhenaconnectionismadeinQuickConnectionMode.AstheSignalintensityincreases,sodoesthenumberoflitindicators. |
 Switchhtoolbardisplay Switchhtoolbardisplay | Switches the toolbar display betweenFull,Normal,andSimple.The toolbardisplayremainsasisuntilswitchedagain. |
Selecttargetprojector
Projectorcontrol
Parenttopic:ScreenSummary
Relatedtasks
HidingComputerOperations
ProjectingOnlyaPowerPointSlideShow
FinishingProjectingImages
Relatedtopics
Setoptions
ProjectingMovies
Selecttargetprojector
When you click the button on the toolbar, the following screen is displayed.
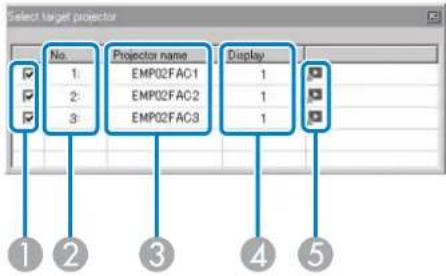
| 1-Selecttheprojectoryouwanttocontrol. | ||
| 2No.Indicatesthenumberassignedtotheprojector.Thisnumberappearsundertheicontoindicatethenumberoftheprojectorthatyoucancontrolfromthetoolbar. | ||
| 3ProjectornameDisplaystheprojector'sname. | ||
| 4DispayDisplaysthedisplynumberyouselectedontheEasyMPNetworkProjectionsearchandconnectscreen. | ||
| 5-Indicate the following status of the projector. | ||
Parenttopic:Toolbar
Relatedreferences
SearchandConnectScreen
Relatedtasks
HidingComputerOperations
ProjectingOnlyaPowerPointSlideShow
Relatedtopics
ProjectingMovies
Projectorcontrol
Whenyouclickthebuttononthetoolbar,thefollowingtoolbarisdisplayed.
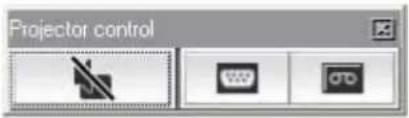
 A/VMute A/VMute | Hidesandmutesthevideoandaudio. |
 SwitchPC source SwitchPC source | ChangestoimagesfromtheinputporttowhichthecomputerorUSBdeviceare connected. |
 Switchvideo source Switchvideo source | Changestoimagesfromthevideoinputport. |
Parenttopic:Toolbar
Relatedtasks
HidingComputerOperations
SwitchingtheInputSource
MovieSendingMode
When you click the button on the toolbar and select a projector, the following screen is displayed.
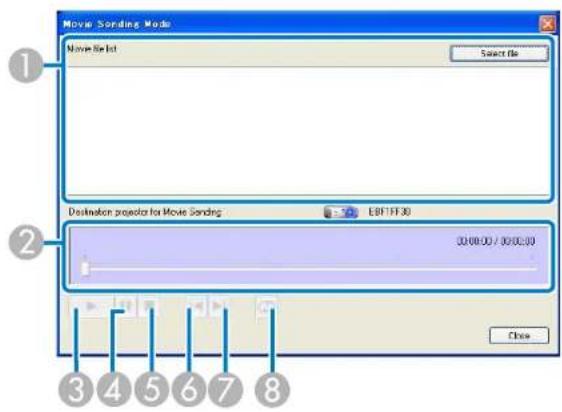
| 1MoviefilelistDisplaysalistotselectedmoviefiles. | |
| 2—Displaysthecurrentpointinthemoviefile.Youcandraganddroptheslidertothepointwhereyouwanttostartplaying. | |
3Playst | |
4Pauseenplayback. | |
5Stop | |
6Playsthecurrentfilefromthebeginning. | |
7Playsthenextfilefromthebeginning. | |
| 8Playsrepeatedlyfromthefirstfileinthelist.Youcannotrepeatonespecific fileiftherearemultiplefilesinthelist. |
Parenttopic:ScreenSummary
Relatedtopics
ProjectingMovies
Add-RemoveVirtualDisplay
During installation and startup of Easy MP Network Projection on Windows, the Add-Remove Virtual Displays screen is displayed.
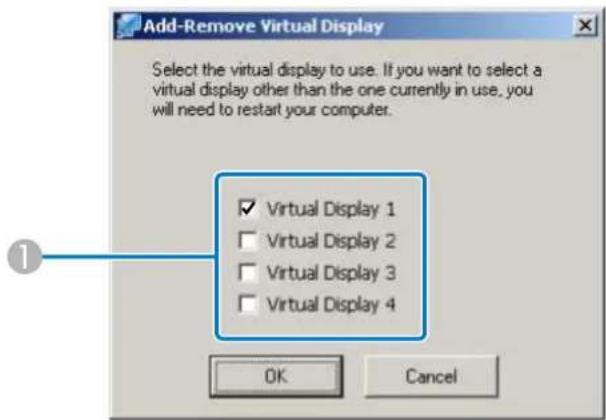
1VirtualDisplaySelectthevirtualdisplayyouwanttouseforthemulti-screendisplay 1to4function.Youcanselectuptofourmonitors.
Parenttopic:ScreenSummary
Relatedtasks
EnablingtheVirtualDisplayDriver(Windows)
Appendix
SeethesesectionstolearnmoreaboutEasyMPNetworkProjectionsoftware.
UpdatingandUninstallingtheSoftware
SupportedResolutionsandColors
Limitations
Notices
UpdatingandUninstallingtheSoftware
FollowtheseinstructionstoupdateoruninstallEasyMPNetworkProjection.
GettingtheLatestVersionoftheApplication
UninstallingEasyMPNetworkProjection(WindowsXP/WindowsVista/Windows7)
UninstallingEasyMPNetworkProjection(Windows8)
UninstallingEasyMPNetworkProjection(MacOSX)
Parenttopic:Appendix
GettingtheLatestVersionoftheApplication
YoucandownloadthelatestversionofEasyMPNetworkProjectionfromtheEPSONWebsite.
Visitwww.epson.comandselectyourlocation.
Parenttopic: Updating and Uninstalling the Software
UninstallingEasyMPNetworkProjection(WindowsXP/WindowsVista/Windows7)
ForWindowsXP, WindowsVista, and Windows7, followtheinstructionsbelowtouninstallEasyMP NetworkProjection.
Note: Youneed administrator authority touninstall EasyMPNetworkProjection.
-
Turnonyourcomputer.
-
Makesureallrunningapplicationsareclosed.
-
ClickStart, and then click ControlPanel.
-
Dooneofthefollowing.
-
WindowsXP:Double-clickAddorRemovePrograms.
-
Windows Vista and Windows 7: Click Uninstall a program from the Programs category.
-
SelectEasyMPNetworkProjection, andthendooneofthefollowing.
-
WindowsXP: ClickChange/Remove.
-
WindowsVistaandWindows7:ClickUninstall/Change.
-
Followtheon-screen instructions.
Parenttopic: Updating and Uninstalling the Software
UninstallingEasyMPNetworkProjection(Windows8)
ForWindows8, followtheinstructionsbelowtouninstallEasyMPNetworkProjection.
Note: Youneed administrator authority touninstall EasyMPNetworkProjection.
- Turnonyourcomputer.
- Makesureallrunningapplicationsareclosed.
-
Navigate to the Start screen, and then right-click (press and hold) EasyMP Network Projection Ver.X.XX.
-
SelectUninstallfromtheappbar.
-
SelectEasyMPNetworkProjection, andthenselectUninstall.
-
Followtheon-screen instructions.
Parenttopic: Updating and Uninstalling the Software
UninstallingEasyMPNetworkProjection(MacOSX)
ForMacOSX, followtheinstructionsbelowtouninstallEasyMPNetworkProjection.
- Turnonyourcomputer.
- Makesureallrunningapplicationsareclosed.
-
OpentheApplicationsfolder.
-
Open the EasyMP Network Projection - Tools folder, and then double-click EasyMP Network ProjectionUninstaller.app.
5.Followtheon-screeninstructions.
Parenttopic: Updating and Uninstalling the Software
SupportedResolutionsandColors
CheckthesesectionsforthecomputerscreenresolutionsandthenumberofcolorsthatEasyMP NetworkProjectioncanproject.
SupportedResolutions
DisplayColor
Parenttopic:Appendix
SupportedResolutions
The following computerscreen resolutions can be projected with EasyMPNetworkProjection. You cannot connect to a computer with a resolution greater than WUXGA.
•VGA(640×480)
•SVGA(800×600)*
•XGA(1024×768)*
•SXGA(1280×960)
•SXGA(1280×1024)
•SXGA+(1400×1050)*
•WXGA(1280×768)*
•WXGA(1280×800)*
- WXGA+(1440×900)*
- UXGA(1600×1200)
•WUXGA(1920×1200)
*Supportedresolutionswhenthemulti-screendisplayfunctionison.
When using a computer screen with a unique aspect ratio, the resolution is increased or decreased depending on the resolution of the computer and the projector so as not to impair image equality.
Dependingontheresolution,attimestheverticalorhorizontalmarginsmaybeprojectedinblack.
Parenttopic: Supported Resolutions and Colors
DisplayColor
The following number of computers screencolors can be projected with EasyMP Network Projection.
| WindowsMacOSX | |
| 16-bitcolorAbout32,000colors(16-bit) | |
| 32-bitcolorAbout16.7millioncolors(32-bit) |
Theoperationalguaranteeformulti-screendisplayis16-bitand32-bitcolor.
Parenttopic: Supported Resolutions and Colors
Limitations
CheckthesesectionsforrestrictionsappliedwhenprojectingcomputerimageswhilerunningEasyMP NetworkProjection.
ConnectionLimitations
LimitationswhenProjectingfromWindowsPhotoGalleryorWindowsLivePhotoGallery
LimitationsinWindowsAero
LimitationswhenProjectingfromWindowsMediaCenter
Parenttopic:Appendix
ConnectionLimitations
NotethefollowinglimitationswhenusingEasyMPNetworkProjection.
- If the transmissions speed of the wireless LAN is slow, then network might be cutoff unexpectedly.
- ApplicationsthatusepartofDirectXfunctionsmaynotbedisplayedcorrectly(Windowsonly).
- You cannot project fullscreen MS-DOS prompts (Windowsonly).
- There are times when the image on the computer screen and the image projected by the projector may not match exactly.
•Moviesarenotplayedassmoothlyastheyareonacomputer.
Parenttopic:Limitations
LimitationswhenProjectingfromWindowsPhotoGalleryorWindowsLivePhoto Gallery
NotethefollowinglimitationswhenlaunchingWindowsPhotoGalleryorWindowsLivePhotoGallery whenEasyMPNetworkProjectionisrunning.
- SlideshowisplayedbackinsimplemodewhenprojectingfromWindowsPhotoGalleryorWindows LivePhotoGallery.
Because the tool bar is not displayed, you cannot change the Theme (effects) while playing as slide show, regardless of the Windows Experience Index rating.
Oncesimplemodehasstarted,youcannotchangemodeswhileWindowsPhotoGalleryorWindows LivePhotoGalleryisrunningevenifyoucloseEasyMPNetworkProjection.RestartWindowsPhoto GalleryorWindowsLivePhotoGallery.
- Youcannotplaymovies. Parenttopic:Limitations
LimitationsinWindowsAero
Notethe following limitations when the window design for your computer is Windows Aero.
- ThelayeredwindowisprojectedregardlessoftheTransferlayeredwindowsettingfromSetoptionsin EasyMPNetworkProjection.
Forexample, when Transferlayered window for the Easy MP Network Projection toolbar is disabled, it is not projected even if it is displayed on the computers screen. However, the toolbar is projected.
- AfewminutesafteryouconnectacomputertotheprojectoroveranetworkwithEasyMPNetwork Projection, the following message may be displayed.
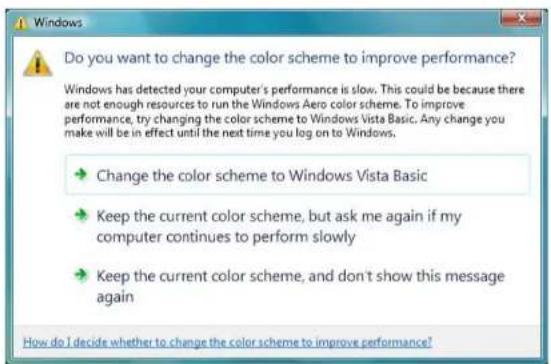
It is recommended that you select Keep the current color scheme, and don't show this message again. This selection is enabled until the computer is restarted.
Parenttopic: Limitations
LimitationswhenProjectingfromWindowsMediaCenter
You cannot project images in full screend display using Windows Media Center. Switch to the window display modetoproject the images.
Parenttopic: Limitations
Notices
Checkthesesectionsforimportantnoticesaboutyourprojector.
CopyrightNotice
AboutNotations
GeneralNotice
Parenttopic:Appendix
CopyrightNotice
Allrightsreserved. Nopartofthispublicationmaybereproduced, storedinaretrievalsystem, or transmittedinanyformorbyanymeans, electronic, mechanical, photocopying, recording, or otherwise, without the prior written permission of Seiko Epson Corporation. Nopatentliability is assumed with respect to the use of the information contained herein. Neither is any liability assumed for damages resulting from the use of the information contained herein.
Neither Seiko Epson Corporation nor its affiliates shall be liable to the purchaser of this product or third parties for damages, losses, costs, or expenses incurred by the purchaser third parties as a result of: accident, misuse, or abuse of this product or unauthorized modifications, repairs, or alteration to this product, or (excluding the U.S.) failure to strictly comply with Seiko Epson Corporation's operating and maintenance instructions.
SeikoEpsonCorporationshallnotbeliableagainstanydamagesorproblemsarisingfromtheuseof anyoptionsoranyconsumableproductsotherthanthosedesignatedasOriginalEpsonProductsor EpsonApprovedProductsbySeikoEpsonCorporation.
Thecontentsofthisguidemaybechangedorupdatedwithoutfurthernotice.
Illustrationsinthisguideandtheactualprojectormaydiffer.
Parenttopic:Notices
AboutNotations
- Microsoft ^ Windows ^ XPProfessionaloperatingsystem
- Microsoft ^ Windows ^ XPHomeEditionoperatingsystem
- Microsoft ^® WindowsVista ^® operatingsystem
•Microsoft ^® Windows ^® 7operatingsystem
•Microsoft ^® Windows ^® 8operatingsystem
In this guide, the operating systems above are referred to as "Windows XP," "Windows Vista," "Windows 7," and "Windows8." Furthermore, the collectiveterm Windows may be used to referto Windows XP.
Windows Vista, Windows7, and Windows8, and multiple versions of Windows may be referred to as, for example, Windows XP/Vista, with the Windows notation omitted.
•MacOSX10.4.x
•MacOSX10.5.x
•MacOSX10.6.x
•MacOSX10.7.x
•MacOSX10.8.x
Inthisguide, the operating systems above are referred to as "MacOSX10.4.x," "MacOSX10.5.x,"
"Mac OS X 10.6.x," "Mac OS X 10.7.x," and "Mac OS X 10.8.x." Furthermore, the collective term "Mac OSX" is used to referto them all.
Parenttopic:Notices
GeneralNotice
IBM, DOS/V, and XGA are trademarks or registered trademarks of International Business Machines Corporation.
Macintosh, Mac, MacOS, and Macaretrademarksof Apple Inc.
Microsoft, Windows, Windows NT, Windows Vista, PowerPoint, and Windows logo are trademarks or registered trademark of Microsoft Corporation in the United States and/or other countries.
Otherproductnamesusedhereinarealsoforidentificationpurposesonlyandmaybetrademarksof theirrespectiveowners.Epsondisclaimsanyandallrightsinthosemarks.
SoftwareCopyright: Thisproductusesfreesoftwareaswellassoftwaretowhichthiscompanyholdsthe rights.
©SEIKOEPSONCORPORATION2012.Allrightsreserved.
CopyrightAttribution
Parenttopic:Notices
CopyrightAttribution
3/13
CPD-38867
Parenttopic: GeneralNotice
- EasyMPNetworkProjection OperationGuide
- Contents
- Introduction to EasyMP Network Projection....7
- Setting Up EasyMP Network Projection for the First Time 12
- Connecting to the Projector and Projecting Images 22
- Screen Summary 81
- Appendix 102
- IntroductiontoEasyMPNetworkProjection
- EasyMPNetworkProjectionFeatures
- DisplayOptions
- Multi-ScreenDisplayFunction
- MovieSendingMode
- PresentationMode
- DistributionFunction
- ConnectionModes
- QuickConnectionMode
- Relatedtasks
- AdvancedConnectionMode
- SettingUpEasyMPNetworkProjectionfortheFirstTime
- InstallingtheSoftware
- Note:
- EasyMPNetworkProjectionSystemRequirements
- InstallingEasyMPNetworkProjection(Windows)
- InstallingEasyMPNetworkProjection(MacOSX)
- SettingUptheProjector
- ConnectionMethodsforVariousNetworkEnvironments
- SettingUpaProjectortoConnectinQuickConnectionMode
- SettingUpaProjectortoConnectinAdvancedConnectionMode(Wireless)
- SettingUpaProjectortoConnectinAdvancedConnectionMode(Wired)
- ConnectingtotheProjectorandProjectingImages
- ConnectionMethods
- ConnectingtheProjectorandaComputerDirectlyUsingWirelessCommunication
- ConnectingtheProjectorandaComputeroveraNetworkSystem(Wireless)
- ConnectingtheProjectorandaComputeroveraNetworkSystem(Wired)
- Select Advanced Connection Mode, and then click OK.
- ChangingtheProjectorSearchMethod
- SearchMethods
- SearchingforNetworkProjectorsAutomatically
- Relatedconcepts
- SearchingforNetworkProjectorsbySpecifyinganSSID,IPAddress,orProjectorName
- SearchingforNetworkProjectorsUsingaProfile
- Profile
- PerformingaProfileSearch
- MakingaProfile
- ManagingaProfile
- 2.ClickEditprofile.
- ControllingtheProjectedDisplay
- HidingComputerOperations
- SwitchingtheInputSource
- FinishingProjectingImages
- UsingAdditionalFunctions
- ChangingtheComputerProjectionSource
- ProjectingOnlyaPowerPointSlideShow
- ProjectingMovies
- SupportedMovieFiles
- UsingMovieSendingMode
- 4.ClickSelectFile.
- Select themoviefileyouwanttoplay, and then click Open.
- ProjectingImagesUsingtheMulti-ScreenDisplayFunction
- Multi-ScreenDisplayExamples
- SettingUpMulti-ScreenDisplay
- EnablingtheVirtualDisplayDriver(Windows)
- Parenttopic:SettingUpMulti-ScreenDisplay
- ArrangingtheMulti-ScreenDisplay(Windows)
- 5.SelectUsemulti-display.
- 6.ClickDisplayproperties.
- 7.ClicktheSettingstab.
- ArrangingtheMulti-ScreenDisplay(MacOSX)
- 6.ClickDisplaypreferences.
- 7.ClickArrangement.
- 8.ClearMirrorDisplays.
- Dragthedisplayedmonitoriconandplaceitwhereyouwanttheadditionalimagetoappear.
- 10.ClosetheDisplaysettingscreen.
- ProjectingImagestotheArrangedMulti-ScreenDisplay
- 4.ClickConnect.
- ProjectingOneComputerScreenfromMultipleProjectors
- SolvingProblems
- SolvingNetworkConnectionProblems
- SolutionsWhenYouCannotConnectUsingQuickConnectionMode
- Relatedreferences
- SolutionsWhenYouCannotConnectUsingAdvancedConnectionMode(Wireless)
- SolutionsWhenYouCannotConnectUsingAdvancedConnectionMode(Wired)
- SolvingProblemsDuringProjection
- SolutionsWhentheComputerScreenisNotDisplayedProperly
- SolutionsWhentheScreenisNotProjectedProperly
- SolutionsWhenThereisNoAudio
- ErrorMessageList
- ErrorMessagewhenSearchingforandSelectingProjectors
- EventIDList
- ScreenSummary
- SelectConnectionModeScreen
- SearchandConnectScreen
- Relatedtopics
- Profiles
- Saveintheprofile
- Editprofile
- Setoptions
- Setoptions-Generalsettings
- Setoptions-Adjustperformance
- Setoptions-AudioOutput
- Toolbar
- Selecttargetprojector
- Projectorcontrol
- Add-RemoveVirtualDisplay
- Appendix
- UpdatingandUninstallingtheSoftware
- GettingtheLatestVersionoftheApplication
- UninstallingEasyMPNetworkProjection(WindowsXP/WindowsVista/Windows7)
- UninstallingEasyMPNetworkProjection(Windows8)
- UninstallingEasyMPNetworkProjection(MacOSX)
- SupportedResolutionsandColors
- SupportedResolutions
- DisplayColor
- Limitations
- ConnectionLimitations
- LimitationswhenProjectingfromWindowsPhotoGalleryorWindowsLivePhoto Gallery
- LimitationsinWindowsAero
- LimitationswhenProjectingfromWindowsMediaCenter
- Notices
- CopyrightNotice
- AboutNotations
- GeneralNotice
Brand : EPSON
Model : EX6220
Category : Video projector