
WG718 - Lawn mower WORX - Free user manual and instructions
Find the device manual for free WG718 WORX in PDF.


| Product Type | Cordless Electric Lawn Mower |
| Brand | WORX |
| Model | WG718 |
| Power Source | Battery (Li-Ion) |
| Voltage | 40V |
| Motor Type | Brushless |
| Cutting Width | 16 inches (40.6 cm) |
| Cutting Heights | 5-position, 1.5-3.5 inches (38-89 mm) |
| Grass Collection Bag Capacity | 13 gallons (50 liters) |
| Weight | 35 lbs (15.9 kg) |
| Dimensions (L x W x H) | 59 x 40 x 30 inches (150 x 102 x 76 cm) |
| Features | Mulching, Rear Bag, Side Discharge, Single Lever Height Adjustment |
| Battery Type | WORX PowerShare 40V (Interchangeable) |
| Battery Included | Yes (2x 4.0 Ah) |
| Charging Time | 60 minutes for 4.0 Ah battery |
| Run Time | Up to 40 minutes (with two batteries) |
| Noise Level | 82 dB (A) |
| Safety Features | Blade Brake, Safety Key, Dual Switch Operation |
| Maintenance | Regular blade sharpening, deck cleaning, battery care |
| Warranty | 3 years limited |
| Included Accessories | Batteries, Charger, Grass Bag, Mulching Plug |
Frequently Asked Questions - WG718 WORX
User questions about WG718 WORX
0 question about this device. Answer the ones you know or ask your own.
Ask a new question about this device
Download the instructions for your Lawn mower in PDF format for free! Find your manual WG718 - WORX and take your electronic device back in hand. On this page are published all the documents necessary for the use of your device. WG718 by WORX.
USER MANUAL WG718 WORX
| 3-in-1 Lawn mower EN | P07 |
| Tondeuse à gazon 3 en 1 F | P17 |
| Cortadora de césped "3 en 1" ES | P28 |

A B1 B2


B3 C D1


D2 E F

G1 G2 H


IJK

LMN


-
SWITCH LEVER
-
SAFETY BUTTON
-
UPPER HANDLE
-
LOWER HANDLE
-
SAFETY FLAP
-
MOTOR COVER
-
SIDE-DISCHARGE COVER
-
CUTTING HEIGHT ADJUSTMENT LEVER
-
GRASS COLLECTION BAG
-
MULCH INSERT (See F)
-
SIDE-DISCHARGE INSERT (See G1)
* Not all the accessories illustrated or described are included in standard delivery.
TECHNICAL DATA
Rated voltages 120V\~60Hz
Rated power 13A
Rated no load speed 3800/min
Deck diameter 19"(48cm)
Front wheel diameter 7"
Rear wheel diameter 8 1/4
Cut height 1.5"-3.5"(38-88mm)
Cutting height positions 6
Grass collection capacity 1.6 bushels(55L)
Machine weight 53.5lbs(24.3Kg)
ACCESSORIES
Grass collection bag 1
Side-discharge insert 1
Spanner 1
Cable clips 2
Cable hook 1
Mulching insert 1
SAFETY INSTRUCTIONS
READ ALL INSTRUCTIONS
WARNING: When using electric lawn mowers, basic safety precautions should always be followed to reduce the risk of fire, electric shock, and personal injury, including the following:
WARNING: Risk of injury could occur if the lawn mower is operated without the catcher assembly attached.
WARNING: the use of any other accessory or attachment might increase the risk of injury
CAUTION: For battery-operated lawn mowers, use only identical replacement batteries and specifying the battery type and manufacturer, and devices for retaining extension cords are available.
FOR ALL DOUBLE-INSULATED LAWN MOWERS
1) Replacement Parts: When servicing use only identical replacement parts.
2) Polarized Appliance Connections
To reduce the risk of electric shock, this appliance has a polarized plug (one blade is wider than the other) and will require the use of a polarized extension cord. The appliance plug will fit into a polarized extension cord only one way. If the plug does not fit fully into the extension cord, reverse the plug. If the plug still does not fit, obtain a correct polarized extension cord. A polarized extension cord will require the use of a polarized wall outlet. This plug will fit into the polarized wall outlet only one way. If the plug does not fit fully into the wall outlet, reverse the plug. If the plug still does not fit, contact a qualified electrician to install the proper wall outlet. Do not change the equipment plug, extension cord receptacle, or extension cord plug in any way.
FOR ALL LAWN MOWERS
1) Avoid Dangerous Environment - Don't use lawn mowers in damp or wet locations.
2) Don't Use In Rain.
3) Keep Children Away - All visitors should be kept a safe distance from work area.
4) Dress Properly - Do not wear loose clothing or jewelry. They can be caught in moving
parts. Use of rubber gloves and footwear is recommended when working outdoors.
5) Use Safety Glasses - Always use face or dust mask if operation is dusty.
6) Use Right Appliance - Do not use lawn mower for any job except that for which it is intended.
7) Ground Fault Circuit Interrupter (GFCI) protection should be provided on the circuit(s) or outlet(s) to be used for the lawn mower. Receptacles are available having built-in GFCI protection and may be used for this measure of safety.
8) WARNING - To prevent electric shock use only with an extension cord suitable for outdoor use, such as SW-A, SOW-A, STW-A, STOW-A, SJW-A, SJOW-A, SJTW-A, or SJTOW-A.
9) Extension Cord - Make sure your extension cord set is in good condition. When using an extension cord, be sure to use one heavy enough to carry the current your product will draw. For lengths less than feet ____ No. ____ AWG extension cord should be used. An undersized cord will cause a drop in line voltage resulting in loss of power and overheating. (NOTE: Table 1 shows the correct size to use depending on cord length and nameplate ampere rating. If in doubt, use the next heavier gage. The smaller the gage number the heavier the cord.) To reduce the likelihood of disconnection of lawn mower cord from the cord set during operating:
i) Make a knot as shown in Figure 1, or
ii) Use one of the plug-receptacle retaining straps or connectors described in this manual.
10) Don't Abuse Cord - Never pull lawn mower by cord or yank it to disconnect from receptacle. Keep cord from heat, oil, and sharp edges.
11) Don't Force Lawn Mower - It will do the job better and safer at the rate for which it was designed.
12) Don't Overreach - Keep proper footing and balance at all times.
13) Stay Alert - Watch what you are doing. Use common sense. Do not operate lawn mower when you are tired.
14) Disconnect Lawn Mower - Disconnect the lawn mower from the power supply when not in use, before servicing, when changing accessories such as blades, and the like.
15) Store Idle Lawn Mower Indoors - When not in use, lawn mower should be stored in an indoor dry and locked-up place - out of reach of children.
16) Maintain Lawn Mower with Care - Keep cutting edges sharp and clean for best and safest performance. Follow instructions for lubricating and changing accessories. Inspect lawn mower cord periodically and if damaged, have it repaired by an authorized service facility. Inspect extension cords periodically and replace if damaged. Keep handles dry, clean, and free from oil and grease.
17) Keep guards in place and in working order.
18) Keep blades sharp.
19) Keep hands and feet away from cutting area.
20) Objects struck by the lawn mower blade can cause severe injuries to persons. The lawn should always be carefully examined and cleared of all objects prior to each mowing.
21) If lawn mower strikes a foreign object, follow these steps:
i) Stop lawn mower. Release the switch.
ii) Unplug power cord.
iii) Inspect for damage.
iv) Repair any damage before restarting and operating the lawn mower.
22) Use identical replacement blades only.
Table 1 Minimum gauge for extension cords
| Volts | Total length of cord in feet | |||||
| 120V | 25 50 | 100 | 150 | |||
| 240V | 50 | 100 | 200 | 300 | ||
| Ampere rating more than | Ampere rating not more than | AWG | ||||
| 0-6 | 18 | 16 | 16 | 12 | ||
| 6-10 | 18 | 16 | 14 | 12 | ||
| 10-12 | 16 | 16 | 14 | 12 | ||
| 12-16 | 14 | 12 | Not recommended | |||
Figure 1
Method of securing extension cord

I. GENERAL OPERATION
- Read, understand, and follow all instructions on the machine and in the manual(s) before starting.
- Do not put hands or feet near or under the machine. Keep clear of the discharge opening at all times.
- Only allow responsible adults, who are familiar with the instructions, to operate this machine.
- Clear the area of objects such as rocks, wire, toys, etc., which could be thrown by the blade. Stay behind the handle when the engine (motor) is running.
- Be sure the area is clear of bystanders before operating. Stop machine if anyone enters the area.
- Do not operate machine barefooted or while wearing sandals. Always wear substantial footwear.
- Do not pull machine backward unless absolutely necessary. Always look down and behind before and while moving backward.
- Never direct discharged material toward anyone. Avoid discharging material against a wall or obstruction. Material may ricochet back toward the operator. Stop the blade when crossing gravel surfaces.
- Do not operate machine without the entire grass catcher, discharge guard, rear guard, or other safety protective devices in place
and working.
- Never leave a running machine unattended.
- Stop the engine (motor) and wait until the blade comes to a complete stop before cleaning the machine, removing grass catcher, or unclogging the discharge guard.
- Operate machine only in daylight or good artificial light.
- Do not operate machine while under the influence of alcohol or drugs.
- Never operate mower in wet grass. Always be sure of your footing; walk; never run.
- Disengage the drive system, if so equipped, before starting the engine (motor).
- If the machine should start to vibrate abnormally, stop the engine (motor) and check for the cause immediately. Vibration is generally a warning of trouble.
- Always wear eye protection when operating machine.
- See manufacturer's instructions for proper operation and installation of accessories. Only use accessories approved by the manufacturer.
ii. Slope operation
Slopes are a major factor related to slip and fall accidents, which can result in severe injury. Operation on all slopes requires extra caution. If you feel uneasy on a slope, do not mow it.
- Mow across the face of slopes; never up and down. Exercise extreme caution when changing direction on slopes.
- Watch for holes, ruts, bumps, rocks, or other hidden objects. Uneven terrain could cause a slip and fall accident. Tall grass can hide obstacles.
- Do not mow on wet grass or excessively steep slopes. Poor footing could cause a slip and fall accident.
- Do not mow near drop-offs, ditches, or embankments. You could lose your footing or balance.
iii. children
Tragic accidents can occur if the operator is not alert to the presence of children. Children are often attracted to the machine and the mowing activity. Never assume that children will remain where you last saw them.
- Keep children out of the mowing area and under the watchful care of a responsible adult other than the operator.
- Be alert and turn mower off if a child enters the area.
- Never allow children to operate the machine.
- Use extra care when approaching blind corners, shrubs, trees, or other objects that may block your view of a child.
iv. Service
GENERAL SERVICE
- Keep all nuts and bolts tight to be sure the equipment is in safe working condition.
- Never tamper with safety devices. Check their proper operation regularly.
- Keep machine free of grass, leaves, or other debris build-up.
- If you strike a foreign object, stop and inspect the machine. Repair, if necessary, before starting.
- Never make any adjustments or repairs with the engine (motor) running.
- Always unplug electric mowers before adjusting, cleaning, or repairing.
- Check grass catcher components and the discharge guard frequently and replace with manufacturer's recommended parts, when necessary.
- Mower blades are sharp. Wrap the blade or wear gloves, and use extra caution when servicing them.
- Maintain or replace safety and instruction labels, as necessary.
Save theSe inStructionS
SYMBOLS

CPSC Danger label.
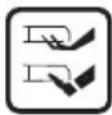
Severing of toes or fingers-Rotary mower blade.

Thrown objects from mower deck.

Keep bystanders/children away.

Safety alert.

Slip on slope.

Read the operator's manual.

Double insulation
ASSEMBLY/ADJUSTMENT
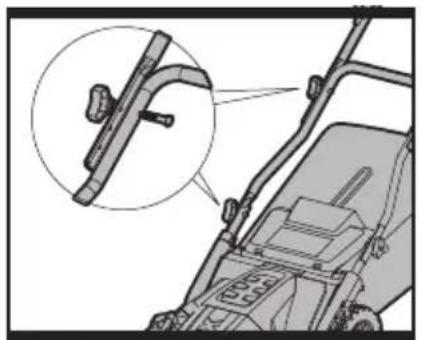
ASSEMBLING THE HANDLE (See A & C)
- Attach the lower handle to the mower body with the bolts and wing nuts. (See A)
- Attach the upper handle to the lower handle with the bolts and wing nuts. (See A & C)
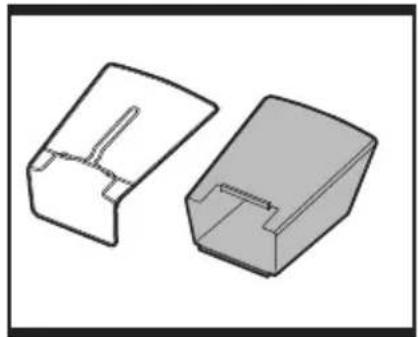
GRASS COLLECTION BAG (See B1, B2 & B3)
- Before starting attaching the grass bag to the frame, check that the grass bag is positioned to slip over the frame. (See B1)
- Slide the grass bag onto the frame. (See B2)
- Assemble the top clips to the frame, and then assemble the two side clips and the bottom clip last. (See B3)
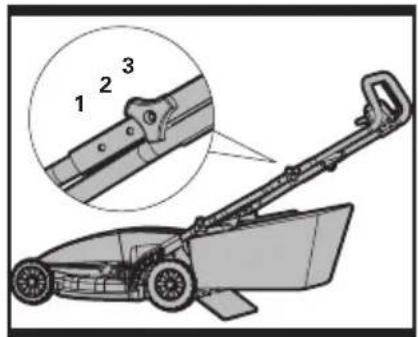
HANDLE ADJUSTMENT (See C)
The upper handle can be adjusted to 3 different height positions.
UNPLUG TOOL, AND WAIT FOR BLADE TO COME TO A COMPLETE STOP
- Loosen the wing nuts and bolts.
- Position the upper handle to one of the three height positions.
- Insert the bolt into the hole then tighten the wing nut.
NOTE: Always check that the upper handle is fixed firmly.
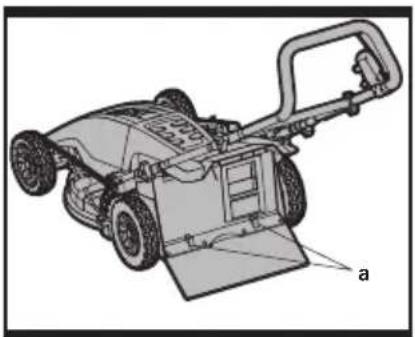
INSTALLING THE GRASS COLLECTION BAG (See D1 & D2)
UNPLUG TOOL, AND WAIT FOR BLADE TO COME TO A COMPLETE STOP
- Raise the safety flap and hold it up, ensure that the mulching insert has been removed. (See D1)
- Pick up the grass collection bag by the handle, and position grass collection bag on the lower hooks (a) on the mower deck. (See D1 & D2)
- Release the safety guard to lock the grass collection bag into position.
NOTE: Push down on the grass collection bag slightly to ensure that it is completely installed.
OPERATION
STARTING (See E)
DO NOT connect the extension cord to power source until you have finished reading this manual and you are ready to start mowing.
- The extension cord must be polarized and will only plug in one way, orient the wide slot with the wide blade into the pigtail. Connect the plug to the mains and switch ON.
a. The switchbox is provided with a lock-off button to prevent accidental starting.
- With one hand press and hold the safety button ①, with the other hand squeeze the switch lever ② towards the handle, and release the safety lock off button. The machine is now started; wait until the product is at full speed before cutting the grass. Then use both your hands to hold the switch lever to keep it running.
STOPPING (See E)
- Release the switch lever ②. The lever is spring loaded and will quickly return to the off position upon release.
REMOVING MULCH INSERT (See F)
To remove the mulching insert so that you can bag the grass or side discharge follow the steps listed below:
- UNPLUG TOOL, AND WAIT FOR BLADE TO COME TO A COMPLETE STOP
- Raise the safety guard and hold it up.
- Grasp the middle of the insert, lift and pull out the mulching insert completely.
- The safety guard is spring loaded. When you release it, the guard will return to the closed position.
INSTALLING MULCH INSERT (See F)
-
UNPLUG TOOL, AND WAIT FOR BLADE TO COME TO A COMPLETE STOP
-
Raise the safety guard and hold it up.
- Slide the mulching insert (10) into the discharge opening until it is firmly in contact with the deck.
- Release safety guard and ensure it is properly closed.
SIDE-DISCHARGE CHUTE (See G1 & G2)
Using the mulching insert and side-discharge chute, the grass can be discharged from the side-discharge of the machine.
- Raise the side-discharge cover and hold it up,
- Position the side-discharge chute onto the hooks, and then release the cover to lock the side-discharge into position.
REMOVING/EMPTYING
UNPLUG TOOL, AND WAIT FOR BLADE TO COME TO A COMPLETE STOP
- Lift the safety flap and hold it up. The grass collection bag will drop automatically.
ADJUSTING THE CUTTING HEIGHT (See H)

WARNING: STOP REALEASE THE SWITH LEVER, UNPLUG TOOL, AND
WAIT FOR BLADE TO COME TO A COMPLETE STOP The blades continue to rotate after the machine is switched off, a rotating blade can cause injury.
CAUTION: Do not touch rotating blades.
The lawnmower can be set to 6 cutting heights between 1.5" and 3.5".
- Your mower features the Worx one touch cut height adjustment
- Move the cutting height adjustment lever outwards then adjust to the preferred position.
- This system will adjust all four wheels at the same time, up or down.
NOTE: Always inspect area where mower is to be used and remove all stones, sticks, wire, metal and other debris which might be thrown by the rotating blade.
- Mow across the face of slopes, never up-and-down. Exercise extreme caution when changing direction on slopes. Do not mow excessively steep slopes. Always maintain good footing.
- Release switch lever to turn mower "OFF" when crossing any graveled area (stones can be thrown by the blade).
- Set mower at highest cutting height when mowing in rough ground or in tall weeds. Removing too much grass at one time can cause circuit breaker to trip, which stops mower.
- If a grass collection bag is used during the fast growing season, the grass may tend to clog up at the discharge opening. Release switch lever to turn mower "OFF". Remove
the grass collection bag and shake the grass down to the back end of the bag. Also clean out any grass or debris which may be packed around the discharge opening. Replace the grass collection bag.
- If mower should start to vibrate abnormally, release switch lever to turn mower "OFF". Check immediately for cause. Vibration is a warning of trouble. Do not operate mower until a service check has been made.
ALWAYS RELEASE SWITCH LEVER TO TURN MOWER "OFF".
MULCHING MOWING TIPS
While mulching, your new mower is designed to cut the grass clippings into small pieces and distribute them back into the lawn. Under normal conditions, the mulched grasses will biodegrade quickly to provide nutrients to the lawn.
Please review the following recommendations for optimum mulching performance.
-
Avoid mowing when the grass is wet from rain or dew. Wet grass may form clumps which interfere with the mulching action and reduce runtime. The best time to mow grass is in the late afternoon when the grass is dry and the newly cut area will not be exposed to direct sunlight.
-
For best mulching performance, set the cutting height to remove about one third of the grass blade length, ideally no more than 1-1/2" at one time. If the lawn is overgrown, it may be necessary to increase the cut height to reduce the pushing effort and prevent overloading the motor. For extremely heavy mulching, it is advisable to first cut at a high cut height setting, and then re-cut to the final cut height. Otherwise, make narrower cuts and mow slowly. (See I)
-
For best performance, keep the mower housing free of built-up grass. From time to time turn off mower and wait for the blade to come to a complete stop. Using an object such as a stick, wipe out any accumulation of grass in the blade area. Be careful of the sharp edges of the blade. Clean often in wet, new grass, and always
after every use.
- Certain types of grass or grass conditions may require that an area be mulched a second time to fully disperse the grass throughout the lawn. If cutting a second time, it is advisable to cut perpendicular (across) the first cut pattern. DO NOT CHANGE CUT PATTERN IN ANY WAY THAT WOULD CAUSE MOWING DOWN A HILL.
- Change your cutting pattern from week to week. This will help prevent matting and graining of the lawn.

CAUTION: Do not attempt to unclog the blade chamber by dropping or tapping the tool on the ground. This can damage the unit. Keep hands clear of blade when cleaning.
DISCHARGING (AVAILABLE AS AN OPTION AT EXTRA COST)
The mower with discharge chute can be used to discharge grass clippings back to the lawn.
- Discharging may be necessary if the grass is too long to mulch or the bag fills too quickly.
- Clippings may be further dispersed, if needed, by blowing them with a yard blower.
- In heavy grass conditions, a narrower pass may be required.
MAINTENANCE

WARNING: Stop the mower and unplug the tool before performing any maintenance.
NOTE: To ensure long and reliable service, perform the following maintenance procedures regularly. Check for obvious defects such as a loose, dislodged or a damaged blade, loose fittings and hardware, and worn or damaged components. Check that the covers and guards are all undamaged and are correctly attached to mower. Carry out any necessary maintenance or repairs before operating mower. If the mower should happen to fail despite regular maintenance, please call our customer helpline for advice, 1-866-354-WORX.
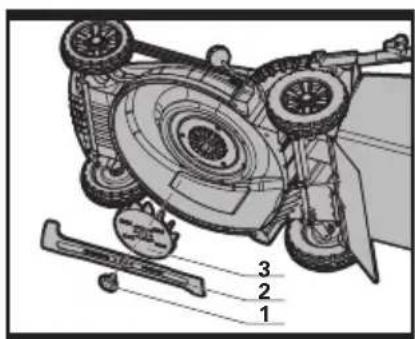
BLADE MAINTENANCE (See J & K)
Renew your metal blade after 50 hours mowing or 2 years, which ever is the sooner-regardless of condition.
Follow these procedures to remove and replace the blade. You will need garden gloves (not provided) and a spanner wrench (provided) to remove the blade. Hold the blade (K-2) and unscrew the blade bolt (K-1) counter-clockwise using a spanner wrench, and then remove blade.
To re-assemble, position the blade (K-2) with the cutting edges towards the ground. Then securely tighten the blade bolt (K-1).
BLADE SHARPENING
KEEP BLADE SHARP FOR BEST MOWER PERFORMANCE. A DULL BLADE DOES NOT CUT GRASS CLEANLY OR MULCH PROPERLY. WEAR PROPER EYE PROTECTION WHILE REMOVING, SHARPENING, AND INSTALLING BLADE. ENSURE THE MOWERIS OFF AND THE CORD IS UNPLUGGED.
Sharpening the blade twice during a mowing season is usually sufficient under normal circumstances. Sand causes the blade to dull quickly. If your lawn has sandy soil, more frequent sharpening may be required. REPLACE BENT OR DAMAGED BLADE IMMEDIATELY.
WHEN SHARPENING THE BLADE:
- Make sure blade remains balanced.
- Sharpen blade at the original cutting angle.
- Sharpen cutting edges on both ends of blade, removing equal amounts of material from both ends.
TO SHARPEN BLADE IN A VISE (See L)
Be sure the switch lever is released; the blade has stopped and unplug the mower before removing the blade.
- Remove blade from mower. See instructions for removing and attaching blade.
- Secure blade L-1 in a vise L-2.
- Wear safety glasses, sturdy gloves and be careful not to cut yourself.
- Carefully file the cutting edges of the blade with a fine tooth file L-3 or sharpening
stone.
- Check balance of blade. See instructions for blade balancing.
- Replace blade on mower and tighten securely. Refer to instructions below.
BLADE BALANCING (See M)
Check balance of blade by placing center hole in blade M-1 over a nail or screwdriver shank M-2, clamped horizontally in a vise M-3. If either end of the blade rotates downward, file that end. Blade is properly balanced when neither end drops.
STORAGE
Stop the mower and unplug the tool.
Clean the exterior of the machine thoroughly using a soft brush and cloth. Do not use water, solvents or polishes. Remove all grass and debris, especially from the ventilation slots.
Turn the machine on its side and clean the blade area. If grass cuttings are compacted in the blade area, remove with a wooden or plastic implement.
Store the machine in a dry place. Do not place other objects on top of the machine.
To aid storage loosen the wing nuts to fold the handles and remove the grass collection bag. (See N)
WARRANTY STATEMENT
30 DAY Satisfaction Guarantee
If for any reason you are dissatisfied with any WORX product, you can return the product, along with proof of purchase, within 30 days for a full refund.
If your WORX product becomes defective due to faulty materials or workmanship within the specified warranty period of;
- 24 months for DIY and light trade use, from the date of purchase.
We guarantee to repair or replace all defective parts free of charge, repair products subject to fair wear and tear, free of charge, or at our discretion, replace the unit free of charge to ensure minimum inconvenience to the
customer. Your warranty is subject to the following conditions:
- Proof of purchase date and a valid receipt is produced.
- The product has not been misused.
- The product has not been used for Professional purposes.
- Unauthorized persons have not attempted repairs.
- The product has not been used for hire purposes.
- The product has not sustained damage through foreign objects, substances or accidents.
- Damage is not a result of fitting non-approved accessories.
To claim the guarantee, you will need to submit proof of purchase to the seller or an authorized repair agent.
You can check the location of your nearest authorized repair agent by contacting us at: Positec USA, Inc.
Charlotte, NC 28216
PHONE: 1-866-354-WORX (9679)
This warranty does not apply to accessories. This warranty applies only to the original purchaser and may not be transferred. All repairs and replacement tools will be covered by the limited warranty for the balance of the warranty period from the date of the original purchase. All repairs must use genuine spare parts
WORX
it's your nature
Copyright © 2008, Positec. All Rights Reserved.


- TECHNICAL DATA
- ACCESSORIES
- SAFETY INSTRUCTIONS
- READ ALL INSTRUCTIONS
- FOR ALL DOUBLE-INSULATED LAWN MOWERS
- POLARIZED APPLIANCE CONNECTIONS
- FOR ALL LAWN MOWERS
- GENERAL OPERATION
- II. SLOPE OPERATION
- III. CHILDREN
- IV. SERVICE
- GENERAL SERVICE
- SAVE THESE INSTRUCTIONS
- SYMBOLS
- ASSEMBLY/ADJUSTMENT
- ASSEMBLING THE HANDLE (SEE A & C)
- GRASS COLLECTION BAG (SEE B1, B2 & B3)
- HANDLE ADJUSTMENT (SEE C)
- UNPLUG TOOL, AND WAIT FOR BLADE TO COME TO A COMPLETE STOP
- INSTALLING THE GRASS COLLECTION BAG (SEE D1 & D2)
- OPERATION
- STARTING (SEE E)
- STOPPING (SEE E)
- REMOVING MULCH INSERT (SEE F)
- INSTALLING MULCH INSERT (SEE F)
- SIDE-DISCHARGE CHUTE (SEE G1 & G2)
- REMOVING/EMPTYING
- ADJUSTING THE CUTTING HEIGHT (SEE H)
- ALWAYS RELEASE SWITCH LEVER TO TURN MOWER "OFF
- MULCHING MOWING TIPS
- DISCHARGING (AVAILABLE AS AN OPTION AT EXTRA COST)
- MAINTENANCE
- BLADE MAINTENANCE (SEE J & K)
- BLADE SHARPENING
- WHEN SHARPENING THE BLADE
- TO SHARPEN BLADE IN A VISE (SEE L)
- BLADE BALANCING (SEE M)
- STORAGE
- WARRANTY STATEMENT
Brand : WORX
Model : WG718
Category : Lawn mower