
CA330 - Keyboard KAWAI - Free user manual and instructions
Find the device manual for free CA330 KAWAI in PDF.


User questions about CA330 KAWAI
0 question about this device. Answer the ones you know or ask your own.
Ask a new question about this device
Download the instructions for your Keyboard in PDF format for free! Find your manual CA330 - KAWAI and take your electronic device back in hand. On this page are published all the documents necessary for the use of your device. CA330 by KAWAI.
USER MANUAL CA330 KAWAI
Note: This equipment has been tested and found to comply with the limits for a Class B digital device, pursuant to Part 15 of the FCC Rules. These limits are designed to provide reasonable protection against harmful interference in a residential installation. This equipment generates, uses and can radiate radio frequency energy and, if not installed and used in accordance with the instructions, may cause harmful interference to radio communications. However, there is no guarantee that interference will not occur in a particular installation. If this equipment does cause harmful interference to radio or television reception, which can be determined by turning the equipment off and on, the user is encouraged to try to correct the interference by one or more of the following measures:
- Reorient or relocate the receiving antenna.
- Increase the separation between the equipment and receiver.
- Connect the equipment into an outlet on a circuit different from that to which the receiver is connected.
- Consult the dealer or an experienced radio/TV technician for help.
This instrument has been certified to comply with the limits for a class B digital apparatus, pursuant to the Radio Interference Regulations, C.R.C., c. 1374.
This digital piano should be not commercial use but household use.
KAWAI
CA330
Owner's Manual
Note: This equipment has been tested and found to comply with the limits for a Class B digital device, pursuant to Part 15 of the FCC Rules. These limits are designed to provide reasonable protection against harmful interference in a residential installation. This equipment generates, uses and can radiate radio frequency energy and, if not installed and used in accordance with the instructions, may cause harmful interference to radio communications. However, there is no guarantee that interference will not occur in a particular installation. If this equipment does cause harmful interference to radio or television reception, which can be determined by turning the equipment off and on, the user is encouraged to try to correct the interference by one or more of the following measures:
- Reorient or relocate the receiving antenna.
- Increase the separation between the equipment and receiver.
- Connect the equipment into an outlet on a circuit different from that to which the receiver is connected.
- Consult the dealer or an experienced radio/TV technician for help.
This instrument has been certified to comply with the limits for a class B digital apparatus, pursuant to the Radio Interference Regulations, C.R.C., c. 1374.
This digital piano should be not commercial use but household use.
IMPORTANT SAFETY INSTRUCTIONS
WARNING - when using electric products, basic precautions should always be followed, including the following:
- Read all the instructions before using the product.
- To reduce the risk of injury, close supervision is necessary when a product is used near children.
- Do not use this product near water - for example, near a bathtub, washbowl, kitchen sink, in a wet basement, or near a swimming pool, or the like.
- Do not touch the power plug with wet hands. There is a risk of electrical shock. Treat the power cord with care as well. Stepping on or tripping over it can break or short-circuit the wire inside.
- This product should be used only with a cart or stand that is recommended by the manufacturer.
- This product, either alone or in combination with an amplifier and headphones or speakers, may be capable or producing sound levels that could cause permanent hearing loss. Do not operate for a long period of time at a high volume level or at a level that is uncomfortable. If you experience any hearing loss or ringing in the ears, you should consult an audiologist.
- The product should be located so that its location or position does not interfere with its proper ventilation.
- The product should be located away from heat sources such as radiators, heat registers, or other products that produce heat.
-
Keep the instrument away from electrical motors, neon signs, fluorescent light fixtures, and other sources of electrical noises.
-
The product should be connected to a power supply only of the type described in the operating instructions or as marked on the product.
- This product may be equipped with a polarized line plug (one blade wider than the other). This is a safety feature. If you are unable to insert the plug into the outlet, contact an electrician to replace your obsolete outlet. Do not defeat the safety purpose of the plug.
- Always turn the power off when the instrument is not in use. The power supply cord of the product should be unplugged from the outlet when left unused for a long period of time.
- Care should be taken so that objects do not fall and liquids are not spilled into the enclosure through openings.
- The product should be serviced by qualified service personnel when:
A. The power supply cord or the plug has been damaged; or
B. Objects have fallen, or liquid has been spilled into the product; or
C. The product has been exposed to rain; or
D. The product does not appear to operate normally or exhibits a marked change in performance; or
E. The product has been dropped, or the enclosure damaged.
- Do not attempt to service the product beyond that described in the user -maintenance instructions. All other servicing should be referred to qualified service personnel.
SAVE THESE INSTRUCTIONS
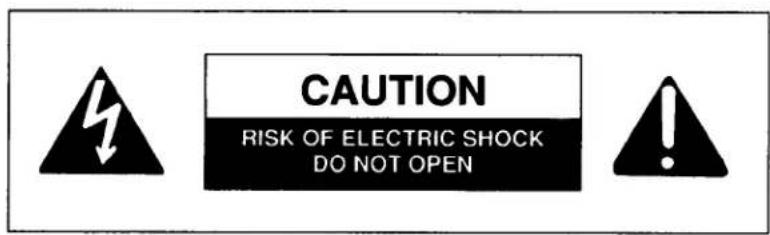
WARNING
TO REDUCE THE RISK OF FIRE OR ELECTRIC SHOCK.
DO NOT EXPOSE THIS PRODUCT TO RAIN OR MOISTURE.
AVIS: RISQUE DE CHOC ELECTRIQUE -NE PAS OUVRIR.
TO REDUCE THE RISK OF ELECTRIC SHOCK, DO NOT REMOVE COVER (OR BACK). NO USER-SERVICEABLE PARTS INSIDE. REFER SERVICING TO QUALIFIED SERVICE PERSONNEL.
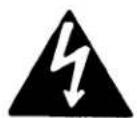
The lighting flash with arrowhead symbol, within an equilateral triangle, is intended to alert the user to the presence of uninsulated "dangerous voltage" within the product's enclosure that may be of sufficient magnitude to constitute a risk of electric shock to persons.

The exclamation point within an equilateral triangle is intended to alert the user to the presence of important operating and maintenance (servicing) instructions in the literature accompanying the product.
Thank you for purchasing a KAWAI Digital Piano!
The Kawai digital piano is a revolutionary new keyboard instrument that combines the latest in electronic advances with traditional craftsmanship inherited from Kawai's many years of experience in building fine pianos. Its keyboard provides the touch response and full dynamic range required for a superb performance on the piano, harpsichord, organ, and other instrument presets. Moreover, the reverb effect gives you even deeper resonance. Industry-Standard MIDI (Musical Instrument Digital Interface) jacks are included which allow you to play other electronic instruments at the same time-opening a whole new world of musical possibilities.
This Owner's Manual contains valuable information that will help you make full use of this instrument's many capabilities. Read it carefully and keep it handy for further reference.
Table of Contents
■ Basic Controls....1
- Front Panel....1
- Rear Panel....3
■ Let's Play ....4
- Basic Operations....4
- Transpose ....5
- Selecting the Touch Curve 6
- Playing the Demo Songs....7
- Metronome 8
■ Let's Record ....10
- Simple recording .... 10
- Easy play back....11
- Recording over the previous song 12
- Playing back the song 13
- Recording the left and right hand parts separately .....14
- Playing back the left and right hand parts separately .....16
- Deleting unnecessary songs....17
■ Advanced Features....18
- Programming Mode....18
- Tuning....20
- Temperaments 21
- Setting the metronome volume....23
■ MIDI Interface ....24
- What's MIDI? 24
- Connections....25
- MIDI Implementation 27
- MIDI Settings....28
(A) Setting the channel 28
(B) Sending program number (timbre code) and MIDI exclusive data.....29
(C) Turning MULTI TIMBRE on and off 32
(D) Turning on and off individual sounds when using MULTI TIMBRE 2 mode.....33
(E) Local Control 35
(F) One Touch Local Control OFF 35
MIDI Exclusive Data Format....36
■ Specifications....37
MIDI Implementation Chart 38
1 Front Panel

① VOLUME
Move the volume slider to the right to increase the instrument's volume.
Move the slider to the left to decrease the volume.
② TRANSPOSE
This switch is used to transpose from one key to another. (See p. 5)
That is, you can use transpose to switch from the key of C to the key of D. This is valuable when you have learned a song in one key and someone (usually a singer) asks you to play it in another key. The transpose feature lets you play the song as you learned it (in the original key), but hear it in another key.
③ TOUCH CURVE selector
Use these switches to select the touch curve. See p. 6 for more information on the touch curve.
④ TONE SELECTORS
Select the desired instrument by pressing the appropriate switch.
⑤ REVERB switches
These add REVERB (echo) effect to the sound for greater beauty.
⑥ DEMO
Use this button to play the 3 demo songs stored in the keyboard's internal memory.
See p. 7 for more information on playing the demo songs.
⑦ TEMPO SLIDER
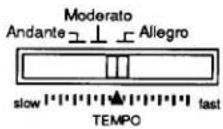
Set the tempo of the metronome or recorder when recording and playing back.
⑧ METRONOME
Use this switch to make the metronome count.
⑨ PLAY/STOP
Play back/stop the recorder.
⑩ REC
Use this switch to record a song.
11 POWER
This switch turns the instrument on and off. Be sure to turn off the instrument when finished playing.
⑫ HEADPHONE jack
This jack equipped with CA330 is for headphones sold separately (SH-2).
2 Rear Panel

1 LINE OUT
These jacks provide stereo output to amplifiers, stereo systems, tape recorders, or similar equipment. Use the L/MONO jack when using only one output.
② LINE IN
These jacks connect two channels of output from other electronic instruments to the piano's speakers. Use the L/MONO jack when using only one input.
This input bypasses the piano's VOLUME control. To adjust the balance, you must use the output volume controls on the individual instruments.
③ MIDI
These jacks allow communication with other gear equipped with MIDI.
4 PEDAL jack
This jack is used to activate the damper, the sostenuto and soft pedals.
⑤ Optional PEDAL jacks
These jacks are used to connect optional pedals externally.
• The pedals
From right to left, the pedals are the damper pedal, sostenuto pedal, and the soft pedal.

Damper pedal: Pressing this pedal sustains the sound even after removing the hands from the keyboard.
Sostenuto pedal: Depressing this pedal after pressing the keyboard and before releasing the keys sustains the sound of only the keys just played.
Soft pedal: Pressing this pedal softens the sound, and also reduces its volume.
1 Basic operations
Step 1
Turn on the power.

Step 2
Adjust the volume.
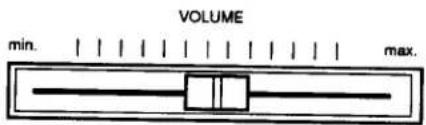
Play a note on the keyboard and adjust the volume (Moving the slider to the right raises the volume; moving it to the left lowers it).
Step 3
Choose the tone.
Pressing a TONE SELECTOR switch automatically changes the tone of the piano. The LED above it lights to indicate which tone is currently in effect.
PIANO1 is automatically selected when the power is turned on.

Step 4
Play.
Experiment with the various tone colors to acquaint yourself with the sounds that are available.
Up to 15 keys can be played simultaneously (15 note polyphonic).
Step 5
Add REVERB.
Three REVERB effects are available.
ROOM: Gives a soft REVERB effect simulating play in a room.
STAGE: Gives a REVERB effect simulating play on stage.
HALL: Gives a deep REVERB effect simulating play in a large concert hall.
2 Transpose
TRANSPOSE allows you to shift key when playing with an instrument in a different key or accompanying a singer on the piano. You can also play the piano using easier keys if there are a lot of sharps or flats in the score.
Putting the attached sheet on the panel makes the operation easier.
Step 1
Press the TRANSPOSE switch so that the LED above it flashes and the current key LED lights.

The key is set to C when the power is turned on.
Step 2
Holding down the TRANSPOSE switch, press the key switch you wish to select. To change the key to #, simultaneously press the switches on either side of that key.

In the example above, D# will be selected.
TRANSPOSE LED will light when the key except for when C is selected.
Step 3
Press the TRANSPOSE switch to exit. The TRANSPOSE LED will go off and the key signature will return to C.
3 Selecting the Touch Curve
When playing a piano, the volume of the sound produced increases in direct relation to how hard the key is struck. "Touch Curve" is the expression used to describe the relationship between the volume and the strength with which the keyboard is struck.
You can select from 3 different touch curves with this keyboard.

①Light: For those still developing finger strength, such as a child, a louder sound is emitted even when played with a soft touch.
②Normal: Volume changes accordingly with normal touch.
③Heavy: Perfect for those with strong fingers or for practicing with a hard touch.
Step 1 Press either the LIGHT or HEAVY switch to select the touch curve.

The LED of the selected touch curve will light.
When neither LED is lit, the Normal setting is selected.
Step 2 When you want to return the setting to "Normal", press the switch of the currently selected touch curve once again and its LED will turn off.
The default setting when the power to the keyboard is turned on is "Normal".
4 Playing the Demo Songs
There are 3 demo songs stored in the keyboard's internal memory. Using the following method you can enjoy listening to an automated recital of these songs.
Step 1
Press the DEMO switch.
![graph TD A["1"] --> B["ROOM"] C["2"] --> D["STAGE"] E["3"] --> F["HALL"] G["DEMO"] --> H["REVERB"] style A fill:#fff,stroke:#000 style C fill:#fff,stroke:#000 style E fill:#fff,stroke:#000 style G fill:#fff,stroke:#000](/content/2026/05/945624/images/a0827524aad893a94af22113a4fc0551419400e854fc5c5b42f3ebc49e30be1b.jpg)
The 3 demo songs will play automatically one after another and repeat until stopped.
Step 2
By pushing the ROOM, STAGE, or HALL switches, you can choose the specific demo song or songs (demo song 1 \~ 3) you wish to hear.
![graph TD A["1"] --> B["ROOM"] C["2"] --> D["STAGE"] E["3"] --> F["HALL"] G["DEMO"] --> H["REVERB"] I["Hand icon"] --> J[" pointing finger"]](/content/2026/05/945624/images/f53c55952f67f0becd28ad1bbf11f8f81efbb274b5ea6ffd3794a00a9d5d96bb.jpg)
Step 3
To stop the demo concert.....
Push the DEMO button once again.
The demo song will stop.
Step 4
If you select the demo songs you want to hear, while at the same time holding down the DEMO switch, the selected song or songs will play repetitively until stopped.

In the example above demo songs 2 and 3 will be played repetitively.
In this situation, the LED of the song being played will flash, and the LED of the song cued to play next will be lit. If you push the switch whose LED is lit or the one whose LED is flashing, the song corresponding to that switch will be played from the beginning.
You cannot change the reverb while the demo songs are playing.
5
Metronome
Now let's practice using the metronome.
Step 1
Press the METRONOME switch once.
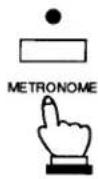
The metronome counts in four-four time.
Press the METRONOME switch once again to count in three-four time and twice for one-four time. Press the METRONOME switch once again to turn it off.
![graph LR A[" "] --> B["4/4"] B --> C["3/4"] C --> D["1/4"] D --> E[" "] style A fill:#fff,stroke:#000 style B fill:#fff,stroke:#000 style C fill:#fff,stroke:#000 style D fill:#fff,stroke:#000](/content/2026/05/945624/images/2fec3ccf80853c91e077c28a6a79ef18189abdad18aeaccc5ecb21dbcaf3fab2.jpg)
Step 2
Adjust the tempo.


Move the tempo slider to the right or left to select the desired tempo while listening to the metronome counts.
To set the tempo using numbers (for example, ♩ =135), see page 9.
Setting the tempo using numbers.
You can set the tempo using numbers (to set the metronome precisely ♪ =135) as follows:
Putting the attached sheet on the panel makes the operation easier.
♩ =135
Step 1
Holding down the METRONOME switch, press the switches in order with the left hand as shown in the illustration.

Then, press switch 5 (ones digit).
Press the PIANO 1 (1), E. PIANO (3) and FULL ORGAN (5) switches one after another using the left hand.
Step 2
The tempo is now set to ♪ =135.
The tempo can be set anywhere between 40 and 200 in quarter note (♩) increments.
The tempo slider is not activated when setting the tempo with numbers. However, if you shift the slider after setting, the tempo will follow the slider selection.
1 Simple recording
This piano has a record function to record what is played. You can use this function to check your piano practice or playing.
Step 1 Press the REC switch.

Step 2 Play the piano.
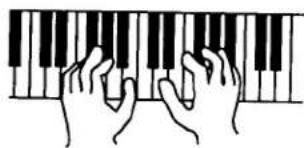
Playing the piano will automatically start the recording.
REC and PLAY/STOP LEDs will light.
You can also start recording by pressing the PLAY/STOP switch after step 1.
Step 3 Press the PLAY/STOP switch after you have finished playing.

The REC and PLAY/STOP LEDs will turn off and recording will stop.
2 Easy play back
Let's play back the recording.
Step 1 Press the PLAY/STOP switch.

The song will be played back in the same tone it was recorded in.
Step 2 Press the PLAY/STOP switch once again to stop the play back.

Play back will automatically stop when play back is finished.
If the METRONOME is activated before recording, you can record what you play in time with the metronome counts. (The metronome counts are not recorded.)
Making another recording will delete the song you previously recorded. To keep the recorded song, record the song following the procedures on page 12.
3
Recording over the previous song
The memory of this piano can record and store a maximum of 5 songs. Placing the attached sheet on the panel of the piano will help you to operate it easily. Recording the second song.
Step 1
Holding down the REC switch, press the PIANO 2 (SONG 2) switch.

SONG 2 will be selected and piano will be ready to record.
The recording procedures explained on page 10 record what you play in SONG 1. The song recorded in SONG 1 can be kept by recording the second song in SONG 2.
![graph LR A["The LED of the song where the song is recorded will be lit."] --> B["SONG 1"] B --> C["SONG 2"] C --> D["Piano 1"] C --> E["Piano 2"] D --> F["The LED of the song selected to record (play back) will flash."] E --> F](/content/2026/05/945624/images/638c60bdb151c664ba63018701dbd4fd0d40e6a0ad7cb645b6d0366d2d2d3735.jpg)
Step 2
Play the piano.

Playing the piano will automatically start the recording.
REC and PLAY/STOP LEDs will light.
Recording can also be started by pressing the PLAY/STOP switch after step 1.
Step 3
Press the PLAY/STOP switch after you finish playing.

The REC and PLAY/STOP LEDs will be turned off and the recording will stop.
You can record a third, fourth and fifth song in SONG 3, 4 and 5. Recording a song in an area where a song has already been recorded, will delete the previously recorded song.
4 Playing back the song
This function enables you to select and play back a song you want to hear from all of the recorded songs. The following explains the case where a song has been recorded in all of the areas SONG 1 to 5.
Step 1
Press the SONG switch where the song you want to hear has been recorded, at the same time holding down the PLAY/STOP switch.

For example, pressing the JAZZ ORGAN (SONG 4) switch will flash the LED to show that SONG 4 is selected.
Step 2
Releasing both switches will play back SONG 4.
Relationship between the SONG status and its corresponding LED

In the case above,
SONG 1, 2 (LED lights) .....Area in which the song has been recorded. SONG 3 (LED flashes) .....Area whose stored song will play back soon. SONG 4, 5 (LED turns off) ..Area in which a song is not recorded.
PART 1 and 2 LEDs indicate the part status of the song being selected (SONG 3).
PART 1 (LED lights (flashes)) ..Part of the SONG 3 which will be played back (or recorded) soon.
PART 2 (LED turns off) ......Part of the song that has not been recorded or played back. (See p. 14 - 16.)
5
Recording the left and right hand parts separately
This piano can record the parts played by the left or right hand and play back these parts separately or simultaneously.
This function can be enjoyed in different ways. For example, you can practice the right hand part of the song while playing back the recorded left hand part or record the melody part of the song while playing back previously recorded accompaniment.
Here, let's try to record the left and right hand parts restectively in SONG 3.
Step 1
Let's play the left hand part
Holding down the REC switch, press the E. PIANO (SONG 3) switch.
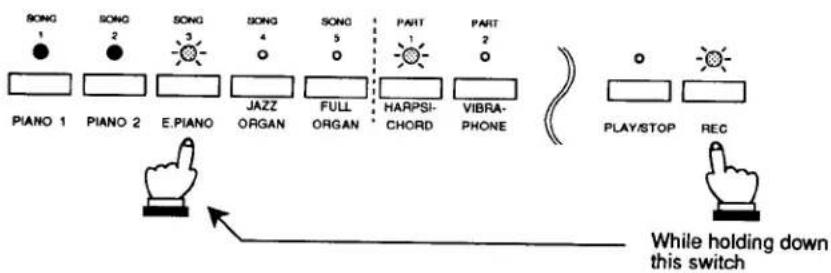
PART 1 of SONG 3 will be selected and the piano will be ready to record.
Step 2
Play the piano with the left hand.

Playing the piano will automatically start the recording.
REC and PLAY/STOP LEDs will light.
Recording will start by pressing the PLAY/STOP switch after step 1.
Step 3
Press the PLAY/STOP switch after you finished playing.

The REC and PLAY/STOP LEDs will be turned off and the recording will stop.
Step 4
Now play back the left hand part. Press the PLAY/STOP switch.

The left hand part you have recorded (PART 1 of SONG 3) will be played back. You can practice the right hand part to accompany the recorded part.
Step 5
Let's record the right hand part while listening to the left hand part. Holding down the REC switch, press the VIBRAPHONE (PART 2) switch.

The PART 1 LED will light (ready to play back) and the PART 2 LED will flash to indicate the piano is ready to record.
Step 6
Play the piano with the right hand.

Pressing the keyboard will start playing back the recorded left hand part (PART 1) and playing with the right hand will be recorded. REC and PLAY/STOP LEDs will light.
You can start recording by pressing the PLAY/STOP switch after step 5.
Step 7
Press the PLAY/STOP switch after you have finished.

The REC and PLAY/STOP LEDs will be turned off and the recording will stop.
6 Playing back the left and right hand parts separately
If you succeeded in recording the left and right parts explained on pages 14 to 15, it will be possible to play back the left and right parts by themselves or together. The following will show an example of how to play back only left hand part.
Step 1 Select the SONG switch while pressing the PLAY/STOP switch.

In the example above, SONG 3 is selected.
Step 2 Holding down the PLAY/STOP switch, press the VIBRAPHONE switch.

The right hand part LED (PART 2) will turn off and only the left hand part (PART 1) will be ready to be played back.
The LED will light by pressing the VIBRAPHONE switch once again.
Step 3 Releasing both switches will play back only the left hand part (PART 1).
To play back only the right hand part, turn off the LED for the left hand part (PART 1) by pressing the HARPSICHORD switch as step 2. If you play back with both LEDs of PART 1 and 2 lit, then both parts will be played back at the same time.

7 Deleting unnecessary songs
This function allows you to delete the songs that were not recorded correctly or the songs you do not want to listen to any more.
Putting the attached sheet on the panel makes the operation easier.
Step 1 Simultaneously hold down the PLAY/STOP switch and the REC switch.
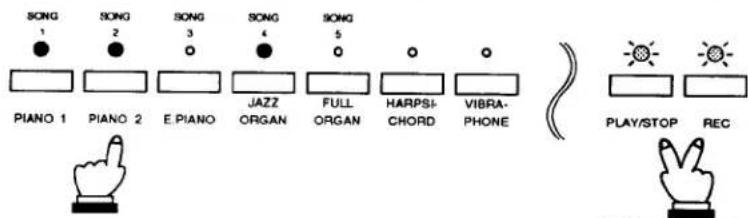
LED of the area where the song has been recorded will light. In the example above, the songs have been stored in SONG 1, 2 and 4.
Step 2 Press the SONG switch you wish to delete while holding down the switches in step 1.

To cancel deletion, press the SONG switch again so that the LED lights before releasing the PLAY/STOP and REC switches.
Step 3 Releasing the switches will delete the specified song.
To delete more than one song, repeat steps 1 to 3.
The total memory capacity of the recorder is approximately 5000 notes. Recording will stop if the memory becomes full during recording. However, the play recorded before the interruption will be retained. The recorder memory will be retained after turning off the power switch. However, memory may be lost if the power remains off for more than 10 days. To delete all the recorded songs (reset), turn the power off and then on while holding down the PLAY/STOP and REC switches.
1 Programming Mode
The programming mode allows you to change the keyboard's tuning, and temperament, and utilize the various MIDI capabilities. These programming functions are performed using the panel switches and keyboard, so please try them after reading and understanding the programming instructions completely.
A. Entering the programming mode
Step 1 Press the VIBRAPHONE switch.
Step 2 Holding down the VIBRAPHONE switch, press the first three tone selector switches (PIANO 1, PIANO 2, and E. PIANO).
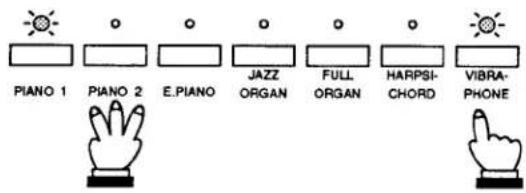
Step 3 The LEDs above the VIBRAPHONE and PIANO 1 switches should then start flashing to indicate that the piano is in the programming mode. In this mode, striking the keyboard produces no sound.
Step 4 Press a TONE SELECTOR switch to select the desired programming mode. The correspondence between switches and 6 types of programming mode is as below.

B. Leaving the programming mode

Press the VIBRAPHONE switch.


The flashing will stop, and you will return to the tone in effect when you entered the programming mode.
You can also continue into another programming mode by pressing another TONE SELECTOR without pressing the VIBRAPHONE switch.
2 Tuning
Step 1 Make sure that the piano is in the programming mode (see P. 18)
Step 2 Press the JAZZ ORGAN switch so that it flashes to indicate that the piano is ready to be tuned.

Step 3 Unlike the other functions in the programming mode, this one produces sound so that you can compare the piano's pitch with another instrument.
Playing the keyboard when set up this way produces the tone selected before entering the programming mode. Tuning is done using this tone. If you want to change the tone, leave the programming mode (see P. 19), select the new tone and repeat steps 1 and 2.
Step 4 Press the highest black key to lower the pitch.
Or press the highest white one to raise it.
It may be necessary to press these keys repeatedly to achieve proper tuning.

The range of tuning possible is ±50 cents (100 cents = a half tone). Each push of the key will change the tuning 1.56 cents.
Step 5 Leave the programming mode by pressing the VIBRAPHONE switch.
Momentarily turning off the power restores the original pitch.
3
Temperaments
Your Kawai digital piano offers not only equal temperament (the modern standard) but also immediate access to those popular during the Renaissance and Baroque periods.
Step 1
Make sure that the piano is in the programming mode.
Step 2
Press the FULL ORGAN switch so that it flashes to indicate that the piano is waiting for a temperament specification.
Step 3
Press one of the seven white keys at the lower end of the keyboard to select one of these corresponding temperaments.

① Equal temperament without the tuning curve
② Mersenne pure temperament
③ Pythagorean temperament
④ Meantone temperament
⑤ Werckmeister III temperament
⑥ Kirnberger III temperament
⑦ Equal temperament with the tuning curve
Step 4
Leave the programming mode.
When the power is first applied or reapplied after a short break, the piano returns to the modern standard (equal temperament with the tuning curve = #7).
Key set function is also available at this point. As you know, limitless modulation of the key became available only after the invention of Equal temperament. When we use a temperament other than Equal temperament, we must carefully choose the key signature to play in.
To select the key signature setting, simply press one of the keys. For example, if the song you are going to play is written in D major, press D key to set the keys.
Please note that this will only change the "balance" of the tuning, and the pitch of the keyboard will remain unchanged. Use the TRANSPOSE control to change the pitch of the whole keyboard.
♣ Temperament characteristic
♣ Equal temperament
This, by far the most popular piano temperament, divides the scale into twelve equal semitones and has the advantage of producing the same chordal intervals in all twelve keys.
♣ Mersenne temperament
This temperament, which eliminates consonances for thirds and fifths, is still popular for choral music.
♣ Pythagorean temperament
This temperament, which uses mathematical ratios to eliminate consonances for fifths, has problems with chords, but produces very beautiful melodic lines.
♣ Meantone temperaments
This temperament, which uses a mean between a major and minor whole tone to eliminate consonances for thirds, was devised to eliminate the lack of consonances experienced with certain fifths for the Mersenne pure temperament. It produces chords that are more beautiful than those with the equal temperament.
♠ Werckmeister III temperament, Kirnberger III temperament
For key signatures with accidentals, this temperament produces the beautiful chords of the mean tone, but, as the accidentals increase, the tension increases, and the temperament produces the beautiful melodies of the Pythagorean temperament. It is used primarily for classical music written to take advantage of these characteristics.
4 Setting the metronome volume
The metronome volume is adjusted with the master volume. The degree of volume change can be set.
Step I
Holding down the VIBRAPHONE switch, press the 3 switches, PIANO 1, PIANO 2 and E. PIANO simultaneously to enter "programming mode". (see p. 18) The LEDs of the VIBRAPHONE and PIANO 1 switches will both flash.
Step 2
Press the METRONOME switch.

The metoronome will sound in four-four time.
The PIANO1 LED will be turned off and in turn, the METRONOME LED will flash.
Now you can start setting the metronome volume.
In this state, pressing the keyboard keys will not produce sound.
Step 3
Set the degree of volume change for the metronome.
Use the seven white keys at the left end of the keyboard to set the degree of volume.

Volume is set to its lowest with the "1" key and at its highest with the "7" key. The "4" key is the factory setting.
Step 4
Press the VIBRAPHONE switch to leave the "programming mode" (see p. 19) You may then transfer to another mode.

What's MIDI?
Before attempting to set the MIDI function, let's take a brief look at what MIDI is.
The letters MIDI stand for Musical Instrument Digital Interface, an international standard for connecting synthesizers, drum machines, and other electronic instruments so that they can exchange performance data.
Instruments equipped with MIDI have three jacks for exchanging data: IN, OUT, and THRU. Each uses a special cable with a DIN connector for connection (see p. 25).
IN: For receiving keyboard, timbre, and other data
OUT: For sending keyboard, timbre, and other data
THRU: For sending received data to another instrument without processing
Electrical and electronic musical instruments equipped with MIDI are able to transmit and receive performance data such as for keyboard and timbre.
Depending on the connection method, instruments are grouped as those which receive data (producing sound according to data received from the connected instrument), those which send data (to the instruments to which they are connected), and those which both send and receive data.
The cable is connected to the MIDI IN jack of the instrument receiving data and to the OUT jack of the sending instrument. The THRU jack is used when the data received is to be sent to another instrument.
MIDI uses what are known as "channels" as a means of transmitting data for playing a specified instrument.
There are two types of channels, one for receiving and one for sending, and MIDI instruments are normally equipped with both types. Receive channels are used when an instrument receives data from another instrument, and send channels are used for transmission to another instrument.
For instance, let's say that three instruments are connected for playing in this way:

① Transmit
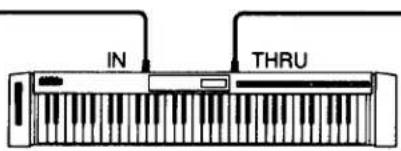
② Receive

③ Receive
Instrument ①, which is sending, transmits the send channel along with keyboard and other data to instruments ② and ③, which are receiving. This data is sent to instruments ② and ③, but the data will not be received unless the receive channel for these two instruments matches the send channel used by instrument ①.
There are 16 channels each (1 through 16) available for both sending and receiving.
2 Connections
(1) Connection to another
MIDI-compatible keyboard
(connection with instruments such as the Kawai digital synthesizers KC10/K1II/K4)
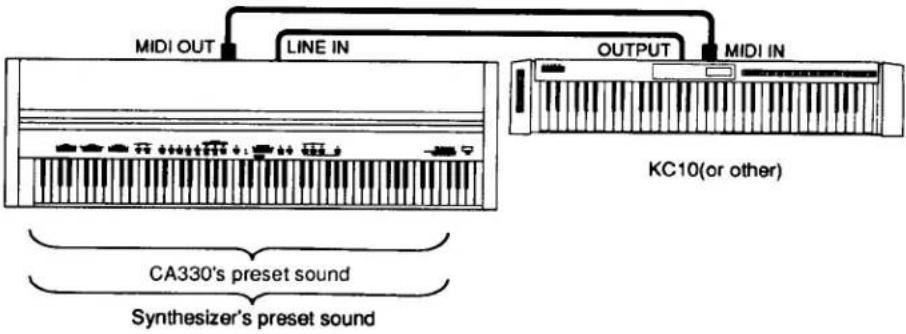
When connected as shown in the illustration, data on how the digital piano is played (what keys are struck and how hard) is sent to the synthesizer unchanged. Also, by connecting the synthesizer's OUTPUT jack and the LINE IN jack on the digital piano, the sound from the digital piano can be layered over the sound of the synthesizer.
Since timbre can be set separately, you can assemble a wide variety of sound combinations, such as a PIANO tone from the digital piano layered with a STRING tone from the synthesizer for a thick sound.
You can assemble the PIANO tone from a synthesizer by connecting the MIDI IN and OUT jack backwards.
(2) Connection to a drum machine

When connected as shown in the illustration, you can not only play along with the rhythm from the drum machine, you can also play the drum machine by striking the keys on the digital piano.
(3) Connection to a sound generator module
(connection with instruments such as the Kawai XS-1)

When connected as shown in the illustration, you can layer sounds like in example (1), as well as playing a large number of tones.
(4) Connection to a sequencer and sound generator module
(connection with instruments such as the Kawai Q-55/XS-1)
![graph TD A["XS-1 (Module)"] -->|MIDI IN| B["Q-55 (sequencer)"] A -->|OUTPUT| C["LINE IN"] A -->|MIDI OUT| D["MIDI IN"] A -->|MIDI IN| E["MIDI OUT 2/THRU"]](/content/2026/05/945624/images/616cc30c4476a44dfeaccebe7993e47ce1972a5de5697a293839ed85155fca39.jpg)
When connected as shown in the illustration, you can record songs played on the digital piano with a sequencer, and play them back as many times as you like. This is very useful for practice. You can also play back the contents of the digital piano recorder and record them with the sequencer.
You can layer the module's tones such as piano, harpsichord and vibraphone, made with the digital piano's MULTI TIMBRE function to assemble a complex automatic performance. If you use a KAWAI Q-55 sequencer, pressing only one switch will easily record and play back this automatic performance. For details of the sequencer operation, please refer to the sequencer manual.
3 MIDI Implementation
The MIDI interface on your Kawai Digital Piano allows you to:
- Receive and transmit keyboard data.
You can play the digital piano to output sound on a synthesizer or other instrument, or vice versa. - Set channel numbers for sending and receiving.
You can set send or receive channels to any number from 1 to 16. - Receive and transmit program numbers (codes for changing timbres).
You can operate the digital piano to change the programmed timbre of a synthesizer or other instrument connected with the MIDI interface to the digital piano, or vice versa (see p. 29).
- Receive and transmit pedal data.
You may receive and transmit ON/OFF data for the soft and damper pedals or transmit ON/OFF information for the sostenute pedal.
- Receive volume data.
You can control the volume of the digital piano from an external source connected via the MIDI interface.
- Set MULTI TIMBRE.
When the digital piano is used as a receiving instrument, you can receive keyboard data on a number of different channels, producing different timbres for each one.
- Sending and Receiving Exclusive data
Settings in the Programming Mode or Panel switch operations can be sent as MIDI exclusive data.
- Sending the recorder play back
You can play back a performance recorded with the recorder on an instrument connected to the MIDI interface of the digital piano or record it using the external sequencer.
For details of the MIDI function of this instrument, please refer to the MIDI Implementation Chart.

MIDI Settings
A. Setting the channel
In order to be able to exchange information with a connected MIDI instrument, you must first set the interconnected instruments to the same channel.
Step 1 Make sure that the digital piano is in the programming mode. (see p. 18)
Step 2 Press the PIANO 2 switch so that it flashes to indicate that the interface is waiting for a channel specification.
(It is also possible to turn the MULTI TIMBRE function on and off. See following section.)
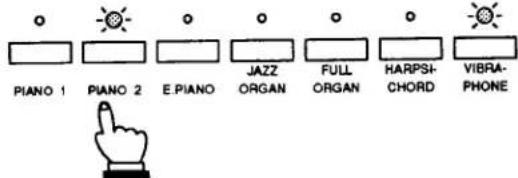
Step 3 Select the channel by pressing the one of the first 16 white keys at the lower end of the keyboard.

Step 4 Pressing one of these keys automatically sets the instrument's transmitting and receiving channel to the number selected.
Step 5 Leave the programming mode. (see p. 19)
When the power is first applied, the interface uses Channel 1 and has the OMNI parameter on. Changing to another channel automatically turns the OMNI parameter off. In OMNI mode, information from all channels is received.
B. Sending program number (timbre code) and MIDI exclusive data
(a) Transmitting with the TONE SELECTORS
You can use the seven TONE SELECTORS during normal playing to transmit program number 0 through 6 shown in the chart below.
| Tone Selector | Program No. |
| PIANO 1 | 0 |
| PIANO 2 | 1 |
| E. PIANO | 2 |
| JAZZ ORGAN | 3 |
| FULL ORGAN | 4 |
| HARPSICHORD | 5 |
| VIBRAPHONE | 6 |
The digital piano is also able to transmit information on TOUCH CURVE, and Effects (REVERB) operation statuses as MIDI exclusive data.
Transmission of a program number and MIDI exclusive data can be switched on and off as described below.
Step 1
Enter the programming mode (see p. 18).
The LEDs for VIBRAPHONE and PIANO 1 will flash. The flashing of the PIANO 1 LED shows that the instrument is in the programming mode for transmitting the program number, so move on to the next step.
No sound will be played if the keyboard is pressed at this time.
Step 2
Press the highest black or white key.

Pressing the black key (OFF) disables transmission of the program number and MIDI exclusive data. Pressing the white key (ON) enables it.
Step 3
Press the VIBRAPHONE switch to leave the programming mode.
You may then change to another programming mode.
The setting described above is automatically set on when the power is turned on, so you can also turn the setting simply by turning the power off and then on again, instead of using the procedure described above.
(b) Using black keys
In addition to transmission with the TONE SELECTORS, you can also use the black keys on the instrument to send program numbers 0 through 127.
Step 1
Make sure that the digital piano is in the programming mode. (see p. 18)
The flashing LED of the PIANO 1 switch indicates that the interface is ready to transmit a program number.

Step 2
Select the program number by pressing the corresponding pair of black keys at the lower end of the keyboard.
There are a total of 128 numbers possible: the first thirteen black keys give the first and second digits ("00" - "12") of this three digit numbers; the next ten, the final digit ("0" - "9").

You must press the two keys in order from left to right.
• Example
- Program No. 3

- Press the "00" key and then the "3" key.
- Program No. 20

- Press the "20" key and then the "0" key.
- Program No. 42

- Press the "40" key and then the "2" key.
When transmitting a program number that has the same tens digit as the number being sent (such as, for instance, transmitting 33 after sending 31), you don't need to press the tens digit. The number can be transmitted simply by pressing the ones digit.
The tens digit is set at "0" when the programming mode is entered.
Step 3
Leave the programming mode. (see p. 19)
C. Turning MULTI TIMBRE on and off
Normally, the procedure described above is used to transmit or receive data on a set MIDI channel (any one of 1 through 16), but by turning the MULTI TIMBRE function on you can receive more than one MIDI channel and simultaneously play a different type of timbre on each one. With this feature, you can use a sequencer such as the Kawai Q-80/Q-55 to assemble performances with a number of timbres (MULTI TIMBRE) on the digital piano.
There are 2 parameters to which the MULTI TIMBRE mode can be set. MULTI TIMBRE 1 produces the preset sound directly corresponding to the channel of the MIDI signal received. MULTI TIMBRE 2 lets you set which sound will be on or off for each channel of signal received.
Step 1 Make sure that the digital piano is in the programming mode. (see p. 18)
Step 2 Press the PIANO 2 switch to set the LED above the PIANO 2 switch flashing.

Step 3 The white and black keys on the far right of the keyboard are used to turn the MULTI TIMBRE mode on and off.
Pressing the white key on the extreme right turns on MULTI TIMBRE 1, the white key second from the extreme right turns on MULTI TIMBRE 2, and the black key turns off MULTI TIMBRE.

When MIDI data is received while the MULTI TIMBRE function is off, it will be played according to whichever TONE SELECTOR is currently selected. When the MULTI TIMBRE 1 mode is on, the received MIDI data will be played in the timbre corresponding to the MIDI channel shown in the chart below, regardless of the TONE SELECTOR currently in effect.
| Channel | Timbre | Channel | Timbre |
| 1 | PIANO 1 | 9 | Empty |
| 2 | PIANO 2 | 10 | Empty |
| 3 | E. PIANO | 11 | Empty |
| 4 | JAZZ ORGAN | 12 | Empty |
| 5 | FULL ORGAN | 13 | Empty |
| 6 | HARPSICHORD | 14 | WOOD BASS |
| 7 | VIBRAPHONE | 15 | WOOD BASS |
| 8 | Empty | 16 | WOOD BASS |
When MULTI TIMBRE 2 is on, you can select which sound will be on and off for each channel of reception.
The default setting for the MULTI TIMBRE mode ON/OFF when the keyboard's power is turned on is OFF.
Step 4
Leave the programming mode. (see p. 19)
D. Turning on and off individual sounds when using MULTI TIMBRE 2 mode
When MULTI TIMBRE 2 mode is on, use the following steps to turn on or off each sound.
Step 1
Enter the programing mode. (see p. 18)
Step 2
Press E. PIANO switch.
The flashing LED will move from PIANO 1 to E. PIANO indicating that the keyboard is in the programming mode for setting which sounds will be on and off, and turning local control on and off when using MULTI TIMBRE 2 mode.

Step 3
Use the black and white keys at the left end of the keyboard to set the sound for each channel on or off.

Use the 16 white keys at the left end of the keyboard to set the channels to ON. Use the 16 black keys at the left end of the keyboard to set the channels to OFF.
Step 4
Press VIBRAPHONE switch to exit the programming mode. (see p. 19)
The default setting in the MULTI TIMBRE 2 mode, the sound for 2 to 10 channels is off.
In the MULTI TIMBRE 2 mode, receiving the program change data for individual channels makes it possible to change the tone color which corresponds to the table given below.
| Program change number | Tone color | Program change number | Tone color |
| 0 | PIANO 1 | 6 | VIBRAPHONE |
| 1 | PIANO 2 | 7 | WOOD BASS |
| 2 | E. PIANO | 8~127 | PIANO 1 |
| 3 | JAZZ ORGAN | ||
| 4 | FULL ORGAN | ||
| 5 | HARPSICHORD |
E. LOCAL CONTROL
This mode is used to set whether the sound from the piano's keyboard will be played or not, and is called the LOCAL CONTROL ON/OFF mode.
Step 1
Make sure that the piano is in the programming mode.(see p.18)
After turning off the MULTI TIMBRE mode, press the E. PIANO switch.
The flashing LED will change from PIANO 2 to E. PIANO.
Step 2
Press the highest white or black key to turn LOCAL CONTROL on or off.

White key (ON): The piano will output sound when the keys are struck.
Black key (OFF): Sound will be output only when MIDI data is received, and not when the keyboard is played.
You can also turn this on by turning the power off and then on again, instead of using the highest key as described above.
Step 3
Press the VIBRAPHONE switch to leave the programming mode.
F. One Touch Local Control OFF
The followings are a shortcut method to turn the Local Control OFF.
Step 1
Turn the power switch on while holding down the 3 reverb switches.
![graph TD A["REVERB"] --> B["ROOM 1"] A --> C["STAGE"] A --> D["HALL 3"] A --> E["DEMO"] F["Hand gesture at bottom"] --> G["+"] H["+"] --> I["+"]](/content/2026/05/945624/images/f2579f19546ff313ac53eec04e91a63cd94d238f4db4e55d18f9f9dd440498b9.jpg)
While holding down

Power ON
Local control has been set to off.

MIDI Exclusive Data Format
1 Data format
| 1st byte | 2nd byte | 3rd byte | 4th byte | 5th byte | 6th byte | 7th byte | 8th byte | 9th byte | 10th byte |
| 1 | 2 | 3 | 4 | 5 | 6 | 7 | 8 | 9 | 10 |
① F0 ...... Start code
② 40....Kawai's ID number
③ 00 - 0F ...MIDI channel
④ 10, 30.....Function code (30 when setting MULTI TIMBRE 2 ON/OFF)
⑤ 04.....Indicates that the instrument is Electronic Piano
⑥ 02......Indicates that the piano is one of "CA" series
⑦ data 1
⑧ data 2
} Exclusive data. Data 3 may not exist depending on the function (see below).
⑨ data 3
⑩ F7 ...... End code
2 Data structure
| data 1 | data 2 | data 3 | Function |
| 00 | 00 | - | MULTI TIMBRE 1 OFF |
| 01 | 00 | - | MULTI TIMBRE 1 ON |
| 02 | 00 | - | MULTI TIMBRE 2 ON |
| 0B | 00 /7F | - | CHORUS ON/OFF (7F;ON, 00; OFF) |
| 0E | 00 - 03 | - | data 2 = 0; Reverb OFFdata 2 = 1 ~ 3; Reverb 1 ~ 3 ON |
| 0F | 15 ~ 6C | - | Split point (CA800 only) |
| 14 | 00 ~ 7F | - | Dual/Split balance (40; center)(CA800 only) |
| 15 | 00/7F | - | PAN ON/OFF |
| 16 | 20~40~5F | - | Tuning (20;minimum, 40;center, 5F;maximum) |
| 17 | 00/7F | - | MIDI exclusive data transmission ON/OFF |
| 18 | 00 ~ 02 | - | Touch curve select (0; Light, 1; Normal, 2; Heavy) |
| 20 | 00 ~ 07 | 00 ~ 07 | Dual ON (data 2; Right tone, data 3 ; Left tone) |
| 21 | 00 ~ 07 | 00~07,00~12 | Split ON (data 2; Upper tone, data 3; Lower tone) |
| 25 | 00 ~ 06 | 00 ~ 0B | data 2; Temperament No., data 3; root key No. |
| 26 | 00/7F | 00 ~ 0F | data 2; MULTI TIMBRE 2 ON/OFF data 3; Channel |
Specifications
| Keyboard | 88 WOODEN ADVANCED AWA |
| Polyphonic | 15 |
| Tone colors | PIANO 1, PIANO 2, E. PIANO, JAZZ ORGAN, FULL ORGAN, HARPSICHORD, VIBRAPHONE |
| Effects | REVERB (ROOM, STAGE, HALL) |
| Temperaments | Equal, Mersenne pure, Pythagorean, Meantone, WerckmeisterIII, KernbergerIII |
| Other Features | VOLUME, TRANSPOSE, TUNE, TOUCH CURVE SELECTION (Light, Normal, Heavy) |
| Recorder | 2 Parts (Tracks), 5 Songs The total memory capacity of the recorder is approximately 5000 notes. |
| Metronome | 4/4, 3/4, 1/4 |
| Pedals | Damper, Sostenuto, Soft |
| Jacks | Headphone, Pedal (Damper, Sostenuto, Soft), MIDI (IN, OUT, THRU), LINE IN (L/MONO, R), LINE OUT (L/MONO, R) |
| Output Power | 20W x 2 |
| Speakers | 13cm x 2, 5cm x 2 with enclosure |
| Key Cover | Slide type |
| Power Consumption | 70W |
| Finish | Bright Cosmo Black |
| Dimensions | 140 x 49 x 82 cm |
| Weight | 63 kg (without bench) |
Mode 1: OMNI ON, POLY
Mode 2: OMNI ON, MONO
○ : Yes
Mode 3: OMNI OFF, POLY
Mode 4: OMNI OFF, MONO
× : No
KAWAI
Kawai Musical Instruments Manufacturing Co., Ltd 200 Terajima-cho, Hamamatsu, Japan
- KAWAI
- CA330
- IMPORTANT SAFETY INSTRUCTIONS
- SAVE THESE INSTRUCTIONS
- WARNING
- AVIS: RISQUE DE CHOC ELECTRIQUE -NE PAS OUVRIR
- THANK YOU FOR PURCHASING A KAWAI DIGITAL PIANO
- TABLE OF CONTENTS
- 1 FRONT PANEL
- ① VOLUME
- ② TRANSPOSE
- ③ TOUCH CURVE SELECTOR
- ④ TONE SELECTORS
- ⑤ REVERB SWITCHES
- ⑥ DEMO
- ⑦ TEMPO SLIDER
- ⑧ METRONOME
- ⑨ PLAY/STOP
- ⑩ REC
- 11 POWER
- ⑫ HEADPHONE JACK
- 2 REAR PANEL
- 1 LINE OUT
- ② LINE IN
- ③ MIDI
- 4 PEDAL JACK
- ⑤ OPTIONAL PEDAL JACKS
- THE PEDALS
- 1 BASIC OPERATIONS
- STEP 1
- STEP 2
- STEP 3
- STEP 4
- STEP 5
- 2 TRANSPOSE
- 3 SELECTING THE TOUCH CURVE
- 4 PLAYING THE DEMO SONGS
- 5
- METRONOME
- ♩ =135
- 1 SIMPLE RECORDING
- 2 EASY PLAY BACK
- 3
- RECORDING OVER THE PREVIOUS SONG
- 4 PLAYING BACK THE SONG
- RECORDING THE LEFT AND RIGHT HAND PARTS SEPARATELY
- STEP 6
- STEP 7
- 6 PLAYING BACK THE LEFT AND RIGHT HAND PARTS SEPARATELY
- 7 DELETING UNNECESSARY SONGS
- 1 PROGRAMMING MODE
- ENTERING THE PROGRAMMING MODE
- LEAVING THE PROGRAMMING MODE
- 2 TUNING
- TEMPERAMENTS
- ♣ TEMPERAMENT CHARACTERISTIC
- ♣ EQUAL TEMPERAMENT
- ♣ MERSENNE TEMPERAMENT
- ♣ PYTHAGOREAN TEMPERAMENT
- ♣ MEANTONE TEMPERAMENTS
- ♠ WERCKMEISTER III TEMPERAMENT, KIRNBERGER III TEMPERAMENT
- 4 SETTING THE METRONOME VOLUME
- STEP I
- WHAT'S MIDI
- 2 CONNECTIONS
- CONNECTION TO ANOTHER
- MIDI-COMPATIBLE KEYBOARD
- CONNECTION TO A DRUM MACHINE
- CONNECTION TO A SOUND GENERATOR MODULE
- CONNECTION TO A SEQUENCER AND SOUND GENERATOR MODULE
- 3 MIDI IMPLEMENTATION
- MIDI SETTINGS
- SETTING THE CHANNEL
- SENDING PROGRAM NUMBER (TIMBRE CODE) AND MIDI EXCLUSIVE DATA
- TRANSMITTING WITH THE TONE SELECTORS
- USING BLACK KEYS
- EXAMPLE
- TURNING MULTI TIMBRE ON AND OFF
- TURNING ON AND OFF INDIVIDUAL SOUNDS WHEN USING MULTI TIMBRE 2 MODE
- LOCAL CONTROL
- ONE TOUCH LOCAL CONTROL OFF
- MIDI EXCLUSIVE DATA FORMAT
- 1 DATA FORMAT
- 2 DATA STRUCTURE
- SPECIFICATIONS
Brand : KAWAI
Model : CA330
Category : Keyboard