SSVC2 - Switch OSD Audio - Free user manual and instructions
Find the device manual for free SSVC2 OSD Audio in PDF.


User questions about SSVC2 OSD Audio
0 question about this device. Answer the ones you know or ask your own.
Ask a new question about this device
Download the instructions for your Switch in PDF format for free! Find your manual SSVC2 - OSD Audio and take your electronic device back in hand. On this page are published all the documents necessary for the use of your device. SSVC2 by OSD Audio.
USER MANUAL SSVC2 OSD Audio
The SSVC1 SSVC2 & SSVC4 are switchable dual source speaker selectors with individual volume control for up to 4 different zones. With the switchable function, users can alternate between the two different amplifiers or receivers in each zone. This allows users to enjoy Source A in one room and Source B in another room.
2. Installation Consideration
The SSVC1 SSVC2 & SSVC4 are designed for use with a receiver or amplifier with a maximum power of 180 Watts per channel at 8 ohms respectively. If you are uncertain about the power rating of your receiver or amplifier, consult the appliance's manufacturer.
OSD recommend using only 8 ohm speakers when using the SSVC1 SSVC2 & SSVC4. Furthermore, OSD does not recommend installing more than 1 pair of speakers per pair of channels. Each pair of channels or terminal block is designed for 1 pair of speakers using up to 14 gauge wire.
Speaker wires can act as an antenna for electrical noise. Locating speaker wires too close to a light dimmer or switch may cause a buzzing or popping sound to be heard through the speakers. If you must locate the SSVC wiring near electrical devices, route the speaker wires several inches away from
3. Operation
It is important to properly adjust an impedance-matching system to avoid distortion or DC clipping (DC voltage will produce from an amplifier that is overworked or that has an improper load). These can cause the amplifier/receiver to go into protection, and can cause the SSVC to heat up, damaging the system components. To set up the system, the amplifier/receiver volume should be at its lowest volume setting, and the selector volume control should be the highest setting. Slowly adjust the amplifier/receiver volume to a level that is acceptable for the amplifier to produce without clipping.
Warranty & Repair
All OSD Audio speaker products have (5) year Limited Warranty against defects in materials and workmanship. Proof of purchase must accompany all claims. During the warranty period OSD will replace any defective part and correct any defect in workmanship without charge for either parts or labor.
OSD Audio may replace returned speakers with a product of equal value and performance. In such cases, some modifications to the mounting may be necessary and are not OSD's responsibility. For this warranty to apply, the unit must be installed and used according to its written instructions. If necessary, repairs must be performed by OSD. The unit must be returned to OSD at the owner's expense and with prior written permission. Accidental damage and shipping damage are not considered defects, nor is damaged resulting from abuse or from servicing performed by an agency or person not specifically authorized in writing by OSD.
OSD Audio sells products only through authorized dealers and distributors to ensure that customers obtain proper support and service. Any OSD product purchased from an unauthorized dealer or other source, including retailers, mail over dealers and online sellers will not be honored or serviced under existing OSD warranty policy. Any sale of product by an unauthorized source or other manner not authorized by OSD shall void the warranty on the applicable product.
Damage to or destruction of components due to application of excessive power voids the warranty on those parts. In these cases, repairs will be made on the basis of the retail value of the parts and labor. To return for repairs, you must email customer service at RMA@osdaudio.com for a Returned Merchandise Authorization (RMA) number# then the unit must be shipped to OSD at the owner's expense, along with a note explaining the nature of service required. Be sure to pack the speaker(s) in a corrugated container with at least 3 inches of resilient material to protect the unit from damage in transit.
This Warranty Does Not Cover:
Damage caused by abuse, accident, misuse, negligence, or improper operation (installation) • Any products that have been altered or modified • Any product whose identifying number of decal, serial #, etc. has been altered, defaced or removed • Normal wear and maintenance.
4. Operation
- Make sure the amplifier or receiver power is OFF and set the volume to minimum.
- Set the volume control for the speaker pair you wish to play to maximum (Fully clockwise)
- Locate the on/off button which corresponds to the speaker pair you wish to play. Set it to the ON position.
- Gradually turn up the amplifier or receiver volume and set it an acceptable listening level. Be careful not to overdrive your amplifier. It might get distorted or muddy.
- You can turn off the speakers by turning the appropriate volume control on the SSVC fully counter-clockwise, or by pressing the on/off button.
5. Installation
- Insert each wire into the appropriate hole on the removeable terminals.
- Strip 1/4" of insulation from the end of each wire. Tightly twist the end of each wire until no frayed ends remain. Use a small screwdriver to tighten each wire in place.
- Insert the connector plug into the socket and lock in place by tightening captive screws on each side of the connector (See Figure 1). The inputs of SSVC are the connecting terminals for the amplifiers or receivers. Be sure not reverse these connections or the SSVC will not function properly.
- Each zone gets connected to a pair of speakers. Make sure you connect negative (-) to negative (-) and positive (+) to positive (+).
Figure 1: Wiring Diagram
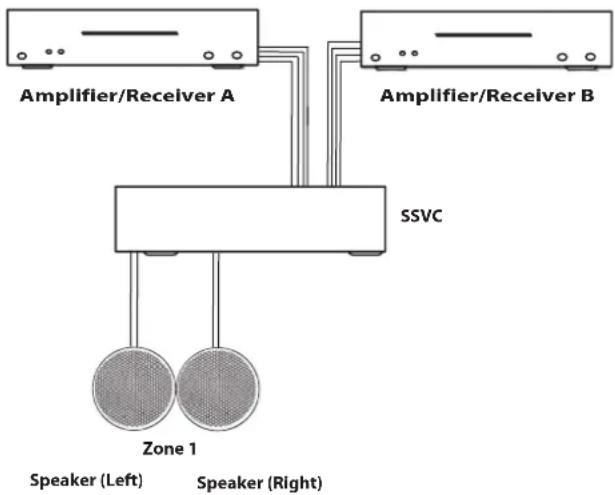
flowchart
graph TD
    A["Amplifier/Receiver A"] --> B["SSVC"]
    C["Amplifier/Receiver B"] --> B
    D["Speaker (Left)"] --> E["SSVC"]
    F["Speaker (Right)"] --> E
    E --> G["Zone 1"]
Technical Specifications
Audio Power Handling: 100 Watts/Channel peak
Frequency Response: 20Hz - 20kHz
Input Source: Up to 2 Amplifiers or 2 Receivers
Wiring requirement: Up to 14 gauge wire
Speaker impedance: 8 ohm
Unit Dimensions: SSVC1/2 8½"W x 6¼"D x 2½"H
SSVC4 16 ^3/4 "W x 6 ^1/4 "D x 2 ^1/2 "H
Warranty: 5 Years
Call 562-697-2600 or visit www.osdaudio.com for information

Brand : OSD Audio
Model : SSVC2
Category : Switch