
CDR 900 C - Dash cam COBRA - Free user manual and instructions
Find the device manual for free CDR 900 C COBRA in PDF.


| Product Type | Dash Cam |
| Brand | Cobra |
| Model | CDR 900 C |
| Video Resolution | Super HD 1296P (2304x1296 @30fps) / Full HD 1080P (1920x1080 @30fps) |
| Viewing Angle | 160 degrees |
| Image Sensor | 3 MP CMOS |
| Video Format | MP4 |
| Display | 2.0" TFT |
| Memory Support | MicroSD up to 64GB (8GB included) |
| Battery Capacity | 700 mAh |
| Connectivity | WiFi, USB 2.0 |
| G-Sensor | 3-axis accelerometer |
| Loop Recording | Yes (3-minute segments) |
| Motion Detection | Yes (via app) |
| Voice Recording | Built-in microphone and speaker, can be toggled |
| Power Supply | Car charger (12V cigarette lighter), micro USB |
| Mount Type | Heavy-duty suction cup |
| Wireless App | Drive HD™ (iOS/Android) for live view, control, cloud |
| Cloud Mode | Yes, via WiFi internet connection |
| Warranty | Limited 1-year |
| Included Accessories | Suction cup mount, 8GB MicroSD, car charger, micro USB cables (1ft data, 12ft power), tripod connector, lanyard |
Frequently Asked Questions - CDR 900 C COBRA
User questions about CDR 900 C COBRA
0 question about this device. Answer the ones you know or ask your own.
Ask a new question about this device
Download the instructions for your Dash cam in PDF format for free! Find your manual CDR 900 C - COBRA and take your electronic device back in hand. On this page are published all the documents necessary for the use of your device. CDR 900 C by COBRA.
USER MANUAL CDR 900 C COBRA

Controls Indicators and Connections
Controls, Indicators and Connections
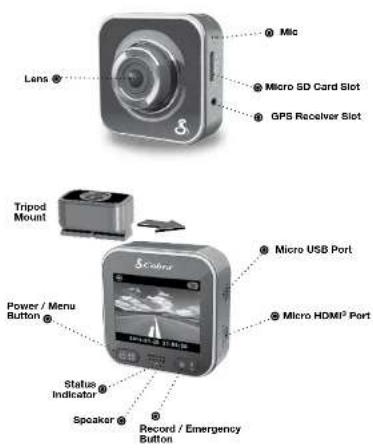


Product Features
Congratulations! You've made a smart choice by purchasing a Drive HD Dash Cam from Cobra. This booklet describes the simple steps for mounting, setting up, and using your dash camera.
Camera Features
Records 1296P Super HD or 1080P Full HD video. Ambarella™ chipset ensures excellent image quality, night time performance, and advanced dynamic range.
WiFi capability allows the CDR 900 to connect wirelessly with the Drive HD™ app for viewing live video, controlling the camera, uploading and sharing videos, adjusting settings, and Cloud Mode on your smartphone.
Ultra wide 160° viewing angle films the entire road and your peripherals without edge distortion.
Continuous Loop Recording overwrites old footage unless you want to save it. A time/date stamp is embedded on all recordings so you'll never miss an event while driving.
Ready to use out-of-the-box. Includes a heavy-duty suction cup to mount the camera to your windshield and an 8GB MicroSD card to Record your Ride.
3-axls G-Sensor senses sudden accelerations and collisions and automatically protects footage surrounding the incident.
Additional Features:
Motion Sensor
Built-in Microphone & Speaker
Auto-Record and Auto-Power Off
Optional waterproof case (not included)

Limited 1-Year Warranty
Limited 1-Year Warranty
Cobra Electronics Corporation warrants that this product and the component parts thereof, will be free of defects in workmanship and materials for a period of one year from the date of first consumer purchase. This warranty may be enforced by the first consumer purchaser. If the product is under warranty, it will be repaired or exchanged depending on the model as determined at Cobra's sole discretion. Such remedy shall be your sole and exclusive remedy for any breach of warranty. The procedure for obtaining service and support, and the applicability of this warranty, will vary depending on the country or jurisdiction in which you purchased and utilize the product. For the details on obtaining product service, support and warranty please visit www.cobra.com/support
Provided that the product is utilized within the U.S.A.- Cobra will, without charge, repair or replace, at its option, defective products, products or component parts upon delivery to the Cobra Factory Service department, accompanied by proof of the date of first consumer purchase, such as a duplicated copy of a sales receipt. You must pay any initial shipping charges required to ship the product for warranty service, but the return charges, to an address in the U.S.A., will be at Cobra's expense, if the product is repaired or replaced under warranty.
This warranty gives you specific legal rights, and you may also have other rights which may vary from state to state and country to country.
Exclusions: This limited warranty does not apply: 1) To any product damaged by accident; 2) In the event of misuse, ordinary wear, failure to follow directions, or improper maintenance of the product or as a result of unauthorized alterations or repairs; 3) If the serial number has been altered, defaced, or removed; 4) If the product was purchased or is utilized in a jurisdiction not covered by the limited warranty.
All implied warranties, including warranties of merchantability and fitness for a particular purpose are limited in duration to the length of this warranty. Cobra shall not be liable for any incidental, consequential or other damages; Including, without limitation, damages resulting from loss of use or cost of installation.
Some states and countries do not allow limitations on how long an implied warranty lasts and/or do not allow the exclusion or limitation of incidental or consequential damages, so the above limitations may not apply to you. This warranty gives you specific legal rights, and you may also have other rights which vary from state to state and country to country.
Nothing Caves Close to a Caber


English

Introduction
Important Information....A1
Customer Assistance.... A1
Controls, Indicators and Connections.... A2
Product Features A3

Your Device
What's in the Box.... 2
Installation.... 3
Camera Operation 4-9
Charging the device 4
Inserting and removing the Memory Card 4
Dash Cam Mode vs Action Cam Mode 5
To Start recording video 6
To make an emergency recording. 6
To cancel an emergency recording 6
To Toggle the Microphone on/off (while recording)....7
To Power the device off 7
Video playback 8
Using the Playback Screen.... 9
Adjusting Camera Settings 10
Adjusting the Main Menu Settings .... 10
Connecting to a Computer.... 11
Connecting to a TV.... 11
Wireless and App Operation 12
Connecting to the Smartphone App....13
Smartphone App Operation 14
Cloud Mode Features....16
Motion Detector Setup....18

Customer Information
Specifications 19
Troubleshooting....20
Product Service & Support 20
Licensing 21
Trademark Acknowledgement....21
Limited 1-Year Warranty 22
What's in the Box
What's in the box
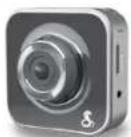
Dash Cam (Model # CDR 900)
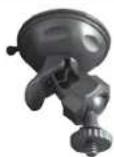
Heavy Duty Suction Cup Mount
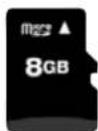
8GB Micro SD Card (installed)
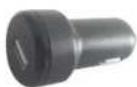
Cigarette Lighter Adapter
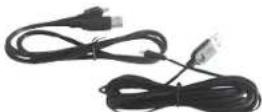
Micro USB to USB Cables (1 foot power/data & 12 foot power only)
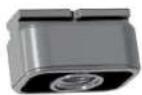
Tripod Connector
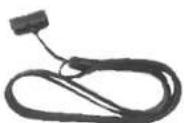
Lanyard and Lanyard Mount

NOTE: While the 12 foot and 1 foot cables look similar, they have different functions. The 12 foot cable is for power only and enables Auto-Power ON and Auto-Record. The 1 foot cord is for data transfer to a computer.

English
Installation
Installation
Where to Mount Your Unit
You will get optimum performance from your camera if you mount it on the front windshield, behind the rear-view mirror. This will minimize the impact on the driver's line of sight. You'll also want to keep the camera centered and angle the bracket to optimize the camera's view of the road ahead.
Windshield Mounting
| Peel the plastic film off of the suction cup. | |
| Screw the tripod mount onto the base of the suction cup mount. |  |
| Slide your CDR 900 onto the tripod mount using the channel on the top of the unit. | 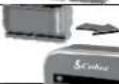 |
| To adjust the angle to the road, loosen the angle locking ring, turn the camera so that it has a clear view of the road ahead and tighten the knob. | 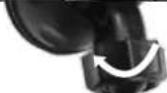 |
| Press the Suction Cup firmly onto the windshield. Push down on the lever to lock the suction cup in place. | 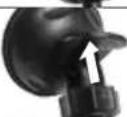 |
| Plug the 12 foot Micro-USB cable into the camera. | 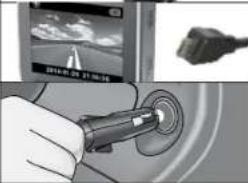 |
| Plug the cigarette lighter adapter on the power cord into your vehicle's cigarette lighter. | |
| You can temporarily remove the camera by sliding it off the tripod mount. | |
You can temporarily remove the camera by sliding it off the tripod mount.
Nothing Comes Close to a Cobra ^®
Camera Operation
Charging the device
You can charge the device with the included car charger, or with any micro USB cable.
When the system is OFF, the status indicator flashes orange.
When the system is ON, the unit will charge in the background without any icon shown.
Inserting and removing the Memory Card
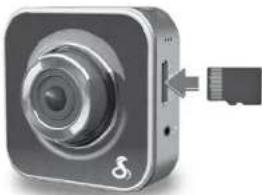
Your camera comes with an 8GB Micro SD Card preinstalled, but it can support up to 64GB Micro SD cards (not included).
To remove the memory card, push the Memory card forward gently until you hear a click, and the card should release.
To insert a different memory card, orient the card as shown and press it in until you hear a click.
natural_image
Close-up of a digital camera with an attached USB port (no visible text or symbols)
Camera Operation
Dash Cam Mode vs Action Cam Mode
The CDR 900 has two recording modes for different applications:
Dash Cam Mode: Shoots continuous loop and emergency videos.
Action Cam Mode: Shoots normal videos.
| Mode Action Cam Dash Cam | |||
| Recording Type Normal Continuous Loop Emergency | |||
| To Start in preview | Car impactSelectduring looprecording | ||
| Recording Duration | Unlimited | Three Minute Segments | One min. section(30 secondsbefore and afterthe event) |
| Display Info 00:06:36 2014/01/01 21:06:35Remaining on Current date & timeSD card | |||
Continuous Loop Recording: Once the memory card is full, this camera will continuously overwrite the oldest footage recorded.
G-Sensor: The G-Sensor is an accelerometer that can detect an impact caused by an accident. If the G-Sensor is triggered the camera will automatically save the footage 30 seconds before and after the incident to a protected file that will not be overwritten by loop recording.

NOTE: By default, the CDR 900 formats the SD card so that 50% of the memory is used for Action Cam Mode and 50% is reserved for Dash Cam Mode. This allocation can be modified through settings in the App.

English
Nothing Comes Close to a Cobra ^®


Camera Operation
Camera Operation
| To Start recording video | |
| Press [IMAGE] to turn the camera on. | Visual Display |
| The camera screen turns on to show a live preview of the camera image. | |
| Press [IMAGE] to begin recording. Recording begins and the letters REC flash in red. | |
| While recording, press [IMAGE] to stop recording. | The recording stops and letters REC disappear. |
| To make an Emergency Recording | |
| While recording, press then [IMAGE] | Visual DisplayThe ⚠ icon flashes on the top bar and shows a progress percentage of the locked file being recorded. |
| To cancel an Emergency Recording | |
| While In an emergency recording, press ⚠ ! . Press 📊 confirm. | Visual DisplayThe emergency recording will stop and the camera will return to standard recording mode. |
OR
| To cancel an Emergency Recording | |
| While in an emergency recording, pressand then press to confirm. | Visual DisplayThe emergency recording will stop and the camera will return to standard recording mode. |

English
Nothing Comes Close to a Cobra®

Camera Operation
Camera Operation
Video playback:
If you're currently recording video, you need to stop recording video first.
Press ⏻ to bring up the main menu:
Visual Display
The main Menu will appear:
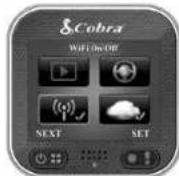
Select ▶ and use the buttons to view Action Cam or Dash Cam files.
Playback Selection Screen will appear:
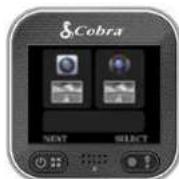
Using the Playback Screen
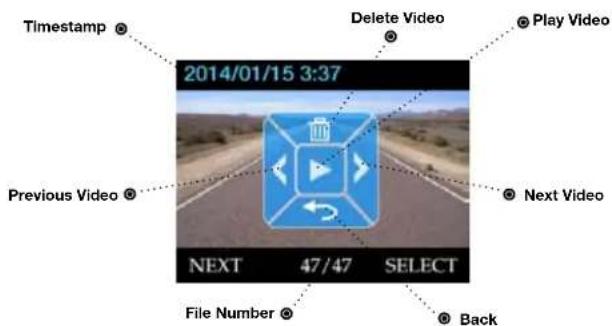
Use the NEXT and SELECT soft keys to select, play and delete files or return to the main menu screen.
Videos can also be viewed and managed using the Drive HD™ App or a computer (explained later in this manual).

English
Nothing Comes Close to a Cobra ^®

Adjusting Camera Settings

Connecting to a Computer
Adjusting the Main Menu Settings
the main menu.
Use the NEXT and SELECT soft keys to navigate and toggle settings.
Menu Settings
| Playback | This will take you to the Playback selection screen, allowing you to play back video you've recorded. | |
| Action Cam/Dash Cam | Switches between Action Cam and Dash Cam modes. Action Cam mode allows you to shoot videos of any length and the G-Sensor is ignored. Dash Cam mode will run continuous loops of 3 minute videos, and delete the oldest videos automatically. | |
| Wi-Fi Enable | /disable WiFi for wireless connection. | |
| Cloud Mode | Note: To use this feature, you must first use our Smartphone app to connect your camera to the cloud by providing it the name and password to connect to a WIFI network. | |
| Voice Record | If you do not want this device to record audio with its internal microphone, turn this setting off (Dash Cam mode only). | |
| Auto Record | If this setting Is turned on, The camera will automatically start recording video when it receives power from the car charger (Dash Cam mode only). | |
| Screen Auto Off | If this setting Is turned on, the screen will automatically go dark after 60 seconds of inactivity. The camera will continue recording (Dash Cam mode only). | |
| Settings | Select this option if you want to reset your camera to factory settings, or format your SD card. |
These are basic settings only. More advanced settings can only be changed through the mobile App.

1 English
To connect your camera to a Computer
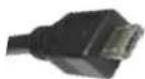
Connect the camera to your computer using the included USB to Micro-USB Cable.
By default, your device connects to your PC in Mass Storage mode, and acts like a flash drive. Videos are stored in the MP4 format. These files can be opened with the video player that came with your operating system, or with many third party video players.
Videos that are locked can be found in the "Emergency" folder, and Videos that are not locked can be found in the "DCIM" folder.
Note that while in Dash Cam mode, if the Memory card gets full, videos that are not locked will be overwritten to make room for new videos. If you want to save any videos that are in the DCIM folder, you should copy them to your computer, or lock the files.
| Name | |
| DCIM | |
| 100MEDIA | |
| 01160240_0131.mp4 | |
| 01160240_0132.mp4 | |
| 01160316_0133.mp4 | |
| EMERGENCY | |
| 02141829_0027.mp4 | |
| 02141835_0031.mp4 | |
| 02141859_0041.mp4 | |
| MISC | |
To connect your camera to a TV
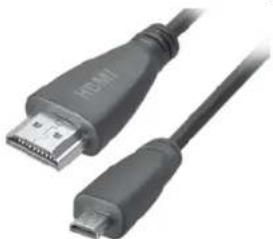
If your TV supports HDMI® input, you can connect a Micro HDMI to HDMI cable (not included) between the camera and the TV.
The camera screen will be duplicated on your TV screen.
natural_image
Close-up of a USB and USB cable with a small USB connector (no text or symbols visible)Nothing Comes Close to a Cobra ^®


Wireless & APP Operation
The WiFi capability of the CDR 900 allows you to view live video, control the camera, upload and share videos, or adjust settings; all from your smartphone. The first step to connect your smartphone with the CDR 900 is to download and install the Drive HD™ App, available for Android™ on the Google Play Store and for iOS on the App Store.
The camera can connect to the App in two ways:
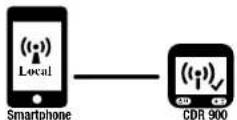
1. Local Direct Connection
The smartphone connects to the CDR 900 directly via WiFi for remote control, live view, album management and camera setup.
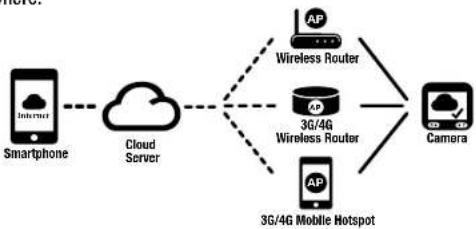
2. Cloud-Based Internet Connection
The CDR 900 connects to a wireless access point and uploads live video to the internet cloud server, which can be viewed with your smartphone from anywhere.
flowchart
graph LR
    A["Smartphone"] --> B["Cloud Server"]
    B --> C["Wireless Router"]
    C --> D["Camera"]
    C --> E["3G/4G Mobile Hotspot"]
    E --> C
    style A fill:#f9f,stroke:#333
    style B fill:#ccf,stroke:#333
    style C fill:#cfc,stroke:#333
    style D fill:#fcc,stroke:#333
    style E fill:#cff,stroke:#333


Connecting to the Smartphone app
To connect your camera to the App - Local Mode
On the Camera, make sure recording is stopped. Go into the main menu settings and turn ON the Wi-Fi Local option.
Back on the video preview screen, you should now see a white Wi-Fi icon in the upper left corner of the camera screen. This means your camera's Wi-Fi hotspot is active.
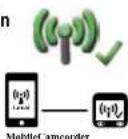
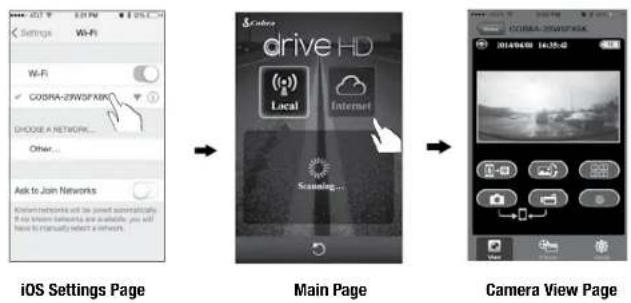
Go to the Wi-Fi settings on your smartphone and look for a new network that starts with "Cobra —." Connect to this network.
On your smartphone, launch the Drive HD™ App. It will present you with two options: Local and Internet. Choose Local, and then choose the Cobra camera from the list.
NOTE: It may take up to a minute after you have connected to the camera for it to show up on the App's device list.
If the Cobra camera is not appearing in the list, press the 📋 button to refresh. In rare cases, you may also have to reboot both the smartphone and the camera to get them to connect the first time.
flowchart
graph LR
    A["Settings"] --> B["Wi-Fi"]
    B --> C{COOSHA-2W05FXMX?}
    C --> D["Choose a NETWORK..."]
    D --> E["Other..."]
    E --> F["Ask to Join Networks"]
    F --> G["Main Page"]
    G --> H["Scaming..."]
    H --> I["Camera View Page"]
Nothing Comes Close to a Cobra ^®

Smartphone App Operation Smartphone App Operation
The WiFi Local connection on the Drive HD™ App has three tabs across the bottom. The buttons in each tab, and their functions, are described below.
View Tab
 | Rec / Stop | Tap this button to start and stop recording. These files will be saved on the camera's SD card memory, not on your smartphone. |
 | Video to smartphone | Tap this button to start and stop recording video. These files will be saved to your smartphone's camera roll (on iOS) or Photo Gallery (on Android). |
 | Still Image to smartphone | Tap this button to take a still picture. This file will be saved to your smartphone's camera roll (on IOS) or Photo Gallery (on Android). |
 | Talk from smartphone to camera | Tap this button to turn on your smartphone's microphone and send the audio over Wi-Fi to be played on the camera's speaker. |
 | Multi-Camera view | If you have multiple Cobra cameras in your system, tap this button to see them all at the same time. Tap one of the camera images to go back. |
 | Flip Vertical | Flip the image upside down. This is best if the camera is mounted on a tripod. |
Album Tab
 | Dash Cam tab Tap on this tab to view the list of videos taken in the dash cam mode. | |
 | Action Cam tab Tap on this tab to view the list of videos taken in the action cam mode. | |
 | Playback buttons | Tap on one of these buttons to play back any video from the list. |
 | Trash icons Tap on one of these buttons to delete a video. This cannot be undone. | |

5
English

NOTE: Video files are very large so it may take some time for videos to update.
Setup Tab
| Camcorder Name | You can rename your Camcorder here and set a password if you wish. |
| Date and Time Here | you can send your phone's system time to the Camera with just one tap. |
| Resolution | This sets the level of detail in the video. FHD is the default value and records in 1080P Full HD. SHD is 1296P Super HD, which provides higher resolution video. Note that not all players support 1296P. |
| Operation Sound Toggle the Dash Cam's button tone on/off. | |
| Factory Settings | Select this option if you want to reset your camera to factory settings. This will NOT erase the videos you have stored on your SD card. |
| Format SD Card | Here you can fully erase the videos on your SD Card, and adjust how much space you want to make available to cyclical recording in Dash Cam mode. Drag the slider from left to right to set the ratio. |
| Language | Choose your preferred language for the CDR 900. |
| Internet settings | Here you can register a free cloud account so you can access your camera from your smartphone from anywhere in the world. |
| Voice Record | If you do not want this device to record audio with its internal microphone, turn this setting off (Dash Cam mode only). |
| Auto Record | If this setting is turned on, The camera will automatically start recording video when it receives power from the car charger (Dash Cam mode only). |
| Screen Auto Off If this setting is turned on, the screen will automatically go dark after 60 seconds of inactivity. The camera will continue recording (Dash Cam mode only). | |
| Motion Detector If this setting is turned on, the camera will automatically start recording video if it detects movement in view of the camera. Video recording stops when there is no movement. | |
| Delay Power Off Here you can select how long the camera waits to shut down after power is removed. Select 10 second delay, or immediately off. | |
| Impact Sensor Sets the sensitivity of the Impact Sensor (G-Sensor). Options include High, Low, and Off. The impact sensor, when triggered, will automatically lock files to prevent them from being automatically deleted by continuous loop recording. | |
Nothing Comes Close to a Cobra ^®

Cloud Mode Features
To connect your camera to the Cloud
Because your camera has Wi-Fi, it can be connected to the internet (the Cloud). Once connected, your camera can be accessed from anywhere you carry your smartphone. This is useful if you want to check on the status of your home or loved ones while you are away. If your home already has a Wi-Fi network, then you'll need to put the SSID (network name) and password into the Cobra Drive HD app, and then your camera will connect to the internet.
If the location where you are using your camera does not have a Wi-Fi network yet, consider a wireless router, or Mobile hotspot product to get your camera connected to the internet.

Wireless Router

3G/4G Mobile Wireless Route

3G/4G
Mobile Hotspot
When you're done, your final network will look something like the chart below.
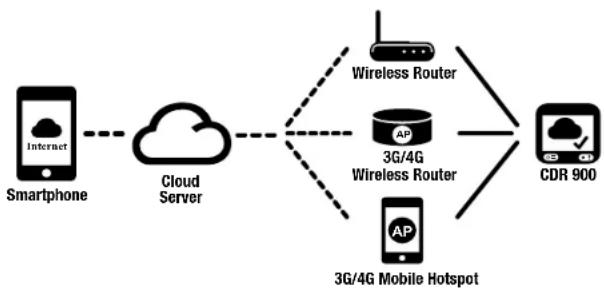
flowchart
graph LR
    A["Smartphone"] --> B["Cloud Server"]
    B --> C["Wireless Router"]
    B --> D["3G/4G Wireless Router"]
    B --> E["3G/4G Mobile Hotspot"]
    C --> F["CDR 900"]
    D --> F
    E --> F

7 English
Cloud Mode Features
| To configure Cloud Mode |
| Connect your camera to the App using the Local Mode Instructions on page 13. |
| Inside the app, tap on the “Setup” tab at the bottom, and scroll down to “Internet settings.” |
| Under Access Point (AP) tap the button labeled “Click here to Add Cloud AP” |
| Tap your home network name from the list. If your home network name does now show up in the list, tap “other” and enter your network name (SSID) and password manually. |
| Tap the “Setup” button in the upper left to go back to setup. |
| In the Email Box, Enter your email address. This is needed to help protect your privacy, so only you can access your camera over the cloud. |
| Tap the Green save button, and hit OK. |
| Exit the smartphone app, and your camera should return to the video preview screen. |
| Turn on Wi-Fi Cloud in the Main Menu settings of the camera. |
| After you exit the settings, the camera will show the video preview screen with a green cloud icon in the upper left corner. |
| Make sure your smartphone is now connected to the internet, via the cellular network or via Wi-Fi. |
| Open the Cobra Drive HD app, and tap on the Cloud Icon that says “internet.” |
| Your camera will appear in the list. Tap it. After a short while, your camera’s image will be visible. |
If you ever need to get back into your camera settings again, follow the instructions on page 13 to get back into Local Wi-Fi Mode.
Nothing Comes Close to a Cobra®

Motion Detector Setup
Specifications
Motion Detector Setup
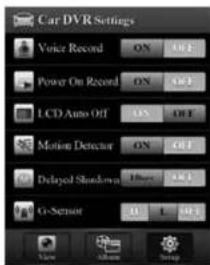
If this setting is turned on, the camera will automatically start recording video if it detects movement in view of the camera. Video recording stops when there is no movement.
- Go to App (Setup) (Car DVR Settings), Turn on (Motion Detector) Tap (Save).
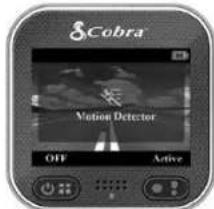
- The CDR 900 will show 🎨 on the standby screen.
- When the power cord is removed from the unit or the switched power supply turns off, select (Active) to start Motion Detector mode.
Camera Specifications:
Visual Angle.... 160 degrees
Sensor 3 MP CMOS
Video resolution. Super HD 1296P, 2304 x 1296 30 fps
.Full HD 1080P 1920 x 1080 30 fps
Video Format.... MP4
White Balance.... Auto
Color Effect ...... Auto
Continuous Loop Recording.... Supported
Motion Detection.... Supported
Date and Time .... Supported
Media Supported. SD Card - 8GB Included (64GB Max)
Sound Recording.... Synchronous video and sound record
Sound Recording can be disabled.... Supported
Player Software Use Operating System's video player
USB Interface.... USB 2.0
Display Screen.... 2.0" TFT
Battery Capacity 700 mAh

19 English
Nothing Comes Close to a Cobra ^®


Troubleshooting and Product Service & Support
Troubleshooting
| Situation Cause/Solution | |
| Camera cannot turn on Power is low. Recharge battery | |
| Camera is frozen | Press and hold 📊 for 5 seconds to force shutdown; press again to turn on |
| Camera cannot record | No microSD card or microSD card is fullmicroSD card cannot be recognizedFormat microSD card or replace microSD card |
| Camera cannot connect to AP or could server | Invalid AP name or passwordWeak WiFi signal or not in WiFi coverageNo internet or cloud server is temporarily unavailableConnection may be blocked by a firewall |
| Smartphone cannot find camera | Camera WiFi is disabled or not in WiFi coverageSmartphone WiFi is disabledFor iOS users, camera name is not selected in WiFi settingsTap [Refresh] button on Drive HDTM AppWalt 1-2 minutes for WiFi connection to fully establishTurn both the phone and camera off, and then try again |
| Smartphone cannot watch live view | Weak WiFi signalCamera is recordingCamera is connected to another smartphone |
| Smartphone cannot connect to cloud server | Check mobile 3G/4G or WiFi internet connection |
| Forget camera password | Enter camera settings menu and select [Settings] → [Factory Reset] to set to default. |
For detailed and up-to-date FAQ's, please visit www.cobra.com/support/faqs.
Product Service & Support
For any questions about operating or installing this new Cobra product, PLEASE CONTACT COBRA FIRST...do not return this product to the retail store. The contact information for Cobra will vary depending on the country in which you purchased and utilize the product. For the latest contact information, please go to www.cobra.com/support
For products purchased in the U.S.A. you may also call 1-800-262-7212 (1-800-COBRA-12). For Products Purchased in the U.S.A., if your product should require factory service, please go to www.cobra.com/support and follow the instructions for returning your product to the Cobra Factory Service Department for service.

English
Product Service

Licensing & Trademark Acknowledgement
Licensing
NOTE: This device complies with part 15 of FCC rules: Operation is subject to the following two conditions: (1) This device may not cause harmful interference, and (2) This device must accept any interference received including interference that may cause undesired operation.
CAUTION: Modifications or parts not approved by Cobra Electronics Corporation may violate FCC Rules and void authority to operate this equipment.
This device complies with Industry Canada license-exempt RSS standard(s). Operation is subject to the following two conditions:
(1) this device may not cause interference, and (2) this device must accept any interference, including interference that may cause undesired operation of the device.
This device is designed and manufactured not to exceed the emission limits for exposure to radio frequency (RF) energy set by Industry Canada for an uncontrolled environment.
WARNING: This product contains chemicals known to the State of California to cause cancer and birth defects or other reproductive harm.



Trademark Acknowledgement
Cobra ^™ , Cobra Electronics Corporation ^™ , Drive HD ^™ . Nothing Comes Close to a Cobra ^™ , and the snake design are trademarks of Cobra Electronics Corporation, USA.
Android™ and Google Play™ are trademarks of Google, Inc. Use of this trademark is subject to Google permission.
Cobra, the snake design, Drive HD™, the d design, and Record your ride™ are proprietary trademarks of Cobra Electronics Corporation, USA. Other trademarks and trade names are those of their respective owners. Cobra Electronics Corporation™ is a trademark of Cobra Electronics Corporation, USA.
HDMI, the HDMI logo, and High-Definition Multimedia Interface are trademarks or HDMI registered trademarks of HDMI licensing LLC in the United States and other countries.
- Controls Indicators and Connections
- Product Features
- Camera Features
- Limited 1-Year Warranty
- Introduction
- Your Device
- Customer Information
- What's in the Box
- Installation
- Where to Mount Your Unit
- Camera Operation
- Charging the device
- Inserting and removing the Memory Card
- Dash Cam Mode vs Action Cam Mode
- OR
- Video playback:
- Visual Display
- Adjusting Camera Settings
- Connecting to a Computer
- Adjusting the Main Menu Settings
- To connect your camera to a Computer
- To connect your camera to a TV
- Wireless & APP Operation
- Local Direct Connection
- Cloud-Based Internet Connection
- Connecting to the Smartphone app
- To connect your camera to the App - Local Mode
- NOTE: It may take up to a minute after you have connected to the camera for it to show up on the App's device list.
- Smartphone App Operation Smartphone App Operation
- Cloud Mode Features
- To connect your camera to the Cloud
- Motion Detector Setup
- Specifications
- Camera Specifications:
- Troubleshooting and Product Service & Support
- Product Service & Support
- Licensing & Trademark Acknowledgement
- Licensing
- Trademark Acknowledgement
Brand : COBRA
Model : CDR 900 C
Category : Dash cam