
Monitor 7 v4 - Loudspeaker Paradigm - Free user manual and instructions
Find the device manual for free Monitor 7 v4 Paradigm in PDF.

User questions about Monitor 7 v4 Paradigm
0 question about this device. Answer the ones you know or ask your own.
Ask a new question about this device
Download the instructions for your Loudspeaker in PDF format for free! Find your manual Monitor 7 v4 - Paradigm and take your electronic device back in hand. On this page are published all the documents necessary for the use of your device. Monitor 7 v4 by Paradigm.
USER MANUAL Monitor 7 v4 Paradigm
YOU HAVE PURCHASED ONE OF THE FINEST SPEAKER SYSTEMS AVAILABLE. The ability of PARADIGM MONITOR SERIES speakers to accurately portray the full scope of the original music event is truly exceptional. Please take a few moments to read this manual. Follow all instructions to ensure proper installation and operation for maximum listening enjoyment.
The development of MONITOR SERIES speakers called for a complete re-examination of all materials and design concepts. Exhaustive R & D was undertaken to achieve best possible performance of every individual component part at every design stage. This has led to speaker systems that expand the envelope of musical reproduction in terms of performance sophistication - transparency, articulation, spaciousness, localization, etc. A giant step closer to the live event!
Efficient manufacturing techniques are then employed ensuring that the MONITOR SERIES, like all other PARADIGM speakers, offers unprecedented value - quite simply a level of performance unmatched at the price.
Using the finest components and materials along with precision manufacturing and tight quality control ensures that this outstanding level of performance will be maintained for many years.
PARADIGM MONITOR SERIES enclosures come in elegant real wood veneers that have been carefully selected and hand finished by craftsman. Care is taken to ensure similar woodgrain, however, there will always be some differences reflecting the variety found in nature.
To clean and maintain the finish, use furniture oil or a light spray wax. Do not use a strong or abrasive cleaner on any surface. Keep all other liquids away from surfaces to avoid blemish or stain damage.

IF YOUR PARADIGM SPEAKERS have been transported or stored at temperatures below 10^ C ( 50^ F) they must be allowed to warm up to normal room temperature before using, otherwise performance will be significantly affected. This is because of two factors:
- The surround material used in the bass/midrange drive unit is made of a compound that stiffens in colder temperatures.
- The ferrofluid used in the tweeter thickens in colder temperatures.
Before doing any serious listening PARADIGM MONITOR SERIES speakers must be "broken-in". This is best achieved by playing pink noise through the speakers for 24 to 48 hours at a moderate/loud listening level. If pink noise is unavailable, then white noise - the interstation "hiss" of an FM tuner - will suffice.
IN CANADA: PARADIGM ELECTRONICS INC., 101 HANLAN RD., WOODBRIDGE, ON L4L 3P5 IN THE U.S.: AUDIOSTREAM, MPO BOX 2410, NIAGARA FALLS, NY 14302
YOUR LISTENING ROOM
PARADIGM SPEAKERS have been designed to provide excellent musical results in a wide variety of domestic settings. It is important to note however, that construction, dimensions and furnishings all play a part in the quality of sound you will ultimately achieve. Your listening room will impose its own character on the performance capabilities of any speaker system. The extra care you take in setting-up PARADIGM speakers in your room will result in greater musical enjoyment. Please consider and try to follow these guidelines:
a) Low frequency performance may be affected by the construction of your room. Strong, rigid floors and walls are preferred for best bass balance. Concrete floors and walls (i.e. basement rooms) may reduce bass and are less preferred.
b) Rooms where the height, width and length are similar should be avoided as they can exhibit significant standing wave resonances. This may result in reduced clarity throughout the bass and midrange. If no other room is possible, experiment with loudspeaker placement in your room to minimize the problem.
c) Mid and high frequencies are affected by the amount of soft furnishings in your room such as curtains, carpets, sofas, wallcoverings etc. An excess of such items can produce a dull, lifeless sound. The same room without any soft furnishings will produce a brighter sound. A "normal" quantity of soft furnishings found in most living situations provides the right acoustic space so that the speaker will sound balanced.
SPEAKER LOCATION
PARADIGM SPEAKERS are designed to provide an unusually large listening window and therefore offer quite flexible placement in your listening room. To optimize performance, however, we do suggest that you follow these guidelines:
a) PARADIGM speakers are designed to be free standing. They require an open space between the loudspeakers and the walls and floors of your listening room.
b) Performance speaker stands that bring the tweeter to approximate ear level are required. We recommend PREMIERTM m-series speaker stands. These stands can be further improved by filling the center posts with lead shot.
c) The speakers should be positioned at least 30cm (12") from the back wall and at a distance from side walls that is different than the distance to the back wall. Avoid corner placement as this usually produces excessive bass and reduces clarity.
d) Measure the approximate distance from your listening position to the speakers. The speakers should then be positioned approximately 2/3 of that distance from each other. For example, if the listening-position to speakers-position distance is 3m (9ft) then the speakers should be 2m (6ft) apart.
e) The speakers should be turned in so that each speaker is approximately "aimed" toward the listening position.
CONNECTION
BE SURE YOUR AMPLIFIER IS OFF before connecting. This will avoid damage which may result from accidental shorting of speaker cables.
For optimum sound reproduction the use of high-quality audiophile speaker cable is essential. We recommend AUDIOSTREAM™ TL- and FMS-Series speaker cable. The following chart identifies minimum gauge requirements for various lengths:
| Length | Diameter | Gauge |
| Under 4.5m (15ft) | 1.3mm | 16awg |
| Under 9m (30ft) | 1.6mm | 14awg |
| Over 9m (30ft) | 2.0mm | 12awg |
Correct polarity, or phase, is critical for proper stereo imaging and bass performance. If you hear a distinct lack of bass and a dislocated stereo image, then your speakers are most likely connected out of phase. Be careful! Connect one speaker at a time to ensure proper connection of left and right channels. The red (+) amplifier terminal must be connected to the red (+) PARADIGM speaker terminal. The same applies to the black (-) terminals. Make sure all wires are firmly fastened.

ALL MONITOR SERIES speakers have separate terminals for high frequency input and low/mid frequency input except the STUDIO MONITOR - it has separate terminals for high frequency input, mid frequency input and low frequency input. These terminals are connected together, externally, with jumper bars; the speaker cable (+) and (-) can then be connected to any input terminal pair for standard connection.
Removing the jumper bars, however, gives separate access to each frequency-section of the speaker. This allows for two different connection configurations which are described as follows:

flowchart
graph TD
    A["RIGHT SPEAKER"] -->|BLACK RED LOWMID FREQUENCY INPUT| B["AMPLIFIER"]
    C["LEFT SPEAKER"] -->|BLACK RED LOWMID FREQUENCY INPUT| B
    B --> D["AMPLIFIER"]
    style A fill:#f9f,stroke:#333
    style C fill:#f9f,stroke:#333
    style B fill:#ccf,stroke:#333
BI-WIRING/TRI-WIRING
- WARNING! • Maintain correct polarity to avoid possible speaker or amplifier damage! Make sure that the jumper bars have been removed. Make sure that the Red(+) speaker terminals are connected to one Red (+) amplifier terminal and the Black(-) speaker terminals are connected to one Black (-) amplifier terminal.
Bi-wiring/tri-wiring improves clarity and openness with less grain and more solidity to the bass. As it only requires two additional speaker cables, it is also a low cost way to achieve even better performance from your Monitor Series speaker. All MONITOR SERIES speakers can be bi-wired. The STUDIO MONITOR can be bi-wired or tri-wired.
flowchart
graph TD
    subgraph_LeftSpeaker["LEFT SPEAKER"]
        A1["AMPLIFIER#2"] -->|R L INPUT| B1["Black RED RIGHT"]
        A1 -->|R L INPUT| C1["Black RED LEFT"]
        A2["AMPLIFIER#2"] -->|R L INPUT| D1["Black RED RIGHT"]
        A2 -->|R L INPUT| E1["Black RED LEFT"]
        A3["AMPLIFIER#2"] -->|R L INPUT| F1["Black RED RIGHT"]
        A3 -->|R L INPUT| G1["Black RED LEFT"]
        A4["AMPLIFIER#2"] -->|R L INPUT| H1["Black RED RIGHT"]
        A4 -->|R L INPUT| I1["Black RED LEFT"]
        A5["AMPLIFIER#2"] -->|R L INPUT| J1["Black RED RIGHT"]
        A5 -->|R L INPUT| K1["Black RED LEFT"]
        A6["AMPLIFIER#2"] -->|R L INPUT| L1["Black RED RIGHT"]
        A6 -->|R L INPUT| M1["Black RED LEFT"]
        A7["AMPLIFIER#2"] -->|R L INPUT| N1["Black RED RIGHT"]
        A7 -->|R L INPUT| O1["Black RED LEFT"]
        A8["AMPLIFIER#2"] -->|R L INPUT| P1["Black RED RIGHT"]
        A8 -->|R L INPUT| Q1["Black RED LEFT"]
        A9["AMPLIFIER#2"] -->|R L INPUT| R1["Black RED RIGHT"]
        A9 -->|R L INPUT| S1["Black RED LEFT"]
        A10["AMPLIFIER#2"] -->|R L INPUT| T1["Black RED RIGHT"]
        A10 -->|R L INPUT| U1["Black RED LEFT"]
        A11["AMPLIFIER#2"] -->|R L INPUT| V1["Black RED RIGHT"]
        A11 -->|R L INPUT| W1["Black RED LEFT"]
        A12["AMPLIFIER#2"] -->|R L INPUT| X1["Black RED RIGHT"]
        A12 -->|R L INPUT| Y1["Black RED LEFT"]
        A13["AMPLIFIER#2"] -->|R L INPUT| Z1["Black RED RIGHT"]
        A13 -->|R L INPUT| AA1["Black RED LEFT"]
        A14["AMPLIFIER#2"] -->|R L INPUT| AB1["Black RED RIGHT"]
        A14 -->|R L INPUT| AC1["Black RED LEFT"]
        A15["AMPLIFIER#2"] -->|R L INPUT| AD1["Black RED RIGHT"]
        A15 -->|R L INPUT| AE1["Black RED LEFT"]
        A16["AMPLIFIER#2"] -->|R L INPUT| AF1["Black RED RIGHT"]
        A16 -->|R L INPUT| AG1["Black RED LEFT"]
        A17["AMPLIFIER#2"] -->|R L INPUT| AH1["Black RED RIGHT"]
        A17 -->|R L INPUT| AI1["Black Red LEFT"]
        A18["AMPLIFIER#2"] -->|R L INPUT| AJ1["Black Red RIGHT"]
        A18 -->|R L INPUT| AK1["Black Red LEFT"]
        A19["AMPLIFIER#2"] -->|R L INPUT| AL1["Black Red RIGHT"]
        A19 -->|R L INPUT| AM1["Black Red LEFT"]
        A20["AMPLIFIER#2"] -->|R L INPUT| AN1["Black Red RIGHT"]
        A20 -->|R L INPUT| AO1["Black Red LEFT"]
        A21["AMPLIFIER#2"] -->|R L INPUT| AP1["Black Red RIGHT"]
        A21 -->|R L INPUT| AQ1["Black Red LEFT"]
        A22["AMPLIFIER#2"] -->|R L INPUT| AR1["Black Red RIGHT"]
        A22 -->|R L INPUT| AS1["Black Red LEFT"]
        A23["AMPLIFIER#2"] -->|R L INPUT| AT1["Black Red RIGHT"]
        A23 -->|R L INPUT| AU["Black Red LEFT"]
        A24["AMPLIFIER#2"] -->|R L INPUT| AV1["Black Red RIGHT"]
        A24 -->|R L INPUT| AW1["Black Red LEFT"]
        A25["AMPLIFIER#2"] -->|R L INPUT| AX1["Black Red RIGHT"]
        A25 -->|R L INPUT| AY1["Black Red LEFT"]
        A26["AMPLIFIER#2"] -->|R L INPUT| AZ1["Black Red RIGHT"]
        A26 -->|R L INPUT| BA1["Black Red LEFT"]
        A27["AMPLIFIER#2"] -->|R L INPUT| BB1["Black Red RIGHT"]
        A27 -->|R L INPUT| BC1["Black Red LEFT"]
        A28["AMPLIFIER#2"] -->|R L INPUT| BD1["Black Red RIGHT"]
        A28 -->|R L INPUT| BE1["Black Red LEFT"]
        A29["AMPLIFIER#2"] -->|R L INPUT| BF1["Black Red RIGHT"]
        A29 -->|R L INPUT| BG1["Black Red LEFT"]
        A30["AMPLIFIER#2"] -->|R L INPUT| BH1["Black Red RIGHT"]
        A30 -->|R L INPUT| BI1["Black Red LEFT"]
        A31["AMPLIFIER#2"] -->|R L INPUT| BJ1["Black Red RIGHT"]
        A31 -->|R L INPUT| BK1["Black Red LEFT"]
        A32["AMPLIFIER#2"] -->|R L INPUT| BL1["Black Red RIGHT"]
        A32 -->|R L INPUT| BM1["Black Red LEFT"]
        A33["AMPLIFIER#2"] -->|R L INPUT| BN1["Black Red RIGHT"]
        A33 -->|R L INPUT| BO1["Black Red Left"]
        A34["AMPLIFIER#2"] -->|R L INPUT| BP1["Black Red RIGHT"]
        A34 -->|R L INPUT| BPI1["Black Red LEFT"]
        A35["AMPLIFIER#2"] -->|R L INPUT| BUI1["Black Red RIGHT"]
        A35 -->|R L INPUT| BW1["Black Red Left"]
    end
    subgraph VerticalBikeDiagram
    direction TB
    direction LR
    note right of AB
    note bottom of AB
PASSIVE BI-AMPING/TRI-AMPING
• WARNING!
- Make absolutely sure that jumper bars have been removed from your speakers or serious damage to your amplifier will result!
- Avoid confusion and incorrect wiring. Connect one amplifier at a time.
- Maintain correct polarity! Make sure that Red(+) speaker terminals are connected to Red(+) amplifier terminals and Black(-) speaker terminals are connected to Black (-) amplifier terminals.
- NOTE! Be sure to use amplifiers with identical gain. If uniform amplifier gain is not maintained the left/right stereo balance will be incorrect when vertically bi-amped or the speaker system frequency balance will be incorrect when horizontally bi-amped. To prevent problems use identical amplifiers (Brand and Model) in identical operating mode (stereo or bridged mono).
Passive bi-amping/tri-amping provides a dramatic improvement in clarity, openness and detail - less grain - much better bass solidity and definition. The presentation of music is simply more intelligible and transparent.
flowchart
graph TD
    A["RIGHT SPEAKER"] --> B["AMPLIFIER#1"]
    A --> C["AMPLIFIER#2"]
    D["LEFT SPEAKER"] --> E["AMPLIFIER#1"]
    D --> F["AMPLIFIER#2"]
    B --> G["OUTPUT L R"]
    C --> H["R L INPUT"]
    E --> I["R L INPUT"]
    F --> J["R L INPUT"]
    G --> K["PREAMP"]
    H --> K
    I --> K
    J --> K
    K --> L["LOWMID FREQUENCY INPUT"]
    K --> M["LOWMID FREQUENCY INPUT"]
    K --> N["HIGH FREQUENCY INPUT"]
With passive bi-amping/tri-amping the speaker's internal passive crossovers remain connected. An external electronic crossover is not required and cannot be used (there is no direct electrical access to individual drive units). This saves expense and set-up difficulties. Passive bi-amping/tri-amping fully optimizes your MONITOR SERIES speaker. All MONITOR SERIES speakers can be bi-amped. The STUDIO MONITOR can be bi-amped or tri-amped.
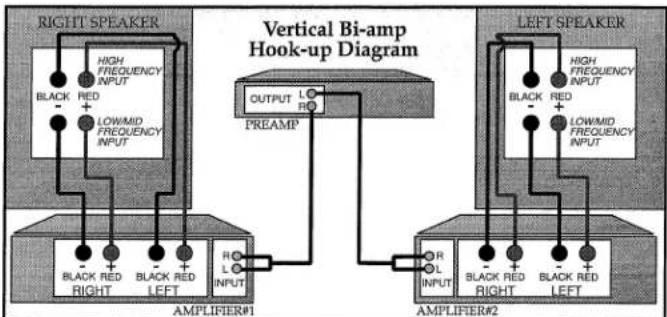
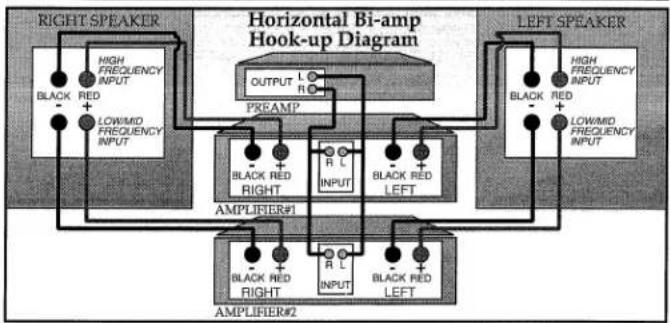
To bi-amplify, two power amplifiers are required. Connection can be either "vertical" or "horizontal" as shown. "Vertical" means that one amplifier is dedicated to each speaker - one channel drives the low/mid frequency input and the other drives the high frequency input. "Horizontal" means that one amplifier is driving both low/mid frequency inputs and another the high frequency inputs. Each configuration has advantages and disadvantages.
Vertical bi-amping dedicates an individual amplifier to each speaker. This optimizes stereo separation and will provide an outstanding three-dimensional soundstage with precise image localization.
When listening at loud levels, however, horizontal bi-amping is more optimal. Low/mid frequencies are more demanding on an amplifier than high frequencies. This imbalance can become a problem in the vertical configuration at loud levels - the clipping distortion in the amplifier's "low/mid frequency" channel can crosstalk into the "high frequency" channel and thus result in increased distortion going to the speaker's high frequency input.
Horizontal bi-amping dedicates one amplifier to the speaker's low/mid frequency inputs and another to the speaker's high frequency inputs. Distortion crosstalk between low/mid and high frequency channels can no longer occur. However, stereo separation is reduced from what can be achieved with the vertical configuration. The best configuration for you depends on your listening habits and equipment.
The tri-amping provision on the STUDIO MONITOR opens up even more possibilities:
- To bi-amp leave the high and mid frequency input jumper bars connected and remove the mid and low frequency input jumper bars. One amplifier channel drives the high+mid frequency input and the other the low frequency input.
- To tri-amp remove all jumper bars. Then connect three amplifiers - vertically to high and mid frequency inputs and horizontally to low frequency input, or horizontally to all three inputs. With independent access to each crossover section there are many possible vertical/horizontal combinations.
ENCEINTES ACOUSTIQUES HAUTE DEFINITION
SERIE MONITOR
MANUEL
DE L'UTILISATEUR
FÉLICITATIONS!
Brand : Paradigm
Model : Monitor 7 v4
Category : Loudspeaker