
MW 26146 - Microwave KALORIK - Free user manual and instructions
Find the device manual for free MW 26146 KALORIK in PDF.


| Brand | Kalorik |
| Model | MW 26146 |
| Product Type | Microwave Oven with Grill, Convection, and Steam |
| Capacity | 25 Liters (0.9 cubic feet) |
| Turntable Diameter | 315 mm / 12.4 inches |
| Net Weight | Approx. 20 kg (44 lbs) |
| Operation Frequency | 2450 MHz |
| Power Supply | 120 V, 60 Hz (grounded outlet required) |
| Microwave Power | 800 W (5 levels: 100, 250, 400, 550, 800 W) |
| Grill Function | Yes, with heating element |
| Convection Function | Yes, 7 temperature levels (200°F to 410°F) |
| Steam Function | Yes, with dedicated water tank and steam generator |
| Combination Cooking Modes | 5 modes: Microwave+Grill, Microwave+Convection, Microwave+Steam, Grill+Steam, Convection+Steam |
| Auto-Cook Menus | 7 presets (Braised Pork, Porridge, Rice, Stew, Noodles, Cookie, Bake) |
| Defrost Function | Yes, by weight (4 categories: Joint Meat, Steaks/Chops, Chicken Quarters, Fish) |
| Child Lock | Yes, via holding STOP/CLEAR button |
| Clock and Alarm | Digital clock with alarm timer |
| Clean-Up Function | Steam clean cycle |
| Water Tank Capacity | Approx. 1 liter (with min/max marks) |
| Steam Generator Maintenance | Decalcify every 20 uses with vinegar |
| Accessories Included | Glass tray, roller ring, metal rack, egg tray, water tank, waste water tank, steam generator |
| Warranty | 1 year limited warranty |
Frequently Asked Questions - MW 26146 KALORIK
User questions about MW 26146 KALORIK
0 question about this device. Answer the ones you know or ask your own.
Ask a new question about this device
Download the instructions for your Microwave in PDF format for free! Find your manual MW 26146 - KALORIK and take your electronic device back in hand. On this page are published all the documents necessary for the use of your device. MW 26146 by KALORIK.
USER MANUAL MW 26146 KALORIK
Operation frequency: 2450MHz
Capacity: 25 Liters (0.9 cubic feet)
Turntable system: 315mm / 12.4 feet
Net weight: Approx. 20 kg (44lbs)
PRECAUTIONS TO AVOID POSSIBLE EXPOSURE TO EXCESSIVE MICROWAVE ENERGY.
a) Do not attempt to operate this oven with the door open since open-door operation can result in harmful exposure to microwave energy. It is important not to defeat or tamper with the safety interlocks.
b) Do not place any object between the oven front face and the door or allow soil or cleaner residue to accumulate on sealing surfaces.
c) Do not operate the oven if it is damaged. It is particularly important that the oven door close properly and that there is no damage to the: door (bent), hinges and latches (broken or loosened), door seals and sealing surfaces.
d) The oven should not be adjusted or repaired by anyone except properly qualified service personnel.
IMPORTANT SAFETY INSTRUCTIONS
When using electrical appliances, basic safety precautions should always be followed including the following: WARNING -To reduce the risk of burns, electric shock, fire, injury to persons, or exposure to excessive microwave energy:
- Read all instructions before using the appliance.
- Read and follow the specific "PRECAUTIONS TO AVOID POSSIBLE EXPOSURE TO EXCESSIVE MICROWAVE ENERGY" found on page 2.
- This appliance must be grounded. Connect only to properly grounded outlet. See "GROUNDING INSTRUCTIONS" found on page 5.
- Install or locate this appliance only in accordance with the provided installation instructions.
- Some products such as whole eggs with / without shells and sealed containers -for example, closed glass jars are able to explode and should not be heated in this oven.
- Use this appliance only for its intended use as described in the manual. Do not use corrosive chemicals or vapors in this appliance. This type of oven is specifically designed to heat, cook, or dry food. It is not designed for industrial or laboratory use.
- As with any appliance, close supervision is necessary when used by children.
- Do not operate this appliance if it has a damaged cord or plug, if it is not working properly, or if it has been damaged or dropped.
- This appliance should be serviced only by qualified service personnel. Contact nearest authorized service facility for examination, repair or adjustment.
- Do not cover or block any openings on the appliance.
- Do not store this appliance outdoors. Do not use this product near water -for example ,near a kitchen sink, in a wet basement or near a swimming pool o similar locations.
- Do not immerse cord or plug in water.
- Keep cord away from heated surfaces.
- Do not let cord hang over edge of table or counter.
- To reduce the risk of fire in the oven cavity: a) Do not overcook food. Carefully attend appliance when
paper, plastic or other combustible materials are placed inside the oven to facilitate cooking.
b) Remove wire twist-ties from paper or plastic bags before placing bag in oven.
c) If materials inside the oven ignite, keep oven door closed, turn oven off and disconnect the power cord or shut off power at the fuse or circuit breaker panel.
d) Do not use the cavity for storage purposes. Do not leave paper products, cooking utensils or food in the cavity when not in use.
-
Liquids such as water, coffee or tea are able to be overheated beyond the boiling point without appearing to be boiling. Visible bubbling or boiling when the container is removed from the microwave oven is not always present. THIS COULD RESULT IN VERY HOT LIQUIDS SUDDENLY BOILING OVER WHEN THE CONTAINER IS DISTURBED OR A UTENSIL IS INSERTED INTO THE LIQUID.
-
When cleaning surfaces of door and oven that together on closing the door, use only mild, nonabrasive soaps, or detergents applied with a sponge or soft cloth.
-
To reduce the risk of injury to persons:
a) Do not overheat the liquid.
b) Stir the liquid both before and halfway through heating it.
c) Do not use straight-sided containers with narrow necks.
d) After heating, allow the container to stand in the microwave oven for a short time before removing the container.
e) Use extreme care when inserting a spoon or other utensil into the container.
- The appliance is to be stalled on surface 3FT above floor level.
SAVE THESE INSTRUCTIONS SHORT POWER-SUPPLY CORD WARNINGS:
- A short power-supply cord is to be provided to reduce risks resulting from becoming entangled in or tripping over a longer cord.
- Longer cord sets or extension cords are available and may be used if care is exercised in their use if a long cord or extension cord is used.
- The marked electrical rating of the cord sets or extension cord should be least as great as the electrical rating of the appliance.
Φ. The extension cord should be grounding-type 3-wire cord, and the longer cord should be arranged so that it will not drape over the counter top or table top where it can be pulled on by children or tripped over unintentionally.
GROUNDING INSTRUCTIONS
This appliance must be grounded. In the event of an electrical short circuit, grounding reduces the risk of electric shock by providing an escape wire for the electric current. This appliance is equipped with a cord having a grounding wire with a grounding plug. The plug must be plugged into an outlet that is properly installed and grounded.
ADDITIONAL PRECAUTIONS The safety instructions in your manual are important and should be read carefully. Keep your manual for future reference.
MAINTENANCE:
If your appliance is not maintained in a good condition, its surface could be damaged and diminish inexorably the lifespan of the appliance and lead to a dangerous situation.
Important: People (including children) who are not able to use the appliance in a safe way, due to their physical, sensorial or mental capacity or their lack of experience or knowledge, must never use
the appliance except if they are supervised by a person responsible for their safety or if they previously received instructions concerning the safe use of the appliance.
Close supervision is necessary to prevent children from using the appliance as a toy.
WARNING: To reduce the risk of burns, electric shock, fire, injury to persons or exposure to excessive microwave energy, please read all instructions carefully before using the appliance:
-
Use this appliance only domestic use as described in this manual. This appliance is not suitable for professional use. Do not use corrosive chemicals in this appliance. This type of oven is specifically designed to heat, cook, steam or dry food. It is not designed for industrial or laboratory use.
-
Do not operate the oven when empty.
-
Do not attempt to operate this oven with the door open since open-door operation can result in harmful exposure to microwave energy. It is important not to defeat or tamper with the safety interlocks.
Φ. Do not place any object between the oven front face and the door or allow soil or cleaner residue to accumulate on sealing surfaces.
-
WARNING: △Do not operate the oven if it is damaged. It is particularly important that the oven door closes properly and that there is no damage to the:
-
Door (bent)
- Hinges and latches (broken or loosened)
- Door seals and sealing surfaces
-
(Inner or outer) windows of the door
Do not use the oven until the repairs have been made by a competent qualified service(*). -
If steam appears between the inner and outer window when cooking, immediately stop the oven, unplug it, and contact the nearest customer service. Otherwise, you might be exposed to microwave energy.
-
WARNING ⚠is hazardous for anyone other than a trained person to carry out any service or repair operation that involves the removal of any cover that gives protection against exposure
to microwave energy. Should the appliance or its power cord be damaged, do not use this appliance. All repairs should be made by a competent qualified service (*).
-
Do not attempt to disassemble the appliance or to remove feet, seals etc.
-
Do not use this product near water, for example a kitchen sink, a wet basement, near a swimming pool or similar locations.
-
Do not immerse cord or plug in water.
-
Keep cord away from heated surfaces.
-
This appliance is to be installed on a surface 3 feet above floor level.
-
WARNING : Children should not use this appliance without supervision except if they were previously given proper instructions so that they can use it correctly and understand the risks linked to improper use.
1Φ. To reduce the risk of fire in the oven cavity:
a. When heating food in plastic or paper container, check the power of the microwave oven to avoid any risk of fire.
b. Remove wire twist-ties from paper or plastic bags before placing bag in oven.
c. If smoke is observed, switch off or unplug the appliance and keep the door closed in order to stifle any flames.
d. Do not use the cavity for storage purposes. Do not leave paper products, cooking utensils or food in the cavity when not in use.
15. IMPORTANT: UTENSILS THAT ARE NOT SUITABLE FOR MICROWAVE COOKING.
Always check if your utensils are microwave resistant before using them in the appliance.
- Never use utensils with a metal handle.
- Never use utensils with metal decorations.
- Never use iron locking clips (not even covered with paper)
- Never use melamine receptacles as these contain a substance that absorbs microwave energy. The receptacle might break or carbonise and the cooking process would be slower.
- The use of traditional thermometers is prohibited, use microwave resistant thermometers.
- In case of doubt, please contact the supplier of the utensil to know whether it is microwave resistant or not.
-
Do not prepare food in receptacles with too narrow an opening, as this might cause these receptacles to explode.
-
WARNING : CAUTION, ▲ Liquid or other food must not be heated in sealed containers (such as receptacles with lid or feeding bottle with dummy) since they are liable to explode.
-
Should the symbol be indicated on a certain surface, you need to be careful when handling the product. This symbol means "CAUTION, this surface may get very hot during use".
-
Eggs in their shell or whole hard-boiled eggs must not be heated in the microwave cooking mode as they might explode.
-
Liquids such as water, coffee or tea are able to be overheated beyond the boiling point without appearing to be boiling. Microwave heating of beverage can result in delayed eruptive boiling, therefore care has to be taken when you handle the container. Inserting a utensil into the liquid can result in sudden boiling of the liquid.
-
CAUTION: Do not fry food in the oven. Hot oil can damage oven parts and utensils and even result in skin burns. Do not warm up greasy foods in the microwave oven, as it might catch fire.
-
Do not heat water and oil or fat together, it may cause a violent eruption.
-
Pierce foods with heavy skins such as potatoes, whole squash, apples and chestnuts before cooking. Otherwise they might explode.
2Φ. The contents of feeding bottles and baby jars should be stirred or shaken and the temperature should be checked before serving in order to avoid burns.
-
The liquid may splash out during or after heating or when adding ingredients (instant coffee, etc), resulting in possible harm or injury to persons.
-
Cooking utensils may become hot because of heat transferred from the heated food. Potholders may be needed to handle the utensil.
-
Before operating the oven in the microwave cooking mode, make sure the glass tray, the motor shaft and the roller ring are in
correct position inside the oven. If you want to use the oven in the steam mode, remove the glass tray and the roller ring.
-
Make sure the openings of microwave resistant receptacles are neither obstructed nor covered in order to avoid that they explode during operation.
-
Do not place the preparation directly on the glass tray, but put them in a microwave resistant receptacle.
-
Food containing a mixture of water and grease should be left 30 to 60 seconds in the oven when switched off to allow the mixture to come down to avoid bubbling, especially when a beef cube is added.
-
It is necessary to clean regularly the cavity of your oven and to remove any rests of food. Food remains on the heating elements of the oven will produce smoke and bad smells.
-
Your appliance must never be switched on through an external timer or any kind of separate remote control system.
-
Before using a steam function, insert the water tank and wait 60 seconds before adding tap water, then switch on the appliance.
3Φ. If you use the steam feature again after a long time, insert the water tank, wait for 30 seconds, then empty the water tank in the steam generator. Then wait for 60 seconds before switching on the appliance.
-
After you cooked using the steam feature, use "clean up" function for self-clean, or wipe up the steam generator, the water tank and the collecting slot. If you regularly use the steam feature, the steam generator should be cleaned with lemony acid every three months.
-
The purpose of the water collecting slot is to collect all excessive water which can occur when using the microwave and steam functions. The slot should be emptied after each use of the steam or the microwave function. Be careful not to get scalded.
-
After cleaning the water collecting slot, put it back in the oven keeping both your hands close to both sides of the water collecting slot. Put it upward into the oven and keep it horizontal.
-
The egg rack can only be used for steaming eggs with the steam feature. Do not use the microwave feature or other.
-
Never use a steam function with an empty water tank.
Φ0. Do not touch or pull out the steam generator while using a steam function.
Φ1. The steam generator can only be pulled out for cleaning and maintenance. Do not immerse it in water or other fluids.
(*) Competent qualified service: after sales department of the producer or importer or any person who is qualified, approved and competent to perform this kind of repairs in order to avoid all danger. In any case you should return the appliance to this electrician.
PART DESCRIPTION
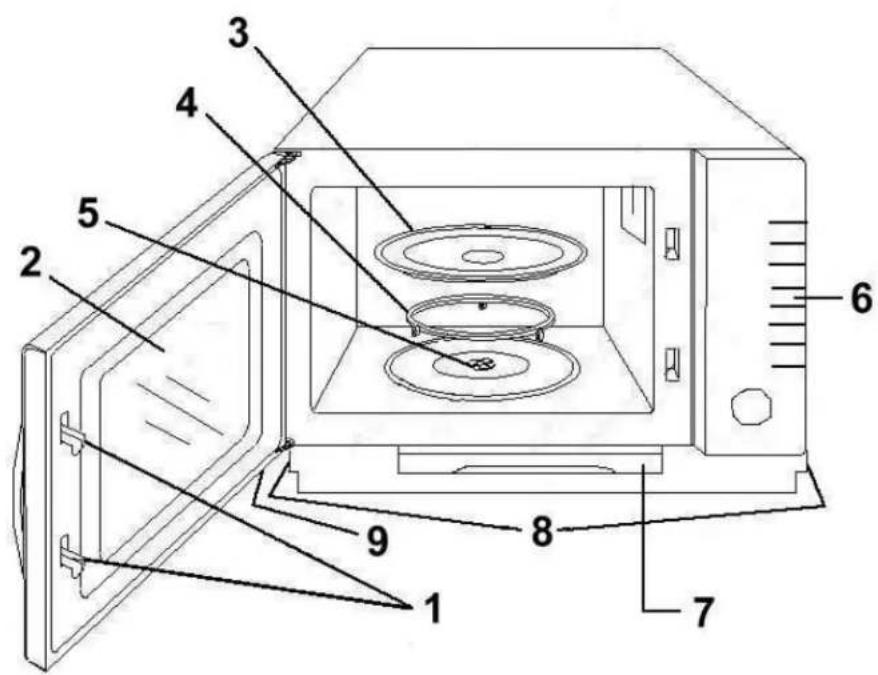
- Door safety lock system
- Oven window
- Glass tray
Φ. Roller ring - Shaft
- Control panel
- Water tank
- Waste water tank
- Steam generator
- Egg tray

INSTALLATION
- Make sure that all the packing materials are removed from the inside of the door.
- Check the oven for any damage, such as misaligned or bent door, damaged door seals and sealing surface, broken or loose door hinges and latches and dents inside the cavity or on the door. If there is any damage, do not operate the oven and contact a competent qualified service.
- This microwave oven must be placed on a flat, stable surface to hold its weight (19.5 kg / ΦΦlbs) and the heaviest food likely to be cooked in the oven.
Φ. Do not place the oven where heat, moisture or high humidity are generated, or near combustible materials. - Do not cover or block any openings on the appliance. Do not remove the feet.
- For correct operation, the oven must have sufficient airflow. Allow 20cm / 8 inches of space above the oven, 10cm / Φ inches at back and 8cm/ 3 inches at both sides.
- The socket must be readily accessible so that it can be easily unplugged in case of emergency.
- Do not use the oven outdoors.
WARNING
We advise you to call for an electrician if you have any questions concerning the technical installation of your appliance.
This appliance is protected by a safety fuse. Should this fuse be replaced, please contact a competent qualified electrician (*).
RADIO INTERFERENCE
Operation of the microwave oven can cause interference to your radio, TV or similar equipment. When there is interference, it may be reduced or eliminated by taking the following measures:
- Clean door and sealing surface of the oven.
- Reorient the receiving antenna of radio or television.
- Move the microwave oven away from the receiver.
Φ. Plug the microwave oven into a different outlet so that microwave oven and receiver are on different branch circuits.
MICROWAVE COOKING PRINCIPLES
- Arrange food carefully. Place thickest areas towards outside of dish.
- Watch cooking time. Cook for the shortest amount of time indicated and add more as needed. Food severely overcooked can smoke or ignite.
- Cover foods while cooking. Covers prevent spattering and help foods to cook evenly.
Φ. Turn foods over once during microwaving to speed cooking of such foods as chicken and hamburgers. Large items like roasts must be turned over at least once. - Rearrange foods such as meatballs halfway through cooking both from top to bottom and from the centre of the dish to the outside.
STEAM COOKING PRINCIPLES
-
If you want to steam foodstuffs with the steam function, a steam auto-cook function or a combined function with steam, always remove the glass tray and the roller ring before use. You can leave the shaft inside the appliance.
-
Before use, make sure that the waste water tank is empty and that there is sufficient water in the water tank. Also check if the steam generator, the waste water tank and the water tank are placed correctly.
-
Only steam consumable food. Do not place too large pieces of food in the oven cavity.
Φ. During the steaming process, the window stays clean. Do not open the door too many times as a lot of steam will escape and heat will be lost. For every time you open the door, the steaming process will need 2 extra minutes.
- At the end of the steam cooking process, it is best to wait 30 seconds before opening the door, as the steam remains in the oven cavity for a while and thus helps steaming the foodstuffs even after the oven has stopped.
UTENSILS GUIDE
- We advise you to use utensils that are specially conceived for microwave cooking as they allow energy to pass through the container and heat the food.
- Microwave cannot penetrate metal, so metal utensils or dishes with metallic trim should not be used.
- Do not use recycled paper products when microwave cooking, as they may contain small metal fragments which may cause sparks and/or fire.
Φ. Round/oval dishes rather than square/oblong ones are recommended, as food in corners tends to overcook.
The table below is a general guide to help you select the correct utensils.
| Cookware | Microwave Cooking | Grill | Combination | Convection | Steam |
| Heat-Resistant Glass | Yes Yes Yes | Yes | Yes | ||
| Non Heat-Resistant Glass | No No | No | No No | ||
| Heat-Resistant Ceramics | Yes | Yes | Yes Yes Yes | ||
| Microwave-Safe Plastic Dish | Yes No | No | No No | ||
| Kitchen Paper Yes No | No No No | ||||
| Metal Tray No Yes Yes | Yes Yes | ||||
| Metal Rack No Yes Yes | Yes Yes Yes | ||||
| Aluminium Foil & Foil Containers | No Yes | No | No Yes |
CONTROL PANEL
For each pad, please refer to the paragraph "USE" to know their functions.
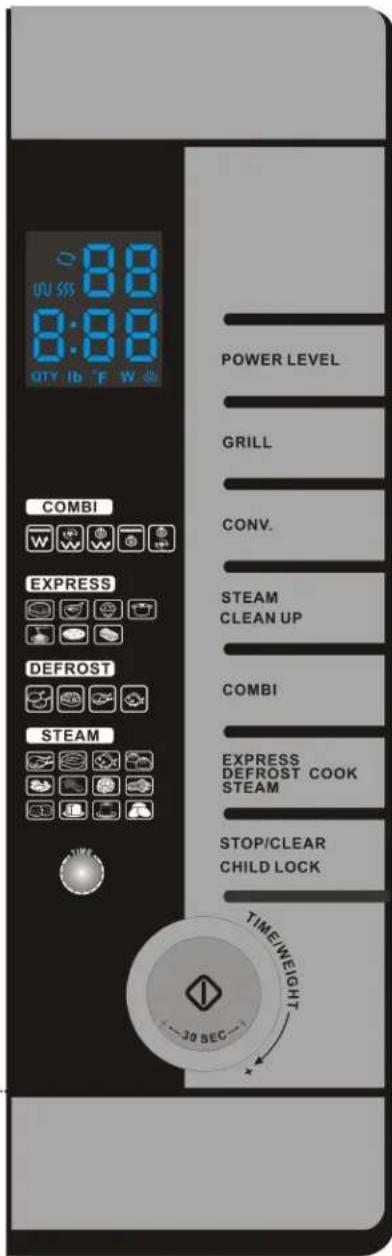
Display: indicates the cooking time, the power, the present time and the state of the different settings or other adjustments.
POWER LEVEL: to set the microwave cooking function (5 power levels) and to set the microwave power level.
GRILL: to set the grill cooking function.
CONV.: to set the convection function and to set the temperature for convection cooking.
STEAM/CLEAN UP: to set the steam function and to set the clean-up function.
COMBI: to set a combination cooking function.
EXPRESS/DEFROST/STEAM COOK: to set the auto-menu, the defrost by weight function or the steam autocook function.
STOP/CLEAR/CHILD LOCK: to pause or to stop the microwave oven while in use or to cancel the current program. It can also be used to activate and to deactivate the child safety lock.
TIME: allows to set the clock or to set the alarm clock.
/30 SEC (START): you can use the START button to start the oven once a function is set. It can also be used to add 30 seconds to the cooking time.
Rotary knob: allows regulating the cooking times, power, weights or current time.
USE
IMPORTANT REMARKS:
1) There must be a food preparation in the oven cavity before starting the microwave oven.
2) Make sure the receptacle does not touch the walls of the cavity in order not to disturb the rotation of the glass tray.
3) The metal rack supplied is microwave resistant and can be used without any risk, both in grill or microwave function (or combination) or also in the steam function. It can be used to put the food nearer to the heating element or to put several receptacles in the oven.
) The polypropylene P16 egg tray supplied can be used for the steam function only. It should never be used for microwave cooking, grill cooking or convection cooking.
Each time a pad is pressed, a short beep will sound to acknowledge the press.
When the appliance starts, the light switches on in order to check the cooking. The cooking time countdown begins.
At the end of the cooking time, beeps will sound and the light switches off. If you do not press any button or open the oven, 3 beeps will sound every minute.
If you press the "STOP/CLEAR" pad once while the oven is cooking, the oven will pause (press the START button to continue cooking). If you press "STOP/CLEAR" twice during the cooking process, the oven will stop. If you are setting a program when pressing "STOP/CLEAR", the program will be cancelled.
IF YOU OPEN THE DOOR DURING THE COOKING PROCESS, THE OVEN WILL STOP.
SETTING THE CLOCK
The oven has a digital clock. To set the time:
-
Press the "TIME" button twice. The display will show "0:00" and the first "0" indicating the hour will start flashing.
-
Adjust the hour by turning the rotary knob.
-
Press "TIME" again to confirm the setting of the hour. The "00" indicating the minutes will start flashing.
Φ. Adjust the minutes by turning the rotary knob. - Press "TIME" again to finish the setting. ":" will flash, and the set time will light up.
If time resetting is needed afterwards, press "TIME" twice and proceed as described above.
The oven can also work as an alarm clock:
- Press "TIME" once. The "0" on the display will start flashing.
- Set the time by turning the rotary knob (maximum 60 minutes). The time will flash on the display.
- Press the START button " /BOSEC". The countdown begins.
Φ. At the end of the countdown, you will hear Φ beeps. If you do not press any button or open the oven, 3 beeps will sound every minute.
SETTING THE COOKING TIME, POWER AND COOKING FUNCTION
a) Quick start
This function allows a quick and easy heating, for instance of a glass of water.
Press the START button "30SEC" and the oven will start working at full microwave power (100% power output, or 800W) for 30 seconds. Each press of the START button will add 30 seconds to the cooking time, which is shown on the display.
b) Microwave cooking
- Press the "POWER LEVEL" button. "800" will be displayed, which is the maximum power (800W).
- If you do not wish to cook at the maximum power level, select the desired power by pressing "POWER LEVEL" a number of times. "800", "550", "Φ00", "250" and "100" will be displayed in turn, indicating 800W, 550W, Φ00W, 250W and 100W respectively.
- Set the cooking time by turning the rotary knob (maximum 60 minutes).
Φ. Press the START button "130SEC" to start cooking. The countdown begins.
c) Grill cooking
The grill cooking is particularly useful for thin slices of meat, steaks, chops, kebabs, sausages or pieces of chicken. It is also suitable for hot sandwiches and au gratin dishes.
- Press the "GRILL" button.": 0" will be displayed and appears on the display as well.
-
Set the cooking time by turning the rotary knob (maximum 60 minutes).
-
Press the START button "XBOSEC" to start cooking. The countdown begins.
Note: The heating element will go out 15 seconds before the end of the cooking time.
d) Convection cooking
The convection function can be used to preheat the oven to a certain temperature and to cook food with convection.
- Press the "CONV." button. On the display, "ΦΦ0" will start flashing, which is the preset temperature.
- Press the "CONV." button again if you wish to set a different temperature. You can choose between 7 temperature levels for convection: 0^ , 00^ , 360^ , 320^ , 280^ , 20^ and 200^ .
- Set the cooking time by turning the rotary knob (maximum 60 minutes).
Φ. Press the START button "130SEC" to start cooking. The countdown begins.
Note: The heating element will go out 15 seconds before the end of the cooking time.
e) Steam cooking
Before using the steam function, fill the water tank with water. To do so, take out the water tank situated at the front side of your microwave. Then open the water tank by turning the cap anticlockwise and taking it off. Pour in the desired amount of water, respecting the minimum and maximum levels indicated on the water tank. Close the water tank by turning the cap clockwise until it clicks and place the water tank back in the appliance. Make sure that it fits perfectly and wait 30 seconds before use. See also section "STEAM COOKING PRINCIPLES".
-
Press the "STEAM/CLEAN UP" button.": 0" and will be displayed.
-
Set the cooking time by turning the rotary knob (maximum 30 minutes).
-
Press the START button "XBOSEC" to start cooking. The countdown begins.
Note: If there is not sufficient water in the water tank when using this function, 8 beeps will sound. If you do not add water when that happens, beeps will sound every minute.
f) Combination cooking
You can choose between 5 combination cooking programs:
1. Microwave + Grill
- Press the "COMBI" button once. "550" will be displayed, which is the maximum power.
- If you do not wish to cook at the maximum power level, select the desired power by pressing "POWER LEVEL". You can choose between power levels: 550W, 00W, 250W and 100W.
- Set the cooking time by turning the rotary knob (maximum 60 minutes).
Φ. Press the START button "130SEC" to start cooking. The countdown begins.
Note: The heating element will go out 15 seconds before the end of the cooking time.
2. Microwave + Convection
- Press the "COMBI" button twice. On the display, "ΦΦ0" will start flashing, which is the preset temperature.
- Press the "CONV." button if you wish to set a different temperature. You can choose between 7 temperature levels for convection: 0^ , 00^ , 360^ , 320^ , 280^ , 20^ and 200^ .
-
Press "POWER LEVEL" to select the power. You can choose between power levels: 550W, 00W, 250W and 100W.
Φ. Set the cooking time by turning the rotary knob (maximum 60 minutes). -
Press the START button "XBOSEC" to start cooking. The countdown begins.
Note: The heating element will go out 15 seconds before the end of the cooking time.
3. Microwave + Steam
- Press the "COMBI" button three times. On the display, "800" will start flashing, which is the preset power level.
- Press "POWER LEVEL" to select the power. You can choose between 5 power levels: 800W, 550W, Φ00W, 250W and 100W.
- Set the cooking time by turning the rotary knob (maximum 60 minutes).
Φ. Press the START button "130SEC" to start cooking. The countdown begins.
Note: If there is not sufficient water in the water tank when using this function, 8 beeps will sound. If you do not add water when that happens, beeps will sound every minute. See also section "STEAM COOKING PRINCIPLES".
4. Grill + Steam
- Press the "COMBI" button four times. ": 0" appears on the display.
- Set the cooking time by turning the rotary knob (maximum 60 minutes).
- Press the START button "ABOSEC" to start cooking. The countdown begins.
Note: The heating element will go out 15 seconds before the end of the cooking time.
If there is not sufficient water in the water tank when using this function, 8 beeps will sound. If you do not add water when that happens, beeps will sound every minute. See also section "STEAM COOKING PRINCIPLES".
5. Convection + Steam
-
Press the "COMBI" button five times. "ΦΦ0" appears on the display, which is the maximum temperature for convection.
-
Press the "CONV." button to set the temperature. You can choose between 7 temperature levels for convection: 0^ , 0^ , 00^ , 360^ , 320^ , 280^ , 20^ and 200^ .
- Set the cooking time by turning the rotary knob (maximum 60 minutes).
Φ. Press the START button "130SEC" to start cooking. The countdown begins.
Note: The heating element will go out 15 seconds before the end of the cooking time.
If there is not sufficient water in the water tank when using this function, 8 beeps will sound. If you do not add water when that happens, beeps will sound every minute. See also section "STEAM COOKING PRINCIPLES".
AUTO-menu
The auto-functions select the appropriate cooking programme according to the food you want to prepare.
- Press the "EXPRESS/DEFROST/STEAM COOK" button once. "C -- 1" appears on the display and "QTY" flashes.
- Turn the rotary knob to select the desired auto-cook function according to the type of food that needs to be cooked. You can choose between 7 auto-cook functions (see table).
- Press the START button "X80SEC" to confirm the setting of the auto-cook function.
Φ. Turn the rotary knob to set the quantity that needs to be cooked (see table). The selected quantity flashes on the display. - Press the START button "ABOSEC" to start cooking. The countdown begins.
Note: The heating element will go out 15 seconds before the end of the cooking time.
Auto Express Cook List:
| Type Food pounds/QTY Total time | Automatic Settings | |||
| 1.1 lb 28 min | 1. microwave 800W 8 min2. microwave 550W 20 min | |||
| c-1 BRAISED PORK | 1.65 lb 38 min | 1. microwave 800W 10 min2. microwave 550W 28 min | ||
| 2.2 lb Φ7 min | 1. microwave 800W 12 min2. microwave 550W 35 min | |||
| c-2 PORRIDGE | 0.22 lb(+1000ml water) | 21 min | 1. microwave 800W 10 min2. microwave 550W 8 min3. microwave 800W 3 min | |
| 0.ΦΦ lb(+1800ml water) | 28 min | 1. microwave 800W 15 min2. microwave 550W 10 min3. microwave 800W 3 min | ||
| 0.ΦΦ lb(+Φ00ml water) | 23 min | 1. microwave 800W 5 min2. microwave Φ00W Φ.5 min3. microwave 800W Φ.5 minΦ. microwave 500W 9 min | ||
| c-3 RICE | 0.66 lb(+500ml water) | 25 min | 1. microwave 800W 6 min2. microwave Φ00W 5.5 min3. microwave 800W Φ.5 minΦ. microwave 500W 9 min | |
| 1.1 lb(+700ml water) | 30 min | 1. microwave 800W 8 min2. microwave 500W 7 min3. microwave 800W 5 minΦ. microwave 500W 10 min | ||
Auto Express Cook List:
| Type Food pounds/QTY | Total time | Automatic Settings | |
| c-Φ STEW | 0.88 lb(+800ml water) | 23 min | 1. microwave 800W 8 min2. microwave 550W 15 min |
| 1.76 lb(+1200ml water) | 35 min | 1. microwave 800W 15 min2. microwave 550W 20 min | |
| 2.65 lb(+1600ml water) | Φ3 min | 1. microwave 800W 18 min2. microwave 550W 25 min | |
| c-5 NOODLES | 0.ΦΦ lb(+800ml water) | 10 min | 1. microwave 800w 7 minpause2. microwave 800W 3 min |
| 0.66 lb(+900ml water) | 13 min | 1. microwave 800W 9 minpause2. microwave 800W Φ min | |
| 0.88 lb(+1000ml water) | 17 min | 1. microwave 800W 12 minpause2. microwave 800W 5 min | |
| c-6 COOKIE | 0.ΦΦ lb 20 min | 1.preheat (conv.ΦΦ0°F) 10min. >pause2. conv.ΦΦ0°F 10 min.1. preheat (conv.ΦΦ0°F) 10min. >pause2. conv.ΦΦ0°F 13 min.1. preheat (conv.ΦΦ0°F)10 min. >pause2. conv.ΦΦ0°F 15 min. | |
| 0.88 lb 23 min | |||
| 1.1 lb 25 min | |||
Auto Express Cook List:
Type Food pounds/QTY Total time Automatic Settings
| c-7 BAKE | 0.66 lb 23 min | 1. preheat (conv.ΦΦ0°F) |
| 10 min. >pause | ||
| 2. conv.ΦΦ0°F 8 min. | ||
| 3. grill 5 min. | ||
| 1.1 lb 25 min | 1. preheat (conv.ΦΦ0°F) | |
| 10 min. >pause | ||
| 2. conv.ΦΦ0°F 10 min. | ||
| 3. grill 5 min. | ||
| 1.65 lb 30 min | 1. preheat (conv.ΦΦ0°F) | |
| 10 min. >pause | ||
| 2. conv.ΦΦ0°F 15 min. | ||
| 3. grill 5 min. |
g) Defrost by weight
With this function, the power (250W) and time are set automatically in order to defrost your preparation progressively without cooking it.
- Press the "EXPRESS/DEFROST/STEAM COOK" button twice. "d -- 1" appears on the display and "lb" flashes.
- Turn the rotary knob to select the desired defrost function according to the type of food that needs to be defrosted. You can choose between defrost functions (see table).
- Press the START button " 780SEC" to confirm the setting of the defrost function.
Φ. Turn the rotary knob to set the quantity that needs to be defrosted (see table). The selected quantity flashes on the display. - Press the START button "XBOSEC" to start the defrosting process. The countdown begins.
Auto Defrost Cook List:
| Food | Weight (pounds) | Total time | Turn over time | Power |
| d-1 Joint Meat | 0.Φ5 lb Φ:30 2:00 Micro. 250W | |||
| 0.65 lb 5:32 2:30 Micro. 250W | ||||
| 0.85 lb 7:25 3:11 Micro. 250W | ||||
| 1.10 lb 8:15 Φ:12 Micro. 250W | ||||
| 1.30 lb 10:10 5:10 Micro. 250W | ||||
| 1.50 lb 12:06 6:11 Micro. 250W | ||||
| 1.75 lb 1Φ:13 7:12 Micro. 250W | ||||
| 2.00 lb 16:15 8:13 Micro. 250W | ||||
| 2.20 lb 18:10 9:1Φ Micro. 250W | ||||
| 2.Φ0 lb 20:26 10:15 Micro. 250W | ||||
| 2.65 lb 22:1Φ 11:00 Micro. 250W | ||||
| 2.85 lb 2Φ:23 12:17 Micro. 250W | ||||
| 3.10 lb 26:05 13:18 Micro. 250W | ||||
| 3.30 lb 28:27 1Φ:19 Micro. 250W | ||||
| 3.50 lb 29:0Φ 15:20 Micro. 250W | ||||
| 3.75 lb 30:09 16:03 Micro. 250W | ||||
| Φ.00 lb 32:12 17:23 Micro. 250W | ||||
| Φ.20 lb 33:16 18:31 Micro. 250W | ||||
| Φ.Φ0 lb 3Φ:30 19:28 Micro. 250W | ||||
Auto Defrost Cook List:
| Food | Weight (pounds) | Total time | Turn over time | Power |
| d-2 Steaks/Chops | 0.Φ5 lb Φ:07 2:10 Micro. 250W | |||
| 0.65 lb 6:17 3:11 Micro. 250W | ||||
| 0.85 lb 8:20 Φ:12 Micro. 250W | ||||
| 1.10 lb 10:10 5:20 Micro. 250W | ||||
| 1.30 lb 12:30 6:21 Micro. 250W | ||||
| 1.50 lb 1Φ:10 7:22 Micro. 250W | ||||
| 1.75 lb 16:Φ0 8:23 Micro. 250W | ||||
| 2.00 lb 18:35 9:2Φ Micro. 250W | ||||
| 2.20 lb 20:20 10:00 Micro. 250W | ||||
| 2.Φ0 lb 21:30 10:26 Micro. 250W | ||||
| 2.65 lb 22:10 11:00 Micro. 250W | ||||
| 2.85 lb 23:26 11:Φ0 Micro. 250W | ||||
| 3.10 lb 2Φ:23 12:05 Micro. 250W | ||||
| 3.30 lb 25:20 12:26 Micro. 250W | ||||
| 3.50 lb 26:12 13:00 Micro. 250W | ||||
| 3.75 lb 27:26 13:30 Micro. 250W | ||||
| Φ.00 lb 28:25 1Φ:00 Micro. 250W | ||||
| Φ.20 lb 29:15 1Φ:30 Micro. 250W | ||||
| Φ.Φ0 lb 30:20 15:10 Micro. 250W | ||||
Auto Defrost Cook List:
| Food | Weight (pounds) | Total time | Turn over time | Power |
| d-3 Chicken quarters | 0.Φ5 lb 3:05 1:51 Micro. 250W | |||
| 0.65 lb Φ:39 2:Φ7 Micro. 250W | ||||
| 0.85 lb 6:11 3:00 Micro. 250W | ||||
| 1.10 lb 7:23 3:32 Micro. 250W | ||||
| 1.30 lb 8:53 Φ:33 Micro. 250W | ||||
| 1.50 lb 11:30 5:16 Micro. 250W | ||||
| 1.75 lb 12:30 6:00 Micro. 250W | ||||
| 2.00 lb 13:30 6:30 Micro. 250W | ||||
| 2.20 lb 1Φ:20 7:06 Micro. 250W | ||||
| 2.Φ0 lb 15:Φ8 7:28 Micro. 250W | ||||
| 2.65 lb 17:30 8:15 Micro. 250W | ||||
| 2.85 lb 19:30 9:03 Micro. 250W | ||||
| 3.10 lb 20:10 10:00 Micro. 250W | ||||
| 3.30 lb 21:10 10:Φ8 Micro. 250W | ||||
| 3.50 lb 22:Φ7 11:21 Micro. 250W | ||||
| 3.75 lb 2Φ:Φ6 12:00 Micro. 250W | ||||
| Φ.00 lb 25:21 12:36 Micro. 250W | ||||
| Φ.20 lb 26:10 13:16 Micro. 250W | ||||
| Φ.Φ0 lb 28:10 1Φ:25 Micro. 250W | ||||
Auto Defrost Cook List:
| Food | Weight (pounds) | Total time | Turn over time | Power |
| d - Φ Fish | 0.Φ5 lb 6:00 2:00 Micro. 250W | |||
| 0.65 lb 9:00 3:00 Micro. 250W | ||||
| 0.85 lb 12:00 Φ:00 Micro. 250W | ||||
| 1.10 lb 15:00 5:00 Micro. 250W | ||||
| 1.30 lb 16:00 5:00 Micro. 250W | ||||
| 1.50 lb 18:00 6:00 Micro. 250W | ||||
| 1.75 lb 20:00 6:00 Micro. 250W | ||||
| 2.00 lb 22:00 7:00 Micro. 250W | ||||
| 2.20 lb 2Φ:00 7:00 Micro. 250W | ||||
| 2.Φ0 lb 26:00 8:00 Micro. 250W | ||||
| 2.65 lb 28:00 9:00 Micro. 250W | ||||
| 2.85 lb 30:00 9:00 Micro. 250W | ||||
| 3.10 lb 32:00 10:00 Micro. 250W | ||||
| 3.30 lb 36:00 12:00 Micro. 250W | ||||
| 3.50 lb 38:00 12:00 Micro. 250W | ||||
| 3.75 lb Φ0:00 13:00 Micro. 250W | ||||
| Φ.00 lb Φ2:00 1Φ:00 Micro. 250W | ||||
| Φ.20 lb ΦΦ:00 15:00 Micro. 250W | ||||
| Φ.Φ0 lb Φ5:00 15:00 Micro. 250W | ||||
h) Steam auto-cook function
-
Press the "EXPRESS/DEFROST/STEAM COOK" button three times. "S -- 1" appears on the display and "lb" flashes.
-
Turn the rotary knob to select the desired steam auto-cook function according to the type of food that needs to be cooked. You can choose between 12 steam auto-cook functions (see table).
-
Press the START button " 180SEC" to confirm the setting of the steam auto-cook function.
Φ. Turn the rotary knob to set the quantity that needs to be cooked (see table). The selected quantity flashes on the display. - Press the START button "XBOSEC" to start the cooking process. The countdown begins.
Note: If there is not sufficient water in the water tank when using this function, 8 beeps will sound. If you do not add water when that happens, beeps will sound every minute. See also section "STEAM COOKING PRINCIPLES".
Auto Steam Cook List:
| Type | Food | Pounds/ QTY | Total time | Automatic settings |
| 1. conv.ΦΦ0°F 12min. | ||||
| s-1 | CHICKEN | 1.1 lb 27 min | 2. steam + conv.ΦΦ0°F3min. (combi. Type) | |
| 3. conv.ΦΦ0°F 12min. | ||||
| 1. conv. ΦΦ0°F 15min. | ||||
| 1.65 lb 31 min | 2. conv.ΦΦ0°F + steam3min. (combi. Type) | |||
| 3. conv. ΦΦ0°F 13min. | ||||
| 1. conv. ΦΦ0°F 17min. | ||||
| 2.2 lb 35 min | 2. conv. ΦΦ0°F+ steamΦmin. (combi. Type) | |||
| 3. conv.ΦΦ0°F 1Φmin. | ||||
| 1. conv.ΦΦ0°F 20min. | ||||
| 2.75 lb. Φ0 min | 2. conv. ΦΦ0°F+ steam5min. (combi. Type) | |||
| 3. conv.ΦΦ0°F 15min. | ||||
| 3.3 lb Φ6 min | 1. conv. ΦΦ0°F 2Φmin.2. conv. ΦΦ0°F +steam6min.(combi. Type)3. conv. ΦΦ0°F 16min. |
| Auto Steam Cook List: | ||||
| Type | Food | Pounds/ QTY | Total time | Automatic settings |
| 1 QTY(0.36 lb) | 18 min | 1. conv. ΦΦ0°F preheat10min.2. steam+conv. ΦΦ0°F8min. (combi. Type) | ||
| s-2 STEAK | 2 QTY(0.7 lb) | 19.5 min | 1. conv. ΦΦ0°F preheat10min.2. steam+conv. ΦΦ0°F9.5min. (combi. Type) | |
| 3 QTY(1.0 lb) | 21 min | 1. conv. ΦΦ0°F preheat10min.2. steam+conv. ΦΦ0°F11min. (combi. Type)1. microwave550W+steam Φ min.(combi. Type) | ||
| 0.66 lb 7 min | 2. steam 1 min.3. microwave550W+steam 2 min.(combi. Type)1. microwave800W+steam 5 min.(combi. Type) | |||
| s-3 STEAM FISH | 0.99 lb 15 min | 2. steam 2 min.3. microwave800W+steam 8 min.(combi. Type)1. microwave800W+steam 7 min. | ||
| 1.33 lb 20 min | (combi. Type)2. steam 3 min.3. microwave800W+steam 10 min. | |||
(combi. Type)
Auto Steam Cook List:
| Type | Food Pounds/ QTY | Total time | Automatic settings | |
| 2 QTY 5 min | 1. steam | 2 min. | ||
| 2. microwave | ||||
| 800W+steam 1 min.(combi. Type) | ||||
| 3. steam | 2 min. | |||
| 1. steam | 2 min. | |||
| 2. microwave | ||||
| s-Φ | STEAMED FILLED BUNS / FROZEN STEAM BREAD | Φ QTY 5 min | 800W+steam 1 min.(combi. Type) | |
| 3. steam | 2 min. | |||
| 1. steam | 2 min. | |||
| 2. microwave | ||||
| 6 QTY 6 min | 800W+steam 1 min.(combi. Type) | |||
| 3. steam | 3 min. | |||
| 9 QTY 12 min steam | 12 min | |||
| s-5 | STEAM DUMPLINGS | 12 QTY 1Φ min steam | 1Φ min | |
| 16 QTY 18 min steam | 18 min | |||
| s-6 | STEAM VEGETABLES | 0.22 lb 3.5 min | microwave 550W + steam3.5 min. (combi. Type) | |
| 0.ΦΦ lb Φ.5 min | microwave 550W+steamΦ.5 min. (combi. Type) | |||
Auto Steam Cook List:
| Type | Food Pounds/ QTY | Total time | Automatic settings | ||
| 0.22 lb 11 min | 1. steam | 8 min. | |||
| 2. microwave 550W 1.5 min. | |||||
| s-7 | STEAM BROCCOLI | 0.33 lb 13 min | 3. steam | 1.5 min. | |
| 1. steam | 8 min | ||||
| 2. microwave 550W 2 min. | |||||
| 3. steam | 3 min. | ||||
| 1. steam | 8 min. | ||||
| 0.ΦΦ lb 1Φ min | 2. microwave 550W 3 min. | ||||
| 3. steam | 3 min. | ||||
| 0.55 lb 8 min | microwave 800W+steam 8 min. (combi. Type) | ||||
| s-8 | FROZEN CORN | 1.1 lb 11 min | microwave 800W+steam 11 min. (combi. Type) | ||
| 1.65 lb 13 min | microwave 800W+steam 13 min. (combi. Type) | ||||
Auto Steam Cook List:
| Type | Food Pounds/ QTY | Total time | Automatic settings | |
| 1. steam | 6 min. | |||
| 2. microwave | ||||
| 0.77 lb 19 min | 800W+conv.ΦΦ0°F (combi. Type) | 5 min. | ||
| 3. conv.ΦΦ0°F | 8 min. | |||
| 1. steam | 6 min. | |||
| 2. microwave | ||||
| s-9 POTATO | 1.55 lb 21 min | 800W+conv.ΦΦ0°F (combi. Type) | 6 min. | |
| 3. conv.ΦΦ0°F | 9 min. | |||
| 1. steam | 6 min. | |||
| 2. microwave | ||||
| 2.2 lb 23 min | 800W+conv.ΦΦ0°F (combi. Type) | 7 min. | ||
| 3. conv.ΦΦ0°F | 10 min. | |||
| 0.55 lb 25 min | 1. conv. 360°F | 20 min. | ||
| 2. conv. Φ00°F | 5 min. | |||
| 1. conv. 360°F | 7 min. | |||
| S-10 CAKE | 2. steam | 1 min. | ||
| 1.1 lb Φ8.5 min | 3. conv. 360°F | 5 min. | ||
| Φ. steam | 30 sec. | |||
| 5. conv. 360°F | 35 min. | |||
Auto Steam Cook List:
| Type | Food Pounds/ QTY Total time | Automatic settings | ||
| 1 QTY(+100ml water) | 12 min | 1. microwave Φ00W + steam 2 min.2. steam 10 min. | ||
| s-11 | EGG POTAGE | 2 QTY(+200ml water) | 18 min | 1. microwave Φ00W + steam 3 min. (combi. Type)2. steam 15 min. |
| 3 QTY(+Φ00ml water) | 2Φ min | 1. microwave Φ00W + steam Φ min. (combi. Type)2. steam 20 min. | ||
| 2 QTY 15 min steam | 15 min | |||
| s-12 | STEAM EGG | Φ QTY 16 min steam | 16 min | |
| 7 QTY 17 min steam | 17 min | |||
Remark: For the Steamed Whole Egg function (S - - 8), the egg tray supplied can be used. Up to 7 eggs can be steamed at the same time.
i) Adjusting the cooking time
During the cooking process, each press of the START button "
◇/30SEC" will add 30 seconds to the cooking time.
If you turn the rotary knob clockwise during the cooking process, the cooking time will increase (10 seconds for each step). If you turn the rotary knob anticlockwise, the cooking time will decrease (10 seconds for each step).
Note: The cooking time cannot be adjusted for the maximum microwave power level (800W), the steam function, the auto-cook functions and the defrost functions.
CHILDREN LOCKOUT FUNCTION
This oven has a safety device that locks the keys so that the oven cannot be used when it is unsupervised. To lock the control panel, press the button "STOP/CLEAR/CHILD LOCK" for a number of seconds. "L" will appear on the display for 2 seconds before it returns to clock time. If you press a button when the oven is in the locked state, "L" will appear on the display for 2 seconds. To unlock, press the button "STOP/CLEAR/CHILD LOCK" again for a number of seconds.
BEFORE YOU CALL FOR SERVICE
If the oven fails to operate:
a) Check to ensure that the oven is plugged in securely. If it is not, remove the plug from the outlet, wait 10 seconds and plug it in again securely.
b) Check for a blown circuit fuse or a tripped main circuit breaker. If these seem to be operating properly, test the outlet with another appliance.
c) Check to ensure that the control panel is programmed correctly and the timer is set.
d) Check to ensure that the door is securely closed. Otherwise, the microwave energy will not flow into the oven.
e) Check to ensure that the steam generator is placed correctly and that it is locked in place with the screw. Also check if it is clean.
f) Check that the water tank and the waste water tank are placed correctly and that they are clean.
IF NONE OF THE ABOVE RECTIFIES THE SITUATION, THEN CONTACT A COMPETENT QUALIFIED ELECTRICIAN. DO NOT TRY TO ADJUST OR REPAIR THE OVEN YOURSELF.
CLEANING AND CARE
- Turn off the oven and remove the power plug from the wall socket before cleaning.
- It is very important to clean the oven door, as it is responsible for the impenetrability of the oven. Therefore, make sure it is always clean and make sure no object hinders the door from being properly closed.
- Keep the inside of the oven clean. When food splatters or spilled liquids adhere to oven walls, wipe with a damp cloth. Mild detergent may be used if the oven gets very dirty. Avoid the use of spray and other harsh cleaners as they may stain, streak or dull the door surface.
Φ. The outside surfaces should be cleaned with a damp cloth. To prevent damage to the operating parts inside the oven, water should not be allowed to seep into the ventilation openings.
5. Do not allow the control panel to become wet. Clean with a soft, damp cloth. When cleaning the control panel, leave oven door open to prevent oven from accidentally turning on.
6. If steam accumulates inside or around the outside of the oven door, wipe with a soft cloth. This may occur when the microwave oven is operated under high humidity conditions, this is normal.
7. If you have used the steam feature, wipe the inside of the oven immediately after use. Also clean the water tank, the slot for the water tank and the steam generator from time to time. To take the steam generator out of the appliance, you need to unscrew the screw on the left side of your appliance and take off the small plate. Then you can take out the steam generator, empty it and wipe it with a soft cloth. After cleaning, put the steam generator back in place and screw the small plate back on the appliance to prevent the steam generator from being taken out during use.
8. The steam generator needs to be decalcified regularly, at least every 20 uses. To do so, fill the water tank with vinegar and run 3 cycles with the STEAM/CLEAN UP function (see section "Steam cooking"). If you do not decalcify the steam generator regularly, the warranty becomes null and void.
9. The holes for the steam outlet should be clean at all times. You can wipe the 9 holes on the left side of the oven cavity with a soft cloth dipped in vinegar.
10. It is occasionally necessary to remove the glass tray for cleaning. Wash the tray in warm sudsy water or in a dishwasher.
11. The roller ring and oven floor should be cleaned regularly to avoid excessive noise. Simply wipe the bottom surface of the oven with mild detergent. The roller ring may be washed in mild sudsy water or dishwasher. When removing the roller ring from cavity floor for cleaning, be sure to replace in the proper position.
12. Remove odours from your oven by combining a cup of water with the juice and skin of one lemon in a deep microwaveable bowl, microwave for 5 minutes. Wipe thoroughly and dry with a soft cloth.
- When it becomes necessary to replace the oven light, please consult the customer service to have it replaced.
1Φ. You can also clean your microwave oven in an easy way with the clean-up function. Make sure there is sufficient water in the water tank and proceed as follows:
- Press the "STEAM/CLEAN UP" button twice.
- Press the START button " /30SEC". The oven cavity will be cleansed with water and steam will appear in the oven.
- Repeat above steps if necessary.
- Wipe the bottom of the oven cavity with a sponge to remove the dirt that has fallen down.
- Let the appliance work for minutes at 220^ in the convection cooking mode. Then the oven is clean
WARRANTY
We suggest that you complete and return the enclosed Product Registration Card promptly to facilitate verification of the date of original purchase. However, return of the Product Registration Card is not a condition of these warranties. You can also fill this warranty card online, at the following address: www.KALORIK.com
This KALORIK product is warranted for 1 year from the date of purchase against defects in material and workmanship. This warranty is not transferable. Keep the original sales receipt. Proof of purchase is required to obtain warranty performance.
During this period, the KALORIK product that, upon inspection by KALORIK, is proved defective, will be repaired or replaced, at KALORIK's option, without charge to the customer. If a replacement product is sent, it will carry the remaining warranty of the original product.
This warranty does not apply to any defect arising from a buyer's or user's misuse of the product, negligence, failure to follow KALORIK instructions noted in the user's manual, use on current or voltage other than that stamped on the product, wear and tear, alteration or repair not authorized by KALORIK, or use for commercial purposes. There is no warranty for glass parts, glass containers, filter basket, blades and agitators, and accessories in general. There is also no warranty for parts lost by the user.
ANY WARRANTY OF MERCHANTABILITY OR FITNESS WITH RESPECT TO THIS PRODUCT IS ALSO LIMITED TO THE ONE YEAR LIMITED WARRANTY PERIOD
Some states do not allow limitation on how long an implied warranty lasts or do not allow the exclusion of incidental or consequential damages, so the above limitations may not apply to you. This warranty gives you specific legal rights, and you may also have other rights which vary from state to state.
If the appliance should become defective within the warranty period and more than 30 days after date of purchase, do not return the appliance to the store: often, our Consumer Service Representatives can help solve the problem without having the product serviced. If servicing is needed, a Representative can confirm whether the product is under warranty and direct you to the nearest service location.
If this is the case, bring the product (or send it, postage prepaid), along with proof of purchase and indicating a return authorization number given by our Consumer Service Representatives, to the nearest authorized KALORIK Service Center (please visit our website at www.KALORIK.com or call our Customer Service Department for the address of the nearest authorized KALORIK Service Center). If you send the product, please include a letter explaining the nature of the claimed defect.
If you have additional questions, please call our Consumer Service Department (please see below for complete contact information), Monday through Friday from 9:00am - 6:00pm (EST). Please note hours are subject to change.
If you would like to write, please send your letter to:
KALORIK Consumer Service department
Team International Group of America Inc
1Φ00 N.W 159th Street, Suite 102
Miami Gardens, FL 33169 USA
Or call :
Toll Free: +1 888-521-TEAM
Only letters can be accepted at this address above. Shipments and packages that do not have a return authorization number will be refused.

Peso neto: Approx.20 kg (44 lbs)
PRECAUCIONES PARA EVITAR POSIBLES EXPOSICIONES EXCESIVAS AL ENERGIA MICROONDAS
Team International Group of America Inc
1Φ00 N.W 159th Street, Suite 102
Miami Gardens, FL 33169 USA
O llame gratuitamente al +1 888-521-TEAM
Copies of the I/B. Please reproduce them without any changes except under special instruction from Team International BELGIUM. The pages must be reproduced and folded in order to obtain a booklet A5 (+/- 1Φ8.5 mm width x 210 mm height). When folding, make sure you keep the good numbering when you turn the pages of the I/B. Don't change the page numbering. Keep the language integrity.
K080425
www.KALORIK.com
- PRECAUTIONS TO AVOID POSSIBLE EXPOSURE TO EXCESSIVE MICROWAVE ENERGY.
- IMPORTANT SAFETY INSTRUCTIONS
- SAVE THESE INSTRUCTIONS SHORT POWER-SUPPLY CORD WARNINGS:
- GROUNDING INSTRUCTIONS
- MAINTENANCE:
- IMPORTANT: UTENSILS THAT ARE NOT SUITABLE FOR MICROWAVE COOKING.
- INSTALLATION
- WARNING
- RADIO INTERFERENCE
- MICROWAVE COOKING PRINCIPLES
- STEAM COOKING PRINCIPLES
- UTENSILS GUIDE
- CONTROL PANEL
- USE
- IMPORTANT REMARKS:
- SETTING THE CLOCK
- SETTING THE COOKING TIME, POWER AND COOKING FUNCTION
- a) Quick start
- b) Microwave cooking
- c) Grill cooking
- d) Convection cooking
- e) Steam cooking
- f) Combination cooking
- Microwave + Grill
- Microwave + Convection
- Microwave + Steam
- Grill + Steam
- Convection + Steam
- AUTO-menu
- Auto Express Cook List:
- Type Food pounds/QTY Total time Automatic Settings
- g) Defrost by weight
- h) Steam auto-cook function
- i) Adjusting the cooking time
- CHILDREN LOCKOUT FUNCTION
- BEFORE YOU CALL FOR SERVICE
- IF NONE OF THE ABOVE RECTIFIES THE SITUATION, THEN CONTACT A COMPETENT QUALIFIED ELECTRICIAN. DO NOT TRY TO ADJUST OR REPAIR THE OVEN YOURSELF.
- CLEANING AND CARE
- WARRANTY
- KALORIK Consumer Service department
- PRECAUCIONES PARA EVITAR POSIBLES EXPOSICIONES EXCESIVAS AL ENERGIA MICROONDAS
Brand : KALORIK
Model : MW 26146
Category : Microwave