
the Kinetix Pro Blender BBL800 - Blender BREVILLE - Free user manual and instructions
Find the device manual for free the Kinetix Pro Blender BBL800 BREVILLE in PDF.

User questions about the Kinetix Pro Blender BBL800 BREVILLE
0 question about this device. Answer the ones you know or ask your own.
Ask a new question about this device
Download the instructions for your Blender in PDF format for free! Find your manual the Kinetix Pro Blender BBL800 - BREVILLE and take your electronic device back in hand. On this page are published all the documents necessary for the use of your device. the Kinetix Pro Blender BBL800 by BREVILLE.
USER MANUAL the Kinetix Pro Blender BBL800 BREVILLE
natural_image
Exterior view of a modern stainless steel blender with control buttons and lid (no visible text or symbols)CONGRATULATIONS
on the purchase of your new
Breville product
CONTENTS
4 Breville recommends safety first
6 Know your Breville product
8 Assembling your Breville product
10 Operating your Breville product
13 Disassembling your Breville product
15 Care & cleaning
20 Troubleshooting
22 Recipes
At Breville we are very safety conscious. We design and manufacture consumer products with the safety of you, our valued customer, foremost in mind. In addition we ask that you exercise a degree of care when using any electrical appliance and adhere to the following precautions.
IMPORTANT SAFEGUARDS
READ ALL INSTRUCTIONS BEFORE USE AND SAVE FOR FUTURE REFERENCE
- Remove any packaging material and promotional labels before using the Kinetix® Pro Blender for the first time.
• To eliminate a choking hazard to young children, remove and safely discard the protective cover fitted to the power plug of the appliance. - Do not place the Kinetix® Pro Blenderg operation. Ensure that the surface is level, clean and free of water, flour and other substances. Vibration during operation may cause the appliance to move.
- Do not place the Kinetix® Pro Blender on or near a hot gas or electric burner, or where it could touch a heated oven.
- Do not use the Kinetix® Pro Blender on uneven metal surfaces for example, a sink drain board.
• Always ensure the Kinetix® Pro Blender is properly assembled before use. Refer to Assembling your Breville Blender.
• Use only the blender jug and lid supplied with the Kinetix® Pro Blender.
• Always ensure the blender lid is firmly positioned on the blender jug before operating. -
Do not leave the Kinetix® Pro Blender unattended when in use.
-
Always ensure the Kinetix® Pro Blender is turned off by pressing the POWER button on the control panel. Then switch the appliance off at the power outlet and unplug the cord. Make sure the motor and blades have completely stopped before attempting to move the appliance, or when the Blender is not in use and before disassembling, cleaning and storing.
- If food becomes lodged around the blending blade, turn the Kinetix® Pro Blender off by pressing the POWER button on the control panel. Then switch the appliance off at the power outlet and unplug the cord. Make sure the motor and blades have stopped before removing the jug from the motor base. Use a spatula to dislodge or stir the food before continuing. Do not use fingers as the blades are sharp.
- Keep hands, fingers, hair, clothing, as well as spatulas and other utensils away from the blender jug during operation. Never place your fingers, hands or utensils inside the blender jug without unplugging the appliance from the power outlet.
-
In the unlikely event of an excessive load, the blender is equipped with electronic protection which will safely shut down the unit. If this occurs, unplug the blender and allow it to rest for 30 minutes. None of the recipes in this instruction book are considered a heavy load.
-
Be careful when handling the blending blade assembly as the blades are very sharp. Be careful when emptying the blender jug and during cleaning. Mishandling of the blades may cause injury.
- Do not remove the blender jug from the motor base whilst in operation.
- Do not use the Kinetix® Pro Blender for anything other than food and/or beverage preparation.
- Do not operate the Kinetix® Pro Blender without food or liquid in the blender jug.
- Do not process hot or boiling liquids. Allow to cool before placing into the blender jug.
- Do not subject the blender jug to extremes of hot or cold, for example placing a cold jug in hot water or vice versa.
• Always visually inspect the blade assembly before each use. If the blades appear bent or damaged, or if discoloration of the plastics noted, please contact your Breville service centre. - Keep the appliance clean. Refer to care and cleaning.
- The motor is protected from burning out by an automatic, temperature operated, cut-out switch. If the blender is overloaded or operated continuously for too long, the motor may overheat. If this happens, the buttons will start to flash and the safety cut-out switch will prevent the blender from operating. To operate the blender again, you must switch off at the power outlet, unplug and allow to cool for approximately 30 minutes. Once the motor has fully cooled, it is ready for use again.
SAVE THESE INSTRUCTIONS
IMPORTANT SAFEGUARDS FOR ALL ELECTRICAL APPLIANCES
• Fully unwind the power cord before use.
- Do not let the power cord hang over the edge of a bench or table, touch hot surfaces or become knotted.
• To protect against electric shock do not immerse the power cord, power plug or appliance in water or any other liquid.
- The appliance is not intended for use by persons (including children) with reduced physical, sensory or mental capabilities, or lack of experience and knowledge, unless they have been given supervision or instruction concerning use of the appliance by a person responsible for their safety.
• Children should be supervised to ensure that they do not play with the appliance.
- It is recommended to regularly inspect the appliance. To avoid a hazard do not use the appliance if power cord, power plug or appliance becomes damaged in any way. Return the entire appliance to the nearest authorised Breville Service Centre for examination and/or repair.
• Any maintenance other than cleaning should be performed at an authorised Breville Service Centre.
- This appliance is for household use only. Do not use this appliance for anything other than its intended use. Do not use in moving vehicles or boats. Do not use outdoors. Misuse may cause injury.
- The installation of a residual current device (safety switch is recommended to provide additional safety protection when using electrical appliances. It is advisable that a safety switch with a rated residual operating current not exceeding 30mA be installed in the electrical circuit supplying the appliance. See your electrician for professional advice.
KNOW
your Breville product
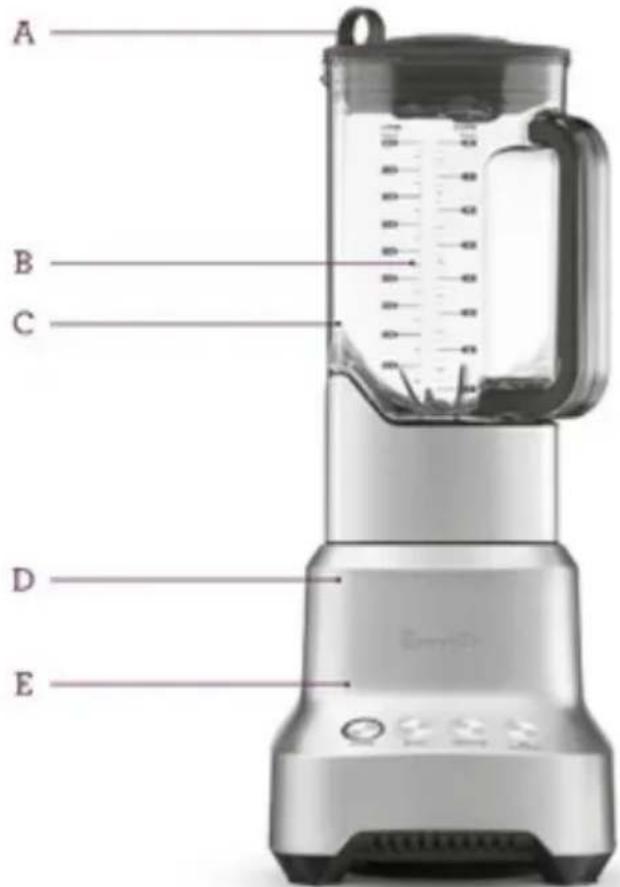
A. Easy One Finger Removal
Breville Assist™ Lid for easy handling.
B. Light Weight Jug
2 litre jug is remarkably strong and lightweight.
C. Dishwasher Safe
The one-piece blade is ergonomically designed for ease of cleaning. Both jug and blade are dishwasher safe.

natural_image
Close-up of a mechanical component with four blades and central hub (no visible text or symbols)Surgical Grade Stainless Steel Blades
To ensure the blades stay sharp longer they are made from surgical grade stainless steel. The central blades are serrated for extra cutting performance.
D. Premium Materials
Stainless steel and die-cast
construction for durability.
E. Intelligent engineering
Powerful 2000 watt motor and
highly efficient blades results in quiet
operation.

natural_image
Illustration of a bear inside a dark, curved object (no text or symbols)Blade removal
The one piece blade removal system is ergonomically designed for ease of cleaning.
ASSEMBLING
your Breville product
ASSEMBLING YOUR BREVILLE PRODUCT
BEFORE FIRST USE
Before using your Breville product for the first time, remove any packaging material and promotional labels. Ensure the appliance is switched off at the power outlet and the power cord is unplugged.
Wash the lid, inner lid, blender jug and blade assembly (refer to Disassembling the blender) of the Breville product in warm, soapy water with a soft cloth. Rinse and dry thoroughly. The motor base can be wiped with a damp cloth. Dry thoroughly.
The lid, inner lid, blade assembly and silicon seal may be washed in the dishwasher in the top shelf only on a standard wash.
The blender jug may be placed in the bottom shelf.
NOTE
Ensure that the silicon seal is carefully placed completely around the blade assembly, prior to inserting into the jug, as this will prevent leakages.
- To assemble the blender jug, place the silicon seal onto the blade assembly
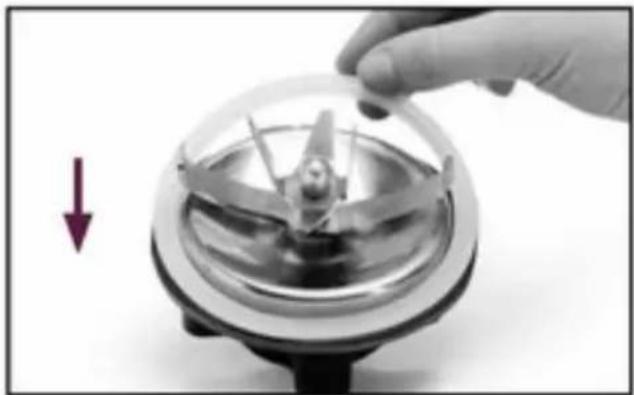
natural_image
Hand holding a metallic mechanical component with a downward arrow indicating rotation (no text or symbols)- Upturn the blender jug and insert the blade assembly into the jug base.

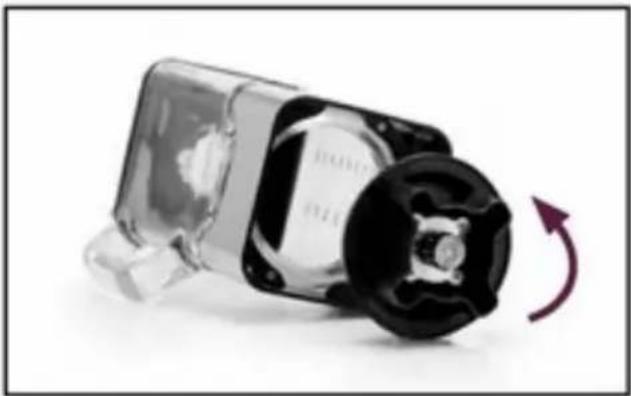
natural_image
Close-up of a hand holding a digital pressure meter with a red arrow indicating left vent (no text or symbols visible)- Turn the blade removal system anticlockwise until firmly screwed into position.
natural_image
Close-up of a mechanical device with a rotating arrow indicating rotation (no text or symbols visible)-
Place the motor base on a flat, dry surface such as a bench top. Ensure that the motor base is switched off at the power outlet and the power cord is unplugged. Turn the blender jug upright and insert onto the motor base. The handle of the blender jug can be positioned to the left or right hand side of the appliance.
-
Plug the power cord into a 230/240v power outlet and switch on.
OPERATING
your Breville product
OPERATING YOUR BREVILLE PRODUCT
- To turn the blender on press the POWER button on the far left of the control panel. The POWER button will illuminate and flash indicating the blender is powered on. When the jug is placed on the base all lights will illuminate signalling the blender is ready for use.
NOTE
When using your for the first time, you may notice an odour coming from the motor. This is normal and will dissipate with use.
- Add food or liquid into the blender jug ensuring not to exceed the MAX mark.
- Place the blender lid firmly into position on the top of the blender jug. If not already in place, insert the clear inner lid into the blender lid and turn clockwise or anticlockwise to lock into position.
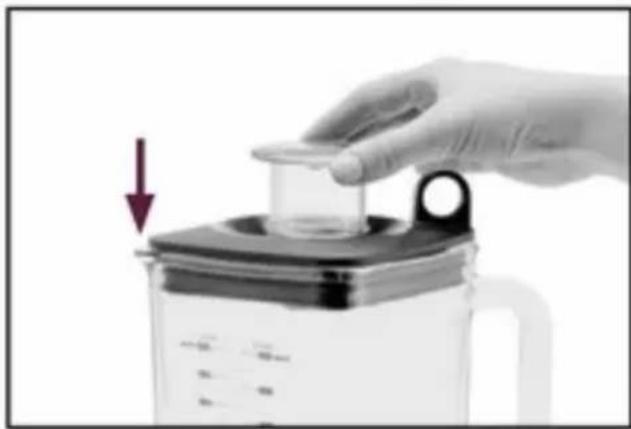
natural_image
Hand placing a small container into a glass container with a red arrow indicating the drop (no text or symbols visible)NOTE
When the blender jug is filled at or near the MAX line, place one hand on the blender lid to avoid displacement of the lid during operation. Do not blend hot ingredients, allow to cool before placing into the blender jug.

natural_image
Hand pressing a black lid onto a glass pitcher with an upward arrow indicating motion (no text or symbols)- The Blender features a Breville Assist Lid™ for easy handling. This allows the lid to fit tightly onto the blender jug, avoiding displacement during operation. The ring pull design allows the user to easily remove the lid with a simple leverage action.
- Select the required function (BLEND, SMOOTHIE or ICE/AUTO PULSE) by pressing the corresponding function button. The blender will start to operate and only the selected function button will illuminate. The POWER button will continue to flash. The speed can be changed at any time during the blending process. Each time a new function is selected its button will illuminate and the previous function button illumination will go out.
- For ice-crushing or ingredients that require short bursts of power, select the ICE/AUTO PULSE button. The blender will start to operate and the ICE/AUTO PULSE button will illuminate. The POWER button will continue to flash. The pre-programmed functions have been designed to run for a specific time. To operate these functions simply press desired function button once only and release — automatically preprogrammed function will begin.
OPERATING YOUR BREVILLE PRODUCT
NOTE
Operate the blender only for the appropriate amount of time required. The Blender will automatically stop blending on the Blend function after 120 seconds (2 minutes) and after 60 seconds (1 minute) on the SMOOTHIE and ICE/AUTO PULSE functions to avoid over processing.
| FUNCTION | PROGRAMMED TIME |
| BLEND | 120 seconds(2 minutes) |
| SMOOTHIE | 60 seconds(1 minute) |
| ICE/AUTO PULSE | 60 seconds(1 minute) |
NOTE
The SMOOTHIE function has a unique processing technique that blends the denser ingredients at a lower function, then increases as ingredients thicken. This may happen several times while blending smoothies.
- To stop blending at any time, press the selected speed button. The POWER button can also be pressed.
- At the end of use, always ensure the Blender is turned off by pressing the POWER button on the control panel. Then switch the appliance off at the power outlet and unplug the cord. Ensure the motor and blades have completely stopped before attempting to move the appliance, or when the Blender is not in use and before disassembling, cleaning and storing.
NOTE
During the blending process, ingredients may stick to the sides of the blender jug. To push the food back onto the blades, press the POWER button on the control panel and switch off at the power outlet and remove the power cord. Remove the lid and use a plastic spatula to scrape down the sides of the jug. Replace the lid before recommencing blending.
NOTE
If the blades become stuck, the blender will automatically turn off. To reset turn the blender off at the power outlet, clean jug with spatula and then turn back on, blender will reset.
NOTE
If any moisture or liquid appears on top of the motor base during blending, press the POWER button on the control panel, switch off at the power outlet and remove the power plug. Remove the blender jug. Wipe the motor base immediately with a dry cloth or paper towelling to absorb the liquid. Check the blender jug is correctly assembled.
DISASSEMBLING
your Breville product
DISASSEMBLING YOUR BREVILLE PRODUCT
- Always ensure the Blender is switched off by pressing the POWER button on the control panel. Then switch off at the power outlet and unplug the power cord.
- Remove the blender jug from the motor base by grasping the handle and lifting the jug in an upward direction.
- Remove the blade assembly by upturning the blender jug and turning the blade removal system clockwise then lift upwards and away from the base of the blender.

natural_image
Close-up of a mechanical device with a rotating arrow indicating rotation (no text or symbols visible)- Remove the silicon seal from the blade assembly.

natural_image
Hand holding a metallic mechanical component with a red upward arrow indicating motion (no text or symbols)CARE & CLEANING
for your Breville product
CARE & CLEANING
CLEANING THE MOTOR BASE
- Wipe the motor base with a soft, damp cloth then dry thoroughly.
- Wipe any excess food particles from the power cord.
NOTE
Do not use abrasive scouring pads or cleaners when cleaning the parts or motor base as they may scratch the surface.
NOTE
The lid, inner lid, blade assembly and silicon seal may be washed in the dishwasher in the top shelf only on a standard wash. The blender jug may be placed in the bottom shelf.
CLEANING THE BLENDER JUG, LID, INNER LID AND BLADE ASSEMBLY
- Wash all parts in warm soapy water with a soft cloth. Use a kitchen bottle brush to dislodge stubborn foods. Rinse and dry thoroughly.
REMOVING STUBBORN OR STRONG FOOD STAINS AND ODOURS
Strong smelling foods such as garlic, fish and some vegetables such as carrots may leave an odour or stain on the blender jug and lid. To remove, soak blender jug and lid for 5 minutes in warm soapy water. Then wash with a mild detergent and warm water, rinse well and dry thoroughly.
STORAGE
Store your Blender upright with the blender jug, lid and inner lid assembled and inserted on the motor base or beside it. Do not place anything on top.
NOTE
The blending blades are extremely sharp. Avoid any contact with fingers and hands. Use caution when handling and storing.
CARE & CLEANING
| FOOD | PREPARATION & USAGE | QUANTITY | FUNCTION | TIME |
| Lean meat/poultry | Trim excess fat and sinew, cut into 2cm cubesUse: mince | 250g | Blend or Ice/Auto Pulse | 10-20 secs |
| Fish/seafood | Remove skin and bones and cut into 2cm cubesUse: mince | 300g | Blend or Ice/Auto Pulse | 10-15 secs |
| Raw vegetable | Peel and cut into 1.5-2cm cubesUse: stuffing, filling, puree,soup | 200g | Ice/Auto Pulse | 10-30 secs |
| Nuts | Remove shellsUse: cakes, toppings, pastes | 200g | Ice/Auto Pulse | 10-30 secs |
| Bread or biscuit crumbs | Cut bread into 2cm pieces,break up biscuitsUse: cheesecake crust | 100g | Ice/Auto Pulse | 10-30 secs |
| Mayonnaise | Mix the egg yolk and vinegar.Add the oilUse: dressings | 125g | BlendBlend | 10-15 secs then30-60 secs |
| Whipped cream | Add sugar or vanilla if desiredUse: topping | 300ml | Blend or Ice/Auto Pulse | 10-15 secs |
| Herbs/spices | Whole or halvedUse: pastes, sauces | 1 cup | Blend or Auto Pulse | 20-30 secs |
| Smoothie | Milk, whole fresh fruits,yoghurt, ice creamUse: milkshakes, frappes | Max 800 ml | Smoothie | 60 secs |
| Fresh fruit | Chopped whole berriesUse: dessert sauce | 250g | Blend | 20-30 secs |
| Dried Fruit | Chopped dry fruitUse: fruit mince | 300g | Ice/Auto Pulse | 20-30 secs |
| Ice | CrushUse: mixed drinks, cocktails | 250g | Ice/Auto Pulse | 10-20 secs |
NOTE
This blending chart should be used as a guide only.
DO'S
• Use the Blend function for drink or cocktail making, emulsions such as mayonnaise, dressings, marinades and foods that require mixing until just combined, such as batters, also for pureeing soups and aerating liquids.
• Use a combination of the BLEND and ICE/AUTO PULSE functions to suit the foods being processed.
• Use the SMOOTHIE function to blend fruits, ice cream and yoghurts into thick smoothies, whips and milkshakes.
• Use the ICE/AUTO PULSE function for foods that only require short bursts of power such as chopping nuts and crushing ice.
• Use the ICE/AUTO PULSE function with short bursts of power, when blending drinks containing ice cubes or frozen fruit.
- Ensure all foods are cut into cubes (approx. 2cm square) where appropriate to achieve an even result.
- Do not put more than 2 cups of warm ingredients into the Blender before blending commences. After the blending process has begun and the blades are turning you may slowly add another 1 12 cups of ingredients through the opening in the lid if desired.
- Thick mixtures puree more efficiently if the blender is 14 to 12 full.
- When using several ingredients, place liquid ingredients in the blender jug before solid ingredients, unless specified in the recipe. When blending thick or dry mixtures it may be necessary to stop the blender and scrape down the sides of the blender jug with a plastic or rubber spatula, once or twice during blending.
DON'TS
- Do not use metal utensils as they may damage the blades or blender jug.
- Do not operate a heavy mixture for more than 10 seconds. For normal blending tasks, for example, mayonnaise, dressings etc., do not operate for longer than 2 minutes at one time without turning off the blender and stirring the ingredients, and then continue blending.
- Do not operate the blender without having the blender lid in position. To add additional ingredients whilst blending, remove the inner lid and place ingredients through the opening in the lid.
- Do not place any objects, other than food or liquid, into the blender whilst the motor is running.
• Do not use the blender jug to store food.
• The blender will not knead dough or mash potatoes. - Do not remove the blender jug while the blender is operating. Always make sure the blender is switched off by pressing the POWER button, switch off the power at the power outlet and unplug the power cord from the power outlet.
-
Do not overload the blender with more than the specified quantity of ingredients as doing so could cause the motor to stall. Turn the blender off by pressing the POWER button on the control panel, switch off the power at the power outlet and unplug the cord. Remove a portion of the mixture from the blender jug before continuing.
-
Do not place hot or boiling ingredients into the blender; allow to cool before placing into the blender jug.
- Do not place the blender near the edge of a bench or table during operation. Ensure that the surface is level, clean and free of water, flour and other substances. Vibration during operation may cause the appliance to move.
TROUBLESHOOTING
TROUBLESHOOTING
| POSSIBLE PROBLEM | EASY SOLUTION |
| Motor doesn't start or blade doesn't rotate | Check that the blender jug is securely locked into position.Check that the blade assembly is correctly attached to the base of the blender jug.Check that the POWER button and selected function or speed setting is illuminated.Check that the power plug is securely inserted into the power outlet and switched on. |
| Food is unevenly chopped | Either too much food is being blended at one time or the pieces are too large.Try cutting food into smaller pieces of even size and processing a smaller amount per batch.For best results, the food should be chopped into pieces no larger than 2cm. |
| Food is chopped too fine or is watery | The food is over processed. Try using the ICE/AUTO PULSE function or process for a shorter time. |
| Food sticks to blades and jug | The mixture may be too thick. Try adding more liquid to the mixture and/or use another function |
| Overload blender | The motor is protected from burning out by an automatic, temperature operated, cut-out switch.If the blender is overloaded or operated continuously for too long, the motor may overheat. If this happens, the buttons will start to flash and the safety cut-out switch will prevent the blender from operating. To operate the blender again, you must switch off at the power outlet, unplug and allow to cool for approximately 30 minutes. Once the motor has fully cooled, it is ready for use again. |
RECIPES
EGGPLANT DIP
Makes approximately 2 cups
INGREDIENTS
2 large eggplants
oil spray
2 cloves garlic
1 tablespoon lemon juice
2 tablespoons olive oil
1 teaspoon sea salt
12 teaspoon ground cumin
2 tablespoon chopped fresh parsley
Freshly ground black pepper
Fresh or toasted Lebanese bread
METHOD
-
Preheat oven to 200°C. Spray eggplants lightly with oil spray. Place into a baking dish and bake for about 40 minutes or until skin is begins to darken.
-
Add garlic to baking dish and continue baking eggplant and garlic until garlic is softened and eggplants are blackened and blistered all over. Remove from oven.
-
Place eggplants into a plastic bag and set aside until cool enough to handle.
-
Remove skin from eggplants and discard, roughly chop the flesh and place into blender jug with garlic, lemon juice, olive oil, salt and cumin. Place lid on jug.
-
Select BLEND and process until mixture is almost smooth, scraping down the sides of blender if necessary.
-
Pour into bowl and stir through parsley and season with black pepper.
Serve dip with fresh or toasted Lebanese bread.
ROAST BEETROOT DIP
Makes approximately 2 cups
INGREDIENTS
4 medium beetroot
1 garlic bulb
2 teaspoons lemon juice
1 tablespoon horseradish
14 cup light olive oil
Salt and freshly ground black pepper
Turkish bread to serve
METHOD
-
Preheat oven to 200°C. Wash beetroot well and pat dry. Cut top off garlic and place beetroot and garlic onto a baking tray and drizzle with oil. Bake for 30 minutes then remove garlic and turn beetroot over and cook beetroot for a further 15-20 minutes or until the beetroot is tender. Set aside to cool completely.
-
Once beetroot is cool peel off skin and cut into quarters. Squeeze garlic out of skin.
-
Place beetroot and garlic and remaining ingredients into blender jug. Place lid on jug. Select BLEND and process until combined, scraping sides if necessary.
Serve dip chilled with Turkish bread.
DIPS
HUMMUS
Makes approximately 2½ cups
INGREDIENTS
2 x 400g can chick peas, rinsed and drained
2 cloves garlic
12 cup warm water
14 cup tahini
14 cup lemon juice
1 teaspoon ground cumin
Sea salt and fresh ground black pepper to taste
Extra virgin olive oil, to serve
Fresh Turkish or Lebanese bread to serve
METHOD
- Place chick peas, garlic, water, tahini, lemon juice and cumin into the blender jug. Place lid on jug.
- Select BLEND and process, blend until mixture is smooth, scraping down sides of blender during processing if necessary. Season to taste.
SPINACH, PARMESAN AND CASHEW DIP
Makes approximately 1 cup
INGREDIENTS
75g baby spinach leaves
1 clove garlic
½ cup unsalted toasted cashews
75g parmesan, chopped into 1cm pieces
½ cup olive oil
2 teaspoons lemon juice
salt and freshly ground black pepper
METHOD
- Combine all ingredients except salt and pepper into the blender jug in the order listed. Place lid on jug.
- Select BLEND and process until all the ingredients are chopped as desired; scrap down side if necessary. Do not over process and it should be slightly chunky.
Season to taste and serve with crackers.
TIP
Dip will keep fresh for 1 day.
MAYONNAISE
Makes approximately 1 cup
INGREDIENTS
2 egg yolks
1 teaspoon Dijon mustard
1 teaspoon salt
1 tablespoon lemon juice
12 cup olive oil
12 cup grape seed oil
METHOD
-
Combine yolks, mustard, salt and lemon juice into the blender jug. Place lid on jug. Select BLEND and process until combined.
-
With blender running on slowly pour oil through the inner measuring lid until mixture thickens, this should take about 1 minute.
-
Transfer to an airtight container and refrigerate for up to 1 week.
GARLIC AIOLI
Makes approximately 1 cup
INGREDIENTS
1 whole bunch garlic
2 egg yolk
1 tablespoon lemon juice
1 cup vegetable or olive oil
Salt and pepper, to taste
METHOD
- Pre-heat oven to 200°C.
- Slice the top off the garlic bulb and wrap in foil. Place onto an oven tray and roast for 30 minutes or until garlic is softened and fragrant.
- Remove from the oven and allow to cool slightly. Squeeze garlic from the bulb.
- Place egg yolks and lemon juice into the blender jug. Place lid on jug. Select BLEND and process until combined.
- With the motor running on slowly pour oil through the inner measuring lid until mixture thickens, this should take about 1 minute. Add roasted garlic and season to taste.
- Transfer to an airtight container and refrigerate for up to 1 week.
CAESAR DRESSING
Makes approximately 1½ cups
INGREDIENTS
2 tablespoons Dijon mustard
2 cloves garlic, crushed
2 tablespoons lemon juice
4-6 anchovy fillets, chopped
2 tablespoons sour cream or crème fraîche
12 cup grated parmesan cheese
12 cup olive oil
Sea salt and freshly ground black pepper cos lettuce, to serve
shaved parmesan cheese, to serve
Crisp fried bacon pieces, to serve croutons, to serve
METHOD
- Place mustard, garlic, lemon juice, anchovies, sour cream and parmesan into blender jug. Place lid on jug.
- Select Speed BLEND, blend 20 seconds or until ingredients are well combined.
- With blender running on Speed BLEND, slowly pour oil through the inner measuring lid until mixture thickens, this should take about 1 minute.
Serve over crisp cos lettuce with grated parmesan cheese, crisp bacon and croutons.
PESTO SAUCE
Makes approximately 1½ cups
INGREDIENTS
2 cups firmly packed basil leaves (approx 1 large bunch basil)
2 cloves garlic
2 teaspoons lemon juice
1/3 cup pine nuts, toasted
60g grated parmesan cheese
12 cup olive oil
Salt and freshly ground black pepper
METHOD
- Place all ingredients into blender jug in the order listed. Place lid on jug. Select Speed BLEND, blend until all ingredients are very finely chopped and almost smooth. Scrape down sides of blender if necessary.
- Spoon into an airtight container and chill until ready to use.
TIP
Pesto will keep in an airtight container in the refrigerator for a few days. Pour a little extra oil over the top of the pesto and place a piece of plastic wrap on top of the pesto. This will prevent excess browning.
MEDITERRANEAN SOUP
Serves 4-6
INGREDIENTS
2 tablespoons olive oil
2 red onions, quartered
5 cloves garlic
1 large fennel, cut into thin wedges
3 zucchini, roughly chopped
2 red capsicum, quartered and seeded
2 green capsicum, quartered and seeded
1-2 tablespoons olive oil
Salt and freshly ground black pepper
1 litre chicken or vegetable stock
2 x 400g can chopped tomatoes
12 cup shredded fresh basil leaves
METHOD
- Preheat oven to 200°C. Place onions, garlic, fennel, zucchini and capsicums into a large baking dish; drizzle with oil and season with salt and pepper. Bake in oven for about 30 minutes or until vegetables are tender.
- Place vegetables into a saucepan with stock and chopped tomatoes. Bring mixture to the boil and cook for a 10 minutes. Allow soup to cool slightly.
- Spoon soup, no more than half full into the blender jug. Place lid on jug. Select BLEND and process until smooth.
- Return pureed soup to saucepan with basil leaves to heat through. Season to taste.
THAI SWEET POTATO SOUP
Serves 4
INGREDIENTS
2 tablespoons oil
1 large brown onion, chopped
2 cloves garlic, chopped
1-2 tablespoons red curry paste
1 kg peeled, chopped sweet potato
1 litre chicken stock
270ml can light coconut cream
Salt and pepper
chopped fresh coriander, to serve
METHOD
- Heat oil in a large saucepan, add onion, garlic and curry paste and cook, stirring for 4 to 5 minutes or until onion has softened and curry paste is fragrant.
- Add sweet potato and stock and bring to the boil. Lower heat and simmer covered for 25 minutes or until sweet potato is soft. Remove from heat and allow soup to cool slightly.
- Spoon soup, no more than half full into the blender jug. Place lid on jug. Select BLEND and process until smooth.
- Return pureed soup to saucepan with coconut milk; season to taste and heat on low until hot.
Serve with fresh coriander.
DESSERT
RICOTTA PANCAKES
Makes 6 to 8
INGREDIENTS
3 eggs
200g fresh ricotta
½ cup milk
^34 cup self raising flour
1 ½ teaspoons baking powder
2 tablespoons caster sugar
Unsalted butter for greasing
fresh berries, to serve
maple syrup, to serve
METHOD
-
Place eggs, ricotta, milk, flour, baking powder and caster sugar into blender jug. Place lid on jug.
-
Select BLEND and process, blend for 10 seconds. Scrape sides down if necessary then blend for a further 5 seconds. Do not over process.
-
Heat a heavy base frying pan or griddle over a low to moderate heat. Lightly grease with butter.
-
Spoon about 2 heaped tablespoons of the mixture into pan and cook until golden brown on both sides.
Serve with fresh blueberries and maple syrup.
TIP
For berry pancakes pour mixture into pan; top with several fresh berries before flipping over and cooking other side.
QUICK TEACAKE WITH CINNAMON SUGAR
Serves 8
INGREDIENTS
2 eggs
35 cup milk
1 teaspoon vanilla extract
125g butter, melted
1 cup caster sugar
2 cups self raising flour
Cinnamon topping
20g butter, melted
1 tablespoon caster sugar
1 ½ teaspoons ground cinnamon
METHOD
-
Preheat oven to 160^ C with fan. Grease and line a 20cm cake pan with baking paper.
-
Combine ingredients in the order listed into the blender jug. Place lid on jug.
-
Blend on Speed PULSE until mixture is just combined. Scrape down any caught flour if needed.
-
Pour mixture into prepared pan and bake in oven for 50-60 minutes or until a wooden skewer inserted comes out clean.
-
Allow to cool for 5 minutes then turn out onto a cooling rack. Brush with melted butter and sprinkle with cinnamon topping. Allow to cool before serving.
INDIVIDUAL STICKY DATE PUDDINGS WITH BUTTERSCOTCH SAUCE
Makes 12
INGREDIENTS
200g dried seedless dates, coarsely chopped
1 teaspoon bicarbonate soda
1 ¼ cups boiling water
60g butter, softened
1 cup firmly packed brown sugar
1 cup self raising flour
2 eggs, lightly beaten
Butterscotch sauce
1 ¼ cup firmly packed brown sugar
1 cup pouring cream
125g butter
METHOD
- Preheat oven to 180°C. Grease a ½ cup capacity muffin tray with oil spray.
- Place dates, bicarbonate soda and boiling water into a heatproof jug; cover and stand for 5 minutes then carefully pour into blender jug. Place lid on jug.
- Add butter and sugar and PULSE 2-3 times. Add remaining ingredients and PULSE mixture until just combined. Do not over process. Scrape down sides of jug if necessary.
- Divide mixture evenly between holes of the muffin tray and bake for about 20 minutes or until cooked when tested with a wooden skewer. Remove from oven and stand for 5 minutes before turning out onto a wire rack.
Serve puddings warm with butterscotch sauce.
To make butterscotch sauce.
- Combine all ingredients in a saucepan and cook, stirring, over a low heat until combined.
DRINKS
BAKED LEMON CHEESECAKE
Serves 8-10
INGREDIENTS
250g packet plain sweet biscuits
125g unsalted butter, melted
300ml carton sour cream
1 cup caster sugar
12 teaspoon vanilla extract
1 tablespoon finely grated lemon rind
4 eggs
750g cream cheese, at room temperature, cut into cubes
METHOD
-
Preheat oven to 160^ C no fan. Line the base of a 23cm springform pan with non-stick baking paper. Place biscuits into blender jug. Place lid on jug.
-
Select ICE CRUSH or PULSE setting and blend until biscuits are finely crushed. Place into a bowl, add melted butter and mix well. Press biscuits mixture into the base and sides of a greased and lined. Use a straight-sided glass to spread and press the biscuit mixture firmly over the base and side of pan, leaving 1cm at the top of the pan. Refrigerate 10 minutes.
-
Meanwhile place sour cream, sugar, vanilla and lemon rind, eggs into the blender jug and blend with lid on, on speed BLEND until just combined. Turn blender off and add half of the cream cheese; replace lid and blend on speed BLEND for 30 seconds. Turn blender off and add remaining cream cheese, replace lid; and blend for a further 30 seconds or until mixture is smooth. Do not overmix.
-
Pour the cream cheese mixture into the base. Place the pan on a baking tray and bake for 1 14 -1 12 hours or until just set in the centre. Turn oven off. Leave the cheesecake in oven, with the door ajar, for 2 hours or until cooled completely (this will prevent cheesecake from cracking). Refrigerate until well chilled.
DRINKS
BANANA SMOOTHIE
Serves 2
INGREDIENTS
2 ripe bananas, halved
2 cups chilled milk
2 scoops frozen vanilla yogurt or
1 cup vanilla yogurt and 6 ice cubes
1 tablespoon honey
Nutmeg, to taste
METHOD
- Place all ingredients into blender jug. Place lid on jug.
- Blend using the SMOOTHIE setting.
Serve immediately.
BREAKFAST SMOOTHIE
Serves 2
INGREDIENTS
1 cup orange juice, chilled
250g fresh strawberries, hulled
12 teaspoon grated orange rind (optional)
1-2 tablespoons rolled oats
2 scoops frozen fruit based yogurt
METHOD
- Place all ingredients into blender jug. Place lid on jug.
- Blend using the SMOOTHIE setting.
Serve immediately.
FRUIT FUSION
Serves 2
INGREDIENTS
1 cup/250ml pineapple juice
1 banana, chopped
1 orange, skin and pith removed then quartered
2 tablespoons passionfruit pulp
1 cup/250ml soda water
METHOD
- Place pineapple juice, banana and orange in blender jug. Place lid on jug.
- Blend using the SMOOTHIE setting.
- Stir in passionfruit pulp and soda water.
Serve immediately.
ICED MOCHA
Serves 2
INGREDIENTS
14 cup/60ml cold espresso
2 scoops chocolate ice cream
1 ½ cups chilled milk
6 ice cubes
METHOD
- Place all ingredients into blender jug. Place lid on jug.
- Blend using the SMOOTHIE setting.
Serve immediately.
COCKTAILS
VANILLA MILKSHAKE
Serves 2
INGREDIENTS
2 cup chilled milk
3 scoops vanilla ice cream
12 teaspoon vanilla essence extract
METHOD
- Place all ingredients into blender jug. Place lid on jug.
- Blend using the SMOOTHIE setting.
Serve immediately.
CHOCOLATE MILKSHAKE
Serves 2
INGREDIENTS
2 cup chilled milk
3 scoops chocolate ice cream
1 tablespoon chocolate syrup, optional
METHOD
- Place all ingredients into blender jug. Place lid on jug.
- Blend using the SMOOTHIE setting.
Serve immediately.
STRAWBERRY MILKSHAKE
Serves 2
INGREDIENTS
2 cup chilled milk
3 scoops strawberry ice cream or
3 scoops vanilla ice cream + 10 strawberries
METHOD
- Place all ingredients into blender jug. Place lid on jug.
- Blend using the SMOOTHIE setting.
Serve immediately.
COCKTAILS
SUGAR SYRUP
Makes approx 1 12 cups
INGREDIENTS
1 cup white sugar
1 cup/250ml water
METHOD
- Place sugar and water into a heavy base saucepan and cook, stirring over a very low heat until sugar has dissolved.
- Bring to the boil then reduce heat and simmer mixture for 5 minutes.
- Remove from heat and allow to cool completely. Store in an airtight container in the refrigerator.
STRAWBERRY DAIQUIRI
Serves 2
INGREDIENTS
6-8 strawberries, hulled and quartered
60ml nip white rum
14 cup/60ml fresh lime juice
14 cup/60ml sugar syrup
12 ice cubes
METHOD
- Place all ingredients into blender jug. Place lid on jug.
- Use ICE CRUSH function and blend until ice is crushed.
Pour into 2 cocktail glasses to serve.
2 standard drinks
LIME AND MINT CRUSH
Serves 2
INGREDIENTS
2 limes, peeled and cut into 8 pieces
16-20 mint leaves
14 cup/60ml sugar syrup
60ml nip white rum or vodka
8 medium ice cubes
1 cup/250ml soda water
METHOD
- Place all ingredients into blender jug. Place lid on jug.
- Select ICE CRUSH function or setting and blend until all ingredients are roughly chopped.
Pour into a glass, serve immediately.
2 standard drinks
MARGARITA
Serves 4
INGREDIENTS
60ml nip tequila
60ml nip cointreau
½ cup/80ml lime juice
14 cup/60ml sugar syrup
12 ice cubes
METHOD
- Place tequila, cointreau, lime juice, sugar syrup and ice cubes into blender jug. Place lid on jug.
- Use ICE CRUSH function and blend until well combined and ice is crushed.
Serve in salt rimmed glasses.
4 standard drinks
COCKTAILS
PINA COLADA
Serves 2
INGREDIENTS
60ml nip white rum
14 cup/60ml coconut cream
34 cup/180ml pineapple juice
1 ½ tablespoons/30ml sugar syrup
10 ice cubes
METHOD
-
Place all ingredients into blender jug. Place lid on jug.
-
Use ICE CRUSH function or and blend until well combined and ice is crushed.
Serve immediately.
2 standard drinks
CUBA LIBRE
Serves 2
INGREDIENTS
60ml nip aged amber rum
1 lime, peeled and cut into 4 pieces
12 ice cubes
METHOD
-
Place all ingredients into blender jug. Place lid on jug.
-
Use ICE CRUSH function and blend until well combined and ice is crushed.
Serve immediately.
2 standard drinks
SEA BREEZE
Serves 2
INGREDIENTS
12-14 ice cubes
60ml nip vodka
½ cup/125ml orange juice
½ cup/125ml cranberry juice
½ cup/125ml ruby red grapefruit juice
METHOD
-
Place ice cubes in blender jug. Place lid on jug. Using ICE CRUSH function blend until finely crushed.
-
Spoon crushed ice into 2 large chilled glasses. Layer remaining ingredients in order listed over ice.
Serve immediately.
2 standard drinks
MANGO TANGO
Serves 2
INGREDIENTS
34 cup/180ml mango nectar
½ cup/125ml orange juice
30ml nip white rum
14 cup/60ml fresh lime juice
12 ice cubes
Mineral water to serve
METHOD
-
Place nectar, juices, ice cubes into blender jug. Place lid on jug. Use ICE CRUSH function and blend until well combined.
-
Pour into large chilled glasses and top with mineral water.
2 standard drinks
Breville
Breville Customer Service Centre
Australian Customers
Mail: PO Box 22
Botany NSW 2019
AUSTRALIA
Phone: 1300 139 798
Fax: (02) 9384 9601
Email: Customer Service:
askus@breville.com.au
New Zealand Customers
Mail: Private Bag 94411
Botany Manukau 2163
Auckland NEW ZEALAND
Phone: 0800 273 845
Fax: 0800 288 513
Email: Customer Service:
askus@breville.com.au
www.breville.com.au
Breville is a registered trademark of Breville Pty. Ltd. A.B.N. 98 000 092 028.
Copyright Breville Pty. Ltd. 2012
Due to continued product improvement, the products illustrated/photographed
in this brochure may vary slightly from the actual product.
BBL800 Issue - B12
- CONGRATULATIONS
- CONTENTS
- IMPORTANT SAFEGUARDS
- READ ALL INSTRUCTIONS BEFORE USE AND SAVE FOR FUTURE REFERENCE
- SAVE THESE INSTRUCTIONS
- IMPORTANT SAFEGUARDS FOR ALL ELECTRICAL APPLIANCES
- KNOW
- Surgical Grade Stainless Steel Blades
- Blade removal
- ASSEMBLING
- ASSEMBLING YOUR BREVILLE PRODUCT
- BEFORE FIRST USE
- NOTE
- OPERATING
- OPERATING YOUR BREVILLE PRODUCT
- DISASSEMBLING
- DISASSEMBLING YOUR BREVILLE PRODUCT
- CARE & CLEANING
- CLEANING THE MOTOR BASE
- CLEANING THE BLENDER JUG, LID, INNER LID AND BLADE ASSEMBLY
- REMOVING STUBBORN OR STRONG FOOD STAINS AND ODOURS
- STORAGE
- DO'S
- DON'TS
- TROUBLESHOOTING
- RECIPES
- EGGPLANT DIP
- INGREDIENTS
- METHOD
- ROAST BEETROOT DIP
- DIPS
- HUMMUS
- SPINACH, PARMESAN AND CASHEW DIP
- TIP
- MAYONNAISE
- GARLIC AIOLI
- CAESAR DRESSING
- PESTO SAUCE
- MEDITERRANEAN SOUP
- THAI SWEET POTATO SOUP
- DESSERT
- RICOTTA PANCAKES
- QUICK TEACAKE WITH CINNAMON SUGAR
- Cinnamon topping
- INDIVIDUAL STICKY DATE PUDDINGS WITH BUTTERSCOTCH SAUCE
- Butterscotch sauce
- To make butterscotch sauce.
- DRINKS
- BAKED LEMON CHEESECAKE
- BANANA SMOOTHIE
- BREAKFAST SMOOTHIE
- FRUIT FUSION
- ICED MOCHA
- COCKTAILS
- VANILLA MILKSHAKE
- CHOCOLATE MILKSHAKE
- STRAWBERRY MILKSHAKE
- SUGAR SYRUP
- STRAWBERRY DAIQUIRI
- standard drinks
- LIME AND MINT CRUSH
- MARGARITA
- standard drinks
- PINA COLADA
- CUBA LIBRE
- SEA BREEZE
- MANGO TANGO
- Breville
- Breville Customer Service Centre
Brand : BREVILLE
Model : the Kinetix Pro Blender BBL800
Category : Blender