
FP1700B - Blender BLACK & DECKER - Free user manual and instructions
Find the device manual for free FP1700B BLACK & DECKER in PDF.


| Product Type | Food Processor (also functions as blender) |
| Brand | Black & Decker |
| Model | FP1700B |
| Capacity | 8 cups (64 oz) workbowl |
| Material | Stainless steel chopping blade and slicing/shredding disk |
| Control Type | Pulse and ON/OFF buttons |
| Power Rating | Approximately 350 watts (maximum rating based on chopping blade) |
| Voltage | 120 V AC, 60 Hz |
| Plug Type | Polarized (one blade wider) |
| Cord Length | Approximately 2 feet (short cord to reduce tangling) |
| Dimensions (approx.) | 10" W x 8" D x 15" H |
| Weight (approx.) | 5 lbs |
| Safety Features | Interlock system (bowl and cover must be locked), tamper-resistant screw, polarized plug |
| Accessories | Food pusher, cover, disk stem, slicing/shredding disk, chopping blade, workbowl, non-skid feet |
| Cleaning | Dishwasher safe (top rack) or hand wash; do not immerse base |
| Warranty | 2-year limited warranty (US and Canada) |
| Usage | Household use only |
Frequently Asked Questions - FP1700B BLACK & DECKER
User questions about FP1700B BLACK & DECKER
0 question about this device. Answer the ones you know or ask your own.
Ask a new question about this device
Download the instructions for your Blender in PDF format for free! Find your manual FP1700B - BLACK & DECKER and take your electronic device back in hand. On this page are published all the documents necessary for the use of your device. FP1700B by BLACK & DECKER.
USER MANUAL FP1700B BLACK & DECKER
8-CUP FOOD PROCESSOR
Accessories/Parts (USA)
1-800-738-0245
For online customer service
and to register your product, go to
www.prodprotect.com/applica
natural_image
Black and white photo of a black and white blender with clear glass casing and control buttons (no visible text or symbols on the device body)
natural_image
Black and Co. Decker blender with clear glass interior and control buttons (no visible text or symbols on device body)MODELS/MODELOS
○ FP1600B
○ FP1700B
Please Read and Save this Use and Care Book.
IMPORTANT SAFEGUARDS
When using electrical appliances, basic safety precautions should always be followed, including the following:
○ Read all instructions.
To protect against risk of electrical shock do not immerse cord, plugs or appliance in water or other liquid.
- Close supervision is necessary when any appliance is used by or near children.
- Unplug from outlet when not in use, before putting on or taking off parts and before cleaning.
○ Avoid contacting moving parts.
Do not operate any appliance with a damaged cord or plug or after the appliance malfunctions, or is dropped damaged in any manner. Return appliance to the nearest authorized service facility for examination, repair or electrical or mechanical adjustment. Or, call the appropriate toll-free number on the cover of this manual.
The use of attachments not recommended or sold by the manufacturer may cause fire, electric shock or injury.
○ Do not use outdoors.
○ Do not let cord hang over edge of table or counter.
Keep hands and utensils away from moving blade or disc while processing food to reduce the risk of severe injury to persons or damage to the food processor. A scraper may be used, but must be used only when the food processor is not running.
○ Blade is sharp. Handle carefully.
To reduce the risk of injury, never place cutting blade or discs on base without first putting bowl properly in place.
- Be certain cover is securely locked in place before operating appliance.
- Never feed food by hand. Always use food pusher.
○ Do not attempt to defeat the cover interlock mechanism.
This appliance is not intended for use by persons (including children) with reduced physical, sensory or mental capabilities, or lack of experience and knowledge, unless they have been given supervision or instruction concerning use of the appliance by a person responsible for their safety.
Children should be supervised to ensure that they do not play with the appliance.
SAVE THESE INSTRUCTIONS.
This product is for household use only.
Note: The maximum rating is based on the chopping blade. Other attachments may draw significantly less power.
POLARIZED PLUG
This appliance has a polarized plug (one blade is wider than the other). To reduce the risk of electric shock, this plug is intended to fit into a polarized outlet only one way. If the plug does not fit fully into the outlet, reverse the plug. If it still does not fit, contact a qualified electrician. Do not attempt to modify the plug in any way.
TAMPER-RESISTANT SCREW
Warning: this appliance is equipped with a tamper-resistant screw to prevent removal of the outer cover. to reduce the risk of fire or electric shock, do not attempt to remove the outer cover. there are no user-serviceable parts inside. Repair should be done only by authorized service personnel.
ELECTRICAL CORD
The cord of this appliance was selected to reduce the possibility of tangling in or tripping over a longer cord. If more length is needed, use an extension cord rated no less than 15 amperes. (For 220 volts rated products, use an extension cord rated no less than 6 amperes.) When using an extension cord, do not let it drape over the working area or dangle where someone could accidentally trip over it. Handle cord carefully for longer life; avoid jerking or straining it at outlet and appliance connections.
Note: If the power supply cord is damaged, it should be replaced by qualified personnel; in Latin America, by an authorized service center.
Product may vary slightly from what is illustrated.

A
† 1. Food pusher
Model FP1600B (Part # 07255EZB)
Model FP1700B (Part # 07255EZH)
† 2. 8-cup processing workbowl cover (Part # 77916)
† 3. Stainless steel slicing and shredding disk (Part #77919)
† 4. Disk stem (Part # 77917)
† 5. Stainless steel chopping blade (Part # 77920)
† 6. 8-cup processing workbowl
Model FP1600B (Part # 77915)
Model FP1700B (Part # 77988)
-
Base
-
Cord wrap (under base)
† 9. Non-skid suction feet (Part # 09183-1)
-
Control panel
-
Center post
-
Feed chute
† 13. Workbowl coupling (Part # 77918)
Note: indicates consumer replaceable/removable parts
CONTROL PANEL
natural_image
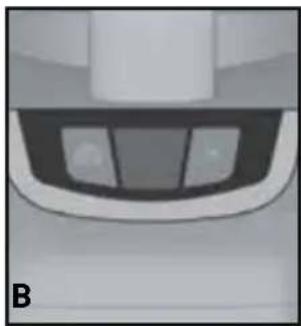
Close-up of a car's front grille and dashboard (no visible text or symbols)The controls are located on the front of the base (B). Press OFF/PULSE or ON to select a function (see directions below).
OFF/PULSE CONTROL
- Processor should be stored in OFF position and unplugged when not in use.
-
Use PULSE for short processing tasks. This lets you control the size and uniformity of foods being chopped.
-
The OFF/PULSE button must be pressed and held for the appliance to operate in PULSE mode. When released, the appliance will stop.
- The motor of the processor will run as long as the OFF/PULSE button is held down. Press the button and then release to allow the blade to stop running and the food to fall to the bottom of the workbowl.
- Pulsing gives better control when chopping, mincing, mixing and blending foods. You can control the size of the foods, from coarse to fine.
ON CONTROL
When the ON control is selected, the processor will run continuously until the OFF/PULSE button is pressed.
How to Use
This product is for household use only.
GETTING STARTED
- Please go to www.prodprotect.com/applica to register your warranty.
Important: Handle chopping blade and slicing and shredding disk carefully. They are very sharp.
- Wash all removable parts as instructed in CARE AND CLEANING section of this manual.
- Select a level, dry countertop where the appliance is to be used, allowing air space on all sides to provide proper ventilation for the motor.
ASSEMBLING THE PROCESSOR
How to Insert and Remove the Center Post
The center post is removable:
- Turn the bowl upside down.

natural_image
Diagram of a mechanical component with a central shaft and upward arrow, labeled 'c' (no text or symbols on the diagram itself)- Grasp the clear outer tabs and turn the center post clockwise until the lower tabs are free. Lift the post out (C).
- To return to its original position, place center post into smaller opening in bottom of workbowl and turn counterclockwise until tabs snap into place.
HOW TO LOCK THE PROCESSOR WORKBOWL IN POSITION
IMPORTANT: Press the OFF/PULSE button before placing the workbowl on the base of the processor.

natural_image
Close-up of a transparent container with a vertical rod and arrow indicating a measurement or direction (no text or symbols)- Attach center post to workbowl. Place the workbowl on the base with handle turned to the right of the locking mechanism (D) over the unlock symbol.

natural_image
Illustration of a glass mug with an arrow indicating direction, no text or symbols present- Hold handle and rotate workbowl clockwise toward the lock symbol until it clicks firmly into place (E).
Note: Be sure to lock the workbowl in place before attaching the chopping blade or the slicing and shredding disk and the cover.
HOW TO CHOP IN THE PROCESSING WORKBOWL
The chopping blade is used to coarsely or finely chop, mince, mix, and puree foods to a smooth consistency.

natural_image
Illustration of a hand pouring liquid into a glass container with a downward arrow indicating flow (no text or symbols)- Lock workbowl into position (see Illustrations D and E).
- Hold chopping blade by center shaft and insert onto center post (F).
Caution: The chopping blade is very sharp. Use caution when handling and storing.
-
Place food in workbowl.
-
Place cover on workbowl and lock into place by rotating clockwise (see Illustration J).
-
Place the food pusher in place.
Important: Never use your fingers to direct food through the feed chute.
- Select your desired speed (PULSE or ON).
Note: Process foods for no more than a few seconds at a time. Pulsing produces excellent results and offers greater control.
Important: Make sure the chopping blade has completely stopped spinning before removing cover from processing bowl.
- Press the OFF/PULSE button and allow the chopping blade to stop revolving before removing cover. Twist cover toward (counterclockwise) to remove.
Important: Unlock lid first before removing workbowl.
- Unlock workbowl by turning it counterclockwise and lift off base.
Note: Remove workbowl from appliance before removing the chopping blade to prevent food from leaking through the center opening of the workbowl.
-
Carefully remove the chopping blade.
-
Unplug appliance when not in use.
Helpful Tips for Chopping
- Watch carefully to avoid over-processing foods.
- The PULSE button offers the best control.
- For best results, process foods that are about the same size.
- Do not overload the workbowl.
- Never walk away from the processor while it is on.
- You may use hot but not boiling liquids.
- Do not process more 3 cups of liquid in the workbowl at any given time.
- To process meat, use no more than 2 cups of 34 -inch cubes. Process using PULSE in 5 second intervals.
- Insert a funnel into the feed chute when adding ingredients such as, oil, flour and sugar.
HOW TO SLICE OR SHRED IN THE WORKBOWL
- Lock workbowl into position (see Illustrations D and E).
natural_image
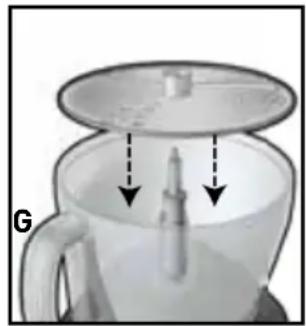
Diagram of a container with liquid and a lid, showing internal components and arrows indicating flow or movement (no text or symbols)- Place disk stem onto center post in workbowl.
- Carefully place slicing and shredding disk on top of disk stem with appropriate side up (depending on work to be done) (G).
Caution: The slicing and shredding disk is very sharp. Use caution when handling and storing.
- Place cover on workbowl and lock into place by rotating cover clockwise (see Illustration J).

natural_image
Close-up of a laboratory glassware setup with a pipette and beaker, showing liquid and particles (no text or symbols visible)- Fill feed chute with food. Position food pusher over food (H).
- Select the PULSE or ON control; press firmly on food pusher to guide food through feed chute, but do not force it.
Note: Heavy pressure on the pusher does not speed the work; use the pusher only as a guide. Let the processor
do the work.
- When finished, press OFF/PULSE and wait for disk to stop rotating before removing cover. Twist cover toward counterclockwise to remove.
Important: Make sure the slicing and shredding disk has completely stopped spinning before removing cover from processing bowl.
Important: Unlock lid first before removing workbowl.
-
Carefully remove the slicing and shredding disk. Unlock workbowl by turning it counterclockwise and lifting it off the base.
-
Unplug appliance when not in use.
Helpful Tips When Slicing and Shredding
- Before slicing fruits and vegetables in the processor, cut a thin slice from the bottom of the food to make it flat.
- Place the food cut side down in feed chute.
- Remove seeds and pits before processing.
- Select foods that are firm and not overripe.
- Remove the core from hard vegetables such as cabbage.
- When slicing thinner vegetables, cut them just short of the length of the feed chute and stand them vertically in feed chute so they are solidly packed and cannot turn or tilt.
- Shred hard cheeses at room temperature.
- Chill soft and semi-hard cheeses before shredding.
- After food has been processed, remove the cover and invert on countertop. Remove the slicing and shredding disc before removing the workbowl from the processor. Place the disk on top of the inverted workbowl cover.
HOW TO LOCK THE COVER

natural_image
Illustration of a small ceramic container with handle and side port, no text or symbols present- Place cover over workbowl with the small latch to the right of the workbowl's handle (J).
- Hold feed chute of workbowl cover and rotate cover clockwise until cover locks into place.
Important: For your protection this appliance has an interlock system. The processor will not operate unless the processing workbowl and cover are properly locked in place.
- Insert the food pusher into the feed chute.
Note: The food pusher is used to guide foods through the feed chute and can be removed when adding liquid or additional foods while the processor is running.
Care and Cleaning
This product contains no user serviceable parts. Refer service to qualified service personnel.
Note: Do not attempt to sharpen the cutting edges of the chopping blade or slicing and shredding disk. They are permanently sharpened at the factory and will be ruined if sharpened.
CLEANING
Note: Before cleaning, be sure unit is turned off and cord is unplugged.
- Completely disassemble processor parts before washing.
- Rinse parts immediately after processing for easy cleanup.
Caution: The slicing and shredding disk is very sharp. Use caution when handling and storing.
- Wipe base and feet with a damp cloth and dry thoroughly. Stubborn spots can be removed by rubbing with a damp cloth and a mild, nonabrasive cleaner. Do not immerse base in liquid.
- All removable parts can be washed by hand or in a dishwasher. Hand washing of plastic parts will help to maintain the food processor's appearance.
- If washing by hand, fill workbowl with hot, soapy water and rapidly raise and lower the chopping blade or slicing and shredding disk up and down on the center shaft.
Caution: The slicing and shredding disk is very sharp. Use caution when handling and storing.
- If washing in a dishwasher, place removable parts on top rack only—not in or near utensil basket.
- Some staining of parts may occur. If so, make a paste of 2 tablespoons of baking soda and 1 tablespoon of water. Apply to stains and let stand overnight. Rinse and dry.
- Do not use rough scouring pads or cleansers on any plastic or metal parts to clean.
- Do not allow chopping blade or slicing and shredding disk to soak in water for long periods of time.
- Remember to clean the internal shaft of the chopping blade; use a baby bottle brush to remove any clogged food particles.
- If you are having trouble closing the cover over the workbowl, apply a small amount of vegetable oil to the rim of the cover and workbowl. This should make the pieces work smoother when attaching the cover to the workbowl.
NEED HELP?
For service, repair or any questions regarding your appliance, call the appropriate 800 number on cover of this book. Please DO NOT return the product to the place of purchase. Also, please DO NOT mail product back to manufacturer, nor bring it to a service center. You may also want to consult the website listed on the cover of this manual.
TWO-YEAR LIMITED WARRANTY
(Applies only in the United States and Canada)
What does it cover?
- Any defect in material or workmanship provided; however, Applica's liability will not exceed the purchase price of product.
For how long?
- Two years from the date of original purchase with proof of such purchase.
What will we do to help you?
- Provide you with a reasonably similar replacement product that is either new or factory refurbished.
How do you get service?
- Save your receipt as proof of date of sale.
- Visit the online service website at www.prodprotect.com/applica, or call toll-free 1-800-231-9786, for general warranty service.
- If you need parts or accessories, please call 1-800-738-0245.
What does your warranty not cover?
- Damage from commercial use
- Damage from misuse, abuse or neglect
• Products that have been modified in any way
- Products used or serviced outside the country of purchase
- Glass parts and other accessory items that are packed with the unit
- Shipping and handling costs associated with the replacement of the unit
- Consequential or incidental damages (Please note, however, that some states do not allow the exclusion or limitation of consequential or incidental damages, so this limitation may not apply to you.)
How does state law relate to this warranty?
- This warranty gives you specific legal rights. You may also have other rights that vary from state to state or province to province.
BLACK&DECKER
is a registered trademark of The Black & Decker Corporation,
Towson, Maryland, USA
Made and Printed in People's Republic of China
A
natural_image
Close-up of a car's front grille and dashboard (no visible text or symbols)natural_image
Diagram of a mechanical component with a central shaft and upward arrow, labeled 'C' (no text or symbols on the diagram itself)natural_image
Diagram of a laboratory funnel with a vertical rod inserted, showing liquid level and an arrow indicating direction (no text or symbols)natural_image
Illustration of a glass mug with an arrow indicating direction, no text or symbols presentnatural_image
Close-up of a hand using a pipette to press or lift liquid in a glass container (no text or symbols visible)natural_image
Illustration of a glass teapot with internal components and arrows indicating flow or movement (no text or symbols)natural_image
Laboratory glassware setup with a pipette and beaker, no visible text or symbolsnatural_image
Illustration of a small ceramic container with a handle and lid, showing internal structure and an arrow indicating direction (no text or symbols)San Jose, Costa Rica
Tel.: (506) 257-5716 / 223-0136
Ecuador
Servicio Master
Col. Centro, Cuauhtemoc,
México, D.F.
Tel. 01 800 714 2503
Nicaragua
ServiTotal
City Market Nivel Plaza Local 153
Diagonal Hotel Melia,
Caracas.
Tel. (582) 324-0969
www.applicaservice.com
servicio@applicamail.com
- 8-CUP FOOD PROCESSOR
- Please Read and Save this Use and Care Book.
- IMPORTANT SAFEGUARDS
- SAVE THESE INSTRUCTIONS.
- POLARIZED PLUG
- TAMPER-RESISTANT SCREW
- ELECTRICAL CORD
- CONTROL PANEL
- OFF/PULSE CONTROL
- ON CONTROL
- How to Use
- GETTING STARTED
- ASSEMBLING THE PROCESSOR
- How to Insert and Remove the Center Post
- HOW TO LOCK THE PROCESSOR WORKBOWL IN POSITION
- IMPORTANT: Press the OFF/PULSE button before placing the workbowl on the base of the processor.
- HOW TO CHOP IN THE PROCESSING WORKBOWL
- Caution: The chopping blade is very sharp. Use caution when handling and storing.
- Important: Never use your fingers to direct food through the feed chute.
- Important: Make sure the chopping blade has completely stopped spinning before removing cover from processing bowl.
- Important: Unlock lid first before removing workbowl.
- Helpful Tips for Chopping
- HOW TO SLICE OR SHRED IN THE WORKBOWL
- Caution: The slicing and shredding disk is very sharp. Use caution when handling and storing.
- Important: Make sure the slicing and shredding disk has completely stopped spinning before removing cover from processing bowl.
- Helpful Tips When Slicing and Shredding
- HOW TO LOCK THE COVER
- Care and Cleaning
- CLEANING
- NEED HELP?
- TWO-YEAR LIMITED WARRANTY
- (Applies only in the United States and Canada)
- What does it cover?
- For how long?
- What will we do to help you?
- How do you get service?
- What does your warranty not cover?
- How does state law relate to this warranty?
- BLACK&DECKER
- Ecuador
- Nicaragua
Brand : BLACK & DECKER
Model : FP1700B
Category : Blender