
the All Climate 2-in-1 BAD358 - Dehumidifier BREVILLE - Free user manual and instructions
Find the device manual for free the All Climate 2-in-1 BAD358 BREVILLE in PDF.


| Product Type | 2-in-1 Dehumidifier & Air Purifier |
| Model Number | BAD358 (also LAD358) |
| Brand | Breville |
| Dimensions (H x W x D) | 577 x 331 x 264 mm |
| Weight | 7 kg |
| Power Supply | 230-240 V ~ 50 Hz |
| Power Consumption | 650 W |
| Dehumidification Capacity | 8 L/day (at 30°C, 80% RH) |
| Water Tank Capacity | 4 L |
| Recommended Room Size | Up to 50 m² |
| Noise Level | 51 dB |
| Technology | Desiccant (rotor) |
| Operating Temperature Range | 5°C to 40°C |
| Filtration | Washable Pre-filter + AntiViral HEPA-13 Filter |
| Modes | Auto, Continuous, Laundry, Purify Only, Sleep |
| Fan Speeds | Low, Medium, High |
| Air Deflector Oscillation | Yes (up/down) |
| Timer | Up to 24 hours (Auto Off / Delayed Start) |
| Connectivity | Wi-Fi (2.4 GHz) & Bluetooth; Breville Home Connect app |
| Voice Assistant Compatibility | Amazon Alexa, Google Assistant |
| Continuous Drainage | Yes (with included 1 m hose) |
| Safety Features | Tilt protection, auto shut-off when tank full |
| Replaceable Filter Part No. | LAD070 (AntiViral HEPA-13) |
| Warranty | Limited warranty (see manual for details) |
Frequently Asked Questions - the All Climate 2-in-1 BAD358 BREVILLE
User questions about the All Climate 2-in-1 BAD358 BREVILLE
0 question about this device. Answer the ones you know or ask your own.
Ask a new question about this device
Download the instructions for your Dehumidifier in PDF format for free! Find your manual the All Climate 2-in-1 BAD358 - BREVILLE and take your electronic device back in hand. On this page are published all the documents necessary for the use of your device. the All Climate 2-in-1 BAD358 by BREVILLE.
USER MANUAL the All Climate 2-in-1 BAD358 BREVILLE
the All Climate™ 2-in-1 Dehumidifier & Purifier
Instruction Book - LAD358
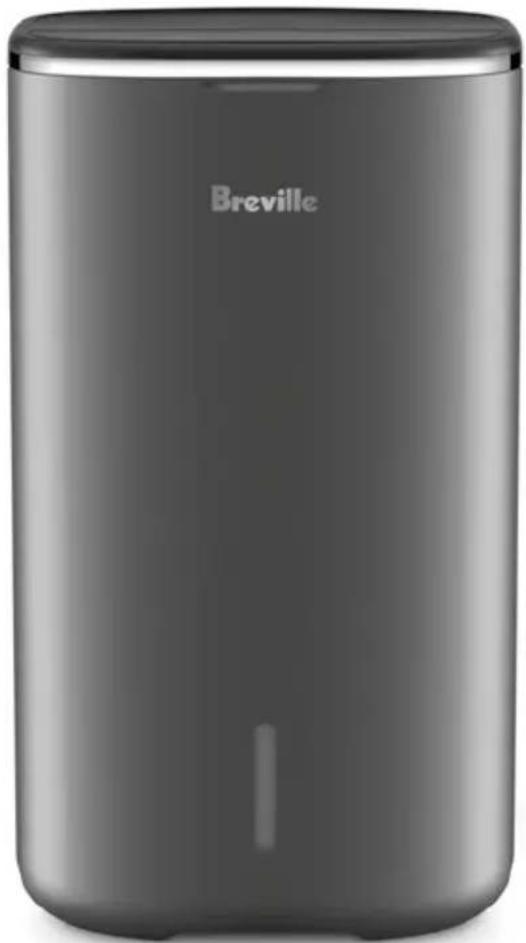
natural_image
Exterior view of a modern gray Breville brand water filter can (no text or symbols on body)Breville®

Contents
2 Breville Recommends Safety First
6 Components
7 Control Panel
8 Features
9 Assembly
10 Functions
14 Wi-Fi Connectivity & Voice Assistant
17 Care, Cleaning & Storage
20 Troubleshooting

Limited Product Warranty
Breville's warranty for this product covers the repair or replacement if it's found to be defective due to faulty materials, workmanship, or function within the warranty period. All legal warranty rights under applicable national legislation will be respected and will not be impaired by our warranty. For details on length of warranty, to obtain a printed copy or to read full terms and conditions please
QR149
scan the QR code or visit www.breville.com Alternatively, call the Breville Service Centre (see back cover for contact details).
BREVILLE RECOMMENDS SAFETY FIRST
At Breville we are very safety conscious. We design and manufacture consumer products with the safety of you, our valued customer, foremost in mind. In addition, we ask that you exercise a degree of care and adhere to the following precautions.
IMPORTANT SAFEGUARDS
READ ALL INSTRUCTIONS BEFORE USE AND SAVE FOR FUTURE REFERENCE
- Carefully read all instructions before operation and save for future reference.
- Remove and safely discard any packaging material and promotional labels before using the dehumidifier for the first time.
• To eliminate a choking hazard for young children, remove and safely discard the protective cover fitted to the power plug of this dehumidifier (if applicable). -
When unpacking the dehumidifier, check to see you have received all the items listed in the parts list before discarding the packaging.
-
The dehumidifier is intended for household use only and not for commercial or industrial use. Do not use outdoors.
• Always ensure the dehumidifier is properly assembled before use. Follow the instructions provided in this book. - Do not place the dehumidifier near the edge of a bench or table during operation. Ensure the surface is level, clean and free of water.
- Do not run the power cord under carpeting or cover the cord with rugs, runners or the like. Arrange the cord away from traffic areas and where it will not be tripped over.
- Do not route the power cord under furniture or appliances.
• To protect against electrical hazards, do not immerse any part of the dehumidifier or let the dehumidifier come in contact with water or other liquids. Do not place the dehumidifier close to the bath, shower or swimming pool.
• Water in the water tank is not suitable for drinking. Do not drink this water, and do not serve to animals or use to water plants. When you empty the water tank, pour the water down a drain.
• Always turn off and unplug the dehumidifier before moving, removing the water tank, changing filters, cleaning or whenever the dehumidifier is not in use.
- Do not unplug the dehumidifier by pulling on the cord.
- Never insert fingers, pencils or any other objects through the grilles whenever the power plug is connected, and in particular, when the dehumidifier is switched on.
- Do not operate the dehumidifier with a damaged cord or plug, or if the dehumidifier has been dropped or damaged in any manner. Return the dehumidifier to your nearest Breville service centre for examination, electrical or mechanical adjustment or repair.
- Do not use the dehumidifier with an external timer, programmer or any other device that switches the dehumidifier on automatically since a fire risk may exist if the dehumidifier is covered or positioned incorrectly.
- Do not place anything on top of the dehumidifier when assembled, when in use and when stored.
- Never block the air openings, grilles and outlets, or place on a soft surface such as a bed or sofa, as this could cause the unit to tip over, blocking the air inlet or outlet.
- Do not attempt to repair or adjust any electrical or mechanical functions on this unit. Doing so will void your warranty. The inside of the unit contains no user serviceable parts. All servicing should be performed by qualified personnel only.
- If the dehumidifier ever tips or falls over when the water tank is full, immediately unplug the power cord. Ensure the unit is dried thoroughly before resuming operation.
- Keep the dehumidifier and air inlet and outlet clean and replace the filter as recommended. Follow the cleaning instructions provided in this book.
| Dehumidification Capacity | 8 Litres/day (30°C 80%) |
| Product Dimension 331x26 | 4x577mm |
| Water Tank Capacity 4L | |
| For Room Size 50m2 | |
| Noise Level 51 dB | |
| Power Consumption 650 W | |
| Weight 7kg | |
| Technology Desiccant | |
| Min and Max operating indoor air temperature | 5 - 40 °C |
IMPORTANT SAFEGUARDS FOR ALL ELECTRICAL APPLIANCES
- Fully unwind the power cord before use.
- Connect only to a 230V or 240V power outlet.
- Do not let the power cord hang over the edge of a bench or table, touch hot surfaces or become knotted.
• To protect against electric shock, do not immerse the power cord, power plug or appliance in water or any other liquid or allow moisture to come in contact with the part, unless it is recommended in the cleaning instructions. - The appliance is not intended for use by persons (including children) with reduced physical, sensory or mental capabilities, or lack of experience and knowledge, unless they have been given supervision or instruction concerning use of the appliance by a person responsible for their safety.
• Children should be supervised to ensure that they do not play with the appliance. - It is recommended to regularly inspect the appliance.
To avoid a hazard, do not use the appliance if power cord, power plug or appliance becomes damaged in any way. Return the entire appliance to the nearest authorized Breville Service Centre for examination and/or repair.
- Any maintenance other than cleaning should be performed at an authorised Breville Service Centre.
• This appliance is for household use only.
- Do not use this appliance for anything other than its intended use. Do not use in moving vehicles or boats. Do not use outdoors. Misuse may cause injury.
- The installation of a residual current device (safety switch) is recommended to provide additional safety protection when using electrical appliances. It is advisable that a safety switch with a rated residual operating current not exceeding 30mA be installed in the electrical circuit supplying the appliance.
• See your electrician for professional advice.
• During electrical storms,
the appliance should be disconnected from the power source at the wall socket to prevent any electrical surges that may arise during the storm and which may inadvertently cause damage to the appliance and its electronic componentry.
• Always turn the appliance to the off position, switch off at the power outlet and unplug at the power outlet when the appliance is not in use.
- Before cleaning, always turn the appliance to the off position, switch off at the power outlet, unplug at the power outlet and remove the power cord, if detachable, from the appliance and allow all parts to cool.
- Do not place this appliance on or near a heat source, such as hot plate, oven or heaters.
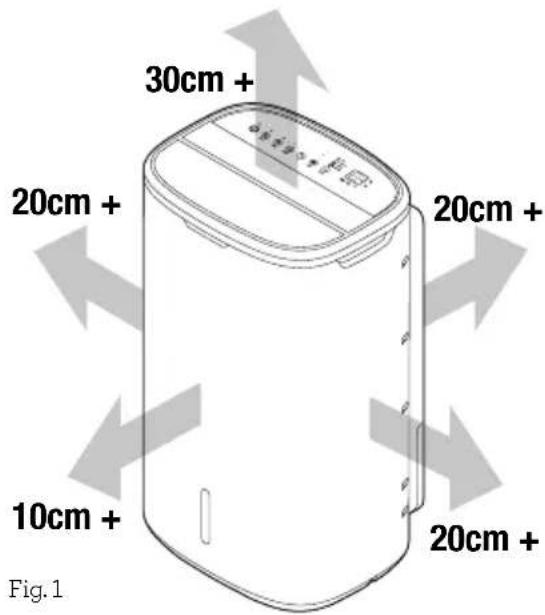
- Position the appliance at a minimum distance of 20cm away from walls, curtains and other heat or steam sensitive materials and provide adequate space above and on all sides for air circulation.

WARNING
To avoid electric shock, do not connect the plug to the power outlet when hands are wet.
FOR HOUSEHOLD USE ONLY SAVE THESE INSTRUCTIONS
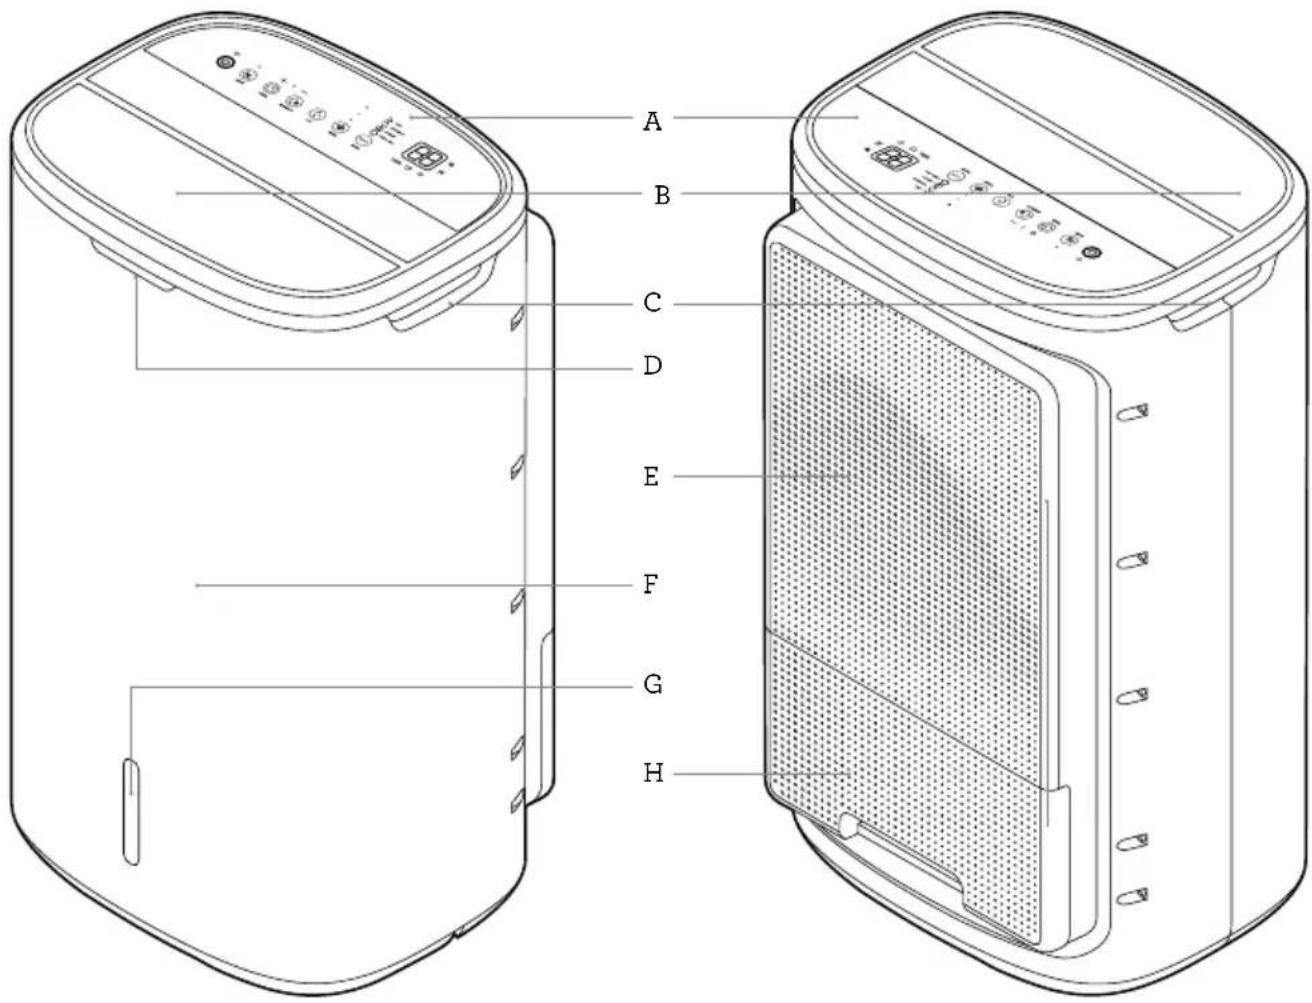
Front Back
Not pictured
A. Control Panel
B. Air Outlet Grille with Air Deflector
C. Carry Handles
D. SensAir™ System Live Humidity Indicator Light
E. Air Inlet Grille
F. Main Housing
G. Water Level Indicator Light
H. Water Tank
• AntiViral HEPA-13 Filter (LAD070)
- Pre-filter
- Cord Wrap Storage
• Continuous Drainage Plug
• Drainage Hose (1 metre)
- Castor Wheels
Control Panel
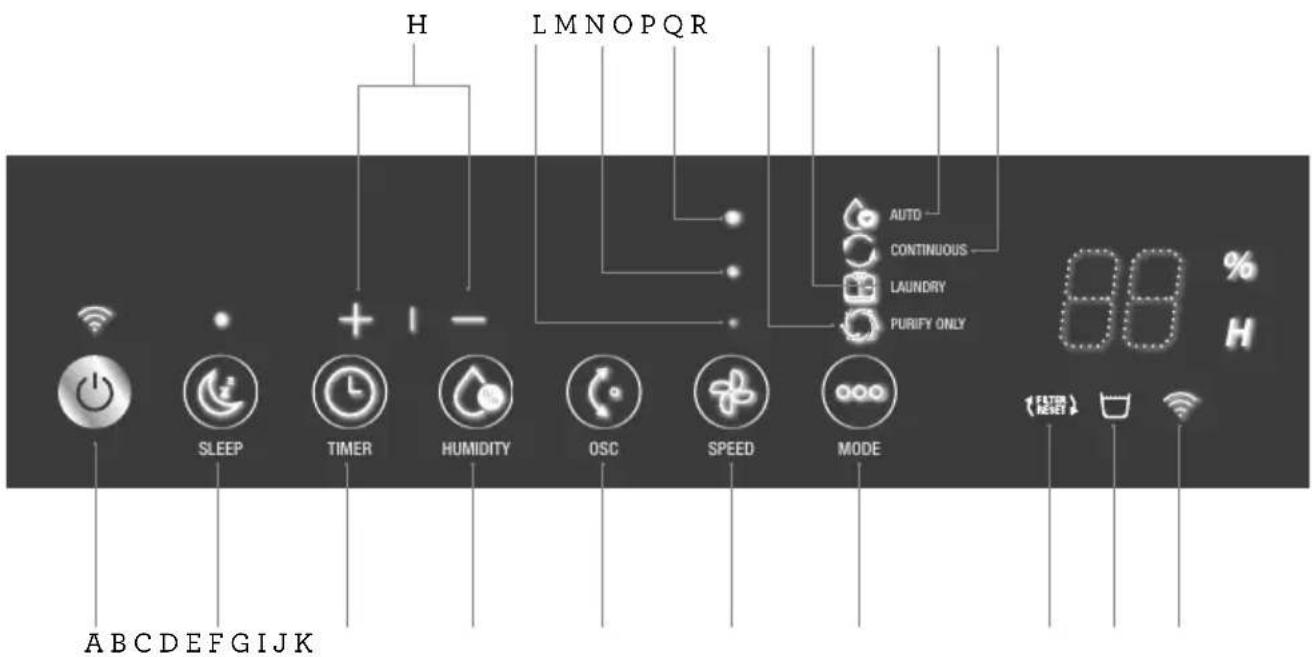
CONTROL PANEL BUTTONS
A. ON/OFF & Wi-Fi
B. Sleep
C. Timer
D. Humidity
E. Oscillation/Filter Reset (press & hold for 3 seconds to extinguish filter reset light)
F. Fan Speed
G. Mode
H. + and - (for Timer & Humidity)
DISPLAY INDICATOR LIGHTS
I. Filter Reset
J. Empty Me
K. Wi-Fi
L. Low Fan Speed
M. Medium Fan Speed
N. High Fan Speed
O. Purify Only
P. Laundry
Q. Auto
R. Continuous
WHAT IS A 2-IN-1 DEHUMIDIFIER & PURIFIER?
The dehumidifier function uses desiccant technology to extract moisture from the surrounding air to reduce and maintain humidity levels in the environment providing a level of comfort to your surroundings. Excess moisture in an environment is problematic and can develop into mould and mildew.
The dehumidifier is most efficient for rooms up to 50m^2 , extracting up to 8L of water volume over a 24 hour period and stores up to 4L in its water tank at any given time.
The air purifier function removes impurities such as airborne allergens and dust particles from the air. Air purification can be used with or without dehumidification.
How Does a Dehumidifier Work?
The dehumidifier regulates the relative humidity of your room by extracting moisture to reduce and maintain humidity levels in the environment. The water is dispensed into the water tank or through the drainage hose. During this process, the air purifier function filters and cleans the air through 3 stages of air filtration to deliver slightly warmed and cleaner air back into the surrounding environment.
Desiccant Technology
Desiccant dehumidifiers work well in all climates - particularly in cold environments. The dehumidifier will draw in humid air that then passes over a wheel coated with a water absorbing material (called desiccant). A stream of warm air will then remove the moisture from the desiccant, where it is dried and regenerated to collect more moisture. The water is then collected in the dehumidifier's water tank.
What is Relative Humidity?
Relative humidity (RH) is the amount of water vapour in the air, and it is commonly expressed as a percentage of the maximum amount of water vapour that the air can hold at a given temperature. A comfortable %RH level is commonly considered to be between 40-60%RH.
BREVILLE HOME CONNECT™
The dehumidifier can also be operated from your smart phone using the Breville Home Connect™ app. Go to the Wi-Fi Connectivity & Voice Assistant section in this booklet for further details.

Assembly
BEFORE FIRST USE
- Remove and safely discard any packaging material and check for any missing or damaged parts before discarding.
- Open the air inlet grille at the back of the unit and remove the assembled AntiViral HEPA-13 filter & pre-filter. Remove packaging and reassemble the filters into the dehumidifier as per the Care, Cleaning & Storage section of this booklet.

IMPORTANT
Remove packaging from the assembled filters before operating.
- Remove the drainage hose and castor wheels from inside of the water tank. Store drainage hose in safe place for future use.
- Carefully place the dehumidifier on its side on a flat surface. Firmly push the castor wheels into the sockets located on the base of the unit. Return the dehumidifier to the upright position.
- Using the carry handles, position the dehumidifier at least 20cm away from walls, furniture, and other appliances. (Fig. 1)
- Ensure that both filters, grille, water tank, castor wheels and drainage hose (if using) are correctly installed.
- Connect the power plug to a 230V or 240V outlet and switch on at the outlet. The dehumidifier is now in standby mode. When in standby mode for the first time, a 'beep' will sound.

IMPORTANT
When moving the dehumidifier, use the carry handles and castor wheels to manoeuvre, where possible. If lifting, use the two handles and set down gently on a flat and level surface. Never turn the dehumidifier upside down.

IMPORTANT
Always ensure the air deflector is open during operation of the dehumidifier. Keep all ventilation openings clear of obstruction.

Functions
- Press the ⏻ button to turn on.
- The air deflector will open to 90 degrees automatically and the unit will default to Auto mode on first use, then will remember the last used function thereafter.
- To turn off the dehumidifier, press the ⏻ button. The fan will continue for 30 seconds before returning to standby mode.
- To revert back to default mode, unplug the unit from the mains power.
SENSAIR™ SYSTEM
- The dehumidifier has a built-in sensor to detect changes in the humidity level in the air. It provides real-time updates through the display screen and the Live Humidity Indicator light.
- The Live Humidity Indicator light is an integrated system that changes colour to visually display the current level of relative humidity % in the air and is also mapped to the Breville Home Connect™ App.
- The Live Humidity Indicator light will change colour according to the current relevant humidity %.
-Green (Low): Below 40% relative humidity.
-Blue (Good): Between 40% - 60% relative humidity.
-Red (High): Above 60% relative humidity.
Humidity Level Setting
- When the dehumidifier is turned on, the current humidity level (\%) will show on the display screen and the 🧐 icon will illuminate. This number will adjust during operation.
- The humidity level can only be set when operating in Auto Mode and allows you to manually set a relative humidity level (RH) between 30% - 80%.
- Press the Ⓧ button. Use the + or - buttons to change the humidity level in 5% increments with each press. Stop once the desired humidity level is displayed on the display screen.
There are 4 preset operating modes. To toggle between each mode, press the ooo button. The light above the chosen operating mode will flash 5 times, then illuminate solid when selected.

NOTE
In all dehumidification modes, air purification will automatically function simultaneously to filter the air before returning it to the surrounding environment.
Auto (Dehumidification)
- Auto mode will dehumidify the air based on the last set humidity level, allowing for more control based on preference.
- Once the humidity level is reached, dehumidification will stop and the fan will continue to operate.
- If the room humidity level is still below the preset humidity after 3 minutes, the fan will stop.
- Dehumidification will resume if the room humidity level is higher than the preset humidity.
- In Auto mode, the fan speed can be adjusted to either high, medium or low, however high will deliver the ideal humidity level quicker.
- In Auto mode, the humidity level can be adjusted between 30-80% RH.

Continuous (Dehumidification)
- Continuous dehumidification will operate at different speeds depending on the room's RH level until manually switched off or if the humidity level falls below 30% RH.
- The fan speed and humidity level cannot be adjusted on Continuous mode.

Laundry (Dehumidification)
- Laundry mode assists to dry clothes hanging indoors faster by drawing out the moisture.
- Laundry mode automatically operates on a high speed and 30% RH.

Purify Only
- The dehumidifier is also an effective air purifier equipped with an AntiViral HEPA-13 filter to help remove floating particles, allergens and dust from the environment.
- Purify Only can be used as a standalone function to filter and deliver cleaner air at any time, without dehumidification.
- The fan speed can be adjusted to high, medium or low in Purify Only mode.

NOTE
The dehumidifier produces heat during operation which may cause room temperatures to rise by 1^ C to 4^ C, especially if used in an enclosed space.

Sleep
- Sleep mode turns off all the lights on the unit to assist with sleeping, unless the water tank is full.
- Sleep mode operates on low speed as the default setting.
- To activate Sleep mode, press the 📄 button. All lights will turn off, the light above the sleep icon will flash 3 times, then turn off.
- To exit Sleep mode, press the button.

Fan Speed
Fan speed can be adjusted manually in Auto and Purify Only mode.
- Press the button to select between low., medium:, or high:.
- Laundry mode operates on high speed as the default setting.
- Continuous mode operates on low fan speed as the default setting.

Timer
The Timer operates in two ways.
- Auto Off, where the timer determines when the unit will turn OFF and can only be set when the dehumidifier is already turned on.
- Delayed Start, where the timer determines when the unit will turn ON and can only be set when the dehumidifier is in standby mode.
To program the Timer:
- Press and hold the Ⓛ button.
- The display screen will flash '00' and the Timer icon will illuminate.
- Press the ⏻ button to increase the time in one-hour increments, up to 24 hours. Alternatively, you can press the ⏻ button and then + or — buttons to increase or decrease the time.
- The time will countdown each hour, automatically turning the dehumidifier ON (Delayed Start) or OFF (Auto Off) when it reaches '00'.
- To view the remaining countdown time left, press the Timer button once.
- To cancel Auto Off or Delayed Start, press and hold the ⏻ button until the timer is shown. Press and hold the Timer button again or continue to press the button until it reaches '00'. Alternatively, you can press the ⏻ button and then + or — buttons to change the time to '00'. Turning off the dehumidifier will reset the timer.

WARNING
As a safety feature, the dehumidifier will automatically turn off when the water tank is full, even if the Auto Off countdown timer has not elapsed.
Oscillation
The dehumidifier also allows for the air deflector to oscillate up and down, depending on personal preference. When first turned on, the air deflector will open to 90 degrees as the default setting.
- Press the button once and up/down oscillation will begin.
- Press the button again and the air deflector will pause at the angle it is in when button is pressed.
- Press the button again and the air deflector will fully open and reset at 90 degrees.

WARNING
Do not interfere or obstruct the air deflector whilst it is in operation, as this may cause injury or damage to the unit.
(RESET) Filter Reset
- The filter reset icon will flash, indicating that the filter needs to be replaced. The icon will continue to flash during operation and in standby mode.
- Replace the filter according to the directions found under Replacing the Filter section in this booklet.
- Once the filter has been replaced, press and hold the (• button for 5 seconds to reset the Filter Reset timer. The filter reset light will stop flashing.
- The built-in timer for the filter reset alert will activate at 2,160 operating hours.

NOTE
For best performance, the filter should be cleaned at least monthly as per the instructions found in the Care, Cleaning & Storage section of this booklet.
For optimal filter performance, change filter every 4 - 6 months.
CONTINUOUS DRAINAGE
Using the included hose for gravity-fed draining
The continuous drainage outlet allows water to drain without having to monitor and empty the water tank. Ensure the drainage hose (included) is properly assembled before operating the dehumidifier when using this feature.
- Using the water tank handle, remove the water tank.
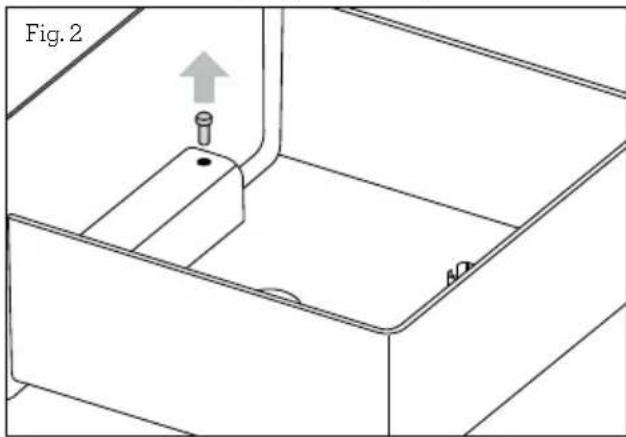
- Remove the water tank lid and remove the plug located in the water tank. (Fig. 2) Keep and retain the plug in a safe place.
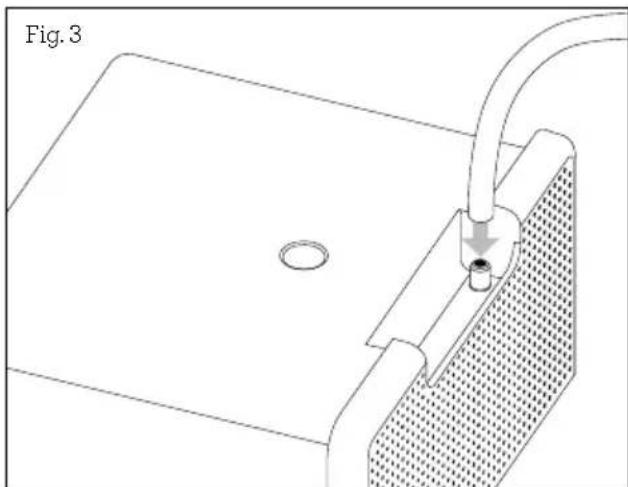
- Turn the water tank upside down to access the hose connection, found within the handle. (Fig. 3) Insert the drainage hose onto the hose connection outlet. Place the water tank lid back onto the water tank and reinsert the water tank to the unit.
natural_image
Technical line drawing of a mechanical component with a circular hole and pipe connection (no text or symbols)-
As drainage is dependent on gravity, to drain correctly, no part of the drainage hose should sit higher than the hose connection outlet.
-
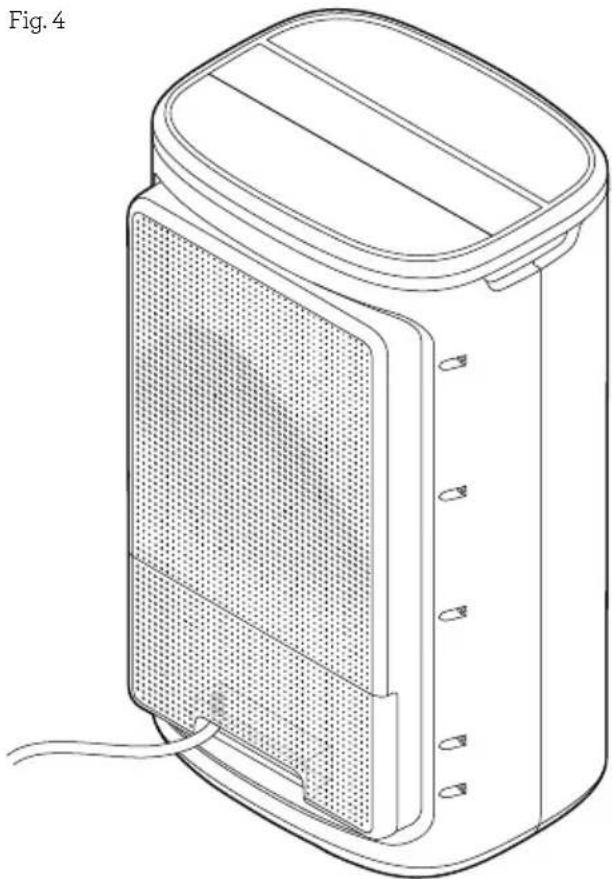
Place the other end of the drainage hose into a water drain, being careful that it cannot inadvertently come loose or be displaced when water starts to drain. The water will drain directly through the hose. (Fig. 4)
natural_image
Line drawing of a portable electronic device with mesh grille and ventilation slots (no text or symbols)- If continuous drainage is no longer needed, remove the hose and re-insert the plug.

NOTE
For the unit to drain correctly, no part of the drainage hose should be above the level of the continuous drainage outlet.

WARNING
Ensure the hose is secure at the hose connection of the drainage outlet and into the water drain.
Empty Me Alert
This dehumidifier comes with two alerts while in operation. Once the water tank is 70% full of water, will flash on the control panel, and the water level indicator light will illuminate white. This pre-warning provides a convenient prompt to empty the tank before it becomes completely full and at its heaviest. When the water tank is 100% full, will illuminate, the water level indicator light will illuminate red, and the dehumidifier will stop operating automatically. Empty the water tank and place back into the unit. The dehumidifier will recommence operation and the Empty Me light and water level indicator light will extinguish.

IMPORTANT
Water collected in the water tank is not suitable for drinking. Do not drink this water and do not serve to animals or use to water plants.

NOTE
Ensure the water tank is fitted correctly or the dehumidifier will not operate.
If the water tank is not fitted correctly, the water level indicator light will illuminate red.
TILT PROTECTION
This dehumidifier is equipped with Tilt Protection. If the dehumidifier is knocked over or tilted at more than a 45-degree angle while in operation, the internal heater will stop operating. The fan and motor will continue to run for 2 minutes (to cool down the unit) before stopping completely. Once the unit is returned upright, the dehumidifier can be turned back on and reset.

Wi-Fi Connectivity
This Breville Home connected product can be controlled both through Wi-Fi and Bluetooth. While Wi-Fi allows for connectivity and control remotely, Bluetooth allows for control within range of the product, even without Wi-Fi.
The Breville dehumidifier offers remote operation by using a home Wi-Fi connection using the Breville Home Connect™ app downloaded to a compatible mobile phone through the Google Play store or Apple App store.
To go straight to the appropriate app store, scan the QR code below.

For instructions on how to use the app, scan the QR code below, refer to the Quick Start Guide that can be found in the box or go to tinyurl.com/HomeConnectQuickStart.


NOTE
The Breville Home Connect™ app is compatible with mobile phones running Android® 5.0 or later and iOS devices 11 or later.

NOTE
To control the dehumidifier using the app, the unit must be plugged into an active power outlet and turned on.
CONNECT YOUR DEHUMIDIFIER TO WI-FI
Choose from the options available to allow for easy pairing and use.
Bluetooth connection has also been activated for this appliance, which will aid in the pairing process, providing a higher success rate when pairing.
- Ensure the mobile device is connected to a home Wi-Fi network.
- The dehumidifier must be on standby mode. Once in standby mode, the Wi-Fi symbol will flash rapidly. The dehumidifier is now ready to connect.
- Log into your Breville Home Connect™ app account and stay on the "Home" page. To add the dehumidifier to the list, touch 'Add Device' or the symbol found in the top right-hand corner of the screen. Follow the prompts in the app.
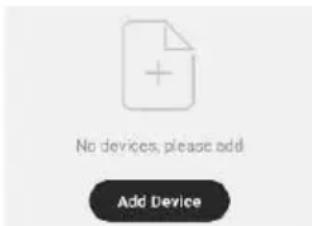
- If the connection is successful, the dehumidifier will appear in the main page of the app and the symbol on the dehumidifier will illuminate.
- If connection is unsuccessful, touch and hold the ⏻ button for 5 seconds until the ⏻ light is flashing slowly. Follow the prompts in the app to connect in a different pairing mode.

NOTE
The Breville Home Connected dehumidifier also has additional features exclusively accessible via the app, including child lock and lighting control.
BLUETOOTH
Bluetooth connectivity is a key feature of the dehumidifier. Ensure that Bluetooth is enabled on the mobile device with Breville Home Connect™ installed.
The light will flash rapidly when attempting to connect to the Bluetooth enabled mobile device. The Breville Home Connect™ app should detect the unit automatically. Press 'Add Device' and follow the prompts on the app to complete the device connection. Refer to the Quickstart Guide in the box or on Breville.com for specific details on how to connect through Bluetooth.
Voice Assistants
The Breville All Climate™ 2-in-1 Dehumidifier & Purifier comes with the added feature of voice assistance, allowing you to control your dehumidifier using your voice by linking your Breville Home Connect™ app with Amazon Alexa and Google Home/Assistant.
To link your Breville Home Connect™ app account with either Google Home/Assistant or Amazon Alexa, refer to the instructions on www.Breville.com or follow instructions found in the Breville Home Connect™ app under Me > Third-Party Voice Services > View more ways to link.

IMPORTANT NOTE
The recommended voice commands to operate the appliance's functions differ between Amazon Alexa and Google Home/Assistant as listed. Variations of these commands may also be recognised, however, if a command fails, check against the recommended voice command.

NOTE
To control the dehumidifier using the Amazon Alexa or Google Home/Assistant app, the dehumidifier must be plugged in to an active power outlet and turned on.
VOICE CONTROL WITH AMAZON ALEXA
Before you can voice control your Breville Dehumidifier with Amazon Alexa, you need to link the Breville Home Connect™ account to the Amazon Alexa app as per instructions on the Amazon Alexa app in the relevant sections for completion.
Amazon Alexa Recommended Voice Commands for the Breville DEHUMDIFIER Supported Settings Amazon Alexa Voice Commands
| Power | Turn ON DEVICENAME |
| Turn OFF DEVICENAME | |
| Mode | Set DEVICENAME to Auto mode |
| Set DEVICENAME to Continuous mode | |
| Set DEVICENAME to Laundry mode | |
| Set DEVICENAME to Purify mode | |
| Fan Speed | Set DEVICENAME fan speed to low |
| Set DEVICENAME fan speed to mid | |
| Set DEVICENAME fan speed to high | |
| Humidity Level(30-80% - Auto mode only) Set DEVICENAME to 35 Set DEVICENAME to 65 | Set DEVICENAME to 30 Set DEVICENAME to 60 |
| Set DEVICENAME to 40 Set DEVICENAME to 70 | |
| Set DEVICENAME to 45 Set DEVICENAME to 75 | |
| Set DEVICENAME to 50 Set DEVICENAME to 80 | |
| Set DEVICENAME to 55 | |
| Sleep Mode | Turn ON Sleep Mode on DEVICENAME |
| Turn OFF Sleep Mode on DEVICENAME | |
| Oscillation | On the device DEVICENAME, set the oscillation to ON |
| On the device DEVICENAME, set the oscillation to PAUSE | |
| On the device DEVICENAME, set the oscillation to OFF |

NOTE
Currently, Amazon Alexa does not support the following settings:
- Timer, Child Lock and Filter Reset.
VOICE CONTROL WITH GOOGLE HOME/ASSISTANT
Before you can voice control your Breville Dehumidifier with Google Home/Assistant, you need to link the Breville Home Connect™ account to the Google Home/Assistant app as per instructions on the Google Home/Assistant app in the relevant sections for completion.
Google Home/Assistant Recommended Voice Commands for the Breville DEHUMDIFIER
Supported Settings Google Home/Assistant Voice Commands
| Power | Turn ON DEVICENAME |
| Turn OFF DEVICENAME | |
| Mode | Set DEVICENAME to Auto mode |
| Set DEVICENAME to Continuous mode | |
| Set DEVICENAME to Laundry mode | |
| Set DEVICENAME to Purify mode | |
| Fan Speed | Set DEVICENAME fan speed to low |
| Set DEVICENAME fan speed to medium | |
| Set DEVICENAME fan speed to high | |
| Humidity Level(30-80% - Auto mode only) Set DEVICENAME to 35 Set DEVICENAME to 65 | Set DEVICENAME to 30 Set DEVICENAME to 60 |
| Set DEVICENAME to 40 Set DEVICENAME to 70 | |
| Set DEVICENAME to 45 Set DEVICENAME to 75 | |
| Set DEVICENAME to 50 Set DEVICENAME to 80 | |
| Set DEVICENAME to 55 | |
| Sleep Mode | Turn ON the Sleep mode |
| Turn OFF the Sleep mode | |
| Oscillation | Set Oscillation to ON on DEVICENAME |
| Set Oscillation to PAUSE on DEVICENAME | |
| Set Oscillation to OFF on DEVICENAME |

NOTE
Currently, Google Home/Assistant does not support the following settings:
- Timer, Child Lock and Filter Reset.

TIPS for Amazon Alexa and Google Home/Assistants
- Configure your Amazon Alexa or Google Home/Assistant compatible devices with the "Alexa" or "Google Home/Assistant" app if using, or simply download onto your phone.
- You will find your device listed as the Breville product name in your Breville Home Connect™ app account. Tap on the device in the app to rename your device for more convenient voice commands, e.g. "Dehumidifier Living Room" or give it a name, e.g. "Kenny".
- Training your voice assistant - Voice Match - Teach your assistant to recognise your voice. This isn't training it to understand English, but rather to recognise your voice as belonging to you. You can do this by going to the Settings menu in the voice assistant app on your phone.
- Routines - Amazon Alexa and Google Home/Assistant allow you to combine multiple actions in one voice command, to create a Routine, tap on the ‘Routines’ option via settings and follow the steps.
- Ensure the primary language is set to English (United States) for all apps.
Care, Cleaning & Storage

WARNING
Before cleaning or maintenance of the dehumidifier, ensure the power is switched off at the outlet and the plug is removed.
CLEANING YOUR DEHUMIDIFIER
- Keep the unit upright when cleaning.
- Wipe the dehumidifier housing, control panel and air inlet and outlet grilles with a soft, dry cloth.
- To remove dirt that may have built up on the housing body and air inlet grille, wipe with a damp cloth only. Do not use on the control panel.

WARNING
Do not clean the control panel with a damp cloth. Do not clean the unit with gasoline, thinner or liquid detergent as chemical substances may damage the screen or cause discolouration on the unit.

NOTE
Do not use any objects that may scratch the unit. For instance, using a brush may leave scratches.
WATER LEVEL SENSOR
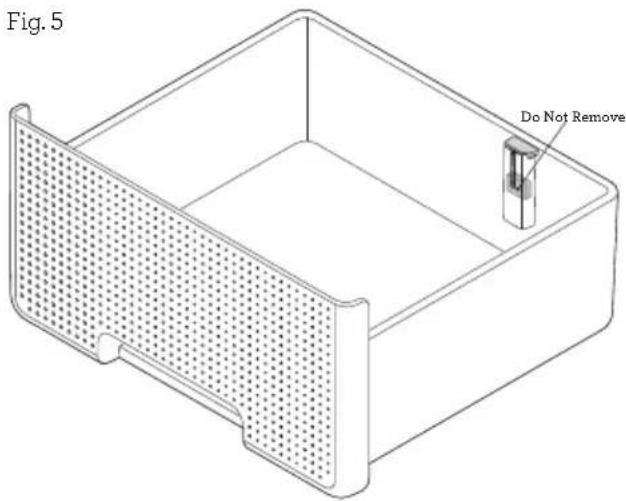
The water level sensor is situated in a chamber found in the corner of the water tank and is held in place by the clip secured over the chamber (Fig. 5). The sensor will rise and fall with the level of the water and should not be removed as this will prevent the dehumidifier from operating.
FILTER CLEANING AND REPLACEMENT
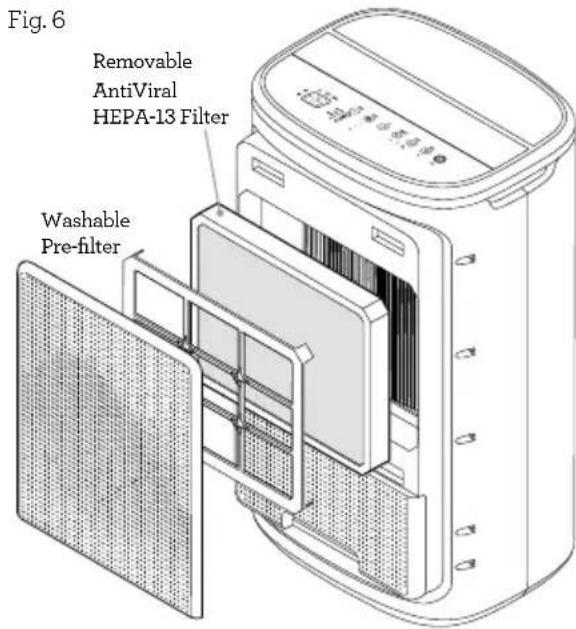
The dehumidifier is fitted with an assembled pre-filter and AntiViral HEPA-13 filter that is located at the back of the dehumidifier. (Fig. 6)

WARNING
It is important to keep the filter clean as a dirty filter may reduce the performance of the dehumidifier.

NOTE
Clean the filter at least monthly, or more often if in frequent use.
Washable Pre-filter
The mesh pre-filter is designed to trap large dirt and dust from the air and is connected to the black side of the AntiViral HEPA-13 filter.
- Remove the air inlet grille from the back of the unit.
- Remove the assembled filters from the unit and separate the pre-filter from the AntiViral HEPA-13 filter.
- Use a hand tool on a vacuum cleaner (such as a brush or upholstery tool) to clean both sides of the pre-filter. Alternatively, lightly tap the pre-filter over a garbage bin to loosen the dust.
- If the pre-filter is extremely dirty, wash it gently with clean water and allow to dry.
AntiViral HEPA-13 Cleaning
The AntiViral HEPA-13 filter sits within a cavity at the back of the dehumidifier and can be accessed by removing the air inlet grille

WARNING
Never wash the AntiViral HEPA-13 filter. This filter can be cleaned by simply tapping over a garbage bin.

NOTE
A dirty HEPA-13 filter may reduce the performance of the dehumidifier. Clean regularly and replace as needed.
- Remove the air inlet grille.
- Remove the assembled filters from the unit and separate the pre-filter from the AntiViral HEPA-13 filter.
- Tap the AntiViral HEPA-13 filter over a garbage bin to remove dust
AntiViral HEPA-13 Filter Replacement
- For best performance, the AntiViral HEPA-13 filter should be replaced in the time frames indicated below.
• The AntiViral HEPA-13 filter life is approximately 4-6 months based on 12 hours daily operation or 2,160 hrs. - The filter life may vary to this timing, depending on environmental conditions.
-
Remove all packaging from the replacement filter before placing the filter into the unit.
-
The filter reset icon will illuminate on the control panel when the AntiViral HEPA-13 filter replacement is due.
- Remove the air inlet grille to access the assembled pre-filter & AntiViral HEPA-13 filter.
- Remove the assembled filters from the rear of the main housing, being careful that any residue or debris that may fall from the filters do not cause damage. Separate the pre-filter from the AntiViral HEPA-13 filter.
-
Remove the new AntiViral HEPA-13 filter from the packaging material.
-
Ensure the pre-filter is clean by following the instructions in this booklet. Using the clips found on the corners of the pre-filter, attach the pre-filter to the black side of the new AntiViral HEPA-13 filter.
- Face the blue side of the assembled filters towards the unit and gently push into the back of the main housing. The white pull tabs found on top and bottom of the AntiViral HEPA-13 filter should be easily accessible.
- Replace the air inlet grille back onto the dehumidifier before operating.

NOTE
If the assembled filters are not in place or not fitted correctly, the dehumidifier will not operate effectively and may be damaged.
Replacement filters can be purchased from the Breville.com website^ or at participating retail outlets.
| Breville | Breville | Filter |
| Dehumidifier | Dehumidifier | Replacement |
| Model | Name | Product Code |
| Number | ||
| LAD358 the All | ClimateTM 2-in-1 Dehumidifier & Purifier | LAD070 |
| LAD708 the All | ClimateTM 2-in-1 Viral Protect |
^Delivery charges may apply.
Please contact Breville Customer Service Centre for further support.
Only use the original Breville filter specially intended for this appliance. Do not use any other filters.
STORAGE
- Disconnect the dehumidifier from the power outlet.
- Ensure the water tank is empty and the unit is cleaned as per instructions found in this booklet.
- Wrap the cord around the cord wrap storage which is located under the unit.
- Store upright and avoid exposure to direct sunlight.
- Never store anything on top of the dehumidifier.
TROUBLESHOOTING GUIDE
Before carrying out any of the following service checks, unplug the unit from the power outlet.
PROBLEM POSSIBLE CAUSES WHAT TO DO
| Dehumidifier not working. | Power plug is disconnected.The water tank is full.The tank is not in the right position.The tilt-over protection switch has been engaged. | Plug the power cord into the power socket.Empty the water tank.Position the water tank correctly in the unit.Position the dehumidifier upright on a flat surface. |
| Dehumidification has reduced in power. | The filter is dirty.The air inlet or outlet are blocked. | Clean the filter.Remove the object that is blocking the air inlet or outlet. |
| Loud noises coming from the dehumidifier. | The dehumidifier is on an uneven surface. | Position the dehumidifier on a smooth and stable surface. |
| The dehumidifier suddenly stops. | The room humidity level is below the set humidity level.The water tank is full. | Lower humidity level setting (if using Auto Mode).Empty the water tank. |
| Clothing dries very slowly. | The room temperature is too low.The wet clothes are not exposed to the air from the unit. | If the room temperature is too low, the clothing will dry slower than usual.Place the wet clothes closer to the unit to allow for better air circulation. |
| Minimal or slow reduction of humidity in the room. | The room is too large relative to the dehumidification capacity of the dehumidifier.Doors and windows in the room are open. | Move dehumidifier to a smaller room.Close any doors or windows in the room. |
ERROR CODES
| ERROR CODE | POSSIBLE CAUSES | WHAT TO DO |
| Screen displays ‘OH’ and the dehumidifier stops operation. | Filter blockage.Air outlet closed or blocked. | Clean or replace filter.Ensure the air outlet grille is open when operating. Clean the air outlet of any blockages.If issue persists, switch off at the power and contact Breville Customer Service. |
| Screen displays ‘E1’. | Temperature and humidity sensor issue. | Switch off at the power and restart. If the issue persists, contact Breville Customer Service |
| Screen displays ‘E2’ and the dehumidifier stops operation. | TPCB NTC1 sensor issue. | Switch off at the power and restart. If the issue persists, contact Breville Customer Service. |
| Screen displays ‘E3’ and the dehumidifier stops operation. | Internal motor issue. | Switch off at the power and restart. If the issue persists, contact Breville Customer Service. |
| Screen displays ‘E4’ and the dehumidifier stops operation. | Internal fan issue. | Switch off at the power and restart. If the issue persists, contact Breville Customer Service. |
| Screen displays ‘E9’ and the dehumidifier stops operation. | PCB issue. | Switch off at the power and restart. If the issue persists, contact Breville Customer Service. |
TROUBLESHOOTING GUIDE FOR AMAZON ALEXA AND GOOGLE HOME/ASSISTANT
PROBLEM WHAT TO DO
| Why is Amazon Alexa or Google Home/Assistant not responding to my voice commands. | Check the internet connection.Restart your device & mobile phone.Restart your modem and router.Make sure your Amazon Alexa or Google Home/Assistant-enabled device or mobile phone is in Wi-Fi range.When you are giving a command to Amazon Alexa or Google Home/Assistant, make sure you are clear and there is no noise in the background.While the voice assistant is always on in the background, only an activation phrase will allow for the voice assistant to start, registering the commands being relayed. The activation phrase depends on the application being used. For Amazon Alexa, use “Alexa”, while “OK Google” is for Google Home/Assistant.Ensure your voice is clear and distinct to allow the assistant to accurately record and process the command.Ask direct questions. Refer to the commands list for recommended commands. |
If the problem is not listed, please contact Breville Customer Service Centre (see back cover for contact details)

Notes

Notes
Breville Customer Service Centre
Australian Customers
Phone: 1300 139 798
Web: www.breville.com
New Zealand Customers
Phone: 0800 273 845
Web: www.breville.com
Breville®
Master Every Moment™
Breville, the Breville logo, Master Every Moment, All Climate, Breville Home Connect and SensAir are trademarks of Breville Pty. Ltd. A.B.N. 98 000 092 928.
Copyright Breville Pty. Ltd. 2024.
All other brands may be trademarks of their respective owners.
Due to continued product improvement, the products illustrated/photographed in this booklet may vary slightly from the actual product.
- the All Climate™ 2-in-1 Dehumidifier & Purifier
- Contents
- Limited Product Warranty
- BREVILLE RECOMMENDS SAFETY FIRST
- IMPORTANT SAFEGUARDS
- READ ALL INSTRUCTIONS BEFORE USE AND SAVE FOR FUTURE REFERENCE
- IMPORTANT SAFEGUARDS FOR ALL ELECTRICAL APPLIANCES
- WARNING
- FOR HOUSEHOLD USE ONLY SAVE THESE INSTRUCTIONS
- Front Back
- Not pictured
- Control Panel
- CONTROL PANEL BUTTONS
- DISPLAY INDICATOR LIGHTS
- WHAT IS A 2-IN-1 DEHUMIDIFIER & PURIFIER?
- How Does a Dehumidifier Work?
- Desiccant Technology
- What is Relative Humidity?
- BREVILLE HOME CONNECT™
- Assembly
- BEFORE FIRST USE
- IMPORTANT
- Functions
- SENSAIR™ SYSTEM
- Humidity Level Setting
- NOTE
- Auto (Dehumidification)
- Continuous (Dehumidification)
- Laundry (Dehumidification)
- Purify Only
- Sleep
- Fan Speed
- Timer
- To program the Timer:
- Oscillation
- (RESET) Filter Reset
- CONTINUOUS DRAINAGE
- Using the included hose for gravity-fed draining
- Empty Me Alert
- TILT PROTECTION
- Wi-Fi Connectivity
- CONNECT YOUR DEHUMIDIFIER TO WI-FI
- BLUETOOTH
- Voice Assistants
- IMPORTANT NOTE
- VOICE CONTROL WITH AMAZON ALEXA
- VOICE CONTROL WITH GOOGLE HOME/ASSISTANT
- TIPS for Amazon Alexa and Google Home/Assistants
- Care, Cleaning & Storage
- CLEANING YOUR DEHUMIDIFIER
- WATER LEVEL SENSOR
- FILTER CLEANING AND REPLACEMENT
- Washable Pre-filter
- AntiViral HEPA-13 Cleaning
- AntiViral HEPA-13 Filter Replacement
- STORAGE
- TROUBLESHOOTING GUIDE
- TROUBLESHOOTING GUIDE FOR AMAZON ALEXA AND GOOGLE HOME/ASSISTANT
- Breville Customer Service Centre
- Breville®
- Master Every Moment™
Brand : BREVILLE
Model : the All Climate 2-in-1 BAD358
Category : Dehumidifier