
TPU100B - Audio Amplifier Bogen - Free user manual and instructions
Find the device manual for free TPU100B Bogen in PDF.


| Product Type | Telephone Paging Amplifier |
| Model | TPU100B |
| Brand | Bogen |
| Power Output | 100W RMS |
| Frequency Response | 70 Hz to 15 kHz ±1 dB |
| Distortion | Less than 1% |
| Inputs | Telephone (600-ohm balanced), Music (Hi-Z RCA or screw terminals), Microphone (Lo-Z balanced dynamic), Music Mute (contact closure), TEL Ring (90V ring signal), Contact Ring (dry contacts), Bridging (RCA) |
| Outputs | 16-ohm, 25V, 25VCT, 70V speaker outputs (balanced or unbalanced); RCA for WMT1A line-matching transformer |
| Controls | Bass, Treble, Audio Enhancement, VOX Sensitivity, Ringer Volume, Music Mute, Music Volume, Mic Volume, Tel Volume, Automatic Level Control (ALC) |
| Indicators | Power LED, Peak Level LED |
| Power Requirements | 120V~, 60 Hz, 2A |
| Overload Protection | Thermal and electronic overload protection; 2.5A circuit breaker |
| Dimensions (W x H x D) | 14-1/4" x 8-3/8" x 3-5/8" |
| Weight | 18 lb |
| Mounting Options | Wall mount (screws included) or rack mount (requires RPK82 kit, sold separately) |
| Warranty | 2 years from date of sale to original purchaser |
Frequently Asked Questions - TPU100B Bogen
User questions about TPU100B Bogen
0 question about this device. Answer the ones you know or ask your own.
Ask a new question about this device
Download the instructions for your Audio Amplifier in PDF format for free! Find your manual TPU100B - Bogen and take your electronic device back in hand. On this page are published all the documents necessary for the use of your device. TPU100B by Bogen.
USER MANUAL TPU100B Bogen
Telephone Paging Amplifier
Models TPU35B, TPU60B, TPU100B, TPU250
Installation and Use Manual
NOTICE: Every effort was made to ensure that the information in this guide was complete and accurate at the time of printing. However, information is subject to change.
WARNING: To reduce the risk of Fire or Electric Shock, Do Not Expose this apparatus to rain or moisture.
Apparatus shall not be exposed to dripping or splashing and no objects filled with liquids, such as vases shall be placed on the apparatus.
WARNING: Only connect unit to AC mains outlet providing protective earthing connection.
NOTE: Mains plug is used as disconnect device from the mains and shall remain readily accessible and operable.
CAUTION: These servicing instructions are for use by qualified service personnel only. To reduce the risk of electric shock, do not perform any servicing other than that contained in the operating instructions unless you are qualified to do so.
CAUTION: DO NOT INSTALL OR PLACE THIS UNIT IN A BOOKCASE, BUILT-IN CABINET, OR IN ANOTHER CONFINED SPACE. ENSURE THE UNIT IS WELL VENTILATED. TO PREVENT THE RISK OF SHOCK OR FIRE HAZARD DUE TO OVERHEATING, ENSURE THAT CURTAINS AND ANY OTHER MATERIALS DO NOT OBSTRUCT THE VENTILATION VENTS.
Always follow these basic safety precautions when installing and using the unit:
IMPORTANT SAFETY INSTRUCTIONS
- Read these instructions.
- Keep these instructions.
- Heed all warnings.
- Follow all instructions.
- Do not use this apparatus near water.
- Clean unit with dry cloth.
- Do not block any ventilation openings. Install in accordance with the manufacturer's instructions.
- Do not install near any heat sources such as radiators, heat registers, stoves, or other apparatus (including amplifiers) that produce heat.
- Do not defeat the safety purpose of the polarized or grounding-type plug. A polarized plug has two blades with one wider than the other. A grounding-type plug has two blades and a third grounding prong. The wide blade, or the third prong, are provided for your safety. If the provided plug does not fit into your outlet, consult an electrician for replacement of the obsolete outlet.
- Protect the power cord from being walked on or pinched particularly at plugs, convenience receptacles, and the point where they exit from the apparatus.
- Only use attachments/accessories specified by the manufacturer.
- Unplug this apparatus during lightning storms or when not used for long periods of time.
- Refer all servicing to qualified service personnel. Servicing is required when the apparatus has been damaged in any way, such as power-supply cord or plug is damaged, liquid has been spilled or objects have fallen into the apparatus, the apparatus has been exposed to rain or moisture, does not operate normally, or has been dropped.
CAUTION
RISK OF ELECTRIC SHOCK DO NOT OPEN


CAUTION: TO PREVENT THE RISK OF ELECTRIC SHOCK, DO NOT REMOVE ANY FRONT/BACK COVERS OR PANELS. NO USER-SERVICEABLE PARTS INSIDE. REFER SERVICING TO QUALIFIED PERSONNEL.
The lightning flash with arrowhead symbol, within an equilateral triangle, is intended to alert the user to the presence of uninsulated "dangerous voltage" within the product's enclosure that may be of sufficient magnitude to constitute a risk of electric shock to persons.
The exclamation point within an equilateral triangle is intended to alert the user to the presence of important operating and maintenance (servicing) instructions.
INTRODUCTION 4
PACKAGE CONTENTS 4
INSTALLATION ....5
Mounting
Ventilation
Wall Mounting
Rack Mounting the TPU35B, TPU60B, & TPU100B
Rack Mounting the TPU250
INPUT WIRING CONNECTIONS 6-7
Music Input
Microphone Input
TEL Input
Night Ringer Connection
Bridging Inputs
Input Cover Replacement
OUTPUT WIRING CONNECTIONS 8
Speaker Connection
Line-Matching Transformer WMT1A Connector
Output Cover Replacement
OPERATION 9-10
Indicator LEDs
Control Knobs
SPECIFICATIONS ....11
LIMITED WARRANTY; EXCLUSION OF CERTAIN DAMAGES ....12
Telephone Paging Amplifiers
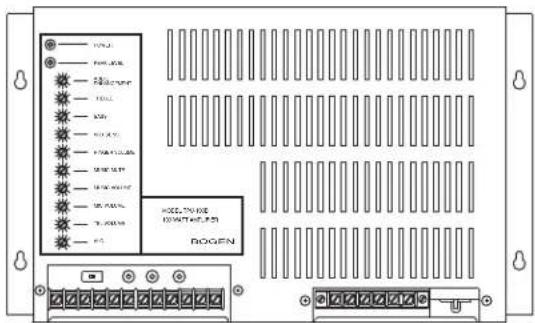
Figure 1: TPU35B, TPU60B, TPU100B Telephone Paging Amplifier
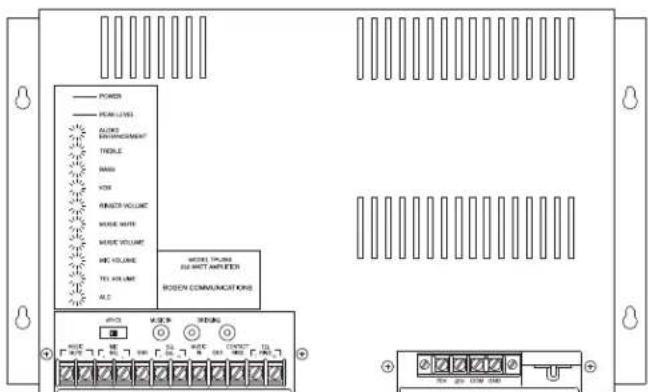
Figure 1a: TPU250 Telephone Paging Amplifier
Introduction
This document describes the Bogen TPU35B, TPU60B, TPU100B (See Fig.1) and TPU250 (see Fig.1A) Telephone Paging Amplifiers. They are full-featured, wall-mounted amplifiers that provide inputs for dry-loop, 600-ohm telephone page signal, background music source, and low impedance microphone. Automatic music mute is provided when making a telephone page. Background music mute level during a page is adjustable and the music slowly fades back in after the page is completed. N.O. contact closure music mute control input is provided for use with push-to-talk microphones. An Automatic Level Control system limits the output level of the telephone page channel so that differences in the volume of the paging party's voice will be less noticeable. Bass and treble controls are provided for adjusting the quality of the output signal. An Audio Enhancement feature is also provided. This improves the clarity of the output signal by replacing the higher frequency harmonics that are normally lost through the telephone system. The TPU amplifiers include a built-in night ringer that can be triggered by either a standard telephone (analog) ring signal or an external contact closure. The night ringer mutes the background music, but does not affect pages.
Package Contents
Before You Start
• Telephone Paging Amplifier unit
• 4 Wall-mounting screws with synthetic washers
• 4 Rubber feet with screws
• Installation and Use Manual
Review the contents of the box. Read through this entire manual to understand how this product installs and operates.
Figure 2: Wall Mounting the Amplifier


Mounting
These amplifiers are designed for wall mount applications but can also be mounted into a standard 19" rack.
Ventilation
The amplifier will produce heat during operation which will rise and may cause problems for temperature-sensitive equipment mounted above it. Mount the amplifier near the top of the backboard (for wall mounting) or rack (for rack mounting) so that no other equipment will be above it. If this is not possible, then allow at least 12" space (or 7 rack spaces min.) between the top of the amplifier and the bottom of any equipment positioned above it. Also allow at least 2" space (or 1 rack space min.) between the bottom of the amplifier and any equipment below it to allow for adequate air circulation. If mounting the TPU above other heat-producing equipment, provide at least 6" of space (or 4 rack spaces min.).
Wall Mounting
To wall mount the amplifiers, use the four 5/8" pan head screws with Teflon washers provided (see Fig. 2). Insert the top two screws first, leaving the heads protruding about 1/4". Lift the amplifier and place it over the 2 screws using the top keyhole slots in the flanges at the sides of the amplifier. Allow the amplifier to rest on the 2 screws and then proceed to insert the bottom 2 screws into the lower keyhole slots. With all the screws in place, tighten the screws to secure the amplifier.
NOTE: Backboard must be a minimum of 3/8" thick plywood and securely mounted to the wall.
Rack Mounting the TPU35B, TPU60B, and TPU100B
The TPU35B, TPU60B, and TPU100B require the use of the RPK82 Rack Mounting Kit (sold separately). Instructions for rack mounting these amplifiers are provided within the RPK82 kit.
Rack Mounting the TPU250
The TPU250 was designed to mount directly, without a rack kit, into standard 19" racks using the mounting flanges as shown in Figure 3 (rack screws are not supplied). In the factory set position, the unit will protrude from the front of the rack. This provides the best ventilation of the unit and easier access to the wiring connections.
The unit can also be mounted with its controls & connectors facing into the rack. This provides a more flush Panel appearance and keeps all wiring inside the cabinet. Be sure to follow all ventilation instructions above.
The unit can also be mounted partially recessed in the rack by reversing the mounting flanges. Unscrew the mounting flanges (3 screws mount the flange to the cover) and install them in a flipped over orientation. This position will provide adequate ventilation and centers the weight of the unit over the rack rails.
Input Wiring Connections
IMPORTANT: Before making any connections or wiring changes to the amplifier or any equipment connected to the amplifier, make sure that the amplifier is NOT plugged into an AC outlet.
NOTE: The amplifier does not have a power switch, so it must be unplugged in order to turn the power off.
All signal input and control wiring is made to the terminal strip and RCA connectors beneath the left side access cover. Loosen the two Phillips-head screws on each side of the cover and remove it.
Music Input
A single RCA connector and screw terminals are provided for the connection of a background music source. The music input is a mono unbalanced input, so the music source's output should be unbalanced and mono. If a balanced input is needed, use a Bogen Line-Matching Transformer WMT1A (sold separately) to balance the music input. The WMT1A is also effective in breaking ground loops that cause hum.
Microphone Input
A low-impedance dynamic microphone input is provided in this amplifier. It is designed to work with push-to-talk, dynamic microphones like Bogen's MBS1000A microphone. Connect the balanced dynamic microphone's signal wires to MIC BAL +/-. Black wires typically connect to the "-" terminal, while white or red wires connect to "+". Connect the shield wire from the microphone to the adjacent GND terminal.
Music Mute for the microphone input is not voice-activated (VOX). The Music Mute terminals must be shorted to mute the music input during a microphone page. A normally open contact set, like the one provided on the MBS1000A, is required for this function.
TEL Input
The telephone input is a 600-ohm, dry-loop, balanced input available at the T and R terminals. Voice-Activated (VOX) music mute is provided when making a telephone page. See page 9 for setting VOX SENS trigger threshold.

Night Ringer Connection
Either a standard telephone (analog) ring signal (90 - 105V AC, 20 - 30 Hz) or an external contact closure activates the night ringer function of the amplifier. To activate the night ringer using standard telephone (analog) ring, connect the analog station's tip lead to the TEL RING "T" terminal and connect the ring lead to the "R" terminal. If using an external contact closure, connect the closure pair across the CONTACT RING and GND terminals. The night ringer follows the cadence of the activating signal.
Bridging Inputs
Two RCA jacks in parallel are provided to ease interconnection of multiple amps. Bridging permits two amplifiers to be used in tandem with one another to increase the total output power of the system, thereby permitting additional speakers to be added (see Fig. 5). For example, when two 250-watt amplifiers are bridged, the total output capacity of the system is 500 watts. However, bridging does not increase the size of the load a TPU250 can individually handle. Once bridged, each amplifier will amplify the inputs present on both amplifiers. The level control of a particular input on an amplifier will control the volume of this signal on both amplifiers. The cable used to bridge amplifiers should not exceed 20 feet in length.
NOTE: You cannot bridge more than two TPU amplifiers. A TPU250 amplifier can only be bridged with another TPU250 amplifier.
Input Cover Replacement
When all connections are made, remove an appropriate knockout on the input cover. Replace the cover and tighten the screws while dressing the wires through the knockout hole.
Figure 5: Bridging Inputs

Output Wiring Connections
All output wiring connections are made to the terminal strip located under the right side access panel. Loosen the two Phillips-head screws on each side of the cover and remove the cover.
IMPORTANT: Before making any connections or wiring changes to the amplifier or any equipment connected to the amplifier, make sure that the amplifier is NOT plugged into an AC outlet.
NOTE: The amplifier does not have a power switch, so it must be unplugged in order to turn the power off.
Speaker Connection
The TPU35B, TPU60B, and TPU100B feature output connectors for 16-ohm, 25V, 25VCT and 70V speakers. The TPU250 provides outputs for 25V and 70V speakers.
70-volt speaker connections are made between the 70V and COM terminals on the output terminal strip. The COM and GND terminals of the output terminal strip are connected using a shorting clip. The shorting clip enables the amplifier output to act as an unbalanced output (one side of the output connected to ground). If desired, the output can be made to be a balanced output with no connection to ground. To balance the output, simply remove the shorting clip. All speaker connections remain the same as above. 25V Speaker connections are done in the same manner.
Line-Matching Transformer WMT1A Connector
An RCA jack is provided near the output terminal strip for connection to a WMT1A line-matching transformer. A 600-ohm, balanced telephone-level output signal can be obtained by plugging the RCA connector of the WMT1A line-matching transformer into this jack and taking the output signal off of the WMT1A line-matching transformer screw terminals (see Fig. 6). The WMT1A will provide approx. 1.73V output. This is useful for driving a long line when connecting to remote equipment.
Output Cover Replacement
When all output connections are made, remove the appropriate knockout on the output cover. Replace the cover and tighten the screws while dressing the wires through the knockout hole.
Figure 6: WMT1A Connection to RCA Jack on Amplifier

Indicator LEDs


POWER


PEAK LEVEL
The POWER LED illuminates whenever AC power is applied to the amplifier (there is no power switch on the amplifier).
The PEAK LEVEL LED illuminates whenever the speaker output signal level approaches its maximum level. This indicator is used when setting volume levels. Maximum output level is achieved when the PEAK LEVEL indicator flashes intermittently on loud peaks of the input signal. If the indicator illuminates steadily, the output signal volume is set too high and distortion is occurring. Decrease the volume control for the appropriate input until the indicator flashes only occasionally.
Control Knobs


AUDIO
ENHANCEMENT
This control adjusts the amount of Audio Enhancement effect mixed in to the page signal. To use this function, the AUDIO ENHANCEMENT switch beneath the input connection cover must be set to ON. Setting this switch to OFF bypasses the Audio Enhancement effect and makes the control inoperable. With the AUDIO ENHANCEMENT switch turned ON, make a page and rotate the control until the audio sounds crisp and clear.


TREBLE


BASS
TREBLE and BASS controls are provided to adjust the high frequency and low frequency response of the paging system. Reference positions are provided for these controls. When set to these positions, the frequency response of the system will be flat. Set the controls to the customer's satisfaction. Clockwise rotation increases (boosts) the response and counterclockwise reduces (cuts) the response. Increasing bass and/or treble can cause output signal peaks to increase. Check the PEAK LEVEL indicator after making adjustments and lower the music input volume if excess peaking occurs.


VOX SENS
The VOX SENS control should be set so that only the desired signal is above the threshold level, while noise or unwanted signal is below it. When a TEL input signal is detected, the music channel will be muted.
To set this feature: Rotate the control fully clockwise. Next, while making a page announcement and talking at a low level, rotate the control counterclockwise to the point where the sound is not choppy or missing parts of words (but not to the maximum counterclockwise position). Setting the control to full counterclockwise will defeat the auto music mute.
If the background music shuts down when no page is in progress, then line noise is triggering music mute. Rotate the control clockwise until the music is restored.

RINGER VOLUME adjusts the level of the night ringer tone output. The music volume level should first be set to the customer's satisfaction. When adjusting this level, the PEAK LEVEL indicator should be used to ensure that the amplifier signal is not distorted.

MUSIC MUTE adjusts the level of the background music heard during a paging announcement. The fully counterclockwise position provides maximum muting (no background music). The background music mute level should be set to the customer's satisfaction, but the page announcement should be heard distinctly above the background music.

MUSIC VOLUME adjusts the level of the background music output. The background music level should be set to an acceptable level without overdriving the system. When adjusting this level, the PEAK LEVEL indicator should be observed to ensure that the amplifier signal is not distorted.

MIC VOLUME adjusts the level of the microphone page output.
CAUTION: Microphone should not be placed near any paging loudspeakers.

TEL VOLUME adjusts the level of the telephone page output. Further adjustment can be made using the PEAK LEVEL indicator described above.

The Automatic Level Control (ALC) controls the level at which the amplifier will begin to limit the output signal.
Adjustment Procedure
1) Disable ALC by turning ALC control to the maximum counterclockwise position.
2) Make a page, speaking softly, yet distinctly. Set the TEL VOLUME control to the desired paging level during this page.
3) Make another page speaking relatively loudly this time. Rotate the ALC control clockwise, while making the page, until it has the same loudness as the first page.
NOTE: The TEL Volume and ALC controls work together to set the output level.
NOTE: The PEAK LEVEL indicator should not show excessive peaking during loud pages. If this is occurring, the ALC control must be adjusted until peaking is at a nominal level.
Technical Specifications
Power Output: TPU35B: 35W RMS; TPU60B: 60W RMS; TPU100B: 100W RMS; TPU250: 250W RMS
Frequency Response: 70 Hz to 15k Hz ±1 dB
Distortion: Less than 1%
Hum & Noise: (20 Hz to 20 kHz) MUSIC: -70 dB; TEL: -70 dB; MIC: -55 dB
Sensitivity: MUSIC: 85mV; TEL: -20 dBm (77mV); MIC: 600μV
Tone Control: BASS: ±9 dB @ 100 Hz; TREBLE: ±9 dB @ 10 kHz
Regulation: 2 dB
Inputs: TEL: 600-ohm balanced line, transformer-isolated MUSIC: Hi-Z source, RCA jacks or screw terminals MIC: Lo-Z balanced, screw terminal connection (dynamic only) MUSIC MUTE: Mutes music when shorted CONTACT RING: Sounds night ringer tone when customer-supplied dry contacts are closed TEL RING: Sounds night ringer in response to 90V ring signal BRIDGING: Permits bridging of two amplifiers
Outputs: 25V, 25VCT, and 70V, 16 ohms (for 35/60/100-watt models) or 25V and 70V (for TPU250 model) balanced or unbalanced speaker output operation Provision for WMT1A line-matching transformer
Controls & Indicators: POWER & PEAK LEVEL LED indicators. ENHANCE, TREBLE, BASS, VOX SENS, RINGER VOLUME, MUSIC MUTE, MUSIC VOLUME, MIC VOLUME, TEL VOLUME, ALC controls (screwdriver-adjustable)
Overload Protection: All models have thermal and electronic overload protection. TPU35B: 1.0A, 120V \~ circuit breaker; TPU60B: 1.6A, 120V \~ circuit breaker; TPU100B: 2.5A, 120V \~ circuit breaker; TPU250: 6.0A slow blo fuse, 120V \~ circuit breaker
Power Requirements: (120V \~, 60 Hz) TPU35B: 0.75A; TPU60B: 1.5A; TPU100B: 2A; TPU250: 5A
Thermal Emissions (Full Power): TPU35B: 166.3 BTU/hr.; TPU60B: 211.7 BTU/hr.; TPU100B: 396.2 BTU/hr.; TPU250: 853.8 BTU/hr.
Finish: Black with silver lettering
Dimensions: TPU35/60/100B models: 14-1/4" W x 8-3/8" H x 3-5/8" D TPU250: 19" W x 10-1/2" H x 3-7/8" D
Product Weight: TPU35B: 12 lb.; TPU60B: 15 lb.; TPU100B: 18 lb.; TPU250: 28 lb.
Limited Warranty; Exclusion of Certain Damages
Bogen TPU-Series Telephone Paging Amplifiers (TPU35B, TPU60B, TPU100B, and TPU250) are warranted to be free from defects in material and workmanship for two (2) years from the date of sale to the original purchaser. Any part of the product covered by this warranty that, with normal installation and use, becomes defective (as confirmed by Bogen upon inspection) during the applicable warranty period, will be repaired or replaced by Bogen, at Bogen's option, provided the product is shipped insured and prepaid to: Bogen Factory Service Department, 4570 Shelby Air Drive, Suite 11, Memphis, TN 38118 USA. Repaired or replacement product will be returned to you freight prepaid. This warranty does not extend to any of our products that have been subjected to abuse, misuse, improper storage, neglect, accident, improper installation or have been modified or repaired or altered in any manner whatsoever, or where the serial number or date code has been removed or defaced.
THE FOREGOING LIMITED WARRANTY IS BOGEN'S SOLE AND EXCLUSIVE WARRANTY AND THE PURCHASER'S SOLE AND EXCLUSIVE REMEDY. BOGEN MAKES NO OTHER WARRANTIES OF ANY KIND, EITHER EXPRESS OR IMPLIED, AND ALL IMPLIED WARRANTIES OF MERCHANTABILITY OR FITNESS FOR A PARTICULAR PURPOSE ARE HEREBY DISCLAIMED AND EXCLUDED TO THE MAXIMUM EXTENT ALLOWABLE BY LAW. Bogen's liability arising out of the manufacture, sale or supplying of products or their use or disposition, whether based upon warranty, contract, tort or otherwise, shall be limited to the price of the product. IN NO EVENT SHALL BOGEN BE LIABLE FOR SPECIAL, INCIDENTAL OR CONSEQUENTIAL DAMAGES (INCLUDING, BUT NOT LIMITED TO, LOSS OF PROFITS, LOSS OF DATA OR LOSS OF USE DAMAGES) ARISING OUT OF THE MANUFACTURE, SALE OR SUPPLYING OF PRODUCTS, EVEN IF BOGEN HAS BEEN ADVISED OF THE POSSIBILITY OF SUCH DAMAGES OR LOSSES. Some States do not allow the exclusion or limitation of incidental or consequential damages, so the above limitation or exclusion may not apply to you. This warranty gives you specific legal rights, and you may also have other rights which vary from State to State.
Products that are out of warranty will also be repaired by the Bogen Factory Service Department – same address as above or call 201-934-8500. The parts and labor involved in these repairs are warranted for 90 days when repaired by the Bogen Factory Service Department. All shipping charges in addition to parts and labor charges will be at the owner's expense. All returns require a Return Authorization number. For most efficient warranty or repair service, please include a description of the failure.
11/2014

- Telephone Paging Amplifier
- Models TPU35B, TPU60B, TPU100B, TPU250
- IMPORTANT SAFETY INSTRUCTIONS
- CAUTION
- RISK OF ELECTRIC SHOCK DO NOT OPEN
- CAUTION: TO PREVENT THE RISK OF ELECTRIC SHOCK, DO NOT REMOVE ANY FRONT/BACK COVERS OR PANELS. NO USER-SERVICEABLE PARTS INSIDE. REFER SERVICING TO QUALIFIED PERSONNEL.
- INTRODUCTION 4
- PACKAGE CONTENTS 4
- INSTALLATION ....5
- INPUT WIRING CONNECTIONS 6-7
- OUTPUT WIRING CONNECTIONS 8
- OPERATION 9-10
- SPECIFICATIONS ....11
- LIMITED WARRANTY; EXCLUSION OF CERTAIN DAMAGES ....12
- Telephone Paging Amplifiers
- Introduction
- Package Contents
- Before You Start
- Mounting
- Ventilation
- Wall Mounting
- Rack Mounting the TPU35B, TPU60B, and TPU100B
- Rack Mounting the TPU250
- Input Wiring Connections
- Music Input
- Microphone Input
- TEL Input
- Night Ringer Connection
- Bridging Inputs
- Input Cover Replacement
- Output Wiring Connections
- Speaker Connection
- Line-Matching Transformer WMT1A Connector
- Output Cover Replacement
- Indicator LEDs
- Control Knobs
- Adjustment Procedure
- Technical Specifications
- Limited Warranty; Exclusion of Certain Damages
Brand : Bogen
Model : TPU100B
Category : Audio Amplifier