
BCWBT - Audio Amplifier Bogen - Free user manual and instructions
Find the device manual for free BCWBT Bogen in PDF.


| Product Type | Wireless Body-Pack Transmitter |
| Brand | Bogen |
| Model | BCWBT |
| Dimensions (W x H x D) | 2.6" x 3.9" x 1.7" |
| Weight | 3.6 oz (transmitter only) |
| Power Source | 2 AA alkaline or NiMH rechargeable batteries (BCBRBP optional) |
| Carrier Frequency | Channel A: 2.0 MHz, Channel B: 2.6 MHz |
| Audio Input Connector | 3.5mm locking jack for microphone |
| Controls | Power ON/OFF, Volume Control, Channel A/B Select |
| LED Indicator | Green (power on), Red (low battery) |
| Transmission Type | Infrared (IR) with multiple emitter array |
| Range | Up to 30 ft (line-of-sight) |
| Compatible Microphones | BCBM body-pack, BCLM lavaliere, BCHM headset (each with 3.5mm locking connector) |
| Included Accessories | Adjustable lanyard, belt clip |
| Optional Accessories | BCBRBP rechargeable battery pack, BCBRA charger |
| Warranty | 1 year limited warranty |
Frequently Asked Questions - BCWBT Bogen
User questions about BCWBT Bogen
0 question about this device. Answer the ones you know or ask your own.
Ask a new question about this device
Download the instructions for your Audio Amplifier in PDF format for free! Find your manual BCWBT - Bogen and take your electronic device back in hand. On this page are published all the documents necessary for the use of your device. BCWBT by Bogen.
USER MANUAL BCWBT Bogen
BCIRS Infrared (IR) Sensors 6
BCWBT Body-Pack Transmitter 7
BCHM Headset Microphone 8
BCBM Body-Pack Microphone 8
BCLM Lavaliere Microphone 8
BCWHT Handheld Microphone Transmitter 9
Specifications 10
Limited Warranty 11
Service 11
Introduction
The Bogen Enhancer is an infrared wireless microphone system offering professional performance and operating features. Infrared transmission is used to reduce room-to-room interference while sending a signal from a presenter's microphone to a dual-channel receiver. The receiver works in tandem with an amplifier and speaker(s) to reduce the effects of poor room acoustics and the weakening effect of voice traveling through air.
Using This Manual
This manual provides instructions for operating the Bogen Enhancer wireless system, and covers all available accessories. Depending on your system configuration, all sections may not apply to your system. Please read the instructions pertaining to your system completely before operating.
This manual first lists the features of the Enhancer and then shows you how to operate the system. After reading the receiver instructions, turn to the section that covers the type of transmitter and microphone you are using with the system. Each section will give you detailed operating instructions. Also included in this manual are system specifications, as well as warranty and servicing information.
Enhancer System Contents
• BCWR Dual-Channel Infrared Receiver (1)
• BCWBT Body-Pack Transmitter (1)
• BCLM Clip-on Lavaliere Microphone (1)
• BCHM Headset Microphone (1)
• BCBM Body-Pack Microphone (1)
- BCIRS Infrared (IR) Sensors (2), each with Mounting Brackets and 35-foot Cable
• 6-Foot RCA Audio Cable (1)
- Adjustable Body-Pack Lanyard (1)
• AC Power Adapter (1)
• AA Alkaline Batteries (2)
- Instruction Manual (1)
Available Accessories
• BCWHT Handheld Microphone Transmitter
• BCHRBP Handheld Rechargeable NiMH Battery Pack
• BCBC Dual Handheld NiMH Battery Pack Charger
• BCBRBP Body-Pack Rechargeable NiMH Battery Pack
• BCBRA Body-Pack NiMH Battery Pack Charger
• BCWBT Body-Pack Transmitter (additional quantities, includes adjustable lanyard)
• BCHM Headset Microphone (additional quantities)
• BCLM Clip-on Lavaliere Microphone (additional quantities)
• BCIRS Infrared Sensor (additional quantity, includes BCYA Adapter)
- BCYA Multiple Sensor Adapter (additional quantity, part of BCIRS)
BCWR Dual-Channel Wireless Microphone Receiver
• Dual Receiver, Simultaneous 2-Channel Operation for 2 Transmitters (Ch. A, Ch. B)
• Infrared (IR) Signal Reception LED Indicators
• Channel A/B Mixed Audio Output RCA-type Connector
- Separate Channel A and Channel B Volume Controls
- Two IR Sensor Coaxial-type Inputs
BCWBT Body-Pack Transmitter
- Multiple Emitter Array of High-Efficiency Infrared Emission LEDs for Optimum IR Transmission
- "Power On" LED
• Channel A/B Selector Switch
• 3.5mm Locking Jack for Connection of Body-Pack, Lapel, or Headset Microphones - Microphone Input Volume Control
- Belt Clip and Adjustable, Neck-Worn Lanyard
- Requires 2 NiMH AA Rechargeable Batteries (BCBRBP, optional) or 2 Alkaline AA Batteries (included)
BCIRS Infrared Sensor
- Multiple Array of Wide-Angle Infrared Sensitive LEDs
• 35-foot Connecting Cable with Coaxial-type Connector - Includes Mounting Brackets
BCHM Headset Microphone
- Ultra-light, adjustable boom arm
- Close-miked vocal pick-up
- Hands-free operation
- Cardioid polar pattern
BCLM Lavaliere Microphone
- Weighs less than one ounce
- Close-miked vocal pick-up
- Hands-free operation
- Omni-directional pattern
BCBM Body-Pack Microphone
- Weighs less than one ounce
- Mounts directly to BCWBT
- Hands-free operation
- Omni-directional pattern
BCWHT Handheld Microphone/Transmitter
(Optional accessory, sold separately)
- Multiple Emitter Array of High-Efficiency Infrared Emission LEDs for Optimum IR Transmission
- "Power On" LED
- Powerful Uni-Directional Dynamic Capsule for Optimum Audio, Minimum Handling Noise, and Maximum Feedback Rejection
• Rugged Steel Mesh Ballscreen with Anti-Roll Ring
- Requires NiMH Rechargeable Batteries (BCHRBP, optional) or 2 Alkaline AA Batteries (included)
BCWR Receiver

Connecting the Audio Output
The BCWR Receiver provides an unbalanced, line-level mixed output to the RCA Jack (3). This can be connected to a mixer or a P.A. system using the supplied RCA to RCA audio cable. The audio of both Channels A and B are mixed together at this output. The Channel A and B mix is dependent on the separate Channel A and Channel B Volume Control (4) settings located on the back panel of the receiver. Always make sure the mixer/P.A. volume is turned to minimum before plugging the audio cable into the receiver or before turning the receiver ON/OFF (if the audio cable is already connected) to avoid possible sound system damage.
Connecting the BCIRS IR Sensors
Connect the BCIRS Infrared Sensors to the BCWR Receiver by plugging both sensor coaxial-type plugs into the Infrared Sensor Inputs (5). Each sensor input will receive both Channels A and B.
Powering the Receiver
Using the AC Power Adapter, connect the AC Power Input (6) to an AC outlet (110-120V AC). Turn ON the BCWR Receiver using the Power Switch (1). The IR Reception LED Indicators (2) will now light either green or red, depending on whether the corresponding transmitters are ON or OFF.
Operation
The IR Sensors act as "antennae" for your infrared wireless microphone system. A multiple array of wide-angle IR-sensitive LEDs (behind the front panel receptors) receive the infrared signal emitted by your IR Transmitter. Connect each BCIRS Sensor to the rear jacks on the BCWR (labeled IR In), then turn the BCWR Receiver ON. The Sensor
Power LED (1) will light to indicate that the sensor is properly connected to the BCWR Receiver. The Channel A and B IR LED indicators will light green when an infrared signal on the corresponding channel is detected.

Installation
The BCIRS Sensors can be mounted on any surface using any of the Mounting Brackets (2) and
screws, included. To ensure proper operation, observe the following installation rules:
a. Position the IR Sensors with their front panel receptors facing the entire area of transmitter operation. If this is a wide area, angle the receptors to cover the maximum area range.
Note: The IR sensors will need to be positioned differently for each environment. During installation, power up the Bogen Enhancer System and have one person walk around the desired location, with the transmitters on, while another person positions the IR Sensors for greatest range of mobility.
b. Since the unit utilizes infrared light reflected off of room surfaces, do not mount the sensors near a black ceiling, wall, or heavy curtains as they may limit the range by eliminating such reflections.
c. Although the unit can be used in most brightly lit rooms, it works best if bright lights do not shine directly on the sensors. (Note: System is not designed for use in high ambient light conditions such as outdoors in sunlight or on stage with strong stage lighting.)
d. Never cover the IR Sensors as this will disrupt normal operation. If they become dirty, clean with a soft cloth. Make sure the sensors are not obstructed and always have a clear line of sight to the transmitters.
e. Position sensors and wires away from Plasma TVs and other equipment that may produce high levels of electrical and RF interference.
Note: Additional BCIRS IR Sensors can be added using the BCYA Multiple Sensor Adapter which allows multiple sensors to be connected to each input.
Transmitter Setup
Slide down the Battery Compartment Cover (1), as shown, exposing the battery compartment. Insert 2 fresh AA alkaline batteries or the optional BCBRBP Battery Pack NiMH rechargeable batteries while observing the correct polarity as marked. Set the Channel Selector Switch (2) to the desired channel of operation and slide the cover back into position on the unit. (Note: Make sure the transmitter is OFF when changing the batteries.)
Operation
a. The BCWBT is provided with a 3.5mm Locking Jack (3) for connecting a microphone. Plug in the microphone and secure the connection by turning the metal slip ring on the plug clockwise to thread it on the jack. To unplug, reverse the process. Clip the transmitter to your clothes/belt or, for best results, hang the transmitter around your neck using the supplied lanyard. Make sure the BCWBT Emitter (4) has a clear line-of-sight with the BCIRS IR Sensors. (See pages 8 and 9 for operation information on microphones.) Attach lanyard to the BCWBT by feeding the strap up and underneath the belt clasp on the rear of the unit. Connect the lanyard strap by snapping the interlocking clasps together. Place the lanyard loop over the head and neck and position the break-away clasps at the back of the neck. Adjust the length of the lanyard by moving the cinching ball up or down until the BCWBT is at a comfortable length.
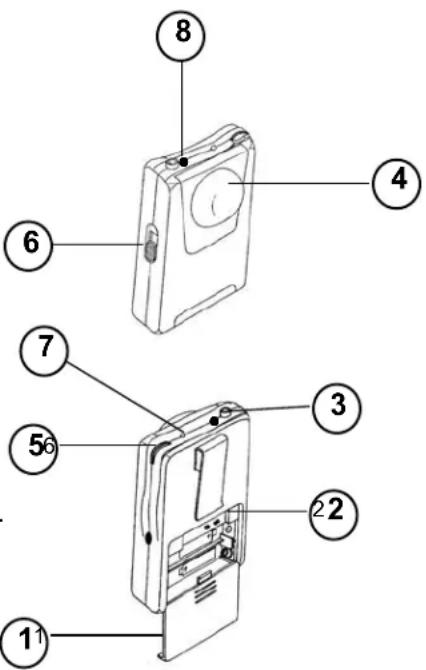
b. Adjust the BCWBT's Volume Control (5) to minimum and slide the Power Switch (6) to the ON position. The two-color Power ON/LOW Battery LED Indicator (7) will light green, indicating that the transmitter is ON. In the case of low power batteries, the indicator will light red, indicating that the alkaline batteries should be replaced with fresh ones or the NiMH batteries should be recharged. (Note: The Rechargeable Battery Pack should only be charged with the Battery Charger listed. Never attempt to recharge alkaline batteries.) The optional BCBRA Recharging Adapter can be plugged directly into the BCWBT DC Input Charge Jack (8) from an AC power outlet for easy charging of NiMH batteries. When the recharging adapter is plugged in, the recharger's LED Indicator will light red. The LED Indicator will light green when the batteries are charged. (Note: Always remove batteries from the BCWBT Transmitter when not in use.)
c. The BCWR Receiver's IR LED Indicator of the corresponding channel should now be lit green. While wearing the microphone and speaking, slowly increase the BCWBT's Volume Control (5) and adjust the volume control on the receiver, and also on the Mixer/P.A. to the desired level while taking care to avoid acoustic feedback. The microphone is now ready to use. For optimum performance and range, make sure that the IR Emitter (4) is not covered by the body or clothing and has an unobstructed line-of-sight with the IR Sensor.
BCHM Headset Microphone
Operation
a. The BCHM is provided with a 3.5mm Locking Connector (1) for connecting the microphone to the BCWBT Transmitter. Plug in the microphone's connector and secure the connection by turning the metal slip ring clockwise to thread it on the jack. To unplug, reverse the process.
b. Wear Headset (2) so that it wraps around the back of the head. The curved Earpieces (3) will fit over the ears.
c. While wearing the Headset, adjust the Boom Arm (4) so that the Microphone (5) is about two inches from your mouth. Do not place the microphone too close to the mouth.

BCBM Body-Pack Microphone
Operation
a. The BCBM (1) is provided with a 3.5mm Locking Connector (2) for connecting the microphone to the BCWBT Transmitter. Plug in the microphone's connector and secure the connection by turning the metal slip ring clockwise to thread it on the jack. To unplug, reverse the process.
b. The body-pack must be used with the Lanyard (3) in order to optimize the BCBM. When the lanyard is around the user's neck, use the Cinch (4) to adjust lanyard length until the BCBM is about six inches from the user's mouth.

BCLM Lavaliere Microphone
Operation
a. The BCLM is provided with a 3.5mm Locking Connector (1) for connecting the microphone to the BCWBT Transmitter. Plug in the microphone's connector and secure the connection by turning the metal slip ring clockwise to thread it on the jack. To unplug, reverse the process.
b. Wear the microphone by attaching the Clip (2) to shirt front or jacket lapel. The Microphone (3) should point toward the user's mouth.

Note: Microphones that are farther from the sound source, such as lavaliere mics, require more acoustic gain and thus are also more prone to feedback than close-source mics such as handheld and headset mics that are used closer to the mouth.
BCWHT Handheld Microphone Transmitter
Transmitter Setup
Unscrew and remove the Battery Compartment Cover (1) by sliding it down off the microphone to expose the battery holder. Insert 2 fresh AA alkaline batteries or the optional BCHRBP Battery Pack NiMH rechargeable batteries, while observing the correct polarity as marked, and screw the cover back on the battery compartment. (Note: Make sure the transmitter is OFF when changing the batteries.)
Operation
Slide the Power Switch (2) to the ON position. The Power LED Indicator (3) will light green, indicating that the transmitter is ON. In the case of dead batteries, the indicator will be off, indicating that the alkaline batteries should be replaced with fresh ones or that the BCHRBP Battery Pack should be recharged. (Note: The optional Battery Pack should only be charged with the BCBC Charger

listed. Never attempt to recharge alkaline batteries.) The BCBC can also be used to recharge two BCWHT Handheld Microphones simultaneously. When the microphone is placed in the recharging adapter, the recharger's LED Indicator will light bright red. The LED Indicator will light green when the batteries are charged. (Note: Always remove batteries from the BCWHT microphone when not in use.)
The microphone is now ready to use. The BCWR receiver IR LED Indicator of the corresponding channel should now be lit green. While speaking into the microphone, adjust the corresponding Volume Control on the receiver and also on your Mixer/P.A. to the desired level. For optimum performance and range, make sure that the IR emitter at the base of the transmitter is not covered by the hand and has an unobstructed line-of-sight with the IR sensor.
Note: Observe care in selecting volume, transmitter location and speaker placement so that acoustic feedback (howling and screeching) will be avoided.
Specifications
BCWR Receiver:
Mode Infrared Frequency Modulated
Receiving Channels Dual-Channels A & B
Carrier Frequency Ch. A: 2.0 MHz; Ch. B: 2.6 MHz
Audio Frequency Response 60 Hz-12 kHz
S/N Ratio > 90 dB
Audio Mix Output 400 mV
Range (line-of-sight) Up to 30 ft.
Controls Power ON/OFF (front); Ch. A and B Volume (rear)
Connectors IR Sensor Coaxial-type Jacks, Ch. A/B (rear);
AC Power input jack (rear);
Audio Mixed output RCA-type Jack (rear)
Power Requirements 16V AC, 600mA (via AC adapter)
Power Consumption 8W
Dimensions (W x H x D) 10.6" x 2" x 7.4"
Weight 4 lb.
BCWBT Body-Pack Transmitter:
Carrier Frequency Ch. A: 2.0 MHz; or Ch. B: 2.6 MHz
Audio Input BCBM Body-Pack Omni-directional Condenser
BCLM Lavaliere-type Omni-directional Condenser
BCHM Headset-type Uni-directional Condenser
Controls ON/OFF Switch, Volume Control, Ch. A/B Select
Switch
Connectors 3.5 mm Locking Jack (MIC connection); DC Input
Charge Jack
Power Requirements 2 AA Batteries (2.4V DC)
Optional Rechargeable Battery Pack BCBRBP*
Optional Battery Charger BCBRA*
Dimensions (W x H x D) 2.6" x 3.9" x 1.7"
Weight (Transmitter) 3.6 oz.
Weight (Headset) 1.1 oz.
BCWHT Handheld Microphone Transmitter:
Carrier Frequency Ch. B: 2.6 MHz
Audio Input Uni-directional Dynamic Cartridge
Controls ON/OFF Switch
Power Requirements 2 AA Batteries (2.4 V DC)
Optional Rechargeable Battery Pack BCHRBP*
Optional Battery Charger BCBC*
Dimensions (D x Dia.) 10.2" × 2.2"
Weight 14 oz.
* The Rechargeable Battery Packs should only be used with the Battery Chargers listed. Never attempt to recharge alkaline batteries.
Limited Warranty
Bogen Enhancer products (BCWR Receiver, BCWBT Transmitter, BCLM Lavaliere Microphone, BCHM Headset Microphone, BCBM Body-Pack Microphone, BCIRS Infrared Sensors, BCYA Multiple Sensor Adapter, BCWHT Transmitter/Microphone, BCBRBP Battery Pack, BCHRBP Battery Pack, BCBRA Battery Charger and BCBC Battery Charger) are warranted to be free from defects in material or workmanship for one (1) year from the date of sale to the original purchaser. Any part of the product covered by this warranty that, with normal installation and use, becomes defective will be repaired or replaced by Bogen, at our option, provided the product is shipped insured and prepaid to: Bogen Factory Service Department, 50 Spring Street, Ramsey, NJ 07446, USA. The product will be returned to you freight prepaid. This warranty does not extend to any of our products that have been subjected to abuse, misuse, improper storage, neglect, accident, improper installation or have been modified or repaired or altered in any manner whatsoever, or where the serial number or date code has been removed or defaced.
THE FOREGOING LIMITED WARRANTY IS BOGEN'S SOLE AND EXCLUSIVE WARRANTY AND THE PURCHASER'S SOLE AND EXCLUSIVE REMEDY. BOGEN MAKES NO OTHER WARRANTIES OF ANY KIND, EITHER EXPRESS OR IMPLIED, AND ALL IMPLIED WARRANTIES OF MERCHANTABILITY OR FITNESS FOR A PARTICULAR PURPOSE ARE HEREBY DISCLAIMED AND EXCLUDED TO THE MAXIMUM EXTENT ALLOWABLE BY LAW. Bogen's liability arising out of the manufacture, sale or supplying of products or their use or disposition, whether based upon warranty, contract, tort or otherwise, shall be limited to the price of the product. In no event shall Bogen be liable for special, incidental or consequential damages (including, but not limited to, loss of profits, loss of data or loss of use damages) arising out of the manufacture, sale or supplying of products, even if Bogen has been advised of the possibility of such damages or losses. Some States do not allow the exclusion or limitation of incidental or consequential damages, so the above limitation or exclusion may not apply to you. This warranty gives you specific legal rights, and you may also have other rights which vary from State to State.
8/10/2004
Service
Products that are out of warranty will also be repaired by the Bogen Factory Service Department — same address as above or call 201-934-8500. The parts and labor involved in these repairs are warranted for 90 days when repaired by the Bogen Factory Service Department. All shipping charges will be at the owner's expense. All returns require a Return Authorization number.
BOGEN®
COMMUNICATIONS, INC.
50 Spring St.
Ramsey, N J 07446
Tel: 201-934-8500, Fax: 201-934-9832
www.bogen.com

- Introduction
- Using This Manual
- Enhancer System Contents
- Available Accessories
- BCWR Dual-Channel Wireless Microphone Receiver
- BCWBT Body-Pack Transmitter
- BCIRS Infrared Sensor
- BCHM Headset Microphone
- BCLM Lavaliere Microphone
- BCBM Body-Pack Microphone
- BCWHT Handheld Microphone/Transmitter
- Connecting the Audio Output
- Connecting the BCIRS IR Sensors
- Powering the Receiver
- Operation
- Installation
- Transmitter Setup
- BCWHT Handheld Microphone Transmitter
- Specifications
- BCWR Receiver:
- BCWBT Body-Pack Transmitter:
- BCWHT Handheld Microphone Transmitter:
- Limited Warranty
- Service
- BOGEN®
Brand : Bogen
Model : BCWBT
Category : Audio Amplifier