
UP7P - Uncategorized PURE - Free user manual and instructions
Find the device manual for free UP7P PURE in PDF.


| Product Type | Exercise Bike |
| Brand | Pure |
| Model | UP7P |
| Maximum User Weight | 120 kg |
| Resistance System | Adjustable friction resistance with 8 levels |
| Number of Programs | 24 (Manual, 13 Pre-programs, Watt Control, Body Fat, Target Heart Rate, 3 Heart Rate Control, 4 User Programs) |
| Display | LCD display showing Time, Speed, Distance, RPM, Calories, Pulse, Watt, Odometer |
| Heart Rate Monitoring | Hand pulse grips with pulse wire |
| Body Fat Measurement | Yes, via hand grips (calculates Body Fat %, BMR, BMI, Body Type) |
| Seat Adjustment | Vertical (pop-pin knob) and horizontal (U-shaped slider with knob) |
| Handlebar Adjustment | Tilt angle (via T-shape bolt) |
| Pedals | Left and right, marked L/R, with toe cages (implied) |
| Stabilizers | Front and rear, rear with adjustable leveling knob |
| Power Supply | AC adaptor (included) |
| Transport Wheels | Not included |
| Safety Features | Emergency stop? (not specified); caution to consult physician |
| Assembly Required | Yes, 5 steps, recommended for 2 people |
| Maintenance | Check bolts regularly, clean with mild detergent, avoid moisture |
| Spare Parts Availability | Contact manufacturer through website for original parts |
| Warranty | Not specified; register at www.puredesignfitness.com.au for service |
Frequently Asked Questions - UP7P PURE
User questions about UP7P PURE
0 question about this device. Answer the ones you know or ask your own.
Ask a new question about this device
Download the instructions for your Uncategorized in PDF format for free! Find your manual UP7P - PURE and take your electronic device back in hand. On this page are published all the documents necessary for the use of your device. UP7P by PURE.
USER MANUAL UP7P PURE
natural_image
Line drawing of a stationary exercise bike with adjustable arm and wheel (no text or symbols)IMPORTANT!
Please read all instructions carefully before using this product.
Retain this manual for future reference.
The specifications of this product may vary slightly from the illustrations and are subject to change without notice
Before You Start
Thank you for purchasing this Exercise Bike! For your safety and benefit, read this manual carefully before using the machine.
Prior to assembly, remove components from the box and verify that all the listed parts were supplied. Assembly instructions are described in the following steps and illustrations.
IMPORTANT SAFETY NOTICE
PRECAUTIONS
BE SURE TO READ THE ENTIRE MANUAL BEFORE YOU ASSEMBLE OR OPERATI MACHINE. IN PARTICULAR, NOTE THE FOLLOWING SAFETY PRECAUTIONS:
1、Check all the screws, nuts and other connections before using the machine for the first time and ensure that the trainer is in the safe condition.
2、 Set up the machine in a dry level place and leave it away from moisture and water.
3、Place a suitable base (e.g. rubber mat, wooden board etc.) beneath the machine in the area of assembly to avoid dirt and etc..
4、Before beginning training, remove all objects within a radius of 2 meters from the machine.
5、DO NOT use aggressive cleaning articles to clean the machine, Only use the supplied tools or suitable tools of your own to assemble the machine or repair any parts of machine. Remove drops of sweat from the machine immediately after finishing training.
6、Your health can be affected by incorrect or excessive training. Consult a doctor before beginning a training program. He can define the maximum setting (Pulse. Watts. Duration of training etc) to which you may train yourself and can get precise information during training. This machine is not suitable for therapeutic purpose.
7、Only do training on the machine when it is in correct working way. Use only original spare parts for any necessary repairs.
8、 This machine can be used for only one person's training at a time.
9、Wear training clothes and shoes which are suitable for fitness training with the machine. Your training shoes should be appropriate for the trainer.
10、If you have a feeling of dizziness, sickness or other abnormal symptoms, please stop training and consult a doctor ASAP.
11、People such as children and handicapped persons should only use the machine in the presence of another person who can give aid and advice.
12、The power of the machine increases with increasing the speed, and the reverse. The machine is equipped with adjustable knob which can adjust the resistance. Reduce the resistance by turning the adjusting knob for the resistance setting towards stage 1. Increase the resistance by turning the adjusting knob for the resistance setting towards stage 8.
WARNING: BEFORE BEGINNING ANY EXERCISE PROGRAM, CONSULT YOUR PHYSICIAN. THIS IS ESPECIALLY IMPORTANT FOR INDIVIDUALS OVER THE AGE OF 35 OR PERSONS WITH PRE-EXISTING HEALTH PROBLEMS. READ ALL INSTRUCTIONS BEFORE USING ANY FITNESS EQUIPMENT.
SAVE THESE INSTRUCTIONS / Maximum user's weight: 120KG
EXPLODED DIAGRAM
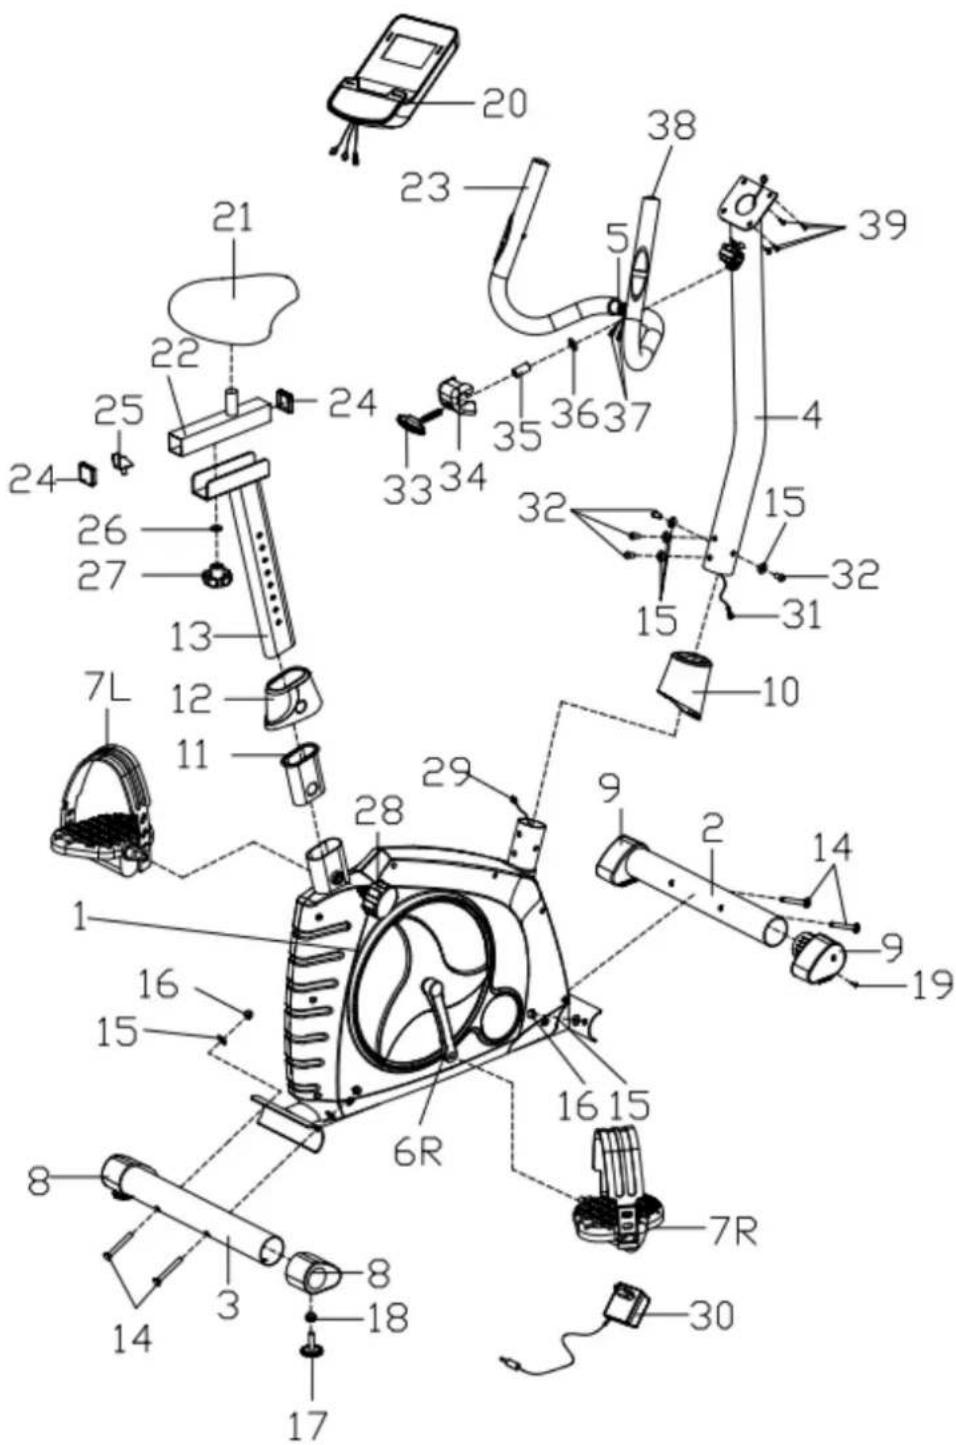
PARTS LIST
| NO. | DESCRIPTION Q'TY | NO. | DESCRIPTION Q'TY | |
| 1 | Main frame 1 21 Saddle 1 | |||
| 2 | Front Stabilizer 1 22 Horizontal Saddle Post | 1 | ||
| 3 | Rear Stabilizer 1 23 Foam grip | 2 | ||
| 4 | Handlebar post | 1 24 | Square end cap | 2 |
| 5 | Handlebar | 1 | 25 | U-shaped slider |
| 6L/R | Crank | 1/1 | 26 | Flat washer D10 |
| 7 L/R | Pedal | 1/1 | 27 | Knob M10 |
| 8 | Rear end cap | 2 | 28 | Pop-pin knob M16×1.5 |
| 9 | Front end cap | 2 | 29 | Sensor wire |
| 10 | Handlebar post cover | 1 | 30 | Adaptor |
| 11 | Saddle Bushing | 1 | 31 | Extension wire |
| 12 | Saddle post cover | 1 | 32 | Inner hex bolt M8×15 |
| 13 | Vertical Saddle Post | 1 | 33 | T-shape bolt M8×65 |
| 14 | Carriage bolt M8×73 | 4 | 34 | Handlebar Chuck Cover |
| 15 | Arc Washer Φ20×D8.5×R30 | 8 | 35 | Spacer |
| 16 | Acorn nut M8 | 4 | 36 | Flat washer D8 |
| 17 | Adjusting Knob M10×38 | 2 | 37 | Pulse wire |
| 18 | Hex bolt M10 | 2 | 38 | Round end cap |
| 19 | Cross tapping screw ST3.5×13 | 2 | 39 | Cross screw |
| 20 | Computer | 1 |
NOTE:
Most of the listed assembly hardware has been packaged separately, but some hardware items have been preinstalled in the identified assembly parts. In these instances, simply remove and reinstall the hardware as assembly is required.
Please reference the individual assembly steps and make note of all preinstalled hardware.
PREPARATION: Before assembling, make sure that you will have enough space around the item; Use the present tooling for assembling; before assembling please check whether all needed parts are available. It is strongly recommended this machine to be assembled by two or more people to avoid possible injury.
ASSEMBLY INSTRUCTION
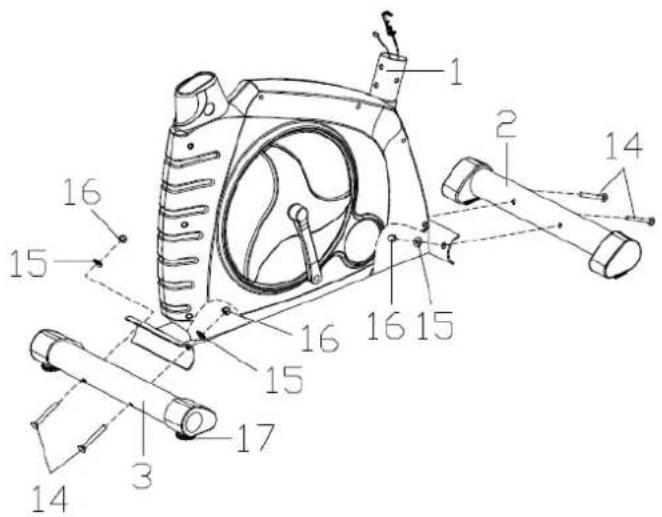
STEP 1
Attach the front stabilizer (2) and rear stabilizer (3) to the main frame (1) with the carriage bolts (14), arc washers (15) and acorn nuts (16) as shown.
Note: The adjusting knob (17) end of the rear stabilizer can be ADJUSTED to keep the equipment stable.
STEP 2
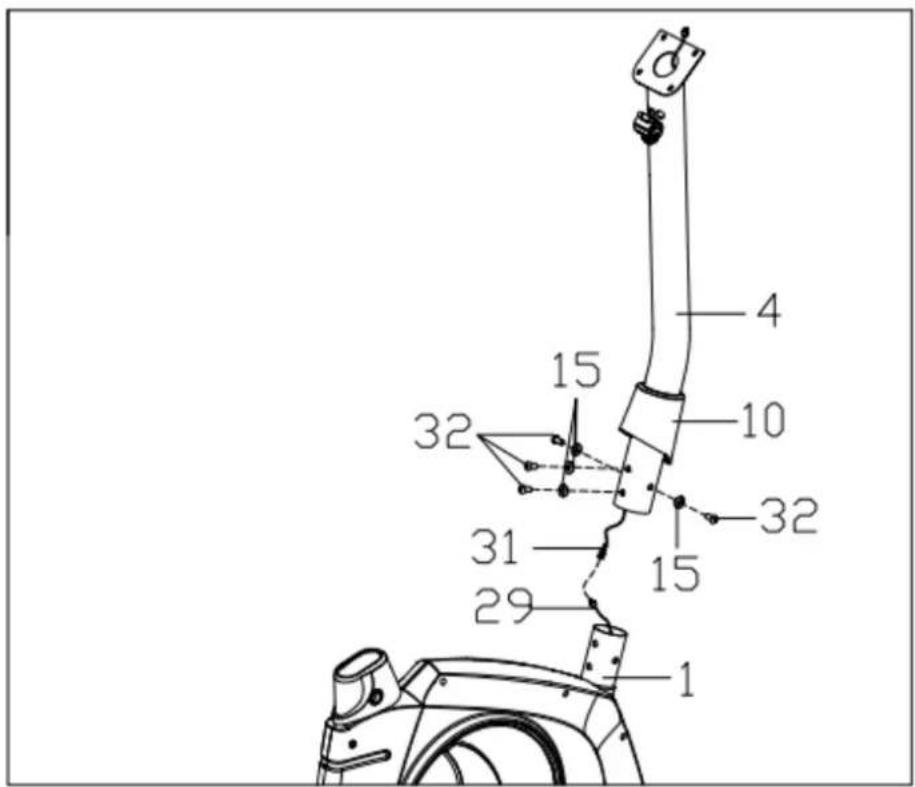
- Insert the handlebar post cover (10) to the handlebar post (4).
- Connect the Extension Wire (31) with the sensor wire (29).
- Fix the handlebar post (4) to the main frame (1) with the Inner hex bolts (32) and arc washers (15). Finally put down the handlebar poster cover (10).
STEP 3
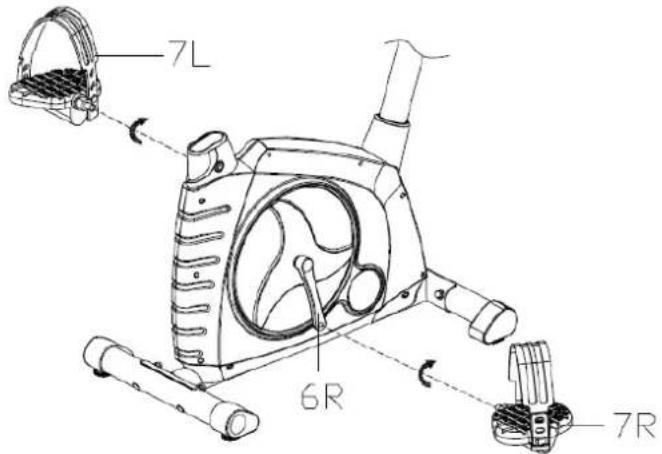
Attach the pedals (7L/R) to the Crank (6L/R) respectively, The right Pedal (7R) should be threaded clockwise. The left Pedal (7L) should be threaded counterclockwise.
Always make sure the pedals are securely tightened before any exercise.
Note: The right and left Pedals (9L/R) are marked "R" for right & "L" for left.
STEP 4
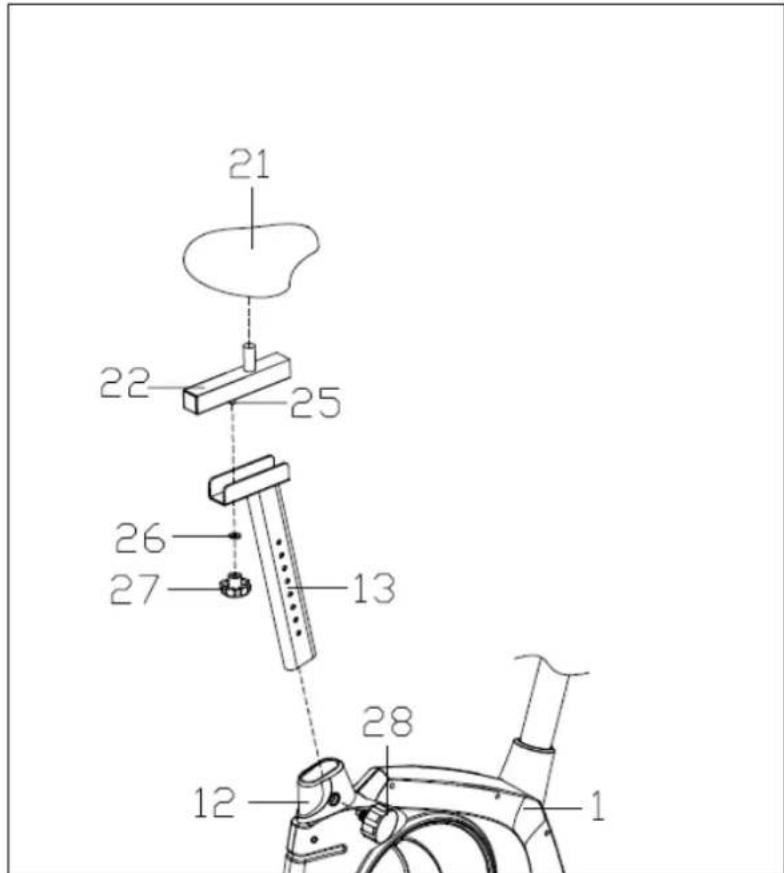
- Insert the vertical saddle post(13) in the tube of main frame (1) at a proper height, and fix it with pop-pin knob(28).
- Attach the Horizontal Saddle Post(22) to the Vertical Saddle Post(13), then fix it with U-shaped slider(25), flat washer (26) and knob(27).
- Attach the saddle(21) to the tube of the Horizontal Saddle Post(22) with cross wrench
Note: Make sure the saddle is locked on the Horizontal Saddle Post when exercising.
STEP 5
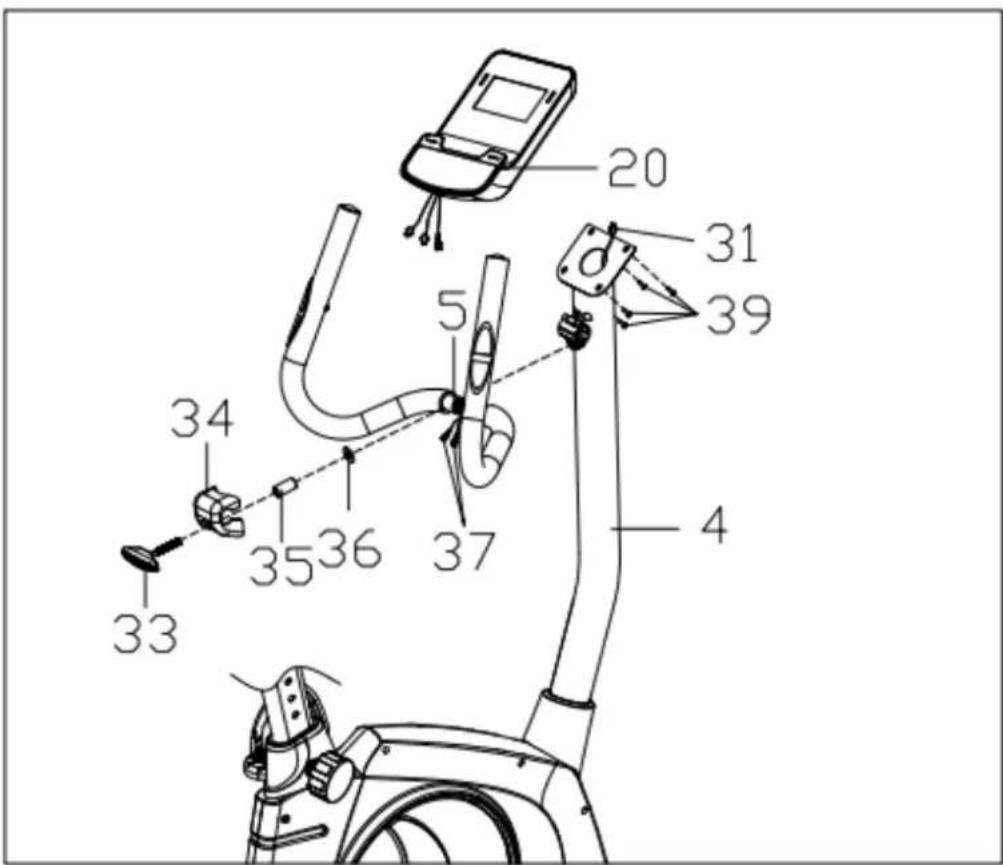
- Feed the pulse wire (37) out of the handlebar post (4) through the top of the computer bracket.
- Attach the handlebar (5) to the handlebar post (4) with the T-shape bolt (33), spacer(35), flat washer (36) and Handlebar Chuck Cover (34).
- Connect the pulse wire (37) and extension wire (31) with the wire come from the computer (20).
- Fix the computer (20) onto the computer bracket on the top of the handlebar post (4) with the cross screw (39).
Note: The tilt Angle of the handle (5) can be adjusted by properly loosening the T-shape bolt (33).
INSTRUCTION MANUAL
Key Functions
START/STOP: 1. Start & Pauses workouts.
- Start body fat measurement.
- Operates only when in stop mode. Holding key for 3 second function value to be zero.
DOWN: Decrease value of selected workout parameter: TIME, DISTANCE, etc. During the workout, it will decrease the resistance load.
UP : Increases value of selected workout parameter. During the workout, it will increase the resistance load.
ENTER: To input desired value or work out mode.
TEST(PULSE、RECOVERY): Press to enter into Recovery function when computer has the heart rate value. Recovery is Fitness Level 1-6 after 1 minute.F1 is the best, and F6 is the worst.
MODE: Press to switch display form RPM to SPEED, ODO to DIST, WATT to Calories during workout.
Workout Selection
After power-up using UP or DOWN keys to select then pressing ENTER to enter the desired mode.
Setting Workout Parameters
After selecting your desired program, you may pre-set several workout parameters for desired results.
WORKOUT PARAMETERS:
Note: Some parameters are not adjustable in certain programs.
Once a program has been selected, pressing ENTER, will make "Time" parameter flash.
Using UP OR DOWN KEY you may select desired time value. Press ENTER KEY to input value. Flashing prompt will move to the next parameter. Continue use of UP OR DOWN KEY.
Press START/STOP to start workout.
Program Operation
Manual(P1)
Selecting “Manual” using UP OR DOWN KEY then pressing ENTER KEY . 1 ^St
parameter "Time" will flash so value can be adjusted using UP OR DOWN KEY .Press
ENTER KEY to save value & move to next parameter to be adjusted.
Continue through all desired parameters, pressing START/STOP to start workout.
Note: One of workout parameters counts down to be zero, it will have bi sounds and stop the workout automatically. Press START KEY to continue the workout to reach the unfinished workout parameter.
Pre-programs (P2-P14)
There are 13 program profiles ready for use. All program profiles have 24 level of resistance.
Setting Parameters for Pre-programs
Selecting one of pre-programs using UP OR DOWN KEY then pressing ENTER KEY . 1 ^st parameter “Time” will flash so value can be adjusted using UP OR DOWN KEY .Press ENTER KEY to save value & move to next parameter to be adjusted.
Continue through all desired parameters, pressing START/STOP to start workout.
Note: One of workout parameters counts down to be zero, it will have bi sounds and stop the workout automatically. Press START KEY to continue the workout to reach the unfinished workout parameter.
Watt control program(P15)
Selecting “Watt control program” using UP OR DOWN KEY then pressing ENTER KEY . 1 ^st parameter “Time” will flash so value can be adjusted using UP OR DOWN KEY .Press ENTER KEY to save value & move to next parameter to be adjusted.
Continue through all desired parameters, pressing START/STOP to start workout.
Note: One of workout parameters counts down to be zero, it will have bi sounds and stop the workout automatically. Press START KEY to continue the workout to reach the unfinished workout parameter.
Computer will adjust the resistance load automatically depends on the speed to maintain the constant watt value. User can use up down key to adjust the watt value during workout.
BODY FAT PROGRAM(P16)
Setting Data for Body Fat
Selecting “BODY FAT Program” using UP OR DOWN KEY then pressing ENTER. “Male” will flash so Gender can be adjusted using UP OR DWON KEY, press ENTER to save gender & move to next data.
“175” of Height will flash so Height can be adjusted to use UP OR DOWN KEY, press ENTER KEY save value & move to next data.
“75 “of Weight will flash so Weight can be adjusted to use UP OR DOWN KEY, press ENTER KEY to save vale & move to next data.
“30” of Age will flash so Age can be adjusted using UP OR DOWN KEY, press ENTER to save value.
Press START/STOP to start measurement, please also grasp hand pulse grips.
After 15 seconds the display will show out Body Fat %, BMR, BMI & BODY TYPE.
NOTE: Body Types:
There are 9 body types divided according to the FAT% calculated. Type 1 is from 5% to 9%. Type 2 is from 10% to 14%. Type 3 is from 15% to 19%. Type 4 is from 20% to 24%. Type 5 is from 25% to 29%. Type 6 is from 30% to 34%. Type 7 is from 35% to 39%. Type 8 is from 40% to 44%. Type 9 is from 45% to 50%.
BMR: Basal Metabolism Ratio
BMI: Body Mass Index
Press START/STOP KEY to return the main Display.
TARGET HEART RATE Program(P17)
Setting Parameters for TARGET H.R
Selecting “TARGET H.R.” using UP OR DOWN KEY then pressing ENTER KEY . 1 ^st parameter “Time”
will flash so value can be adjusted using UP OR DOWN KEY .Press ENTER KEY to save value & move to next parameter to be adjusted.
Continue through all desired parameters, pressing START/STOP to start workout.
Note: If Pulse is above or below ( ± 5) the set TARGET H.R, computer will adjust the resistance load automatically. It will check Every 10 seconds approx. I resistance load will increase or decrease.
One of workout parameters counts down to be zero, it will have bi sounds and stop the workout automatically. Press START/STOP to continue the workout to reach unfinished workout parameter.
HEART RATE CONTROL Program(P18-P20)
There are 3 selection for target pulse:
P18- 60% TARGET H.R= 60% of (220-AGE)
P19- 75% TARGET H.R= 75% of (220-AGE)
P20- 85% TARGET H.R= 85% of (220-AGE)
Setting Parameters for HEART RATE CONTROL
Selecting “One of Heart Rate Control Program.” using UP OR DOWN KEY then pressing ENTER KEY. 1 ^st parameter “Time” will flash so value can be adjusted using UP OR
DOWN KEY .Press ENTER KEY to save value & move to next parameter to be adjusted.
Continue through all desired parameters, pressing START/STOP to start workout.
Note: If Pulse is above or below (± 5) the TARGET H.R, computer will adjust the resistance load automatically. It will check Every 10 seconds approx. I resistance load will increase or decrease.
One of workout parameters counts down to be zero, it will have bi sounds and stop the workout automatically. Press START/STOP KEY to continue the workout to reach unfinished workout parameter.
User Program(P21-P24)
There are four user programs can be selected form U1 to U4.
User program allows user to set their own program that can be used immediately.
Setting Parameters for User Program
Selecting user using UP OR DOWN KEY then pressing ENTER KEY meter 1 "Time" will flash so value can be adjusted using UP OR DOWN KEY .Press ENTER KEY to save value & move to next parameter to be adjusted.
Continue through all desired parameters.
After finished set up desired parameter, the level 1 will flash, use UP OR DOWN KEY to adjust then pressing ENTER until finished. (There are 10 times total). Press START/STOP to start workout.
Note: One of workout parameters counts down to be zero, it will have bi sounds and stop the workout automatically. Press START/STOP KEY to continue the workout to reach unfinished workout parameter.
WARM-UP and COOL-DOWN
A successful exercise program consists of a warm-up, aerobic exercise, and a cool-down. Do the entire program at least two and preferably three times a week, resting for a day between workouts. After several months, you can increase your workouts to four or five times per week.
WARM-UP
The purpose of warming up is to prepare your body for exercise and to minimize injuries. Warm up for two to five minutes before strength-training or aerobic exercising. Perform activities that raise your heart rate and warm the working muscles. Activities may include brisk walking, jogging, jumping jacks, jump rope, and running in place.
STRETCHING
Stretching while your muscles are warm after a proper warm-up and again after your strength or aerobic training session is very important. Muscles stretch more easily at these times because of their elevated temperature, which greatly reduces the risk of injury. Stretches should be held for 15 to 30 seconds. DO NOT BOUNCE.
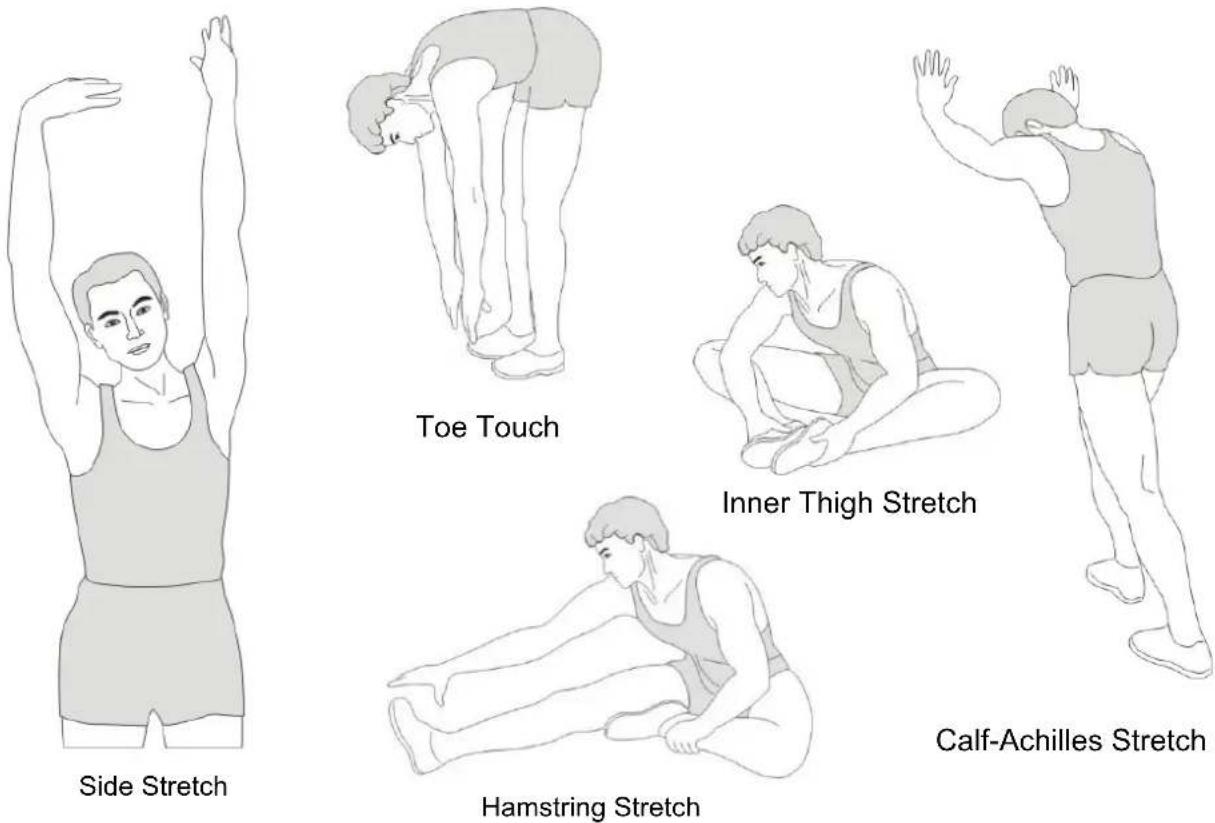
Remember always to check with your physician before starting any exercise program.
COOL-DOWN
The purpose of cooling down is to return the body to its normal or near normal, resting state at the end of each exercise session. A proper cool-down slowly lowers your heart rate and allows blood to return to the heart.
PUREDESIGN
WaterRower
104 Yale Drive Epping VIC 3076, AUSTRALIA
Ph: 02 98981405
email: admin@puredesignfitness.com.au
For registration or service enquiries please visit our website:
www.puredesignfitness.com.au
- IMPORTANT!
- Before You Start
- IMPORTANT SAFETY NOTICE
- PRECAUTIONS
- EXPLODED DIAGRAM
- NOTE:
- ASSEMBLY INSTRUCTION
- STEP 1
- STEP 2
- STEP 3
- STEP 4
- STEP 5
- INSTRUCTION MANUAL
- Key Functions
- Workout Selection
- Setting Workout Parameters
- WORKOUT PARAMETERS:
- Program Operation
- Manual(P1)
- Pre-programs (P2-P14)
- Setting Parameters for Pre-programs
- Watt control program(P15)
- BODY FAT PROGRAM(P16)
- Setting Data for Body Fat
- TARGET HEART RATE Program(P17)
- Setting Parameters for TARGET H.R
- HEART RATE CONTROL Program(P18-P20)
- User Program(P21-P24)
- Setting Parameters for User Program
- WARM-UP and COOL-DOWN
- WARM-UP
- STRETCHING
- COOL-DOWN
- PUREDESIGN
Brand : PURE
Model : UP7P
Category : Uncategorized