MI-386 - Flat Screen Mount Mount-It! - Free user manual and instructions
Find the device manual for free MI-386 Mount-It! in PDF.


| Product Type | Flat Panel TV Mount |
| Brand | Mount-It! |
| Model | MI-386 |
| Compatible Screen Sizes | 37" to 70" |
| Maximum Weight Capacity | 132 lbs (60 kg) |
| VESA Compatibility | 100x100mm to 600x400mm |
| Tilt Range | +5° to -15° |
| Swivel Range | ±45° |
| Level Adjustment | ±3° |
| Wall Plate Dimensions | 23.6" x 6.7" (600 x 170 mm) |
| Mounting Depth | 2.5" to 17.7" (64 to 450 mm) |
| Material | Cold rolled steel (SPCC) |
| Finish | Powder coated - black |
| Installation Type | Single stud or double stud |
| Hardware Included | Yes (screws, spacers, washers, concrete anchors) |
| Wall Type Compatibility | Wood stud, concrete, brick |
| Safety Features | Safety bolt, anti-theft lock hole |
| Warranty | 5 years |
| Product Weight | 11.5 lbs (5.2 kg) |
| Cleaning Instructions | Wipe with dry or slightly damp cloth, no solvents |
Frequently Asked Questions - MI-386 Mount-It!
User questions about MI-386 Mount-It!
0 question about this device. Answer the ones you know or ask your own.
Ask a new question about this device
Download the instructions for your Flat Screen Mount in PDF format for free! Find your manual MI-386 - Mount-It! and take your electronic device back in hand. On this page are published all the documents necessary for the use of your device. MI-386 by Mount-It!.
USER MANUAL MI-386 Mount-It!
natural_image
Technical line drawing of a mechanical device with control panel and remote control (no text or symbols)Please Scan this QR code to visit the product page.
Motorized Fireplace TV Wall Mount

HAVE QUESTIONS?
Monday - Friday from 8:00am - 4:00pm PST

support@mount-it.com

(855) 925-5668

www.mount-it.com
Thank you for choosing Mount-It!
EN Read the entire instruction manual before you start installation and assembly. If you have any questions regarding any of the instructions or warnings, please contact /Actu-11 for assistance.
CAUTION: Use with products heavier than the rated weights indicated may result in instability causing possible injury.
- Mounts must be attached as specified in assembly instructions. Improper installation may result in damage or serious personal injury.
- Barely gear and proper tools must be used. This product includes only be introduced by professionals. - Make sure that the supporting surface will safely support the combined weight of the equipment and all attached hardware and components.
- Use the mounting screws provided and DO NOT OVER TIGHTEN mounting screws
- This product contains small items that could be a choking hazard if swallowed. Keep these items away from children.
* This product is intended for visitor use only. Using this product outdoors could lead to product before and personal injury. IMPORTANT: Explain that you have received all parts according to the component checklist prior to installation. If any parts are missing or faulty, telephone
An Let-H for a replacement.
MAINTENANCE: Check that the bracket is secure and safe to use at regular mispair (at least every three months).
(1) - Let concrete devient fire clante current article dans les instructions for reorientation. Use manurees installations must further and decrease as the owners become more
DEFIGURE.
A. stock price: \100,000; stock price: \100,000; stock price: \$100,000
This mount is powered by electricity. Please use caution to avoid burns, fire and electrical shock hazards. Please read the warnings and safety instructions in this manual before using this product.
Warnings
- This TV mount is operated by a powerful motor that is designed to lift and lower the arm and the attached TV. The person
operating the mount must be knowledgeable with the operation of the mount; must be aware of pinch points and must ensure the area surrounding the mount and the TV is clear of persons and objects. Failure to understand and follow safety precautions might cause injury and properly damage.
- Ensure the fireplace TV mount power cord and the cables for the TV are kept clear of the moving parts.
• Do not disassemble the product, Electrical shock risk.
Electrical Safety Instructions
- Use the TV mount only with the power cord and the power supply system provided. Do not make alterations to the power system.
- Do not operate the unit a damaged power cord or a power plug. Contact Mount-III Customer Support team to purchase replacements
for any damaged parts
- Do not install or operate the unit in wet or extremely high humidity environments.
- Don't clean the product while the power is still connected.
- Don't disassemble or replace components while the power is still connected
• Unplus the mount if it will not be used for a prolonged period. Keep the power plus out of reach of children.
Remote Control Operation Instructions
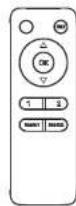
A. Button Functions
1.Raising/Lowering
Press and hold the up "△" button to raise the mount. Press and hold the down "▽" button to lower the mount. (Tip: Clear all obstacles within the range of motion.)
2 Memory Setting
Long press the "over" or "double" button for 2 seconds until you hear a beep, indicating that the current position has been saved. The "double" "double" buttons can each store a different position.
3. Recall Memory
Press the "1" or "2" button and the mount will automatically move to the position save in the corresponding button "or "Press any button to stop motion.
4.Default Setting
Short press the "∞" button and the mount will automatically react to the highest position. Press any button to stop motion.
5. Reset Mode
Disconnect the power supply cord. Wait for 10 seconds and reconnect. Long press the "OK" button for 5 seconds until you hear a long beep. The mount will move upward to the highest position and the control box will emit a beep. It will then move downward to the lowest position and the control box will emit two beeps.
Note: The remote control is powered by two AAA batteries (not included).
B. Pairing the Remote Control to the Control Box
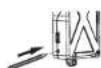
STEP1: When the mount is powered on, press the small button on the control box with a thin tool as shown. The unit will emit a beep, indicating that the control box is on standby for remote pairing. STEP2: Press the "button" button on the remote control and the control box will repeatedly beep for approximately 10 seconds indicating that the remote control is being paired. The process will be finished automatically when the beeps stop.
Note: To clear stored memory when pairing a new remote control press the small button on the control box until you hear a beep, then hold for 10 seconds to erase the stored memory. The process is completed when you hear two beeps.

TROUBLESHOOTING
If a problem arises, please try the troubleshooting guidelines below. If the problem is not listed, please contact Mount-it! for additional technical assistance.
- The mount beeps constantly or is making an abnormal noise.
a). Reset the system: Press and hold the "box" button for 5 seconds. The mount will retract to the highest position, and the reset is complete.
c). If the beeps or raise continuous please contact Mount-ill for more assistance.
- The TV mount stops moving during operation and emits a long beep.
a) Check by set if a function object is imination the result from motion if an example the abstraction
b) The weight of TV may exceed the maximum weight limitation of the mountain system.
c). Reset the system: Press and hold the "box" button for 5 seconds. The mount will retract to the highest position, and the reset is complete. If the problem persists please contact Mount-It! for more assistance.
- The mount emits 2 short beeps, then stops.
Weight Capacity/Ovar-current protection: Ensure the mount is not over the weight capacity, then raise and lower the mount continuously for 2 minutes until the mount stops moving. Unplug the power cable and wall approximately 20 minutes for the motor to cool, then plug it back in. The mount should resume normal operation.
- The mount emits 2 sets of 2 short beeps.
The Mount is Overextended and needs to be reset: Disconnect the power adaptor then plug it in again, next press and hold the "50" button on the remote for 5 seconds. The mount will retract to the highest position, and the reset is complete.
- The mount emits 3 sets of 2 short beeps.
Operating Fault or Signal Error: Please contact Mount-it! for further assistance.
- The mount emits 4 sets of 2 short beeps.
Mount strap is misaligned or stuck: Press the '△' button to raise the mount to the highest position, if it will not move or will not fully raise it will need to be reset, press and hold the "○" button for 5 seconds. The mount will retract to the highest position, and the reset is complete. If the mount still will not move, or is stuck in the highest position the belt may be stuck. Please contact Mount-lit for assistance to manually react the belt.
Remote Control
- The remote control may be too far and not in range of the mount. The maximum operating range for the remote control is 30 feet (10m).
The batteries in the remote control may be low or empty. Replace the batteries
The remote control may be defective. Check to see if the indicator LED found on the remote lights up when a button is pressed, if the problem persists contact Mount-It! for additional assistance.

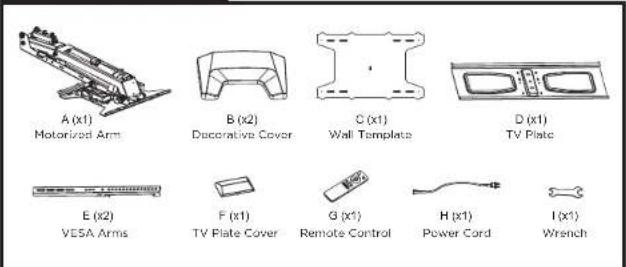
PACKAGE CONTENTS
VESA HARDWARE
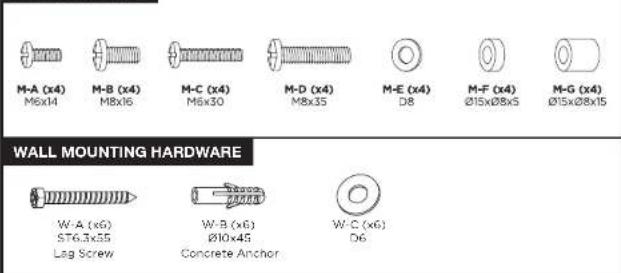
Check carefully to make sure there are no missing or defective parts. Some hardware provided may not be used. Use the correct wall mounting and monitor mounting hardware suitable for your installation.
CHOKING HAZARD. Package includes small parts. Not for children under 3 years. Adult supervision is required.
Missing Parts? Call us at (855) 925-5668 and we will ship replacement parts free of charge.
Tools Needed
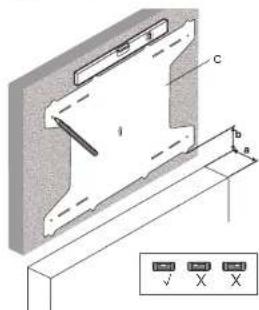
- The height of the mount is dependent on the depth of the mantel to ensure the motorized arm clears the mantel when fully lowered. - Determine the proper wall placement using the chart. Measure the depth of your mantel and locate the closest measurement in column a that your mantel depth is Greater Than Or Equal To. The corresponding measurement in column b will show the minimum required mounting height from the mantel to the bottom of the wall plate.
Note: Installing below the required mounting height for your mantel depth will prevent the mount from fully clearing the mantel.

natural_image
Illustration of various office tools including a hammer, pen, screwdriver, and pliers (no text or labels)Take Wall Placement Measurement
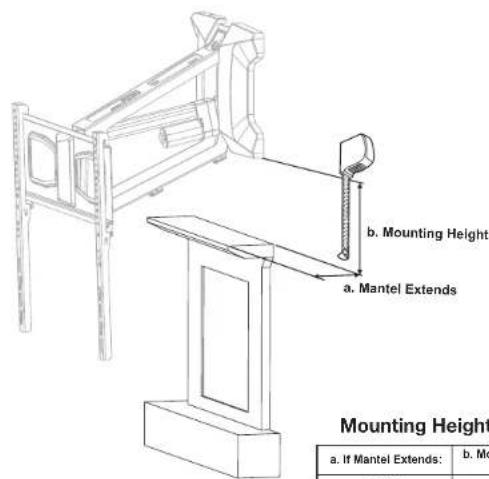
Mounting Height Chart
| a. If Mantel Extends: | b. Mounting Height Required: |
| <3.94" | >3.15" |
| <7.87" | >7.87" |
| <11.81" | >9.84" |
| <13.78" >11.81" |
Step 1a Wood Stud Installation Option
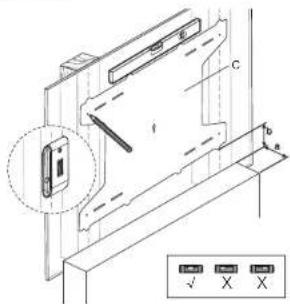
- Once the proper height is determined using the Mounting Height Chart. locate the studs using a stud finder and hold the Wall Template (#C) at the proper height on the wall. Use a level to ensure an even installation and mark the wall through the template in the center of the stud with a pencil.
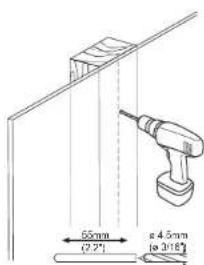
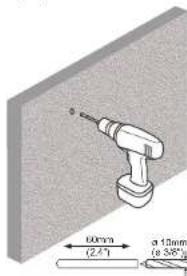
- Drill a hole in the marked locations using a 3/16" (4.5mm) drill bit to a depth of 2.2" (55mm)
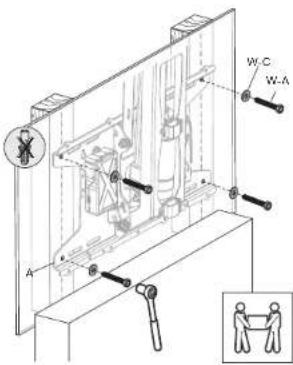
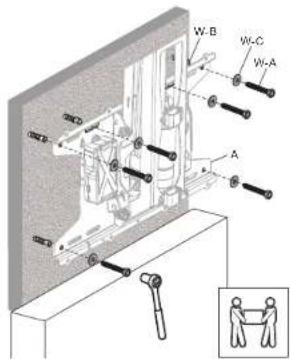
- Attach the Motorized Arm (#A) to the wall using Washer (#W-C) and Lag Screw (#W-A) and tighten until secure using a socket wrench. Do not overlighten.
Step 1b Concrete/Brick Installation Option
- Once the proper height is determined using the Mounting Height Chart, hold the Wall Template (#C) at the proper height on the wall. Use a level to ensure an even installation and mark the wall through the template with a pencil.
Caution: Do not drill mounting holes into mortar (such as between bricks or stones) only drill and install into solid stone or concrete surfaces.
- Drill a hole in the marked locations using a 3/8" (10mm) drill bit to a depth of 2.4" (60mm)
- Clear any dust and debris from the drilled holes and insert Concrete Anchors (#W-B). Attach the Motorized Arm (#A) to the wall using Washer W-C and Lag Screw W-A and tighten until secure using a socket wrench. Do not overtighten.
Step 2
Completing Wall Installation
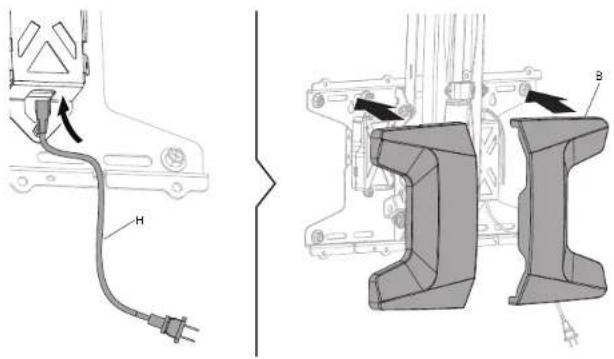
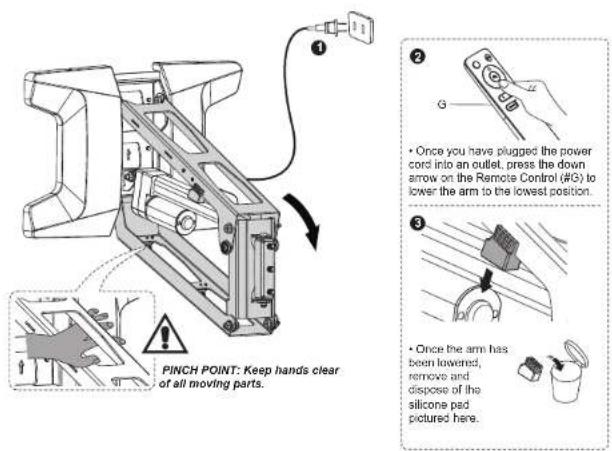
- Plug in the Power Cord (#H) and then attach the Decorative Covers (#B) to cover the wall plate.
Step 3
Preparing the Mount for TV Assembly
Step 4
Attaching the TV Plate
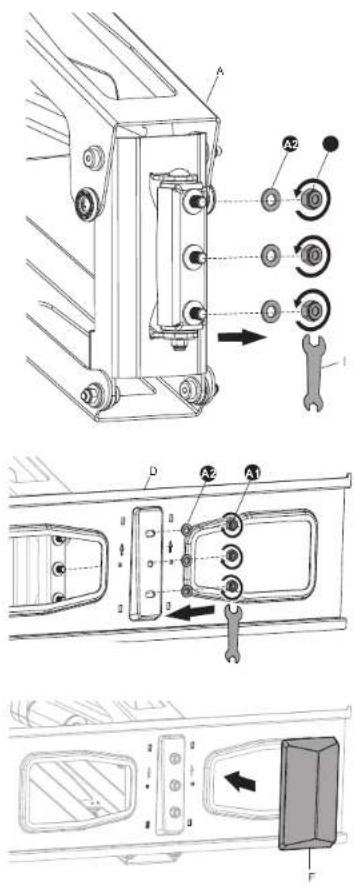
- Remove the three nuts and washers (pictured here) from the end of the arm using the Wrench (#I). Install the TV Plate (#D) over the three exposed bolts and reinstall the nuts and washers. Tighten until secure. Attach the TV Plate Cover (#F) over the bolts as shown.
Step 5
Attaching the VESA Arms to the TV
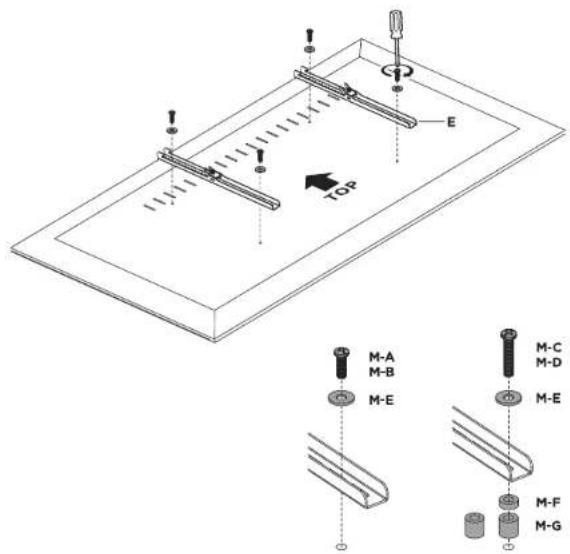
- Lay your TV down on a flat surface and align VESA Arms (#E) over the VESA holes as shown.
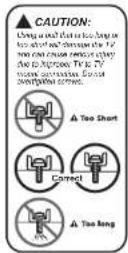
- Select the appropriate size mounting bolt (#M-A through M-D) for your display's mounting holes and verify the length of the VESA bolt is not too long. If you are unsure of the correct bolt size for your display refer to your TV user manual or contact the TV manufacturer for sizing information. If necessary, use the included spacers (#M-F, M-G) between the mount and the TV to adjust the length of the mounting bolt. Multiple spacers can be used in combination to achieve the desired bolt depth.
- Square Washer (#M-E) must be used in all configurations.

MOUNT-IT!
Step 6
Attaching the TV to the Motorized Arm
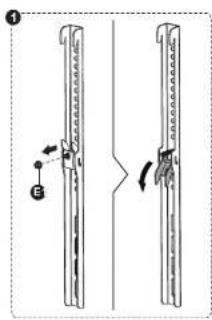
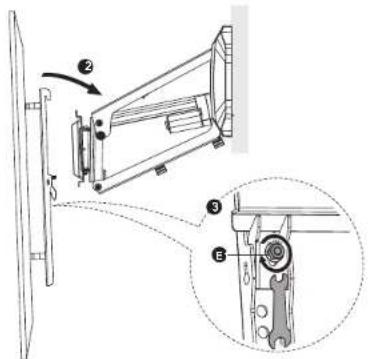
- Remove the security nut (pictured in bubble #1) from both VESA Arms and flip the tab down. Hang the TV on the end of the arm as shown, then raise the tab back into place and re-install the security nut.

HEAVY! You may need assistance with this step.
Step 7
Making Final Adjustments
natural_image
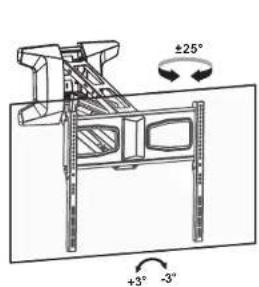
Technical line drawing of a mechanical assembly with no visible text or symbols• The viewing angle can be adjusted manually up to 25 degrees left and right. Levelling up to 3 degrees is possible post installation.
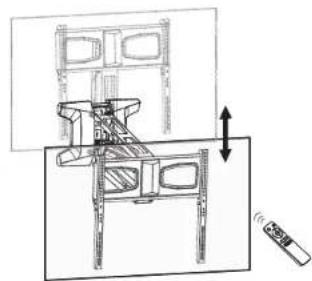
- Press the up or down arrows on the remote control to raise and lower the TV.
MOUNT-IT!
Visit us at www.mount-it.com for product registration and warranty information.
Our US based customer service team is standing by to answer any questions you have about your Mount-It! product.
Available by phone Monday - Friday from 8:00am to 4:00pm PST.
Chat live with an agent on our website!

support@mount-it.com

(855) 925-5668

www.mount-it.com
- Motorized Fireplace TV Wall Mount
- Thank you for choosing Mount-It!
- Warnings
- Electrical Safety Instructions
- Remote Control Operation Instructions
- Button Functions
- 1.Raising/Lowering
- Memory Setting
- Recall Memory
- 4.Default Setting
- Reset Mode
- Pairing the Remote Control to the Control Box
- TROUBLESHOOTING
- Remote Control
- Tools Needed
- Step 1a Wood Stud Installation Option
- Step 1b Concrete/Brick Installation Option
- Step 2
- Completing Wall Installation
- Step 3
- Preparing the Mount for TV Assembly
- Step 4
- Attaching the TV Plate
- Step 5
- Attaching the VESA Arms to the TV
- Step 6
- Attaching the TV to the Motorized Arm
- Step 7
- Making Final Adjustments
Brand : Mount-It!
Model : MI-386
Category : Flat Screen Mount