OMP9554BGH - Oven Hansa - Free user manual and instructions
Find the device manual for free OMP9554BGH Hansa in PDF.


| Product Type | Built-in Electric Oven |
| Brand | Hansa |
| Model | OMP9554BGH |
| Energy Source | Electric |
| Oven Capacity | Approx. 65 liters |
| Width | 595 mm |
| Height | 595 mm |
| Depth | 560 mm |
| Weight | Approx. 30 kg |
| Power Supply | 220-240 V ~ 50/60 Hz |
| Energy Efficiency Class | A (estimated) |
| Heating Methods | Top heat, bottom heat, fan-assisted, grill, pizza mode |
| Temperature Range | 50°C - 250°C |
| Control Type | Touch-control with rotary knobs |
| Display | Digital LCD |
| Cleaning System | Catalytic self-cleaning (rear wall) |
| Cooling Fan | Built-in for external surface cooling |
| Safety Features | Child lock, automatic shut-off, overheating protection |
| Interior Light | Halogen bulb, replaceable |
| Spare Parts Availability | Oven door seal, heating elements, control board, and knobs are replaceable |
| Accessories Included | One baking tray, one wire shelf, and one grill grid |
| Installation Type | Built-in under counter or in a tall unit |
Frequently Asked Questions - OMP9554BGH Hansa
User questions about OMP9554BGH Hansa
0 question about this device. Answer the ones you know or ask your own.
Ask a new question about this device
Download the instructions for your Oven in PDF format for free! Find your manual OMP9554BGH - Hansa and take your electronic device back in hand. On this page are published all the documents necessary for the use of your device. OMP9554BGH by Hansa.
USER MANUAL OMP9554BGH Hansa
natural_image
Line drawing of a kitchen chimney with steam rising (no text or symbols)OMP9554BGH
EN- Table of contents
NOTES ON SAFETY 5
UNPACKING 8
DISPOSAL OF OLD APPLIANCE 8
OPERATION 9
COOKER HOOD CONTROLS 9
OFF-TIMER 9
GESTURE CONTROL 10
OTHER IMPORTANT INFORMATION CONCERNING THE OPERATION OF THE HOOD 11
CLEANING AND MAINTENANCE 12
MAINTENANCE 12
GREASE FILTER 12
ACTIVATED CHARCOAL FILTER 12
LIGHT 12
WARRANTY AND AFTER SALES SERVICE 13
WARRANTY 13
КК - Мазмуны
ҚАУІПСІЗДІК ТЕХНИКАСЫ`БОЙЫНША НЎСҚАУЛАР 15 ОРАУДАН АШУ 19
ПАЙДАЛАНЫЛГАН КУРЫЛФЫЛАРДЫ КЭДЕГЕ ЖАРАТУ 19
ПАЙДАЛАНУ 20
From now on, your daily housework will be easier than ever before. Your appliance ^Hansa is exceptionally easy to use and extremely efficient. After reading these Operating Instructions, operating the appliance will be easy.
Before being packaged and leaving the manufacturer, the appliance was thoroughly checked with regard to safety and functionality.
Before using the appliance, please carefully read these Operating Instructions. By following these instructions carefully you will be able to avoid any problems in using the appliance. It is important to keep these Operating Instructions and store them in a safe place so that they can be consulted at any time.
Follow these instructions carefully in order to avoid possible accidents.
Sincerely,

Hansa
Haushaltsgeräte
NOTES ON SAFETY
- Before using the appliance, please carefully read this manual!
- The appliance is designed for household use only.
- The manufacturer reserves the right to introduce changes, which do not affect operation of the appliance.
- The manufacturer shall not be liable for any damage or fire caused by the appliance resulting from failure to follow instructions in this manual.
- Cooker hood is designed to remove cooking odours. Do not use cooker hood for other purposes.
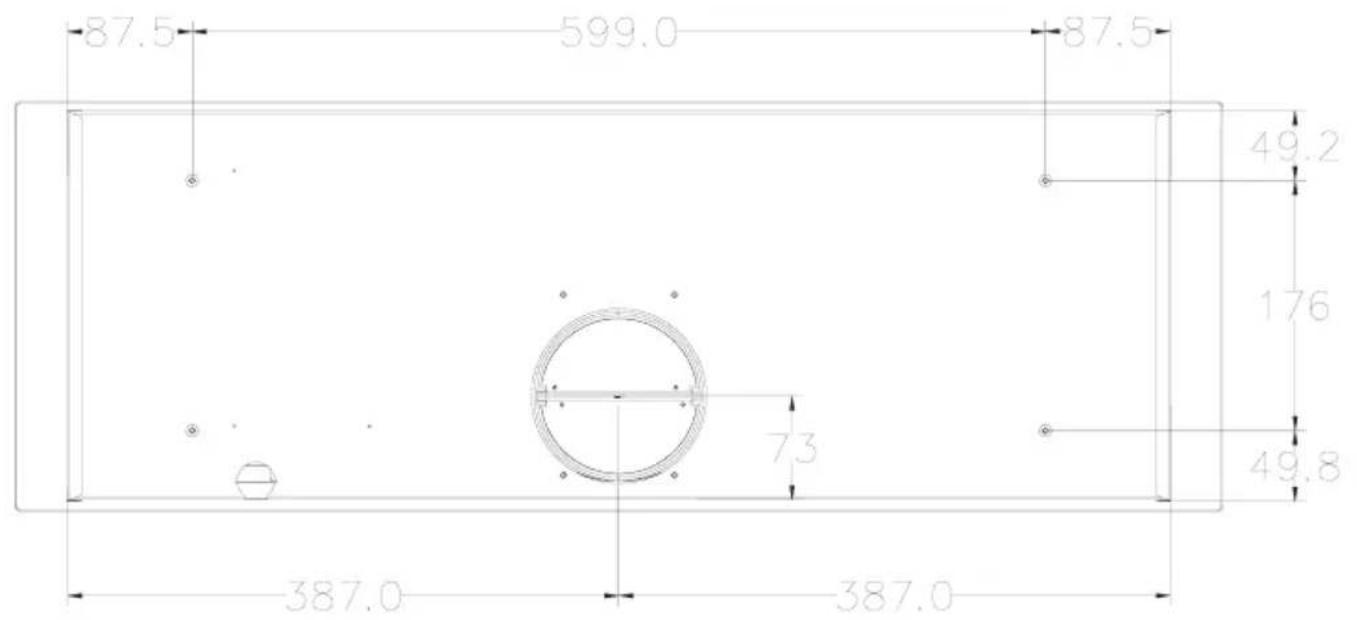
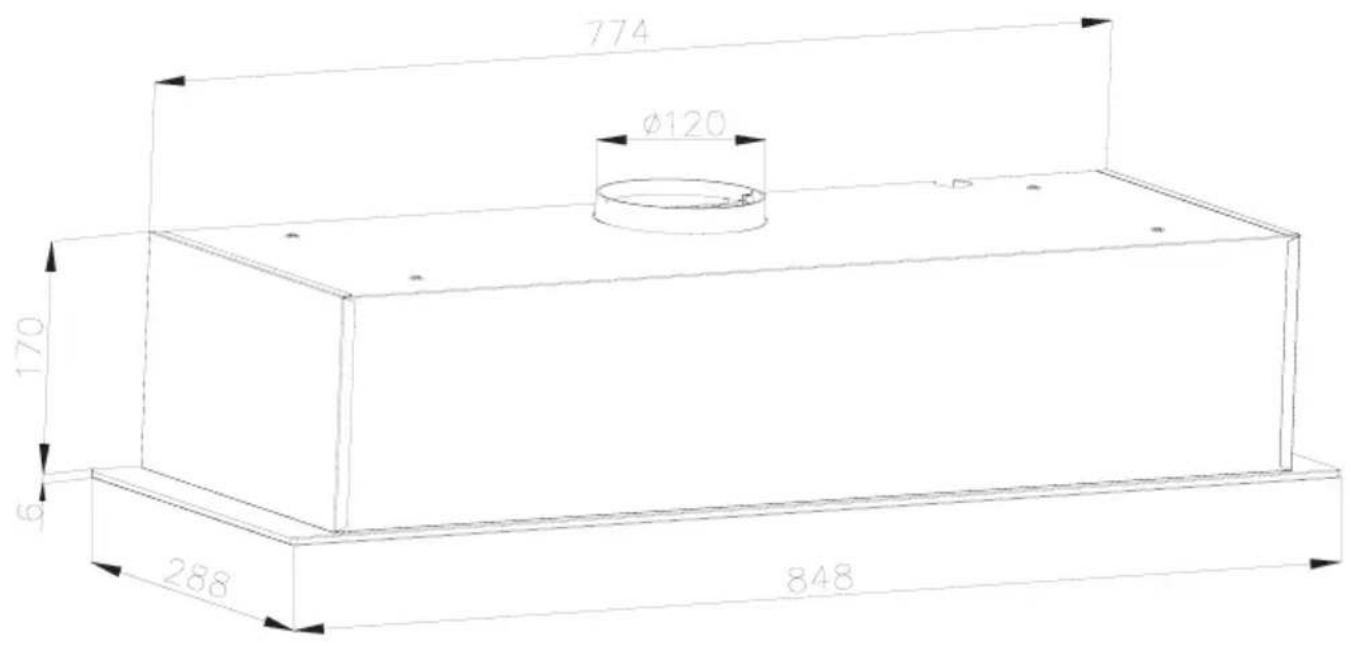
- Connect the cooker hood operating in extraction mode to a suitable ventilation duct (do NOT connect the cooker to smoke or flue gas ducts, which are in use). It requires installation of the air extraction duct to the outside. The length of the duct (usually a pipe of ∅ 120 or 150 mm) should not be longer than 4-5 m. An air extraction duct is also required for telescopic and furniture hoods in absorption mode.
- Cooker hood operating in air recirculation mode requires the installation of an activated charcoal filter. In this case, installing an extractor duct is not required, however it is recommended to install an air guide vane (Mainly in chimney cooker hoods).
- The cooker hood features independent lighting and exhaust fan that can be operated at one of several speeds.
- Depending on the type, the hood is designed to be permanently attached to a vertical wall over a gas or electric stove (chimney and universal hoods); on the ceiling over a gas or electric stove (island hoods); on the vertical built in furniture over a gas or electric stove (telescopic and built-in hoods). Before installing, make sure that the wall/ceiling structure is strong enough to suspend the hood. Some hoods are very heavy.
- For details of the installation distance above an electric hob please refer to product technical sheet. If the installation instructions of the gas cooker specify a greater distance, this must be taken into account (Fig. 1).
- Do not leave an open flame under the hood. When the pots are removed from the burner, set the minimum flame. Always make sure that the flame does not extend outside the pot, because it causes unwanted loss of energy and a dangerous concentration of heat.
- When cooking on fat, supervise the pans constantly, because overheated fat can ignite.
- Unplug the appliance before any cleaning, replacing the filter or repair work.
- Cooker hood grease filter should be cleaned at least once a month, because the filter saturated with fat is flammable.
- Ensure adequate ventilation (air flow) if other equipment such as liquid fuel stoves or heaters are operated in the room in addition the cooker hood. When the cooker hood is simultaneously operated with burning appliances requiring adequate fresh air from the room to work properly, their safe operation is possible if under pressure around these appliances is a maximum of 0.004 mbar (this does not apply when the cooker hood is used as an odour filter)
- Do not lean on the hood.
- The hood should be cleaned regularly both inside and out (AT LEAST ONCE A MONTH, following the indications concerning maintenance provided in this manual)..Failure to adhere to the rules concerning cleaning the hood and replacing filters results in a fire risk.
- If the power cord is damaged it should be replaced by a specialised service centre.
- Ensure that it is possible to disconnect the appliance from the mains by removing the plug or switching off the bi-polar switch.
- This appliance is not intended for use by persons (including children) with physical, mental or sensory handicaps, or by persons inexperienced or
unfamiliar with the appliance, unless under supervision or in accordance with the instructions as communicated to them by persons responsible for their safety.
- Particular attention should be paid not to allow unaccompanied children to use the appliance.
- Make sure voltage indicated on the nameplate corresponds to the local mains supply voltage.
- Before use, extend and straighten the power cord.
- Packaging materials (bags, polyethylene, polystyrene, etc.) should be kept away from children during unpacking.
- Before connecting the hood to the mains power supply always check that the power cord is properly installed and is not trapped by the appliance. Do not connect the appliance to the mains until assembly is complete.
- Do not operate your kitchen hood without the aluminium grease filters.
- It is strictly forbidden to cook dishes under on an open flame (flambé) under your kitchen hood.
- Always strictly adhere to regulations issued by the competent local authorities regarding the technical and safety requirements for fume extraction.
- Failing to tighten bolts and fasteners in accordance with these instructions may endanger life and health.
- Hanging kitchen hoods operate only in air circulation / odour absorber mode
- WARNING! Failure to install the screws or fixing device in accordance with these instructions may result in electrical hazards.
- This appliance can be used by children aged 8 years and older or by persons with physical, mental or sensory handicaps, or by those who are inexperienced or unfamiliar with the appliance, provided they are supervised or have been instructed how to safely use the appliance and are familiar with risks associated with the use of the appliance. Ensure that children do not play with the appliance. Cleaning and maintenance of the appliance should not be performed by children unless they are 8 years or older and are supervised by a competent person.
UNPACKING

natural_image
Recycling symbol composed of three chasing arrows forming a triangle (no text or labels)During transportation, protective packaging was used to protect the appliance against any damage. After unpacking, please dispose of all elements of packaging in a way that will not cause damage to the environment.
All materials used for packaging the appliance are environmentally friendly; they are 100% recyclable and are marked with the appropriate symbol. Important! Packaging materials (bags, polyethylene, polystyrene, etc.) should be kept away from children during unpacking.
DISPOSAL OF OLD APPLIANCE
natural_image
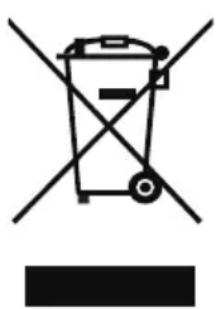
Symbol of a trash bin crossed with a diagonal line and a horizontal bar below (no text or numbers present)In accordance with European Directive 2012/19/EU and local legislation regarding used electrical and electronic goods, this appliance is marked with the symbol of the crossed-out waste container. This marking indicates that the appliance must not be disposed of together with other household waste after it has been used.
The user is obliged to hand it over to waste collection centre collecting used electrical and electronic goods. The collectors, including local collection points, shops and local authority departments provide recycling schemes.
Proper handling of used electrical and electronic goods helps avoid environmental and health hazards resulting from the presence of dangerous components and the inappropriate storage and processing of such goods.
OPERATION
Cooker hood controls
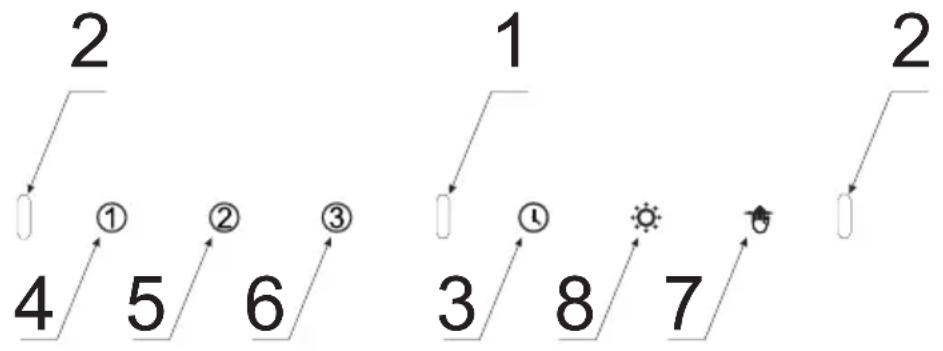
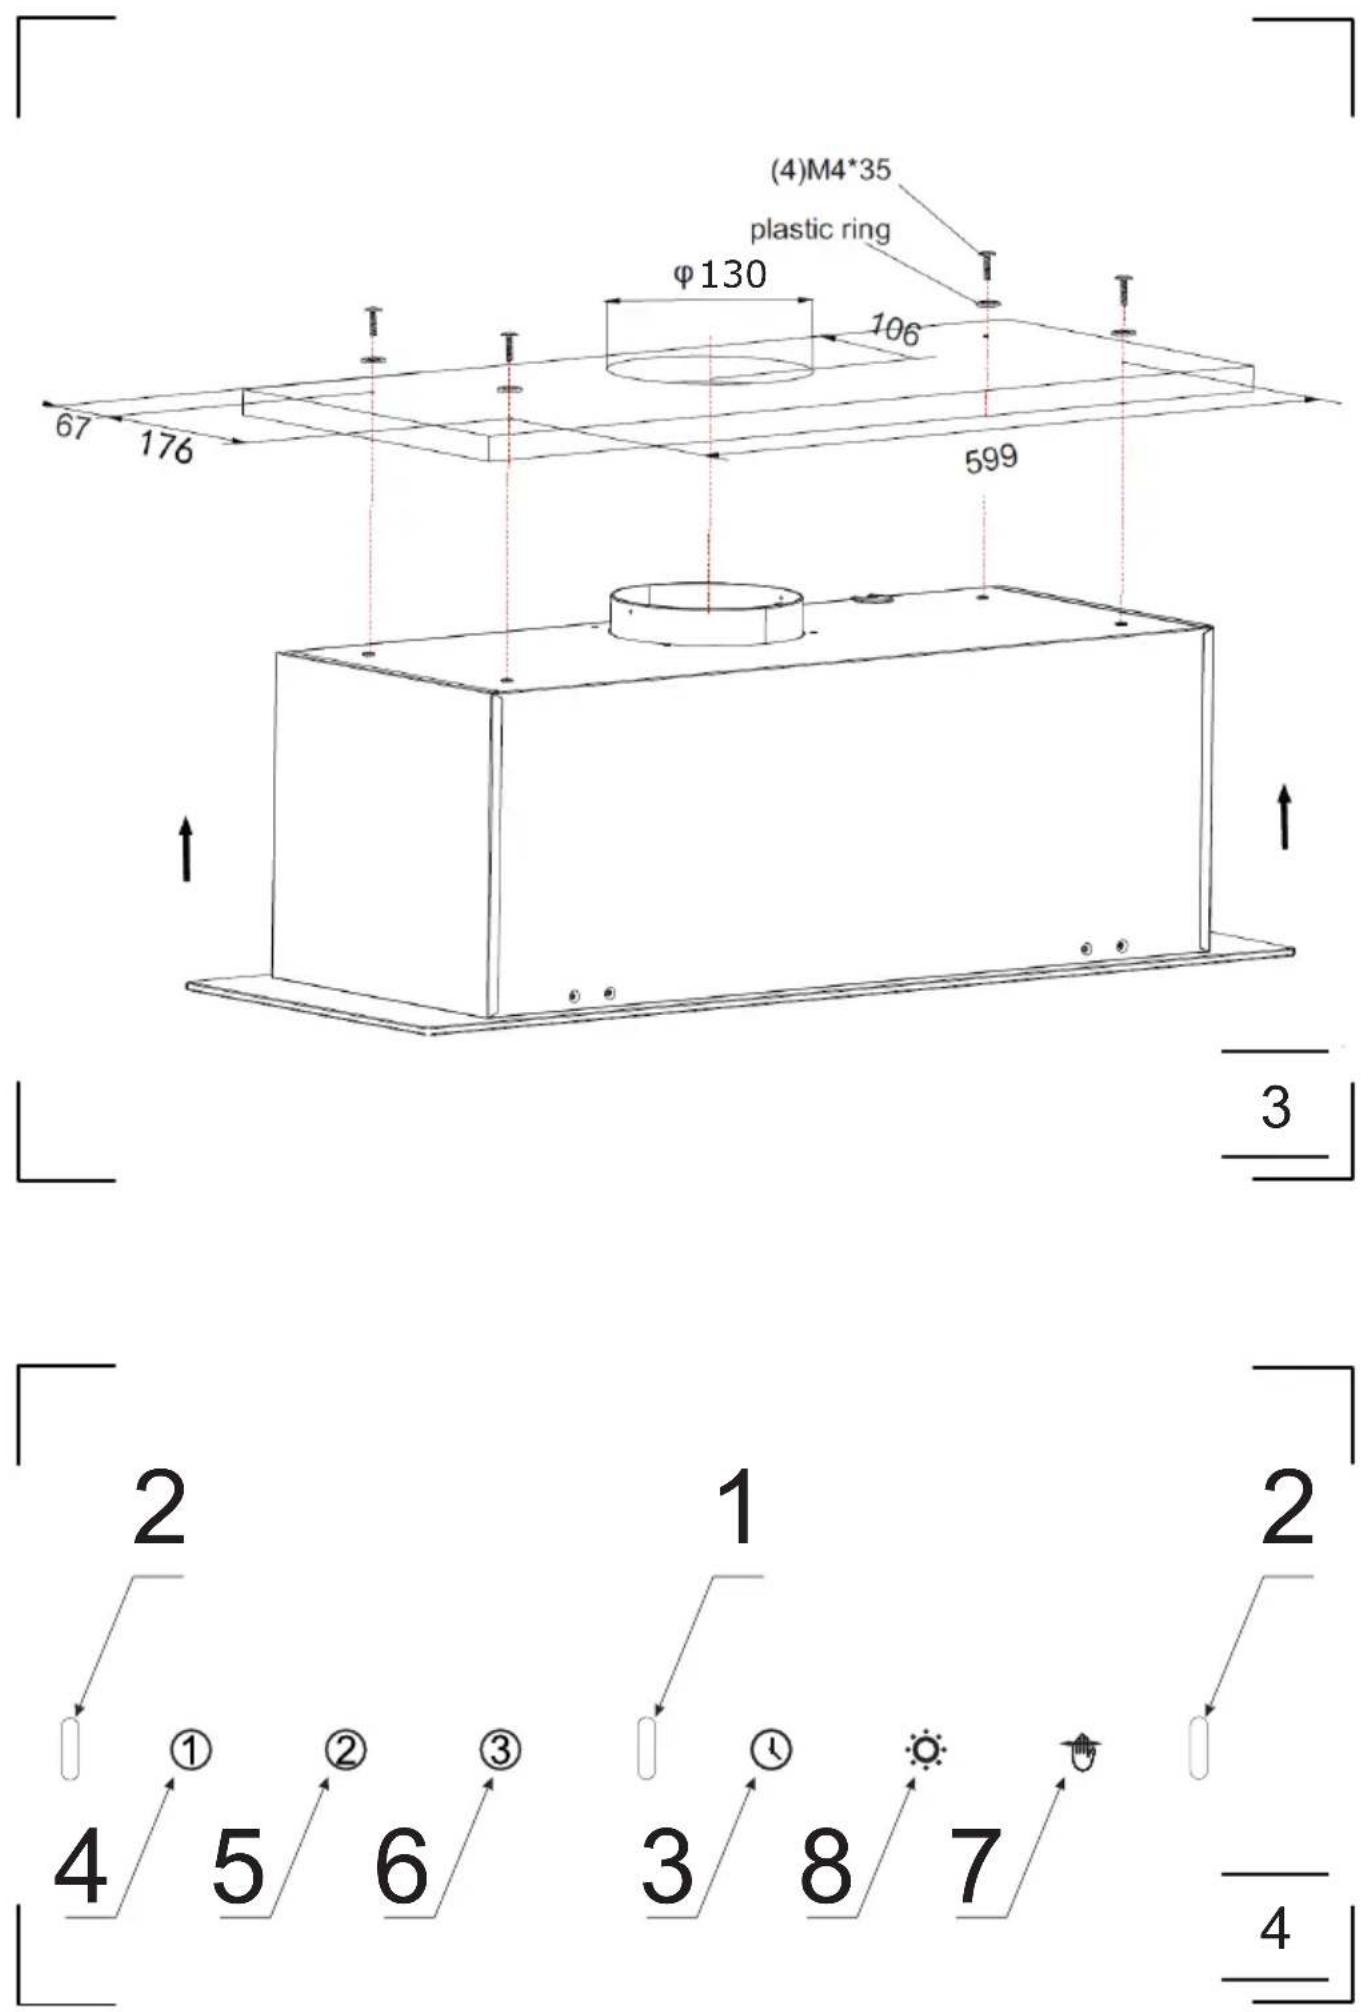
Control Panel is shown in Figure 4, for reference it is also shown below:
flowchart
graph TD
    A["2"] --> B["4"]
    B --> C["5"]
    C --> D["6"]
    E["1"] --> F["3"]
    F --> G["8"]
    G --> H["7"]
    I["2"] --> J["7"]
    J --> K["8"]
    K --> L["9"]
    M["①"] --> N["5"]
    N --> O["6"]
    P["②"] --> Q["6"]
    R["③"] --> S["6"]
This appliance features gesture control:
1- Light on/off gesture control sensor
2- Fan speed gesture control sensors
The control panel is equipped with touch controls: Control functions are described below:
3- Off-Timer sensor
4- Low speed- Use this speed when cooking a little food with hardly any fumes.
5- Medium speed- Use this speed when cooking multiple dishes at the same time with moderate amount of fumes.
6- High speed- Use this speed when frying or grilling, with large amount of fumes.
7- Gesture control on/off
8- Light control sensor
When you plug in the appliance to power, it will emit a short beep and all sensors will light for a brief moment.
Touch sensor 1, 2 or 3 to start the fan. Touch the sensor corresponding to current fan speed to turn off the fan.
Touch to turn the lighting on. Touch again to turn the lighting off. The lighting operates independently of fan.
Off-Timer
Use Off-Timer to turn off the hood after a specified time. Use Off-Timer to filter the fumes out of the air after cooking. The fan will turn off after 15 minutes. Touch Ⓛto activate the Off-Timer at any time. Sensor flashes. Touch Ⓛto deactivate the Off-Timer at any time and Ⓤwill stop flashing.
Gesture control
Touch 📂 to turn gesture control on/off.
You can use gestures to control the fan speed and lighting. When gesture control is active, you can also control the appliance using the touch sensors.
Gesture control works correctly when you move your open hand about 3 to 10 cm from the surface of the control panel.
Note: When controlling the fan speed, the hand motion must cover both motion sensors (Figure 4, item 2, or the hand must be stationary within the light control sensor (Figure 4, item 1).
If activating a certain function (such as fan speed 3) requires multiple hand gestures, reposition your hand for another gesture away from the control panel to avoid triggering the motion sensors). Hand movements must not be too fast. Preferably, a single gesture should take about 1 second.
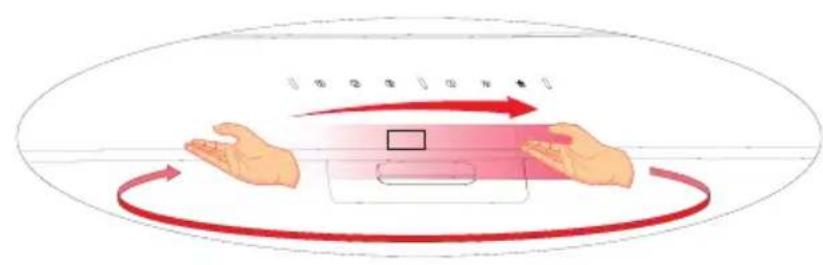
To turn on the fan or increase fan speed, move your hand from left to right several times. With hand movement, current fan speed sensor will light up.
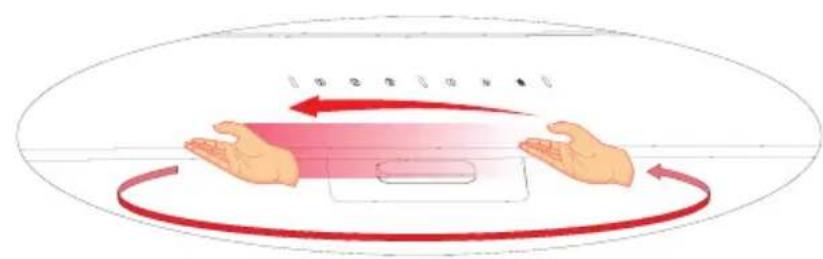
To turn off the fan or reduce fan speed, move your hand from right to left several times until sensor 1 lights up. Move your hand one more time and the fan will turn off (gesture control will still be active)
natural_image
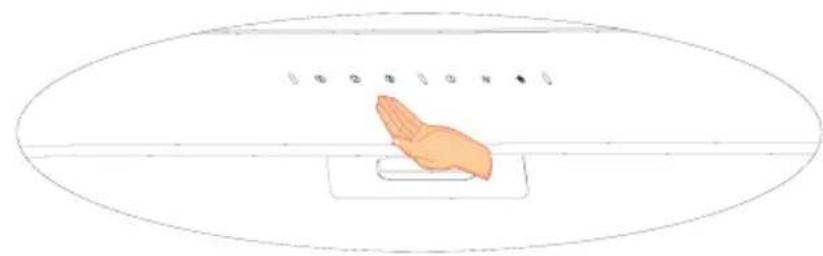
Simple line drawing of a hand pressing down on a tray, no text or symbols presentTo turn the lighting on or off, position your hand near the centre of the control panel (under the sensor labelled 1) for about 2 seconds. The ⚙ symbol will light up.
Other important information concerning the operation of the hood
Operation in air circulation / odour filter mode. In this mode, the filtered air returns to the room through the outlets. Install activated charcoal filter in this setting. It is recommended to install the air guide (available depending on the model, mainly in chimney cooker hoods).
Air extraction operation: When cooker hood operates in extraction mode, air is discharged outside through an extraction duct. Remove activated charcoal filter in this setting. The cooker hood is connected to the air outlet opening using a rigid or flexible extraction duct with a diameter of 150 or 120 mm, and the appropriate clamps, which must be purchased at a hardware store. The appliance should be installed by a qualified installer.
Fan speed: Lowest and medium fan speed is used in normal conditions and less intense odours, while the highest speed is used only when cooking odours are very intense, such as during frying or grilling.
Note (applies to universal hoods only): Due to the design of universal hoods you need to manually change the mode of operation. See Figure 8 for instructions on how to change the mode.
Note (only applies to telescopic and in-built kitchen hoods): Furniture and telescopic cooker hoods operating in air recirculation mode require installation of the exhaust duct. The other end of the duct should be directed to the room as it will discharge filtered air.
Note: Hanging kitchen hoods operate only in air circulation / odour absorber mode
CLEANING AND MAINTENANCE
Maintenance
Regular maintenance and cleaning of the appliance will ensure trouble-free operation of the cooker hood and extend its life. Especially make sure that the grease filter and activated charcoal filter are replaced according to manufacturer's recommendations.
- Do not use a soaked cloth, sponge, or water jet.
- Do not use solvents or alcohol, as they may tarnish lacquered surfaces.
- Do not use caustic substances, especially for cleaning stainless steel.
- Do not use a rough or abrasive cloth.
- It is recommend to use a damp cloth and a neutral detergent.
Note: After several washes in the dishwasher, the colour of the aluminium filter may change. The change of colour does not indicate improprieties or the necessity to change it.
Grease filter
For normal hood operation, grease filter should be cleaned every month in the dishwasher or by hand using a mild detergent or liquid soap.
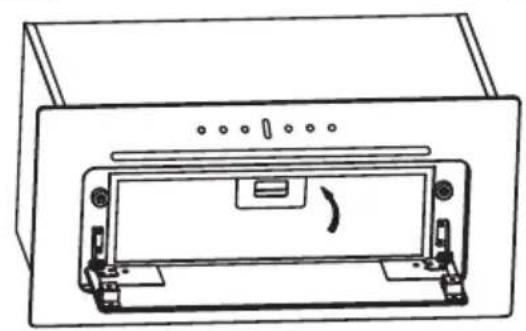
Dismantling of grease filter is shown on Figure 5.
Acrylic filter is used in some models. This filter should be replaced at least once every 2 months or more frequently if the appliance is used intensively.
Activated charcoal filter
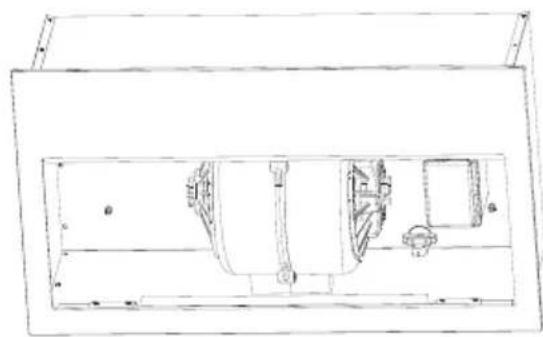
Charcoal filter is used only when the cooker hood is not connected to the ventilation duct. Activated charcoal filter can absorb odours until saturated. Charcoal filter is not suitable for washing or regeneration and should be replaced at least once every 3-4 months or more frequently if the appliance is used intensively.
Dismantling of charcoal filter is shown on Figure 6.
Light
Use incandescent / halogen / LED modules of the same specification as those factory-installed in the appliance. See Figure 7 for details how to replace lights. If there is no such figure in this manual, please contact authorised service to replace the lighting module.
WARRANTY AND AFTER SALES SERVICE
Warranty
Warranty service as stated on the warranty card. The manufacturer shall not be held liable for any damage caused by improper use of the product.
Service
- The manufacturer recommends that all repairs and adjustments be carried out by the Factory Service Technician or the Manufacturer's Authorized Service Point. For safety reasons, repairs should be referred to professionals.
- Repairs carried out by unqualified persons may seriously endanger the appliance user.
- The minimum warranty period for the appliance offered by the manufacturer, importer or authorized representative is given in the warranty card.
- The warranty shall be void if you make any independent adaptations or alterations, tamper with seals or other appliance safety devices or its parts or interfere with the appliance contrary to operating instructions.
In the event of appliance malfunction, request assistance or repair.
If your appliance needs repair, please contact the service centre. Please see warranty card for address and contact details of our service centre. Before contacting us, please have ready the appliance serial number, which can be found on the identification sticker: For your convenience, please write it down below:
Күрметті Түтынушы,
natural_image
Recycling symbol composed of three chasing arrows forming a triangle (no text or labels)natural_image
Symbol of a trash bin crossed with no text or numbers, representing waste sorting or disposal (no text present)natural_image
Recycling symbol composed of three chasing arrows forming a triangle (no text or labels)natural_image
Simple line drawing of a trash bin with crossed lines indicating no waste or restriction (no text or symbols)
natural_image
Simple line drawing of a hand pressing down on a rectangular object, enclosed in an oval frame (no text or symbols)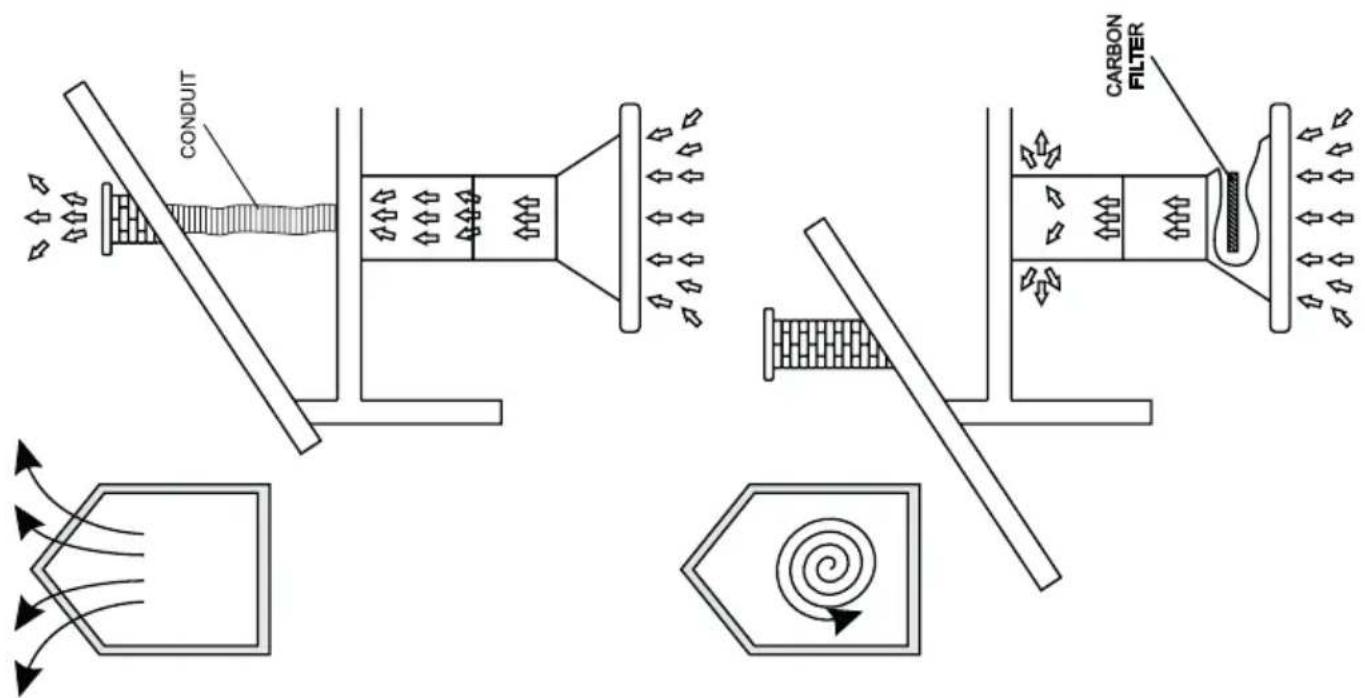
flowchart
graph TD
    A["Carbon Filter"] --> B["Reinjection Column"]
    B --> C["Contraction Column"]
    C --> D["Recycling Column"]
    D --> E["Final Discharge"]
natural_image
Line drawing of a device rear panel with buttons and a central button (no text or symbols)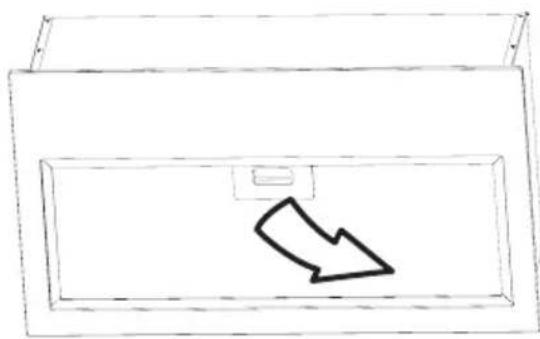
natural_image
Simple line drawing of a rectangular box with a downward-pointing arrow inside, no text or symbols present.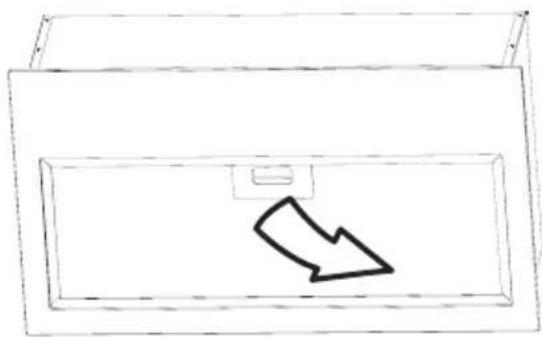
natural_image
Simple line drawing of a rectangular box with a downward-pointing arrow inside (no text or symbols)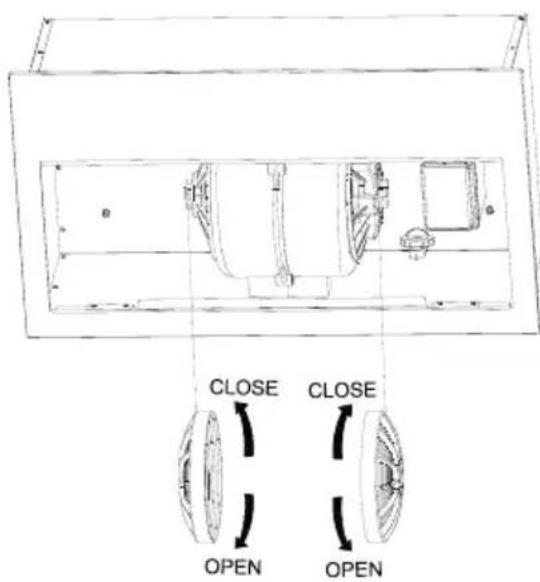
natural_image
Technical line drawing of a mechanical assembly with no visible text or symbols5
6
EAC
- EN- Table of contents
- КК - Мазмуны
- NOTES ON SAFETY
- UNPACKING
- DISPOSAL OF OLD APPLIANCE
- OPERATION
- Cooker hood controls
- Off-Timer
- Gesture control
- Other important information concerning the operation of the hood
- CLEANING AND MAINTENANCE
- Maintenance
- Grease filter
- Activated charcoal filter
- Light
- WARRANTY AND AFTER SALES SERVICE
- Warranty
- Service
- Күрметті Түтынушы,
Brand : Hansa
Model : OMP9554BGH
Category : Oven